RSS
 

Posts Tagged ‘Stackable’

Firecrest 77mm 16-Stop Stackable Neutral Density Filter Review

26 Aug

The post Firecrest 77mm 16-Stop Stackable Neutral Density Filter Review appeared first on Digital Photography School. It was authored by John McIntire.

There is something about long exposure photography that is just, for lack of a better word, appealing. Blurring moving elements (like water, clouds, tourists and moving cars) in your images can create an ethereal or even surreal aesthetic that many photographers, myself included, are drawn to. Formatt-Hitech’s Firecrest 16-stop neutral density filters take long exposure photography to the extreme. By allowing ten-minute exposures in the middle of the day, these filters open up long exposure techniques to normally impossible times. And it does it with fantastic results. In this article, I’ll review the Firecrest 77mm 16-stop Stackable Neutral Density Filter.

What is it?

Firecrest-77mm-16-Stop-Stackable-Neutral-Density-Filter

A neutral density filter is a piece of material (glass or resin in most cases) that you affix to the front of your lens. What they do is cut down the amount of light hitting your sensor, increasing the amount of time you need to expose for. Doing this allows you to get longer exposures than you would normally be able to, making it easy to blur water and clouds in a satisfying way.

Most ND filters come in a range of one to three stops. However, five and ten-stop filters are also very popular amongst landscape photographers. During golden hour and blue hour, when light levels are generally quite low, these strengths of filter make it easy to achieve exposures that last for several seconds.

Image: An exposure time of 408 seconds in the middle of the day is impossible without a specialist f...

An exposure time of 408 seconds in the middle of the day is impossible without a specialist filter such as this one.

What a 16-stop filter allows is extremely long exposures even in the brightest of lighting conditions; including midday sun. For example, with a 16-stop filter, an exposure of 1/2000th of a second becomes 30 seconds. In comparison, with a 10-stop filter, that 1/2000th of second exposure becomes 1/2 of a second. You can probably already see the advantage that the denser 16-stop filter provides.

To drive it home, look at the sunny 16 rule, which says that on a bright sunny day, an exposure of f/16 at 1/125th of a second should give you close to a correct exposure (it usually does). With a 10-stop filter, that becomes 8 seconds.

That might be good enough in many cases, but it also won’t completely blur anything other than the fastest moving elements. With 16 stops, that 1/125th of a second becomes 8 minutes and 44 seconds, ensuring anything moving in your frame is either blurred or disappeared.

What is this good for?

Firecrest-77mm-16-Stop-Stackable-Neutral-Density-Filter

A 16-stop ND filter allows you to blur moving objects in your frame, which can lead to more pleasing images.

Being able to blur details out of clouds and water allows you to remove details that might detract from your subject. This lends itself well to minimalist styles of photography. If that fits your taste, the results can be stunning.

Exposures of this length not only blur moving elements within your frame but can also completely remove other moving things. Boats in rivers, tourists in front of landmarks, and anything else that might move through your frame during the exposure time disappears.

A filter of this strength is also good for things like star trails at night.

Before you consider

Image: You may need some extra specialist equipment before you get started, such as the trigger that...

You may need some extra specialist equipment before you get started, such as the trigger that allows the control of your camera with a phone.

The one thing that you need to know before you consider purchasing a filter like this is that you will need some extra equipment you may not already have. A high-quality tripod is an absolute must as you will need to keep your camera absolutely still during the long exposures.

The other thing you need to take into account is some way of controlling your camera. Because many cameras are limited to exposures of 30 seconds, you will need a way to keep the shutter open in bulb mode for the duration of the exposure without touching the camera. There are many options out there, including remotes and cable releases. I used the Pulse time-lapse trigger from Alpine Labs, which lets you control your camera with your phone. There are others available too, like the MIOPS trigger.

An exposure calculator is also an absolute must as you will need to be able to calculate how long your exposures need to be. There are plenty of free options available for both Android and iOS.

The Filter

Firecrest-77mm-16-Stop-Stackable-Neutral-Density-Filter

After shopping around for a bit, I decided on Formatt-Hitech’s circular screw-in Firecrest 77mm 16-Stop stackable neutral density filter. This filter has a few features that make it stand out.

Since I knew that I would not be using any other filters in conjunction with this one, I wanted a circular screw-in variety. That’s because I thought that the length of the exposures might create the opportunity for light leaks with my normal filter system. I might be wrong on this, but it’s not a chance I wanted to take.

Formatt-Hitech claims their filter is truly neutral (including in the UV and infrared spectrums) and that there are no color casts. This is important to me as my Lee Big Stopper (10-stops) always adds a strong blue cast that is painful to deal with. I won’t go into details about the coatings as you can find them on the product listings.

Does it do the job?

Image: The Formatt-Hitech Firecrest 77mm 16-Stop stackable neutral density filter is certainly a cap...

The Formatt-Hitech Firecrest 77mm 16-Stop stackable neutral density filter is certainly a capable piece of kit.

That’s an emphatic “yes” from me. While there are some downsides to the filter, it provides all of the quality you could expect. The few places it does fall short are all easy to overcome and well worth the little effort to do so.

Pros

Exposure times

Image: The exposure difference between a 10-stop and 16-stop filter can be a bit staggering at first...

The exposure difference between a 10-stop and 16-stop filter can be a bit staggering at first.

Just as the exposure calculator said, the 16-stops of ND filter provides really long exposures even in daylight. 1/125th of a second becomes nearly nine minutes, while 1/15th of a second becomes nearly one hour and thirteen minutes.

Attaches well

Image: It still takes care, but the filter attaches easily enough.

It still takes care, but the filter attaches easily enough.

It’s easy enough to attach the filter to the filter thread of your lens. It does require care as it is easy to slip (I’m sure that’s more me than the filter), but with this technique, there’s no reason to go fast anyway.

Color casts

Image: The color represented without the 16-stop filter.

The color represented without the 16-stop filter.

Firecrest-77mm-16-Stop-Stackable-Neutral-Density-Filter

Color represented with the 16-stop filter.

I won’t say there is no color cast, but they are very minimal if they appear. Comparing shots with and without the filter side by side, it does seem that there is a slight, slight shift towards blue and green. However, I am not sure if that’s an optical illusion. Either way, it’s easy to deal with.

Cons

There are some downsides of both the filter and the technique. However, their effects are minimal and easy to overcome.

Extra equipment

Firecrest-77mm-16-Stop-Stackable-Neutral-Density-Filter

As mentioned, to get started with this technique, it’s not just the cost of the filter you need to take into account. If you don’t have a good enough tripod or some variety of release to trigger your camera, you will have to shell out for those.

Light leaks

Firecrest-77mm-16-Stop-Stackable-Neutral-Density-Filter

Circled is a pair of light leaks that appear at either edge of the frame.

Despite opting for the circular filter to avoid light leaks, they did appear in my images at the left and right of the bottom third of the frame. They were minimal and easy to deal with in post-production, but they are there.

I have done some research, and it seems there’s a chance these leaks are coming from where the lens attaches to the camera body. If that’s the case, you can fix it by covering the join with black material. Formatt-Hitech also sells an accessory that fits around the front of the lens and filter to help prevent light leaks.

Exposure times in low light

When it comes to shooting later in the day when the exposure times get longer, and the light changes rapidly, it’s likely your required exposure time will change partway through your exposure. For example, if your metered exposure when you start is 1/125th (8 minutes and 44 seconds), and the light levels drop to 1/30th (if the sun moves behind a cloud for example) during that exposure, the new time is 36 minutes and 24 seconds. This means that your image will be quite underexposed.

Because of this, I’ve found this technique works better in the middle of the day when light levels are consistent.

Noise and hot pixels

Image: Here, you can see a combination of noise and hot pixels after an 8-minute and 44-second expos...

Here, you can see a combination of noise and hot pixels after an 8-minute and 44-second exposure.

Noise and hot pixels have little to do with the filter itself. Extremely long exposures with digital cameras open you up to problems with noise. The longer your shutter is open, the more noise appears in your frame.

Software is very good at dealing with this, but you do need to be aware of it.

This is especially true if you opt to up your ISO in lower light levels to keep the exposure time in the minutes rather than in the hours.

Direct light

Image: Taken in overcast conditions, the technique has emphasized the flatness of the light.

Taken in overcast conditions, the technique has emphasized the flatness of the light.

Image: In direct sunshine, contrasty conditions get emphasized.

In direct sunshine, contrasty conditions get emphasized.

What I’ve found with this technique is that it works best with direct light on your subject. If the conditions are overcast, or the light is otherwise dull, the long exposure tends to emphasize the flatness of the scene.

Of course, that won’t always be the case and please don’t take that as a rule of any sort, it’s just an observation. If you live somewhere that is sunny and bright most of the time, this won’t pose you much of a problem. However, I live in Yorkshire and overcast days are the rule rather than the exception.

Price

I do not include the price of the Firecrest 77mm 16-Stop Stackable Neutral Density Filter as either a pro or a con. At $ 125, it’s probably not going to be an impulse buy for most photographers. However, for what it is, what it does, and how well-made it is, it is well worth that price. It’s also roughly the same price as filter offerings from companies like Lee Filters.

Overall experience

Firecrest-77mm-16-Stop-Stackable-Neutral-Density-Filter

Overall, the Formatt-Hitech Firecrest 77mm 16-Stop Stackable Neutral Density Filter does exactly the job I bought it for.

In the end, the Firecrest 77mm 16-stop Stackable Neutral Density Filter does exactly what I wanted it to when I bought it, and it does it well. The complications aren’t hard to overcome, and it is well worth the extra effort. At $ 125, it is well within reach of anyone who wants to have a serious attempt with the techniques it offers.

I also found that I really appreciate the side effects of the technique. Because the exposure times are incredibly long, you can spend a couple of hours on location and come away with only a handful of images. This slow-treacle approach to photography is enjoyable and turns the whole experience into a mindful one.

If you like the effect of streaky clouds and flat water, or you are into minimalist photography, this type of filter may be indispensable for you.

Do you do long exposure photography? Do you use a 16-stop filter? What are your experiences? Share with us in the comments!

Firecrest-77mm-16-Stop-Stackable-Neutral-Density-Filter

The post Firecrest 77mm 16-Stop Stackable Neutral Density Filter Review appeared first on Digital Photography School. It was authored by John McIntire.
Digital Photography School

 
Comments Off on Firecrest 77mm 16-Stop Stackable Neutral Density Filter Review

Posted in Photography


Quick Review of the Kupo Click Stackable Light Stand

02 Feb

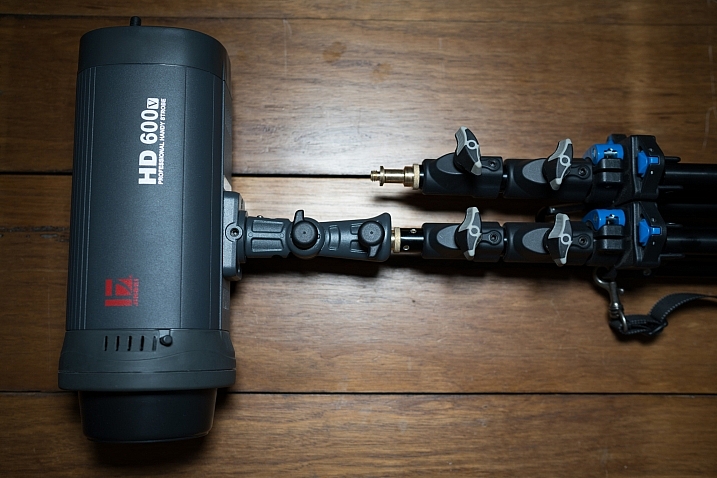
I’ve recently started using a pair of Jinbei HD600 studio lights for my photography and what I love about them is that they are self-contained units. They don’t have any requirements for power cables, etc., as they’re battery powered, wireless studio lights. What was starting to bug me, though, was that I only had heavy light stands to mount them on. Not a problem when you’re working in a studio, but when you have to visit a client to do a headshot or a quick portrait of someone, having to take a C-Stand along isn’t always ideal (especially if you’re on public transport).

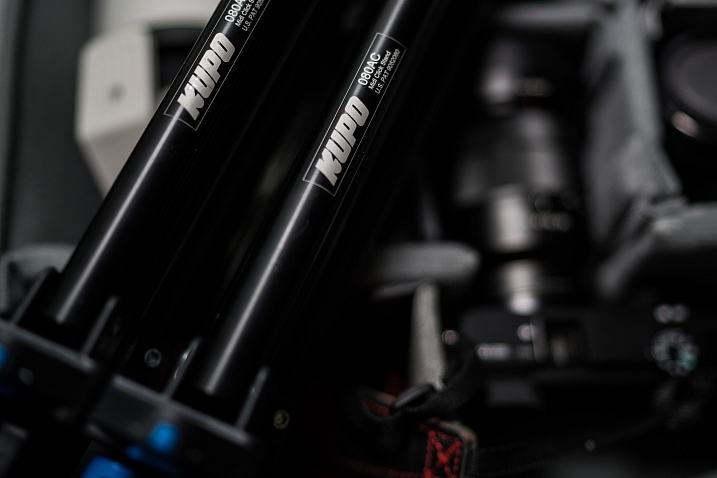
I wanted to stick with Kupo gear as I’m very happy with the quality and innovation of their products, so I asked the crew at ProTog what my options were. They suggested I hold out for the Kupo CLICK stackable lighting stands. I did and I’m very happy I did. Here’s my review…

Check out the Kupo Click Light Stands on Amazon or on B&H Photo’s website.
Kupo click light stand

My wish list

I had a few simple ideal specs for the stands that I was after:

  • I wanted them to be light enough to sling over my shoulder when I was on the go.
  • They need to not suffer from bad build quality due to being light weight.
  • I wanted to be able to quickly use them for either a well-placed strobe on an outdoor shoot, a quick portrait in an office or studio, and maybe even to mount a GoPro on to run a quick timelapse of a session.

Features of the Kupo Click

The Kupo Click had everything I wanted in a portable light stand. Let’s take a look through the feature list.

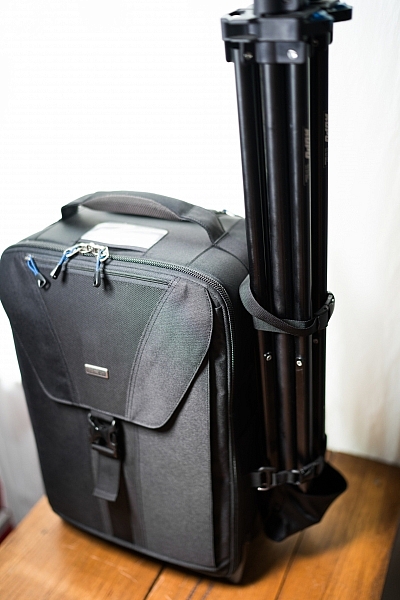
  • Coming in at 1.3kg (2.9 pounds), the weight was just fine, easily able to attach a pair of stands to the side of my ThinkTank Airport TakeOff roller.
  • In terms of load, the diminutive stands were capable of holding a 5kg (11 pounds) payload, more than I’d need to place atop the aluminum light-weights.
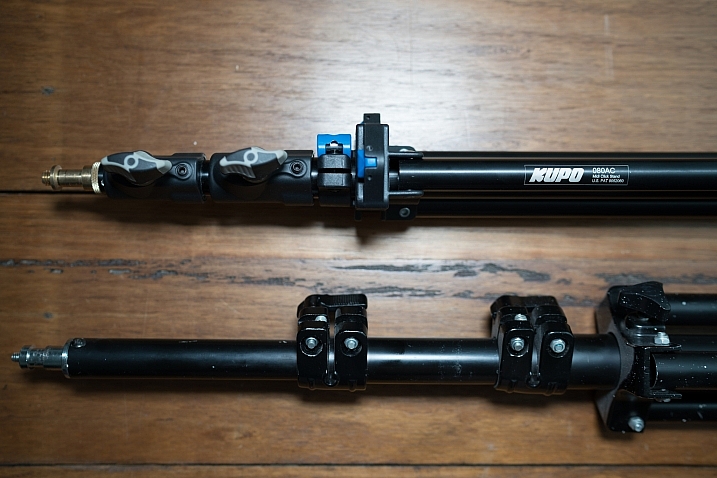
  • The tubes are also double pinned to the threaded ends, this makes them a lot less likely to fail when compared with my old stands, after a few months of heavy use, the stands haven’t loosened up in the slightest.

Kupo click light stand

Kupo click light stand

The Click

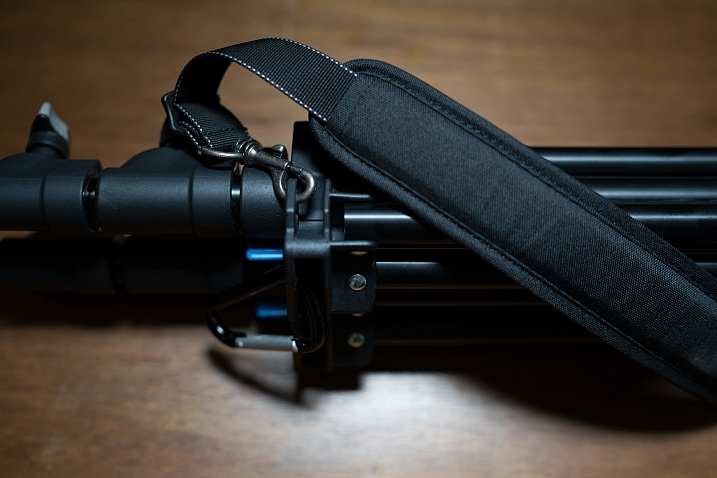
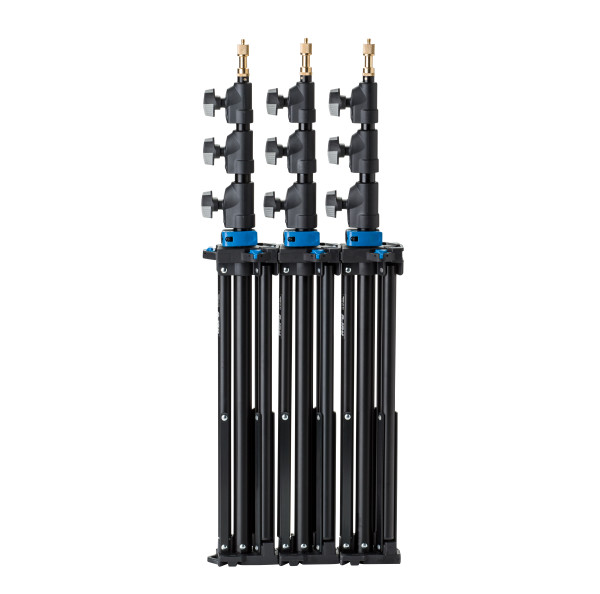
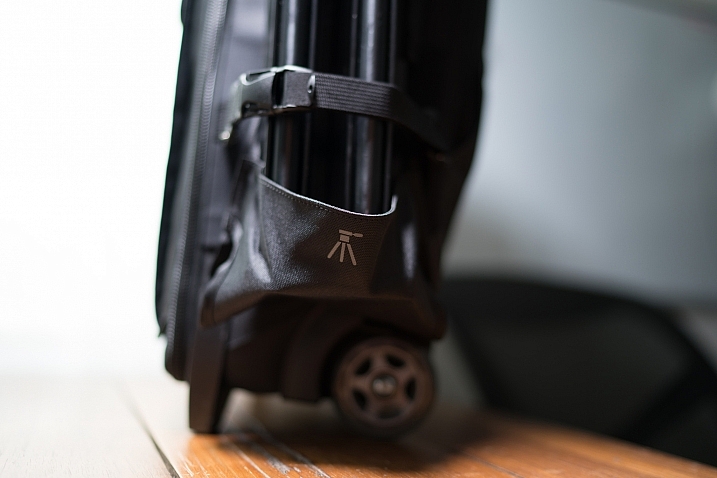
The Kupo Click light stands allow you to click them together either side by side or on top of each other. So you can essentially have one of them flat on each side of your bag with some little attachment straps, or you can have them side by side (above) and sitting in the tripod cup on your rolling camera bag, or you can use a strap (sold separately, I didn’t get one as I used a regular strap with a clip attached to sling mine over my shoulder, see below)

Kupo click light stand

Kupo click light stand

Kupo click light stand

The stands have a sweet built-in air damper that prevents damage to your lights if you accidentally undo the locks by cushioning the column on release. I have tested this and it works. The midsection is better than the top section at slowing descent, but it certainly does slow down the inevitable crash and ultimately a replaced flash tube!

Attaching your lights

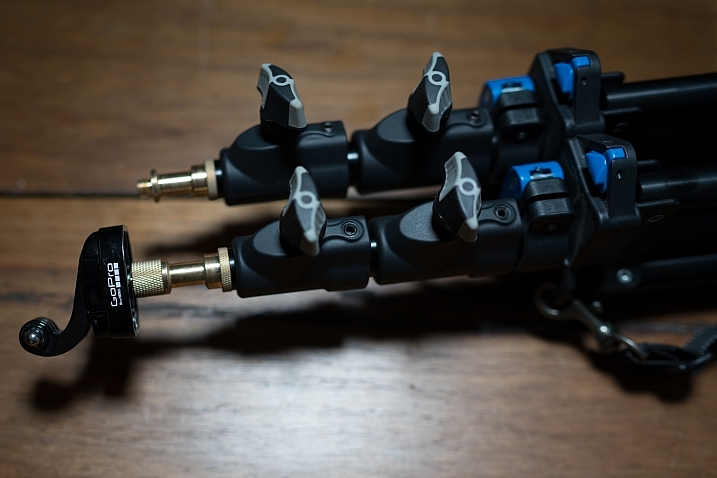
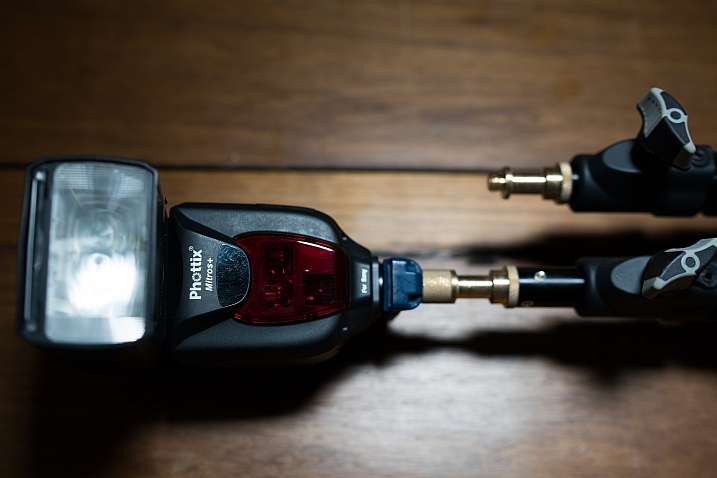
The stands are equipped with a 5/8″ top stud with a 3/8″ threaded, plus a removable 1/4″-20 threaded top, this lets you mount a whole raft of lighting gear, as well as Sony ActionCam / GoPro mounts (The 1/4 20″ adaptor) which I like to use often on a shoot, or just to pop a camera up high for some reason or other – you can attach a regular ball head and mount your camera on that.

Kupo click light stand

Kupo click light stand

Kupo click light stand

Bottom line

I’ve had these stands a few months now and have had many chances to use them and abuse them. They pack away well, they’re all the things I was after in a light stand. I can’t fault these stands and for the price, I’d say they’re one of the best on the market and well worth your hard earned coin. Five stars.

googletag.cmd.push(function() {
tablet_slots.push( googletag.defineSlot( “/1005424/_dPSv4_tab-all-article-bottom_(300×250)”, [300, 250], “pb-ad-78623” ).addService( googletag.pubads() ) ); } );

googletag.cmd.push(function() {
mobile_slots.push( googletag.defineSlot( “/1005424/_dPSv4_mob-all-article-bottom_(300×250)”, [300, 250], “pb-ad-78158” ).addService( googletag.pubads() ) ); } );

The post Quick Review of the Kupo Click Stackable Light Stand by Sime appeared first on Digital Photography School.


Digital Photography School

 
Comments Off on Quick Review of the Kupo Click Stackable Light Stand

Posted in Photography


How to Save and Use Stackable Lightroom Presets

02 Oct

Lightroom presets are basically post-processing shortcuts that can save you tons of time and really speed up your editing workflow. They allow you to save a particular set of edits and apply them later with a single click. Presets can either be a final solution or a great starting point from where you can further tweak and perfect your images.

Processed Image featured

Making development presets is incredibly easy and effective working in Adobe Lightroom CC. It even gives you the option to import presets made by others into your own library. Chances are, if you’re a seasoned photographer, you have used presets at some point.

But are you really getting the most from the huge range of editing control that presets can give you? In this article, you will learn just how versatile your Lightroom preset options can be and how you can essentially stack multiple presets to achieve the exact result you want.

The Basics

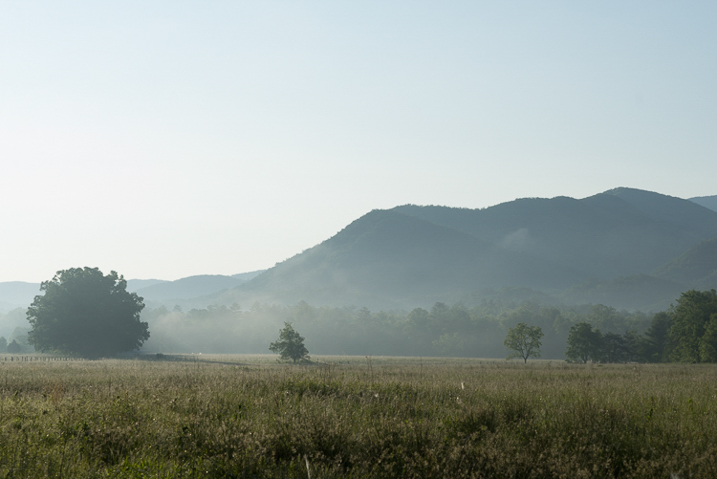
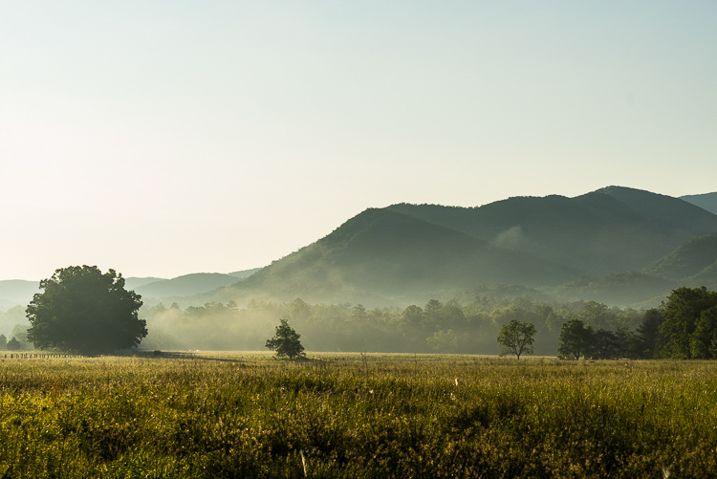
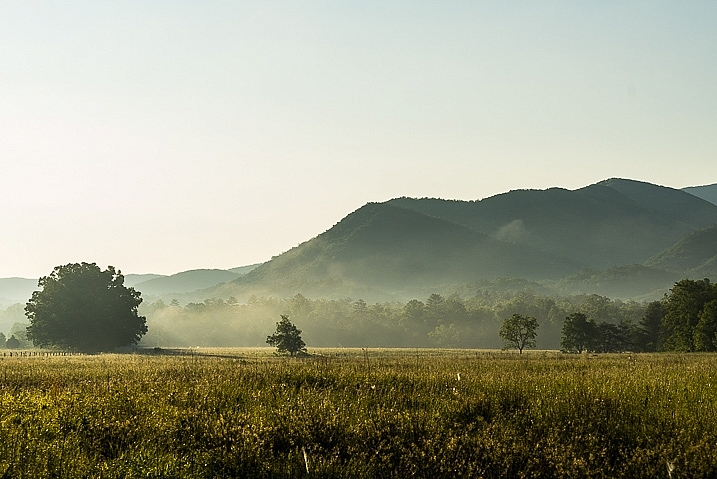
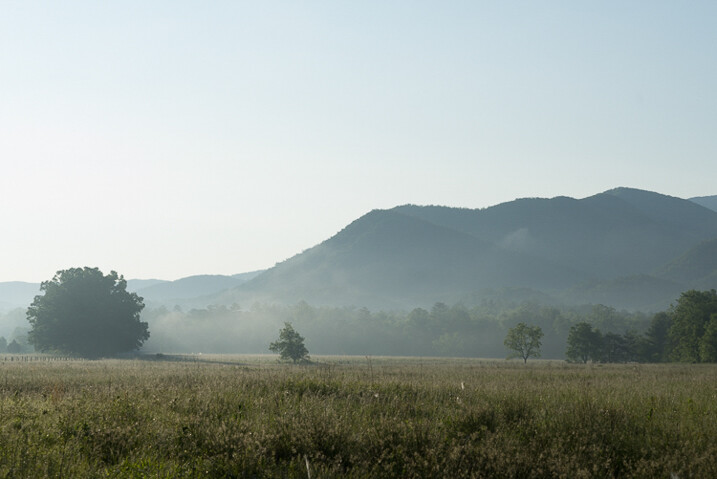
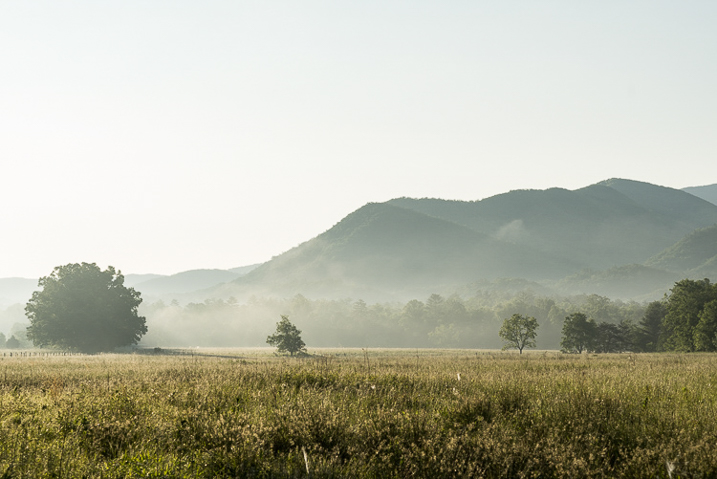
Just as a refresher, let’s go over the steps for creating and saving presets in Lightroom. Here is a original RAW file of a mountain meadow in the early morning mist.

RAW Image

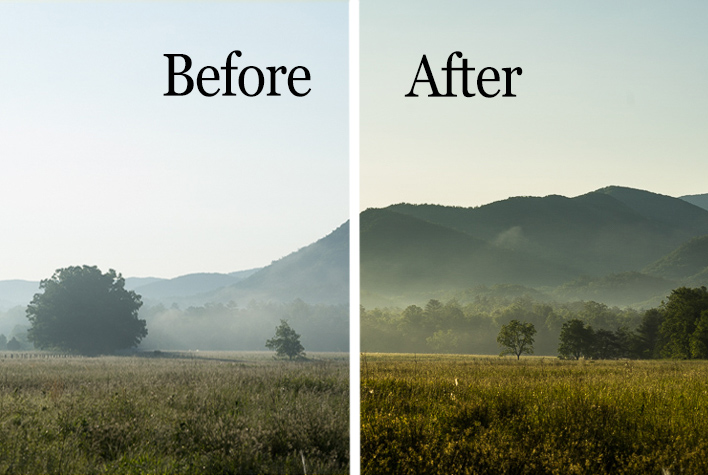
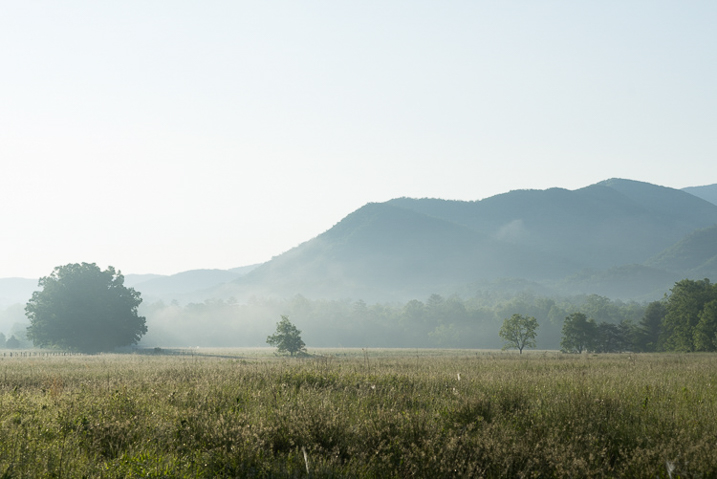
I applied some basic edits to the RAW file which consist of contrast, clarity, whites and shadows, warming, and then finally sharpening to get the following result:

Processed Image

How to save a Preset

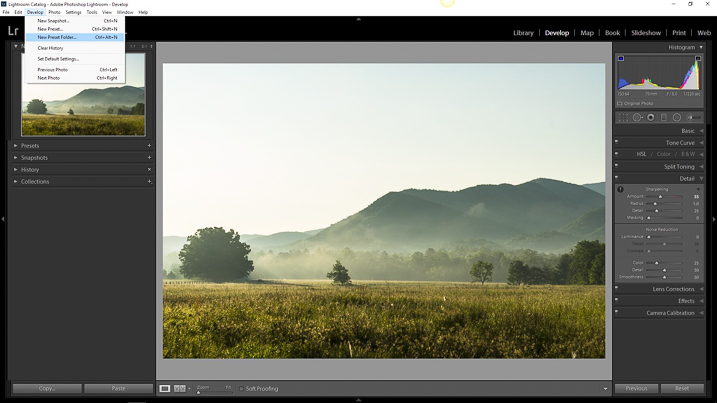
It’s looking decent. Hmmm, if you feel these edits might work for some similar images later, why not make a preset to save some clicking next time? To do this, you must first create a folder to house your presets. Click the Develop dropdown at top left or use the keyboard shortcut Ctrl+Alt+N (Command+Option+N for Mac).

Preset Folder

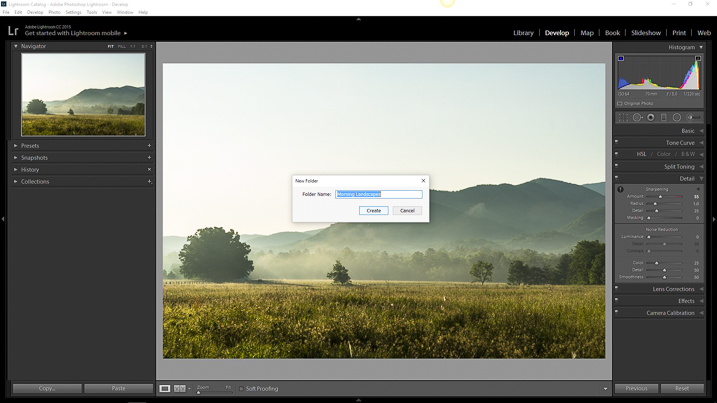
Then name your freshly minted folder so you can easily locate it later.

Preset Folder Naming

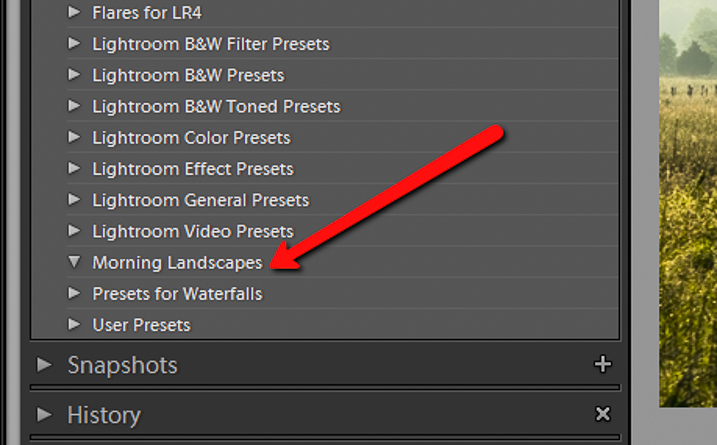
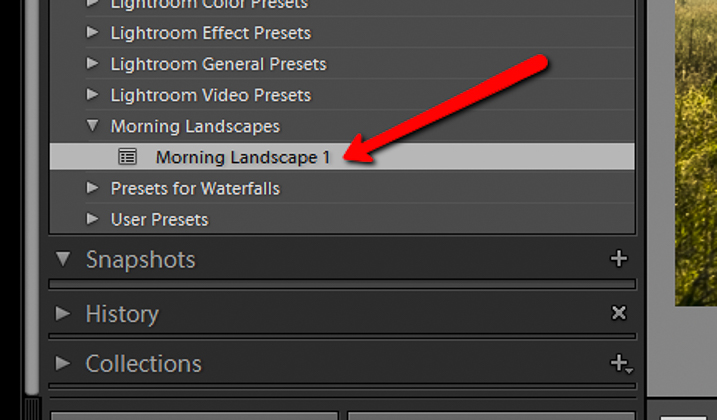
Now you will see your brand new folder appear under the Presets drop down menu.

Preset Folder Location

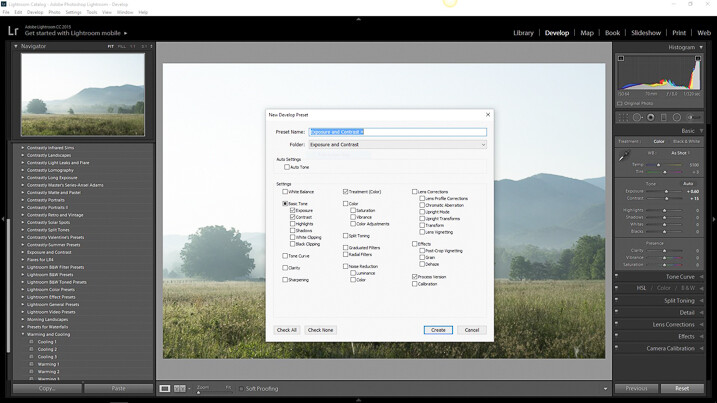
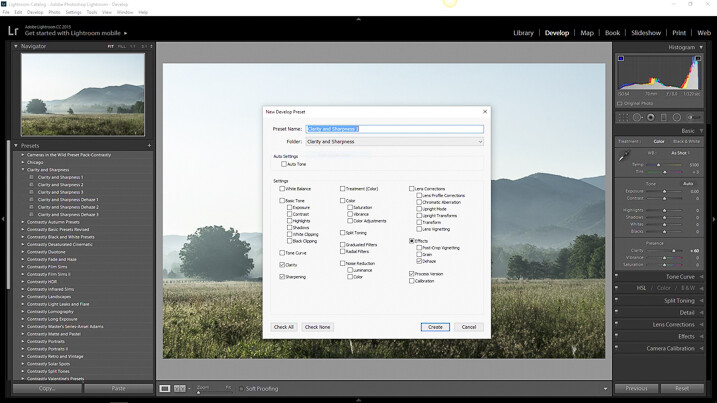
Since you now have a destination for your preset you can go about actually saving the preset itself. To do this, simply go back to the Develop drop down and select New Preset. You can also use the keyboard shortcut Ctrl+Shift+N (Command+Option+N for Mac) or just click the + symbol next to the Presets menu on the left panel (see below). A fairly large dialog box will appear bring along with it a host of options for saving your preset. First things first, come up with a name for your preset and then select the folder you made earlier as the destination.

Save preset

If you leave the Check All option selected, all the edits you made with any of the sliders and filter tools will be saved. Click on Create at the bottom right of the dialog box and viola! You will see your newly created preset appear in the folder to the left.

Preset Location

Preset conflicts

In most Lightroom preset tutorials that would be all you would do. But this isn’t most tutorials. In order to have full control over your presets you have to go a little deeper and that hinges on just how far you are willing to venture down the post-processing rabbit hole.

Here is the final image from which I saved the Morning Landscape 1 preset with the Check All settings applied.

morning_landscape_preset


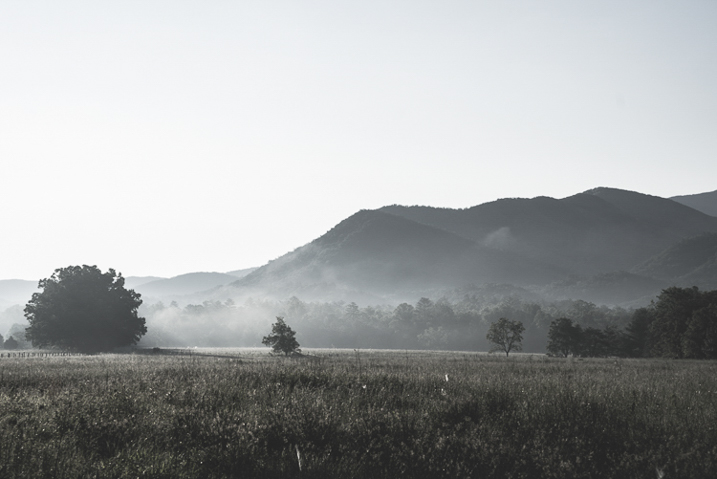
If I attempt to apply another preset, all of the current settings will be changed to whatever values the new preset dictates. Here is the same image after clicking another preset from my preset library.

Preset Conflict

The problem that arises when you try to combine multiple presets is that you can’t do it without the processing values conflicting and overriding one another. Or can you? Well, yes and no.

Remember, that dialog box asking which edits you wanted to save that appeared earlier while you were making the preset? That dialog box is the key to being able to stack multiple editing presets so you can apply different adjustments without them overriding one another. Let me show you how.

Stacking Lightroom Presets

It comes down to which edits you choose to save when creating your preset. Instead of selecting to save each and every adjustment, you can select only the ones you want. This way, you can avoid conflicting edits when you apply multiple presets. That means you can have a preset folder for various Clarity edits, a folder for Contrast and Exposure, a folder for Vignettes, or virtually any combination of any adjustment in Lightroom. Here’s how it’s done.

How to do it

I’ve created a folder called Clarity and Sharpness. This will be where I keep the Sharpness and Clarity (and even Dehaze) adjustments. I then created a folder for Exposure and Contrast and another for warming and cooling effects aptly titled Warming and Cooling.

Each one of these folders contains presets related to their respective edits to varying degrees of intensity. When saving for the Clarity and Sharpness folder click the uncheck all box and then select ONLY the Clarity, Sharpness, and Dehaze boxes. This way, any other edits will be left as they are and only these settings will change once you apply your presets.

Do this with the presets you save for the Exposure and Contrast and Warming and Cooling folders except only check the respective edit boxes to save for each.

Exposure and Contrast Selection

For Exposure and Contrast, select only the relevant boxes as seen here.

Calrity and Sharpness Selection

Do the same for the Clarity and Sharpness folder.

Saving separate presets which only affect certain aspects of your processing will allow a huge range of preset adjustments to be applied without affecting all the other unrelated edits from another preset. Essentially letting you stack one preset on top of another.

Applying the new presets

Let’s look at an example. Here is the RAW image again to which we will now apply our selective presets one by one.

RAW Image

RAW image.

First I will apply the Exposure and Contrast + preset.

Exposure and Contrast +

Next, I will add the Warming 2 preset.

Warming 2

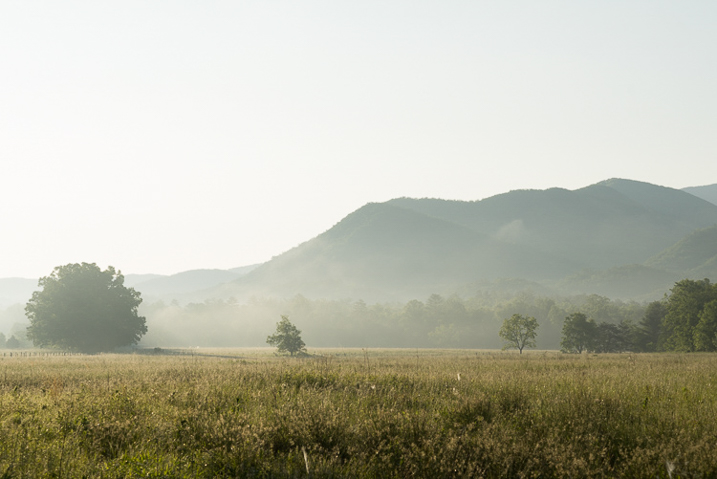
And lastly, I will Sharpen and Clarify the photo with my Clarity and Sharpness Dehaze ++ preset.

Clarity and Sharpness Dehaze 2

Conclusion

By saving your presets in a way which targets only specific edits, you essentially enable yourself to allow the presets to work together. This way, quickly editing your photos becomes much more controllable and streamlined because you can apply different presets in tandem without disrupting the edits applied by each.

This advanced knowledge of creating, saving, and applying Lightroom presets can remove a lot of the headache from your post-processing conundrums. It can give you, for lack of a better word, limitless combinations of adjustment possibilities. What might have taken you an hour’s worth of post-processing can now be reduced to only three or four clicks of your mouse.

While presets might not be a one and done method for editing your photos they can still give you a wonderful starting point to base your more in-depth editing. By being able to apply multiple presets to one image you will have even more of a head start in your processing workflow. Work smarter – not harder.

How do you use Lightroom presets? Please share in the comments below.

googletag.cmd.push(function() {
tablet_slots.push( googletag.defineSlot( “/1005424/_dPSv4_tab-all-article-bottom_(300×250)”, [300, 250], “pb-ad-78623” ).addService( googletag.pubads() ) ); } );

googletag.cmd.push(function() {
mobile_slots.push( googletag.defineSlot( “/1005424/_dPSv4_mob-all-article-bottom_(300×250)”, [300, 250], “pb-ad-78158” ).addService( googletag.pubads() ) ); } );

The post How to Save and Use Stackable Lightroom Presets by Adam Welch appeared first on Digital Photography School.


Digital Photography School

 
Comments Off on How to Save and Use Stackable Lightroom Presets

Posted in Photography


Stay on the Go: 13 Stackable, Movable Modular Hotel Designs

17 Jul

[ By Steph in Architecture & Offices & Commercial. ]

Modular Hotels Main

These hotel rooms can be stacked on top of each other, swapped out for easy renovation and easily transported from one place to the next thanks to their modular design. From a shipping container hotel to floating hotel with detachable boat-like rooms, the 13 designs featured here are anything but stale and static.

Modular Bamboo Hotel
Modular Hotel Bamboo 2

Modular Hotel Bamboo 1

Using cheap and highly renewable bamboo as a sort of scaffolding, the ‘One with the Birds’ modular hotel concept by Penda stacks pyramid-shaped volumes high into the sky while barely making a mark on the ground below. The low-impact, tent-themed hotels would be easy and quick to reproduce and expand as necessary. Inspired by Native American tipis, the structures use X-shaped bamboo joints to hold horizontal bamboo rods in place, which support the flooring. Joints would be tied together with rope so the whole structure can be disassembled and reused in other projects.

Bayside Marina Hotel
Modular Hotels Bayside Marina 1

Modular Hotels Bayside Marina 2

Long, narrow two-story prefabricated cottages based on the form of the shipping container are grouped together along the seaside of Yokohama as the ‘Bayside Marina Hotel.’ The containers are staggered along the site to give each residence a different view. The units are fabricated in Thailand and transported to Japan, where they’re assembled on-site.

Botel Floating Hotel with Detachable Rooms
Modular Hotels Botel 1

Modular Hotels Botel 2

Ever wish you could detach your hotel room from the main building and move it somewhere else? With ‘Botel,’ not only can you do that, your hotel room is actually a boat. The concept by Ivan Filipovic enables guests to explore their surroundings autonomously while retaining access to all of the amenities provided by the core structure. Dock at the main part of the hotel to have dinner or go to a nightclub, or enjoy a little privacy in a separate area of the bay.

Shelf Hotel: Swappable Modules in a Frame
Modular Hotels Shelf 1

Modular Hotels Shelf 2

What if hotel rooms of various sizes, shapes and levels of luxury could simply be swapped out like objects on a shelf? The Shelf Hotel by 3Gatti, envisioned for Xian, China, sets little removable modules within a framework raised above ground level to preserve green space below. The modules would consist of hotels as well as homes and offices.

CitizenM Hotels
Modular Hotels Citizen M 1

Modular Hotels Citizen M 2

Now open in various cities around the world, including Amsterdam, Glasgow and London (pictured), CitizenM hotels provide affordable luxury by fitting compact yet comfortable rooms within a simple frame for an industrial, urban appearance. The shipping container-like rooms are stacked on top of each other like LEGOs and contain a king size bed, pod-like toilet, shower and sink as well as lighting and other functions controlled via iPad.

Next Page – Click Below to Read More:
Stay On The Go 13 Stackable Movable Modular Hotels

Share on Facebook


[ By Steph in Architecture & Offices & Commercial. ]

[ WebUrbanist | Archives | Galleries | Privacy | TOS ]


WebUrbanist

 
Comments Off on Stay on the Go: 13 Stackable, Movable Modular Hotel Designs

Posted in Creativity


Transportable Tourist Towers Provide Stackable Housing

22 Feb

[ By Steph in Architecture & Houses & Residential. ]

Transportable Tourist Tower 1

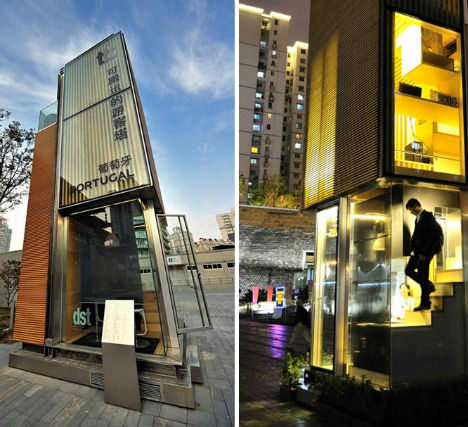
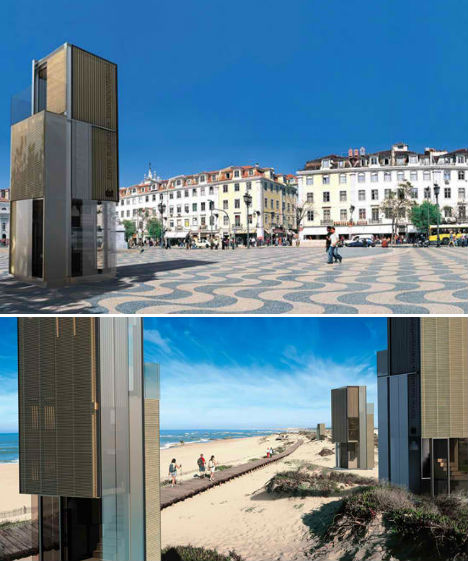
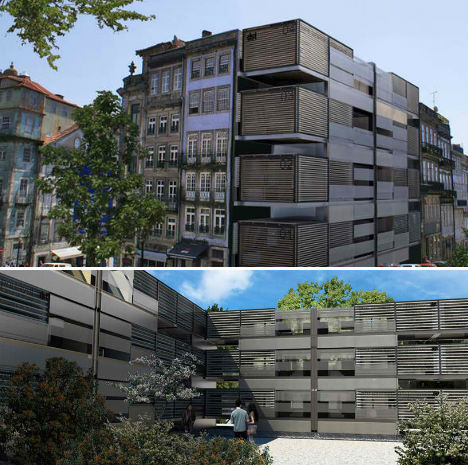
Prefabricated, portable and modular, the Transportable Tourist Tower (TTT) by Portuguese architect Jose Pequeno is an adaptable housing solution that can be installed on almost any site, vertically or horizontally, as a single unit or a larger stacked structure.  Capable of being made from local, recyclable materials, this nearly self-contained unit is ideal for temporary installations and sensitive building sites.

Transportable Tourist Tower 2

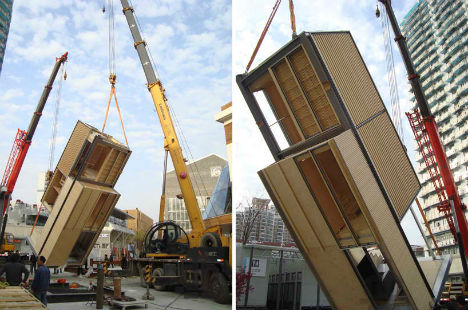
The tower debuted at the 2010 Shanghai Expo and has since made its way around the world, installed in various locations as a tourist information center. It needs as little as 10 square meters for its installation, fitting into tight spaces. It can be transported on a truck, and lifted into place with a crane.

Transportable Tourist Tower 3

Transportable Tourist Tower 5

Vertically, the Transportable Tourist Tower can be placed alone or side-by-side. But what makes this unit even more versatile is its ability to be placed on its side. All of the components within the building are flexible and modular, making them easy to move, remove or replace as needed.

Transportable Tourist Tower 4

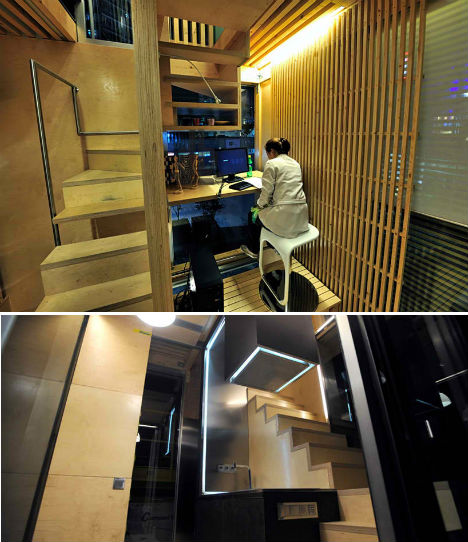
The three-story unit is packed with functionality despite its small size. It contains a living space, dining area, kitchen, bedroom, bathroom, study and rooftop deck. It’s easy to imagine this tower in use at large events such as the Olympics, where compact housing is only needed for a short period of time.

Share on Facebook


[ By Steph in Architecture & Houses & Residential. ]

[ WebUrbanist | Archives | Galleries | Privacy | TOS ]


WebUrbanist

 
Comments Off on Transportable Tourist Towers Provide Stackable Housing

Posted in Creativity