Off-camera flash is a huge part of lighting used in photography today. Of course you can’t compare it to studio lighting, but the question is, how close can you get? In this article I will talk about portable lighting, and how to control it with some simple accessories and light modifiers to achieve the big lights look.
As a serious off-camera flash fan, when the Canon 600EX-RT Speedlite was put out on the market, I immediately went out to buy it. I have to say, I love the way it performs and the upgrades it has, compared to its predecessor, the 580EX II. After testing it for a couple of weeks, I started thinking about buying another one so I could take advantage of the built-in radio triggers that are one of the major selling points of these units. But the thing is, they don’t come cheap. After some searching around, I realized that for the price of another Canon 600EX-RT, I could buy two Yongnuo 600EX-RTs plus one ST-E3-RT controller, which are really similar to the Canon units and use the same radio-triggering system. So this is what I ended up with:

You can see from the image how similar they look, and the functions and menus are pretty much the same as well. It’s the perfect solution for good equipment on a low budget.
They are a Chinese-made product and I wouldn’t trust them for serious on-camera work as they’re reported to have some overheating and TTL metering problems. But surprisingly, the build quality is much better than I expected, so for the price, I decided to give them a go for off-camera lighting.
You don’t really need three speedlights as a starting point to do off-camera flash. All you need is a simple flash that allows manual power control, a couple of cheap triggers, and you’re in business. This setup is a step forward in the off-camera flash world, as it allows you to control up to five groups of flashes in slave mode, through a master unit in manual or TTL mode.

The shooting session you are about to see was my first time trying out this setup, and it was all about getting familiar with the controls and trigger functions, which I found very intuitive and user-friendly. It took place in a high-end car stand with no prior scouting or production. So the idea was to get to the venue and work with what I had; two beautiful models, a great clothing collection, and a few exotic cars.
All the images were made with simple light modifiers like shoot-through umbrellas, softboxes and snoot grids that are simple and fast to assemble, making the job a lot easier if you’re doing it alone. The light stands are the 001B by Manfrotto, which are ultra-compact, and support enough weight to use with speedlights and simple modifiers.
I also carry around some gels for simple colour temperature correction, or for when I want to go crazy with colour and party like it’s the 90s all over again.

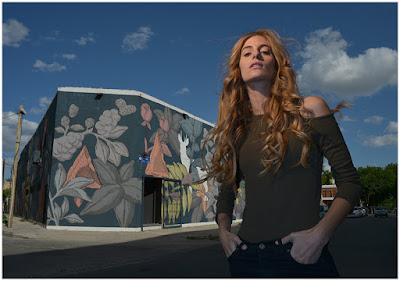
This image is a good example of how you can achieve a high-end fashion look with this equipment and a simple two-light setup.

The ambient light plays an important role in this image and it should always be the starting point. A quick reading with the camera light meter told me that the ambient light was – f/2.8, 1/125th at 100 ISO. So my flash power was set to complement that lighting without overpowering it; a main light with a shoot-through umbrella, and a hair light with a grid.
A lighting ratio of 1:2 is usually a good proportion. The ability to control everything from a master transmitter on top of your camera is priceless, as it allows you to adjust things as you go, without having to constantly move and change settings in the units themselves. This is a great way to keep it simple and effective. When you have control of this basic setup, then you can start to play around with it. Change the light modifiers and add more light sources to fill out different areas in your image. Like the setup used in this second image where the light positioning is similar to the first, but I added a third flash to add a little more light to the background.

Besides power and ratio control, the next important thing is to control the direction of your light. One simple way to do that without a modifier is to use the internal zoom control in the flash. In these units it ranges from 20 to 200mm which enables you to control the angle the light is going to reach from a wider to a narrower beam.
You can also use grids, or just make your own snoot or flag with some cardboard, or whatever you have with you that will do the trick. Usually I use black cinefoil which is completely malleable, and allows me to get the shape I want for greater light control.

This next image is all about grids, and critical light placement to keep the light focused on the model to allow for a dark background.

The trick here is the HSS (high-speed sync) function of these flashes which allows the use of shutter speeds higher than 1/200, freezing fast action movements and blocking the ambient light that would otherwise illuminate some of the background.
The major drawback of off-camera lighting is, of course, the power output these units provide. Even with the powerful guide number of 197′ at ISO 100 and 200mm of the Canon 600EX-RT, which is probably the most powerful on the market in its range, it’s still not enough to compare to a studio strobe.
But that doesn’t mean you can’t cheat. One easy way is to group flashes together and try to squeeze more juice out of them. I use a triple bracket inside a soft box to fake it, and get the look of a more powerful light source.

This way you can use different settings on your camera and make the light work your way, giving you more depth of field, for instance.

So, how close can you get to studio strobes with off-camera speedlights? Well, pretty darn close if you ask me, as long as you’re able to accept its limitations and just get the most out of it. How do you use your speedlights?
googletag.cmd.push(function() {
tablet_slots.push( googletag.defineSlot( “/1005424/_dPSv4_tab-all-article-bottom_(300×250)”, [300, 250], “pb-ad-78623” ).addService( googletag.pubads() ) ); } );
googletag.cmd.push(function() {
mobile_slots.push( googletag.defineSlot( “/1005424/_dPSv4_mob-all-article-bottom_(300×250)”, [300, 250], “pb-ad-78158” ).addService( googletag.pubads() ) ); } );
The post Take Your Light With You – the Power of Speedlights by Ivo Guimaraes appeared first on Digital Photography School.

Digital Photography School


