RSS
 

Posts Tagged ‘Smoothing’

Easy Skin Smoothing Using the High-Pass Filter in Photoshop

13 Dec

The post Easy Skin Smoothing Using the High-Pass Filter in Photoshop appeared first on Digital Photography School. It was authored by Adam Welch.

Easy-Skin-Smoothing-in-Photoshop

When you think about it, shooting portraits can be extremely tricky. Not because of concerns over lighting or wardrobe or hair or even makeup…although…sheesh. One of the largest issues that portrait photographers can face is how much (or how little) to retouch the, well, let’s call them the “imperfections” of their subject’s skin. The amount of skin smoothing and retouching can vary from subtle smoothing of skin to extreme masking of each and every blemish we all possess to one extent or another.

Easy Skin Smoothing Using the High-Pass Filter in Photoshop

Fortunately for us, there is an easy way to take full control of how much skin smoothing we apply (and where) when we bring our portrait images into Photoshop. No really, this is incredibly simple and relies on just a few basic features of Photoshop that won’t give your photos that gaudy, “in your face” sort of skin smoothing.

Let me show you.

The power of the High-Pass Filter

The engine which will drive our skin smoothing effect is an old stand-by tool found in Photoshop called the “high-pass filter”.

If you’re familiar with processing your images in Photoshop, you’ve likely heard about how powerful the high-pass filter can be for sharpening your photos. There’s a great article here at Digital Photography School which talks about how to use high-pass for easy, effective sharpening.

Image: Sharpening with the high-pass filter

Sharpening with the high-pass filter

However, in our case, we’re going to use the high-pass filter to essentially work in the opposite way of sharpening, which is to “soften” or smooth the skin of our subject. Moreover, we will use the high-pass filter to accomplish this task easily and with a realistic outcome. Meaning, it won’t make your subject appear to be made from wax – unless you want them to for some reason.

At any rate, here’s how to apply easy skin smoothing in Photoshop using the high-pass filter.
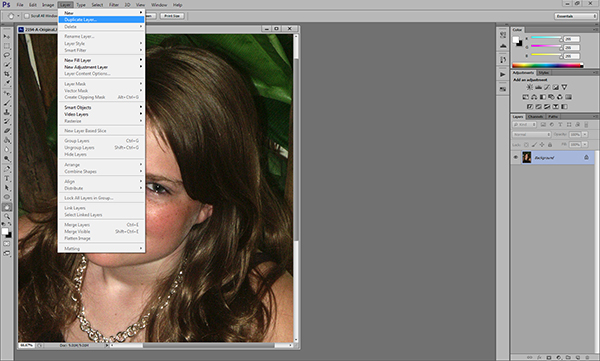
Duplicate the layer

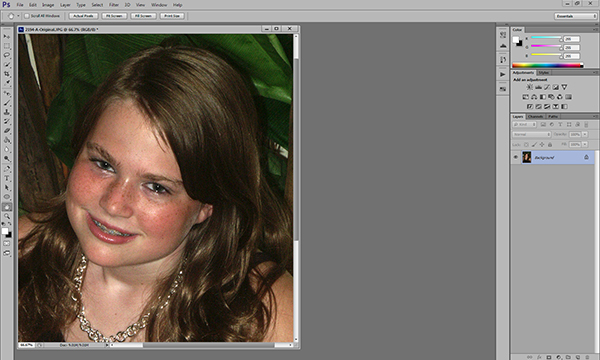
This is the image we will use to demonstrate our skin smoothing technique with the high-pass filter. Incidentally, it’s a portrait of my father.

Easy-Skin-Smoothing-Using-the-High-Pass-Filter-in-Photoshop

I wanted to preserve the character of his visage while granting a small amount of skin smoothing to areas of his face.

After you bring your photo into Photoshop, the first thing we will do is duplicate that layer. The easiest way to duplicate the layer is to click on it and use the keyboard shortcut Ctrl+J on Windows or Cmd+J for Mac. I’ve renamed the copy just to keep track.

Easy-Skin-Smoothing-Using-the-High-Pass-Filter-in-Photoshop

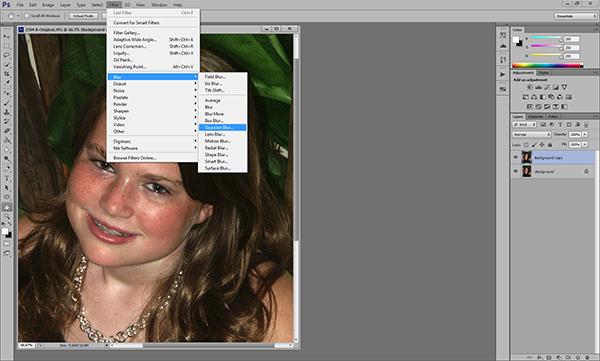
Add the High-Pass Filter

Next, we’ll add the high-pass filter to our newly duplicated layer.

Find the high-pass filter located under the ‘Filter’ tab. Select ‘Other’ and then ‘high-pass’.

Easy-Skin-Smoothing-Using-the-High-Pass-Filter-in-Photoshop

It’s here where we must set the radius for the high-pass filter, but don’t get nervous. Generally speaking, the higher the number for the radius, the more intense the smoothing effect will be.

Increase the value until you begin seeing more and more of your image coming through from behind the gray mask of the high-pass.

It’s difficult to give specific numbers here, but a radius of 100 and above is a good starting point.

Easy Skin Smoothing Using the High-Pass Filter in Photoshop

Click ‘OK’

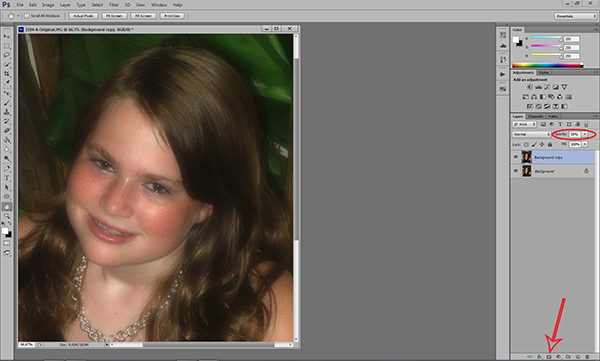
Change the Blend Mode

You might be thinking “ewwwwww”.

Easy-Skin-Smoothing-Using-the-High-Pass-Filter-in-Photoshop

You would be correct to recoil, but don’t worry, it’s all about to get better with the next step.

Make sure the newly-filtered layer is selected and then change the blend mode to ‘Overlay.’ You can also experiment with other blend modes (Softlight also works well).

Easy-Skin-Smoothing-Using-the-High-Pass-Filter-in-Photoshop

Notice how the photo now appears to be massively sharpened? This is due to the high radius we set for the high-pass filter which we will need for the next phase of the process.

Invert your adjustments

The skin-smoothing magic happens here.

We must invert the adjustments of our high-pass layer. We can easily use the invert layer keyboard shortcut Ctrl+I for Windows or Cmd+I for Mac. Alternatively, select the ‘Image’ tab, then ‘Adjustments’ and finally ‘Invert’.

Easy Skin Smoothing Using the High-Pass Filter in Photoshop

After the high-pass layer is inverted we can instantly see the effects of the skin smoothing.

Easy Skin Smoothing Using the High-Pass Filter in Photoshop

This global smoothing effect grants the photo a glowy “pictorialist” feel which might actually work for some photos.

Of course, we’re not finished yet. Now we can freely adjust the opacity of this layer until you have the desired amount of overall smoothing.

Easy Skin Smoothing Using the High-Pass Filter in Photoshop

Add a Mask for complete control

You might be happy with the results of the smoothing as-is, which is fine. However, I highly recommend tailoring your skin smoothing effect using a layer mask to achieve the best, most professional-looking outcome.

Adding a layer mask will allow you to add or remove the skin smoothing from the image selectively. Believe me, even if you’re a first time user of Photoshop, working with simple layer masks such as these is incredibly easy. I’m going to approach this next step as if you’ve never used a layer mask before in your life.

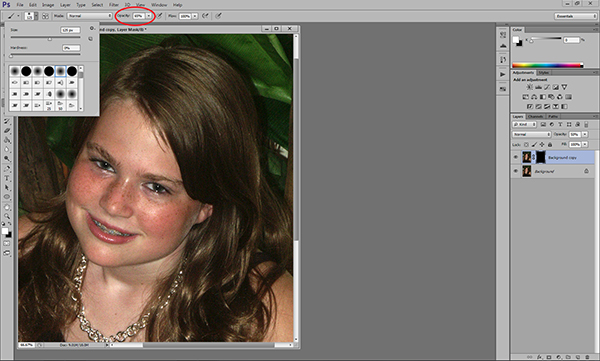
First, with the high-pass layer selected, click on the layer mask icon at the bottom of the Layers panel.

Easy Skin Smoothing Using the High-Pass Filter in Photoshop

This will add a mask to the layer.

Depending on your settings, this mask will manifest as either a white or black square. From here, we’ll select our paintbrush from the toolbar…

Easy Skin Smoothing Using the High-Pass Filter in Photoshop

…and make sure that our brush is set to the opposite color of whatever our mask might be.

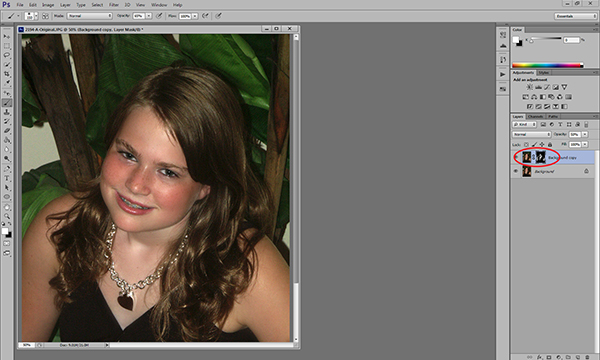
So if our mask is black, make sure the brush is set with white over black or vice versa. This will make the brush remove the skin smoothing effect wherever we paint.

To add the smoothing effect back in, simply switch the brush color to the same color as the mask by clicking the swatch at the bottom of the tool panel.

And here we have our finished portrait.

Easy-Skin-Smoothing-Using-the-High-Pass-Filter-in-Photoshop

Details are preserved, and yet, we’ve managed to dial back the clock slightly and even-out some effects of aging, all while keeping the overall impact of the photo intact.

Painting the skin-smoothing effect in or out truly is that easy. Also, remember you can adjust the flow rate and opacity of your paintbrush as you work.

Make it an Action…

I’m all about saving work, saving time, and saving mouse clicks. Turning your skin smoothing effects into a Photoshop action is not only a great way to save time, but you can also save multiple variations of skin-smoothing effects. Then make them available with just a single click (maybe two).

By creating an action for your skin smoothing, you can easily access different variations. You can have one with lots of opacity, another with very subtle opacity, and multiple blend modes, all without having to go through each individual step every time you want to produce the skin-smoothing effect.

So when you’ve practiced the steps a few times, it’s a good idea to record them as an action for future use.

Here’s a quick walk-through of creating the action for the skin-smoothing effect we used here.

Click on the actions icon to open your Actions Panel if it’s not already visible.

Easy Skin Smoothing Using the High-Pass Filter in Photoshop

Click on the New Action icon (next to the folder icon) and then name your new action. I’ve gone with the highly creative title “Skin Smoothing 1.” When your ready, click ‘Record.’

Easy Skin Smoothing Using the High-Pass Filter in Photoshop

Photoshop will now record each step you make in creating the skin smoothing effect, including layer opacity and the layer mask.

Once you’ve finished, click the Stop icon to halt the recording. And, viola, your new action is now nested in the Photoshop Actions panel for quick selection later.

Easy-Skin-Smoothing-Using-the-High-Pass-Filter-in-Photoshop

I like to keep my Actions panel in “Button Mode” for easier viewing

IMPORTANT NOTE: It’s important that you stop your action recording prior to painting onto your adjustment mask. For more in-depth information on creating Photoshop actions check out this article by Melinda Smith.

Wrapping up

Just as with any sort of digital post-processing, the amount of skin smoothing (and how you go about it) varies tremendously from photographer to photographer and from subject to subject.

Some prefer the visceral realism of seeing every pore and line in the skin, and some like to see porcelain-smooth skin with no signs of aging or blemishes – to each their own.

This is why using the high-pass filter method for skin smoothing is so wonderful. It allows us to tailor our skin-smoothing effect not only to fit the expectations of the client but also to our own style of portraiture.

I hope you enjoyed this quick and easy guide to easy skin smoothing in Photoshop using the high-pass filter. There are many other methods for smoothing and retouching portraits, and we’d love to hear your favorite technique. Let us know in the comments below!

The post Easy Skin Smoothing Using the High-Pass Filter in Photoshop appeared first on Digital Photography School. It was authored by Adam Welch.


Digital Photography School

 
Comments Off on Easy Skin Smoothing Using the High-Pass Filter in Photoshop

Posted in Photography


Video: How Defocus Smoothing works inside Canon’s new 85mm F1.2L USM DS lens

25 Oct

To coincide with the official release of its now-official RF 85mm F1.2L USM DS lens, Canon has released a 90-second video showing how the Defocus Smoothing (DS) technology inside its upcoming lens actually works.

For those not familiar, Canon’s DS technology is similar to the apodization technology found in Sony’s FE 100mm F2.8 STF GM OSS and Fujifilm’s APD version of the XF 56mm F1.2 R. In the case of Canon’s new RF 85mm F1.2 DS IS, the DS technology consists of a new vapor-deposited coating applied to two elements inside the lens that ‘has the effect of gradually decreasing the transmission factor from the center to the periphery of the lens.’ In other words, two elements inside the lens effectively have a radial graduated neutral density coating that’s feathered around the outermost edge of the element.

As demonstrated in the above comparison from the video, the DS coating creates much smoother bokeh by softening the edges of out-of-focus highlights.

The Canon RF 85mm F1.2L USM DS lens will be available in December 2019 for $ 3000.

Articles: Digital Photography Review (dpreview.com)

 
Comments Off on Video: How Defocus Smoothing works inside Canon’s new 85mm F1.2L USM DS lens

Posted in Uncategorized


Lightroom Texture Slider vs. Skin Smoothing

09 Jul

The post Lightroom Texture Slider vs. Skin Smoothing appeared first on Digital Photography School. It was authored by Simon Ringsmuth.

One of Adobe’s recent feature updates to Lightroom has profound implications for photographers who retouch their portraits. While in-depth alterations are best handled in an app like Photoshop or Affinity Photo, Lightroom’s brush tool has been a good choice for basic retouching for many years. Users can dial in specific settings to help skin appear softer and smoother, or select a preset defined by Adobe. However, these retouches have typically employed the Clarity slider, which is great for a lot of situations but not exactly ideal for portraits. Thankfully, the new Lightroom Texture Slider option aims to solve this and a whole lot more.

Lightroom Texture Slider vs. Skin Smoothing - 1

Before I get too deep into the Texture option, it’s important to know that it’s not just for tweaking headshots. It is specifically designed to either increase or decrease the detail on textured surfaces. These can be cloth, rocks, plants, skin, or anything that has a non-uniform appearance.

If you want to smooth the texture to make a surface appear more glassy, slide the Texture option to the left. By contrast, if you want to enhance the look of any textured object, just slide the tool to the right.

Texture vs. Clarity vs. Sharpening

Texture is fundamentally different from other tools such as Clarity or Sharpening, each of which has long been a staple in many portrait photographers’ workflows. Clarity works by increasing or decreasing contrast specifically along edges, or areas of already-high contrast. It primarily affects mid-tones and not the lightest and darkest portions of an image. Sharpening makes the edges of objects and surfaces much more vivid. It has some additional parameters like Radius and Amount that can be fine-tuned to get you just the right balance.

Lightroom Texture Slider vs. Skin Smoothing - 2

Each of these tools has a specific purpose, and they can be used alone or together to create specific results. If you usually do basic portrait retouching by using the Brush tool and selecting the Soften Skin option, you may have noticed that it’s merely a combination of Clarity and Sharpness. Texture, on the other hand, is specifically designed by Adobe to alter the appearance of textured surfaces.

If you have traditionally done some basic retouching using Clarity and Sharpening, you might be surprised at how effective the Texture option is.

The Soften Skin brush preset in Lightroom is just a combination of -100 Clarity and +25 Sharpening.

Retouching with Texture

While you can apply texture globally by using the option in the Basic panel of Lightroom’s Develop module, portrait photographers will appreciate that it can be applied selectively using the Brush tool. Select the Brush option and then look for the Texture slider, which is right above Clarity, Dehaze, and Saturation. You can also configure parameters like Size, Feather, Flow, and Auto Mask though I would recommend leaving the latter turned off if you are editing portraits.

Click on your photograph and brush in the Texture adjustment the same you would with any other adjustment. Be careful to stay in the facial region and not brush into hair, clothing, or other parts of the image. You certainly can apply the texture brush to other elements of your picture later on, but to start with stay focused on the face.

Lightroom Texture Slider vs. Skin Smoothing - 3

Original image with no brush adjustments applied.

As you brush in the Texture adjustment, you will see rough areas of the skin become smooth. I recommend starting with a value between -25 and -50. This retains most of the original look of the portrait while smoothing things out just a bit.

If you have never worked with the Adjustment Brush tool, you might take a minute and look over these five tips that could speed things up or make your work a lot more efficient.

Lightroom Texture Slider vs. Skin Smoothing - 4

Texture -50 adjustment brush applied to the cheeks, chin, and nose.

The resulting portrait has a smoother, softer appearance where the Texture adjustment was applied. Details such as pores and wrinkles remain, and color gradients and shifting tones are also preserved.

This is much different than the results typically produced by using the Skin Smoothing option, which employs a mix of negative Clarity and positive Sharpening.

Lightroom Texture Slider vs. Skin Smoothing - 5

Image with Soften Skin adjustment applied to the same areas.

This third image looks as though petroleum jelly has been smeared over the camera lens. The woman’s cheeks are missing the subtle color variations from the original image. While the skin is certainly smoother, it also looks more artificial.

To show how these images look in direct relation to one another, here is a graphic that shows all three versions for three seconds at a time. First is the original, then the Texture adjustment, then the original again, and finally the Soften Skin adjustment.

Lightroom Texture Slider vs. Skin Smoothing

You can create your own Adjustment Brush preset if you don’t want to rely on the Soften Skin preset. But if you have traditionally used the Clarity option, you may find it pleasantly surprising how vastly improved your results are by using Texture instead.

Comparison two

For another comparison, here are three more images to help you see the difference between Texture and other methods of softening skin.

Lightroom Texture Slider vs. Skin Smoothing - 6

The original image with no skin softening adjustments applied.

Applying a Texture -50 Adjustment leaves the pores, stubble, and small wrinkles intact but smooths them out just a bit. It’s a subtle change that doesn’t alter the original too much or make the face appear artificially smooth.

Lightroom Texture Slider vs. Skin Smoothing - 7

Texture -50 applied to the cheeks, chin, nose, and forehead.

A custom skin smoothing adjustment of Clarity -75 and Sharpness +15 makes the young man’s forehead and cheeks appear fake and plastic. It’s not a great look for a portrait.

Lightroom Texture Slider vs. Skin Smoothing - 8

Clarity -75 and Sharpness +15 applied to the same areas.

Looking at the three images sequentially shows the effect in a more pronounced fashion. The Texture adjustment gives a much more natural result while the final image seems over-processed and fake.

Lightroom Texture Slider vs. Skin Smoothing - 9

Conclusion

There’s a lot more you can do with the Lightroom Texture slider, and it’s useful for a wide variety of images aside from portraits. Some photographers like to reduce texture in the face and increase texture on hair and clothing for a punchier look.

My recommendation is to open up some of your images, especially portraits or headshots, and try it out for yourself. You might be surprised at how well it works.

Have you used the Lightroom Texture slider? What are your thoughts? Please share your thoughts (and images) with us in the comments section.


Lightroom Texture Slider vs Skin Smoothing

The post Lightroom Texture Slider vs. Skin Smoothing appeared first on Digital Photography School. It was authored by Simon Ringsmuth.


Digital Photography School

 
Comments Off on Lightroom Texture Slider vs. Skin Smoothing

Posted in Photography


How to Create and Use a Light Skin Smoothing Action in Photoshop

18 May

The post How to Create and Use a Light Skin Smoothing Action in Photoshop appeared first on Digital Photography School. It was authored by Jackie Lamas.

When you photograph portraits, you’ll spend time editing the photos so your clients look their very best. A lot of that time is often spent smoothing out the skin. But while some smoothing is okay, doing it too much can change the look of the person.

Here’s how to create a simple and easy Photoshop action that will have you smoothing out skin faster without over-retouching it.

Before and after using this light skin smoothing action.

What is a Photoshop Action?

A Photoshop action is where you record various steps in an editing process and save them so you can then reapply those steps simply by ‘playing’ the action.

In this case, the action will have three steps. When you press ‘Play’ it will apply those three steps quickly and automatically so you can get to the fun part – the retouching.

Create the action

Step 1: Open a photo (any photo will do) so you can create the action.

Step 2: Make sure the Actions panel is open. If it isn’t, go to the Window menu and make sure Actions is selected. If you can’t find the Actions panel on your workspace, deselect and re-select it in the menu.

Step 3: Create an Action Set, which will create a master folder for your action to live in and help you organize your actions. (You can skip this step if you already have one.) Click on the three lines in the Actions panel and select New Set. You can also create it by clicking the folder icon at the bottom of the Actions panel. You can give it any name you like. (In this example I named it “My actions”.)

Step 4: Now it’s time to record the action. Select New Action from the Actions panel menu, or click the New icon at the bottom. Choose a name for your action, select the set you want it stored in, and click Record.

Note: Once you hit record, everything you do in Photoshop will be recorded – including the things you did accidentally. Fortunately, you can click the Record and Stop buttons at any time while you’re recording the steps.

Step 5: Once you start recording your action, duplicate your layer in the layers panel or by hitting CMD/CTRL+J.

Step 6: From the Photoshop menu select Filters ->Blur -> Gaussian Blur and choose a value between 10 and 25 pixels. (Don’t worry. Your photo won’t stay blurry.)

Step 7: Create a mask layer, then hold down the Alt/Option key and click on the mask. This will add a black mask on your blur, and your photo will be back to normal. We’ll be using this mask to add the smoothing rather than erase the blur, which is a lot more work.

Step 8: Select the Brush tool (or press B on the keyboard), and choose an opacity between 10% and 20%. Make sure your foreground color is set to white so you can paint back the smoothing.

Step 9: Hit Stop to stop recording.

Your action is now ready to use.

To test your action, open a new photo and hit Play in the Actions panel.

You’ll see the actions you recorded re-applied to the new photo.

How to use your action

Open a photo with the skin you want to smooth out. It’s best if you retouch any imperfections or blemishes beforehand. This action simply smoothes out the skin lightly to make it look natural and clean.

Hit Play on your action, choose a brush size that’s best for your photo and start painting in the smoothing in small strokes. Make sure you paint in the mask layer or you’ll be painting white onto the skin.

You should see the difference after a few strokes. You can also change the opacity if you need more or less smoothing.

Tips

If you accidentally record extra steps, simply stop the recording and then delete the steps that aren’t part of the action.

You can also delete the action and start over. So don’t worry if you don’t get each step right the first time.

In conclusion

Retouching skin can often take time away from photographing clients. But by using actions, you can streamline your editing by automating steps you use regularly.

This action also helps you retouch photos lightly and more naturally.

Let us know if you find it helpful.

The post How to Create and Use a Light Skin Smoothing Action in Photoshop appeared first on Digital Photography School. It was authored by Jackie Lamas.


Digital Photography School

 
Comments Off on How to Create and Use a Light Skin Smoothing Action in Photoshop

Posted in Photography


Basic Skin Smoothing in Photoshop

22 Aug

I’ve always said that the best Photoshop is the Photoshop you never even notice.  I encourage my students to get it right in the camera, because my belief is that imaging software is a tool, not a crutch.  To quote commercial/portrait photographer Zack Arias, “If you find yourself saying, ‘I’ll just fix that later in Photoshop,’ stop what you’re doing and slap yourself as hard as you can.”  When people look at my portraits, I want them to see the personality.  I want them to see the emotion.  I want them to remember a moment in time.  What I don’t want is for them to look at my work and say, “Wow, great editing!”

In a perfect world, the photo shoot goes flawlessly.  The photos are creatively lit and bring out my subject’s personality.  It’s an intersection where subject and photographer come together in a collaborative effort that creates images needing almost no post production.

But since I don’t live or work in anything even remotely resembling a perfect world, Photoshop has become a necessary tool in the arsenal.  A levels adjustment to tweak the blacks.  Maybe a curves layer to bump the contrast.  I try to keep it subtle.  If you are shooting landscapes, it’s easy to let the artist run amok with color and special effects.  HDR?  Sure, go for it!  As a portrait photographer, though, you have to be very careful about not taking the editing and manipulation too far.

What do I mean by “too far?”  Have you ever seen a post-processed portrait where the whites of the eyes are so white that the subject looks like something out of a sci-fi movie?  What about skin so smooth it looks like plastic, totally devoid of any texture?  Any edit that pushes the bounds of reality is– in my opinion– “too far.”  I know there are people who disagree,  but my philosophy is this: whether you are coming to me for wedding/engagement photos, press photos for your band, or a head shot for the dust jacket of your latest book, we are coming together to make a portrait– not a semblance of a portrait.

Like I noted earlier, if I’ve done things properly, my portraits shouldn’t need much processing once they come off the camera.  Usually cropping/sizing.  Maybe a contrast tweak.  And maybe just a little attention to the skin.  But skin has texture.  It has pores.  It can be tricky, so here’s how I handle it.

This is a very old test shot from just before I went professional ten years ago.  Not exactly my finest hour– the pose is a bit awkward, there are multiple hot spots, the background is a mess– I could pick this photo apart for hours.  It is, however, a great image for demonstrating a skin smoothing technique.   There are a lot of different ways of doing this.  I’m not going to tell you that my way is best, but I am going to  tell you that my way is best for me.  It’s a pretty basic, straightforward approach, so it might end up being best for you, too.

First, let’s open up our image in Photoshop.  I’m doing this in Photoshop CS6 (No Cloud yet for me!), but I’ve been using this method for years, so you should be fine, regardless of which version you are using.   Step One is zooming in on our target areas.  Any adjustments you make in Photoshop will be less noticeable if you work on an enlarged view.  You’ll be making smaller, more direct adjustments, and you’ll have a better idea of when to stop.

Zooming in lets you make more direct, subtle changes.

Zooming in lets you make more direct, subtle changes.

Once we’ve zoomed in on our target areas, we duplicate the layer and add a 20-pixel Gaussian blur in the Filters menu.  You’ll immediately see the entire image go very soft.  In the Layers palette, reduce the opacity of the layer to 50%.

Duplicate the background layer in the Layers Menu.

Duplicate the background layer in the Layers Menu.

Add a Gaussian Blur.

Add a Gaussian Blur…

...and adjust it to 20 pixels.

…and adjust it to 20 pixels.

Next we are going to add a layer mask.  Don’t be intimidated.  The only thing a layer mask does is either hide or reveal the effects of the layers below it.  More on that in a little bit.  We are going to add the layer mask by holding down the ALT/OPTION key and clicking the Add Layer Mask icon at the bottom of the Layers palette.  You’ll see your image go back to its pre-blur appearance and a small black box will appear next to the layer thumbnail.

Reduce the opacity of the layer to 50% and add a layer mask.

Reduce the opacity of the layer to 50% and add a layer mask.

Next, select the brush tool.  You can use the bracket keys to adjust the size of the brush.  Pressing the SHIFT key while using the bracket keys will adjust the hardness/softness of the brush.  You’ll definitely want a brush with softer edges.  This will allow your facial edits to blend for a more natural look.  Hard brush edges will stand out.

Select a soft, white brush and adjust the size.

Select a soft, white brush and adjust the size and opacity.

Make sure you are using a white brush.  The opacity of the brush will dictate the overall affect.  The closer you are to 100%, the closer you will be to the original Gaussian blur and we don’t want that.  I generally work with an opacity between 50%-70%.  I usually work at the higher end on female portraits and the lower end on males.  Experimenting with various opacities will show you how they affect the overall look of your image.  If you think you’ve chosen the wrong opacity, simply switch the brush color to black and go back over what you’ve done.  This will replace the part of the layer mask you’ve just removed.  Then readjust your opacity, switch the brush color back to white, and continue with your edits.

Before we go any farther, let’s take a look at what exactly is happening.  When we duplicated the layer and added the blur, creating the black layer mask only covered the blur– it didn’t remove it.  By using a white brush on the black layer mask we are removing parts of the mask, revealing the blur underneath only where we need it.  You’ll notice these areas appearing on the layer mask thumbnail.

You'll see the effects of your brush strokes on the layer mask.

You’ll see the effects of your brush strokes on the layer mask.

Be careful to not brush over features like eyes and lips.  In a good portrait, facial features– the eyes particularly– should be sharp.  You do need to make sure, however, that you are consistent in your edits.  For instance, if I’ve smoothed the forehead and cheeks, chances are that the neck and shoulders are going to need some attention, too.  One sure-fire way to bring attention to your edits is to be inconsistent.  You don’t want some sort of imaginary line between retouched and non-retouched areas drawing attention to them.

The end result is a subtle, but noticeable change.

The bottom line is that skin has texture.  If you over-smooth it you will be left with a portrait that draws attention to the edits, rather than the person.  How much is too much is subjective, but keep in mind what I said earlier about going too far.  This is a technique where a little bit can go a long way.  What I really like about it is that it lets you make these edits in a subtle way, leaving you with a natural-looking portrait.

Post originally from: Digital Photography Tips.

Check out our more Photography Tips at Photography Tips for Beginners, Portrait Photography Tips and Wedding Photography Tips.

Basic Skin Smoothing in Photoshop


Digital Photography School

 
Comments Off on Basic Skin Smoothing in Photoshop

Posted in Photography


Skin Smoothing with Lightroom 3

03 Nov

Learn how to use Lightroom to smooth skin, then enhance it further and tweak the eyes and the lips to create that model skin finish! Learn how to use the Adjustment Brush Learn how to use Clarity to smooth skin

 
Comments Off on Skin Smoothing with Lightroom 3

Posted in Retouching in Photoshop


Photoshop CS3 Beginners Tutorial – Smoothing Skin (Removing Spots) Part 1

21 Sep

Any Questions? Don’t Hesitate To Ask [; Video Was Edited With Sony Vegad Pro 8 And Recorded With Camtasia Comment, Rate + Subscribe : )
Video Rating: 4 / 5


Skin Smoothing in Photoshop

20 Sep

Lee Varis – blog.varis.com – examines a new skin smoothing technique in Photoshop. Learn how to iron out bumps and blotches while retaining the fine skin texture. This is a very trick, non-intuitive technique that is easy to execute if you know how… See more tutorials at http & blog.varis.com
Video Rating: 5 / 5

a fastmotion by Felix Rachor Postproduction in Photoshop, Camera RAW and Bridge
Video Rating: 5 / 5


Skin Smoothing in Photoshop

18 Sep

Lee Varis – blog.varis.com – examines a new skin smoothing technique in Photoshop. Learn how to iron out bumps and blotches while retaining the fine skin texture. This is a very trick, non-intuitive technique that is easy to execute if you know how… See more tutorials at http & blog.varis.com
Video Rating: 5 / 5

a fastmotion by Felix Rachor Postproduction in Photoshop, Camera RAW and Bridge
Video Rating: 5 / 5

 
Comments Off on Skin Smoothing in Photoshop

Posted in Retouching in Photoshop


[MODIFIED] Safari for Windows – Change Font Smoothing

02 Sep

Change the amount of smoothing Safari performs on text to increase legibility.

Similar to some other web browsers, Safari for Windows includes technology to smooth the display of on-screen fonts to help increase text legibility.

However, Safari takes font smoothing a step further and lets you adjust the amount of smoothing you wish to perform instead of using Windows default settings. Depending on your monitor type and preferences, experimenting with these settings may create pleasing results:…

Read more at MalekTips.
New Computer and Technology Help and Tips – MalekTips.Com

 
Comments Off on [MODIFIED] Safari for Windows – Change Font Smoothing

Posted in Technology