RSS
 

Posts Tagged ‘Slider’

Silkypix Development Studio Pro8 released with new clarity slider and B&W controls

17 Feb

Japanese software developer Ichikawa Soft Laboratory Co. has released a new version of its Silkypix Development Studio Pro application that introduces a number of new tools and functions. Version 8 of the Raw adjustment and conversion program adds a clarity slider to the tool-set, that can be used to emphasize or smooth-out differences in neighboring tones to deliver more or less tonal impact in an image.

Users can also now take more control of black and white conversions using the Monochrome Controller Function that allows a range of colors to be lightened or darkened to simulate the use of colored optical filters over the lens of a camera loaded with black and white film. For selective enhancements a brush tool has been added to the Partial correction tool kit which the company says will make it easier to create rounder selection areas for adjustment.

Those who like to shoot underwater will be glad of a dedicated tool for correcting the color of images recorded in a range of sub-aqua conditions which reduces the impact of color-loss and shift at various selectable depths. Silkypix also now allows a single license to cover three computers and the company says it has cleaned up the user interface to make it more straightforward to use.

The program, and variations on it, is favored by a number of camera brands as an in-the-box raw converter given away with their cameras, but the full version can be purchased on-line from the manufacturer for 22464 JPY (approx. $ 200/£160). A 30-day free trial is also available. The program supports raw files from 613 cameras, it is claimed. For more information see the Silkypix website.

Press release

Product release announcement, high quality RAW development software high-end version “SILKYPIX Developer Studio Pro8 download version”

The product concept of SILKYPIX Developer Studio Pro8

“SILKYPIX Developer Studio Pro8” is the latest development in the SILKYPIX series, aiming at “enhancement of functions for finishing photographs that meet the photographer’s expectations” and “a comfortable and enjoyable RAW development software.” In this version, we have added “Clarity” and a “Brush” to the “Partial correction tool,” which have been requested by many customers. In addition, it has been equipped with a “Monochrome controller” specialized for monochrome adjustments and a “Underwater photo controller” specific for underwater photography. This RAW development software will be a strong support so you can create your own works.

SILKYPIX Developer Studio Pro8 major features

Clarity adjustment
A “Clarity” parameter has been added to the “Tone” adjustment item to adjust the luminance level of each pixel based on information from surrounding pixels. Increasing the effects of “Clarity” will make it possible to finish the details of the subject in a bold picture, so it is effective when you want to finish bold scenes with a hazy surrounding. In contrast, by lowering the “Clarity” you can finish with a soft ambience like with a soft focus, so you can use it to effect with women and children’s photography.

A Brush added to the Partial correction tools
A “Brush” that makes it possible to select correction areas more freely to “Partial corrections” was added in “SILKYPIX Developer Studio Pro7.” Using the “Brush” makes corrections easier even in difficult areas of “circular correction filter” and “gradual correction filter.” More creative adjustments have become possible by making partial corrections that do not take the form of the subject.

Strengthening the Monochrome Controller Function
A Monochrome Controller function has been installed specialized for adjusting monochrome pictures. Eight kinds of “Color filters” can be selected, and it is possible to reproduce filters when shooting monochrome photographs on your screen. In addition, since the “Lightness” can be adjusted for each hue, you can make a thorough finish to your black and white photographs. Even beginners of black and white photography can easily switch between color and monochrome images after applying parameters in the preview display, so you will be able to intensify the understanding of effects on monochrome photographs due to changes in color.

Underwater Photo Controller Installed as a Function for Correcting Dedicated to Underwater Photography
A function from “SILKYPIX Marine Photography” for RAW development software dedicated to underwater photography has been installed into “SILKYPIX Developer Studio Pro8” called Underwater photo controller. With this Underwater photo controller, you can correct the bluishness that is difficult to adjust with the normal white balance by using “White balance for underwater.” It also features “Color restoration,” which actually reproduces colors lost in water, as well as “Muddy reduction” to eliminate murkiness in water.

Focus Peaking Function Installed
A Focus peaking function has been installed to detect the parts focused on from adjacent pixels in the image, and to display them with colors added to those parts. With this function, you can clearly check the area of focus.

Improved User Interface
We have improved the design to be clean and simple to make it possible to concentrate on adjusting images. In addition, the layout has been changed to make it easier to understand for those using adjustment functions for the first time. Also, you can now change the background color of the preview display according to your preference.

One License Can Be Used on Three Computers
In recent years, more and more people own multiple computers, such as desktops, laptops, tablets, etc., sometimes using both Windows and macOS. With such changes in the industry, “SILKYPIX Developer Studio Pro8” is now available for use on three computers with one license.

New function / Improvement list

  • Tone – Clarity slider addition
  • Partial correction tool – brush addition
  • Monochrome controller
  • Underwater photo controller
  • Warning indication – Focus peaking addition
  • Preview display Select background color
  • Choose Rating Display / Non-display under the thumbnail display
  • Improved User Interface
  • One License Can Be Used on Three Computers

SILKYPIX Developer Studio Pro8 download version (Win/Mac) license price

Regular list price
New license
28080 JPY (tax included)

Upgrade license
Customer who already has following license can purchase one license for your one product license.
Upgrade target products:
SILKYPIX Developer Studio Pro, Pro5, Pro5 for Panasonic, Pro6, Pro7, Pro7 for Panasonic
11232 JPY (tax included)
Upgrade target products:
SILKYPIX Developer Studio 3.0, 4.0, 6, 7
16848 JPY (tax included)

Special price for bundle products
Customers for (bundle version) SILKYPIX series which were shipped with the cameras and lenses
22464 JPY (tax included)
[Target products]
SILKYPIX Developer Studio SE version
SILKYPIX Developer Studio 4.0 for TAMRON
SILKYPIX Developer Studio 4.0 for CASIO
FUJIFILM RAW FILE CONVERTER powered by SILKYPIX
SILKYPIX Developer Studio 3.0 for PENTAX or LE
SAMSUNG RAW Converter

Articles: Digital Photography Review (dpreview.com)

 
Comments Off on Silkypix Development Studio Pro8 released with new clarity slider and B&W controls

Posted in Uncategorized


Grip Gear introduces Movie Maker, a tiny slider for smartphones and action cams

30 Nov

Grip Gear, maker of the handheld smartphone stabilizer IndieSolo, has launched the Movie Maker: a portable, electronically driven slider built for smartphones, action cams and compact cameras.

Powered by AAA batteries or a separate power bank via USB, the Movie Maker includes a rail, motorized head and a clamp to accommodate most smartphones. Eight speeds can be utilized, as slow as 6mm/min up to 300mm/min to create slow motion, time-lapse or real-time stabilized panning shots.

Upon reaching the end of the track, the Movie Maker will automatically bounce back and move in the opposite direction. The motorized head can also be used separately from the rail to pan 360-degrees for panorama. It’s all designed to pack away into a compact kit that can fit into a camera bag or backpack.

The Movie Maker is available now on Amazon for a list price of $ 130.

Press release

Hollywood production tools arrive for smartphones.
Grip Gear launches The Movie Maker tool set

<GripGear. 31 Oct. 2016. For immediate release. > Smartphone movie tool kit company, Grip Gear has upped the ante in video production with the launch of Movie Maker: a set of miniature production tools that puts all the equipment a movie company might use to make a major Hollywood production into a tiny package that will help turn a smartphone into a full-blown movie making resource.

As smartphones become more and more capable, they are becoming one of the most important tools for creating video content for both brands and individuals. By 2019 video will account for almost 80 percent of all consumer Internet traffic. Even now, Facebook experiences 8 billion video views per day. But as video proliferates, standing out from the crowd becomes an increasing challenge.

The Movie Maker helps video makers move up into a new realm of production quality and creativity with gadgets like an 8-speed electronic tracking slider, a 360º panoramic function and suction cups to hold your phone in impossible positions for the most amazing shots.

Co-founder Rhys Bradley said: “As a former grip in the film industry, I’ve long had a vision of creating a film set experience in a smaller format for smartphones and other small cams. With the Movie Maker, smartphone users can now create beautiful movie quality footage that used to take massive pieces of expensive film making equipment with a set of highly portable tools that can fit in a camera bag!”

Co-founder Dean Tzembelikos said: “After 3 years of development and meticulous attention to detail and quality we are proud to launch the Movie Maker. It will enhance the video making experience and bring out the creative juices in everyone. This is a genuine breakthrough in putting movie making into the everyone’s hands”

The Movie Maker will shortly be available on Amazon as well as at www.gripgear.com and cost USD $ 129.

Technical information:

  • Can use 99% of all smartphones, action camera’s and light compact camera’s
  • Folds small and is light weight and backpack friendly • Comes with 2 x 31cm tracks, additional tracks are available for extensions
  • Power Options: Plug into a power bank to extend operating times +36 hours (10400MA), or use 2 AAA batteries for 2 hours
  • Remote control for both speed and direction (8 speeds)
  • Bounce back for continuous motion: When the movie maker reaches the end of track it will not stop but move in opposite direction
  • Motor speeds vary from very slow, mostly used in time lapse 6mm/minute and to a 300mm/minute for real time.
  • Operates as a manual slider
  • Convenient ¼ inch threads allow you to attach The Movie Maker to a tripod, suction cup
  • Can climb 90 degrees
  • Weighs 900g and can hold up to 300g phone/camera
  • Can operate upside down
  • Use without tracks for pans or 360 Panorama shots
  • No vibration, even on full zoom videos are stable
  • Easy to use

Articles: Digital Photography Review (dpreview.com)
 
Comments Off on Grip Gear introduces Movie Maker, a tiny slider for smartphones and action cams

Posted in Uncategorized


4 Ways to Make Your Photos Stand Out with the Clarity Slider

28 May

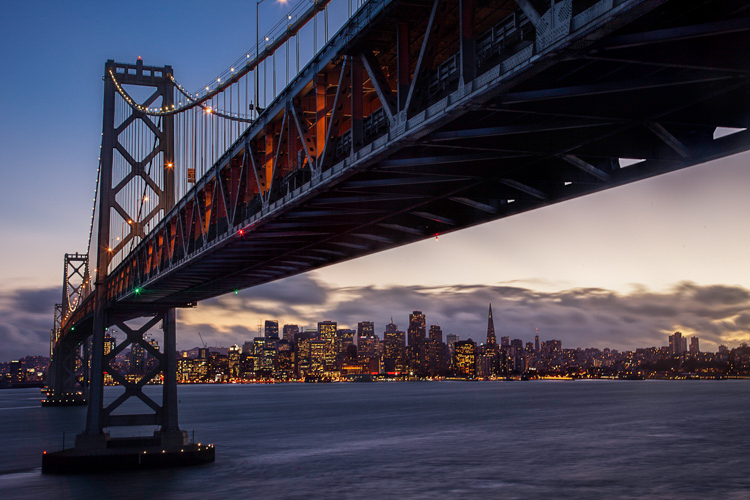
Clarity - Bay Bridge example

You want your photos to be as sharp as possible. Of course, there is no substitute for good technique in the capture phase, but you would like to add something in the post-processing to make the pictures clearer and sharper. You may already be adding sharpening, but how to add that extra crispness to make your pictures pop? The answer is clarity. This article will show you how to add that to your photos.

Clarity - before and after

What Exactly Is Clarity?

What is clarity? Clarity is a local contrast increase that focuses on the mi-tones of the image. If differs from sharpness, because whereas increasing sharpness increases the contrast between dark and light tones, clarity increases the contrast within the middle tones of the image. The effect is similar to sharpening, but it brings out textures a bit more. In addition, digital noise isn’t as much of a problem as it is with sharpening increases.

Adding Clarity in Lightroom (or ACR)

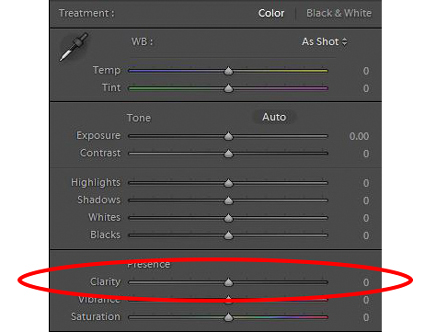
How do you add clarity to your photos? The best-known, and simplest way, to add clarity is to use the Clarity slider in Lightroom (there is an equivalent in Adobe Camera Raw – or ACR). To do that, just find the Clarity slider in the Basic panel of the Develop module. Increase the clarity by moving the slider to the right a bit. That’s all there is too it.

Clarity - Lightroom slider

The Clarity slider makes a global adjustment to your image (meaning it affects the entire image). If you want to add clarity only to specific portions of your image (referred to as local adjustments), you can do so by using the Adjustment Brush (or Radial or Graduated filters). When you select that brush, you will see clarity among the sliders that you can use. Increase the clarity to the desired amount and brush the effect where you want it, on your image.

I find it best to apply a slight, to moderate amount, when making Lightroom adjustments. Think of it as a baseline. Other areas of the image that you want to draw out can be targeted later. You may find it easier, and more precise, to make local adjustments using Photoshop, so that will be the next topic.

High Pass Filter in Photoshop

Within Photoshop, there is no Clarity slider. If you want to add clarity to your photos within Photoshop, there is still a way to do it. It is called the High Pass filter.

Why should you use this filter, and not the Clarity slider in Lightroom (assuming you have both)? Mostly because, with the High Pass filter you can take advantage of all the masking and blending tools available within Photoshop. The primary reason is the ability to mask the changes, which is a much more precise and powerful way to create localized adjustments, than using Lightroom’s adjustment brush. Use the High Pass filter for targeted adjustments to specific areas that you want to draw out in your picture.

It takes a few steps to use this tool, so follow this process:

  1. Make a copy of the background layer (Ctrl+J) of your picture.
  2. Set the blend mode of the new layer to Overlay. The picture will look terrible for now, but don’t worry about it.
  3. Select the High Pass Filter by going to Filters – Other – High Pass.
  4. Set the radius, which is the equivalent of setting the strength of the effect.

Clarity - high pass filter

Note that this process will create a global adjustment to your image. To turn it into a local adjustment, create a layer mask to apply the effect only where you want it. To do that, with the new layer selected go to Layer – Layer Mask – Hide All. That will create a black layer mask. A black layer mask hides the effect everywhere. Now use a white brush to paint (on the mask) in the effect where you want it. Use the Opacity slider to control the degree to which the effect is applied by your brush (you can also adjust the layer opacity).

Local Contrast Adjustments in Photoshop

Another way to add a degree of clarity to your photos is to increase the local contrast, with the best way being a Curves Adjustment Layer. You’ll be surprised at how much clearer and more detailed things look after you increase local contrast in this way. This is another tool for making targeted adjustments.

They key here is to select an area and then increase the contrast just within that area. Here’s how:

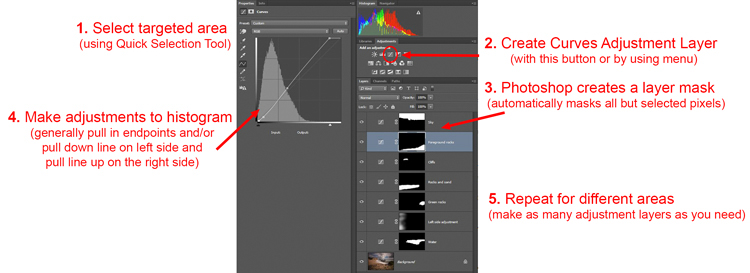
  1. Select the area you want to affect. Use the Quick Selection tool to select those pixels.
  2. Create a Curves Adjustment Layer (Layer – New Adjustment Layer – Curves) with those pixels selected. When you do so, Photoshop will create a new adjustment layer, but it will mask off all the pixels except those you previously selected. Therefore, the changes you make will only apply to your selection.
  3. Increase the contrast of your selected area. You can either drag in the endpoints of the curve, or you can push down the line on the left (dark) side and pull up the line on the right (bright) side of the histogram. (You can also use Levels to increase the contrast, if you are uncomfortable with Curves).
  4. Clean up with your brush tool. If there are harsh transitions, use a soft brush to feather out the change (paint ON the mask only, not on the layer). You can increase or lessen the effect using the brush tool as well.

Clarity - Photoshop curves adjustment layers

Be sure you select targeted areas and use this method to draw out the contrast. It will add clarity and texture to that portion of the picture you want only, not the entire image.

Clarity by Topaz

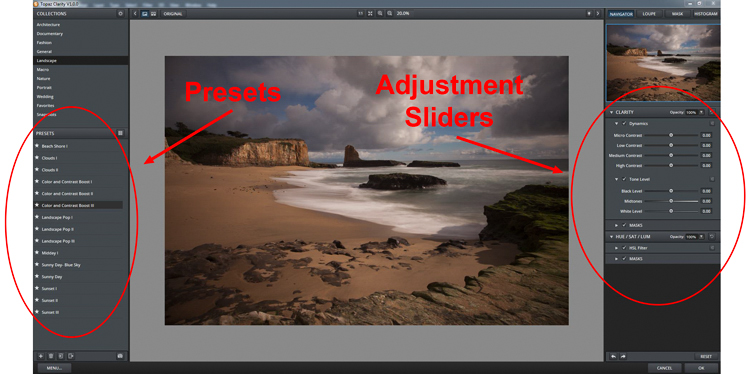
There is another tool you can use to add clarity to your photos. It is a plug-in by Topaz that is named, appropriately enough, Clarity. It costs $ 50 and acts as a plug-in to Photoshop or Lightroom.

Clarity by Topaz divides contrast into different components ranging from Micro contrast, to High contrast, and provides a slider for each. That allows you to reach different parts of the picture and affect contrast in different ways.

The best part of Clarity is the Micro contrast, although this often requires offsetting adjustments to other areas of contrast. That is the greatness of this plug-in: you are not confined to a simple contrast adjustment that pushes all bright areas toward white, and all dark areas toward black. It allows you to add some clarity and texture to your pictures without blowing out your highlights or losing your shadow detail. You can also effect saturation, brightness, and other controls from within Clarity.

Clarity - using Topaz Clarity

The best way to use Clarity is by creating a duplicate layer of your image in Photoshop (Ctrl+J) and then opening the plugin. That way, after you have made your changes in Clarity and you have gone back to Photoshop, you can mask in or out the effect to whatever degree, and in whatever areas of your image, you wish.

Clarity - Davenport example

Application

The best part about these tools is that you can combine them to get exactly the effect you want. For example, you might make a minor global adjustment to Clarity in Lightroom, then take it into Photoshop and make a series of Curves Adjustment Layers to bring out certain areas. You might also do the same with Topaz’s Clarity and mask off the effect. When you are done, you can use the High Pass filter to highlight key areas of your photo in Photoshop. Of course, you’ll need to be careful not to overdo the effect, which can happen quickly, especially if you use multiple tools listed here. But judicious use of these tools, in conjunction with your normal input and output sharpening, can really make your photos pop.

googletag.cmd.push(function() {
tablet_slots.push( googletag.defineSlot( “/1005424/_dPSv4_tab-all-article-bottom_(300×250)”, [300, 250], “pb-ad-78623” ).addService( googletag.pubads() ) ); } );

googletag.cmd.push(function() {
mobile_slots.push( googletag.defineSlot( “/1005424/_dPSv4_mob-all-article-bottom_(300×250)”, [300, 250], “pb-ad-78158” ).addService( googletag.pubads() ) ); } );

The post 4 Ways to Make Your Photos Stand Out with the Clarity Slider by Jim Hamel appeared first on Digital Photography School.


Digital Photography School

 
Comments Off on 4 Ways to Make Your Photos Stand Out with the Clarity Slider

Posted in Photography


Rhino Slider PRO 4ft Review – Camera Rail System for Time Lapse and Video

02 Jun

If you’re into Videography or time lapse photography, chances are you’ve either already got yourself a slider or are considering making that purchase. Smooth camera movement can really add major production value to your footage and the key word here is ‘smooth’. Having your camera glide through space like it’s floating on air gives a huge boost to any kind of footage.

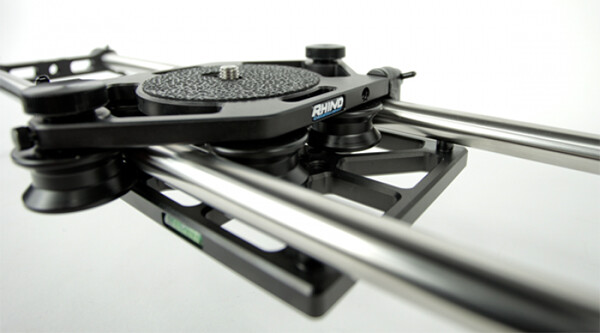
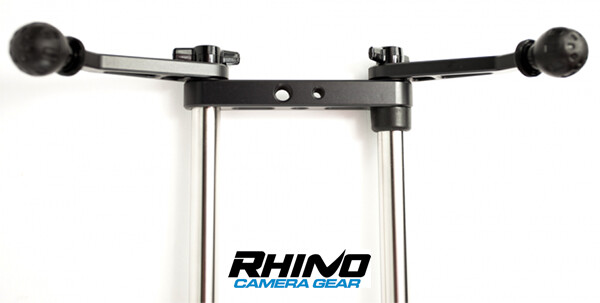
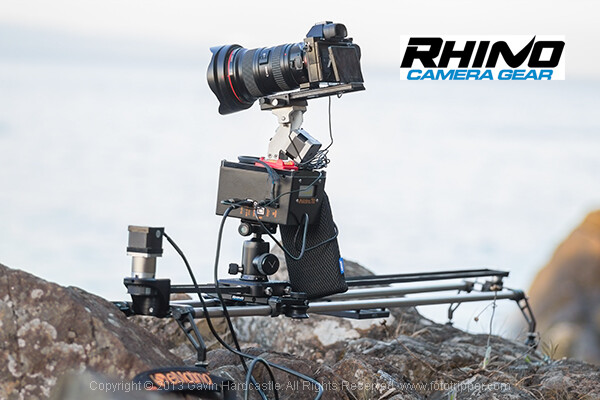
Enter the Rhino Slider Pro 4ft from Rhino Camera Gear, currently priced at $ 550. As the name suggests, this is a four foot wide slider, onto which you can attach your camera or take things a step further and add a robotic tripod head for a three axis solution of motion control awesomeness.

Rhino Slider PRO 4ft

How Smooth is the Slide?

The most important thing to consider when thinking about buying a slider is the smoothness of the sliding action. This is where the Rhino slider excels. The sliding motion of the carriage on to which you place your camera is as smooth as silk. Once you’ve set the tension on the outer wheels of the carriage, you’re good to go and you can rely on a super smooth slide every time.

Rhino Slider Pro Review

Build Quality

There is a huge difference between the build quality of a sub $ 300 slider and what you’re getting with the Rhino. This is a sturdy, well built unit, that performs well in all kinds of conditions. Sliders are a bit like tripods, if you buy a really cheap one –  it’ll probably end up in the trash. Spend a little more and you’ll get a unit that delivers the goods and lasts a long time. All of the Rhino slider parts are well machined and have that solid, reliable feel to them.

Rhino Slider Review PRO 4ft - Gavin Hardcastle

Heavy is Good Right?

Of course, all of that stability comes at a cost of added weight. The product page on the Rhino Camera Gear web site says that the Rhino Pro 4FT Slider weighs around 10 pounds (4.54 kg). That might not sound like much but by the time you’ve strapped on your camera bag, tripods and any other gear, you’ll be carrying the Rhino slider in its case and holding it in your hand. Talk about a forearm workout. Turns out you can’t have your cake and eat it.

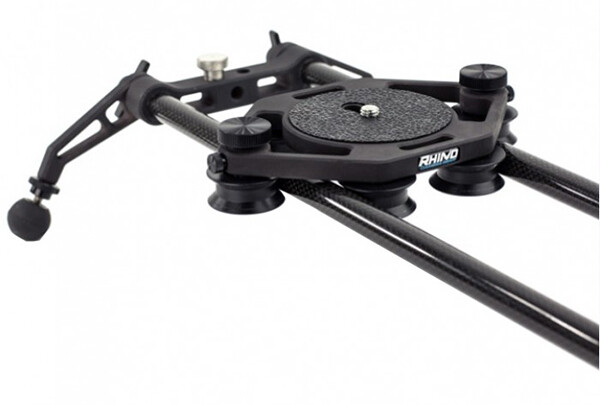
For those concerned about the weight, you might want to consider the carbon fibre rails or two foot rails to keep things more portable on long bush hikes.

Rhino Slider Carbon Legs

Rhino Slider Pro shown with Carbon fibre rails which weigh much less than the stainless steel ones.

The Rhino Gear Carry Case

The test unit I received from Rhino Camera Gear came with the Rhino Armor – Slider Carrying Case 4ft, which is an additional $ 100. Let’s be honest, you’re not very likely to be dragging a 4ft slider into the bush without the carry case so you might as well consider it a foregone conclusion that your total cost will be $ 650. On the plus side, the carry case has space for extra rails so that you can extend the length of your slide. Having more rails means more weight, so I’d definitely opt for the carbon rails.

I found the case to be just a little too short. It was difficult and fiddly to fit the slider back in the case due to the four legs on the ends of the slider. If the case had been an inch longer I reckon this would have been much easier. I’m guessing they make it super tight so that the slider doesn’t shift in the case during transport but there’s tight, and then there’s this.

Rhino Armor Carry Case

Pros for the Rhino Slider PRO 4ft

  • Super smooth sliding action
  • Build quality
  • Value for money
  • Ease of use

Cons against the Rhino Slide PRO 4ft

  • Carry Case could be an inch longer to make it easier to pack the slider
  • Stainless steel rails are heavy – consider buying carbon rails if you are going on long hikes
  • End plates could have been taller. I found that the carriage hit my tripod plates long before it hit the rubber brakes.

Rhino Slider PRO Review

Would I Recommend It?

Having looked at the prices of similar sliders that boast the same build quality, the Rhino slider is looking like a bargain at $ 550 (+ $ 100 for the carry case). Before shelling out the dollars though I’d like to test out the carbon fibre rails to see if they perform as well. If the whole rig could be made lighter, that would eliminate my worst grumble and make this a near perfect product. If you’re not too bothered about the weight of those stainless steel rails, I think you’ll be extremely satisfied with the build quality and smooth sliding action of the Rhino Slider Pro 4ft from Rhino Camera Gear.

The post Rhino Slider PRO 4ft Review – Camera Rail System for Time Lapse and Video by Gavin Hardcastle appeared first on Digital Photography School.


Digital Photography School

 
Comments Off on Rhino Slider PRO 4ft Review – Camera Rail System for Time Lapse and Video

Posted in Photography


Four Ways to Improve Your Photos With the Clarity Slider in Lightroom

05 Apr

Using the Clarity slider in Lightroom

Andrew S. Gibson is the author of Mastering Lightroom: Book 2 – The Develop Module. There’s a special deal on now at Snapndeals, get 40% off for a limited time only.

The Clarity slider is one of the most useful in Lightroom when it comes to giving your images extra punch and impact. Today I’m going to show you several ways you can use it to improve your photos. But first, let’s take a look at exactly what the Clarity slider does, and how it differs from its cousin the Contrast slider.

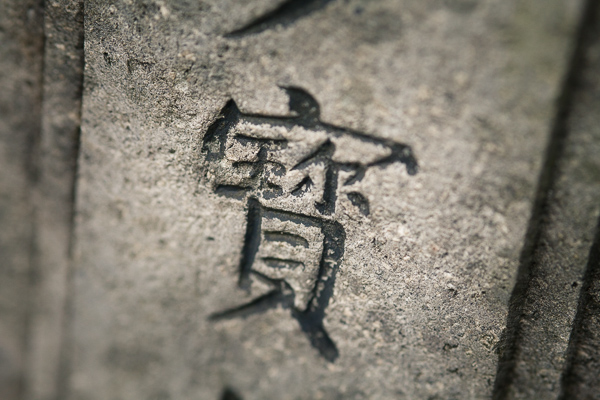
This photo is ideal to demonstrate the difference:

Using the Clarity slider in Lightroom

Using the Clarity slider in Lightroom

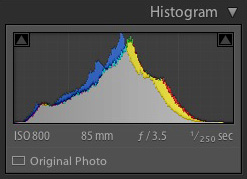
It was taken on an overcast day and the light was very flat. This is confirmed by the histogram, which has gaps on both the left and right-hand sides (screen capture image to the right).

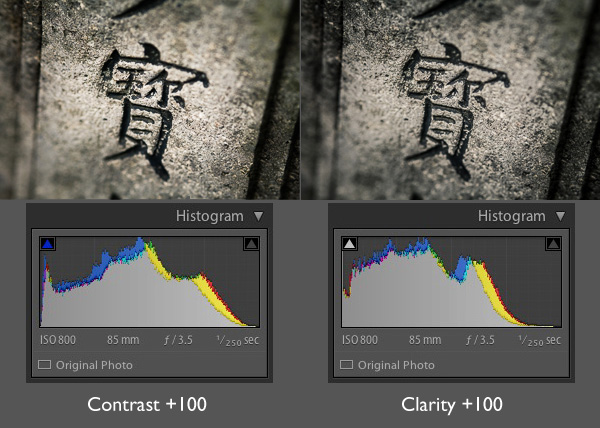
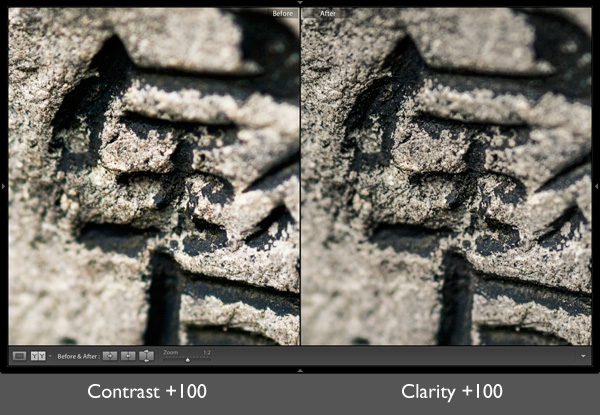
Now let’s see what happens when we set the Contrast slider, and then the Clarity slider, to their maximum settings of +100:

Using the Clarity slider in Lightroom

The most obvious difference at this scale is that the Contrast slider has a more far reaching effect. It makes both the shadows darker and the highlights brighter, stretching the histogram in the process.

The Clarity slider works differently. It increases contrast, but in the mid-tones only. The highlights aren’t affected, and if anything the photo becomes darker as the Clarity slider has a greater effect on dark tones than the Contrast slider.

Here’s a close-up of both images so you can see the effect in more detail. Look closely and you’ll see that the Clarity slider brings out more texture than increasing Contrast.

Using the Clarity slider in Lightroom

That’s the key to using this slider successfully. Increasing mid-tone contrast brings out texture and detail, increasing the tactility and apparent sharpness of the image. That’s what the Clarity slider is designed to do. Now I’m going to show you some practical applications.

1. Emphasizing texture

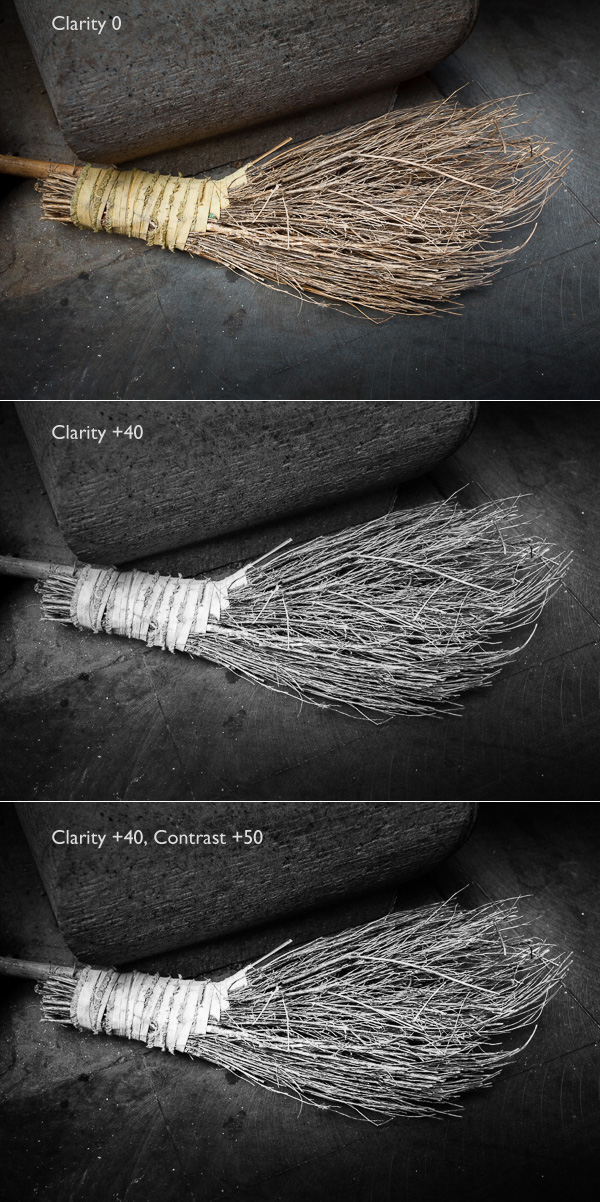
The Clarity slider in the Basic panel is a  global adjustment – meaning that, moving this slider affects the entire image. A small but subtle boost to Clarity can lift just about any image. Photos with more texture, such as the one below, may benefit from a larger increase in Clarity to bring out the texture and detail. This technique is especially effective in black and white. Plus, there’s nothing to stop you increasing contrast as well, especially in black and white, which usually benefits from higher contrast than colour images.

Using the Clarity slider in Lightroom

2. Emphasising texture locally

There is a theory in photography called visual mass that states that certain elements pull the viewer’s eye more than others (you read more about it in my article Composition, Balance and Visual Mass). One of these elements is sharpness. The eye goes to sharp parts of the image before it goes to unsharp, or out of focus areas.

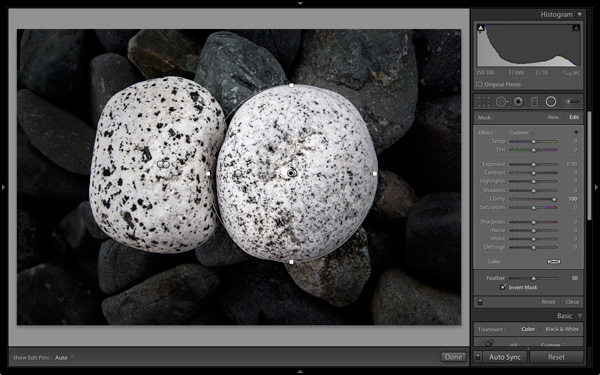
You can use this to your advantage by making local adjustments to Clarity rather than global ones. In the example below, I wanted the white stones to be the centre of attention. The principle of tonal contrast ensures that they are, and I emphasixed it here by placing Radial filters over the stones and setting Contrast to +100 in each one.

Using the Clarity slider in Lightroom

Note: The Radial filter is new to Lightroom 5. If you have an older version of Lightroom you can use the Adjustment Brush tool instead.

3. Emphasize the eyes in a portrait

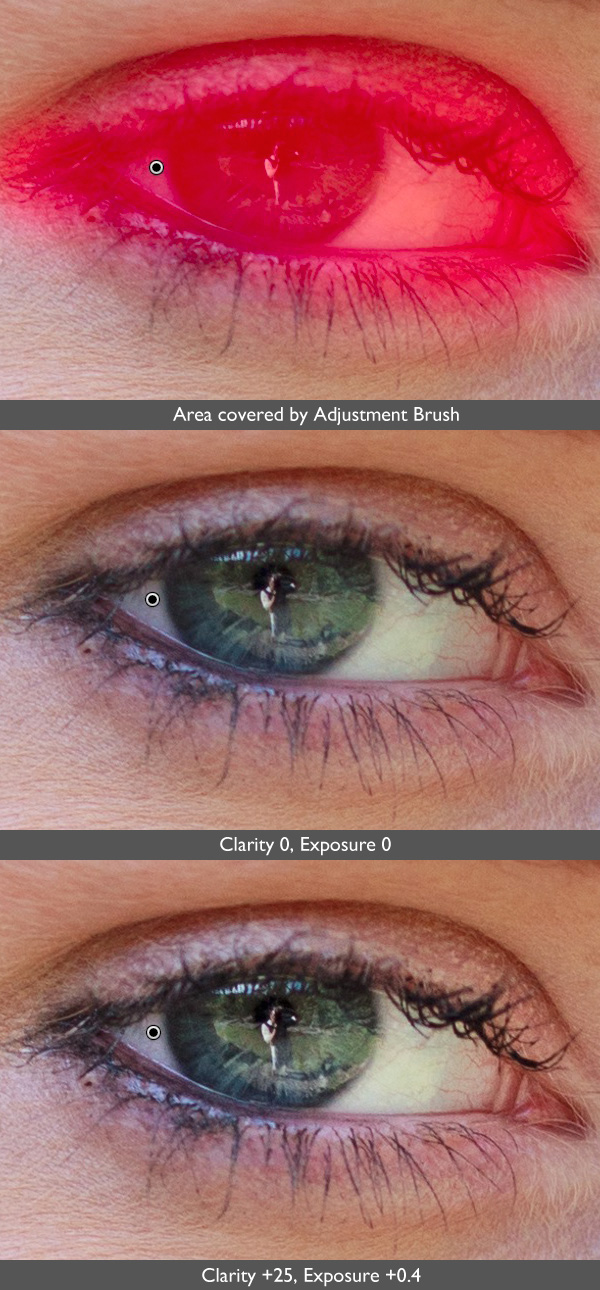
There’s another area where increasing Clarity locally can make a huge difference and that’s in portraiture. Use either the Radial filter or Adjustment Brush to increase the Clarity of your model’s eyes. Again, it’s a subtle, but often effective change. You can also do the same with your model’s mouth to emphasize the lips. Remember that as Clarity tends to make things darker, you’ll probably need to increase Exposure a little as well.

Using the Clarity slider in Lightroom

4. Soften skin

So far we’ve just looked at what happens when you increase Clarity, but you can also go the opposite way and decrease it in order to obscure detail, or soften part of the photo. You do have to be careful with this as the result can look a little false. A light touch is essential.

You can use negative Clarity as a kind soft focus effect in portraits. The most effective way is to increase Sharpness at the same time that you decrease Clarity. This helps retain realistic looking texture in the skin and avoids the false effect I spoke of earlier.

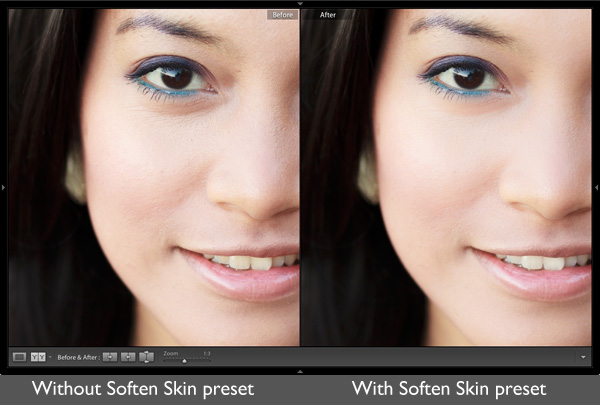
Lightroom has a built-in Adjustment Brush preset called Soften Skin which does exactly that. You can see the effect here. It’s subtle, look at the area under the model’s eyes if you’re not sure what the difference is:

Using the Clarity slider in Lightroom

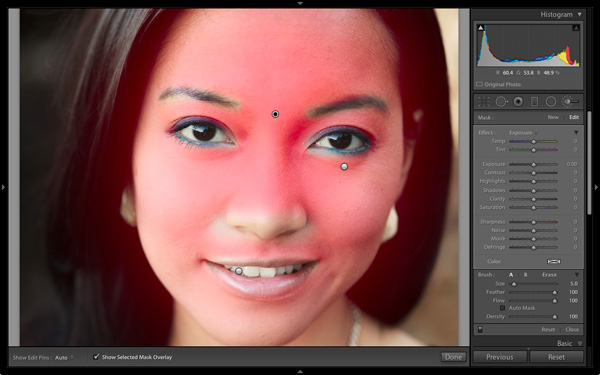
To use the Soften Skin preset, start by activating the Adjustment Brush and paint in the area you want to apply the preset to (shown in red below). Leave the eyes, eyebrows, mouth and tip of the nose alone as you don’t want to soften those areas.

Using the Clarity slider in Lightroom

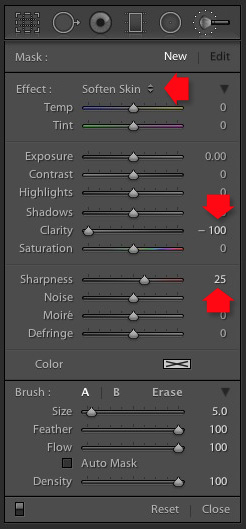
Select Soften Skin from the Effects menu. Lightroom sets Clarity to -100 and Sharpness to +25.

Using the Clarity slider in Lightroom

Using the Clarity slider in Lightroom

This is the strongest Soften Skin preset. If it’s too strong, you can reduce it by hovering the mouse over the Adjustment Brush pin until the double arrow icon (left) appears. When you see it, hold the left mouse button down and move the mouse left. Lightroom reduces the Clarity and Sharpness settings proportionally. Moving the mouse left, reduces the settings, moving it right increases them. Let go when it looks good to your eye. (You can also adjust the sliders manually)

Your turn

How do you use the Clarity slider? I’m curious to see what applications you have come up with for it.

Let us know in the comments, and feel free to share your photos so we can see what you have done.


Mastering Lightroom: Book Two

Mastering Lightroom: Book Two – The Develop Module ebookMy new ebook Mastering Lightroom: Book Two – The Develop Module teaches you how to process your Raw files in Lightroom for spectacular results. Written for Lightroom 4 & 5 it takes you through every panel in the Develop module and shows you how to creatively edit your photos. It’s now 40% off at Snapndeals for a limited time only.
The post Four Ways to Improve Your Photos With the Clarity Slider in Lightroom by Andrew S. Gibson appeared first on Digital Photography School.


Digital Photography School

 
Comments Off on Four Ways to Improve Your Photos With the Clarity Slider in Lightroom

Posted in Photography


How to Add an Opacity Slider to Lightroom Develop Presets with The Fader Plug-In

13 Jan

The Fader Lightroom plugin

For me, one of the biggest advantages of Lightroom over Photoshop is the ability to use Develop Presets on your images. Here are some of the benefits:

  • You can create several virtual copies of an image and use different Develop Presets to see how they come out. Doing so uses virtually no extra hard drive space as the changes are stored in the Lightroom Catalog in the form of text commands.
  • Develop Presets fit in neatly with your Lightroom workflow – there’s no need to export your images to Photoshop or other software.
  • It’s easy to see how Develop Presets work. If you download someone else’s Develop Presets it is easy to go to the Develop module and see which settings have been altered. You can tweak them to suit your photo, and (best of all) you get to see how the photographer achieved the effect. It’s a great way to learn how to use Lightroom.

Lightroom comes with some built-in presets, and there are plenty of websites that either give Develop Presets away for free or sell them. One of my favourites are the Signature Collections from OnOne Software. They are free (click the link for details) and give you a range of creative effects you can add to your images.

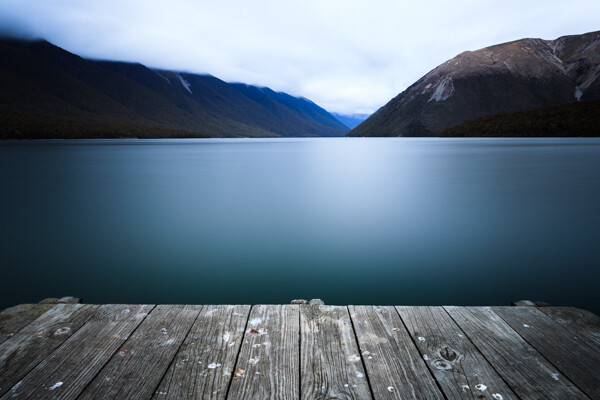
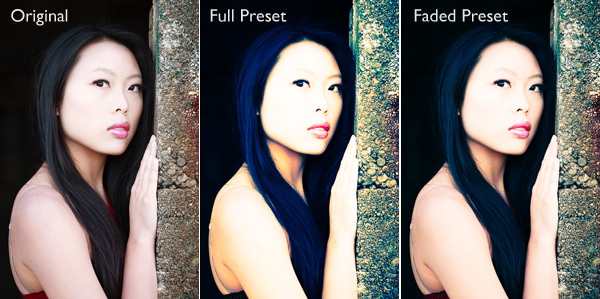
The only thing with downloaded Develop Presets is that most of them are not subtle. Here’s an example:

The Fader Lightroom plugin

If only there was a way of fading the effect – a kind of opacity slider in Lightroom. Maybe it will come in a future version. But at the moment there isn’t, so we have to find a way around that.

One method is to export two versions of your image, one with the preset applied and the other without. You place one on top of the other in Photoshop and use the Opacity slider to fade the effect. Easy enough – but it does take you out of Lightroom, something that’s good to avoid where possible. Those exported files take up valuable hard drive space. Plus, you may want to do something else to the image afterwards back in Lightroom.

As a smart Lightroom user you probably want to save time as well as hard drive space. That’s where a Lightroom plug-in called The Fader comes in.

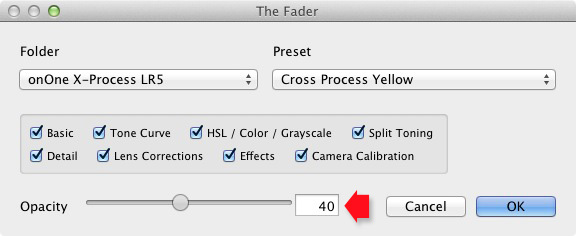
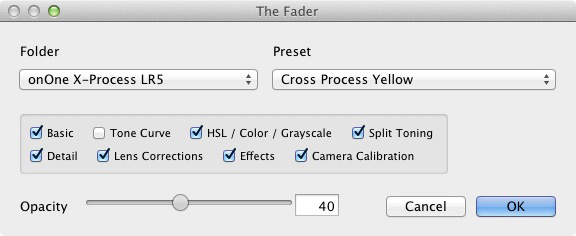
The Fader does exactly what its name suggests. Once installed, you can activate it, select the Develop preset you want to apply from the drop down menu, and use an Opacity slider to fade the effect. This clever plug-in calculates the changes the Develop preset made to the image, and fades them all at the same time.

It’s simple, and it works wonderfully well. It isn’t free, but it’s relatively inexpensive at $ 10 (plus 24% VAT if you live in the European Union). You can download it, and test it out, with Lightroom’s built-in Develop presets at no cost. Paying the registration fee lets you use it with all your Develop presets.

You can download The Fader plug-in from the Capture Monkey website.

Installing The Fader plug-in

1. Go to this page on the Capture Monkey website and download The Fader plug-in. Select a folder to store it in (creating a folder called “Lightroom Plug-ins” in your Documents folder seems logical). Double-click the zipped folder to extract the files.

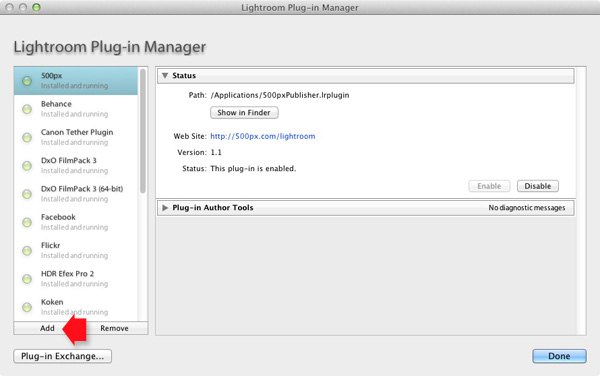
2. Open Lightroom and go to the Plug-In Manager (File > Plug-in Manager). Click the Add button in the bottom left-hand corner and navigate to the folder where you saved The Fader folder. Open the folder and double-click on the file called TheFader.lrplugin to complete the installation:

The Fader Lightroom plugin

Using The Fader

1. Open the photo you want to process in the Develop module. If you are using Develop Presets like the ones in OnOne Software’s Signature Collection, then you should process your file first in Lightroom and then apply the Develop Preset afterwards. Don’t expect the preset to do all the developing for you, it doesn’t work that way:

Original images before preset

Original images before preset

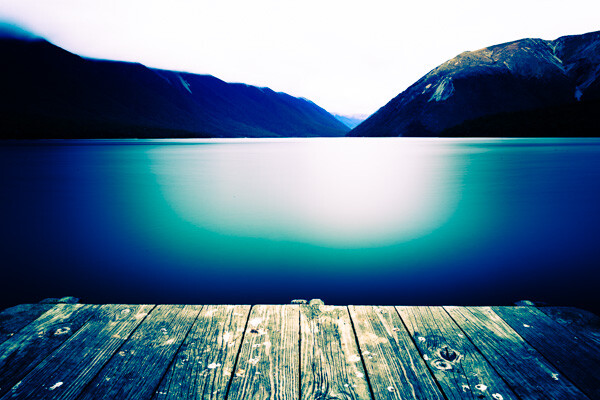
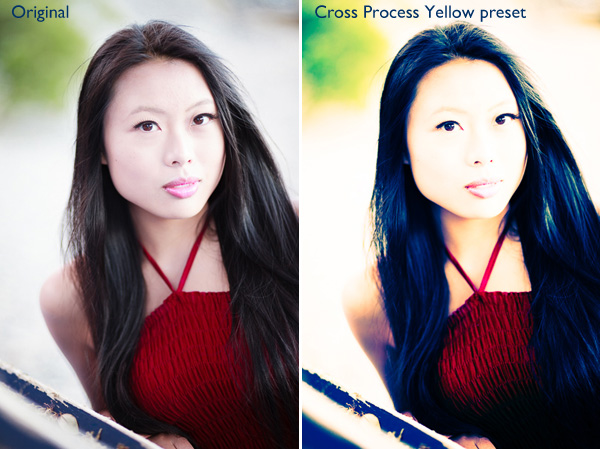
Then go to File > Plug-in Extras > The Fader and select the Develop Preset you want to apply. In this case I’ve chosen the Cross Process Yellow preset from OnOne Software. The effect is dramatic:

Preset applied

Preset applied

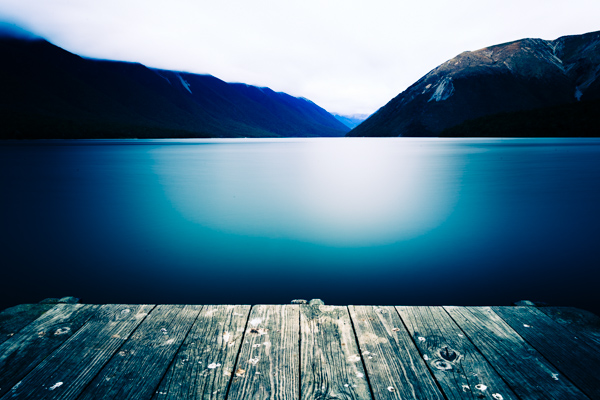
2. Now use the Opacity slider to reduce the intensity of the Develop Preset:

Fader applied

Fader applied at 40%

Here, I set Opacity to 40% for a more subtle effect:

The Fader Lightroom plugin

The Opacity slider has a range of -50 to 150. Values above 100 increase the intensity of the Develop Preset. The effect of minus values varies according to the preset used, but it is unlikely you will ever use them.

3. Finally, you can fine-tune the fade even further by selecting which parameters to apply to your photo. For example, if the Develop Preset you selected applies a Tone Curve to the photo, you can disable that part of the preset by unticking the Tone Curve box. Then you can use the Opacity slider to fade out the rest of the Develop Preset.

The Fader Lightroom plugin


Mastering Lightroom Book One: The Library Module

key-11My latest ebook Mastering Lightroom Book One: The Library Module is a complete guide to using Lightroom’s Library module to import, organize and search your photo files. You’ll learn how to tame your growing photo collection using Collections and Collection Sets, and how to save time so you can spend more time in the Develop module processing your photos.
The post How to Add an Opacity Slider to Lightroom Develop Presets with The Fader Plug-In by Andrew Gibson appeared first on Digital Photography School.


Digital Photography School

 
Comments Off on How to Add an Opacity Slider to Lightroom Develop Presets with The Fader Plug-In

Posted in Photography


The Rocket Travel Slider

07 Apr

Long time no chat! Hello! I’ve been digging about for products that are currently on my radar that I wanted to tell you about!

I’ve posted previously about Kickstarter stuff, the last time was another product from the same group of folk out of Bend, Oregon. Nice Industries are skipping along a sweet looking trail of products for the dSLR video producer, or even the 4/3rds / mirror-less video producer. The last product, the one I wrote about previously, was called “Aviator Travel Jib” So, this time I wanted to tell you about a complimentary product called “The Rocket – Travel Slider” You might hear people talk about a “Dolly shot” that’s the nice smooth slide shot – left to right, back and forward… It really does add an extra “something” to your film making that you can’t typically get when handheld or on a static tripod.

Have a look at the THE ROCKET – These guys are doing something right – the Kickstarter was already funded less than 24 hours after launch!

If you’re going to the 2013 NAB Show you can see The Rocket Slider in action at booth 12141, and Zeke may even make you a nice cup of tea!

So I have my very own Aviator Travel Jib now and i’ll be working on an article / review for you all [When I get better at film making!] it is a great little product that has added SO much ‘dynamics’ to my current film making. As well as the Canon 5D MK3, I’ve started using the Olympus OM-D (which I’ve fallen in love with!) and the two together are fantastic! – more on that later… Much more! I’m very much looking forward to getting The Rocket and finishing my film project!

The_Rocker_Travel_Slider_Dolly

The simplicity is what makes it that little bit more epic… You take the bar ends, the rocket sled and stick them in any old bag, your pipe goes wherever and you’re away! I’ve just priced up some extra light galvanised steel pipe here in Melbourne, it’s $ 38 for a 6.5M length – that’s with 2mm walls, so you’re going to be able to get a great dolly shot by cutting that in half and using the center support. Pretty excited about where dSLR cameras are taking independent film making right now, much more accessibility for the regular person (me!) to try this and that with the gear a lot of us already have.


The_Rocket_Travel_Slider

Enjoy!

–Sime

Post originally from: Digital Photography Tips.

Check out our more Photography Tips at Photography Tips for Beginners, Portrait Photography Tips and Wedding Photography Tips.

The Rocket Travel Slider


Digital Photography School

 
Comments Off on The Rocket Travel Slider

Posted in Photography


DIY KronoX Camera Slider – $22

02 Feb

This is part one demonstrating the construction of the slider and information you will need to know. Part two is simply the test footage shot using the slider along with an audio test of how much sound this design may or may not produce. This is my own design that I developed with the idea…
Video Rating: 4 / 5

In this week’s episode Mark answers several questions about street photography, with urban street portraiture as a focus. Watch as Mark walks through the process of capturing images while out and about in the city.


Danie Nel DIY: Homemade Camera Slider

24 Oct

Making a camera slider using sliding door ball bearings. Get away for about R100 or so.
Video Rating: 5 / 5

 
Comments Off on Danie Nel DIY: Homemade Camera Slider

Posted in Photography Videos