RSS
 

Posts Tagged ‘Skies’

To the skies! DJI launches Zenmuse X5 and X5R 4K Micro Four Thirds aerial cameras

11 Sep

Drone maker DJI has announced a pair of Micro Four Thirds aerial cameras including a model that can shoot lossless 4K Raw footage. The Zenmuse X5 and X5R are built around 16MP Four Thirds sensors, are compatible with a handful of small Micro Four Thirds lenses and can be flown on the company’s Inspire 1 drones. Read more

Articles: Digital Photography Review (dpreview.com)

 
Comments Off on To the skies! DJI launches Zenmuse X5 and X5R 4K Micro Four Thirds aerial cameras

Posted in Uncategorized


3 Simple Steps to Make Your Skies Pop in Lightroom

08 Sep

2-for-1 special

As part of Landscape Photography Week here on dPS, we’re offering TWO for the price of ONE on our best-selling Living & Loving Landscape Photography ebooks!

Click here to take advantage of this offer.


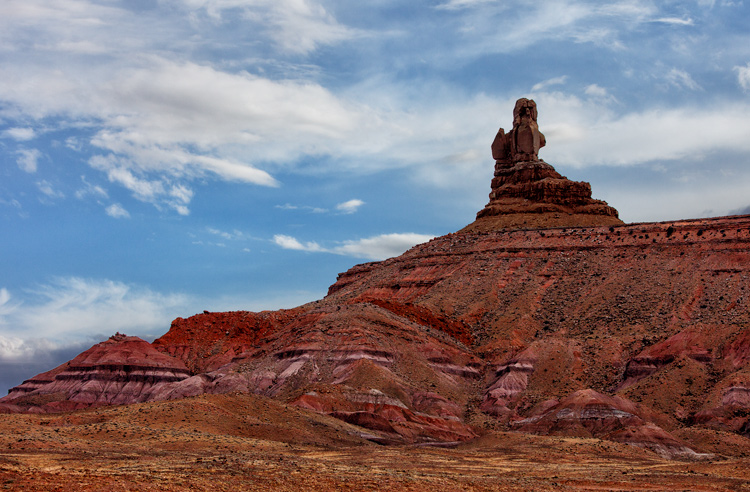
Photo of Monument Valley: Example of sky enhancement with Lightroom.

You take a photograph of a scene that includes a beautiful blue sky with puffy white clouds. You look at your LCD after taking the photo only to see that the sky your camera captured is not what you see in front of you. Instead, your camera captured a washed-out-looking sky with little or no detail. It looks overexposed. What to do?

You could take another picture, reducing the exposure so that the sky looks better. But if you do that, the foreground will be underexposed and maybe even black. So what now?

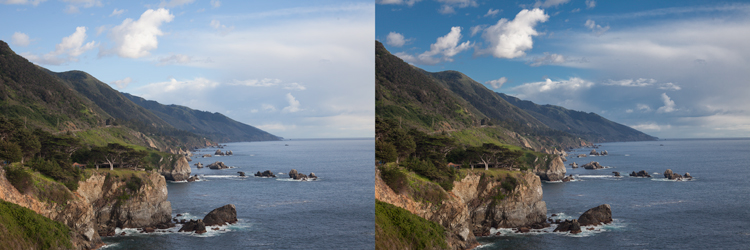
There is good news here, and it is that Lightroom can fix this problem easily and incredibly quickly. In fact, there are three quick steps you can take in Lightroom that will each dramatically improve the daytime sky in your pictures. They are all dead simple. You can do any one of the steps, or do all three together. Even if your sky already looks pretty good, and you just want a minor enhancement, these steps will help.

Photo of Big Sur: Example of sky enhancement using Lightroom

1. Darken the Blues

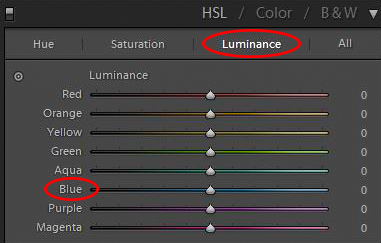
The first move you should make is to darken the blue tones in your image. This is simple to do in the HSL/Color/B&W panel in Lightroom’s Develop module. There you will see a number of sliders that control individual colors. You can adjust the hue, the amount of saturation, or the luminance of these colors. Use the sliders – specifically the  blue slider – to affect only the blue tones in the image and reduce the brightness of those tones. Just find the slider marked Blue, make sure that the panel is set to change Luminosity, and pull the slider to the left. There is no set amount or range of values for this change, it will just depend on each picture.

HSL/Color/B&W panel in Lightroom's Develop Module

If you need more punch to the blues, change the setting above to saturation, and push the Blue slider to the right. This will increase the saturation of the blues in your image. For our purposes here, what is important to know, is that increasing the saturation of the blues will make the luminosity adjustment you just made have even more bite.

You should see a dramatic improvement in your sky, just with this one move. Sometimes it is all you need to do. But for additional improvements, read on.

Note: be careful not to go too far. Pulling one color to extremes can cause banding (separation of the colors into stripes, not a smooth transition) or image degrading. 

Photo taken from Seven Mile Bridge in the Florida Keys: Example of sky enhancement using Lightroom

2. Control the Highlights

It might have surprised you that our first move was not to tone down the highlights of the image. After all, that is where the problem lies. The sky is so bright that there is little detail in it, and a reduction in the highlights will target those tones and add detail.

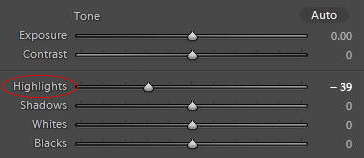
Highlights control in Basic panel of Lightroom's develop module

But recall that part of what makes a sky look great is deep rich blue tones combined with bright white clouds. If you crank down the highlights, yes, you will add detail to the clouds, but you will push the tones of the blues and whites together so that there will not be the strong contrast you want. That’s why we started with darkening the blue tones.

If there is already sufficient detail in your clouds, you do not need to do anything further. In fact, sometimes you may want to increase the Whites or the Highlights to create more contrast between the blue sky and white clouds.

Other times, however, your sky will still be too bright and the clouds will lack detail. In that case, it is time to tone down the brightest portions of the image to add some detail. Do that by pulling down the highlights of your image. You want to do just enough that you add detail in the sky, but not so much that your clouds turn grey. Let the histogram be your guide. Pull the Highlights slider to the left until any spike on the right side of your histogram moves to the left (use the Alt/Option button to see where the highlights are clipped). At the same time, you should be adding detail to your sky.

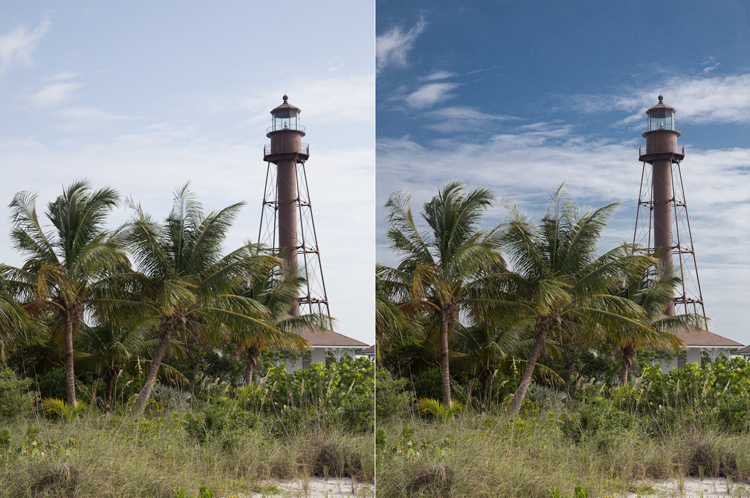
Photo of Lighthouse on Sanibel Island, Florida: Example of sky enhancement using Lightroom

3. Add a Blue Tint to the Sky

At this point, your sky should be looking very good. In fact, in most cases, the two moves above should be all you need. If you have a particularly flat and lifeless sky, however, you may need to break out the big guns. That means adding a tint to your sky.

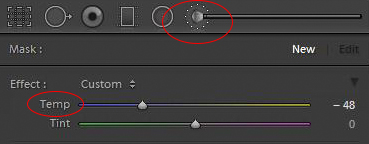
To do this, you will need to employ the Adjustment Brush (actually, you can use the Adjustment Brush for either of the two steps above, but you usually won’t need to). Click on the Adjustment Brush, then when the sliders for the brush appear, go to the White Balance ones at the top. Move the Temp slider to the left, which will increase the amount of blue in the image.

Adjustment brush and tint controls in Basic panel of Lightroom's develop module

Before you apply the brush to the sky, there is one important thing you need to check. Make sure the “Auto Mask” box at the bottom of the Adjustment Brush panel is checked. Doing so will limit the brush to the sky only. Once that is checked, go ahead and brush in the effect where you want it.

When you are done, you can adjust the effect by moving the blue slider (or any other sliders you might want to change). When you close the Adjustment Brush, the sky should be blue and look much better.

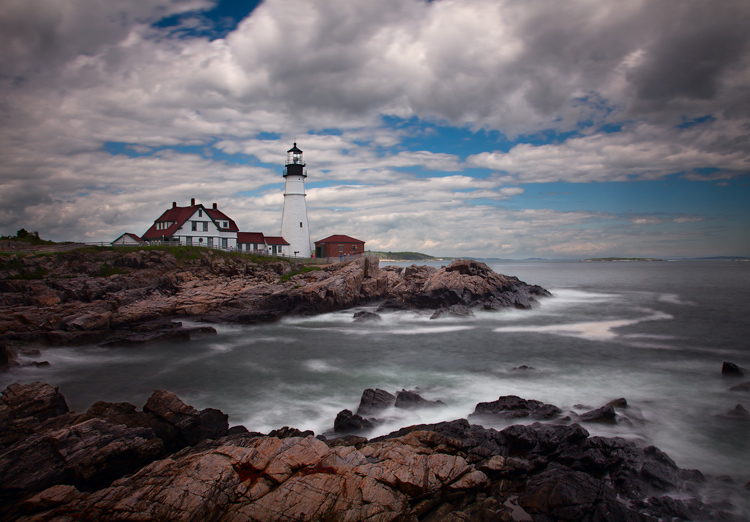
Photo of the Portland Head Light: Example of sky enhancement using Lightroom

Application

The old adage about “getting it right in-camera” still applies. Try to get your skies looking as good as possible in the field with proper exposure techniques. Further, if you have a polarizing filter, that will make midday skies look much better. You might also employ a graduated neutral density filter to tone down the sky and make it even with the foreground.

When these techniques won’t work, however, Lightroom can make your skies look dramatically better. Of course, you could also use blending or HDR techniques, but these can appear surreal and involve much more work. The same goes for a wholesale sky replacement.

So next time, use Lightroom to achieve the desired effect simply. You can use these steps along with your normal workflow to make your photos look even better.


Here on dPS this is landscape week – here is list of what we’ve covered so far. Watch for a new article (or two) on landscape photography daily for the next day or so.

  • 6 Tips for Better Low-Light Landscape Photography
  • Landscape Photography and the Human Element
  • 5 Ways a Telephoto Lens Can Improve Your Landscape Photography
  • Landscape Photography from the Side of the Road
  • 32 Majestic Landscape Photos to Inspire Your Wanderlust
  • Weekly Photography Challenge – Landscape
  • Landscape Photography – Shooting the Same Location Through the Seasons
  • How to Solve 5 Composition Conundrums Faced by Landscape Photographers
  • 6 Tips for Creating More Captivating Landscape Photographs
  • Tips for Getting Started with Urban Landscape Photography

googletag.cmd.push(function() {
tablet_slots.push( googletag.defineSlot( “/1005424/_dPSv4_tab-all-article-bottom_(300×250)”, [300, 250], “pb-ad-78623” ).addService( googletag.pubads() ) ); } );

googletag.cmd.push(function() {
mobile_slots.push( googletag.defineSlot( “/1005424/_dPSv4_mob-all-article-bottom_(300×250)”, [300, 250], “pb-ad-78158” ).addService( googletag.pubads() ) ); } );

The post 3 Simple Steps to Make Your Skies Pop in Lightroom by Jim Hamel appeared first on Digital Photography School.


Digital Photography School

 
Comments Off on 3 Simple Steps to Make Your Skies Pop in Lightroom

Posted in Photography


Photographing Starry Skies for Nocturnal Landscape Without Breaking the Bank

02 Aug
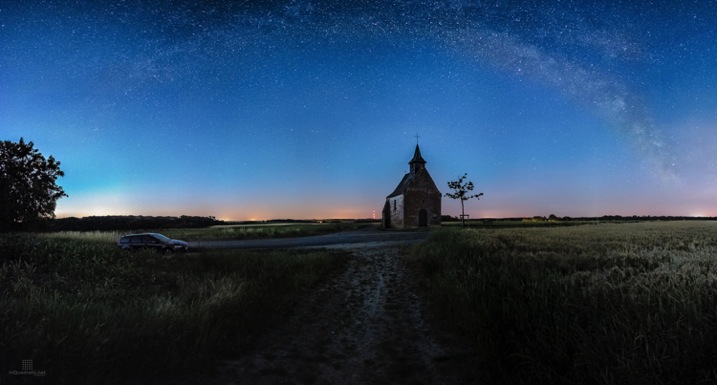
Photo01

Milky Way over the Belgian countryside – Sony RX100, 28mm equivalent f/1.8 + LPR (Light Pollution Reduction) filter, ISO 6400. Panorama composed of 12×3 frames, each frame is the image average of four different photos

Photography in low-light conditions is one of the most challenging things to do with a camera. In conditions with faint, moving, distant lights it is even trickier. There is something about a starry sky that simply inspires awe in all of us. And it does so more often since light pollution is getting worst all around the world. I wonder how many children have seen The Milky Way first hand.

Recently, night photography caught my attention because, it is convenient for me. It is the time my duty as father can be left to sleep alongside my son, and the photographer in me can go out hunting starry skies. What is not convenient, is that I live in Belgium. People may know Belgium for its massive variety of beer, but also sports one of the most light polluted skies in all of Europe (dare I say the world?). Don’t believe me? Check the image below, extracted from the Dark Site Finder website.
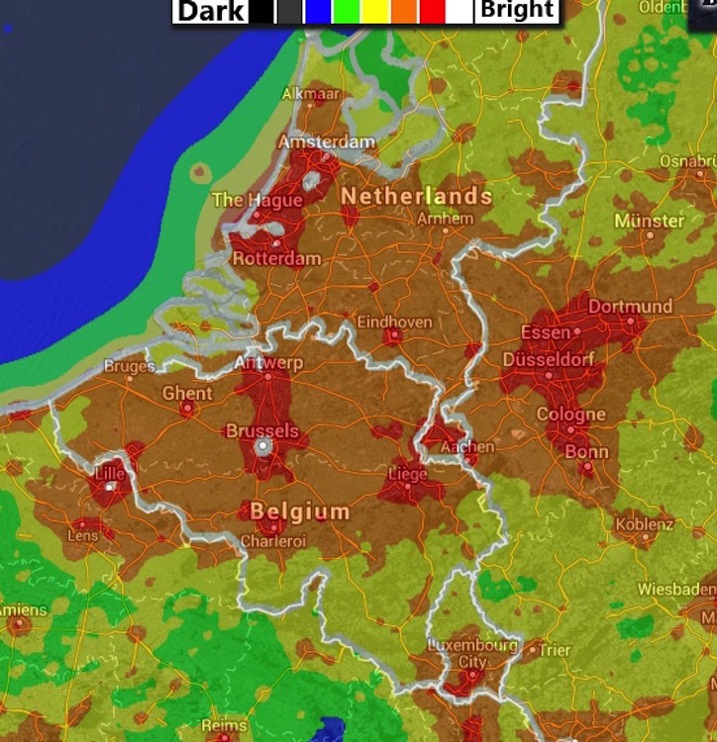
Photo02

Light pollution in Belgium (Source: Dark Site Finder)

As you can see, in Belgium the most you can hope for is a moderately dark sky, somewhere between typical urban suburbs and rural skies. This is mostly due to the presence of street lights lighting up almost all of the Belgian road network. Unfortunately, true dark skies are among the rarest gems in Europe: small, precious, and hard to find. Let me be clear here – nothing beats a truly dark sky and a clear atmosphere when it comes to photographing the stars.

But fear not – we can still get some pretty photos of starry nights with a bit of patience and the right gear.

Astrophotography versus nocturnal landscape

There are two main kinds of night photography that involve the starry sky: astrophotography and nocturnal landscape photography.

The first, in my view, is the attempt to photograph distant objects in the sky (planets, nebulae, galaxies) with no landscape. This kind of photography is usually achieved by using a camera mounted to a telescope (or to a long telephoto lens), all mounted on a motorized head on a tripod. Objects in the sky move pretty fast, so if you cannot track their movement with some sort of tracking device, you will not get many astrophotos. This kind of photography has its own challenges, but it is pretty straightforward: get a telescope, a tracking head, a sturdy tripod and you are pretty much done. A number of filters are also available to enhance the view of nebulae, planet and galaxies, as well to suppress the sky glow and punch through light polluted skies.

Nocturnal landscapes, instead, are another kind of beast entirely – the main problem is that you have the stars moving (fast!) across the fixed landscape. If your exposure is too long, stars will stop appearring as dots, and will begin to become trails. And you cannot track their movement or the landscape will be blurred. Here is the difficulty – you are trying to photograph in low light faint, distant lights and you want to do that as fast as possible (except if you do want to photograph star trails). The technical steps you have to adopt in order to capture a nocturnal landscape may vary depending if you want record star trails or not, and on the darkness of the sky above you.

What you cannot (easily) control: The ideal conditions

Ideally you want to have:

  • The darkest sky possible above you
  • A clear, moonless night (few clouds are allowed)
  • A clear and thin atmosphere
  • An interesting view or foreground

Remember, you are still doing landscape photography. A boring landscape with a dark, empty foreground will ruin even the most majestic of skies. You need to balance both parts to get a keeper.

What you can control: The ideal gear

Ideally, money is one of your last concerns and you have a digital full frame camera (oh what the heck, let’s take a digital medium format camera, even better) with excellent ISO capabilities and a set of fast (ideally f/1.4 to f/2.8) and sharp lenses to put in front of your sensor. Also, you need a sturdy tripod and head, a remote shutter, a headlamp (to see what you are doing) and strong lights (or even off-camera flashguns if you are brave enough) to do some light painting.

If you are like me, and money is a constraint, you can get away with any camera able to shoot at 3200 ISO (while still retaining some image quality) in RAW format. But you will still need fast glass (a lens with a large maximum aperture), anywhere from f/1.8 up to f/3.5.

To give you an idea, below there is the list of my current gear for nocturnal landscape photography:

  • Olympus OM-D EM–10
  • Samyang 7.5 f/3.5 UMC fisheye (Micro Four Thirds) – equivalent to 15mm on full frame
  • Samyang 12 f/2.0 NCS CS
  • Sigma 30 f/2.8 Art DN
  • Sony DSC-RX100 M2 (yes, a compact camera)
  • Manfrotto 055XPROB + ball head
  • MeFoto + ball head with uncoupled pano movement
  • Spare SD memory cards and batteries
  • Remote shutters with intervalometer

Nocturnal Landscapes with star trails
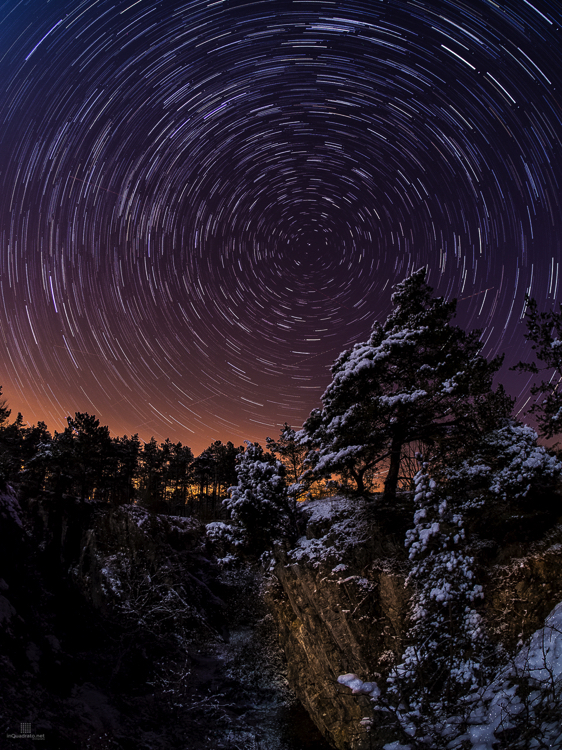
Photo03

Star trails (Stack of 60 frames taken with Olympus OM-D EM–10 + Samyang 7.5 f/3.5 fisheye lens)

The easiest nocturnal landscape you can take is one with star trails, mainly because you are not trying to fight the sky’s rotation (well, technically the Earth’s rotation). Instead, use this to your advantage to create striking images, in particular if you can get the North Star in the frame, so that you will end up having concentric star trails, all centred on the North Star (assuming you are in the northern hemisphere, of course).

In principle, all you need to do is: compose your scene, focus on infinity, set the camera in BULB mode and go grab some coffee. The longer you let the camera register the scene, the higher the number of trails you will record; and they will be longer and more continuous. Practically however, you do not want to do that because the noise due to the overheating sensor (hot pixels) will degrade the quality of the final image. You are better off by taking many shorter exposures (30 seconds each) and stack them later using software like StarStax or similar. This will allows you to keep the digital noise under control, with the downside of recording a great number of images to process later. Be sure you have a high capacity SD card that is empty, and your battery is fully charged before you start taking the sequence. An intervalometer is a must in order to set the appropriate number of shots to take, and the time interval between them. Never touch your camera until the end of the shot sequence.

In summary, get an interesting composition and fire at will. It does not require much more than that. You can even do cityscapes with star trails, like the shot below; this is a view over the city center of Brussels (Belgium), from the roof of my building.
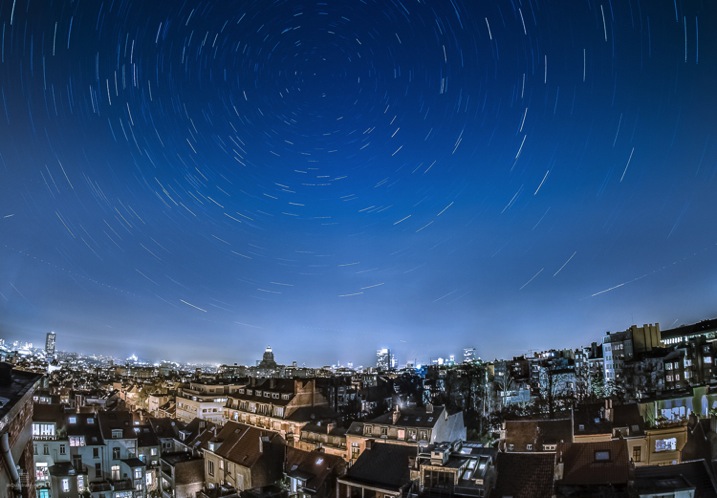
Photo04

Star trails over Bruxelles, Belgium. (Stack of 400 frames taken with Olympus OM-D EM–10 + Samyang 7.5 f/3.5 fisheye lens)

With cityscapes there is the extra difficulty of not blowing out the city lights, which are much brighter than the sky. Graduated filters may be of great help if you have a distant, flat horizon. Else, just expose (to the right) for the city and hope for the best, but some stars should show through. Mind your exposure time will be short because of the bright cityscape, so be prepare to shot a lot of frames (note the number for the shot above).

Nocturnal landscapes without star trails

Basically, the Holy Grail is getting a bright, sharp, colourful, and structured image of the Milky Way to shine across your landscape. This is the most difficult task and requires much more thinking that just doing star trails.

  • Size matters – the Milky Way is huge, so you need an ultra wide angle, or a fisheye, lens to fully capture our galaxy
  • Time matters – you want to get a sharp image of the sky, meaning you should avoid recording the stars movement. There are a couple of mathematical relations that can be used to estimate the longest time you can record the scene at a given focal length (or the equivalent in 35mm if you have a cropped sensor) before stars begins to form trails. These are called 600 and 500 rules: the longest time you can record the image is given by the following equations:Exposure time (t) = 600 / Focal Length OR Exposure time (t) = 500 / Focal LengthWhere the 500 rule is the most conservative of the two. Once you get the maximum exposure time (t) for your chosen focal length, it is just a matter of setting the proper aperture and ISO settings to match it. Usually you will need to use a larger aperture (small f-number), a good starting point for setting the proper ISO value is given by the following equation:

ISO = (6000 * f^2) / Exposure time  – f^2 means the f-number to the power of two

For example, with my Samyang 12mm f/2.0 on my Olympus OM-D (crop factor 2x), in order to get a good sky I should use a shutter speed no longer than: Exposure time = 500/(12*2) or approximately 21 seconds.

Assuming I go for the widest aperture, I should use an ISO value of about:  ISO = 6000 * (f2.0 to the power of 2 = 4) / 21 = 1142 or rounded up to ISO 1150. 

If, say, the aperture was set to f/4.0 instead of f/2.0, the ISO will need to be: ( 6000 * (4.0 ^2)  / 21 OR ( 6000 * 16 ) / 21 = 4571.

With this in mind, it is obvious that wider and faster your lens is, the easier it will be to record a good sky. This will also allow you to use a relatively low ISO, to keep the digital noise as low as possible. The shot below is one of my first attempts to capture the Milky Way. It has been done with my OM-D EM–10 with the Samyang fisheye at f/3.5, ISO 1000 with a shutter speed of 40 seconds, under a fairly dark sky (for Belgian standards).
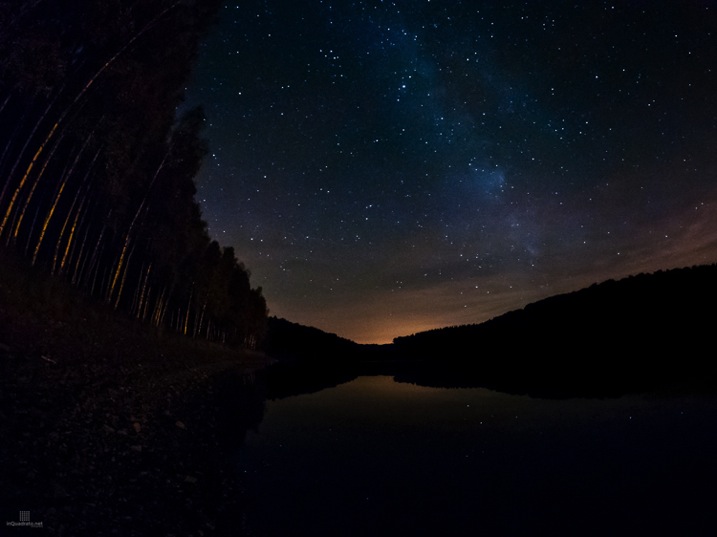
Photo05

The Milky Way in the winter Belgian sky (Olympus OM-D EM–10 + Samyang 7.5 f/3.5 fisheye lens)

Doing nocturnal landscape panoramas

As if the things were not already complicated enough, sometimes a single shot is not enough; either because it is not wide enough, or because you want to produce really large prints and you need to have a file with a resolution larger than that of a single photo. Sometimes you want to do a nocturnal panorama and that means taking different images and merging them later to form a panorama. The only difficulty is that you need to be precise in the camera movements and work as fast as possible to avoid large star movements between one photo and the next. In my experience it is also best to use a wide lens, like a 28mm (in 35 or full frame format) or wider. This because software struggles to automatically stitch together photos containing only stars and no big, fixed points, like a part of a rock or a tree, and also because longer focal lengths will require a greater number of frames to stitch together to cover the same view. For seamless stitching of the different frames, it is best to allow a superposition between the frames in the order of 30–50%.

To help you to work fast, note the vertical and horizontal angles of view for your lens and your camera before heading out. A great tool for this is the Angle of View Calculator. Once you know the vertical and horizontal angles of view you can move precisely and fast with your camera by using the graduated scales on you tripod head.
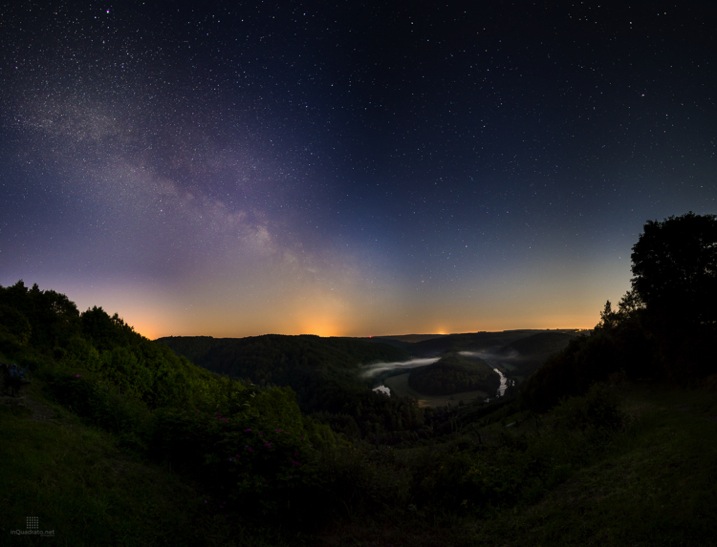
Photo06

The Milky Way over the Belgian Ardennes – Olympus OM-D EM–10 + Samyang 12 f/2.0; panorama composed of 12 (4×3) photos.

Fighting the evil orange glow: LPR filters

Light pollution is, unfortunately, a sad reality in many countries. It is not always possible to be under your dream sky and you have to try to deal with light pollution and the resulting orange glow in the sky. As I mentioned when introducing astrophotography, some filters exist to help holding back light pollution by absorbing light of specific wavelengths: in particular, broad band Light Pollution Reduction (LPR) filters try to reduce the orange glow by absorbing the light emitted by streetlights used in cities and on roadways. Those lights are from low and high pressure sodium lamps, which emit light at around 583nm; this light is cut by the LPR filters. The transmission spectrum for my Sky-watcher LPR filter is shown below.
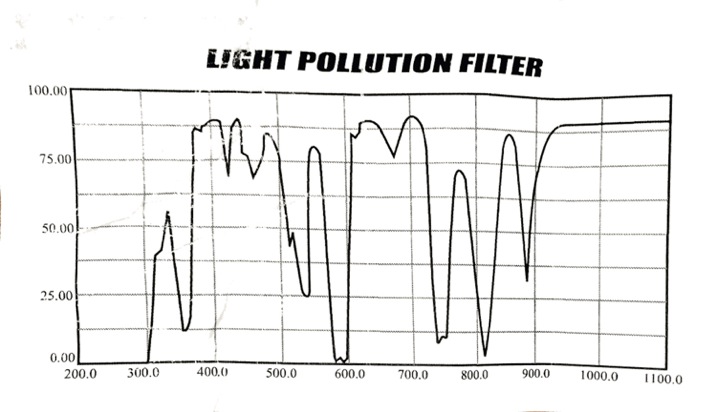
Photo07

Typical transmission spectrum of a broadband LPR filter.

There are many kinds of filters and light polluting sources so you have to find the right filter to suppress or reduce the kind of light in your location. At the moment, here in Belgium, I am happy with the Sky-watcher LPR filter. There are several manufacturers who produce different filters to suit different equipment, as well as large and small wallets. Just have a look for Sky-watcher LPR and UHC filters or Astronimik CLS filters just to name two options.

Do the filters really help in the field? It depends on the kind of light pollution, and also on the amount of pollution versus ambient light. I found that in some circumstances the filter clearly helps, and the non-filtered image cannot be saved in post processing. Other times, the filter seems to be less important. Anyway, with a polluted sky I’d say the filter does help. The image below shows the effect of the filter on street lights compared to using no filter; in both cases you can see the RAW and edited image. They should speak for themselves.
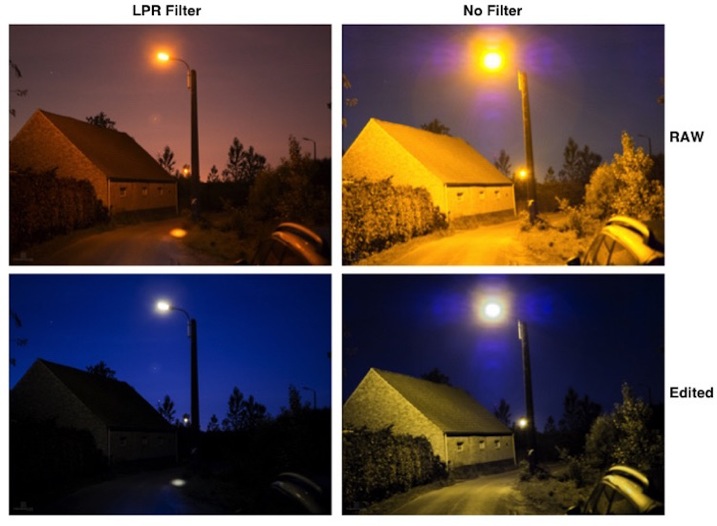
Photo08

Comparison between test shots with and without an LPR filter

Note there are some downsides to the use of this filter. First, it darkens the scene of about one stop (the images above are taken at the same exposure value by using a slower shutter speed when the filter was in use), and it does not work with wide angle lenses. This is because it is an interference filter, and cannot handle light coming in with very different angles, like when using a wide angle – it will generate banding on the image that is difficult or impossible to remove. The solution is using lenses with an equivalent focal length of about 30mm or more and shoot a panorama.

Having to deal with a one stop loss of light, and the use of lenses with a relatively long focal length is challenging, in particular if the lenses you have are not very fast, but it is worth giving the filter a shot.

A final word of caution: cheap LRP filters like mine come usually in sizes of 1.25” or 2” in diameter, and the most suitable diameter of the two is 2”, which corresponds to a 48mm threaded filter. This size suits very well many lenses for micro four thirds camera, such as the Panasonic Lumix 14mm f/2.5 and Lumix 20mm f/1.7, old Zuiko legacy lenses, Sigma 19 and 30 f/2.8 and so on. With larger lenses the amount of vignette you will get will probably make it impossible to produce a useable panorama.

Because my fastest, not too wide lens, is the wide end of the zoom on my Sony DMC-RX100 M2, which is equivalent to a 28mm f/1.8, I decided to play along and use it to photograph the Milky Way. I went to the Chateau de la Hulpe, in La Hulpe (Belgium), which is located a few miles from Bruxelles, under a heavily polluted sky (even for Belgian standards) and I made a 8×4 panorama of the Castle under the Milky Way. I fitted the camera with the LPR filter and shot 18, 20 second long, exposures at f/1.8 and ISO 6400. To contain the digital noise, each frame used for the panorama is the result of image averaging two shots. The result is shown below. I think it is not bad at all and that there is still plenty of room for improvement.
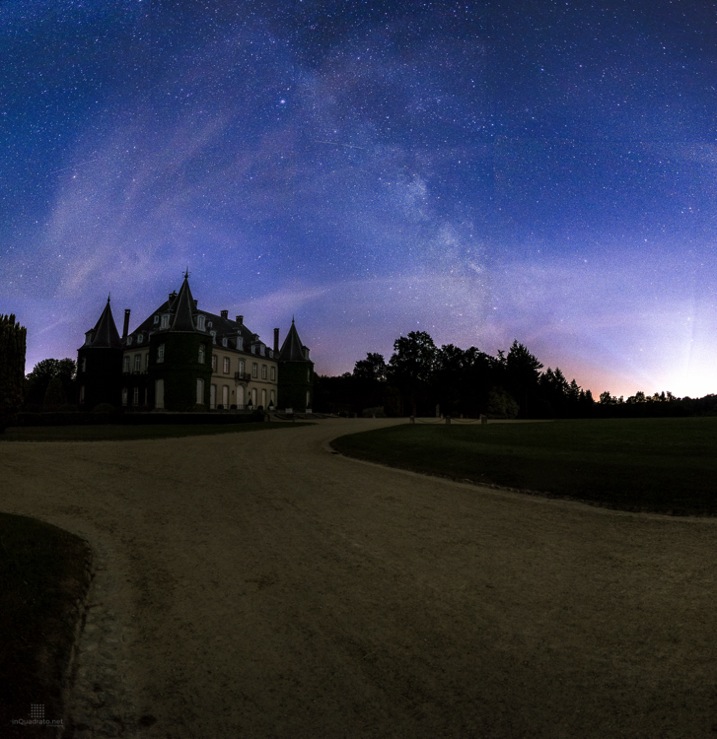
Photo09

The Milky Way in the Belgian heavily light polluted sky – Sony DMC-RX100 M2 at 10.4mm (equivalent to 28mm on full frame camera) and f/1.8 + LPR filter; panorama composed of 32 (8×4) frames.

In summary, don’t give up just yet, if you live in a light polluted area; with a bit of luck (and gear) there is hope, even in the orange glowing sky.

Disclaimer: I am not associated in any way with Skywatcher, Astronomik, Panasonic, Olympus or with any of the other brands I have mentioned in this article.

googletag.cmd.push(function() {
tablet_slots.push( googletag.defineSlot( “/1005424/_dPSv4_tab-all-article-bottom_(300×250)”, [300, 250], “pb-ad-78623” ).addService( googletag.pubads() ) ); } );

googletag.cmd.push(function() {
mobile_slots.push( googletag.defineSlot( “/1005424/_dPSv4_mob-all-article-bottom_(300×250)”, [300, 250], “pb-ad-78158” ).addService( googletag.pubads() ) ); } );

The post Photographing Starry Skies for Nocturnal Landscape Without Breaking the Bank by Andrea Minoia appeared first on Digital Photography School.


Digital Photography School
 
Comments Off on Photographing Starry Skies for Nocturnal Landscape Without Breaking the Bank

Posted in Photography


Vertical Cities: 12 Towers Take Urban Density to the Skies

18 Jun

[ By Steph in Architecture & Cities & Urbanism. ]

vertical cities singapore futuristic

Taking advantage of virtually endless vertical space within urban centers, entire cities-within-cities could spring up into the skies, packing in thousands of new housing units as well as parks, recreational space, offices, shops and everything else you’d expect to find on a typical block. These 12 residential skyscraper designs build up instead of out, often using staggered or stepped arrangements of stacked modules to maintain air circulation, access to daylight, and views. Rather than creating closed class-based communities, most make their communal spaces open to the public, and reserve the ground level for greenery.

High-Rise High-Density Tropical Living in Singapore
vertical cities singapore futuristic 2

How do you pack 100,000 people into a square kilometer without sacrificing quality of life? WOHA’s entry into a competition to design a vertical city for Singapore devised a greenery-laden ‘lattice city’ made of staggered modules. This porous arrangement ensures that all levels get plenty of fresh air and daylight, free up the ground level for nature reserves and heavy industry, and weave social spaces throughout. The plan was created to be walkable, but large elevators and people movers can zip inhabitants vertically and horizontally as needed.

Stacked Modules in Vancouver

vertical cities geometric extruded 1

vertical cities geometric extruded

vertical cities geometric extruded 3

Conceived for Vancouver, this design by Ole Scheeren is made up of stacked rectilinear modules that poke out of the main tower at various angles, projecting the living spaces outward to mimic the spacious feel of living on the ground and create cantilevered terraces. The aim is to reconnect architecture with the natural and civic environment, encouraging social interaction between inhabitants.

Vertical Village in Singapore by OMA

vertical cities singapore village

vertical cities singapore village 2

Condo units that would take up a lot of space if there were all placed on the ground are instead stacked in hexagonal arrangements for The Interlace, a residential project by Ole Scheeren/OMA. 31 individual six-story blocks come together to create a network of both private living spaces and communal areas, with eight large courtyards and various terraced gardens.

Vertical City in Jakarta

vertical cities jakarta

vertical cities jakarta 2

vertical cities jakarta 3

The city of Jakarta in Indonesia is in need of both higher density housing and green space – but designs like these prove that you don’t have to choose. MVRDV has designed a 400-meter-tall tower called Peruri 88 that integrates housing, offices, retail, a luxury hotel, parking, a mosque, an imax theater and more into what is essentially its own city within the city.

Next Page – Click Below to Read More:
Vertical Cities 12 Towers Take Urban Density To The Skies

Share on Facebook


[ By Steph in Architecture & Cities & Urbanism. ]

[ WebUrbanist | Archives | Galleries | Privacy | TOS ]


WebUrbanist

 
Comments Off on Vertical Cities: 12 Towers Take Urban Density to the Skies

Posted in Creativity


Secret Skies: See Starry Nights Normally Hidden by City Lights

03 May

[ By WebUrbanist in Art & Photography & Video. ]

sky glow

With the rise of urbanization, an estimated 80% of the world population has never seen the Milky Way – and while rural dwellers see thousands of stars on a typical night, those in cities typically see a few dozen at best.

night sky la overloook

time lapse anitmation

As part of their Skyglow project, astrophotographers Harun Mehmedinovic and Gavin Heffernan taking pictures from around the country in darkened areas where the night sky is visible, in some cases turning them into true-to-life composites showing what the skies above cities would look like with the lights turned off. In other instances, their timelapses show the rotation of Earth against the sky.

night sky images

night sky timelapse

night urban swirl

Urban light pollution is not just a problem of lost views – it has been known to interfere with bird migrations and other animal behavior, not to mention sleep disorders and disease correlations in humans. Cities like Phoenix, Arizona, are trying to take back the night sky, dimming non-essential artificial lights to cut energy consumption.

You can support the project on Kickstarter for rewards as well: “SKYGLOW will also explore the evolution of our relationship with astronomy over time, including the impact of stars on imagination, mythology, and the sciences. By visiting incredible archaeoastronomy locations like Canyons of the Ancients, Chaco Canyon and Mesa Verde, SKYGLOW will explore the relationship between ancient civilizations and the galaxies they worshiped. Can we learn from them? “

Share on Facebook


[ By WebUrbanist in Art & Photography & Video. ]

[ WebUrbanist | Archives | Galleries | Privacy | TOS ]


WebUrbanist

 
Comments Off on Secret Skies: See Starry Nights Normally Hidden by City Lights

Posted in Creativity


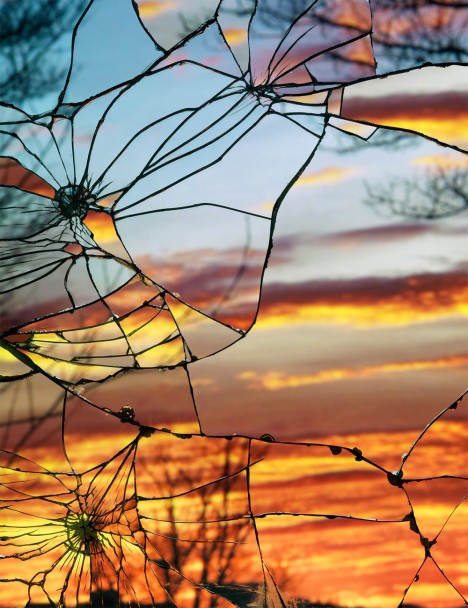
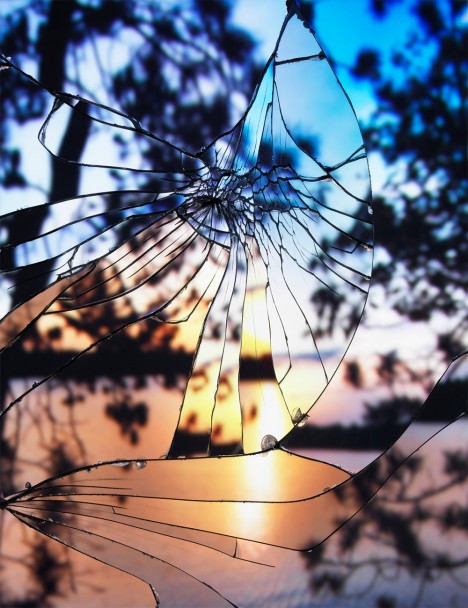
Shattered Sunsets: Broken Mirror Photos of Evening Skies

25 Apr

[ By WebUrbanist in Art & Photography & Video. ]

broken mirror sky clouds

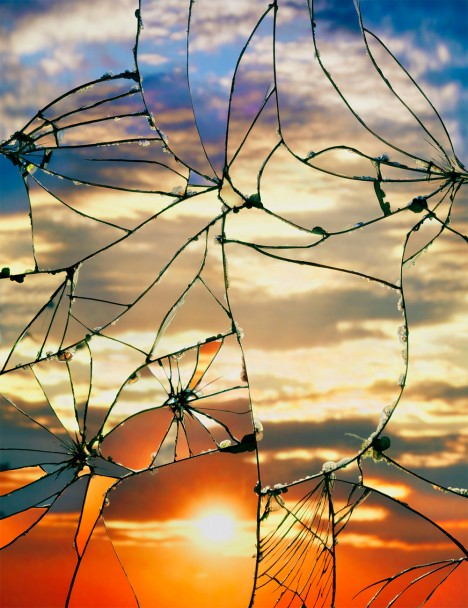
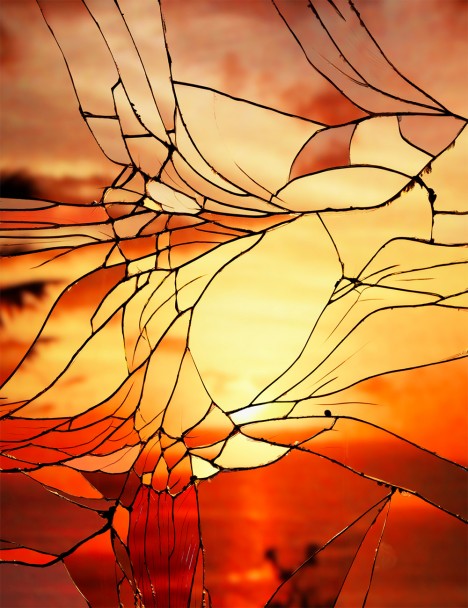
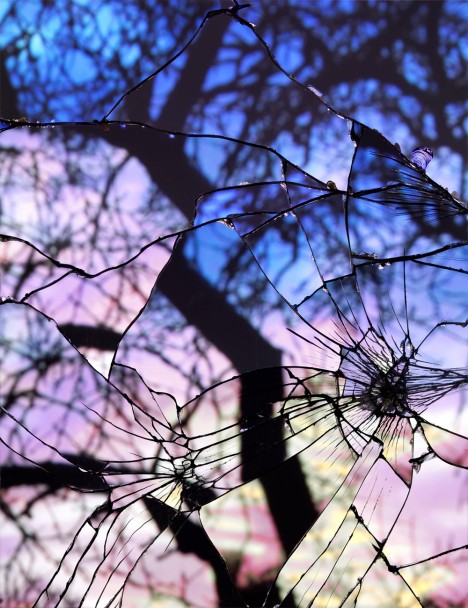
Spanning multiple feet in each direction, these giant-sized photo prints transform the light and color of ordinary sunset scenes, reflecting them through a chaotic lens of unpredictable distortions.

broken mirror evening sky

Bing Wright, a New York photographer, exhibited this series of abstract stained-glass-like landscapes of water, trees, clouds and sky earlier this year at the Paula Cooper Gallery.

broken mirror sunset photo

broken mirror orangered

Titled Broken Mirror /Evening Sky, the set represents a break from his black-and-white work of the past decade, dealing with issues of “depth of field, scale, surface and materiality” and of course: color.

broken mirror reds oranges

broken mirror blues purples

The result is a disjointed set of overlapping refractions and out-of-focus subjects that our mind then works to piece back together, and which compels us to consider the color before completely comprehending the composition.

broken reflection photo series

broken mirror whites blues

About the artist: “Bing Wright was born in Seattle in 1958 and received a Bachelor of Arts in Art History from Columbia University, New York. His work been shown in exhibitions at the New Museum, New York; White Columns, New York; the Queens Museum of Art, New York; and the Tang Museum and Art Gallery, Saratoga Springs, among others.”

Share on Facebook


[ By WebUrbanist in Art & Photography & Video. ]

[ WebUrbanist | Archives | Galleries | Privacy | TOS ]


WebUrbanist

 
Comments Off on Shattered Sunsets: Broken Mirror Photos of Evening Skies

Posted in Creativity


Sucking Smog: Electronic Vacuum Cleaner Clears City Skies

18 Nov

[ By WebUrbanist in Conceptual & Futuristic & Technology. ]

clean air smog vacuum

It sounds so preposterous and yet is sufficiently plausible that its designer is now talking to the mayor of Beijing about how to develop for urban use in this notoriously congested capital of China.

Daan Roosegaarde developed a system using buried coils of copper to create an ion electrostatic field that attracts smog particles, effectively magnetizing them and pulling them down. The result is sizable void of clean air above.

clean air beijing smog

While it cannot yet work on a city-wide basis, the idea is to begin by clearing hundreds of feet of air in key public spaces like parks, squares and other paths trafficked by pedestrians.

clean air beijing cctv

They have already prototyped a device that can suck a square meter of polluted air from a larger interior space, effectively punching a hole in a simulated cloud of smog and collecting the resulting particles safely below.

clean air city streets

The designer puts the problem and project in context: “We have created machines to enhance ourselves. We invented the wheel and cars to liberate ourselves and travel. But now these machines are striking back, making air polluted in high-density cities like Beijing.”

clean air process diagram

Their “young design firm based in the Netherlands and Shanghai, [which] has been working on intricate designs like a sustainable dance floor which generates electricity when you dance, and smart highways which produce their own light. Now [Daan Roosegaarde] and his team of engineers are creating a technology to clean the air of Asian cities.”

Share on Facebook


[ By WebUrbanist in Conceptual & Futuristic & Technology. ]

[ WebUrbanist | Archives | Galleries | Privacy | TOS ]


WebUrbanist

 
Comments Off on Sucking Smog: Electronic Vacuum Cleaner Clears City Skies

Posted in Creativity


Clear Skies Ahead: Quest for a Complete Global Aerial Atlas

13 Sep

[ By WebUrbanist in Conceptual & Futuristic & Technology. ]

altas generation stack algorithm

If you have ever zoomed out in Google Maps (or Mapquest, Yahoo or Bing), you may have been surprised find your field of view relatively unclouded by inclement weather patterns, yet marred by strange and inconsistent seasons. Instead of a continuous satellite view, you see an apparent patchwork quilt of misfit images, incoherently stitched together.

atlas global clouded default

MapBox (which powers FourSquare among other services) is on a mission to make satellite images not only more beautiful but also more consistent and comprehensible. Their task begins with eliminating blurry landscapes, strange seams and the surreal endless summer you see on other aerial images of the globe, but the potential scope of the project goes far beyond that as well.

atlas stacked pixel maps

Talking to Wired, Charlie Loyd describes how the company is sifting through data from Terra and Aqua, two orbiting NASA satellites, to solve this problem pixel by pixel: “For the new release we’re processing two years of imagery, captured from January 1, 2011 through December 31, 2012. This amounts to over 339,000 16-megapixel+ satellite images, totaling more than 5,687,476,224,000 pixels. We boil these down to a mere 5 billion or so.”

atlas consistent cloud free

The industry paradigm is to combine parts of images representing the clearest available shots, but the result can create a clash of color from various seasons. Simply overlapping all of the different possibilities creates a mess of indistinct brown, which is not terribly attractive or useful either. Thus a middle road was found: stacking the images, sorting them by cloudiness, selecting pixels from each picture and filtering around peak growth periods. The result is a consistent yet naturally texture-rich whole both synthetic in composition yet ultimately organic in origin at the same time.

atlas mapbox future potential

The goal for now is to create a single seamless atlas that wraps the world, accurately (but with an eye towards aesthetics) reflecting what the planet actually looks like from above while also being useful in real-life mapping. Future potential iterations, however, could evolve beyond just looking and working best in traditional contexts: “If you do a web search for, say, infrared remote sensing, you’ll get an idea of the richness of possibilities, and you can start to imagine the cross-cutting inquiries that these large, open archives of multi-spectral satellite data enable,” writes Loyd. “Glaciers, wildfires, crops, droughts and floods, cities and forests, surface temperature, plankton blooms, seasonal dynamics, even smog –- it’s all there. It just needs a little work to see clearly.” 

Share on Facebook


[ By WebUrbanist in Conceptual & Futuristic & Technology. ]

[ WebUrbanist | Archives | Galleries | Privacy | TOS ]


WebUrbanist

 
Comments Off on Clear Skies Ahead: Quest for a Complete Global Aerial Atlas

Posted in Creativity


Perfect Pitch: Impossibly Starry City Skies in Blackest Night

22 Apr

[ By WebUrbanist in Art & Photography & Video. ]

pitch black skies

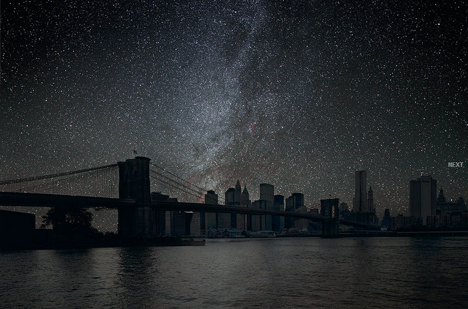
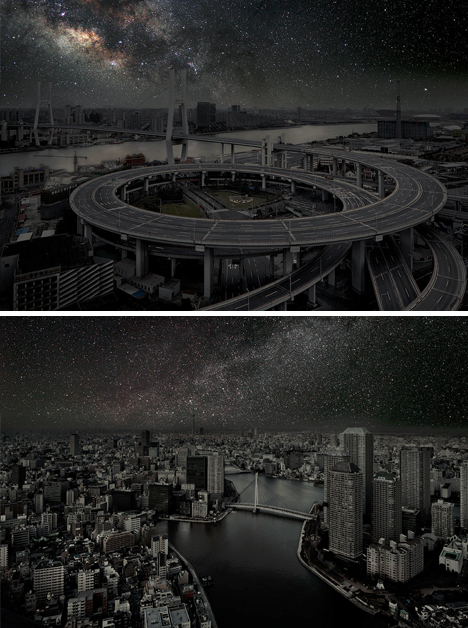
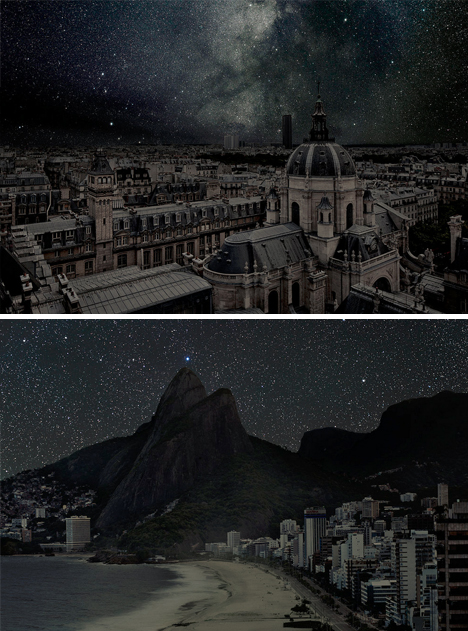
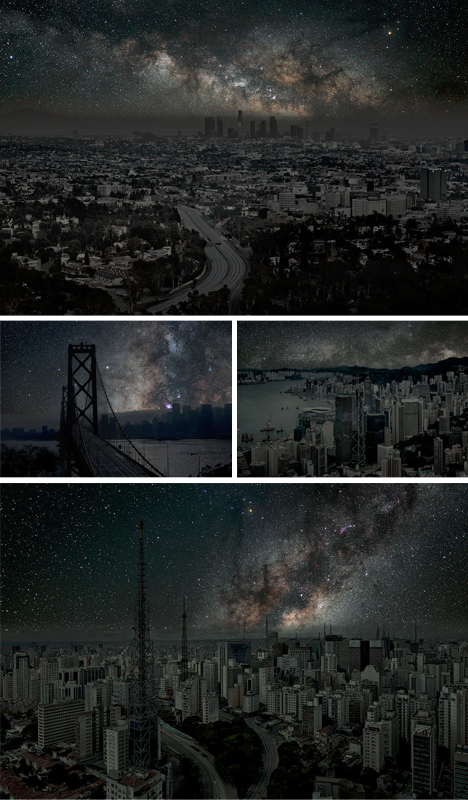
Massive power outages give us rare glimpses of darkened cities, but in normal conditions, there is simply no way to see the starry skies above the typical urban metropolis – but one photographer has found a way to simulate them.

pitch black starry skies

Thierry Cohen uses a multi-step process to create stunning visualizations (dubbed Darkened Cities) of would-be, could-be sights from New York to London, Shanghai to Sao Paulo … ones that the ordinary eye will rarely or never see naturally.

pitch dark night space

Cohen takes a series of shots of each of the cities themselves, and carefully removes illumination from the equation. Night sky photos from the same latitudes (adjusted for time and angle) are then layered into the background, creating a seamless illusion.

pitch photo edited cities

The results are at once mesmerizing, revealing the unseen potential for views of space right where we live, but also somewhat depressing – these are scenes that no one can actually ever see outside of deserts, at least unless disaster strikes.

Share on Facebook


[ By WebUrbanist in Art & Photography & Video. ]

[ WebUrbanist | Archives | Galleries | Privacy | TOS ]


WebUrbanist

 
Comments Off on Perfect Pitch: Impossibly Starry City Skies in Blackest Night

Posted in Creativity


Enhancing Blue Skies in Lightroom

24 Dec

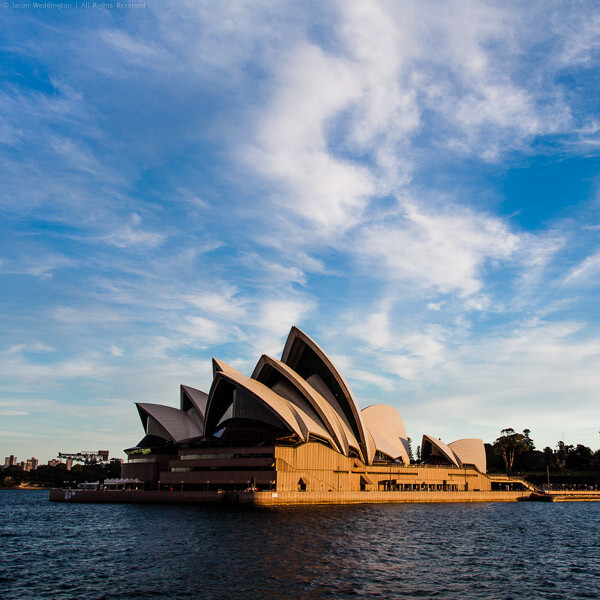
The Color control in Lightroom is a powerful tool for selective color adjustments. This tool allows photographers to adjust the hue, saturation, and luminance of individual color tones. One application of this functionality is enhancing blue skies:

Sydney Opera House

Photo of the famous Sydney Opera House with blue sky enhanced in Lightroom

How to Enhance a Blue Sky

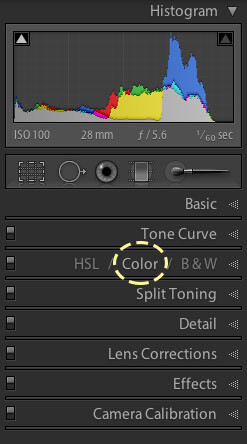
In Lightroom 4, the Color control allows separate control of red, orange, yellow, green, aqua, blue, purple, and magenta:

Lightroom 4 Color Controls

Lightroom 4 Color Controls

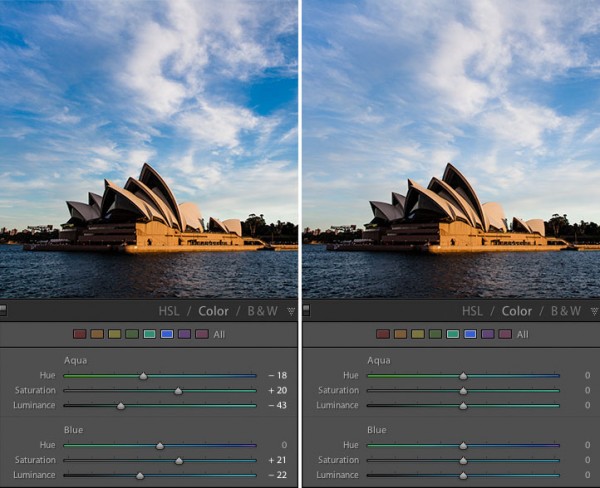
A quick way to emphasize a blue sky is to lower the luminosity and increase the saturation of the blues and aquas in the image:

Enhancing a blue sky in Lightroom

With and without color adjustments

For this image, here are the settings I used:

Aqua

  • Hue: -18
  • Saturation: +20
  • Luminance: -43

Blue

  • Hue: 0
  • Saturation: +21
  • Luminance: -22

Make a Develop Preset

For extra credit, save these settings as a develop preset so that you can quickly apply them later. Note that settings that work to bring out the sky in one photo won’t be perfect for all photos, but this should give you a good starting point.

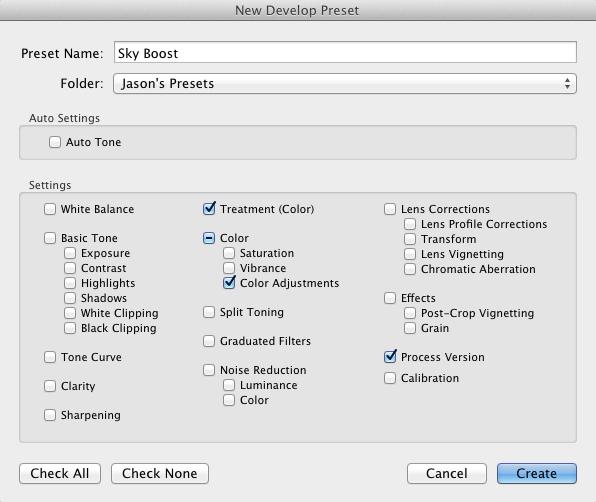
Here are the settings you need to capture for a sky enhancing preset:

Creating a Lightroom Develop Preset

Settings for a sky-enhancing Lr preset

For more detailed information on creating Lightroom Develop Presets, check out this post: 5 Tips for a Faster Lightroom Workflow.

I hope this technique proves useful next time you have a sky that needs just a little more oomph. I’d like you hear your thoughts on this article, please comment below or feel free to connect with me through Facebook or Google+. I’ll do my best to answer questions and reply to comments.

Post originally from: Digital Photography Tips.

Check out our more Photography Tips at Photography Tips for Beginners, Portrait Photography Tips and Wedding Photography Tips.

Enhancing Blue Skies in Lightroom


Digital Photography School

 
Comments Off on Enhancing Blue Skies in Lightroom

Posted in Photography