RSS
 

Posts Tagged ‘Simulate’

How to Simulate Long Exposure using Stacked Image Averaging

18 Aug

The post How to Simulate Long Exposure using Stacked Image Averaging appeared first on Digital Photography School. It was authored by Rick Ohnsman.

Silky water effects, streaked clouds, motion-smoothed with an ethereal look; long exposure photography seems to be in vogue as photographers discover the looks that can be created. There are multiple ways to achieve this. The most basic is to buy a standard neutral-density photography filter which cuts the light, allowing you to use long shutter speeds without overexposing your shot. You can achieve exposures minutes long, especially when using 10-stop ND filters like the Lee Big Stopper or even the 15-stop Super Stopper.

I recently did an article on an alternative way to make long exposure photos, “Try this DIY Neutral Density Filter for Long Exposure Photos.” I encourage you to read the piece and learn how a piece of welding glass can be a budget substitute for more expensive photographic ND filters.

simulate-long-exposure-stacked-image-averaging

This is the same location I used for some of the other shots in this article but taken when the river was much higher and faster. The biggest difference is that I used DIY welding glass ND filter to achieve this shot. See my other article for this technique.

This article teaches you a third method of making long-exposure images with no filter at all. Unlike the welding glass trick which pretty much requires your final image to be monochrome so as not to have to fight the heavy color cast, this works great in full color, with no filter at all, and no color cast present. It’s a great method to simulate long exposure.

The technique uses a stack of multiple images of the same scene then processed with a Photoshop process called Image Averaging. It’s really quite simple and has some advantages over traditional methods with ND filters.

Advantages over the traditional ND filter method

When doing traditional long exposure photography with an ND filter you will be making long exposures.  (Duh!)  There are a few challenges with this:

  • If during the long exposure you bump the camera or things move in the shot you don’t want to be blurred, you will need to re-do the shot.
  • Long exposures can often be several minutes in length. Double the time if you also enable in-camera noise reduction. If it takes 2-minutes to expose and another 2-minutes for the noise reduction to work, you will only be making a shot every 4-minutes. This can really slow down your work, and if the light changes during that time, you could miss it.
  • With very dark ND filters, you won’t be able to see anything through the lens once the filter is in place. You will have to compose your shot, pre-focus, then mount the ND filter and make the image.
  • Determining exposure will take some calculation. You’ll check exposure without the filter then use a calculation tool to determine the new shutter speed the ND filter requires. Often this will need some tweaking after you see your shot and…yup, another re-do will be needed.
  • If back in editing you see the shots and wish you’d gone for longer or shorter shutter speeds to change the look, too bad. You’d have to go back and reshoot – if that is even possible.
Image: In fairly bright sunlight, even with the ISO at 50 and aperture at f/22, 1/5th of a second wa...

In fairly bright sunlight, even with the ISO at 50 and aperture at f/22, 1/5th of a second was as slow a shutter speed attainable while maintaining proper exposure. This was with no filter.

 The advantages of the Image Averaging method

The advantages of using the image stacking method are essentially the opposite of those things just stated above:

  • You’ll be making multiple images rather than one long one. If one of the images in the group has a problem, you may be able to eliminate it and use the rest to still successfully create the effect.
  • You can see what you’re doing! Not shooting with a dark filter means you’ll still be able to see, compose, use auto-focus, auto-exposure, and even image stabilization if you shoot handheld.
  • No calculation! Without the addition of a dark filter, you eliminate this step.
  • Adjust the length of your “simulated slow shutter” later in post-production. Want more or less blur? You can change your mind later.
  • Are conditions too bright for a standard long exposure shot? Maybe you only own a 6-stop ND filter, and daytime conditions are too bright to let you get the length of exposure you’d like. You can combine both methods to simulate a longer exposure than possible with the ND filter alone.
  • Are people in the shot you’d like to remove? Because they are likely to move during the multiple shots, when the averaging process takes place, they will vanish!
simulate-long-exposure-stacked-image-averaging

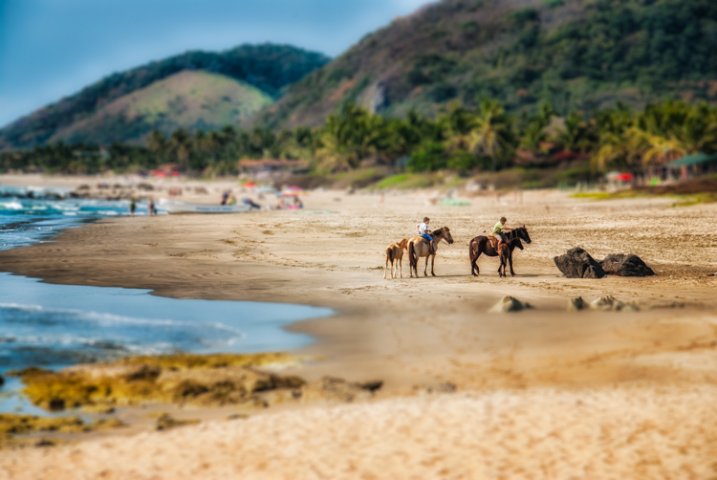
Make people disappear! Notice on the inset the people walking in the river, but on the completed shot, 15 images, each 1/5th of a second = 4 seconds simulated. They are gone.

Making the shots

Setting up and shooting the images you need for your image-averaged creation is much the same as any photography. Here are the factors and steps to keep in mind:

Composition still counts!

Because you introduce a long exposure blurred effect does not mean that you will have automatically created a good photo. Still consider how to carefully compose your image. Take into consideration that moving objects in the shot will blur and look simplified with less detail. Good long exposure shots often emphasize the contrast between static, non-moving objects (buildings, rocks, trees, etc.), and moving objects like clouds and water. Include both in your shot.

Shoot on a tripod

I mentioned you could do this handheld and, well…maybe you could. However, even with this technique, you will still want to shoot at the slowest shutter speed possible. That way, you won’t have to make too many shots for combining. Once you get much slower than 1/30th of a second (and faster than that if if you’ve just had coffee), handholding your camera is probably going to ruin your shots.

simulate-long-exposure-stacked-image-averaging

All Images ISO 50, f/22 . Top left – No filter – 20 images each 1/5 second = simulated total = 4 seconds. Top right – No filter – 35 images each 1/5 second = simulated total = 7 seconds. Bottom – 6-Stop ND filter – 15 images each 20 seconds = simulated total = 5 minutes.

How many shots?

This technique simulates long exposure by combining multiple shots.  The simple formula is:

(# Shots) x (Shutter Speed of each shot) = Total simulated shutter speed effect (in seconds)

Let’s plug some numbers into that and see the result.  Set your camera for the lowest ISO possible.  I can get my Canon 6D down to ISO 50.  Some cameras will have ISO 100 as the lowest.  Use whatever you can.  Set your aperture to the smallest aperture possible.  Meter with those settings and see how long you can make each individual shot and have it properly exposed.  Say we were able to do this in the shade: 1/4 second, f/22, ISO 50.  To get a simulated shutter speed of one minute (60 seconds), we’d need to make 240 shots.

240 shots x 1/4 second (.25) = 60 seconds

That’s a little unwieldy, and stacking 240 shots in Photoshop may cause your computer to choke. So what to do? Perhaps you don’t have an ND filter in your bag, but you do have a circular polarizer. It will help reduce the light. You mount it and now find you’ve lost 2-stops. So your exposure can be 1 second, f/22, ISO 50. Plug that into the formula, and you get:

60 shots  x 1 second = 60 seconds

If you’re shooting in lower light conditions, you may be able to get a slower shutter speed to start with. That will mean you can take fewer shots.

To make your job easier (and the computers as well), always try to get the slowest shutter speed you can for your shots. That will mean you can create the simulated long exposure with fewer shots.

Say you did have a 6-stop ND filter in your kit. You mount that, and now your settings are 16 seconds, f/22, ISO 50. Now, to get that simulated 1-minute exposure, you’d just need about four shots. Why not make 10 while you’re at it and you can simulate a 2.6 minute (160 seconds) exposure?

Had you done this traditionally, and had a 10-stop ND filter, you could take the unfiltered exposure down from 1/4 second, f/22, ISO 50 to 256 seconds (4.2 minutes), f/22, ISO 50. So, to get the same effect with a 6-stop ND filter as you could with a 10-stop by using image averaging, take 16 shots.

16 shots x 16 seconds each = 256 seconds (4.2 minutes)

simulate-long-exposure-stacked-image-averaging

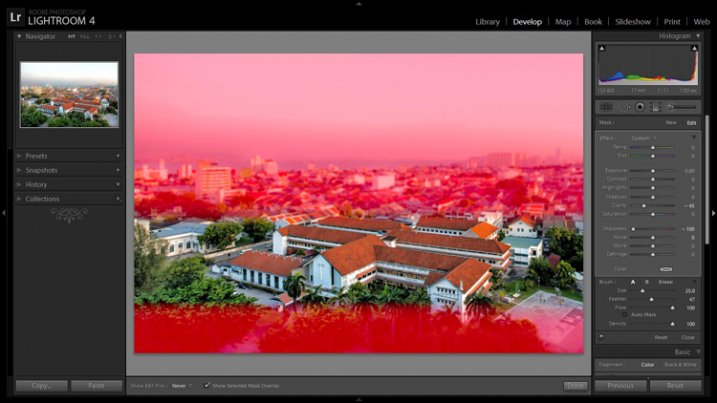
35 images each 1/6 second combine to simulate a 6-second exposure. Shooting into the sun, it would probably be impossible to make a 6-second exposure without a filter.

Forget the math, make the shots!

If all that math made your head hurt (it did mine), here’s the simple way to get what you need so Photoshop can do its magic:

  • Use a tripod.  You don’t want to do all this and get shaky shots.  That will waste all your work.
  • Do what’s necessary to shoot with the slowest shutter speed you can get with the equipment you have.  In the camera, that will usually mean setting the lowest ISO and smallest aperture.
  • If you have a polarizer or ND filter, use those to get the shutter speed even slower if you can.
  • Make lots of shots for each stacked image you will create.  Depending on how slow you were able to get your shutter speed, a few dozen isn’t too many.  You don’t have to use them all when you get into editing, but having more will allow a longer simulated effect.

Putting it all together

This recipe assumes you will be using Adobe Lightroom and Photoshop in combination. You don’t have to use Lightroom. You can get your individual images into a stack in Photoshop another way if you need to (though using LR is much easier). Using Photoshop, however, is mandatory. Also, to use the Smart Objects function described, you will need a version of Photoshop that is Version 14.2 or higher. Older versions of Photoshop won’t have this.

There are ways to do this with older versions in a more manual process. If you have an older version, you will need to do a little online research to learn that technique. I used the latest version of Photoshop at this writing (Photoshop CC 20.0.4).

Let’s look at this step-by-step process visually…

simulate-long-exposure-stacked-image-averaging

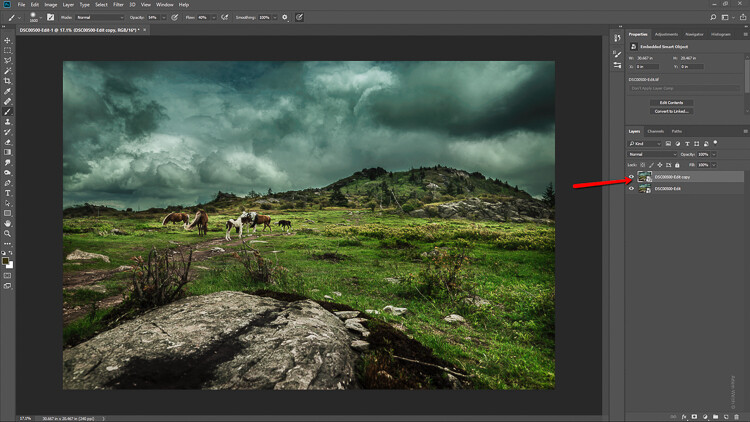
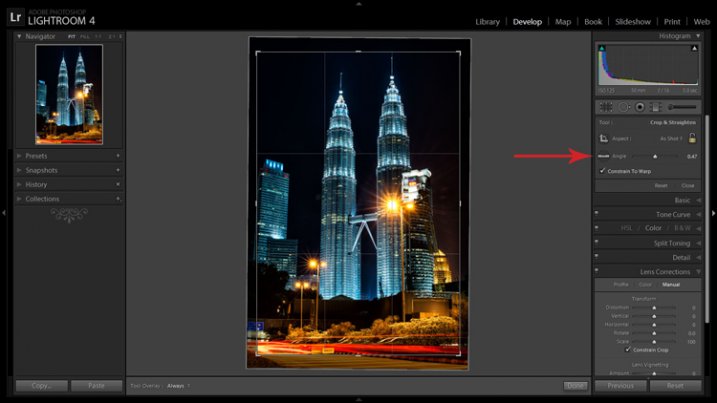
1. From Lightroom, select the sequence of images you will use.  Edit the first one in the sequence to your liking.  Then select all of them and use the Sync function so all have the same settings as the first.

How to Simulate Long Exposure using Stacked Image Averaging

2. With all selected, send the images from Lightroom to Photoshop by going to Photo->Edit In->Open as Layers in Photoshop. (Photoshop will open, and the images will appear as layers in a stack). If you have a lot of images to be opened and stacked, this can take a while. Let it work.

How to Simulate Long Exposure using Stacked Image Averaging

3. With all the layers selected, in the menu select Layer->Smart Object->Convert to Smart Object. This can take a while to do its work. Be patient.

How to Simulate Long Exposure using Stacked Image Averaging

4. With the Smart Object layer selected, from the menu select Layer->Smart Objects->Stack Mode->Mean. This can also take a bit to work.

How to Simulate Long Exposure using Stacked Image Averaging

Wait for it…wait for it…and…

simulate-long-exposure-stacked-image-averaging

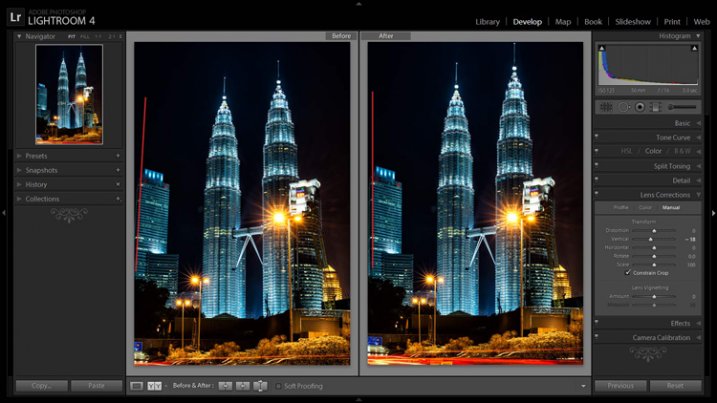
Presto!  You will have a simulated long-exposure image made from your stack of shorter exposures.  20 images each at 3.2 seconds, f/22, ISO 50.  No filter used.  Simulated long exposure of 64 seconds.

simulate-long-exposure-stacked-image-averaging

The water in this section of the river was pretty calm anyway, but look at the before and after areas pointed out by the arrow where the original shots were 3.2 seconds vs the combined 20 shots x 3.2 seconds = a simulated 64 seconds.

How to Simulate Long Exposure using Stacked Image Averaging

5. To finish up, go to Layer->Flatten Image.  Then File->Save As and save the finished image where you like.  If you want to give the completed image some additional tweaking, you can do that with Photoshop or Lightroom as you would with any other image.

Remember…

That’s the magic!  Here are a few things to remember for best results:

  • Consider your composition.  Look for a scene where you will have a combination of static objects that won’t move during the sequence and those that will.  An image with both will be more compelling.
  • Use a tripod.  You can do this handheld if you must, but know that any camera movement will be translated as a blur in the final result.
  • Do what you can to get as long a shutter speed with each image in the sequence as possible.  Drop your ISO to the lowest setting, use a small aperture, and use polarizing filters or whatever ND filters you have.  Longer exposures for each shot mean fewer images are needed to create a simulated long exposure.
  • Overshoot.  You don’t need to use all the images in a sequence if you decide you don’t want as much blur. However, if you don’t shoot enough, you might later wish you had them.
  • As you work through the steps, some things can take a long time.  Be patient and let your computer work.  If the process crashes, it could be you don’t have enough computer resources and will have to settle for a smaller stack.
simulate-long-exposure-stacked-image-averaging

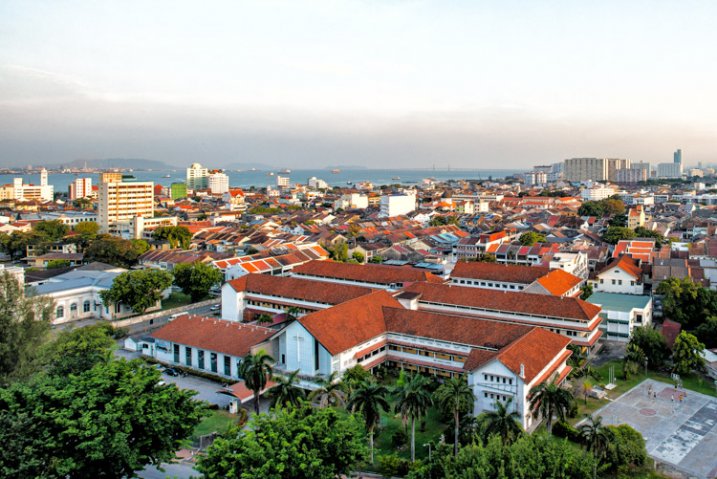
5 images, each 6 seconds = a simulated exposure of 30 seconds. No filter used.

simulate-long-exposure-stacked-image-averaging

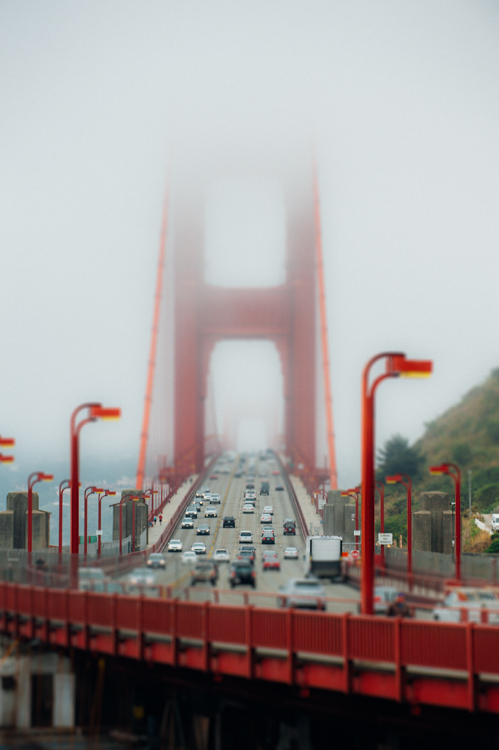
10 images, each 1/4 second combine to give a 2.5-second simulated exposure. This can be a great technique to use for getting silky water effects when you don’t have an ND filter and only need a longer exposure of a few seconds.

Final thoughts

Is this a better method than using an actual ND filter? Like so many photographic things, the answer is probably…it depends. Maybe you don’t have a filter or have one with you. Perhaps you don’t need a really long exposure, but just one a little longer than you can get with a low ISO/small aperture combination such as when seeking blur on a waterfall. Maybe you need to vanish people and don’t want to make a single multi-minute shot for various reasons. Alternatively, perhaps you have an ND filter but need an even longer exposure than it can give you.

There are lots of reasons to add this How to Simulate Long Exposure using Stacked Image Averaging Technique to your bag of tricks. Give it a try, and I’m sure you’ll have fun. Share your images with us in the comments!


simulate-long-exposure-stacked-image-averaging

The post How to Simulate Long Exposure using Stacked Image Averaging appeared first on Digital Photography School. It was authored by Rick Ohnsman.


Digital Photography School

 
Comments Off on How to Simulate Long Exposure using Stacked Image Averaging

Posted in Photography


How to Simulate a Swirly Bokeh in Photoshop

25 Sep

Hailing from Russia, I give you…the Helios and its swirly bokeh.

How to Simulate a Swirly Bokeh in Photoshop - Helios lens

Image by Markus Spiske

I know, it’s kind of an ugly duckling right? At the very least, Helios lenses are certainly not the shining example of classical grace and beauty that the company’s bestowed name might conjure forth. Instead, the true charm and appeal of these vintage lenses comes from what’s on the inside.

Due to their optical nature, Helios lenses can produce wonderfully swirly bokeh and backgrounds when shot at wide apertures.

How to Simulate a Swirly Bokeh in Photoshop - image shot with Helios lens

Image by Mike Newton made with a Helios lens.

If you don’t happen to have a Helios lying around (they’re actually quite cheap) then I hope you will consider learning how easy you can simulate that swirly bokeh of this nifty little lens. You can do it right inside of Photoshop – here’s how.

What Kind of Images Work Best?

The charm of the Helios lens comes from separating the subject from the background with style. This means that just like any other time you want to blur out a background, the further you can place your subject from the objects behind it the more blurred the background will become.

The same is true for images you choose to simulate the “Helios effect” in Photoshop. Look for images with isolated subjects that can be easily separated from the background. This is the example we’ll be using for the demonstration.

How to Simulate a Swirly Bokeh in Photoshop - example image for tutorial

Not only do swirly backgrounds complement images like these more so than others, but having easily identifiable borders between your subject and the background will make things much easier on you during the processing.

How to Create the Helios Effect

The key player in this edit will be a hidden little tool, or rather a filter, buried inside of the Blur Gallery portion of the Filter menu bar at the top of the window. You will use the Spin Blur Filter to give you that dreamy understated swirly bokeh background for which Helios lenses are so favored.

After you’ve got your image opened in Photoshop it’s time to begin the effect.

Duplicate the Layer

Make a duplicate copy of the background layer by using the keyboard shortcut Cmd/Ctrl+J. Feel free to rename the duplicate layer as I’ve done here to help you keep track in case you’re working with more layers.

spin blur layer - How to Simulate a Swirly Bokeh in Photoshop

Next, go up to menu bar you looked at earlier and go to Filter > Blur Gallery > Spin Blur… This will open up the blur gallery and it is here where you’ll do the actual blurring.

spin blur in the menu - How to Simulate a Swirly Bokeh in Photoshop

You’ll notice quite a few options here in the spin blur gallery; the most important of which is the Blur Angle slider.

blur angle slider - How to Simulate a Swirly Bokeh in Photoshop

This is how you will control the amount of simulated blur in your image. Think of the blur angle as the control for the degree of swirl in the background. Before you decide on how much blur you want to introduce to your image you first need to decide where you want the blur effect to be applied. Do this by adjusting the size and shape of the blur filter itself.

Adjust the Size and Feather Amount of the Filter

You can click and drag the outside of the filter to control its size and shape. How close the blur comes to the edges of the filter is controlled by the four larger dots shown here:

spin blur adjustment dots - How to Simulate a Swirly Bokeh in Photoshop

Think of these dots as the way you dictate the feathering of the spin blur effect as it approaches the edges of the filter. Drag the filter out to just past each corner of the frame and then adjust the feathering accordingly.

Feel free to experiment with placing the center point of the filter at different locations within your image.

spin blur filter in action - How to Simulate a Swirly Bokeh in Photoshop

Select the Blur Amount

As I’ve said, the largest variable you can control when applying your swirly bokeh background is the angle of the blur, which essentially dictates the amount of perceived spin blur. In most cases, a very small amount of blur angle works best, say maybe 2-4%.

Keep in mind that the true swirly bokeh from the Helios lens is generally subtle so keep the background blur in your simulated images somewhat subdued. Here’s our image with 4% blur angle applied.

4% blur applied - How to Simulate a Swirly Bokeh in Photoshop

Keep in mind that the final determination of the amount of blur will be decided just a little later in the process by using the layer opacity. So it’s a better idea to add in a little too much blur than not enough at this point in your processing.

Also, keep in mind that you can also increase or decrease the amount of blur angle using the control wheel located at the very center of the filter. Once your blur is applied, click “OK” at the top of the screen.

NOTE: If you convert the layer into a Smart Object before applying the Spin Blur filter, the settings can be adjusted at any time as it will be a non-destructive edit.

Final Blur Adjustments Using Layer Masks and Opacity

Now that you’re back to the main editing window in Photoshop you can finish up your Helios-style blur effect by using layer masks and opacity to customize the blur.

Adjust the opacity of the spin blur layer by using the layer opacity slider until the effect reaches the desired amount you like for your particular image. In this case, I’ve set the opacity to a modest 70%.

layer at 70% opacity - How to Simulate a Swirly Bokeh in Photoshop

Next, we’ll want to make sure the subject of the photo is free from the blur effect. To do this, add a layer mask to the spin blur layer.

add a layer mask - How to Simulate a Swirly Bokeh in Photoshop

Then use the Brush tool to remove the blurring effect from the areas where it’s not needed. And viola! Your freshly minted Helios swirly bokeh simulation is complete!

final image butterfly and flowers - How to Simulate a Swirly Bokeh in Photoshop

Final Thoughts on Simulating Helios Bokeh

Acquiring an actual Helios lens is a surprisingly easy and budget-friendly method for adding a little uniqueness to your photography. Still, if you choose not to get a lens of your own, you can simulate the look of that classic Helios swirl by using the methods shown in this article.

Here are a few points to remember if you want to give the Photoshop Helios method a try:

  • Choose a photo with a subject that is relatively isolated on its focal plane.
  • Images with busy backgrounds work best.
  • A blur angle of 2-4% is adequate for most photos.
  • Center the blur around the main subject but don’t be afraid to move it elsewhere!
  • Control the final blur amount using the layer opacity slider and layer masks.

Simulating the swirly blurred backgrounds of the Helios is easy and quick in Photoshop using the spin blur filter.

Here are a few more examples of images which have been given the Helios effect using the techniques shown here.

The post How to Simulate a Swirly Bokeh in Photoshop appeared first on Digital Photography School.


Digital Photography School

 
Comments Off on How to Simulate a Swirly Bokeh in Photoshop

Posted in Photography


Google reveals how to simulate shallow DOF from a single mobile camera

19 Jun

Google has published an 18-page study fully detailing the synthetic depth-of-field technology that makes its single-camera Portrait Mode possible. Google introduced its evolved Portrait Mode feature on the Pixel 2 and Pixel 2 XL, though neither smartphone model has the dual-camera hardware typically required to produce this effect.

The in-depth paper shows a degree of openness unusual for the smartphone and camera industries. Smartphones with a single camera produce images where everything is generally in focus. Dual-camera phones paired with a stereo algorithm get around this limitation by matching points in images from both cameras to determine depth within the captured scene. Having acquired that depth data, some pixels can be selectively blurred to produce the shallow DOF effect, Google explained in a blog post last year.

Achieving this same effect using only a single camera is difficult. Some mobile camera apps attempt to simulate a shallow DOF by separating an image’s pixels into two layers, isolating the foreground, and then blurring the remaining pixels; this is called semantic segmentation. The lack of depth data, however, means the software doesn’t know how much blur to apply to any arbitrary object in the scene. The results can often be lackluster or unrealistic, without the gradual optical blur expected of objects receding into the distance.

That’s where Google’s “authentic defocus” technology comes in. The Pixel 2 smartphones utilize the semantic segmentation method for images taken with the front-facing camera, but they also use a stereo algorithm for images taken with the rear camera… despite there only being a single lens. Google provided an overview of how it achieves that on its AI blog in October.

There are advantages to Google’s technology versus using a second camera, including reducing the space taken up by the imaging module, reduced power consumption, and helping keep costs down.

Put simply, Google repurposes its dual-pixel auto focus hardware utilized increasingly in mobile cameras for fast AF. Each pixel on the sensor is split into two photodiodes; the left- and right-looking (or up- and down-looking) photodiodes essentially establish two perspectives of the scene with a ~1mm stereo baseline. A burst of images are aligned and averaged to reduce noise, and a stereo algorithm computes a depth map from the two perspectives. This simulates the data that would be provided by two physical cameras next to each other, enabling Google’s software to determine the depth of every point within the captured scene.

There’s a lot more to Google’s approach, including even advantages over traditional optics – for example in its choice to force a larger depth-of-field around the focus plane to ensure a sharp subject, something impossible to achieve optically. The study also points out that there are advantages to Google’s technology versus using a second camera, including reducing the space taken up by the imaging module, reduced power consumption, and helping keep costs down.

Read the full PDF here.

Via: Cornell University Library

Articles: Digital Photography Review (dpreview.com)

 
Comments Off on Google reveals how to simulate shallow DOF from a single mobile camera

Posted in Uncategorized


The Photo Studio AR app lets you ‘simulate’ a photo shoot with 3D models

20 Apr

Have you ever been at a beautiful location and wondered what a photo might look like if you had a model and some lighting equipment on hand? Well, you no longer need to wonder. Los Angeles-baased visual effects studio Surpuba AR has released Photo Studio AR, an app for Android and iOS devices that uses augmented reality (AR) to project a model into any real-world scene you can imagine.

The app features a collection of 3D-rendered models, all based off real people. You can pose them in multiple animated positions, change their location in the AR environment, resize them to fit the scene and even switch their outfits (and purchase other 3D models) via in-app purchases.

As for lighting, you can add multiple lights and props to the scene to emulate what a particular setup would look like. You can even alter where the artificial sunlight is in the app so that it reflects the Sun’s current position in the sky.

Finally, there’s also a built-in recording function so you can save your AR location scouting trip for reference down the road.

A collection of screenshots showing off the props and light modifiers available in Photo Studio AR.

You can purchase Photo Studio AR for both Android and iOS devices for $ 10. In-app purchases start at one dollar a piece. To learn more, head over to the company’s website by clicking here.

Articles: Digital Photography Review (dpreview.com)

 
Comments Off on The Photo Studio AR app lets you ‘simulate’ a photo shoot with 3D models

Posted in Uncategorized


How to Simulate Venetian Blinds Lighting Using Photoshop

16 Apr

When you’re having a romantic dinner you light it with candles and not a bright reflector, right? That’s because light contributes to forming an atmosphere. When you’re making a photograph, measuring the right exposure is not the only thing that matters. Wouldn’t you agree that manipulating that light is what makes it or break it?

In this tutorial, I’ll show you how to simulate light coming in through a window, so that your photo has a warmer ambiance.

Venetian Blinds Lighting Effect Photoshop Tutorial Intro

Getting started

In this case, we’re going to make the effect of sunlight passing through a window with Venetian blinds. This is why the first thing you need to do is delineate the spacing in between the blinds. To make this task easier you can turn on the rulers, just go to Menu > View > Rulers so you can make the spaces more evenly.

Make a new empty layer by going to Menu > Layer > New Layer. Then select the Rectangle Marquee Tool and start tracing. They don’t have to be perfect just try to keep more or less the same width and the same spacing in between. The amount is up to you, for this example, I’ll do 8.

NOTE: Hold the Shift key down to add multiple rectangular selections.

Marquee Selection Venetian Blinds Through Window Light Photoshop Tutorial

Adding the light

Next, you need to fill the selections with white. You can either select the Paint Bucket Tool and click inside each of the rectangles, or you can go to Menu > Edit > Fill which will bring out a pop-up window. Just make sure the content is set to white and all the selected areas get colored at once when you click OK.

Edit Fill Venetian Blinds Through Window Light Photoshop Tutorial jpg

This doesn’t look very realistic yet, but don’t worry, we’ll make it better. To start, you need to give it some perspective to make it fit your image. For this, you can go to Menu > Edit > Transform > Perspective. Find the real light source and make the light (the white bars) smaller on that side. Then turn it and drag it until it feels as if the strips are coming out from that source.

Free Transform Venetian Blinds Through Window Light Photoshop Tutorial jpg

Tweak the light beams

Once it fits you need to make the white bars look more like light beams by smoothing them using a blur filter. Go to Menu > Filter > Blur > Gaussian Blur.

A pop-up window appears and you can set how blurred you want it by dragging the Radius slider. Make sure the preview option is checked so that you can see how your adjustment looks before you apply it. I’m leaving it at around 50 pixels but this is up to you. When you’re happy just click OK.

Gaussian Blur Venetian Blinds Through Window Light Photoshop Tutorial jpg

Then change the blending mode of the layer where your stripes are so that it integrates better with the background image. You can do this in the drop-down menu on top of the layers panel. Open it and select Soft Light blend mode.

SoftLigh Blend Mode Venetian Blinds Through Window Light Photoshop Tutorial

Apply a gradient

It’s already looking much better, there’s just one final touch that needs to be done. Because the light will obviously be stronger closer to the source and slowly fade away; you need to apply a gradient to achieve this effect.

Add a Layer Mask by clicking on the button that looks like a rectangle with a circle in the middle, located at the bottom of the layers panel. While the mask is selected, go to the Gradient Tool that is hidden behind the Paint Bucket Tool. Then from the top sub-menu, choose the one that goes from black to transparent.

Apply the gradient by dragging your mouse across your image. Follow the lines and make sure the white part of the gradient is at the end of the image where you want the light the brightest. If it’s not, you can just invert the layer mask, or undo it and try again.

Graded Layer Mask Venetian Blinds Through Window Light Photoshop Tutorial jpg

Finishing up

There you go, light passing through Venetian blinds from the window onto your subject without even needing a window!

Venetian Blinds Lighting Effect Photoshop Tutorial After

Applying the effect to the background only

This, of course, works if your subject is lit by the same source as the background, but what happens if you have two different light sources? Let’s do an example where we want only the background to receive the light from the window and the subject will be lit by a different light source.

Venetian Blinds Lighting Effect Photoshop Tutorial Before2

Start by doing exactly the same as you did in the previous example. When you’re done with that you have to add one more step. Duplicate the subject that you want to be in front of the Venetian blinds lighting effect.

You do this by selecting the object. It doesn’t matter which tool you use. In this case, I used a combination of the Quick Selection tool refined later in the Quick Mask. Once you have your selection go to Menu > Layer > New > Layer via Copy. A new layer will be created duplicating the subject that you selected onto an empty background; drag this layer to the top.

Venetian Blinds Lighting Effect Photoshop Tutorial Duplicate Layer

That’s it, your subject will be in front of the lighting effect and therefore won’t be affected by it. Give it a try and show us your results in the comment section below.

Venetian Blinds Lighting Effect Photoshop Tutorial After2

The post How to Simulate Venetian Blinds Lighting Using Photoshop appeared first on Digital Photography School.


Digital Photography School

 
Comments Off on How to Simulate Venetian Blinds Lighting Using Photoshop

Posted in Photography


How to Easily Simulate a Tilt-Shift Effect Using Photoshop

03 Feb

You might not know it, but even if you’ve never heard of tilt-shift photography you have probably seen a photograph that was captured in just such a way. A few years ago tilt-shift photos exploded into the mainstream with oddly miniaturized images of cities, cars, and even landscapes going completely viral seemingly overnight.

How to Easily Simulate a Tilt-Shift Effect Using Photoshop

Tilt-shift photography, in itself, is nothing more than a literal optical illusion. Essentially, it is nothing more than adding a strip of sharp focus to an otherwise blurred image. Even the name itself refers not to the type of photograph but rather the camera or lens movements needed to achieve the effect.

Yes, tilt-shift photos have their roots in large format photography but don’t worry, I’ll only touch on that as much as needed to in order to get the point across. What I will focus on (get it?) is showing you how the tilt-shift photo effect can be very closely and easily simulated using Photoshop. Oh, and don’t think that in-camera tilt-shift photos can only be made with large format cameras. There are quite a few tilt-shift lenses available for your SLRs and DSLRs.

What is Tilt-Shift?

The best way to understand the concept behind tilt-shift photography work is to understand what “tilt” and “shift” actually mean as they relate to photography. As I mentioned earlier, they refer to the movements of a large format camera.

The tilt aspect refers to the physical tilting, either forward or backward, of the front or rear part of the camera. This tilt impacts the focus plane.

How to Easily Simulate a Tilt-Shift Effect Using Photoshop

Front and rear tilts demonstrated with a large format camera.

Without going too far into large format camera movements, tilting the front and/or rear of the camera allows for very selective depth of field control.

The “shift” is less important for our purposes today, but since I like being thorough, shifting the front or back of the camera simply means it is moved from side-to-side (or up and down) and literally shifts the image from left to right or up and down.

How to Easily Simulate a Tilt-Shift Effect Using Photoshop

Right and left shift movements on a large format camera.

The tilt effect is what you’re about to learn how to simulate in Photoshop right now.

How to use the Tilt-Shift Filter in Photoshop

To begin, first, select an image that is conducive to the tilt-shift effect. Photos which have a relatively isolated subject with large areas of foreground and background usually work best. Make most if not all of your basic edits before you start your tilt-shift, including sharpening. Here is my image after I’ve made some core adjustments.

How to Easily Simulate a Tilt-Shift Effect Using Photoshop

Open the image in Photoshop

I like to start off in Lightroom and then pitch the image over to Photoshop as a Smart Object to apply the tilt-shift effect. I’ll show you why in just a bit.

How to Easily Simulate a Tilt-Shift Effect Using Photoshop

Now that you have the image opened in the loving hands of Photoshop the fun can begin! Yes, I think this is fun….

Duplicate the Layer

The first step in applying the tilt-shift effect is to duplicate the base image layer. Use the keyboard shortcut Ctrl/Cmd+J. It’s this duplicate layer to which you’ll apply the tilt-shift blur.

How to Easily Simulate a Tilt-Shift Effect Using Photoshop

Applying the Blur

Tilt-shift is essentially a blurring effect, so it makes sense that it is located along with the other blur filters in Photoshop. Click on Filters > Blur Gallery >Tilt-Shift.

How to Easily Simulate a Tilt-Shift Effect Using Photoshop

This brings you into the tilt-shift blur module of Photoshop. You’ll notice that you can also add other forms of blur here, but ignore all that as we are just going to work with tilt-shift.

When the module opens you will see a masking tool already on top of your image. It resembles a dual graduated filter tool. In fact, it works very similarly to the graduated filter. The effect will feather out to the top and bottom from the central axis dot in the center of the filter. The solid lines control the border of the effect with the dotted lines determining the feathering. Here’s a breakdown.

How to Easily Simulate a Tilt-Shift Effect Using Photoshop

The tilt-shift filter overlay.

The intensity of the blur is controlled by the Blur slider or by adjusting the intensity dial. Keep in mind that the entire filter can be moved either simultaneously or the top and bottom portions can be moved and adjusted separately. This happens to be the final position of my tilt-shift filter.

How to Easily Simulate a Tilt-Shift Effect Using Photoshop

Click Ok and allow Photoshop to render the blur.

A few tips for you

While we’re waiting…this is a good time to go over a couple of things that will help make your tilt-shift more effective.

Always remember that, if you’re going for realism, an accurate tilt-shift simulation should adhere as closely as possible to the optical principles of photography. This means that since tilt-shift controls the depth of focus, your effect should also follow those rules. Be careful you don’t have significant irregularities at the borders of the blurred areas. Also, pay special attention to the elements within your photo and their spatial relationship to one another to avoid an overly artificial appearance.

Keep in mind that there are quite a few other sliders to be seen here in the tilt-shift module; namely those for distortion, bokeh, and light range. (Of course if you’re feeling adventurous then, by all means, try out those sliders but I generally leave them as is for virtually all of my work.) Distortion can be added to varying degrees to the blurred areas as well as bokeh enhancement/coloration. The light range slider allows control over blur based on specific luminance values. However, in most cases, the default settings for these sliders will be just perfect for your image.

After your tilt-shift effect is complete the image will automatically reopen in the main Photoshop window with your edits applied.

Tweaking the Effect

Just because you have to loosely adhere to some rules of optics doesn’t mean you are totally bound by them. I actually attempt to never use the word “rules” when it comes to photography. If you find you need to adjust the tilt-shift effect just remember that this is Photoshop after all and you, the intrepid post-processor, wield great power!

Remember how you imported your image as a Smart Object earlier? Well, this is where having your image available as a Smart object really comes in handy.

How to Easily Simulate a Tilt-Shift Effect Using Photoshop

You’ll notice the tilt-shift has already been scooped into its very own layer mask. So now, you are free to paint the blur effect in or out until it is just right. This allows you to go beyond the constraints of filters in the tilt-shift module. With this image, I used a little judicious painting on the Smart Filter layer mask to make the effect look a little more natural.

How to Easily Simulate a Tilt-Shift Effect Using Photoshop

Finish in Lightroom

After I’m completely finished with the tilt-shift I kick the image back over to Lightroom. I add in one last edit to help harmonize the tilt-shift and that is a graduated filter at the bottom of the frame to darken it ever so slightly.

How to Easily Simulate a Tilt-Shift Effect Using Photoshop

And that’s it! You should now have a genuine imitation tilt-shift image. Have a look at the before and after.

Before

After

Final Thoughts on the Tilt-Shift Filter…

Tilt-shift photography in Photoshop is easy and can add some amazing effects to your photos. As with most post-processing effects, it’s important to keep things within the realm of reality unless your goal is to deliberately skew things.

The effects achieved in Photoshop aren’t perfect, of course, but you can get very close to the look and feel of real tilt-shift photography. All this without needing to use a real tilt-shift lens or moving into large format photography. Experiment with the tilt-shift blur in Photoshop and keep these important tips in mind:

  • Remember tilt-shift is just a manipulation of depth of focus.
  • Try not to break the rules…I mean, the guidelines of optics.
  • Pick images that have larger areas of foreground and backgrounds with isolated subjects.
  • Don’t forget to tweak the tilt-shift effect or even add additional edits.

Try out the lessons in this article and stretch your creative legs with tilt-shift blur in Photoshop. And as always remember to have fun with your editing and please share your results and any questions you have in the comments area below.

The post How to Easily Simulate a Tilt-Shift Effect Using Photoshop by Adam Welch appeared first on Digital Photography School.


Digital Photography School

 
Comments Off on How to Easily Simulate a Tilt-Shift Effect Using Photoshop

Posted in Photography


How to Simulate the Look of Analog Film Using Lightroom

06 Apr

The tones and organic nature of analog film are things many of us have began to long for in our digital age. Don’t worry, though, this will not be an article about the merits or disadvantages of digital photography or whether film is better or worse than digital. The purpose of this tutorial is to deliver what might be called the best of both photographic worlds. And if not the best, a very liveable compromise between the charm of analog film and the convenience of digital imaging – how to simulate the look of analog film using Lightroom.

How to Simulate the Look of Analog Film Using Lightroom

Photography, like most everything else, is invariably on a forward march of advancement. Always looking for the next best thing; better cars, better computers, and for us photographers…newer digital cameras. Intriguingly enough, often times we end up missing the “old school” feel of the very things we sought to replace with successive newer versions.

Imparting our digital photos with the great look of film is not only but possible, but simpler than it has ever been before. Furthermore, we can conduct all this retrograde post-processing alchemy in Adobe Lightroom. Yes, I promise it’s easy.

How to Simulate the Look of Analog Film Using Lightroom

Things to Note

Now is a good time to pause and make a small disclosure. There are many other variables that exist which determine the final look of a print made from analog film. These variables range from the type and temperature of the chemistry used to develop the film, to the way it was printed and scanned. Even the age of the film when it was shot can change the look of the final results. So remember that while exact accuracy might not be possible the fun of the process itself certainly is!

First Things First – Find a Film You Like

The first step in the process is to find the film you want to replicate. There are a number of ways to go about this. If you happen to be one of those glorious hybrids who shoot both digital and film then you likely have some examples readily available. But the easiest way I’ve found to discover a multitude of images made with analog film is to have a look at Flickr.

There are quite a few groups there that specialize in “film only”, so each image posted is shot on analog film and then scanned into the computer. Some of these groups, such as Film Database require participants to post their images with the film type indicated. Once you find an image with a grain and tone you like, it’s very simple to learn which film was used to create that image. The more images you can find that were shot with that film, the better you can understand the general feel of it.

How to Simulate the Look of Analog Film Using Lightroom

Moving to Lightroom

Once you’ve found the film-look that you’d like to replicate, it’s time to move into Lightroom and let the fun begin. First, we’ll look at the three key things to pay attention to when it comes to simulating the characteristics of film color tone, contrast, and grain. Then, we’ll walk through creating the look of film with a sample image, so you can see just how easy the process really is!

Color Tone

Color tone is a broad term that, for our purpose, describes the overall color temperature of a film and the saturation of those colors. Analog films come in virtually every color tone under the rainbow (pun intended). Some films are very warm toned with rich, vibrant colors. While others are more subdued, with cooler tones and less color saturation. Even black and white films have certain color tone variations.

When looking for the chromatic characteristics of a film, be sure to take note whether the overall tone is warmer or cooler in temperature. Then, look to see if there is any color cast to the image such as blue, red, green, etc. If the film you’re replicating is black and white, still pay close attention to any coloring that might be present. Black and white film is always more than just black and white!

Contrast

This is perhaps the most straightforward aspect of the entire replication process. Contrast is simply the difference between lights and darks within an image. Films carry different contrast latitudes (again, development is key) which you can observe. Are the blacks dark and dense or are they lighter and more faded? Are the highlights bright and contrasted or is the photo flatter and less punchy? Later in Lightroom, the contrast slider will do a lot of the work for you.

Grain

Perhaps the most fickle property of analog film is the presence of grain. Grain is brought about by the size and number of the tiny light-sensitive silver crystals found in the film’s emulsion. Higher ISO film has more grain and lower ISO films generally have less grain. Depending on the film these grains can be larger or smaller, rough or fine, and literally everything in between. It’s a good idea to view the image at the largest size available when examining the grain of the film. Pay special attention to the amount, size, and coarseness of the grain when taking your notes. You are taking notes…aren’t you? Of course, you are!

The Process of Simulation

How to Simulate the Look of Analog Film Using Lightroom

Fujifilm Provia 400X (Image courtesy of Fujifilm)

Now here comes the good part. We will take a digital image and give it the look of a particular analog film. In this case, I’ve chosen a mid-range ISO film, Fujifilm Provia 400X. It’s a moderately saturated film in terms of color, with nice contrast. At ISO 400 the grain is apparent, but not as coarse as some other mid-range ISO films. In most of the images that I viewed from this film, there exists a slight blue color cast present.

Make a Roadmap

So, before I do anything in Lightroom, I make a road map to help me along the way during my processing. It will list the core attributes of the film I’m hoping to replicate. Do this for your film now:

  • Color Tone: Slight blue hue especially in the shadows. Color saturation is moderate. Color temperature is slightly cool.
  • Contrast: Moderate to strong contrast with deep blacks.
  • Grain: Quite apparent but relatively smooth.

Do Basic Adjustments First

We begin with a photo that has been corrected for exposure but no adjustments for color or contrast. This is the best place to start for replicating analog film.

How to Simulate the Look of Analog Film Using Lightroom

Image before processing.

I crop the photo slightly and then move back to the Basic Panel.

How to Simulate the Look of Analog Film Using Lightroom

Follow the Roadmap

Going back to the road map list I made earlier, contrast is the first adjustment. I increase the contrast slider to +81 but this still doesn’t give me the depth in the shadows I’m after, so I go further and darken the blacks by -40. While I’m here, I reduce the saturation to better match the moderate qualities of the Provia 400x. Since the image needs to be slightly cooler, I decrease the temperature a very small amount as well.

To add a little more blue to the shadows we will next use one of the great unsung hero of Lightroom, the tone curve. Click on the tone curve panel and be sure it’s set to “channels” view. Since I want to add a blue color cast, I select the blue channel (see below).

How to Simulate the Look of Analog Film Using Lightroom

Since I want to apply the blue toning mostly in the shadow areas of the image, I raise the leftmost end of the curve upwards slightly. This will introduce a blue hue to the blacks. Be careful not to overdo it here. A little goes an incredibly long way.

How to Simulate the Look of Analog Film Using Lightroom

Using the Curves Adjustment, in the blue channel – adjust the blacks as shown here to add a cool tint to shadows.

Adding Grain

All that’s left now is to focus in on our grain situation. My original digital image was shot at ISO 500 which is close to the ISO 400 of the Provia. Here’s a 1:1 zoom of the original image.

How to Simulate the Look of Analog Film Using Lightroom
But film grain bears many more nuances. So let’s adjust the grain in the effects panel based on our notes from earlier. We observed that Fujifilm Provia 400x sported grain that was moderate, but rather fine. So I experiment with the Amount, Size, and Roughness sliders until I reach a grain effect that approximates the appearance I’m after. Don’t be afraid to manipulate these sliders into submission! The correct combination only comes from visually comparing the adjustments.

How to Simulate the Look of Analog Film Using Lightroom

Here is the grain we’ve added compared to the original image. At a 1:1 view the difference because readily apparent.

And now, you’re all done!

How to Simulate the Look of Analog Film Using Lightroom

Final image.

Don’t hesitate to go back and tweak the exposure or other adjustments to get the look you want. But remember if you change the contrast or color edits your photo might distance itself from the analog film you’ve attempted to simulate.

*Bonus* Try increasing the color noise reduction slider to remove any traces of color noise. Color noise is a trait exclusive to digital imaging and is not found in analog films.

Here’s the finished simulation of Fujifilm Provia 400x film compared to our original digital photo.

How to Simulate the Look of Analog Film Using Lightroom

Before and after.

Conclusion

While we can’t exactly replicate the look of film due to variances in the development and printing processes, we can achieve very similar looks. In a way, we have more versatility since we can strive to achieve the look of a multitude of films in our digital darkrooms. Show us your own analog film simulations in the comments section below!


Want to get a jump start at creating your very own analog film simulations? Take a look at these presets developed by myself, which replicate the looks of numerous classic analog films. All with just a click of the mouse!

  • Analog Film Simulations: Volume 1
  • Analog Film Simulations: Volume 2

The post How to Simulate the Look of Analog Film Using Lightroom by Adam Welch appeared first on Digital Photography School.


Digital Photography School

 
Comments Off on How to Simulate the Look of Analog Film Using Lightroom

Posted in Photography


How to Simulate Tilt-Shift Lens Effects Using Lightroom

24 Jun

We’ve all at one point been enamoured by the effects produced by tilt-shift or PC (perspective control) lenses.

Even in wide-angle shots, the extremely narrow field of focus transforms the scene into a surreal miniature world. It can be hard to decipher whether it’s actually a close-up of a tiny model scene, or the result of the visual trickery that a tilt-shift lens can produce.

Tilt-shift effect applied to a beach scene.

The tilt-shift effect can be used on more than city street scenes. Use your imagination and be creative!

Besides the nifty miniaturization effect, these high-end specialty lenses are imperative for professional architectural photography. Tilt-shift lenses are basically split into two, parallel to the lens, elements and enable you to tilt the front of the lens barrel in relation to the rear portion, or slide it parallel.

Without actually changing the physical location of the camera, these adjustments allow you to alter the perceived perspective. The most practical application of this effect is to eliminate certain types of distortion, especially the keystone effect.

The keystone effect refers to the convergence of parallel lines which occurs when a camera’s sensor is not parallel to them. You have seen this distortion a million times when the camera was pointed upward at a tall building. It looks as if the building is about to fall over backwards, and it creates the illusion that it is wider at the bottom and continually narrows to the top. The same thing happens with horizontal lines but is often less noticeable, or detrimental to the image.

Although tilt-shift lenses have other practical uses, these are the two that can be replicated effectively in post-processing: creating a miniature effect, and fixing certain kinds of lens distortion.

Eliminating Converging Lines Distortion

Correcting lens distortion in Lightroom (LR) is fairly straightforward with a couple of considerations to keep in mind. I’ll use a night shot of the Petronas Tower in Kuala Lumpur, Malaysia as an example.

1. Straighten first.

If the image you are working with has a distinct horizontal or vertical line which you know to be level or plumb, use the Straighten tool located within the Crop tool (keyboard shortcut R) to align the image before making any lens corrections.

The Level tool can be found beside the Align slider or activated by holding CTRL key.

The Level tool can be found within the Crop panel beside the Align slider, or activated by holding CTRL key.

To align the image using a vertical line, it must be near the center of the image due to the distortion which you are about to fix. With the Crop tool active, you can either grab the Level tool located beside the Angle slider, or hold down the CTRL key and drag the cursor along the chosen line and LR will rotate the image to level or plumb.

Note: new in LR6 or LRCC is the Auto function of the crop tool which attempts to do this for you. Alternatively, the Rotate slider in Lens Corrections can be used with similar results.

2. Open the Lens Corrections panel and click on the Manual tab.

Distortion corrections are made in the Lens Corrections panel.

Distortion corrections are made in the Lens Corrections panel.

3. Check the Constrain Crop box.

Note: As is often the case in life, you don’t get something for nothing. When LR manipulates the image to fix these lines, it must also crop it. You can also crop it manually after you adjust the image, but it is easy to inadvertently leave a little gray strip somewhere along the edge of your image by not cropping it enough.

4. Adjust the sliders

There are several ways to adjust sliders: dragging the slider itself, clicking the name of the slider and using the +/- keys, clicking the value on the right of the slider and dragging the cursor left or right, clicking the value and entering the desire value or clicking the value and using the arrow keys to make micro adjustments. I recommend the latter for accuracy.

5. Show the grid

Hovering the mouse over any of the sliders will show a grid over the image to help guide your adjustment. For this image, a -18 compensation straightens the lines right up.

A before and after showing corrections for converging lines.

A before and after showing corrections for converging lines.

If you plan on shooting architecture and utilizing this feature instead of dropping $ 1,400 on a tilt-shift lens, it may benefit you to activate the crop tool (keyboard shortcut R) to get an idea of how much LR cropped your image. This will give you a point of reference while composing scenes in the future.

Creating a Miniaturization Effect

The tilt-shift effect of severely softening most of an image to isolate a small sharp strip can be simulated in post-processing very effectively. Although there are a couple of different ways to achieve this effect in Lightroom, I find the following to be the easiest and most effective.

Golden Gate Bridge with the tilt-shift effect applied.

The tilt-shift effect can add another level of interest to certain photographs.

Keep in mind that not every photo is a good candidate for this effect. You can find good advice about image selection in the article An Introduction to Tilt-Shift Photography.

1. Process the image as you normally would.

Boosting sharpening, contrast and saturation can help exaggerate the effect.

2. Activate and setup the Adjustment Brush (keyboard shortcut K).

Drag the Sharpening slider all the way down to -100. I also like to reduce Clarity which adds a bit of glow and exacerbates the effect.

3. Show the Mask Overlay box (keyboard shortcut O)

This will allow you to clearly see where the effect is being applied (shift+O will rotate through different mask colors, you may find red is better one image whereas green may work on another).

5. Adjust the brush settings

Setup such things as brush size, flow, etc. Spend a few minutes experimenting with different combinations of these settings to find what works best for your image. CTRL+Z (CMD+Z on Mac) is your friend here.

6. Blur most of the image less a small strip

Holding down the shift key while you click and drag the brush horizontally across your image will apply the effect in a straight line. The goal is to blur the entire image except for a small strip. Make one line across the upper boundary and one line across the lower boundary of the strip you wish to isolate. You can then release the shift key and paint in the remainder of the areas. The in focus strip should account for 20 per cent or less of the image area. If the strip is too big, the effect will be weak.

Holding down the shift key will keep the brush level to paint a straight line.

Holding down the shift key will keep the brush level to paint a straight line.

7. Repeat to increase the effect.

Repeating the previous step several times will compound the effect. To repeat the step, click on New at the top of the Adjustment Brush panel – this will remove the mask to reveal the most recently applied effects, and allow you to add a new pin (brush strokes) and repeat the process.

Before applying the effect to a photo of Penang, Malaysia.

Before applying the effect to a photo of Penang, Malaysia.

After application of the miniaturization effect.

After application of the miniaturization effect.

The effect can also be applied using the Graduated Filter tool but I find it ends up blurring the entire image to some extent and is less effective.

This is a starting point from which to experiment with the effect. Everybody’s tastes differ, so although the general process will remain constant, go crazy with the other variables and see what happens!

googletag.cmd.push(function() {
tablet_slots.push( googletag.defineSlot( “/1005424/_dPSv4_tab-all-article-bottom_(300×250)”, [300, 250], “pb-ad-78623” ).addService( googletag.pubads() ) ); } );

googletag.cmd.push(function() {
mobile_slots.push( googletag.defineSlot( “/1005424/_dPSv4_mob-all-article-bottom_(300×250)”, [300, 250], “pb-ad-78158” ).addService( googletag.pubads() ) ); } );

The post How to Simulate Tilt-Shift Lens Effects Using Lightroom by Jeremie Schatz appeared first on Digital Photography School.


Digital Photography School

 
Comments Off on How to Simulate Tilt-Shift Lens Effects Using Lightroom

Posted in Photography