RSS
 

Posts Tagged ‘Simplify’

Weekly Photography Challenge – Simplify

21 Jul

It’s time once again for the weekly photography challenge. This week your job is to do LESS! Yup, that’s right we want you to put less in your photos. Simplify your images down to one easily identifiable subject with a minimalist composition and simplicity.

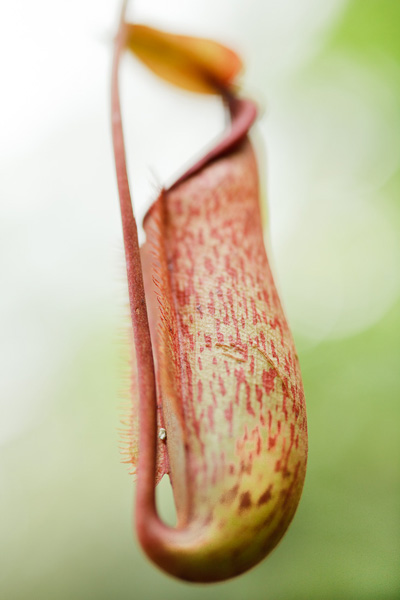
Simplify – you don’t need to see the whole thing to get the message here.

How else can you simplify? Perhaps get rid of all color and shoot monochrome or convert to black and white later? Here are some ideas for simplifying or getting minimalist.

  • How to Simplify and Improve Composition with Normal or Long Lenses
  • 4 Tips for the Minimalist Photographer
  • The Minimalist Landscape Photographer: What do you really need?
  • Tips for Minimalist Photography in an Urban Environment
  • 5 Guidelines of Minimalist Photography to Help Improve Your Work

Here’s an example of a really busy landscape scene. Now let’s simplify it!

Get closer to the subject so it’s super obvious to viewers what you want them to look at. Less is more! 

Weekly Photography Challenge – Simplify

Simply upload your shot into the comment field (look for the little camera icon in the Disqus comments section) and they’ll get embedded for us all to see or if you’d prefer, upload them to your favorite photo-sharing site and leave the link to them. Show me your best images in this week’s challenge. Sometimes it takes a while for an image to appear so be patient and try not to post the same image twice.

Share in the dPS Facebook Group

You can also share your images in the dPS Facebook group as the challenge is posted there each week as well.

The post Weekly Photography Challenge – Simplify appeared first on Digital Photography School.


Digital Photography School

 
Comments Off on Weekly Photography Challenge – Simplify

Posted in Photography


Kickstarter: Pixl-latr aims to simplify film digitization

19 Jun
The Pixl-latr flattens film on a diffused surface so that it can easily be photographed with a conventional digital camera.

The analog revival continues unabated, and a new product – the Pixl-latr – could provide a long-awaited easy solution to the challenge of converting film to pixels.

Just launched on Kickstarter, at its core the Pixl-later is a diffusing plate which comes with a series of pins and frames that can flatten 35mm, 120mm (up to 6×12) and even 5×4 sheet film to be photographed with a digital camera – it even comes with a small stand to prop your negative up.

120 film being loaded into the Pixl-latr.

The idea for the Pixl-latr came to creator Hamish Gill (of 35mmc fame) when he realized the lack of affordable 5×4 film scanning solutions. He decided to create something that could easily flatten his film to be photographed, rather than scanned. Anyone who’s tried to photograph negatives knows what a pain getting them flat can be – the Pixl-latr seeks to solve this very annoying problem.

Through Kickstarter, the Pixl-latr can be yours for the ‘Super-Early Bird – Supporter Special’ price of £25 / ~$ 33, assuming that the funding goal is met.

Personally, considering the time and effort I’ve spent scanning film over the years, £25 seems like a real bargain and I truly hope it gets fully backed. If it has piqued your interest, you can read more about the Pixl-latr and and support the Kickstarter from the link below.

Read more about the Pixl-latr and support the Kickstarter

Articles: Digital Photography Review (dpreview.com)

 
Comments Off on Kickstarter: Pixl-latr aims to simplify film digitization

Posted in Uncategorized


How to Simplify Your Life as a Photographer

04 Jun

Whether you’re an amateur or a professional photographer, complexity, confusion, and chaos are your enemies. When your life is chaotic and you’re feeling out of sorts, you’ll be unfocused and your photography will suffer. As a creative person, the last thing you want is to neglect your creative pursuits like photography.

“The more simple we are, the more complete we become.” – August Rodin

Here are 5 ways for you to simplify your life so that you can focus clearly on your life and love of photography.

Lighthouse - How to Simplify Your Life as a Photographer

Embrace simplicity in your photos by including as little as possible in the frame. In this photo, I eliminated the foreground as well as boats and other objects that could have been in the frame. All our attention is drawn to the clouds and the lighthouse in the distance.

1. Tidy up a mess

“Have nothing in your homes that you do not know to be useful or believe to be beautiful.” – William Morris

One of the simplest ways to bring some order to life around you is to tidy up a mess. Find space that you’ve got control over and clean it up. Start with your desk, or clean up your bedroom. Maybe you’ve got piles of stuff laying around the house. Choose one pile, sort it out, and put it away.

Once your space is clean, make it beautiful. Make a print of your favorite photo and frame it. Place it on your desk or hang it on the wall. Creating a tidy and beautiful space around you will help you simplify the chaos and encourage your creativity.

Jellyfish - How to Simplify Your Life as a Photographer

With nothing else present in this photo our full attention is drawn to the little jellyfish. Sometimes simplicity in photos is hard to achieve because there are so many other distracting elements.

2. Organize your photography gear

“There are two ways to be rich: One is by acquiring much, and the other is by desiring little.” – Jackie French Koller

Gather up all your photography gear into one place. This is especially helpful if you’ve got equipment stashed all over your house or apartment.

Clean it thoroughly, sort it out, and sell what you don’t need. By simplifying your gear, you’ll have fewer decisions to make and you’ll be freer to take photos when you’re in the moment.

For example, instead of wasting time wondering which of your eight lenses you should use, you’ll have three favorite ones from which to choose.

Frosty window silhouette - How to Simplify Your Life as a Photographer

Silhouettes are an excellent way to simplify and draw attention to your photos. The frosty glass adds an interesting background.

Organizing and simplifying the gear you own is one way to simplify your life. But another way is to simplify your desire for more gear.

Photographers are notorious for suffering from GAS – gear acquisition syndrome. Buying new gear is necessary from time to time, but sometimes buying stuff is an easy way to feel like a photographer rather than actually being one.

Make the most of the gear you’ve alredy got and only purchase what will truly allow you to take more creative photos.

Robin's egg - How to Simplify Your Life as a Photographer

I love taking photos with my Fuji x100s because it has just one prime lens. I don’t have to think about lens choices or focal lengths. Instead, I forget about my camera and just observe what’s around me.

3. Learn one new thing

“Knowledge is a process of piling up facts; wisdom lies in their simplification.” – Martin H. Fischer

You’ve embraced simplicity by cleaning up some small space, you’ve made that space more beautiful by printing and framing one of your photos, and you’ve begun relieving your GAS.

Now, take your favorite camera and lens and go learn something new. But learn just one new thing at a time. As a creative photographer, you’re likely eager to learn many new things and become a better photographer. That is a worthy ambition. But don’t pile on too much learning at once. That will only hold you back.

Choose just one article, book, or course, and master that before moving on. DPS has a lot of tips and articles for you to learn from, but they have also organized and simplified topics with their books and courses.

Coffee mugs - How to Simplify Your Life as a Photographer

I decided to spend some time trying to learn food photography. It’s a fun skill to study about. I needed to create some sort of background for this coffee mug and decided to stack up a few other mugs behind it. I like the repetitive pattern, another form of simplicity in photos.

4. Create a photography project

“Simplicity is about subtracting the obvious and adding the meaningful.” – John Maeda

With your new learning, why not tackle a photography project?

Many photographers have thousands of disorganized and disconnected photographs. And they have dozens of ideas in mind for what they will photograph next. Make of list of everything you’re interested in trying as a project and then choose one thing from the list to accomplish.

Silhouette and symmetry with a living room window - How to Simplify Your Life as a Photographer

I have a growing collection of silhouette photos with my living room window. Soon, I’ll gather them all together and choose my favorites for a photo book. The symmetry in this photo is an element of simplicity.

Instead of the chaos of too many options and ideas, choose one thing and bring it to life. Maybe you could take a day trip to a favorite location. Or gather together friends for a portrait project. Maybe you should sort through photos from the past and create a photo book.

In just a few days or weeks you could have a finished project and something new to hang in your tidied up space. Tackling a project will help simplify your life and bring order and accomplishment to your day.

Close up portrait of a toddler - How to Simplify Your Life as a Photographer

Close-ups simplify portraits by eliminating distracting backgrounds. Toddlers and kids have lots of fun peering into the camera or playing peekaboo.

5. Photography business

“Simplicity is the ultimate sophistication.” – Leonardo da Vinci

It is natural for photographers to consider starting a photography business. It’s a natural move since entrepreneurs and creative people are cut from the same cloth. Starting a photography business may seem like the ultimate way to live as a photographer. But even with a business, you must keep it as simple as possible.

Fishing boat silhouette - How to Simplify Your Life as a Photographer

I love to show up early before family photo sessions. Arriving at the harbor at 5 am in the morning, I captured this beautiful silhouette of a father and son heading out on one of the Great Lakes to fish.

If you’re already in business consider ways that you can simplify your photography business:

  • Keep your business aligned with what you actually love to photograph.
  • Offer one type of photography rather than doing everything.
  • Choose a simple pricing strategy.
  • Create a simple mobile-friendly website.
  • Put limits on how long your workday will be.
  • Create simple systems to make your workday flow.
  • Carve out lots of time for family and friendships.
Baseball - How to Simplify Your Life as a Photographer

I played baseball as a kid and feel nostalgic about it in the autumn months. Photographing a single object, such as a baseball, is a way to practice simplicity in your photography.

Start simple and make steady progress

Take the next 90 days (3 months) to simplify your life and your photography. Clean up your spaces, appreciate the gear you’ve got, learn just one new thing, and bring it all together with a photography project. If you have a photography business or are thinking of starting one – keep it simple by keeping all the parts simple.

Let me know in the comments what you plan to simplify first.

The post How to Simplify Your Life as a Photographer appeared first on Digital Photography School.


Digital Photography School

 
Comments Off on How to Simplify Your Life as a Photographer

Posted in Photography


Raya Pro Photoshop Plugin – How to Simplify and Speedup Your Workflow

24 Apr

For a long time, my solution for a faster workflow was to create my own Photoshop Actions. But in the last couple of years, I’ve implemented another third-party software into my workflow, the Raya Pro Photoshop plugin.

The challenge

Let’s face it, Photoshop can be an overwhelming and time-consuming photo editor. However, it’s also one that plays an important part in most photographer’s work. Either they use it for simple color corrections or more advanced techniques, most professional photographers put their images through Photoshop at some point.

I’ve been using Photoshop for the last 10-or-so years, so I would say that I’m pretty familiar with the software. My biggest challenge, or rather annoyment, since I started using Photoshop was the fact that several of the techniques I used took a lot of time to create. Even if I’m only talking about a few minutes, it accumulates when I use it several times in each picture, and I process several pictures a day.

Raya Pro Photoshop Plugin - How to Simplify and Speedup Your Workflow

I’ve used a Luminosity Mask to create local adjustments to the highlights in this image.

What is Raya Pro?

Spending time repeating the same techniques over and over again can be quite demotivating and even lead to you being sloppy in your post-processing. That’s why Raya Pro has become a part of my workflow. It’s a Photoshop Panel which allows you to make several advanced and professional-looking techniques with a simple click.

It’s a tool that’s useful for both experienced Photoshop users (to save time) and complete beginners (to learn to create professional effects).

Raya Pro consists of seven panels:

  • Raya Pro HUB
  • InstaMask
  • Precision Mask
  • Quick Blend
  • Colors
  • Dodge & Burn
  • Filters/Finish

Raya Pro Photoshop Plugin - How to Simplify and Speedup Your Workflow

Each panel contains several Actions which you easily can use to create professional-looking effects or techniques, such as Luminosity Masks, Dodging & Burning, the Orton Effect and Web Sharpening.

Most Important Features

I’m not going to lie and say that it doesn’t take some time to understand all seven panels. It’s quite a lot to get into but along with each panel, there’s a button that takes you to a series of video tutorials specifically for that panel. These tutorials are easy to follow and if you’ve already got some knowledge of Adobe software, it won’t take long for you to master the panels.

While it may seem a bit overwhelming, you’ll most likely not use all the Actions. In my experience, you’ll find a handful of Actions you use on a regular basis and mostly stick to using those. Let me make it a little easier for you and point out the ones I use in my workflow.

Exposure Blending & Luminosity Masks

One of the main features and uses of Raya Pro is to easily blend multiple images and create Luminosity Masks. (If you’re not familiar with Luminosity Masks I recommend reading this article by Raya Pro creator and dPS writer Jimmy McIntyre).

Raya Pro Photoshop Plugin - How to Simplify and Speedup Your Workflow

There are three ways to blend images with Raya Pro:

  1. With the QuickBlend Panel
  2. Using the Precision Mask Panel
  3. With the InstaMask Panel

The easiest option is to use the QuickBlend Panel. Here you can simply blend multiple exposures with one single click. However, being the easiest it’s also the most restricted so you might need to tweak it a little for optimal results. That being said, it does a good job most of the time.

The Precision Mask Panel is slightly more advanced and is divided into three sections: Exposure Blending, Color Zones and Fix Dark Blend. With this panel, you can create precise masks and further refine them by subtracting a specific color from your selection, for example.

InstaMask is the most advanced of the three but also the most flexible. Its main purpose is to create Luminosity Masks so if you want to do exposure blending you’ll need to create and apply the masks. This is my preferred panel as I’m able to further refine selections and apply either apply them to a mask or use them to create an adjustment layer.

Dodge & Burn

While creating a Dodge & Burn layer doesn’t take much time, it’s an effect that I often apply multiple times on an image; which is why I prefer having an Action (or Raya Pro) to create it quickly.

Raya Pro Photoshop Plugin - How to Simplify and Speedup Your Workflow

The Raya Pro Dodge & Burn panel.

Raya Pro has its own panel dedicated to Dodging & Burning where you’re able to create much more than only the traditional 50% Grey layer (though this is what I use the most). In this panel, you can create Dodge & Burn layers that specifically target only the highlights, shadows, or mid-tones. This is a great option to have when you’re working on local adjustments.

In addition to Dodge & Burn layers, you’re also able to create different styles of the Orton Effect; a glow effect that creates a dreamy atmosphere.

Correcting Color Cast

Raya Pro is also a great tool when it comes to working with colors. Whether you want to saturate, desaturate, convert to B&W or add warmth to the highlights, it’s all done with one simple click.

Correcting color cast is done with one simple click as well. In fact, you’ve got four options to use in case one doesn’t give you a good result: Correct 1, Correct 2, Correct 3 and Manual Correct. The three first make use of different techniques that automatically remove color cast. But should those not work, you can use the Manual Correct button for better results.

Filters & Finish

The last panel I use in my workflow is Filters & Finish. While I only use this panel for the Web Sharpening tool that doesn’t mean I don’t recommend playing around with the other effects as well.

Raya Pro Photoshop Plugin - How to Simplify and Speedup Your Workflow

You’re also able to add your own Actions if there’s a specific technique or effect you regularly create, that’s not already on the panel.

Final Words

Raya Pro has been a part of my workflow for the last couple years. While I still make the majority of the techniques, effects, or edits manually, I do use it at some point for most of my images.

It’s a plugin that is great for both complete beginners and advanced users as each panel is built differently. After some trial and error it’s pretty straightforward to use and, in my opinion, it’s never been easier to create professional looking techniques.

The post Raya Pro Photoshop Plugin – How to Simplify and Speedup Your Workflow appeared first on Digital Photography School.


Digital Photography School

 
Comments Off on Raya Pro Photoshop Plugin – How to Simplify and Speedup Your Workflow

Posted in Photography


New startup ‘Binded’ aims to simplify copyright for photographers

28 May

How do you stop your images from being stolen? And if it happens, what can you do about it? Copyright disputes are among the most difficult issues that face working photographers, and in the US, registering copyright is time-consuming and expensive in itself.

Binded CEO Nathan Lands is pitching the service as an easier alternative to traditional means of registering copyright.

He has pledged that Binded will remain a free service, but one that creates a permanent record of copyright, which can be used in the event of a dispute.

‘Binded’ is a free service that aims to simplify the process of registering – and enforcing – copyright for photographers. When you upload an image to Binded, it creates a digital ‘fingerprint’ which serves as a permanent record that you own the copyright. This record is then written to the bitcoin blockchain. Binded will then monitor use of the image on the Internet, and automatically notify the copyright holder if it detects unauthorized use. 

For now, uploading an image to Binded does not count as an official government registration of copyright in the US. According to CEO Nathan Lands, that’s something that he hopes will be added to the service over time.

Previously known as Blockai, the startup has just raised an additional $ 950,000 in funding from investors, bringing total funding to $ 1.5 million.

What do you think? Let us know in the comments.

Learn more at binded.com

Articles: Digital Photography Review (dpreview.com)

 
Comments Off on New startup ‘Binded’ aims to simplify copyright for photographers

Posted in Uncategorized


3 Ways to Simplify and Learn Photography Faster

30 Jun

It’s not always easy to be a photographer, seeing all of the great photo opportunities around us, and wanting to capture them all. Recently, I was working with a student of mine, and she wanted to know how to handle changing settings quickly from one situation to another.  Her example was trying to go from photographing landscapes, to trying to focus on a bird or other wildlife that may quickly enter the scene. While some seasoned photographers may be ready for a situation such as this, it’s certainly not easy, and for someone just learning, I would argue that it shouldn’t be attempted at all.
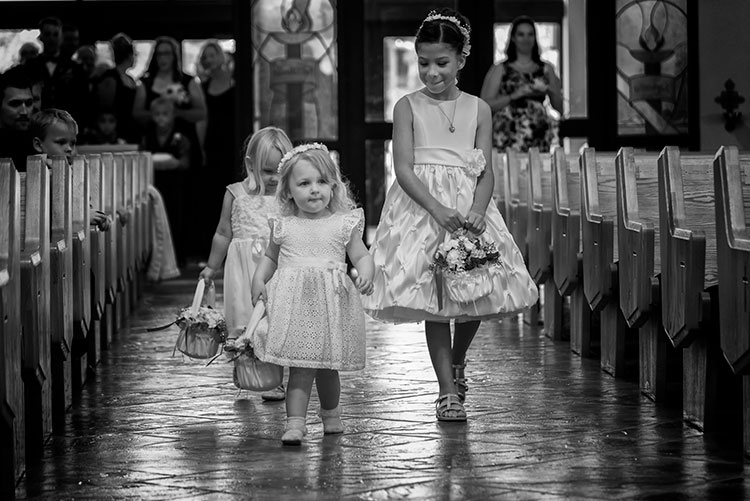
24-120mm. Shot at 120mm, 1/160, f/4, ISO 1400. Knowing how the lens behaves at both ends of the zoom, I knew I could use this lens for wide angle shots in close, but zoom in as the flower girl was coming down the aisle and still get an interesting shot.

24-120mm, shot at 120mm, 1/160, f/4, ISO 1400. Knowing how the lens behaves at both ends of the zoom, I knew I could use this lens for wide angle shots in close, but zoom in as the flower girl was coming down the aisle and still get an interesting shot.

While many of the camera manufacturers want to make photography sound easy (anyone remember “So advanced, it’s simple”?), the fact is, photography is a craft, that despite the advances in technology, takes some time to master. Different photographic situations call for different settings, different lenses, or even a completely different approach to the subject matter. If you’re a hobbyist with only one camera, it can be impossible to be ready for all of the possibilities as they happen.

So here are three ways to keep it simple while you’re learning photography, and stop the overwhelm.

#1 – Focus on one subject at a time

I’m a strong advocate for keeping things simple. First off, if you’re planning to photograph landscapes, wildlife, or portraits, stick with that one goal.  It is easy to get distracted by other subjects that come along. Those opportunities can seem like gold when they pop up, and they can be, but if you’re already set up to shoot a landscape photo at ISO 100, f/16 aperture, and 1/20th shutter speed, quickly switching to settings suitable for capturing a bird in flight is not an easy process. It will likely end in you being frustrated, capturing photos that don’t quite meet your expectations, or worse, don’t come out at all.

Even now, 20-plus years after beginning my photography career, I try not to do too much at once with a camera. I focus on what my goal was when I first decided to pick up the camera and head out. If I’m planning on photographing a landscape at sunset, that’s what I do. The only time I will try to be ready for two separate subjects, is when I have two cameras. For instance, if I’m photographing a landscape, but there are waterfowl nearby and I want to be ready for that, I have a second camera set up with a telephoto lens, so I can grab it and try and get the shot. Even this requires me to at least temporarily put my initial subject, the landscape, aside for a bit.
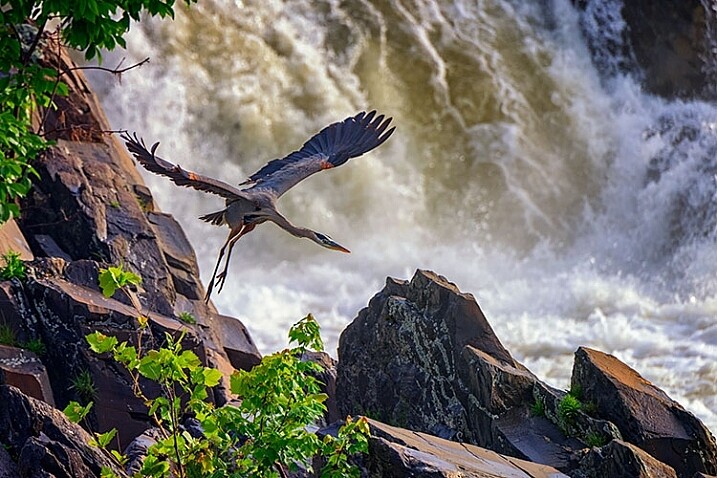
Wildlife image taken using a fast shutter speed and a telephoto lens.

This shot of the blue heron was taken with a 400mm lens, using continuous AF, and 1/1250 shutter speed.

The image of the waterfall (below), and the image of the great blue heron (above), were both taken at the same location.  However, for the shot of the waterfall, I needed to use a neutral density filter to slow down the exposure. There is no way I’d have been able to remove the filter, and be ready to photograph the heron, even if both shots could have been captured with the same lens. Not only would my shutter speed have needed to be drastically faster to stop the flight of the heron, I would also have needed to use continuous AF to capture its flight sharply, while I always use one-shot AF when photographing landscapes.

Knowing there may be wildlife nearby, I mounted a Nikon 80-400mm lens on one camera (on a strap on my shoulder), while I had a second camera with a shorter lens, set up on a tripod to capture the waterfalls. If I only had one camera, I would have needed to choose between one subject or the other, and then move on. Rare is the occasion when you can jump so quickly from one subject to a completely different one using only one camera.
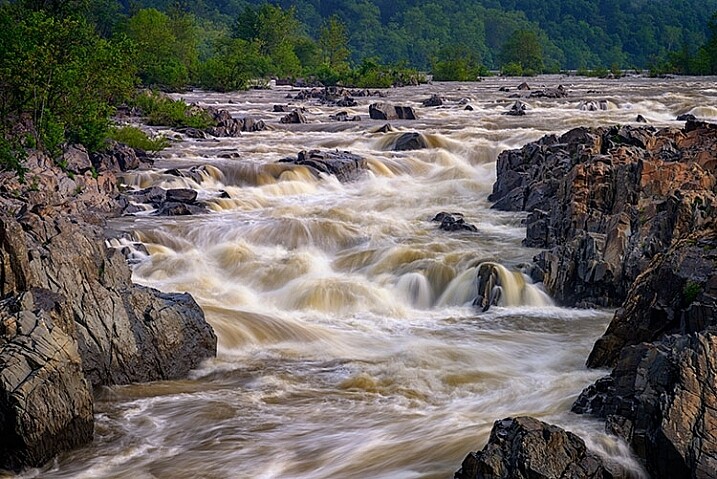
Landscape image using a slow shutter speed and wide angle lens.

This shot was taken with a 16mm lens, using one-shot AF, and a 0.6 second shutter speed.

If you’re working with only one camera, don’t try to do too much.  Pick one subject and work that until you feel you’ve accomplished what you wanted, then move on to another subject. Yes, it’s difficult to be set up to catch a sunset and watch a beautiful snowy egret land nearby and start fishing, leaving you itching to try and catch it, but chances are it will fly away again while you’re still fiddling with your settings. Meanwhile, the sun is still setting, the color is fading, and you’ve likely missed a shot or two there as well.

#2 – Use only one lens

Back when I took my first photo course in college, my professor was adamant that each student use only a 50mm lens. I didn’t understand why at the time, but I do now. It’s important to understand how your lenses behave, so you’ll know which one is right for the job. As photographers, many of us become gear collectors, always wanting another lens, to allow us to photograph the way we saw another photographer do it. But before you start collecting lenses, it’s important to recognize what each lens can do for you, and to truly understand that, you’ve got to use each lens extensively.
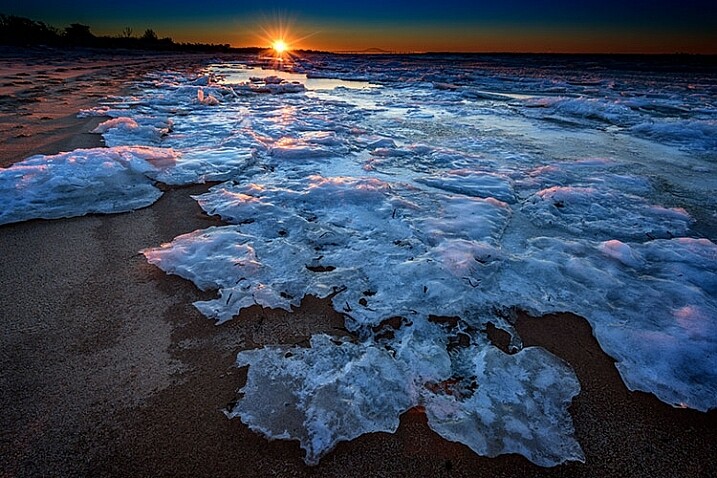
Wide angle lenses expand perspective.

Using a wide angle lens, I was able to emphasize the ice in the foreground, while pushing the bridge to the background at the top center of the frame.

I currently have seven camera lenses in my kit right now. At any given time, there may be four or five in my camera bag when I’m out photographing, depending on what my planned subject is, or what contingencies I want to be ready for. But, as usually happens, it’s rare that most of those lenses will see the outside of my bag once I get where I’m going. While each situation is different, I often find that one lens will usually handle what I want to do when I get to a location. So unless it’s one of those rare times when a situation calls for both a telephoto and a wide angle look, usually only one of those lenses gets mounted on the camera. While in the above example I broke this rule and used two cameras with two different lenses, that is not usually the norm for me.

When you pull your camera out of the bag next time and select lens to use, stick with that one lens. Really get to know it. If it’s a zoom, shoot at only one end of it. The next time you use it, use the other end. Learn how to make that lens really sing. Find out what it’s really good for, and what it’s not good at. Do this with every lens you own, if you own more than one. When it comes time to purchase new glass, you’ll have a much better understanding of where your kit comes up short, and what you need to buy. In addition, you’ll also be building on my first point, focusing on one subject. Too often, new photographers miss opportunities because they are busy changing lenses because they think they need one over another. If changing lenses is not an option, you won’t waste time with it, and can focus on making great photos with whichever lens you find on your camera.

Telephoto lenses compress perspective.

Telephoto lenses compress perspective. Want to make the sun or moon look really big in relation to a building or structure? Back away from your subject a bit and use a telephoto lens to compress the perspective and distort the size relationship.

In the two images shown above, the same bridge can be found in both, and both shots were taken from roughly the same spot. One was taken with a 16mm lens, and the other, with a telephoto lens at 290mm. Wide angle lenses expand perspective, emphasizing the foreground and pushing background objects back, while telephoto lenses minimize foreground and tend to flatten perspective. Using only one focal length will also help you to compose more effective images. Zooms can at times make you lazy. Zooming from a wide angle to a telephoto lens changes the image profoundly, and it’s important to understand what effect that can have on your image.

Telephoto lenses compress perspective, while wide angle lenses enhance it, and each perspective communicates something different to the viewer. There are reasons to use both wide and telephoto lenses, but only working with them extensively will help you recognize the situations where each is most effective.

#3 – Don’t accessorize
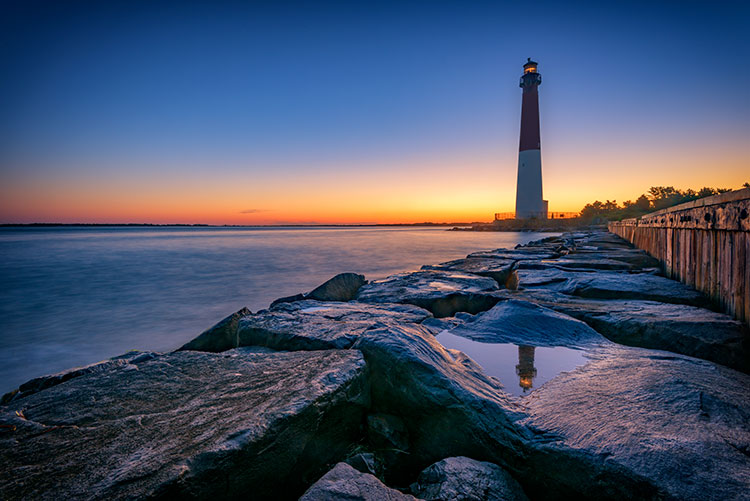
For the lighthouse image- Shot at 16mm, f/16, 15 seconds, ISO 64. I simplified my composition down to two elements, the reflection in the foreground, and the lighthouse in the background. Knowing the lighthouse would be there regardless of where I stood or how I zoomed, I focused on getting the reflection right, and letting the rest of the composition fall into place.

Shot at 16mm, f/16, 15 seconds, ISO 64. I simplified my composition down to two elements, the reflection in the foreground, and the lighthouse in the background. Knowing the lighthouse would be there regardless of where I stood or how I zoomed, I focused on getting the reflection right, and letting the rest of the composition fall into place.

One of the great things about digital photography, and today’s technology, is the many cool new tools available to help with your picture-taking endeavors. It’s great to be able to connect to a camera from your smartphone, and do things such as time lapse or long exposures, but often times, these accessories are one more thing that can go wrong, or distract you from actually taking photos.

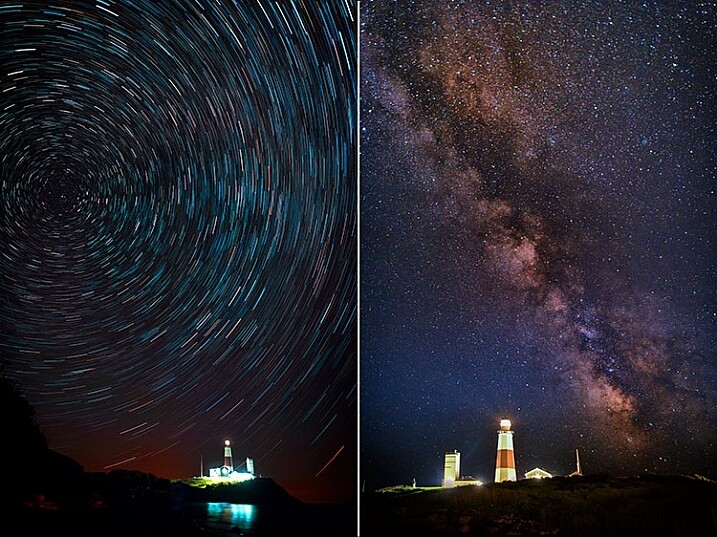
There are only three accessories that I use regularly. One is a time controller that plugs into my camera directly, second is a tripod, and finally, a set of neutral density and graduated neutral density filters, used to help control exposure. I didn’t even begin using the filters until a few years ago, more than 15 years into my photography career. Both images below used nothing more than a remote shutter release. In the case of the Milky Way image, on the right, I set my camera to manual for a 15 second exposure and used the remote release as I would the shutter button, simply to avoid touching the camera. For the image on the left of the star trails, while that becomes a bit more complicated in processing, in reality, it’s just a lot of 30-second exposures. I simply set my camera to continuous drive, and locked the shutter button on the remote down. Simple.
Minimize accessories

Even for images such as these, the only accessory I used was a time controller, with only the shutter button locked down.

It’s important, when learning photography, to focus on the basics – aperture, shutter speed, and ISO, and understand how they affect your images. It’s too easy to get caught up in all the bells and whistles and how cool they are, and forget that the end result is what matters. In my mind, if the accessory isn’t contributing in a way that affects the final image, then I don’t need to use it. I’m not saying that accessories are bad, or even unnecessary, but if you aren’t sure how to achieve a proper exposure yet, put off purchasing that shiny new toy, and really learn your camera.

I would even advise you to stay away from the special modes on your camera, such as HDR, or star trails mode (I do that manually in post-production), or multiple exposure mode. Yes, they can look cool, and do great things, but again, understanding the basics of exposure is paramount. If you don’t understand basic exposure, using the bells and whistles won’t help you make music.

I find that simplifying the process as much as possible helps me come away with the best images possible. What do you do to help simplify your photographic process?

googletag.cmd.push(function() {
tablet_slots.push( googletag.defineSlot( “/1005424/_dPSv4_tab-all-article-bottom_(300×250)”, [300, 250], “pb-ad-78623” ).addService( googletag.pubads() ) ); } );

googletag.cmd.push(function() {
mobile_slots.push( googletag.defineSlot( “/1005424/_dPSv4_mob-all-article-bottom_(300×250)”, [300, 250], “pb-ad-78158” ).addService( googletag.pubads() ) ); } );

The post 3 Ways to Simplify and Learn Photography Faster by Rick Berk appeared first on Digital Photography School.


Digital Photography School

 
Comments Off on 3 Ways to Simplify and Learn Photography Faster

Posted in Photography


Create Art with your Photos Using Topaz Simplify

27 May

Simplified-after-1

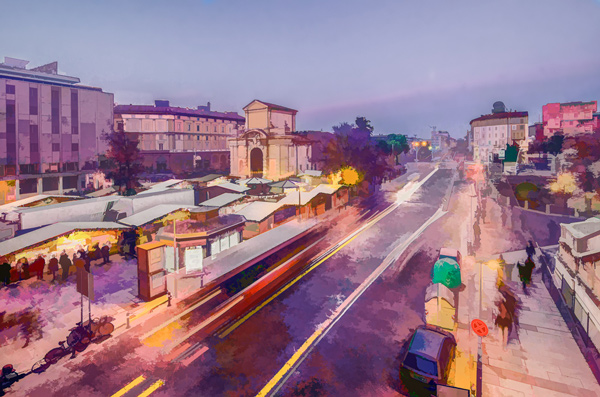
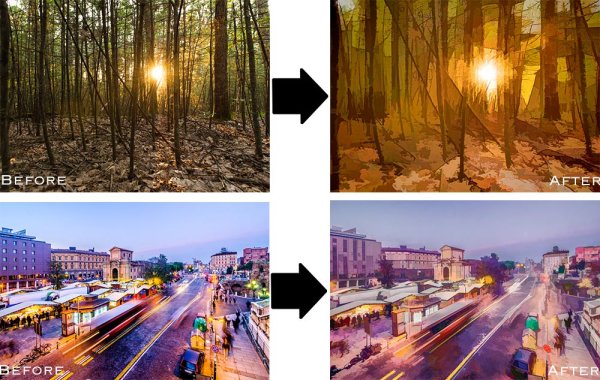
Topaz Simplify is designed in a way that allows you to transform your photography into something that resembles painted or drawn art. There are a ton of different styles of art packed into Simplify, from line and ink, to oil and watercolor painting; so it should provide some great creative opportunities for you. Today I’m only going to do a basic walk through on a couple of different photographs in order to introduce the product to you.

TopazSimplfiy-Beforeandafter

Before getting started I do want to mention that while I’ll be using Topaz Simplify as a Lightroom plugin today, it also works with Photoshop, Aperture, iPhoto and others so you don’t have to have Lightroom to use it. Find out all the info and get the free trial of Topaz Simplify here.

Topaz Simplify Basic Walkthrough

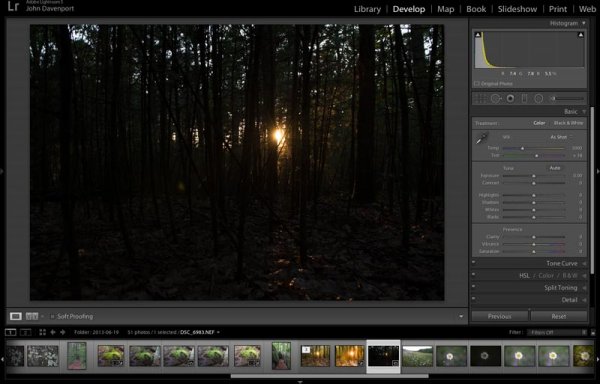
As you can see from the original RAW file below this photograph is in some serious need of help. It’s basically just an underexposed shot of the sun setting through the forest, without much of a focal point or anything interesting going on. Now I don’t want you to think that Simplify will solve all your terrible miss-fired shots, in most cases it won’t. But here I think it does a remarkable job at making lemonade out of lemons.

Do Lightroom basic adjustments first

TopazSimplify-Original

Original RAW file in Lightroom

Before we can use Simplify however, we do need to get the photograph into some sort of usable shape. For this photograph I’ve got to really rely on Lightroom’s power of saving an underexposed image which it handles without too much of a problem.

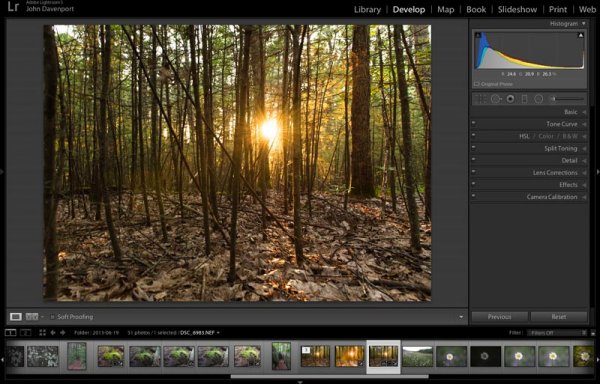
After some adjustments in Lightroom 5 using a combination of sliders in the basic tab, you can see that the photograph is at least now in a condition that Simplify will be able o handle.

TopazSimplify-LightroomCleanupCrop

After some basic Lightroom adjustments

To use Topaz Simplify in Lightroom you’ll also need the free Fusion Express plugin (download it here) which is what launches all of the Topaz products. Once both programs are installed launch Topaz Simplify by right clicking on your photo. Navigate to EDIT IN > FUSION EXPRESS 2.

TopazSimplify-LaunchSequence

You can see this in more detail in the video below

Next, a dialog box will open up asking you to select how you’d like the photograph to be brought into Topaz Simplify there are three options here – I always choose ‘create a copy with Lightroom adjustments’ as the other two work off the original file in Lightroom. Note: if this is an area of confusion for you, you’ll be able to see this process in more detail in the video below.

TopazSimplify-AdjustmentForest

Topaz Simplify preset and adjustment options

Next try the ready-made presets that come with Simply

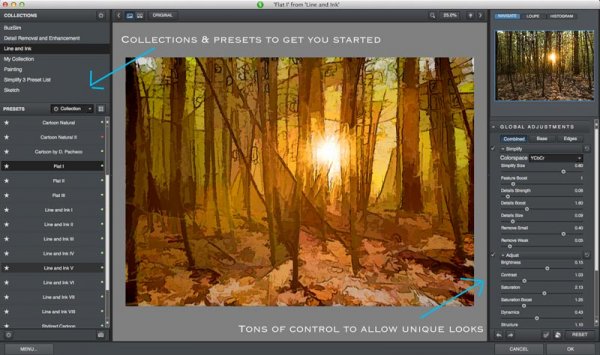
Once you’ve launched Topaz Simplify you’ll be brought into a new editor screen with a bunch of prepackaged collections filled with different presets.

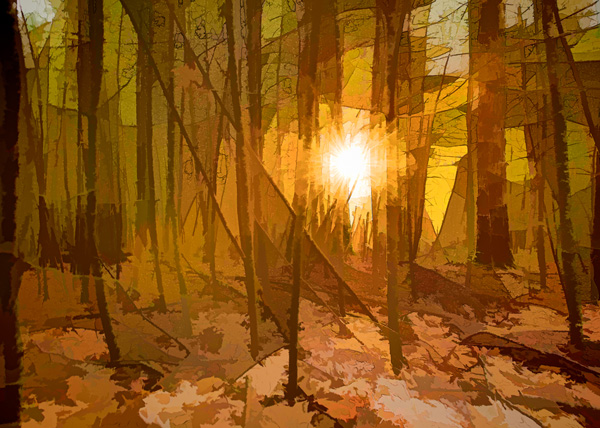
On the left-hand side, as you can see from the screen shot above, the Line and Ink collection is currently selected. There are a handful of other collections, each one containing a different set of presets, all of which are great when you’re just getting started with Topaz Simplify. I highly recommend just playing around with them to find out which ones suite your own creativity best, before getting to involved with the rest of the program. Here are a couple more variations on the photograph above that I achieved with just a few mouse clicks using presets.

TopazSimplify-Forest2

A couple more Topaz Simplify variations.

Customize and play

However, once you have gotten used to the presets and found the ones you like, you also have a lot of control to make the images your own through various adjustment options.

The right-hand panel offers the ability to control things like the overall intensity of the Simplify effect, the ability to determine which edges are drawn in harder or removed entirel,y and the ability to modify how much overall detail is pulled out from the scene.

You also have access to some options for basic image adjustments should you need to do some minor contrast, brightness or saturation modifications (though I’d suggest waiting on these until you get back into Lightroom).

Finally – one of the best parts of Simplify – is that Topaz decided to include bunch of great local adjustment options allowing you to burn, dodge, smooth and/or brush out the effects of Simplify in specific areas of your photograph.

Simplified-after-2

For a look at Topaz Simplify in action watch the video below where I run our second photograph from the two before and after images above through Simplify.

Topaz Simplify Basic Video Walkthrough

What do you think? Have you simplified a photo?

So after this basic walk through I’d love to hear your thoughts on the software. If you do go ahead and use it, or have done so in the past, how about a sharing one of your favorite before and after image sets in the comments below – I’m curious to see what you’re able to come up with.

The post Create Art with your Photos Using Topaz Simplify by John Davenport appeared first on Digital Photography School.


Digital Photography School

 
Comments Off on Create Art with your Photos Using Topaz Simplify

Posted in Photography


How to Simplify and Improve Composition with Normal or Long Lenses

28 Feb

Telephoto lenses and composition

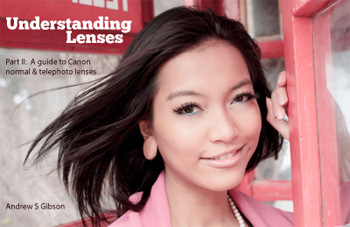
Andrew S. Gibson is the author of Understanding Lenses Part II: A Guide to Canon Normal & Telephoto Lenses, special deal on now 40% off at Snapndeals for a limited time only.

Wide-Angle Lenses

A potential issue with wide-angle lenses is that you try to include too much information in the frame. It takes real skill to create a strong composition with lenses that have a wide field-of-view. It is easier with normal and telephoto lenses, because you can utilise their narrow field-of-view to compose strong yet simple images with little in the background to distract the viewer.

Let’s take a look at how that works:

Field-of-view diagram

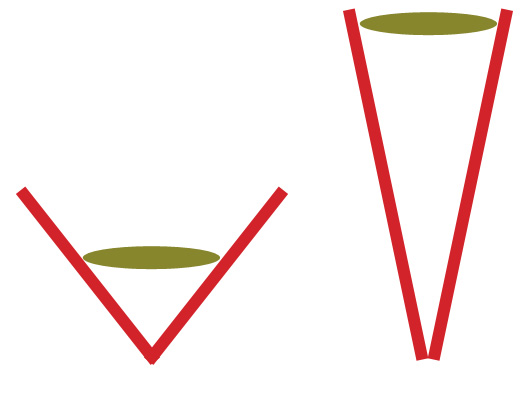
Angle of view from a wide-angle lens (left) and long lens (right)

This diagram shows the difference in field-of-view between a wide-angle lens (left) and a telephoto lens (right). You can think of a wide-angle lens as a lens of inclusion: it enables you to fit a lot of the scene in a photo. You can get close to the subject and still fit in a lot of the background.

The telephoto lens is a lens of exclusion. You don’t get so close to your subject and there is less in the background.

Here are a couple of examples:

Portrait taken with wide angle lens

I took this portrait using a wide-angle lens (24mm on a full-frame camera). I was able to get fairly close to the model and still include a lot of the background.

Portrait taken with telephoto lens

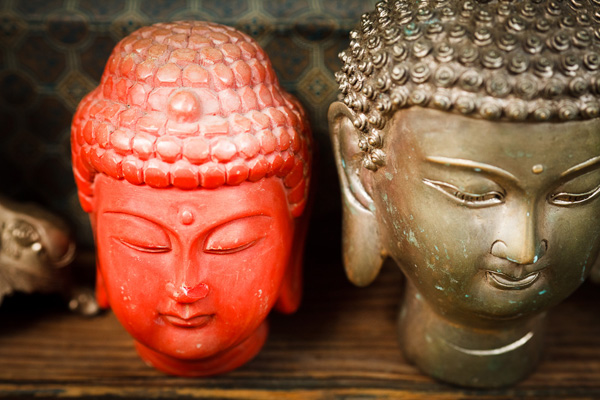
This portrait was taken using a short telephoto lens (85mm on a full-frame camera). I was able to get in close and exclude most of the background. The effect is emphasized by placing the model against a dark background.

This effect seems to kick in at around 50mm on a full-frame camera (the equivalents are 35mm on an APS-C camera, and 25mm with the micro-four thirds format). Here’s a photo taken with a 50mm lens on a full-frame camera to illustrate:

Photo taken with a normal lens

This means that you can use this technique to simplify composition even if the only lens you have is a kit lens. Just set it to the longest focal length and move in closer to your subject.

There are other ways to simplify composition – you can’t rely just on focal length:

  1. Pay attention to the background. Does it contain bright highlights or anything else that pulls attention away from the subject?
  2. Are the colours in your photo harmonious? If the colours don’t work well together this can also weaken the composition.
  3. Experiment with depth-of-field. Using a wide aperture helps simplify composition by throwing the background out of focus. This works best with prime lenses as they have wider apertures than most zooms.
  4. Move in as close as you can to the subject. One of my favourite techniques is to use a close-up lens (it’s called a lens but looks like a filter and screws to the front of your lenses the same way) to reduce the minimum focusing distance of my 85mm lens and get in really close. Another benefit is that depth-of-field becomes narrower in close up photography, helping create images with beautiful bokeh.

Here’s an example taken with an 85mm lens fitted with a Canon 500D close-up lens:

Photo taken with 85mm lens plus close-up lens

What are your thoughts? Do you use normal or telephoto lenses to simplify composition the same way? What are your favourite focal lengths? Let us know in the comments.


Understanding Lenses Part II: A Guide to Canon Normal & Telephoto Lenses

Understanding Lenses ebookMy ebook Understanding Lenses Part II will teach you how to get the most out of Canon’s normal and telephoto lenses. It contains a buying guide, takes a deep look at aperture and bokeh, and shows you how to focus accurately with telephoto lenses. It’s now 40% off at Snapndeals for a limited time only.

The post How to Simplify and Improve Composition with Normal or Long Lenses by Andrew S. Gibson appeared first on Digital Photography School.


Digital Photography School

 
Comments Off on How to Simplify and Improve Composition with Normal or Long Lenses

Posted in Photography


If You Had to Simplify Your Camera Kit… [DISCUSS]

16 Oct

If you had to really strip your camera gear back to the very basics what would you do?

Whats in my camera bag 52/365

This question comes after a chat with a friend yesterday who admitted that he now had 3 DSLRs and 14 lenses for them… in addition to several compact cameras and a four thirds camera body with 4 lenses.

I asked him what he’d do if he had to give it all up except for one camera body and one lens and he almost started to hyperventilate but it led to a fascinating conversation about the merits of different gear.

I know not everyone has that level of gear at their disposal but I know many of our readers have acculated quite a bit of gear…. so what would you do if you had to simplify or strip it back to the basics.

Lets say you can only have one camera body and one lens – which ones would you keep?

Post originally from: Digital Photography Tips.

Check out our more Photography Tips at Photography Tips for Beginners, Portrait Photography Tips and Wedding Photography Tips.

If You Had to Simplify Your Camera Kit… [DISCUSS]


Digital Photography School

 
Comments Off on If You Had to Simplify Your Camera Kit… [DISCUSS]

Posted in Photography