RSS
 

Posts Tagged ‘Silver’

Software review: Nik Silver Efex Pro 3 gives the look of black and white film without the fuss

18 Oct

Nik Silver Efex Pro 3
$ 149 as part of Nik Collection 4

A few months ago we found a lot to like in the latest iteration of the Nik Collection, a suite of eight image processing tools initially developed by Nik Software and these days owned by French software company DxO. At the time, we looked at the overall suite with a focus on what was new. For this review, though, we’d like to take a closer look at just one of the suite’s most useful components, Silver Efex Pro 3.


Introduction

Nik Silver Efex Pro 3 is a black-and-white conversion tool that goes far further than the grayscale or black-and-white tools built into Adobe Photoshop. It allows users to simulate the look of specific real-world film types, manually tuning their color sensitivity and grain with an incredible amount of flexibility and precision. For less experienced users, a generous selection of presets are provided to get you started with minimal effort.

Silver Efex allows you to make a wide range of adjustments to brightness, contrast, structure and tonality, either globally or locally using control points. You can also apply color filters, reduce haze and finish your creations with toning, vignetting, borders and more.

Even at its default ‘neutral’ setting, Silver Efex Pro’s rendering is noticeably different to that of a simple grayscale conversion in Photoshop.
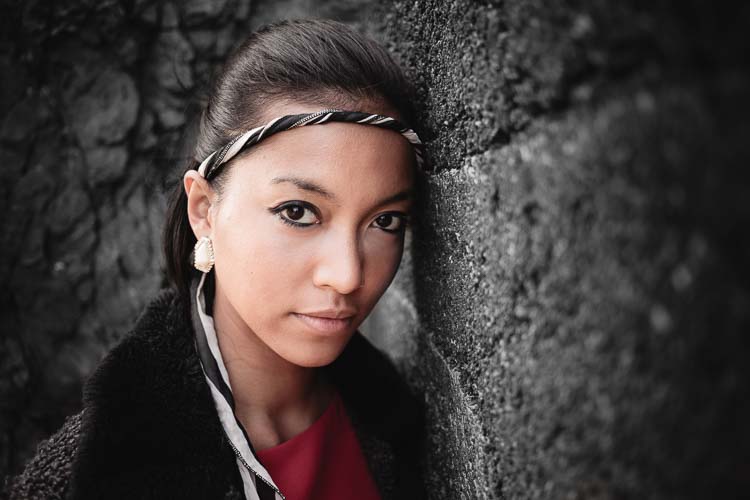
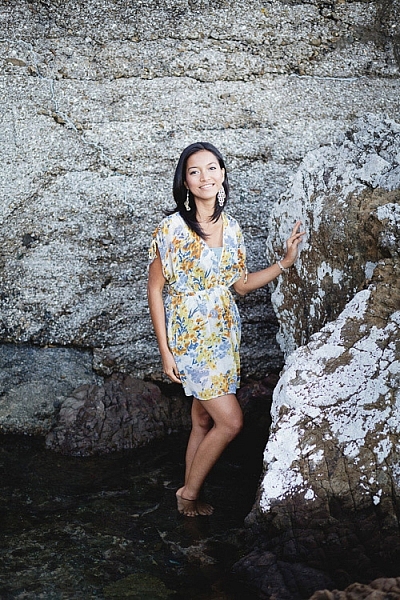
Click here for the full-sized Silver Efex image, here for Photoshop grayscale or here for full color.

Available immediately as part of the Nik Collection 4 bundle, Silver Efex Pro 3 can function either standalone or as a plugin for Photoshop, Lightroom and other compatible apps on both Windows 8.1+ or macOS 10.14+. (And as of the recently-released Nik Collection 4 version 4.2, this includes support for Adobe Photoshop running natively on Apple M1 devices.)

The overall Nik Collection 4 is priced at $ 149 for new customers, with upgrades available to existing customers for $ 79. That actually makes it around $ 50 less for the full suite than Silver Efex Pro 1 or 2 used to cost standalone.


What’s New?

Let’s take a quick look at what’s new in Silver Efex Pro 3. The biggest change is to the user interface, which has been completely redesigned with a far more modern look. Gone are the busy 3D-effect buttons, bevels and drop shadows of the Silver Efex Pro 2 UI, with the new version aiming to reduce distraction with a flatter, cleaner and more modern interface.

Compared to that of version 2, Silver Efex Pro 3’s interface is much cleaner and more modern.

DxO has also updated its U-Point control point technology to reduce visual clutter, significantly increase versatility and in the latest v4.2 release, bring a modest boost to performance as well. Control points can be grouped or renamed, saved for reuse in presets, and in Lightroom Classic can also be copied and pasted between images. Their individual sliders now appear in the right panel rather than directly on the image, and the luminance/chrominance values to which they respond can be tuned.

The company has also borrowed two features from its other apps to further extend Silver Efex Pro. It now boasts both the haze-busting ClearView slider from DxO PhotoLab, as well as the ability to add one of 39 black and white film grain types from DxO FilmPack. Both of these additions can only be applied globally, rather than via U-Point controls.


User interface and controls

Just like the other apps in the Nik Collection, Silver Efex Pro 3 can be used completely standalone and without the need for third-party applications.

Works standalone but it’s best used as a plugin

As a standalone app, Silver Efex can only open images in JPEG or TIFF formats, which rather limits its utility. Since it doesn’t support Raw files standalone, many photographers will instead want to pair it with other apps.

Standalone mode is very similar to plugin mode but without the bottom-of-screen status bar you’d use to apply changes as a plugin. Instead, you must use save command in the file menu.

As well as DxO’s own PhotoLab series, it can officially be used only with Adobe Photoshop and Photoshop Elements 2020+, Lightroom Classic 2019+, Affinity Photo 1.8+ or, as of its v4.2 release, Capture One 21. Other applications may work to varying degrees, but aren’t officially supported.

For example, Exposure X6 works even for Raw files, first converting them to TIFF format, but functions as if Silver Efex had been opened standalone. You aren’t shown the status bar at the bottom of the screen, and instead must use the file menu to save your results. And prior to v4.2, Capture One didn’t work at all, appearing fine but failing to apply its adjustments in the final step.

The good news is that a free 30-day unlimited trial is available, so if you’re using an application that’s not officially supported with the Nik Collection, you can try them together first to see if everything works before paying.

A fair few presets keep things simple for beginners

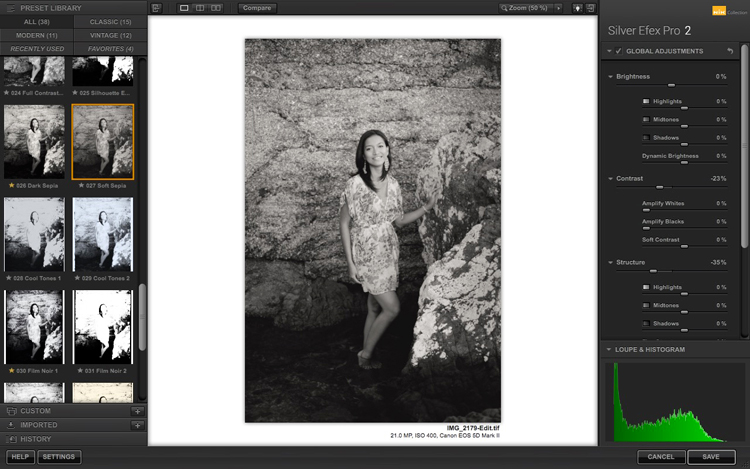
The quickest way to get results from Silver Efex Pro 3 is to use one of its presets, of which there are a reasonably generous 58 in all. They’re separated somewhat haphazardly into five groups with not-so-informative names: Classic, En Vogue, Modern, Vintage and 25th Anniversary. You can also view all five groups together, filtering them to show only your favorites or the ten most recently-used presets.

$ (document).ready(function() { SampleGalleryV2({“containerId”:”embeddedSampleGallery_8828424994″,”galleryId”:”8828424994″,”isEmbeddedWidget”:true,”selectedImageIndex”:0,”isMobile”:false}) });

The presets are all shown atop the left-hand pane, along with your editing history for the current image. For each preset you’re shown a small preview based upon the image you’re currently editing. These are rendered very quickly, making it easy to simply scroll through the list and find the look you’re after, or a preset that will make a good jumping off point for your own creation.

You can’t permanently modify the 58 base presets, but you can create new custom presets which can be exported and imported to allow sharing with other photographers or across multiple workstations. Your custom and imported presets are each grouped separately from the base presets, so there’s no way to quickly access favorites from all three categories or to see them all as one scrollable list.

A vast selection of controls to tune results to your tastes

Of course, while presets are great for beginners who want quick results, more experienced photographers will prefer to capture their own artistic vision, not simply borrow someone else’s.

Silver Efex Pro 3’s control list is so vast that, even with just one control point active and on a 1080p display, the right pane is still almost 3500 pixels tall. The cropped screenshots above link to the top and bottom halves of the right pane, respectively.

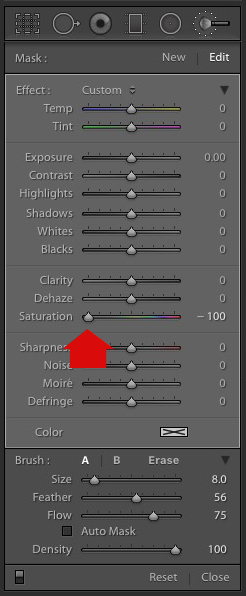
Thankfully, Silver Efex Pro 3 offers a huge amount of control over your images courtesy of a whopping 50+ controls in its right-hand pane. And that’s just counting the controls which affect the entire image globally. If you add one or more of DxO’s U-Point control points to the image, you’ll unlock another dozen-plus sliders per point or group of points.

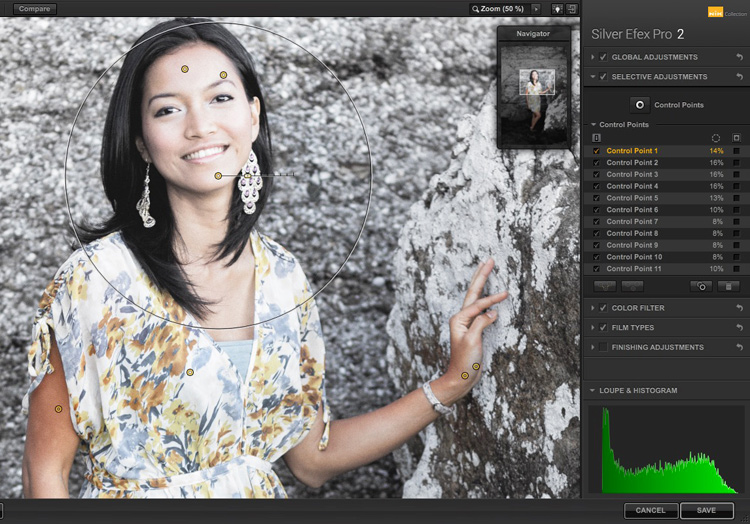
Not only global adjustments, but local ones too

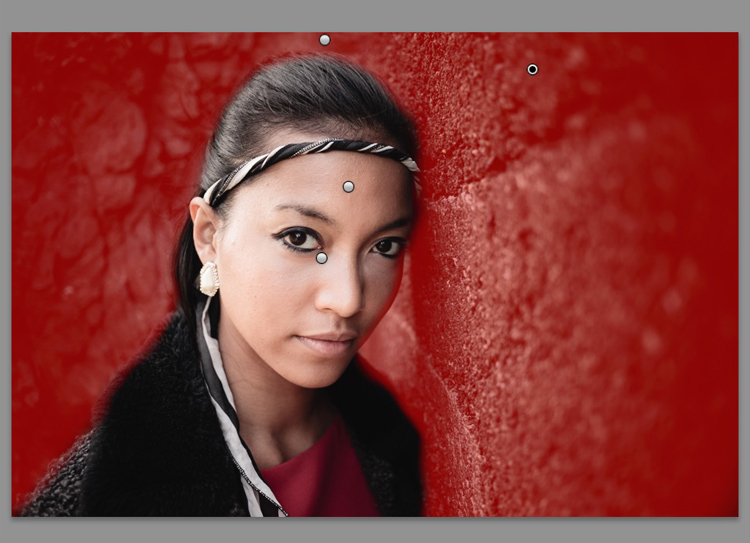
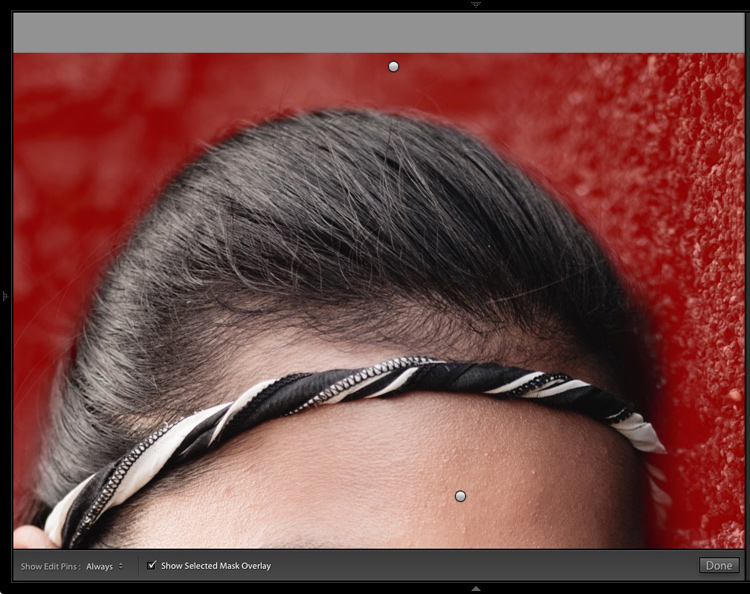
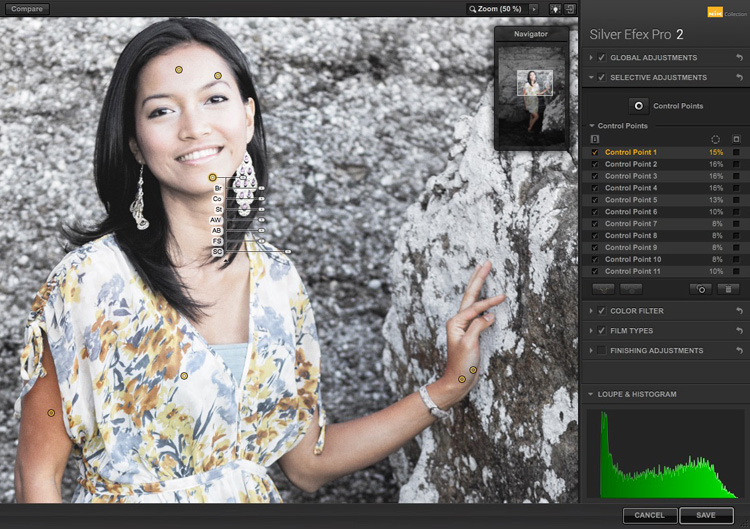
Each control point you add to the image is indicated with a small donut-shaped mark at its center, and while it is selected, an outer circle appears showing the extent beyond which the effect will gradually be feathered away to nothing. This outer limit can be resized to cover the portion of the image you need.

For each point, there are also both luminance and chrominance sliders, and these help you to target specific areas of the image based on their brightness and color before the black and white conversion. If you dial both sliders down to zero, the control point will effectively become a graduated radial selection, instead.

The ability to group and rename control points is very handy. In this mask view, I’ve selected the taxi’s body with one group of control points, and the road markings with another group.

Once placed, multiple control points can be grouped together. You can also rename both individual points and groups of them, and when saving new presets you can choose whether or not control points should be included. Of course, once the preset is subsequently applied to a different image, you can adjust the point positions if they don’t quite match what’s needed from shot to shot.

A closer look at the global controls

The bulk of Silver Efex Pro 3’s controls are grouped under its global adjustments header, with subgroups including brightness, contrast or structure adjustment headers, as well as tonality protection.

Click here for the full-sized Silver Efex image or here for the original color image.

Brightness can be adjusted globally, or for the highlights, midtones and shadows. There’s also a dynamic brightness slider which tries to hold onto local contrast in the highlights and shadows will brightening or darkening the image globally.

For contrast, you have a choice of either the basic contrast slider or a soft contrast slider which aims for a less harsh effect with more diffuse transitions. There are also sliders to amplify whites or blacks alone.

Under the structure header, you get both the basic structure control and one for fine structure, as well as individual controls for structure in the highlight, midtone and shadow areas. And finally, the tonality protection section contains sliders to recover lost detail in just the highlight and shadow areas of the image.

Local adjustments get a subset of these global controls

The selective colorization slider lets you bring back a specific color range to your otherwise-black and white image using U-Point selections. Image uses Full Dynamic (Smooth) preset.
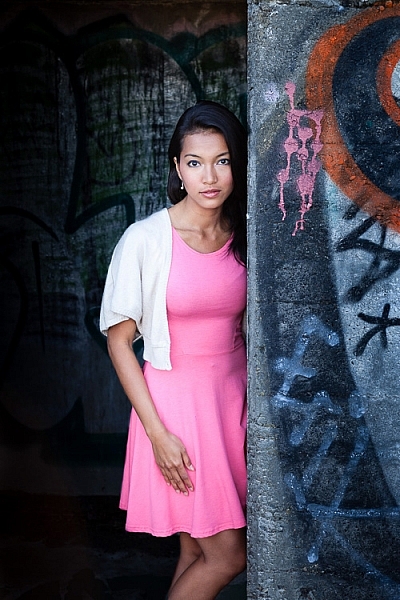
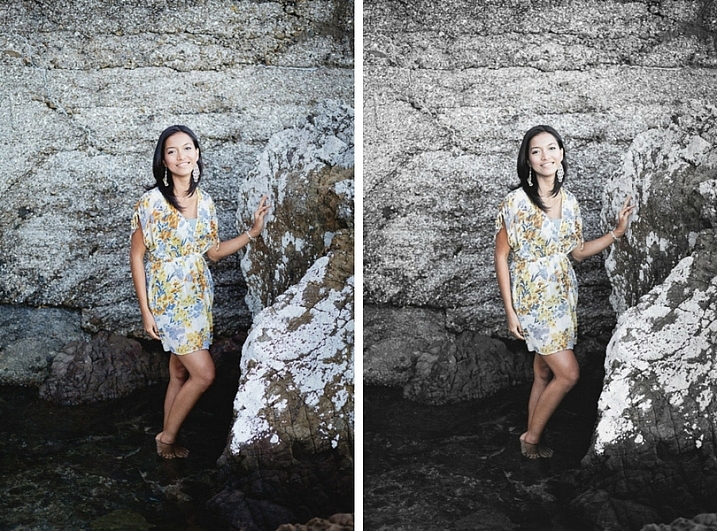
Click here for the Silver Efex image or here for the original color image.

Each individual control point or group of them also offers a subset of the controls from the previous section. Confusingly, they’re grouped rather differently to those for global adjustments, though. All but the dynamic brightness, soft contrast, tonality protection and high/mid/shadow/black structure sliders have equivalents for control points.

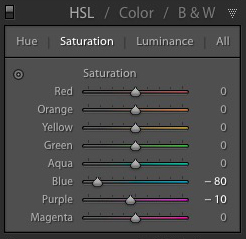
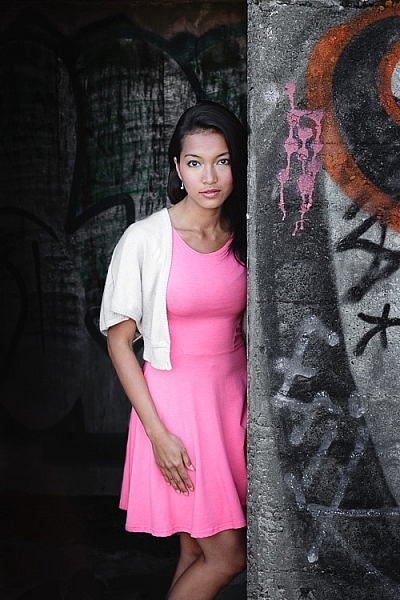
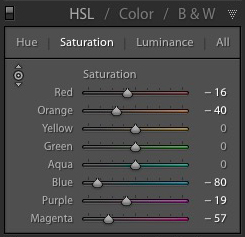
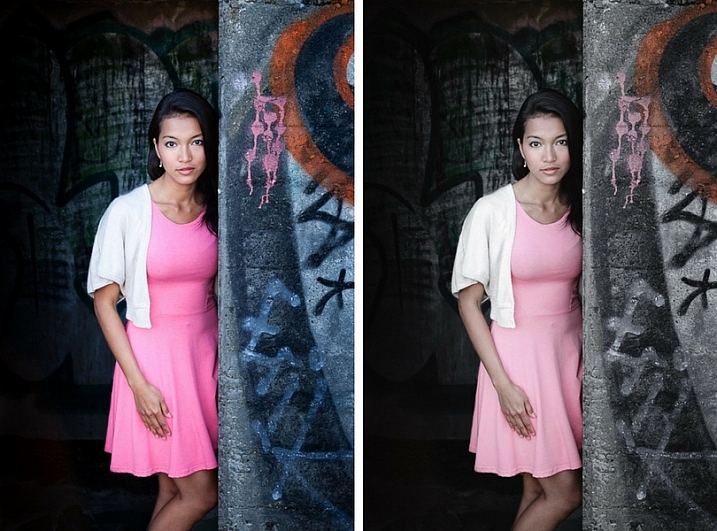
There’s also one extra control which is specific to the control points – selective colorization. This allows you to bring some of the color back into specific parts of your otherwise black and white image, and since you can have multiple control points, you can also bring back multiple colors if you wish.

Vanquish haze with the ClearView slider

The ClearView filter in Silver Efex Pro is quite effective, but can’t be targeted only at specific areas of the image, so can cause overly-contrasty foregrounds if pushed too far.
Click here for the full-sized default image, here for the ClearView image or here for full color.

One of the new features in Silver Efex Pro 3, inherited from DxO’s flagship PhotoLab application, is its new ClearView slider. Just like its PhotoLab equivalent, it’s very effective at recovering detail and increasing contrast in hazy backgrounds and other lower-contrast areas of your image.

I sometimes found it hard to push far enough though, simply because the areas of moderate contrast in my images would start to show too much contrast before the hazy background was fully recovered. I’d really like to see DxO allow ClearView to be paired with U-Point or some other form of localized selection in a future release to help in these situations.

Color filtering without the physical filters

With traditional black and white film, if you wanted to tune the response to individual colors of light you’d do so with filters attached to the front of the lens. For example, you might attach a yellow, orange or perhaps even a red filter to make a blue sky more dramatic, or a green filter to lighten foliage.

With Silver Efex Pro, that’s all achieved post-capture with no need to fumble for physical filters, however. Red, orange, yellow, green and blue filter presets are all provided, but if you prefer you can also dial in a specific hue in one-degree increments, and you can also control the strength of the filter from 0 to 200%.

Color filters can be simulated after the fact in Silver Efex Pro 3, so you can do things like darkening a blue sky with a yellow filter to help give the clouds more definition.
Click here for the full-sized unfiltered image, here for the filtered image or here for full color.

Simulate the look of real B&W film in two somewhat-contradictory ways

Silver Efex Pro 3 now offers two different tools to simulate the look of black and white film grain. The two can be used in concert together, but the division between the two tools is unnecessarily confusing.

Firstly, the film types tool lets you select one of 28 different film types and dial in your desired level of grain size and hardness. You can also control the film’s sensitivity in red, yellow, green, cyan, blue and violet channels, and adjust levels/curves. All of this is carried over from earlier version and is based on code from Nik Software, the original creator of the Nik Collection.

Through the new film grain tool, DxO now also lets you simulate the look of specific, real film grains based on the same algorithms it used to create its FilmPack plugin. In all, there are 38 film grain types on offer, including almost every black and white film type from FilmPack. For each you can adjust the intensity from 0 to 200%, and the grain size from 1.0 to 10.0.

The new film grain tool’s grain patterns have a very authentic feel, but unlike the earlier film types tool, it only handles grain simulation and forgoes any attempt to tune the film’s responsiveness to different wavelengths of light. You can, however, use both tools at once, in which case the new tool overrides only the grain pattern of the earlier one. (And you can, if you want, choose different film types in each section to, say, create a fictitious film with the light response of one film but the grain of another.)

Full-size, no-grain-added image.

A wide range of authentic-looking film grains are available in Silver Efex Pro 3. In order, these are 100% crops of the above image with no added grain, Fuji Neopan 1600, Kodak T-Max 3200, Ilford Delta 3200 and filtered Kodak HIE. All share the same Neutral profile and differ only in their grain selections.

$ (document).ready(function() { SampleGalleryV2({“containerId”:”embeddedSampleGallery_3329018719″,”galleryId”:”3329018719″,”isEmbeddedWidget”:true,”selectedImageIndex”:0,”isMobile”:false}) });

Finish your images with toning, vignetting, burnt edges and borders

Finally, Silver Efex provides four different categories of finishing adjustments: Toning, vignetting, burnt edges and borders. By default, these are one-click adjustments involving no more than making a selection from a list, but far more control is available if you want it.

For toning, you can not only select a color but also control strength, hue and toning for both silver and paper, and the balance between the two. For vignetting, you can adjust the strength of the vignette (which can either darken or lighten), as well as its size, roundness and center point.

For burnt edges, you control the size, transition softness and strength of the effect on all four edges individually. And finally, image borders allows you not only to choose one of 14 predefined border types, but also how thick the border is and how far it extends into the image. You can also adjust the roughness of the border, and provide a ‘seed’ number that the program should use when generating the random details in border textures.

The compare tools allow you to quickly toggle between before and after views, view the image with an adjustable side-by-side or under/over split, or see both before and after images together.

Before-and-after comparisons are quick and easy

View controls can be found at the top of the screen, and I found the comparison controls in particular to be rather handy. The leftmost of these toggles between the results of your current settings or the default black and white conversion, and holding the P key down achieves the same thing.

The central button splits the image in two either vertically or horizontally, and allows you to move the dividing line across the image to allow a careful before-and-after comparison anywhere within the image. And finally, the rightmost button gives you either side-by-side or under/over views of the full image.

The histogram tool allows you to highlight which image areas are within ten different luminance levels at your current settings, even in the loupe view. Note also the history panel at screen left.

The histogram tool is surprisingly handy, too

One last function I found to be particularly handy was Silver Efex Pro 3’s histogram tool, which sits beneath the loupe at the top of the right pane. It not only gives you access to RGB, red, green, blue or luminance graphs of your image, but also splits it into ten different luminance ranges.

For any of the ten, you can enable an overlaid pattern on the image, with the pattern color varying by the range selected. This makes it really easy to see which parts of the image share the same luminance, and I found it even more useful than the more-common technique of just highlighting the brightest and darkest image areas.

Click here for the full-sized Silver Efex image or here for the original color image.

Conclusion

It’s been more than a decade since Silver Efex Pro’s last major update and until just this year, it hadn’t been significantly changed since the suite’s original creator, Nik Software, was sold first to Google and then DxO.

A lot has changed in all that time, not only for Silver Efex itself but also in the imaging software market. Gone are the days when a plugin of its ilk could command the heady price of $ 200. These days you can purchase the entire eight-plugin Nik Collection for a much more reasonable $ 150, but sadly you can’t pick and choose which of those plugins you want to save even more.

Click here for the full-sized Silver Efex image or here for the original color image.

In its overhauled form Silver Efex Pro 3 is much easier on the eye than its predecessor, making it much easier to focus on your images. And while some of its new features sit a little awkwardly alongside earlier ones, once we got used to the differences between film types vs. film grain and global vs. local adjustment sliders, we found it to be pretty easy to use considering the level of control on offer.

Performance, while not mindblowing, is sufficient to prevent frustration. On my 2018-vintage Dell XPS 15 9570 laptop running Windows 10 version 20H2 and Nik Collection v4.2, most sliders update within a half-second or less of being tweaked, even those using U-Point controls to limit their effect to certain area of the image. Final renders can take perhaps 20-30 seconds, which again doesn’t feel unduly slow.

Click here for the full-sized Silver Efex image or here for the original color image.

And it’s hard to argue with Silver Efex Pro’s results. If you’re a fan of black and white photography and are willing to put in a bit more effort than simply clicking on a preset, you can get much more authentic-looking images than you would from the black and white tools in your camera or most all-in-one apps like Photoshop.

If you’re still using the previous release of Silver Efex Pro, its successor represents a no-brainer upgrade. As well as a nicer interface and more film grain types, you’ll also find the new ClearView tool and improved U-Point technology to be big improvements. And if you’re not already a Nik Collection user but want a solid plugin that can deliver realistically film-like black and white images, we’d definitely recommend giving the trial version a spin.

What we like:

  • Yields convincingly film-like results
  • Presets get beginners up and running quickly
  • Making and sharing custom presets is simple
  • Both global and local adjustments
  • Loads of controls to fine-tune the look you’re after
  • ClearView tool is quite effective at correcting haze
  • New user interface is cleaner and less distracting
  • More affordable as a suite component than its predecessors were sold separately

What we don’t:

  • Can no longer be purchased separately
  • No Raw support when used standalone
  • Presets feel rather disorganized
  • Film types vs. film grain tools are unnecessarily confusing
  • Ditto the differing global and local adjustment slider arrangements

Who’s it for:

More experienced photographers who want fine-grained control over their black and white creations, and who desire a convincingly film-like final result.

Articles: Digital Photography Review (dpreview.com)

 
Comments Off on Software review: Nik Silver Efex Pro 3 gives the look of black and white film without the fuss

Posted in Uncategorized


Mynt Medal Silver Bitcoin Andra Erfarenheter

26 Jul

Att välja Mynt Medal Silver Bitcoin Andra de bästa kryptosystem som finns på marknaden är en mycket viktig aspekt av handeln. Om du inte är medveten om detta kan det sluta med att du förlorar mycket pengar i det långa loppet. Om du vill göra mest vinst på kortast möjliga tid måste du göra din hemläxa väl. Här är några av de grunder som du bör känna till innan du väljer de bästa mynten att handla på marknaden med.

Mynt Medal Silver Bitcoin Andra

En av de första sakerna du måste titta efter i de bästa valutorna som finns på marknaden är deras inflationsgrad. För att förstå detta måste du först förstå vad inflation är. Inflation är helt enkelt en ökning av priserna utan att varor och tjänster minskar. Till exempel är en enårig dollar värd mycket mer om några månader, eller hur? Så om du väljer att investera i de bästa råvarorna för det här århundradet vore det klokt att hålla utkik efter de valutor som enligt prognoserna kommer att uppleva den högsta inflationen under de kommande tio åren.

Ett annat grundläggande övervägande när det gäller att investera i de bästa valutorna är deras historik när det gäller handel och gruvdrift. Man kan inte bara välja vilket gammalt system som helst att investera i idag. Det finns hundratusentals valutor som handlas på marknaden och endast ett fåtal utvalda är lönsamma. Därför är det nödvändigt att du forskar väl om de olika systemen som finns tillgängliga för att veta vilket av de tillgängliga kryptosystemen som är det bästa att investera i.

Ett av de enklaste sätten att avgöra vilken av de bästa valutorna att investera i är genom att titta på den underliggande tillgångens egenskaper. Detta kallas tillgångens egenskaper och de är kända som Ripples. Låt oss ta en titt på två exempel på de bästa valutorna att investera i under det kommande decenniet. Den första typen av tillgång är aktier. Ett index som följer värdet av olika typer av företag kallas aktier. Så om vi tittar på de tio främsta valutorna som kommer att styra aktiemarknadens värde i framtiden är det troligt att dollarn kommer att fortsätta sin uppgång eftersom värdet på aktier i USA och Europa förväntas stiga.

Den andra typen av tillgångar är guld. Det finns en stor sannolikhet för att guldpriset kommer att stiga under det kommande decenniet. Om du håller på med handel och inte har teknisk kunskap om vilken av de bästa valutorna du ska investera i bör du prova de bästa kryptovalutorna som sannolikt kommer att öka i värde under detta årtionde. Bland de möjliga valutorna att investera i Mynt Medal Silver Bitcoin Andra finns euron, den japanska yenen, den australiska dollarn, schweiziska francen, den kanadensiska dollarn och det brittiska pundet. Var och en av dessa valutor har sina egna för- och nackdelar och du bör noggrant studera dem innan du investerar i dem.

Även om det är lätt att bli lockad av de dåliga nyheterna om att investera i kryptovalutor finns det ingen dålig investering när det gäller mynt. Anledningen till detta är att de flesta investerare som är nya i den här branschen slutar med att förlora sina pengar eftersom de inte har rätt kunskap om vilka av de bästa valutorna de ska investera i. Så när du letar efter de bästa valutorna att investera i är det viktigt att du blir bekant med alla dessa. Detta beror på att endast genom att bli en registrerad användare av en onlinehandelsplats kan du få tillgång till alla de bästa kryptovalutorna som finns tillgängliga i världen idag.

Det finns många fördelar som är förknippade med att investera i de bästa kryptokurvorna, bland annat det faktum att de handlas på den globala marknaden. Därför är det lätt att handla med de bästa valutorna och du kan också förvänta dig god avkastning. Att investera i de bästa valutorna kräver dock att du lär dig hur systemet fungerar, grunderna i ekonomi och företagsledning. Om du till exempel är en investerare som är ny på att investera på altcoin-marknaden, är det bättre om du får hjälp av professionella personer som experter och handlare.

Det finns många fördelar som du kan njuta av när du investerar i de bästa valutorna i världen. En av dessa är att när du väljer de bästa kryptosurferna kan du vara säker på att värdet på din investering alltid kommer att vara stabilt. Eftersom värdet på varje mynt varierar beroende på utbud och efterfrågan är det viktigt att du investerar i de bästa valutorna och sedan handlar med dem enligt dina behov. När värdet på en valuta fluktuerar kan du alltså enkelt sälja dina tillgångar och investera i de nya.

Det bästa sättet att investera i de bästa kryptosurfarna är att se till att du är välinformerad om de olika faktorer som påverkar värdet på ett visst mynt och du har också en expert som kan lära dig hur du väljer de bästa valutorna att investera i. När du vill göra vinster från handeln med den bästa kryptosurf bör du alltså se till att du utbildar dig om marknadens ekonomi och affärsmodeller. Här är nästa intressanta blogginlägg: Plattform för köp av kryptovaluta.

The post Mynt Medal Silver Bitcoin Andra Erfarenheter first appeared on Hur man använder kryptovalutor på rätt sätt.


Hur man använder kryptovalutor på rätt sätt

 
Comments Off on Mynt Medal Silver Bitcoin Andra Erfarenheter

Posted in Photography


Ricoh releases Silver Edition version of its Pentax K-1 Mark II DSLR, three D FA* lenses

27 Aug

Ricoh has announced the limited release of a Silver edition of its Pentax K-1 Mark II DSLR as well as, for the first time ever, silver versions of its D FA* lenses.

The limited-edition camera is identical to its black counterpart, complete with a 36MP full-frame CMOS sensor, Safox 12 autofocus system with 33 AF points and a maximum ISO of 819,200. The only difference is the paint scheme, which is silver with contrasting parts, including a black shutter release and hot shoe.

In addition to the camera, Ricoh is also releasing Silver edition versions of three lenses: the HD Pentax-D FA* 70–200mm F2.8, 50mm F1.4 and 85mm F1.4. Like the camera, these lenses are identical to their black counterparts, but unlike the camera, just 600 units for each model will be produced.

This isn’t the first time Ricoh has released Silver editions of their gear. In March 2010, the Pentax K-7 Limited Silver camera was released and, more recently, the Pentax K-1 Limited Silver was released in September 2017.

The Pentax K-1 Mark II Silver Edition camera body will be available in September for $ 2100. The lenses will also be released in September with prices ranging from $ 1200–2100. All Silver Edition cameras and lenses will come with specially designed product boxes.

Press release:

Ricoh announces Silver Edition of PENTAX K-1 Mark II, plus three HD PENTAX-D FA? Silver Edition lenses

PARSIPPANY, NJ, August 26, 2020 – Ricoh Imaging Americas Corporation today announced the PENTAX K-1 Mark II Silver Edition, a special silver-colored version of its digital single-lens reflex (SLR) flagship model. Ricoh is also releasing for the first time silver versions of its D FA? series lenses, with high-grade silver coating that is especially well suited to the top-of-the-line PENTAX optics.

The camera will be available in a limited quantity of 1,000 units worldwide, and the three lenses— HD PENTAX-D FA? 70-200mm f/2.8, 50mm f/1.4 and 85mm f/1.4—will be available worldwide in limited quantities of 600 units for each model. These lenses join the silver-edition PENTAX full-frame lenses currently available: SMC PENTAX FA 31mm F1.8 LTD, SMC PENTAX FA 43mm F1.9 LTD and SMC PENTAX FA 77mm F1.8 LTD.

The limited-edition silver models of the camera and lenses are coveted by PENTAX photographers worldwide. The PENTAX K-1 Mark II Silver Edition camera sports contrasting black parts–a shutter release button and hot shoe—to provide a handsome complementary color and enable it to be color coordinated whether used with traditional black or the special silver-colored lenses.

Previously issued limited-edition cameras include the PENTAX K-7 Limited Silver (March 2010) and the PENTAX K-1 Limited Silver (September 2017).

Pricing and Availability

The PENTAX K-1 Mark II Silver Edition camera body will be available in September for a manufacturer’s suggested retail price of $ 2099.95. The HD PENTAX-D FA? Silver Edition lenses will be available in September with prices ranging from $ 1199.95 – $ 2099.95. Both the camera and lenses can be purchased at www.us.ricoh-imaging.com and at select Ricoh Imaging-authorized retail outlets.

Main features of the PENTAX K-1 Mark II Silver Edition

  • ? The camera body and detachable battery grip feature a high-grade, fine-textured silver coating, with an exclusive silver SR badge placed on the front of the body.

  • ? The camera’s shutter release button and hot shoe, as well as the battery grip’s shutter release button, feature black parts, so the camera is coordinated with either black or silver lenses.

  • ? Each camera has been given a unique serial number, from 0000001 to 0001000, to further support its exclusivity.

  • ? Two exclusive batteries are included in a product package to simultaneously power both the camera body and the battery grip.

  • This special camera and its accessories come in a specially-designed product box.

  • The camera body comes with the latest firmware version pre-installed.

Main features of the HD PENTAX-D FA? Silver Edition lenses

  • The lenses’ high-grade silver coating complements their use with silver-edition camera bodies.
  • Each lens has been given a unique serial number, from 0000001 to 0000600, to further support its exclusivity.
  • The lenses come in a specially-designed product box.

NOTE: The features and specifications of this camera body and lenses are identical to those of standard models, except for the camera firmware

Articles: Digital Photography Review (dpreview.com)

 
Comments Off on Ricoh releases Silver Edition version of its Pentax K-1 Mark II DSLR, three D FA* lenses

Posted in Uncategorized


GoPro launches new HERO7 Black, Silver, and White models with HyperSmooth stabilization

22 Sep

GoPro has announced its new collection of HERO7 action cameras, which includes three individual devices: the Hero7 Black, HERO7 Silver and HERO7 White. The three models are set to go on sale next week for $ 399, $ 299 and $ 199, respectively.

If it’s a dramatic redesign you’re looking for with this new generation of GoPro action cams, this isn’t the upgrade for you. On the outside, all three models look almost identical to their respective HERO6 counterparts. The only notable differences are new paint jobs for the HERO6 Silver and HERO6 White to match their respective namesakes and a new logo on the lens-side of the action cams denoting what model you have.

HERO7 Black

The GoPro Hero7 Black is the flagship model in the collection. As with on the outside,, not much has changed inside the camera. GoPro says the Hero7 Black has the same internal components as the HERO6 Black, but notes the custom-built GP1 chip inside has been reworked and an extra bump of RAM has been added (although GoPro doesn’t disclose how much RAM has been added).

The Hero7 Black shoots 4K at 60 frames per second, 2.7K at up to 120 FPS, and 1080p up to 240 FPS. It captures 12-megapixel still images and has built-in RAW and a ‘SuperPhoto’ HDR mode. It also has Wi-Fi and GPS connectivity for geolocation and wireless networking.

The big change this year comes from the software and processing side of things. New this year is an improved stabilization mode GoPro calls HyperSmooth. In GoPro’s own words, ‘HyperSmooth is the best in-camera video stabilization ever featured in a camera. It makes it easy to capture professional-looking, gimbal-like stabilized video without the expense or hassle of a motorized gimbal.’ HyperSmooth even works underwater and in rough, windy environments.

If GoPro’s verbiage sounds like hyperbole, you can check out their claims in the demo video below. A single video montage isn’t much to go off of in terms of real-world use, but from what’s shown, it looks impressive.

There’s also a built-in hyperlapse mode GoPro calls TimeWarp. This feature smooths out timelapse footage to give what GoPro calls a ‘magic carpet ride’ aesthetic. Another new feature is the ability to livestream to online services like YouTube, Twitch, Vimeo and Facebook when connected to a smartphone’s cellular connection.

HERO7 Silver

Externally, the HERO7 Silver looks similar to the Hero7 Black, with the exception of the silver paint job (it’s really more of a gunmetal grey) and the absence of the front-facing settings display.

Internally, the HERO7 Silver appears to be a revamp of the HERO6 Black. It captures 4K video, but only at 30 FPS, and 10-megapixel stills instead of the 12-megapixels of the Hero7 Black. Slow-motion video is also capped at 2x instead of 8x.

Feature wise, the HERO7 Silver lacks the HyperSmooth stabilization, live-streaming and instead of high dynamic range (HDR) images, it only captures wide dynamic range (WDR) images. It still offers the ruggedized, waterproof design, voice control, Wi-Fi and GPS connectivity.

HERO7 White

On the budget-end of things, the HERO7 White keeps it simple. It shoots 10-megapixel stills and 1080p video at 60 FPS — no 4K capture. It lacks the wide dynamic range (WDR) capture mode and also loses the GPS connectivity of its more powerful counterparts.

Pricing and pre-orders

The HERO7 Black, HERO7 Silver and HERO7 White are available for pre-order starting today for $ 399, $ 299 and $ 199, respectively. They are expected to be available at various retailers starting September 30, 2018.

Articles: Digital Photography Review (dpreview.com)

 
Comments Off on GoPro launches new HERO7 Black, Silver, and White models with HyperSmooth stabilization

Posted in Uncategorized


COOPH necklaces line launched with five silver camera-inspired charms

10 Feb

Cooperative of Photography (COOPH) has launched a line of necklaces featuring small silver charms inspired by five different types of cameras: Hasselblad, Rolleiflex, Olympus OM, Nikon F, and Leica M. All five models are made with 100% 925 sterling silver, include a 46cm / 18in chain with two link options and a small black box, and are priced at €59. Shipping is available worldwide and free on orders over €200.00.

Via: PhotographyBLOG

Articles: Digital Photography Review (dpreview.com)

 
Comments Off on COOPH necklaces line launched with five silver camera-inspired charms

Posted in Uncategorized


Sony releases silver version of the popular a6300

05 Jan

$ (document).ready(function() { SampleGalleryV2({“containerId”:”embeddedSampleGallery_3445098688″,”galleryId”:”3445098688″,”isEmbeddedWidget”:true,”selectedImageIndex”:0,”isMobile”:false}) });

Tacked onto the end of the Sony E-mount 18-135mm F3.5-5.6 OSS lens announcement late last night was a short line that is very easy to miss:

Also announced today, Sony will be releasing a new silver color option for the popular ?6300 camera. The sleek new silver camera body will be available in February 2018 at select retailers.

It’s a minor update to be sure: entirely cosmetic, no difference that we know of in terms of specs or even price. But for those of you considering a Sony a6300—which falls into our Best Cameras Under $ 1,000 buying guide—maybe a new color is the nudge you didn’t know you needed to take the leap.

Read our Sony a6300 Review

Articles: Digital Photography Review (dpreview.com)

 
Comments Off on Sony releases silver version of the popular a6300

Posted in Uncategorized


Leica Q in Silver brings a new look to the compact camera

01 Nov

$ (document).ready(function() { SampleGalleryV2({“containerId”:”embeddedSampleGallery_5886797949″,”galleryId”:”5886797949″,”isEmbeddedWidget”:true,”standalone”:false,”selectedImageIndex”:0,”startInCommentsView”:false,”isMobile”:false}) });

Leica has announced a new silver version of the Leica Q camera, giving customers the option of buying a model featuring a silver top plate, baseplate, and silver lens. The back of the new Leica Q Silver model is black, giving the camera what Leica describes as a ‘modern take’ on the two-tone color arrangement.

This rendition of the Leica Q features control elements that have been given the silver touch, while the lens sports red engraved focal length numbers and distance scale. All of this is rounded out by the same high-grip pattern found on the regular model’s black leather trim. The Leica Q in Silver is otherwise identical to the standard model, including its 24MP full-frame sensor.

Leica stores, boutiques and dealers will begin offering the Leica Q in Silver late next month for $ 4,495 (the all-black Leica Q retails for $ 4,250).

Press Release

Leica Camera Announces the Leica Q in Silver

A new look for the ground-breaking compact camera complements its innovation and classically elegant style

Leica Camera reimagined the photographer’s everyday camera with the Leica Q, featuring a trailblazing design, full-frame sensor, the fastest lens in its class, and an interface for easy and intuitive handling. Today, Leica Camera announces a new style for the same innovative technology that many photographers now call their favorite Leica camera yet – the Leica Q (Typ 116) Silver Anodized.

DESIGN

A silver top plate, silver baseplate and silver lens create a striking appearance for this new version of the Leica Q, while the rear of the camera is a sleek and refined black – achieving a modern take on the classic silver and black two-tone look. The characteristic, high-grip pattern of the standard Leica Q black leather trim has been maintained, while the control elements are redesigned with a silver finish. Red engravings of the distance (feet) scale and the focal length numbers on the lens add a colorful accent to the classic look of the camera.

Functional elements within the Leica Q are designed clearly and logistically, for optimum efficiency. For example, the Leica Q control menu provides rapid access to all essential controls and enables users to program personalized settings.

TECHNICAL SPECIFICATIONS

The technical specifications of the silver Leica Q are identical to those of the standard black model. Its incredibly fast lens (the Leica Summilux 28 mm f/1.7 ASPH.) and full-frame sensor (24 megapixels) make the Leica Q a perfect tool for street photography and low light, as well as architecture and landscape shots. An integrated high resolution electronic viewfinder (3.68 megapixels) offers photographers reliable control of their composition. These features, full HD video capabilities, Wi-Fi integration and more ensure that even the finest details of every subject are captured in a snap, and easily accessible at all times.

The Leica Q in Silver will be available at Leica boutiques, stores, and dealers at the end of November 2017.

Articles: Digital Photography Review (dpreview.com)

 
Comments Off on Leica Q in Silver brings a new look to the compact camera

Posted in Uncategorized


First look at upcoming Pentax ‘star series’ lenses and silver edition K-1

27 Oct

First look at upcoming Pentax 50mm F1.4 and 11-18mm F2.8 lenses

Ricoh is showing off two upcoming lenses at the Photo Plus Expo show in New York this week. The HD Pentax-D FA* 50mm F1.4 SDM AW is designed for full-frame cameras, while the HD Pentax-DA* 11-18mm F2.8 is intended to be paired with the company’s APS-C DSLRs.

We weren’t able to get our hands on the new lenses, sadly – they’re still under glass – but we’re told that they’re cosmetically near-final. Click through for a closer look.

First look at upcoming Pentax 50mm F1.4 and 11-18mm F2.8 lenses

We’ve known about the HD Pentax-D FA* 50mm F1.4 SDM AW for a while, but the last time we saw it (also under glass) it was little more than a lens-shaped lump of plastic. Things have advanced since then, and the copy on show here appears to be a working prototype.

The upcoming 50mm is one of a new generation of ‘star series’ lenses that Ricoh intends for high-resolution imaging with its flagship K-1 and (presumably) follow-up full-frame models.

First look at upcoming Pentax 50mm F1.4 and 11-18mm F2.8 lenses

The 50mm F1.4 will come with a generously proportioned lens hood. The ‘AW’ in the designation stands for ‘All Weather’ and denotes environmental sealing, which should mean that like the K-1, it will stand up to use in harsh conditions.

A new ring-type SDM autofocus drive promises fast, quiet focusing. Pricing has yet to be announced, but the new 50mm should be available in spring of next year.

First look at upcoming Pentax 50mm F1.4 and 11-18mm F2.8 lenses

Meanwhile, the HD Pentax-DA* 11-18mm F2.8 is intended to be paired with the company’s APS-C DSLRs, and covers an effective focal length range of ~17-28mm. The fast maximum aperture of F2.8 is fixed across the zoom range, and while it hasn’t been spelled out anywhere, the sample on show appears to feature a switch for optical image stabilization, covered in black tape.

This would be a bit odd, given that Pentax’s DSLRs are stabilized in-body but could point towards hybrid stabilization. The alternative explanation (and probably more likely) is that it’s either a zoom lock or simply a vestigial bump which will be removed in shipping lenses.

First look at upcoming Pentax 50mm F1.4 and 11-18mm F2.8 lenses

Beyond the usual hyperbole (photographers should be able to ‘effortlessly capture breathtaking landscapes’ with this lens, apparently) details of the exact specification are sparse. Along with the mystery switch, the focus scale has also been obscured.

First look at upcoming Pentax 50mm F1.4 and 11-18mm F2.8 lenses

No pricing information has been shared, but we’re told that the 11-18mm will be available next summer.

First look at upcoming Pentax 50mm F1.4 and 11-18mm F2.8 lenses

Here’s the new K-1 ‘Silver Edition’, announced in August. This special edition of Ricoh’s flagship full-frame DSLR features a special silver coating, to match the silver versions of Pentax Limited lenses.

First look at upcoming Pentax 50mm F1.4 and 11-18mm F2.8 lenses

This is the kind of thing that often looks great in manufacturer-supplied renderings, but a bit tacky in real life. We’re pleased to see that in person, the silver K-1 looks pretty classy.

First look at upcoming Pentax 50mm F1.4 and 11-18mm F2.8 lenses

A special silver hotshoe cover is an especially nice touch. The K-1 silver edition is limited to 2000 copies worldwide.

First look at upcoming Pentax 50mm F1.4 and 11-18mm F2.8 lenses

Alongside its conventional cameras and lenses, Ricoh is also showing off its new Theta V 360-degree camera, which improves on the original model with much better resolution and advanced video features. Learn more about the Ricoh Theta V

Articles: Digital Photography Review (dpreview.com)

 
Comments Off on First look at upcoming Pentax ‘star series’ lenses and silver edition K-1

Posted in Uncategorized


Ricoh launches Pentax K-1 Limited Silver Edition

24 Aug

Pentax has made a tradition of launching silver-colored limited edition models of its DSLR line-up, and today parent company Ricoh has done just that, announcing a special edition of the Pentax K-1 36MP full-frame DSLR.

The silver K-1 is limited to 2,000 units worldwide, and features a high-grade silver-color coating on the camera body and battery grip to match the lineup of silver Pentax FA Limited lenses. There is also a limited edition metal hot shoe cover with logo, and the package includes a battery grip and two batteries. All the pieces come wrapped up in an exclusively designed product box.

The Pentax K-1 Limited Silver Edition will be available in mid-September. In the UK the recommended retail price is £2,150 (approximately $ 2755); no information on US pricing has been released yet.

Articles: Digital Photography Review (dpreview.com)

 
Comments Off on Ricoh launches Pentax K-1 Limited Silver Edition

Posted in Uncategorized


3 Ways to Make Selective Color Portraits Using Lightroom and Silver Efex Pro 2

26 Jan

3 Ways Make Selective Color Portraits Using Lightroom and Silver Efex Pro 2Selective coloring is a post-processing technique where you convert an image to black and white, but leave part of it in color. It has a bad reputation because it can be used to create some truly horrendous images where the only thing on display is the photographer’s lack of ability.
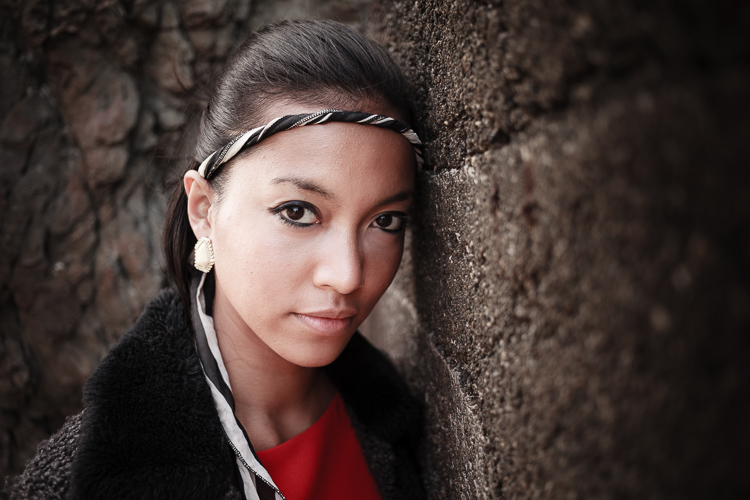
But the good news is that you can use selective coloring in a far more sophisticated way to create some interesting images. The key is to keep it subtle and to use it only on suitable photos. I like to make selective color portraits, but of course you are free to experiment with other subjects as well (but please, no flowers).

I prefer to keep my workflow within Lightroom whenever possible as it saves hard drive space and makes the entire photography workflow much simpler. The first two techniques below are for Lightroom, the third uses Silver Efex Pro 2, a free plug-in you can download from Google.

1. Selective color in Lightroom using the Adjustment Brush

The first example, below, shows what you can do in Lightroom. This is the portrait that I am going to work with for this technique.

3 Ways Make Selective Color Portraits Using Lightroom and Silver Efex Pro 2

The simple background means it’s ideal to use for a selective color portrait.

Start by going to the Develop module and activating the Adjustment Brush tool. Paint in the background to create a mask (as shown below).

3 Ways Make Selective Color Portraits Using Lightroom and Silver Efex Pro 2

The mask is shown here in red.

It may help to zoom in and use a smaller brush around the model for a more accurate mask.

3 Ways Make Selective Color Portraits Using Lightroom and Silver Efex Pro 2

View zoomed in so you can mask more accurately around the model.

Go to the Adjustment Brush sliders and set the saturation to zero.

3 Ways Make Selective Color Portraits Using Lightroom and Silver Efex Pro 2 - set saturation to zero

That removes all color from the background, giving this effect. Don’t forget you don’t have to move Saturation all the way to zero – you can simply lower it to reduce the color intensity of the background. Play around and see what works best for your image.

Selective coloring in Lightroom

It’s important that you chose the correct image for this technique to get the best effect. There are several reasons it works well with this portrait.

  • The background is monochromatic. It wouldn’t work as well with a colorful background.
  • The rocks in the background have plenty of texture, which looks good in black and white.
  • Some of the model’s clothes are black or charcoal gray, so introducing this color into the background fits with the overall aesthetic of the image.

2. Selective coloring in Lightroom using the HSL

The next portrait (below) has a more colorful foreground. I’m not going to remove the color completely, but I would like to make it more monochromatic. That will help the subtle colors in the model’s dress and skin to stand out.

3 Ways Make Selective Color Portraits Using Lightroom and Silver Efex Pro 2

Go to the HSL / Color / B&W panel in the Develop module. Click the Saturation tab, then the Targeted Adjustment tool (marked below) to activate it.

Selective coloring in Lightroom

Move the cursor over part of the image that you want to desaturate. In this case, the foreground has a blue cast that I want to remove, so I chose this spot (marked by the small cross circled in red below).

Selective coloring in Lightroom

Click and hold the button as you move the mouse downward. Lightroom reads the pixels under the cross representing the Targeted Adjustment tool and reduces the saturation of those colors across the entire image. The matching color sliders in the HSL panel move to the left. When I did this, Lightroom set Blue to -80 and Purple to -10.

Selective coloring in Lightroom

This is the result.

3 Ways Make Selective Color Portraits Using Lightroom and Silver Efex Pro 2

I took it further by repeating the technique. This time using the Targeted Adjustment tool on the pink and orange paintwork on the wall, resulted in the following saturation settings.

Selective coloring in Lightroom

This is a before and after of the final portrait showing these extra adjustments.

selective-colored-portrait-01

Notes:

One key thing to be aware of is how the colors in your photo are related. In the photo above reducing the saturation of the pink paint affected the model’s dress, which is also pink.

Reducing the saturation of the orange paint also affected the model’s skin. In this case, it worked out okay, but you should always zoom in and double check, especially when changing the color settings of Red, Orange or Yellow hues, as this can have some strange effects on skin tones.

3. Selective coloring using Silver Efex Pro 2

Silver Efex Pro 2 is one of my favorite black and white plug-ins. I’d like to show you how to use it for making a selective color portrait with a subtle effect that almost looks like an old style hand-tinted black and white print.

This is the portrait I’m going to use. It’s a good photo to use as the colors are subtle.

3 Ways Make Selective Color Portraits Using Lightroom and Silver Efex Pro 2

If you don’t have Silver Efex Pro 2 already, you can download it for free from the official Nik Collection website.

Once it’s installed go to Lightroom’s Library module and select the photo you want to edit. Go to File > Edit In > Silver Efex Pro 2 (you can also find this option by right-clicking the photo).

Select the option that says “Edit a Copy with Lightroom Adjustments” in the next window (it will probably be the only one you can select) and click Edit. Lightroom converts the Raw file to a TIFF file and opens it in Silver Efex Pro 2.

Selective coloring in Silver Efex Pro 2

Your first task in Silver Efex Pro 2 is to decide whether you want to stay with the default neutral black and white conversion or use one of the built-in presets. I selected the Soft Sepia preset (below), then made some adjustments to the tonal values until I was ready to apply selective coloring.

3 Ways Make Selective Color Portraits Using Lightroom and Silver Efex Pro 2

In Silver Efex Pro 2 you make local adjustments by going to the Selective Adjustments panel and adding Control Points. This screenshot shows seven of the Control Points that I added to this photo. Each one is depicted by a yellow dot.

Selective coloring in Silver Efex Pro 2

Using Control Points

Control Points work by analyzing the color and brightness of the pixels underneath them, then applying the selected effect to the pixels within the circle. In this photo, I moved the Selective Coloring slider (SC) to the right to bring the colors back to the model, but not the background.

You control the size of the circle by moving the top slider. Silver Efex Pro 2 displays a circle to show you the area affected by the Control Point.

3 Ways Make Selective Color Portraits Using Lightroom and Silver Efex Pro 2

Add multiple Control Points with circles that cover the model but as little of the background as possible. When you are finished, click the Save button. Silver Efex Pro 2 closes, saving the new TIFF file in the same folder as the original file and adding it to the same Collection in Lightroom.

Here’s the before and after with portrait after selective coloring in Silver Efex Pro 2. Notice it’s very subtle.

selective-colored-portrait-02

Conclusion

Hopefully, this article has shown you how to use selective color in a subtle and sophisticated way that moves on from the garish examples you have probably seen online. Do you have any questions about these techniques? Let me know in the comments below.


If you’d like to learn more about Lightroom, then please check out my popular Mastering Lightroom ebooks.

googletag.cmd.push(function() {
tablet_slots.push( googletag.defineSlot( “/1005424/_dPSv4_tab-all-article-bottom_(300×250)”, [300, 250], “pb-ad-78623” ).addService( googletag.pubads() ) ); } );

googletag.cmd.push(function() {
mobile_slots.push( googletag.defineSlot( “/1005424/_dPSv4_mob-all-article-bottom_(300×250)”, [300, 250], “pb-ad-78158” ).addService( googletag.pubads() ) ); } );

The post 3 Ways to Make Selective Color Portraits Using Lightroom and Silver Efex Pro 2 by Andrew S. Gibson appeared first on Digital Photography School.


Digital Photography School

 
Comments Off on 3 Ways to Make Selective Color Portraits Using Lightroom and Silver Efex Pro 2

Posted in Photography