Introduction
This tutorial has been transcribed from the SLR Lounge Lightroom 4 Workshop on DVD, a 14 hour Lightroom 4 A – Z guide with over 130 tutorials for mastering Lightroom from start to finish. The Digital download can be purchased from SLR Lounge while the physical copy is available through Amazon Prime.
Overview
Having multiple shooters at an event is beneficial because it allows the event to be captured at different angles. One shooter might catch something significant that another shooter missed; therefore, it is always good to have an extra pair of eyes while shooting a big event. However, having multiple shooters means multiple cameras and it is important that the timestamps in all the cameras used at the event are synced to one another. This will save you a lot of time in post-production when you have to cull and edit your images because the images from all the shooters will be organized together. You will be able to see the same scene shot at different angles, which can help you select the best image for each particular scene.
But sometimes you might forget to have all the shooters sync up their cameras to one another prior to shooting. Trying to cull a multi-camera shoot with improper timestamp syncing will waste boatloads of time. But luckily, this time sync issue can be quickly fixed in Lightroom 4. This easy tutorial will show you how to correct the timestamps between multiple cameras so that you can have a quicker post-production workflow.
Step 1: Identify the Lead Camera
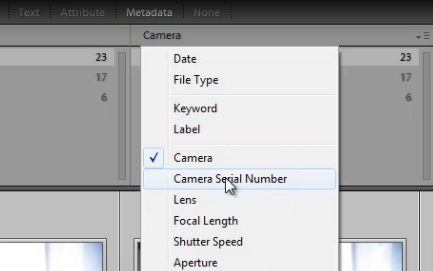
Bring up the Library filter by hitting “backslash” on your keyboard. Generally, the lead camera will be the one with the most images. However, once in a while, you might have a second shooter who takes more images than the lead shooter. You want to sync all other cameras to the timestamp in the lead camera. It is also important to filter by the Camera Serial Number so same-model cameras will not be grouped together. To select this category, click on the drop-down menu from one of categories in the Library filter and select “Camera Serial Number” as shown below.
Step 2: Identify the Moment to be Used for Synchronization
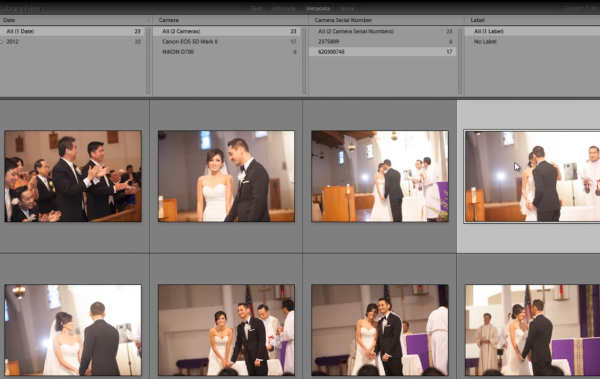
Select the lead camera as I have done so below. To keep this tutorial simple, we have eliminated all but 23 images from the catalog. Most wedding catalogs will have thousands of images, but we don’t want to spend all our time hunting down images between cameras. So, while we are doing this demonstration with a small sample set of images, the same techniques apply, regardless of the size of the shoot.

Find a moment of the day that all shooters will have shot and preferably one that is easily recognizable as well. For example, the first kiss would be an important moment that all cameras should have shot and one that is easily recognizable. As you can see from the image below, I have selected the lead shooter’s shot of the couple’s first kiss. Switch to the Loop View of this image by double-clicking on it or by hitting “E.”
Step 3: Write Down the Timestamp Information
Once in the Loop View, write down what time the shot was taken. The information should be at the top left of the image you have selected. If not, hit “I” until that timestamp is displayed. In my example, the shot was taken at 11:46:09 AM in the lead camera.

Step 4: Identify the Same Moment in the Other Cameras
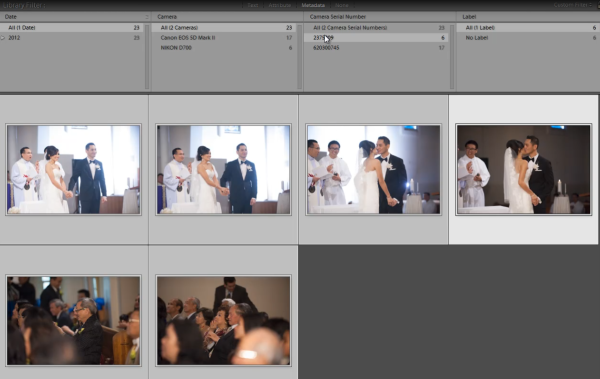
Go back to the Grid View by hitting “G.” Select your second camera in the Library filter, like I have done so below. Make sure no other filter is turned on so that all your images from any additional cameras appear.

Select the image shot at the same moment as the one that we selected from our lead camera. Once you have that image selected, hit “Ctrl + A” on your keyboard to select all the images from the second camera. The first image that you selected is highlighted indicating that it is our key image as shown below.
Step 5: Edit the Capture Time
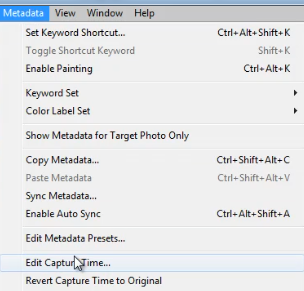
Now that we have selected all of the images from our secondary camera with our “moment image” selected as the key image in this selection, we are ready to change the timestamp. To do so, click the “Metadata” menu at the top of the screen (make sure you are in the Library Module) and click on “Edit Capture Time.”
Type in the exact time that you wrote down from the same moment on the lead camera (11:46:09 AM in our example). Make sure you write your timestamp in correctly because this change cannot be undone; it can only be changed again. When you are done, click on “Change All.”
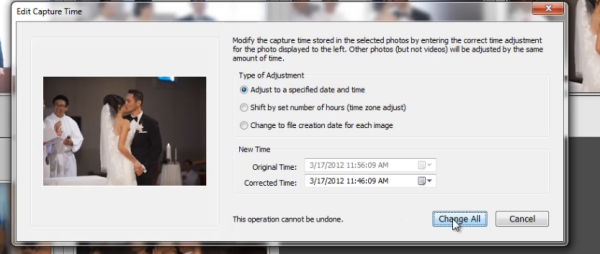
Clicking “Change All” will adjust all images prior to the key moment, as well as after the key moment respectively. To check whether you changed the timestamps correctly, make sure all of your filters are off by selecting “None” next to “Metadata” in the Library filter. If you changed the timestamps correctly, your images should all line up chronologically. As you can see, I now have all my images from both angles lined up in order, as shown below.
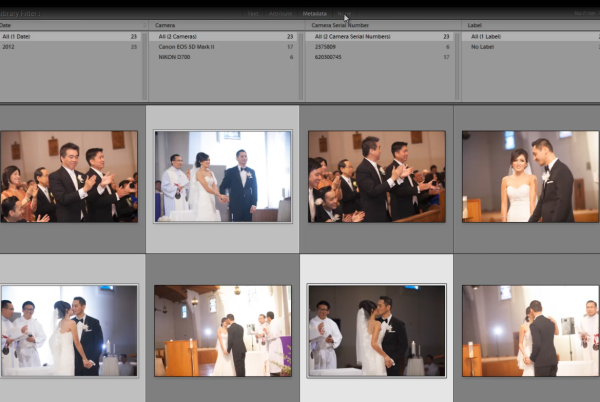
Once again, it is always best to sync your timestamps in your camera with all other shooters prior to the event. However, if you forget to do so, use this tutorial to fix your timestamp synchronization in Lightroom.
Learn More with the Lightroom 4 Workshop Collection!
This was a sample tutorial from the Lightroom 4 A to Z DVD which is one of the DVDs in the Lightroom 4 Workshop Collection. A collection of nearly 30 hours of video education teaching everything from Lightroom basics to advanced raw processing techniques.
The LR4 Workshop Collection also includes the critically acclaimed Lightroom 4 Preset System which is designed to enable users to achieve virtually any look and effect within 3-5 simple clicks. From basic color correction, vintage fades, black & white effects, tilt-shift effects, faux HDR, retouching, detail enhancing, and so much more. Click the links above to learn more.
Post originally from: Digital Photography Tips.
Check out our more Photography Tips at Photography Tips for Beginners, Portrait Photography Tips and Wedding Photography Tips.
How to Fix Timestamp Issues on Multi-Camera Shoots

Digital Photography School




You must be logged in to post a comment.