RSS
 

Posts Tagged ‘sharpness’

Impressive sharpness: Sigma 14-24mm F2.8 DG DN Art sample gallery updated

22 Jun

$ (document).ready(function() { SampleGalleryV2({“containerId”:”embeddedSampleGallery_1853735007″,”galleryId”:”1853735007″,”isEmbeddedWidget”:true,”selectedImageIndex”:0,”isMobile”:false}) });

We initially got our hands on the Sony E-mount Sigma 14-24mm F2.8 while covering the launch in Japan last July. We’ve since acquired a copy here in Seattle and have been shooting with it around town (and in Cabo, pre-quarantine) primarily on a Sony a7R IV body (our initial samples were on an a7R III). These extra pixels should help convey just how ridiculously sharp this lens is. Have a look!

See our Sigma 14-24mm F2.8 DG DN Art sample gallery

Articles: Digital Photography Review (dpreview.com)

 
Comments Off on Impressive sharpness: Sigma 14-24mm F2.8 DG DN Art sample gallery updated

Posted in Uncategorized


6 Reasons Your Photos Might Be Lacking Sharpness

31 Aug

The post 6 Reasons Your Photos Might Be Lacking Sharpness appeared first on Digital Photography School. It was authored by Kav Dadfar.

Capturing sharp photos needn’t be difficult. Most amateur photographers who struggle to capture sharp photos make one of the common mistakes listed below. The good news is that with a little bit of practice and knowhow, you will be able to take sharp photos most of the time. At the very least, you should accept that you will make mistakes and have blurred photos from time to time when starting out. Instead of getting frustrated, try to analyze each blurred photo to understand why it might be lacking in sharpness. In the meantime here are 6 reasons your photos might be lacking sharpness.

Reasons-Your-Photos-Might-Be-Lacking-Sharpness

Reasons your photos might be lacking sharpness

1. Shutter speed too slow

Often this is the number one culprit for photos lacking sharpness. There are three potential mistakes when it comes to shutter speed. The first is simply the question of are you using a fast enough shutter speed for what you are photographing? For example, a cheetah running will need a much faster shutter speed to freeze the action. Whereas, a statue doesn’t. So the first thing you should do is understand what shutter speed you need for the subject you are shooting. As an example, you might be able to get away with something like 1/60th sec when taking a portrait. But for someone running, you will need a shutter speed of something like 1/200th sec.

The second issue is around the lens you are using. As a general rule, your shutter speed should at the least be the same as your lens focal length. So for example, if you are shooting with a 200mm lens, your shutter speed should be at least 1/200th sec. However, there is a slight caveat to this rule. Image stabilization in modern lenses is very good. It can allow you to shoot below the minimum required. But, to be safe, stick to this rule.

Lastly, how fast you need for your shutter speed also comes down to you. If you have steady hands, then you may be able to shoot sharp photos at a slower shutter speed than someone else. Test this out by photographing a scene at different shutter speeds to determine how slow you can go.

Image: Closer inspection of this photo reveals that there is a lack of sharpness.

Closer inspection of this photo reveals that there is a lack of sharpness.

2. Not using the correct aperture

Your aperture determines your depth of field. This also has a major impact on the sharpness of your photo. For example, if you are photographing a landscape scene with a shallow depth of field like f/2.8, then only a small part of your scene will be sharp. Depending on where you focused, only things along that distance will be sharp. So in this scenario, where you want more of your image to be sharp, you need to use a smaller aperture (i.e., higher f/number).

For something like landscape photography, you need to use an aperture of f/8 or smaller.

Reasons-Your-Photos-Might-Be-Lacking-Sharpness

3. ISO is too high

Even though modern-day DSLRs have hugely improved in the amount of noise that appears in photos at high ISOs, unfortunately, it still does affect sharpness. If you set your ISO too high, your image will begin to look soft and as a result lack sharpness. Always remember only to raise your ISO as high as you need to.

Better still, if you can, use a tripod and keep your ISO low.

Image: This photo was taken at 6400 ISO. When zoomed in, as you can see the noise is making it feel...

This photo was taken at 6400 ISO. When zoomed in, as you can see the noise is making it feel soft.

4. Haven’t locked up mirror

A lot of amateur photographers may not be aware of this potential issue when using a tripod. Every time that you click the shutter button, the mirror inside the camera flips over to allow light to hit the sensor.

When you are using a fast shutter speed, this process doesn’t cause any problems. But when you are photographing using a long exposure where your shutter speed is very slow, when the mirror flips over, the vibrations can cause a lack of sharpness in your image. You can either use the function in your DSLR menu to “lock mirror” or shoot in live view mode for the same effect.

Image: An example of the lack of sharpness even when using a tripod when the mirror hasn’t bee...

An example of the lack of sharpness even when using a tripod when the mirror hasn’t been locked.

5. Poor quality tripod

Just like anything else, there are good quality tripods and poor quality tripods. Of course, buying a better and more sturdy tripod might be expensive, but isn’t that a price worth paying for sharper photos?

A poor quality tripod will put your expensive equipment at risk because it may not be sturdy enough even to withstand a gust of wind. However, cheap material can also be prone to vibrations, which, in turn, can mean a lack of sharpness in your photos.

So don’t take the risk. Ideally, invest in a good quality carbon fiber tripod.

6 Reasons Your Photos Might Be Lacking Sharpness

6. Not using a remote or self-timer

Even the faintest of touches can cause camera shake when photographing at long exposures. This means that even when you press the shutter button to take a photo, you are causing movement. The only way to be sure that your photos will not suffer from camera shake is to use a remote release or the self-timer on the camera. This will ensure you will not have to touch the camera when you take the photo.

Reasons-Your-Photos-Might-Be-Lacking-Sharpness

By far the best way to ensure that your photos are sharp is to use a tripod. But whilst that is not always possible or convenient, by following the advice above you can still ensure that your photos will be sharp.

We hope these tips help you achieve sharper photos! Do you have any other tips to add to the reasons your photos might be lacking sharpness? Share with us in the comments!


Reasons-Your-Photos-Might-Be-Lacking-Sharpness

The post 6 Reasons Your Photos Might Be Lacking Sharpness appeared first on Digital Photography School. It was authored by Kav Dadfar.


Digital Photography School

 
Comments Off on 6 Reasons Your Photos Might Be Lacking Sharpness

Posted in Photography


5 Steps to Increase the Sharpness of Your Photographs

13 May

Image001

Here are five steps you can take which help to increase the sharpness of your photographs:

1) Keep your lenses, filters, and camera sensor clean

Somewhat of an obvious point, but a very important one nonetheless. If your lenses and/or filters have dust or debris on them, however small and unnoticeable to the naked eye, it can create ugly soft spots on your photograph. There have been countless times I was in such a hurry to go shoot, I didn’t check the glass to see if it needed a good cleaning. This especially holds true if the lens I am using has been sitting on my shelf for a while, collecting dust. Even if the lens has been wrapped up in a pouch with a cap on top, it can still accumulate dust on the outer element.

Quick side issue: This is why it’s a good idea to keep a protective filter over your lenses when they are resting on a shelf, or when you are traveling. Along with the front lens cap, a protective filter helps to keep dust off the lens glass. If you get scuff marks or dirt on a cheap protective filter, who cares? But if you scuff up the outer element on the lens, it’s costly to fix.

Back on point: It can be very frustrating to think you’ve got yourself a good shot, only to upload the images to your computer and see ugly spots scattered all over the image. You can use the Dust and Scratches Filter in Photoshop, use the healing brush, and/or clone away only so much before the smudges become a real time-consuming burden.

This is easily avoidable if you make it a routine to clean your glass before heading out to shoot.

Image002

2) Shoot at the lowest possible ISO

The higher the ISO, the more noise you introduce into the image.

Sometimes you absolutely have no choice but to shoot at a higher ISO. For example, if you are in a poorly lit gym shooting your kid’s basketball game, you are going to need a relatively high ISO to freeze the action, even with a fast lens. Newer cameras mitigate this issue somewhat, because they are able shoot at higher ISOs without a significant amount of noise.

Additionally, if you are only going to be displaying low resolution photographs on Facebook or elsewhere on the internet, or printing small 5X7 pictures, you can get away with some noise in the photo. But, if you are going to be creating larger prints, or will be showcasing the images on the internet at a high resolution, you want your images tack-sharp, and lower ISOs undoubtedly help. There are all kinds of software programs which can help reduce noise in a photograph, but the more noise you are correcting, the softer the image will become.

This segues nicely into the next step because, if you lower ISO, your shutter speed will slow down (assuming aperture is constant). One way to shoot tack-sharp photographs at slow shutter speeds is to use a sturdy tripod.

Image003

3) Use a sturdy, well-grounded tripod

On a tripod, you can shoot at any shutter speed and the camera and lens will (ideally) stay motionless. This assumes your camera is firmly fastened to the tripod head, and the tripod’s foundation is well anchored and balanced on the ground. Don’t take that for granted – just because you’re on a tripod doesn’t mean everything will stay locked in place. Make sure your tripod feet are solidly on the ground before setting up the camera (I usually press down relatively hard on the tripod to make sure the ground won’t give way…this is especially important on loose ground like mud, wet rocks, or sand).

Then, once your composition is set, make sure your tripod head is locked in position. Additionally, If your tripod has a hook beneath the centre column, hang something with a little bit of weight on it to further lock down the tripod (I usually hang my backpack on the center hook). Even a gentle gust of wind, or the vibration from a nearby car passing by, can introduce minor camera movement into a tripod setup, so you want that setup locked down as tightly as possible.

Image004

4) Mind your shutter speed

If you are going to hand-hold the camera, it is customary to choose a shutter speed that is at least as fast as the reciprocal of the focal length you are using. For example, if you are shooting with a 50mm lens, then you will want your shutter speed to be at least 1/50th, or faster, to get acceptable sharpness. Any slower and you risk motion blur. If you are shooting with a 500mm telephoto, then you want at least 1/500th or faster, and so on. The one caveat to this formula is if your camera or lens has some sort of additional stabilization, like Nikon’s Vibration Reduction (VR – called Image Stabilization or IS on other cameras). This will allow you to shoot at slower shutter speeds, usually by several stops, without introducing significant motion blur.

Image005

5) Lock-up the mirror before firing away

When you are looking through the viewfinder in a DSLR, what you see is the light which passes through the lens, but you don’t actually see it until it bounces off a couple of mirrors. The light of the scene enters through the lens, bounces off of a mirror that sits at an angle directly in front of the shutter/sensor, then it travels through a pentaprism or penta-mirror, before it finally reaches the viewfinder.

So, in order for the exposure to be taken, the mirror in front of the sensor has to flip up, then the shutter opens to allow light to hit the sensor. If the mirror flips up at the same time the shutter opens, there is the potential for very slight movement of the camera due to vibrations caused by the mirror flipping up.

Most modern DSLRs give you the option of locking the mirror up well before the exposure is taken. The Nikon D810, for example, gives you the option of locking up the mirror anywhere between one and three seconds before the shutter opens (Nikon calls it Exposure Delay Mode). I always choose three seconds, unless there’s a need to shoot quicker. That makes sure the camera is nice and still before the shutter opens and the exposure is taken.

Note: if you’re using a mirrorless camera you don’t have to worry about this step!

This is also helpful if you forgot to bring along a remote shutter. Pressing the camera’s shutter release almost always causes slight movement in the camera. But, if the camera waits a couple of seconds after the mirror flips up, it gives the setup time to become completely still again.

Image006

Do you have any additional tips or tricks to increase sharpnes in your images? Please share in the comments below.

googletag.cmd.push(function() {
tablet_slots.push( googletag.defineSlot( “/1005424/_dPSv4_tab-all-article-bottom_(300×250)”, [300, 250], “pb-ad-78623” ).addService( googletag.pubads() ) ); } );

googletag.cmd.push(function() {
mobile_slots.push( googletag.defineSlot( “/1005424/_dPSv4_mob-all-article-bottom_(300×250)”, [300, 250], “pb-ad-78158” ).addService( googletag.pubads() ) ); } );

The post 5 Steps to Increase the Sharpness of Your Photographs by Jeb Buchman appeared first on Digital Photography School.


Digital Photography School

 
Comments Off on 5 Steps to Increase the Sharpness of Your Photographs

Posted in Photography


Maximum sharpness: Nikon’s automated AF Fine Tune explained

22 Apr

Among the features introduced in Nikon’s new D5 and D500 DSLRs, we’re very excited by automated AF Fine Tune. This feature allows users to quickly fine-tune their specific camera bodies and lenses, maximising the chances of a sharp shot and avoiding the lengthy process of trial-and-error tuning that was previously necessary. Watch our video and read our in-depth analysis.

What’s the problem?

If you’re a DSLR shooter, you may be acutely aware of consistent front or back-focus issues with some of your lenses, particularly fast ones like F1.4 primes. Mirrorless users tend to not have such issues, because their cameras focus using their image sensors. When a mirrorless camera says it’s achieved focus, generally it’s actually in focus. That doesn’t necessarily hold true with DSLRs, which use a secondary phase-detect sensor under the mirror as a sort of proxy for focus at the imaging plane. This makes DSLR focus sensitive to misalignments between the secondary AF module and the image sensor, and also requires calibration of the optics inside the module itself. Furthermore, the way these phase-detect AF modules makes them sensitive to certain lens aberrations, like spherical aberration.

Manufacturers of DSLR bodies and lenses do a lot of calibrations to make sure that this isn’t an issue, calibrating every AF point at the factory, writing look-up tables into lenses, and more. But the reality of tolerances is such that you’ll be best off if you calibrate your particular copy of a lens and your particular copy of a body yourself. That’s what AF Fine Tune, or AF micro-adjustment as Canon calls it, is all about.

State of the current art…

Up until now, this calibration procedure has required cumbersome procedures for accurate calibration. We’d often set a camera up on a tripod and align it to a LensAlign (which has a sighting tool), then have to change the set up to test different subject distances, lighting, or lenses. Some photographers even try to Fine Tune on the spot by trying different values and seeing if a real-world target looks sharper or not – but this method is extremely prone to error. Solutions like FoCal have tried to automate the procedure, but again, the requirement of a chart and a computer is cumbersome.*

… disrupted

Nikon’s new automated AF Fine Tune makes things as easy as child’s play. It uses contrast-detect AF in live view, which focuses using the image sensor and is nearly always accurate, to calibrate its own phase-detect AF system. Watch our video above to get an idea of just how easy it is to calibrate your lenses on the new D5 and D500 cameras.

A couple of things are worth keeping in mind. For some lenses and systems, the optimal calibration value can change for different subject distances. This isn’t necessarily always the case, but you may wish to calibrate for the subject distances you’re most likely to shoot for any particular lens. For a good all-round calibration, we’re told that using a target approximately 40x the focal length away strikes a good balance.

The key here is to play around a bit. Try a couple different distances, a few different runs, and make sure you’re getting a consistent result. Sometimes we’ve found the optimal value to change with lighting temperature, but this sort of thing is precisely why the automated procedure is so valuable: if you’re running into trouble with focus, you can – right at the wedding reception you’re shooting – set the camera on a table, point it at a static object, and calibrate your camera in under 10 seconds. Yeah, we timed ourselves.

The result

Here’s an example of how Fine Tune helped calibrate our Nikon 24/1.8 to our D5. Roll your mouse over the ‘OFF’ and ‘ON’ buttons to see Sam’s eye sharpen up. If you click on the main image, you can see the full image in a separate window, where you’ll notice that the ‘OFF’ shot is front-focused on Sam’s nose, while the ‘ON’ shot is focused correctly on his eye. We placed a single AF point over Sam’s left eye (on camera right) for focus in both cases.

AF Fine Tune OFF
(focused on nose)
AF Fine Tune ON
(focused on eye)

In this case, for this lens paired to this body, automated AF Fine Tune found a value of +14 was best. This indicates that for correct focus, the camera has to shift focus backward an arbitrary 14 units from the focus reading the phase-detect sensor makes. In other words, out of the box, this lens on our D5 front-focuses. If it had back-focused out-of-the-box by a similar amount, we might have expected the automated procedure to find -14 to be the optimal value.

How we’d like to see this feature evolve

AF Fine Tune currently only writes one global value per lens. This means the calibration value can’t be adjusted for either end of a zoom. Furthermore, only the center point can be calibrated – the camera assumes that the calibration at the factory ensures all points are consistent with one another and, importantly, the center point. Finally, as mentioned earlier, sometimes the optimal value can change based on subject distance.

Canon cameras currently at least offer to microadjustment values for either end of a zoom, but don’t offer any sort of automation to help you out. Sigma and Tamron USB docks allow for calibration at either end of the zoom, and for 3 to 4 different subject distance ranges, allowing for a high degree of accuracy of calibration. Unfortunately, entering 4 different subject distance ranges for two ends of a zoom mean the user has to literally set up the camera 8 times, with some sort of test target for accurate assessment – hardly practical for most working photographers.  

The key here is automation: automating opens up a world of opportunities, and automated Fine Tune is an important first step. We’d even imagine a future implementation where calibration data for all focus points is stored and learned from over time. Every time you calibrate a particular point, the camera could retain subject distance information (passed on to it via the lens), and over time learn the best calibration values for each point, for all subject distances, for different temperatures and lighting as well (the latter are often minor concerns).

To sum up…

Nikon’s automated AF Fine Tune is truly one of the most welcome features we’ve seen added to a DSLR in recent times. We’ve wondered for years why camera companies don’t use their contrast-detect AF to self-calibrate their phase-detect systems, instead relegating calibration to a cumbersome end-user experience.

Automated Fine Tune changes all that. It’s a really useful feature that takes a lot of guesswork and cumbersome aspects of calibrating yourself out of the equation, allowing you to do it on the spot, at an event, anywhere, on the fly. In fact, anyone working with shallow depth-of-field imagery should absolutely perform this procedure. Wedding, newborn, portrait, lifestyle, photojournalist, and even sports photographers: take note.


* We really like Reikan FoCal for research purposes though: you get a plethora of data for how a body/lens combination behaves at different subject distances, on different days, under different lighting, and even a map of the optimal calibration value per AF point. Of course, since you can only enter one global adjustment value into your camera, this information is a bit more academic, but if you want to get an idea of the behavior of your system, there’s probably no more comprehensive tool than FoCal.

Articles: Digital Photography Review (dpreview.com)

 
Comments Off on Maximum sharpness: Nikon’s automated AF Fine Tune explained

Posted in Uncategorized


Maximizing Sharpness with a Telephoto Lens

11 Dec

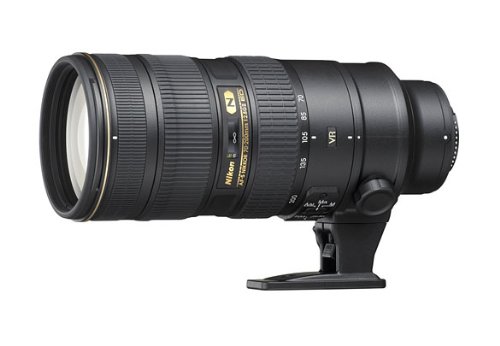
Telephoto lenses are perhaps one of the first people buy to add to their kit, as they are useful in many genres of photography.  The reach that a telephoto lens can offer is crucial for a lot of sports, wildlife or other ‘action’ photography. However, it is that same reach that can introduce the problems that prevent people getting sharp results.  Here are six tips to help you perfect the technique of maximizing sharpness with a telephoto lens.Maximising Sharpness when shooting with a telephoto lens
1. Shutter Speed Selection

One of the biggest hurdles to overcome when shooting with a telephoto lens is camera shake – softness introduced by not being able to hold the camera steady for the duration of the exposure.  One of the easiest ways to overcome this is to make sure that the shutter speed you select is faster than the reciprocal of the focal length. For example, in order to minimize the effect of camera shake with a 300 mm lens, a shutter speed faster than 1/300th second is recommended.

To take this one step further, it is best to consider the “effective focal length” (EFL) of the lens by taking the crop factor of your sensor into account.  If you are not shooting with a full frame camera, you are most likely shooting with a crop sensor (or APS-C) camera.  The sensors within these cameras are smaller than full frame sensors and, as such, give the result of multiplying the focal length of any lens put on the camera (see Crop Factor Explained for further explanation).  The result is, when you are using a 300 mm lens, on a camera with a 1.5x crop factor, the effective focal length is 450 mm. Thus meaning you need to be looking to use a shutter speed quicker than 1/450th second.

So just make sure you are aware of the crop factor of your camera, so that you can quickly approximate the required shutter speed, if shooting handheld.
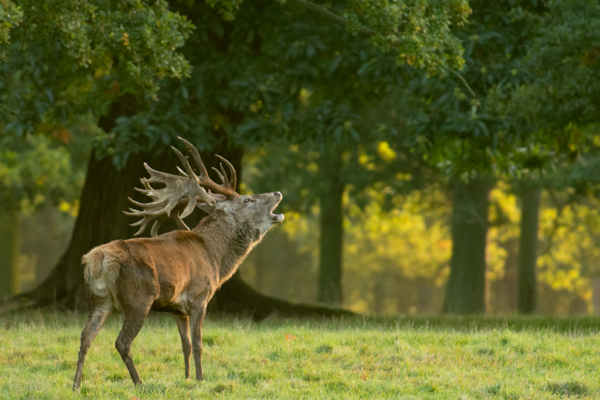
Maximising sharpness when shooting with a telephoto lens

Shot at 340 mm (510 mm EFL), f/5.6, ISO2500 using 1/320th second shutter speed. Use of a tripod here meant that I could be confident that the resulting images of this Red Deer stag would be sharp, even though shot only at 1/320th second.

2. Use a Tripod

Another very simple way to overcome image softness due to camera shake is to use a tripod.  Not everyone enjoys carrying or using a tripod at all times. However, it is a really quick and simple way to help minimize camera shake and to give you more flexibility in using slower shutter speeds, compared to shooting handheld (i.e. not a necessity to stay at “1/EFL”, though still recommended where possible).

There a numerous tripod heads available that have the freedom of movement that is often needed when shooting sports or wildlife. You can also be safe in the knowledge that even at the end of a long day of shooting, when your arms would usually be tired, the tripod will continue to hold the camera steady.

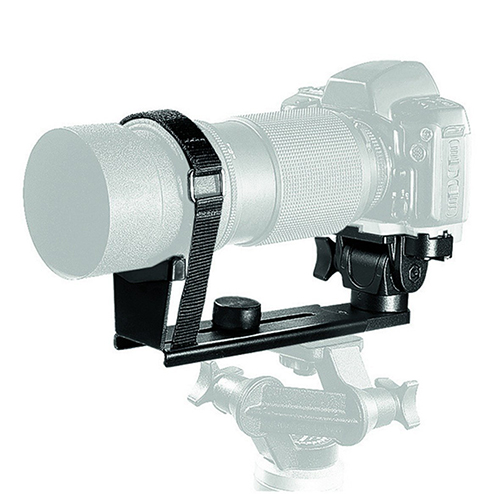
A lot of larger lenses come with a tripod collar which mounts the lens to the tripod, rather than the camera. Most of the smaller, lower budget (but still very long, in terms of focal length) telephoto zoom lenses do not have one, meaning that the camera is mounted to the tripod and the lenses are left dangling off of the camera, susceptible for small vibrations.  Some tripod manufacturers make special brackets to overcome such situations, allowing smaller telephoto zoom lenses to be tripod mounted and become more stable (see image below).
Maximising sharpness using a telephoto lens

Consider tripod mounting your telephoto lens to improve stability when shooting at extreme focal lengths.  Pictured: a Manfrotto 293 telephoto lens support.

3. Image Stabilization

Obviously if shooting handheld, image stabilization (IS or VR) can again help overcome camera shake.  Though you will want to avoid this if you are opting to shoot on a tripod, as image stabilization will actually introduce movement in that situation.

4. Aperture Selection

Shutter speed selection, as mentioned above, was all about considering shutter speed in relation to freezing motion. Aperture selection, however, is two-fold:

a) Diffraction – this is generally a rule for all, but the top of the range telephoto lenses, but shooting at the widest aperture (smallest f/ number) your lens allows will often result in image softness due to diffraction.  This is where light entering the camera is diffracted before hitting the sensor, resulting in the appearance of soft focus throughout the frame (though generally far more noticeable in the corners).  Therefore, if you choose a slightly smaller aperture, e.g. from f/5.6 to 6.3 or 7.1 (known as stopping down) you will minimize the diffraction and see an increase in the sharpness of the resulting images.

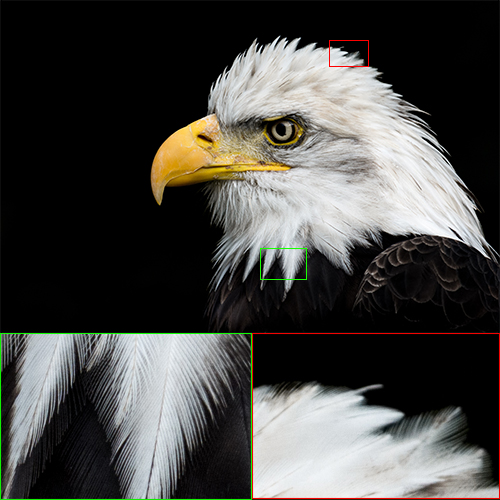
b) Ensuring you have enough depth of field – a key component of wildlife and action photography is depth of field.  Often, you shoot as wide an aperture (small f/ number) as possible, to try and isolate the subject and give a soft diffuse background.  However, at long focal lengths, with a close subject, the depth of field (i.e. the region of the image which will be captured in sharp focus) can be as small as a few millimetres, meaning that tiny errors in focusing accuracy will mean that the crucial part of your wildlife shot that needed to be in focus, will be soft.  There are plenty of mobile apps or websites that help you calculate the depth of field for your given camera, aperture and focal length, so make sure you have an awareness how small an aperture you actually need in order have enough depth of field.
Maximising sharpness using a telephoto lens

Here, even though shot at f/9.0, you can see that there was not sufficient depth of field to render all of the head feathers of this bald eagle, completely sharp.

5. Bump the ISO

Don’t be afraid to boost the ISO on your camera.  Wildlife and sports photography is a constant compromise between shutter speed and aperture to ensure that you are using a quick enough shutter speed to freeze motion and overcome camera shake, and a suitable aperture to give you enough depth of field and avoid diffraction.  To alleviate this, you can increase the sensitivity of your sensor by increasing the ISO.  This will let you use quicker shutter speeds for the same given aperture and exposure.  Increasing the ISO will introduce more noise into the final image, but it’s better to have a sharp, yet noisy photo, than to have missed whatever fleeting moment you were trying to capture by not being able to use a fast enough shutter speed.

6. Teleconverters

Often available in 1.4x or 2x magnifications, teleconverters are great for extending the focal length of your lenses on a budget.  The increase in focal length does come at a cost however, as they increase the maximum aperture of your lens by one or two stops respectively.  Most consumer DSLRs do not allow autofocus with lenses with a smaller aperture than f/8.0 (i.e. f/5.6 + one stop) so you are limited in what teleconverter/lens combinations you can use. You need a fairly fast lens to begin with, i.e. a wide maximum aperture of f/2.8 or f/4.0, to make the most of a teleconverter.  Once the teleconverter is attached, autofocus will generally be slower (less light to play with) and any flaws of your current lens will be magnified – so stopping down, as per in point #4 above, becomes even more important.
Maximising sharpness when shooting with telephoto lenses

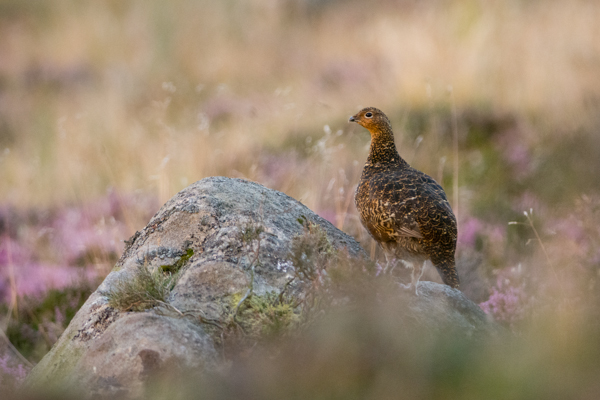
Red grouse at sunset. This is a shot of compromises: 300mm (450mm EFL), f/5, ISO4000, 1/125th second, tripod mounted. Even at ISO4000, the shutter speed was still only 1/125th of a second, but mounted on a tripod the results were nice and sharp.

Summary

Overall, the above tips are just a few considerations for maximizing performance of your telephoto lenses. It’s easy to get carried away thinking that you need more focal length, just to get that little bit closer to your subject. However, it is important to understand the complications of working with such lenses and learn the techniques you can use to overcome the difficulties introduced by such long focal lengths.

Do you have any other techniques that you frequently use to help ensure sharp images when shooting with your telephoto lenses?  Please share them in the comments below.

Post originally from: Digital Photography Tips.

Check out our more Photography Tips at Photography Tips for Beginners, Portrait Photography Tips and Wedding Photography Tips.

Maximizing Sharpness with a Telephoto Lens

The post Maximizing Sharpness with a Telephoto Lens by Elliot Hook appeared first on Digital Photography School.


Digital Photography School

 
Comments Off on Maximizing Sharpness with a Telephoto Lens

Posted in Photography


Where the sharpness comes from: A tour of Sigma’s factory

21 Sep

www.imaging-resource.com-crop.jpg

Some people are happy to shoot with lenses and think only of the results, but it can also be fascinating to think about how such complex, precision pieces of engineering are made. Some insight is provided by Dave Etchells over at Imaging Resource, who has just posted a story about his visit to Sigma’s factory in Aizu, Japan. However, no matter how hard you try, you can’t make every lens perfect – as Lensrentals Roger Cicala explains in his recent blog post. Click through for more.

News: Digital Photography Review (dpreview.com)

 
Comments Off on Where the sharpness comes from: A tour of Sigma’s factory

Posted in Uncategorized


DxOMark introduces ‘Perceptual MPix’ score for lens sharpness

17 Dec

dxomark_logo.png

DxOMark has introduced a new metric of lens sharpness that it’s calling the ‘Perceptual MegaPixel’. This is designed to give a simple, easily-understandable indication of how a lens impacts on the resolution of the camera with which it’s paired. The measurement is based on standard MTF (Modulation Transfer Function) testing, but also takes into account the sensitivity of the human visual system to detail. The data can be explored over at the DxOMark website.  

News: Digital Photography Review (dpreview.com)

 
Comments Off on DxOMark introduces ‘Perceptual MPix’ score for lens sharpness

Posted in Uncategorized


Sharpness of the Nikon 50mm f1.4 at F5.6

13 Dec

more sharpness tests found here dombowerphoto.blogspot.com This should show you the amazingness of how sharp the nikon 50mm f1.4 lens is as you see i am zoomed in past 1:1 at 8:1 and then come out to full image. comparable to any macro level of sharpness photo taken outside with the nikon d300 1/250th of a second f5.6 iso 200 photo of Kim Rooney my girlfriend of the last 9 years photo by dom bower copyright www.dombower.com If you enjoy my videos please post them on your Facebook page and let others know about this channel, please subscribe and share on Facebook and twitter. Also check out the links below. If you really like my work please feel free to check out or buy a copy of the my PHOTOGRAPHY BOOK: Getting There With Photography: By Dom Bower www.blurb.com FACEBOOK Critique/advice GROUP www.facebook.com FACEBOOK PAGE www.facebook.com TWITTER page twitter.com WEBSITE www.dombower.com PHOTOGRAPHY CLOTHING Point and destroy clothing http For my AZ of Weightloss Tips check out: dombowerexercise.blogspot.co.uk And to donate to The Cancer Charity that I am doing a Trek for please visit www.justgiving.com


Nikon 70-200 f2.8 VRII Review w/ Sample Pictures – Focus – VR ii – Sharpness – Bokeh – Accuracy Test

28 Nov

photographyequipment.yolasite.com (Budget Equipment) razzi.me www.facebook.com twitter.com In this video I am doing hands on review of Nikkor 70-200 f/2.8G ED VRii lens. I tested the focus, sharpness at wide open aperture and at 200mm, bokeh, focus accuracy and VRII. It’s an exceptional lens with great sharpness and works great in low light situation when you cannot hand hold at slower shutter speed. Equipment Used in the Video DSLR: Nikon D3s Lenes: 70-200 f/2.8 VRii Speed light: Nikon SB700
Video Rating: 4 / 5

 
Comments Off on Nikon 70-200 f2.8 VRII Review w/ Sample Pictures – Focus – VR ii – Sharpness – Bokeh – Accuracy Test

Posted in Nikon Videos


Tokina 11-16mm f2.8 dslr Lens sharpness test

29 Oct

Here is a test and example show of the sharpness of the tokina 11-16mm f2.8 lens on the nikon d300 dslr If you enjoy myvideos please post them on your Facebook page and let others know about this channel, please SUBSCRIBE and share on Facebook and Twitter. Also check out the links below. If you really like my work please feel free to check out or buy a copy of the my PHOTOGRAPHY BOOK: Getting There With Photography: By Dom Bower www.blurb.com FACEBOOK Critique/advice GROUP www.facebook.com FACEBOOK PAGE www.facebook.com TWITTER page twitter.com WEBSITE www.dombower.com PHOTOGRAPHY CLOTHING Point and destroy clothing http please donate to a charitable cause visit www.justgiving.com and the blog www.dombowerphoto.blogspot.co.uk
Video Rating: 4 / 5

 
Comments Off on Tokina 11-16mm f2.8 dslr Lens sharpness test

Posted in Nikon Videos