RSS
 

Posts Tagged ‘Sharpen’

Photoshop Sharpening for Beginners – Unsharp Mask, High Pass and Smart Sharpen Explained

02 Jan

The post Photoshop Sharpening for Beginners – Unsharp Mask, High Pass and Smart Sharpen Explained appeared first on Digital Photography School. It was authored by Nisha Ramroop.

photoshop-sharpening-for-beginners

With the constant improvement of technology, it is realistic to expect tack sharp images straight out of your camera. Many times, though, the image appears sharper on your camera than when uploaded to your computer. This is because images need to be sharpened for their specified output. In Photoshop sharpening for beginners, we look at why and how to sharpen your images. Also, you will review some of the sharpening filters and techniques that help make a huge difference to the overall quality of your final edit.

Image: F/5.6 1/200/ ISO800 @420mm

F/5.6 1/200/ ISO800 @420mm

Why sharpen?

Before we delve into the photoshop sharpening tools, it is important to know why and when you need to sharpen your images. The premise of sharpening is that it increases the contrasts around the edges in your image.

As previously mentioned, you need to sharpen images for their specific output types. This means you sharpen an image displayed on the internet differently than one meant for print.

Sharpening is also very useful when it comes to correcting smaller focus issues. For example, if you are shooting a portrait and the focus is on the ear instead of the eyes.

Sharpening the subject’s eyes brings the attention back where you intended. In other genres of photography, use sharpening in pretty much this same way. Sharpen the areas you want to draw the viewer’s eyes to and decrease the sharpness in areas you want to “fall away”.

Photoshop-Sharpening-for-Beginners

Sharpen for your respective output: web vs print. Details make a difference F/11 1/250 ISO200 @10mm

Keep in mind that while sharpening takes your image to the next level, there are times when it is not needed. While sharpening a person’s eyes and lips can take their portrait to the next level, you want to avoid sharpening their skin!

How to sharpen

As with other editing techniques, Photoshop sharpening filters are destructive (when applied directly to your image). Use layers and smart objects, to maximize the following sharpening tools and avoid permanently changing it.

Bonus Tip: When post-processing, save the application of your sharpening technique for last.

Unsharp Masks

While the name “unsharp” sounds like a tool that would make your images less sharp, this counter-intuitively named filter is, in fact, a sharpening tool. Interestingly enough, it was regarded as the best tool to sharpen images in earlier iterations of Photoshop.

While it is still useful, some of the other tools afford you a greater amount of control.

Photoshop-Sharpening-for-Beginners

Photoshop sharpening for beginners notes: When you sharpen an image too much, it starts to look a little noisy.

To use Unsharp Mask:

  • Duplicate your original/background layer
  • Right-click on your new layer and choose “Convert to Smart Object”
  • Go to Filter -> Sharpen -> Unsharp Mask. This brings up a dialog box with the options: Amount, Radius and Threshold


Remember, we said that sharpening basically increases the contrasts around the edges in your image? Well, building on that will make these sliders easier to understand.

Use the Amount slider to increase or decrease the amount of contrast in the edges of your image.

Radius manages the level of detail. So a smaller radius will manage the smaller details, while a large radius affects a bigger area.

The last slider, Threshold, affects the areas of higher contrast.

Photoshop Sharpening for Beginners – Unsharp Mask, High Pass and Smart Sharpen Explained

When using these sliders, a good starting place is to figure out your radius first. Do you want to sharpen the smaller details or the larger ones? If you are still unsure how to work with Photoshop sharpening for beginners, experiment!

In this example, push your radius up and then work back down until you affect the areas that you want. From here, you can start moving around the other two sliders until you get your desired results.

One of the downsides of using Unsharp Mask is that it is Layer specific. This is because it affects your entire image, so you need Layer Masking to discard areas that you don’t want sharpening.

Smart Sharpen

The Smart Sharpen tool is like a child of Unsharp Masks, as it gives you some more options. One of the cool things with Smart Sharpening is that it ignores skin detail and focuses on areas with higher contrasts e.g. eyes, eyebrows, lips.

Use the same workflow as above to access the Smart Sharpen filter. The dialog box gives you more advanced options than the previous Unsharp Mask. Amount and Radius work the same way as previously described.

Image: F/5.6 1/1600 ISO100 @420mm

F/5.6 1/1600 ISO100 @420mm

A drop-down menu allows you to remove different types of blurs such as Gaussian, Lens and Motion blur. Lens blur is the most common removal used in this menu.

Image: In Photoshop CC, your menu looks a little differently but has all the same options. Additiona...

In Photoshop CC, your menu looks a little differently but has all the same options. Additionally, it includes a useful option to reduce noise.

Smart Sharpen also allows you to create presets. This is helpful if you are sharpening a batch of images at similar focal lengths. Remember, when you apply your filters/filter preset to a Smart Object, you can further adjust/refine it.

High Pass Sharpening

Another photoshop sharpening for beginners is the High Pass Sharpening technique. While it is a little more advanced than the other tools, you can still easily apply it. It is not a filter found in the Sharpen Menu like the Unsharp Mask and Smart Sharpen filters. What it is, however, is a combination of steps that sharpens your image.

To process with High Pass Sharpening:

  • Duplicate your layer
  • Desaturate your new layer. It seems like a strange step, but since sharpening increases saturation around your edges, your image may start to look surreal.
  • Right-click on your desaturated layer and choose “Convert to Smart Object”
  • Go to Filter -> Other- > High Pass. Your entire image now turns to gray, and when you move the radius slider, you will see the targeted detail areas affected.
Photoshop-Sharpening-for-Beginners

Left: Using High-Pass in the default normal mode, see how your edges are defined. Right: Using High-Pass in Overlay Blend Mode allows you to see your changes in real-time

There is, of course, an alternate way to this gray image where you see your edit in real-time.

Prior to the last step above:

  • Select your desaturated layer and go to Blend Modes
  • Select Overlay
  • Then go to Filter -> Other -> High Pass and adjust


Photoshop-Sharpening-for-Beginners

At full size, you don’t always see that the eyes are not as sharp as they can be. Like Smart Sharpen, the eyes and lips are sharpened, but the skin is unaffected. F/7.1 1/125 ISO100 @70mm

Note: This sharpening technique is the only one that lets you apply sharpening with different blend modes.

Conclusion

Remember, sharpening should be the last step in your post-processing workflow. These filters and techniques in Photoshop Sharpening for Beginners will take your image to that next level. It helps to know when and why to sharpen an image and as with all processing, applying correctly makes a huge difference to your final image.

Do you have any other photoshop sharpening for beginners tips you’d like to share? Please do so in the comments!

The post Photoshop Sharpening for Beginners – Unsharp Mask, High Pass and Smart Sharpen Explained appeared first on Digital Photography School. It was authored by Nisha Ramroop.


Digital Photography School

 
Comments Off on Photoshop Sharpening for Beginners – Unsharp Mask, High Pass and Smart Sharpen Explained

Posted in Photography


How to Use Photoshop to Resize and Sharpen Images for the Web

28 Feb

The post How to Use Photoshop to Resize and Sharpen Images for the Web appeared first on Digital Photography School. It was authored by Peter Dam.

Do you struggle with getting your images to look super sharp when you use them online? Do they even look blurry? No matter if you share your images on social media platforms or photo sharing sites like Flicker and 500px, you want your images to look as sharp as possible.

Most photographers come across web sharpening issues at some point. But did you know that most of the web sharpening issues you experience come from the resizing process? Resizing your image can make your image look blurry and a lot less sharp than the full sized image. You might have spent a long time processing your image so it would be a shame that it should end up as a less sharp online version.

In this article, you will learn the common pitfalls to sharpening your images for web use, and more importantly, how to sharpen in a way that gives you both full control and the best results.

However, let’s take a look at how not to resize images for online use before we dig into the best way to resize and sharpen in Photoshop.

Milford Sound Mitre Peak © Peter Dam

How NOT to resize and sharpen your images for online use

To get sharp and great looking images online, avoid uploading a full-sized image and relying on the website to handle resizing for you. You don’t have any control over the amount of sharpening (if any) that a website’s upload function add to your image.

You should also avoid just using the export dialogue in Photoshop. Even though it is good, it is not great. You can still end up with blurry images, especially if there is a dramatic size change. Like if you want to resize a 6000px wide image to being only 1200px.

Also, avoid just resizing in Photoshop and then let the export tool do the rest if you want the best results. Even though you resize the image, you have little control of the sharpening process when you only use the export tool.

How to sharpen your images in Photoshop for the best results

To follow along, open a copy of an image that you have already processed in Photoshop, as we go through the best method for resizing and sharpening your photos for online use.

Note: Make sure you use a copy of the image and not the original because you are going to resize your image to a much smaller version. If you accidentally save the image without renaming and close Photoshop, you can’t recover the image back to its full size.

The Chute © Peter Dam

It would be logical to go straight ahead and resize your image to the output size you want. However, this won’t lead to the best results as it may be difficult for Photoshop to properly sharpen an image that suffers from a quality loss when you resize a lot.

Instead, resize in two steps and sharpen in between the steps.

Let’s go through the process step-by-step using the dimensions from above as an example, resizing from a 6000px wide image down to 1200px wide.

The first step is to resize your image down to approx. 1.6 of the final output size that you want to use online. In this case, this would be 1.6 X 1200px = 1920px.

To resize your image in Photoshop, you should go to Image->Image Size and enter the width.

This gives you an image that hasn’t degraded too much from being resized but is still relatively close to the final image size.

Before resizing to the final output size, you should add sharpening. You do this by going to Filter->Sharpen->Sharpen.

If you like to keep track of what each layer does, I suggest renaming the layer to “Sharpened.”

After applying this first layer of sharpening, duplicate the layer. You can do this by pressing CMD+J (on Mac) or CTRL+J (on Windows).

Then apply another round of sharpening by using the menu Filter->Sharpen->Sharpen. Rename this layer to “Extra sharpening.”

Now you are ready to resize to the final image size. You do this by going to Image->Image Size and enter 1200px as the width.

Now that you have resized the image to the final output size, you should see that the image looks very sharp when you view it at its actual size.

If you think that it looks somewhat over-sharpened, you can easily adjust it by just changing the opacity of the of the topmost layer (the one called “Extra sharpening”). Pull down the opacity to around 60-70%.

Now you are done with the sharpening process. However, you should know that there are additional issues that occur when resizing images.

Sharpening an image also tends to make it a tiny bit brighter. If you want to address this, you should add a Levels adjustment layer and pull the midtone point slightly to the right. Usually changing the midtone point to 0.97 brings back the original brightness level. You can also use an Exposure adjustment layer if you prefer to use that instead of a Levels adjustment layer.

The colors in your image also suffer a bit when resizing and sharpening; however, it is not always visible. If you find that your image looks a bit less colorful now that it is resized, you should add a Hue/Saturation adjustment layer and add a bit of saturation back into the image. About +5 to +9 usually brings your image back to the level it was before resizing and sharpening.

That is the end of the web resizing and sharpening method used by many professional photographers using Photoshop.

If you are familiar with creating Photoshop actions, you can record the process of resizing and sharpening images to the dimensions you most often use online. This allows you to speed up the process significantly.

Exporting your image

The final step is to export your image. You can do this by going to File -> Export -> Export As…

The setting you choose when exporting your image depends on where you want to upload your image. For some sites, like image galleries or your portfolio website, image quality is more important than the file size. Whereas, blogs prefer to have smaller file sizes, but with a bit lower image quality.

One of the most important things, as discussed in this article, is that the result is a sharp looking image. You already took care of this by following the sharpening and resizing workflow above, where you resized the image to the output size you need. This means that you don’t have to worry about resizing the image or what resample method to use during export.

The only thing to worry about when following this sharpening and resize workflow is choosing the file format you want and the quality to use. The file format is most likely going to be JPG for web use. The image quality settings depend on whether you prefer a really small file size (so the image loads lightning fast online), or whether you prefer to maintain the best image quality possible. Usually, you can lower the image quality to 80% without a visible drop in image quality. This is my preferred personal setting for image quality. You can optimize the file size even more by using a lower image quality. However, I would never recommend going lower than 50% to get smaller file sizes. There are also some image optimizing sites you can use, such as TinyJpeg, that lower your file size without compromising your image quality too much.

Conclusion

Admittedly, it is a lot more complicated method for resizing your images than using the inbuilt Export feature in Photoshop. However, it also leads to much better results. What use is it to put much effort into capturing and processing an image, if it doesn’t look as great as it could when you show it online?

What method do you use for sharpening your images before using them online? Feel free to share your thoughts in the comments below.

The post How to Use Photoshop to Resize and Sharpen Images for the Web appeared first on Digital Photography School. It was authored by Peter Dam.


Digital Photography School

 
Comments Off on How to Use Photoshop to Resize and Sharpen Images for the Web

Posted in Photography


Tutorial: The best way to sharpen portraits in Photoshop

03 May

Sharpening plays an important role in influencing how the human eye interprets a photo and it is the only way to create the illusion of higher definition and detail. Also, much like we use light, color, and composition, it is an extremely effective way to guide the eyes of the viewer to wherever you want them to focus.

The first question to ask isn’t how to sharpen but when to sharpen. Any retouching, compositing, coloring, and any other edits you’ve made should be included in the sharpening process. So make sure that it’s the final step in your workflow just before you export! It’s important to note that you’ll want to resize your images beforehand as well. Resizing an image that has already been sharpened can have adverse effects such as reducing or exaggerating the amount of sharpening.

For example, if you want to upload one of your latest photos to Instagram, first resize your image to 1080 x 1080 pixels (their recommended dimensions for square images). Then go through the sharpening process as normal. Doing this will guarantee that your image quality will be consistent no matter what size your image is or where it will be displayed.

To begin the sharpening process, create a new layer, go to the Image menu, and select Apply Image. Apply Image will take all of the visible layers in your project and merge them together onto the new layer. This will allow you to sharpen your final image (including all of the edits you’ve made) without affecting the originals.

As far as technique goes, there are many ways to sharpen an image. I’ve always preferred the High Pass method which involves converting the new merged image into a Smart Object and then using a High Pass Filter to apply the sharpening effect. Since we’re working with a Smart Object and a Smart Filter, we can always go back to make changes to the radius by simply double-clicking on the High Pass option underneath the layer.

My favorite thing about this technique is just how flexible and precise it can be! If I ever need to make changes to the amount of sharpening I can either duplicate the sharpening layer (for a subtle adjustment), change the radius of the High Pass Filter, raise or lower the opacity, or simply paint with the Brush Tool on the layer mask.

Using Layer Masks, you can apply different levels of sharpening to different parts of a photo. You can have a sharpening layer just for facial features and a second for wardrobe. Create as many layers of sharpening as you need to get the look that you want. Overall, focus your sharpening on aesthetic details in your photo—hair, eyes, jewelry, details in clothing—anything that you want to stand out. Avoid sharpening things that might distract the viewer or bring out details you don’t want to be as noticeable (i.e. pores).

Like most things that we’ll do in Photoshop, sharpening is highly subjective. It’s up to you to determine where and how much to sharpen. And while we use a portrait as our example, this method works across all types of photography! This is a process I’ve developed over several years and it has served me well. So give it a try! I only hope that it helps you figure out your own favorite method that’s best suited for you and your work.


About the Author: For over seven years, Aaron Nace has been teaching photography and photo manipulation on PHLEARN.com to millions of users across the world at every skill level. You can subscribe for his professional videos or view the Photoshop tutorials as well.

Articles: Digital Photography Review (dpreview.com)

 
Comments Off on Tutorial: The best way to sharpen portraits in Photoshop

Posted in Uncategorized


How to Sharpen Your Photos using Lightroom and Nik Efex

02 Nov

Do you want to take razor sharp photos? One of the best methods for creating tack sharp images is what I call The 20/20 Technique. It’s a process that combines the editing power of Adobe Lightroom and Nik Efex to sharpen your images.

sharpen, photos, tips, photography, Lightroom, Nik Efex

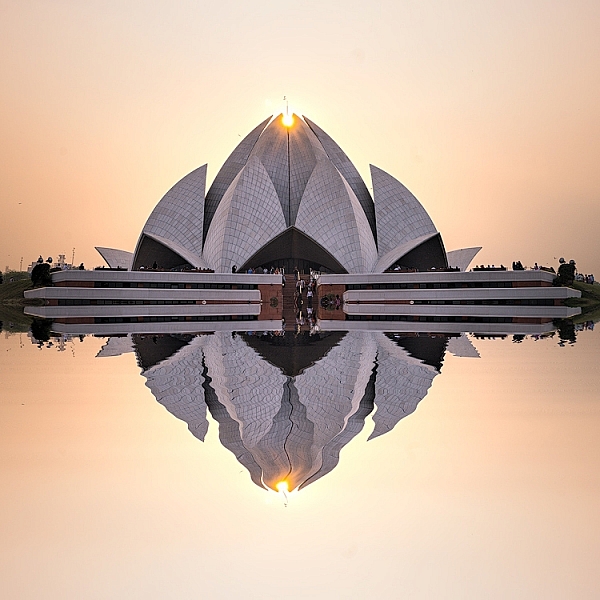
Lotus Temple, Delhi: Bringing out sharpness in architectural photos can really make them pop. © Pete DeMarco

Is sharpness overrated?

The godfather of street photography, Henri Cartier-Bresson, once quipped, “Sharpness is a bourgeois concept.” It’s true that sharpness does not turn a bad photo into a good one. In fact, some of the greatest photographs of our time aren’t that sharp. A picture that evokes emotion will always win over an image that is technically great but lacks feeling.

In the digital age, however, sharpness is another tool in the photographer’s kit that can transform an image from good to great. Have you ever seen a photo so clear that it makes you feel as if you could reach through the screen? It’s almost as if it’s not even a photograph at all but a window into another world.

sharpen, sharper photos, tips, photography, Lightroom, Nik Efex

Bundi, India: Be careful not to sharpen people too much. © Pete DeMarco

Popular advice about getting sharp images usually centers around buying expensive lenses or having the proper settings in camera, as is explained in this article; How to Take Sharp Images. Although those two factors have a major impact on the overall sharpness of the image, today’s top photographers take an additional step. They enhance the sharpness in post-processing.

Sharpen Using The 20/20 Technique

In the modern digital darkroom, there are a number of ways you can add a superior amount of sharpness to your images. I’m going to explain one of the most simple and effective methods you can use to get incredible results. Here is my 20/20 Technique workflow:

sharpen, photos, tips, photography, Lightroom, Nik Efex

Burj Khalifa Reflection, Dubai: Nik Efex is a powerful photo editing suite you can download for free. © Pete DeMarco

Step 1. Open your image in LR

Import your image into Adobe Lightroom (or the editing software of your choice). Open the Develop Module and go to the Detail Panel, then to Sharpening. Increase the sliders up to somewhere between 40 – 50. This is just a general number to start. You’ll have to decide what works best for your image (make sure to view it full size or 1:1). Then finish editing your photo (correcting the white balance, exposure, etc.).

Step 2. Open the image in Nik Efex

For the next step, you will need a piece of software called NIK Efex. You can download NIK Efex for free here. Look for the blue download button in the top-right corner.

NIK Software is a company that develops image editing tools for others like Adobe and Google. In fact, Google bought the company in 2012. Then they copied the best editing algorithms from NIK Efex and created the photo editing app Snapseed. Sadly, NIK Efex has not been updated since then. Most assume it will die a slow death, especially after Google announced the software is now free.

sharpen, photos, tips, photography, Lightroom, Nik Efex

Busan, South Korea: Adding a slight tilt-shift blur effect to the edges of your photo can accentuate the sharpened areas. © Pete DeMarco

Anyways, once you install Nik Efex, right click on your photo in the Lightroom Develop Module > Edit in Nik Output Sharpener, and choose; Edit a copy with Lightroom Adjustments. Your photo will then open in a new Nik Output Sharpener window.

Step 3. Adjust using the Nik filters

From the Nik Output Sharpener window, move the sliders until you get the look and sharpness you are after. For me, I usually leave the “Adaptive Sharpening” at 50%. Then I increase the “Local Contrast” and “Focus” sliders up to around 15-20%.

Google, Nik Efex, sharpen, photograph, output

The Nik Efex Output Sharpener interface.

Step 4. Save and head back to Lightroom

Click on “Save” and the final version of your image will import as a new file back in Lightroom. That’s it!

Here is a video from Nik showing how to use this filter:

Words of warning

Don’t sharpen too much. Know when to pump it up or turn it down. For instance, clouds are soft so you usually don’t want to apply a lot of sharpening to them. Nature scenes usually call for less sharpening. With architecture, some extra sharpening really makes it pop (try adding a little “Structure” sharpening to those). Sharpening people can be hit or miss. It all depends on what you’re trying to achieve.

sharp, photos, tips, photography, Lightroom, Nik Efex

Xingping, China: Selectively sharpening parts of your image, like the houses in the foreground of this photo, helps to lead the viewer’s eye. © Pete DeMarco

Watch out for noise. The more digital sharpening you apply, the greater the noise in your photo. Just zoom in on your photo to see it more clearly. You can apply some Noise Reduction in Lightroom if need be. I don’t like to use it much though because it softens the image. Some noise really doesn’t matter anyways, especially if you are sharing your photo as a smaller size online.

Make sure you’re using a good monitor. If you are viewing or editing your photos on an old monitor, it’s possible that you will not see much difference in sharpness. You can get the best results on a retina display or by printing your photos.

sharpen, photos, tips, photography, Lightroom, Nik Efex

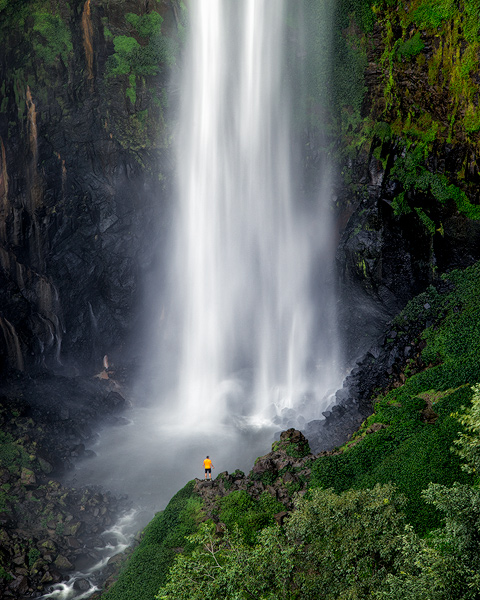
Sipisopiso Waterfall, Indonesia: Transform your images by combining the 20/20 Technique with split toning. © Pete DeMarco

Share your work

Try the 20/20 Technique and share your photo in the comments below. I’d love to see what you do with it. And if you enjoyed this article, you might also like my previous article: How To Use Split Toning to Make Your Photos Stand Out.

googletag.cmd.push(function() {
tablet_slots.push( googletag.defineSlot( “/1005424/_dPSv4_tab-all-article-bottom_(300×250)”, [300, 250], “pb-ad-78623” ).addService( googletag.pubads() ) ); } );

googletag.cmd.push(function() {
mobile_slots.push( googletag.defineSlot( “/1005424/_dPSv4_mob-all-article-bottom_(300×250)”, [300, 250], “pb-ad-78158” ).addService( googletag.pubads() ) ); } );

The post How to Sharpen Your Photos using Lightroom and Nik Efex by Pete DeMarco appeared first on Digital Photography School.


Digital Photography School

 
Comments Off on How to Sharpen Your Photos using Lightroom and Nik Efex

Posted in Photography


Photoshop Tip: Using the High Pass Filter to Sharpen Images

22 Nov

If you’ve used Photoshop, you are likely aware by now that there are many ways to accomplish the same tasks. One of the more important ones that should be done to almost every digital image is sharpening. This is necessary because most digital camera sensors make use of an anti-aliasing filter, which very slightly blurs the image, to reduce the chances of moire occurring in the image. This slight blurring, generally only one pixel in size, causes a slight loss of detail in an image. To correct for the slight blurring, tools such as Unsharp Mask are used. For a good tutorial on Unsharp Mask, check out How To Sharpen Photos: An Introduction.

High Pass Sharpening

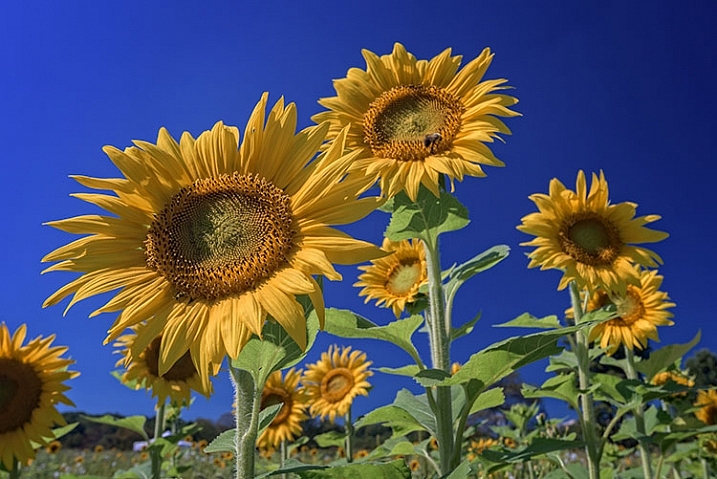
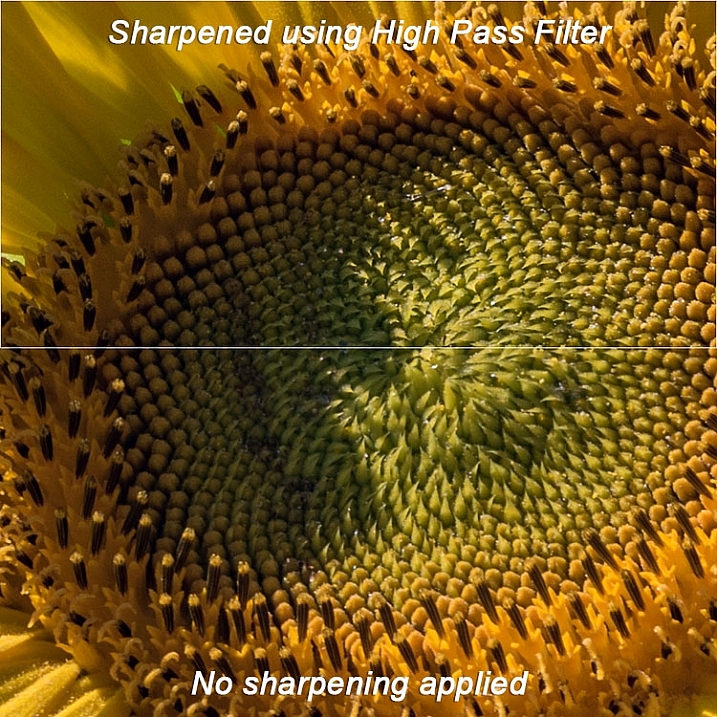
This shot of sunflowers benefited from the High Pass filter by sharpening the fine detail in the center of the flower.

Another easy way to sharpen your images is with a filter that’s not even found in the Sharpen menu under Filters in Photoshop. It’s relegated to the Other category at the bottom of the Filters menu, and is called High Pass. The High Pass filter is a bit easier to use than Unsharp Mask, in that it only has one slider to worry about, and the technique for using it allows for some experimentation even after it’s applied, so you can get your image looking exactly as you want.

Note: I am using the latest version of Photoshop, version 2015.0.1 in Creative Cloud.

Step 1: Edit your image, then flatten it

Before you use the High Pass filter, you’ll first want to process the image to your liking. Generally speaking, sharpening should be the final step in image editing, because it is directly dependent on image size. You will sharpen an image sized to 5×7″ differently than one sized to 13×19″. Once your image is edited, flatten all layers by going to the Layer menu and selecting Flatten Image. Then adjust your image size as needed if you’re going to print or to display online.

Step 2: Duplicate Layer

Now that your image is flattened, duplicate that layer by pressing <CTRL + J> (in Windows) or <CMD + J> (on a Mac). You’ll then want to zoom in to view the image at 100% by pressing <CTRL + 1> (in Windows) or <CMD + 1> (on a Mac), or just double clicking the magnifying glass in the toolbox. You’ll want to be at 100% so you can see the detail of the image clearly.

Step 3: The High Pass Filter

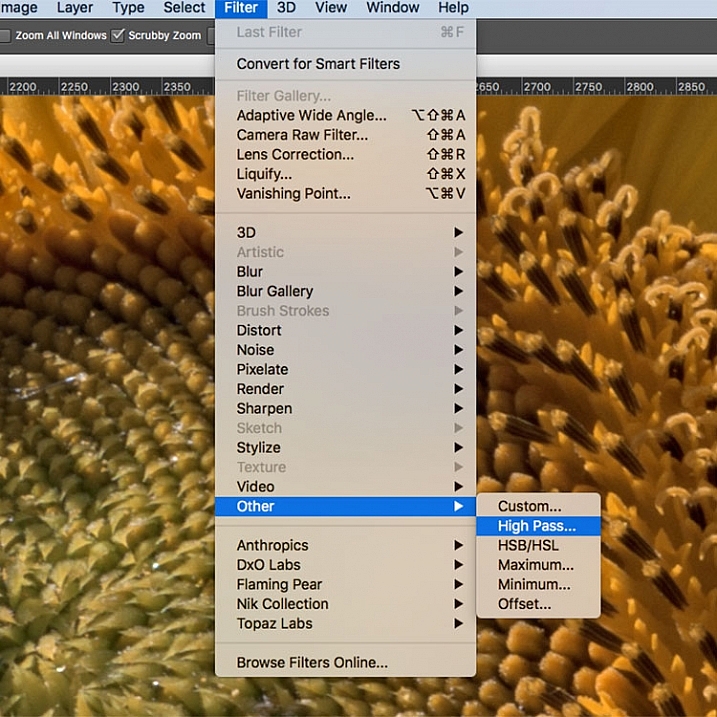
High Pass Filter Selection

In the Filter menu, select Other, then High Pass.

Go to the Filter menu and select Other, and then High Pass. You will see the entire image turn a flat grey color. Not to worry, as this will allow you to see what the filter is doing.

Step 4: Adjust the amount of sharpening

high pass filter sharpening

Once the High Pass filter dialog box pops up, use the slider to adjust the radius.

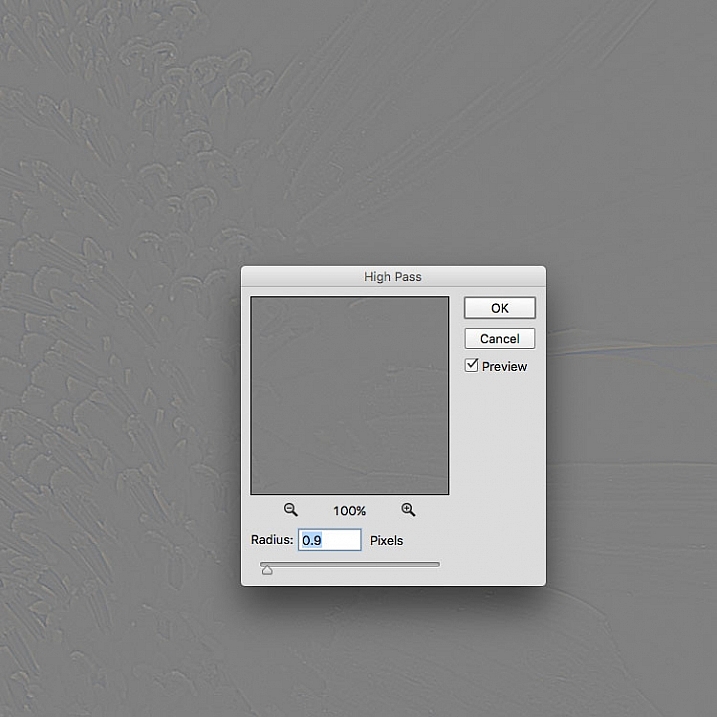
Once you run the filter, you’ll see a dialog box open up, showing a preview along with a radius slider. In addition, the image behind the dialog box will have turned grey, with some edge lines showing.  This allows you to see exactly what is being sharpened. The High Pass filter only sharpens edges, so anything that’s not an edge becomes flat grey. The amount of sharpening you do will largely be image dependent, as well as size dependent.

For this image of the sunflowers, I was making a large print, using the full resolution of the image. When doing so, I’ve found my radius amount will usually fall somewhere between 0.5 and 5 pixels. You need to be careful here, as too much sharpening will introduce unwanted artifacts and noise into the image. I use the preview as my guide. I want to see thin black lines over the grey areas, with little to no white. Once you see any white, it means you’ve begun to get a halo, which you want to avoid. The final effect will be a subtle sharpening, not a drastic pop. For this image, I used a radius of 0.9. You can see above that there are only black lines around the edges of the flower, with very little halo. Click OK when ready.


Step 5: Adjust Layer Blending Mode

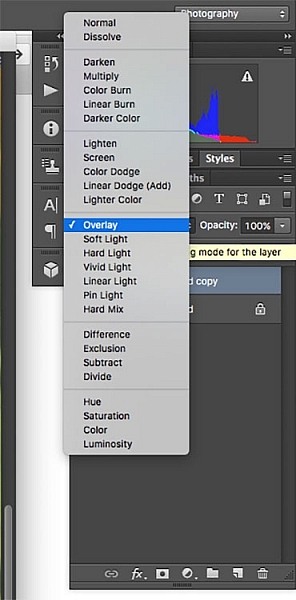
High Pass filter layer blending modeOnce you’ve applied the High Pass filter, it’s time to get rid of that flat grey image and bring your photo back to life. Go to your Layers palette and select the Blending Mode drop-down menu and set it to Overlay. Your image will regain its color, and you can toggle the sharpened layer off and on, to compare the image with and without sharpening.
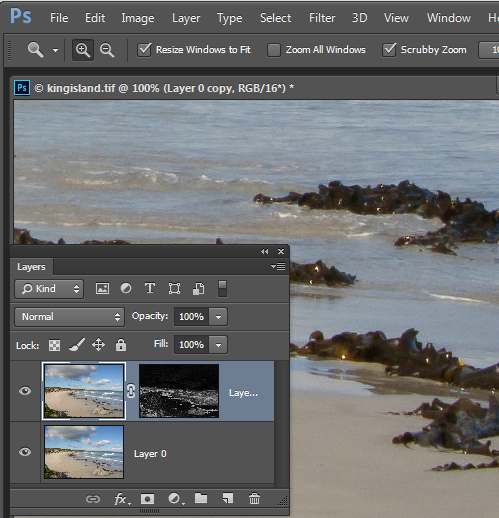
You can also experiment with different blend modes, including Soft Light, Hard Light, Vivid Light, Linear Light, and Pin Light. In addition, you can use the Layer Opacity setting to reduce the effect a bit, if you decide the sharpening is a bit too strong. The beauty of this technique is that it’s completely adjustable (non-destructive) after you’ve applied the filter, and because you’ve worked on a separate layer, you can easily undo the sharpening and start over again if needed. Also, again because you’re working on a separate layer, if there are certain areas in the image where you want the sharpening to be applied, you can use Layer Masks to hide or show it.

Final results

High pass filter comparison

In this comparison image, the top half has been sharpened using the High Pass filter, while the bottom half has not been sharpened.

The High Pass filters allows a lot of flexibility in sharpening photos and is simple to use. It’s a great way to give your images a sharper, crisper look before uploading or printing. Give it a try and let me know what you think!

googletag.cmd.push(function() {
tablet_slots.push( googletag.defineSlot( “/1005424/_dPSv4_tab-all-article-bottom_(300×250)”, [300, 250], “pb-ad-78623” ).addService( googletag.pubads() ) ); } );

googletag.cmd.push(function() {
mobile_slots.push( googletag.defineSlot( “/1005424/_dPSv4_mob-all-article-bottom_(300×250)”, [300, 250], “pb-ad-78158” ).addService( googletag.pubads() ) ); } );

The post Photoshop Tip: Using the High Pass Filter to Sharpen Images by Rick Berk appeared first on Digital Photography School.


Digital Photography School

 
Comments Off on Photoshop Tip: Using the High Pass Filter to Sharpen Images

Posted in Photography


Sharpen Up on FB

29 Jul

Facebook may not be the best place to show off your photography, but it is still a fantastic way to quickly share snaps with close friends and family. After all, not everyone is on Flikr.

You’ve likely noticed that FB compresses photos causing minor, but super irritating, artifacts. Which basically negates all the hours you spent editing them to perfection. GUH.

There is a way to ensure your photos come out looking sharp on FB. Three ways, actually!

  • 1. Upload 2048px size photos, you’ll get less compression.
  • 2. Don’t sharpen the image beforehand.
  • 3. Upload PNG, rather than JPG.

Read about the how and why these tips work in this article by Photoshelter, and start uploading pics to FB without losing your hard-earned quality.

Photo by Allen Murabayashi


© Erin for Photojojo, 2015. |
Permalink |
No comment |
Add to
del.icio.us

Post tags:


Photojojo

 
Comments Off on Sharpen Up on FB

Posted in Equipment


How to Sharpen Image Edges in Photoshop

18 Oct

How to Sharpen Image Edges in Photoshopopener

If you’re a Lightroom user you’ll know that in Lightroom you can mask the sharpening you apply to an image so it is applied to the edges in the image only. This same feature is not yet available in Photoshop and the sharpening filters there are applied to the entire image rather than just edge detail.

However you can achieve a reasonable approximation of the Lightroom masking feature in Photoshop using the Photoshop Find Edges filter. The benefit of this is you can apply more sharpening to the image than you would do without the masking effect and areas of flat color like skies and skin tones won’t be sharpened. Here’s how to do this.

How to Sharpen Image Edges in Photoshop

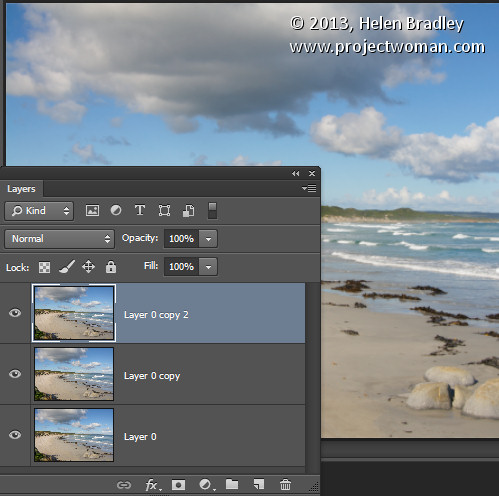
Once you have finished processing your image in Photoshop, flatten the image to a single layer or make a single layer of the edited image by adding a new layer at the top of the Layer palette and press Ctrl + Alt + Shift + E (Command + Option + Shift + E on the Mac) to create a flattened version of the image on that layer.

Duplicate the flattened layer twice.

How to Sharpen Image Edges in Photoshop 1

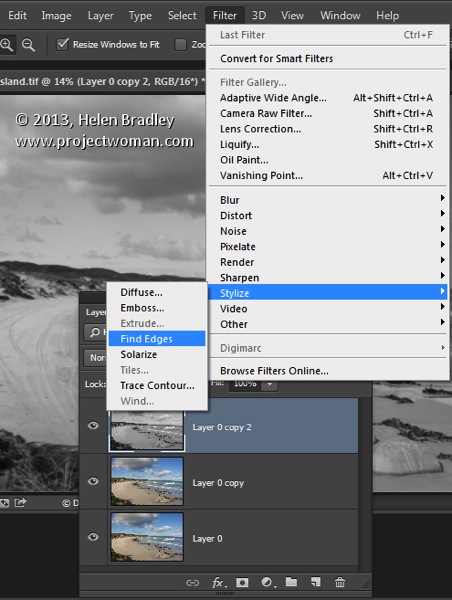
Target the topmost layer – you will create your sharpening mask from this layer. Choose Image > Adjustments > Desaturate to convert it to black and white then choose Filter > Stylize > Find Edges to isolate the edges in the image.

How to Sharpen Image Edges in Photoshop 2

Choose Image > Adjustments > Invert to invert the colors so that what is black is white and vice versa.

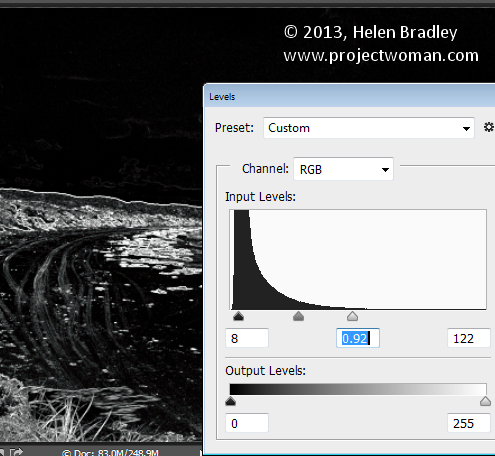
Choose Image > Adjustments > Levels and adjust the mask so that it shows white in the areas that you want to sharpen and black in those areas that you do not want to sharpen.

How to Sharpen Image Edges in Photoshop 3

Once you have a good mask, blur its edges slightly by choosing Filter > Blur > Gaussian Blur and apply a 1 or 2 pixel blur to it. When this is done, hide the sharpening mask layer by turning its visibility icon off in the Layer palette.

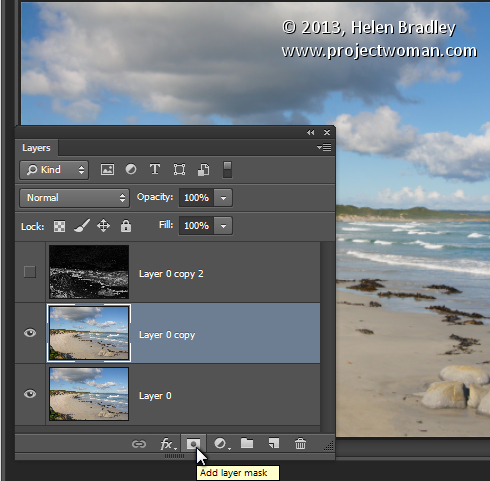
Now target the second topmost layer in the image and click the Add Layer Mask icon at the foot of the Layer palette.

How to Sharpen Image Edges in Photoshop 4

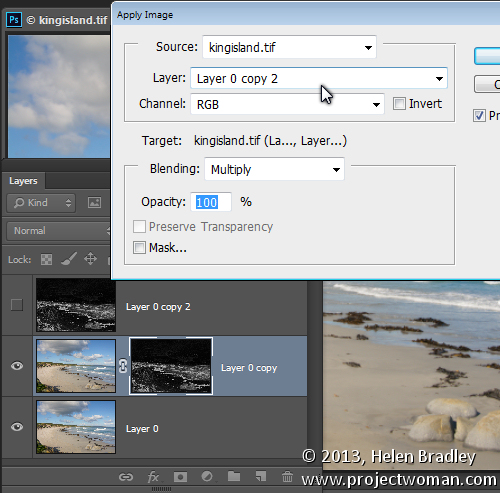
Click the mask thumbnail on this layer to target it and choose Image > Apply Image to open the Apply Image dialog. From the Layer dropdown list select the layer that contains the hidden sharpening mask, and click Ok.

How to Sharpen Image Edges in Photoshop 5

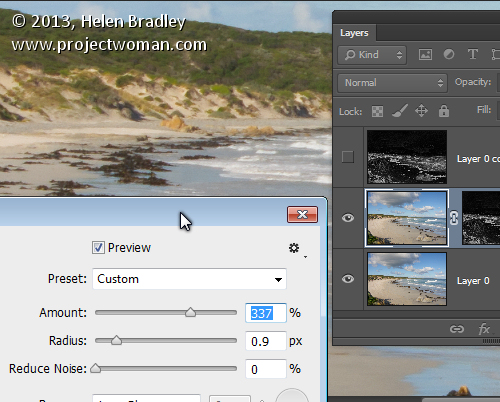
Click on the image thumbnail on this layer to target it and apply your sharpening to this layer – use Smart Sharpen or Unsharp Mask as desired. When you set the slider values, view the result on the image and not using the preview in the sharpening dialog. The preview in the dialog doesn’t take into account the mask you have applied – the image itself does. Click Ok when you’re done.

How to Sharpen Image Edges in Photoshop 6

To compare the before and after result of sharpening the image with an edge mask, Shift + Click on the mask layer thumbnail to disable it and see the image as it would look sharpened and without the masking effect. Click the mask thumbnail again to enable the mask again. You can discard the hidden mask layer now, if desired as it is no longer needed.

While this sharpening mask takes some effort to create once you’ve done it a few times you will find the process quite straightforward and some of its creation can be automated using Actions.

Post originally from: Digital Photography Tips.

Check out our more Photography Tips at Photography Tips for Beginners, Portrait Photography Tips and Wedding Photography Tips.

How to Sharpen Image Edges in Photoshop

The post How to Sharpen Image Edges in Photoshop by Helen Bradley appeared first on Digital Photography School.


Digital Photography School

 
Comments Off on How to Sharpen Image Edges in Photoshop

Posted in Photography


How To Sharpen an Image Photoshop CS3

27 Oct

A quick tutorial on how to sharpen an image

Audience: This webinar is designed for users who are already familiar with the basics of Topaz Detail, and are interested in learning how Detail can enhance their Nature Photography. From wide-open landscapes to close-up macro imagery, detail and tone are essential elements in creating striking nature images. With unprecedented control over small, medium, and large image features, as well as advanced selective tone control, Topaz Detail is a unique tool that allows you to find the perfect balance within your nature photography. Learn how to take your nature images to the next level with Topaz Detail. For more information, please visit www.topazlabs.com.

 
Comments Off on How To Sharpen an Image Photoshop CS3

Posted in Retouching in Photoshop


Photoshop: Sharpen Your Images! (HD)

23 Oct

iceflowstudios.com | http Use the Unsharp Mask filter for complete control over your image’s sharpness. Remember to use Layer Masks! 🙂
Video Rating: 4 / 5

 
Comments Off on Photoshop: Sharpen Your Images! (HD)

Posted in Retouching in Photoshop


[Photoshop Tutorial] Sharpen Blurry Images

20 Oct

Tutorial in Photoshop CS5 where i take a blurry image and improve the pixel quality to give a higher resolution or “Sharpened” result. Link to image: www.morguefile.com User: inatashko Image is FREE TO USE license.
Video Rating: 4 / 5

 
Comments Off on [Photoshop Tutorial] Sharpen Blurry Images

Posted in Retouching in Photoshop