RSS
 

Posts Tagged ‘Selection’

Getting Landscapes Sharp: Hyperfocal Distances and Aperture Selection

07 Mar

The post Getting Landscapes Sharp: Hyperfocal Distances and Aperture Selection appeared first on Digital Photography School. It was authored by Elliot Hook.

How to use hyperfocal distance for sharp landscapes

Want to know how to master depth of field and hyperfocal distance – so you can capture consistently sharp landscape photos?

You’ve come to the right place.

Because in this article, I’m going to tell you everything you need to know about hyperfocal distance.

And by the time you’ve finished, you’ll be able to confidently use it in your own landscape photography.

Let’s get started.

Keeping your landscape photos sharp: depth of field

Great landscape photos generally have all of their key elements sharp.

This includes foreground objects that are just meters from your camera, as well as background elements that are kilometers away.

Sunrise over the limestone pavement hyperfocal distance for sharp landscapes
In this scene, it was important to capture everything in sharp focus – from the frozen puddle in the foreground to the hills in the background.

So how do you achieve such perfect front-to-back sharpness?

By ensuring that your depth of field is large enough to render everything of interest suitably sharp.

Let me explain:

When you focus on an individual point within your landscape, you are creating a plane of focus that lies parallel to the sensor.

Everything in front of and behind that plane is technically not in focus. But there is a region within which objects will appear acceptably sharp – even though they’re not in focus!

That region is the depth of field.

Put another way, the depth of field is the range of acceptable sharpness within a scene, moving outward from the point of focus.

For instance, in the graphic below, the camera is focused on a rock:

Hyperfocal Distance Diagram 1
A theoretical example showing the depth of field for a given focal length, aperture, and point of focus.

So the plane of focus sits parallel to the sensor at that rock, and the limits of acceptable sharpness that form the edges of the depth of field lie in front of and behind that plane.

If you were to fire the shutter button on that camera, you’d get a photo with a sharp rock. The front of the first tree would be sharp, and the rest of the trees would fade into softness.

Make sense?

Factors affecting depth of field

Thus far, I’ve talked about depth of field as if it were a fixed property.

But it’s not. Your depth of field can change depending on three key factors:

  1. Focal length
  2. Aperture
  3. The distance between the camera and the point of focus.

Let’s take a closer look at how each of these elements affects depth of field, starting with:

Focal Length

A short focal length (e.g., 20mm) will give you a greater depth of field than a long focal length (e.g., 400mm).

So while it’s easy to keep an entire scene in focus with a wide-angle lens, you’ll struggle to do the same with a long telephoto.

Of course, changing your focal length will alter your field of view and therefore your composition, so you should rarely adjust your focal length to change the depth of field. Instead, select your focal length, frame your composition, and then use the next factor on this list to achieve the perfect depth of field:

Aperture

A narrower aperture, such as f/16, will produce a deep depth of field. A wider aperture, such as f/2.8, will give you a shallow depth of field.

So if you’re after an ultra-sharp, deep-depth-of-field shot, you’ll want to use a narrow aperture.

But be careful; extremely narrow apertures are subject to an optical effect called diffraction, which will degrade image sharpness. So while you should absolutely use aperture to adjust the depth of field, be on the lookout for blur.

Distance to the point of focus

If your focal point is close to the camera, then you’ll get a shallower depth of field. If your focal point is far from the camera, you’ll get a deeper depth of field. So if you shoot a distant subject, it’ll be much easier to get the entire scene sharp!

In other words:

To increase the depth of field, you can either choose a more distant subject…

…or you can back up to frame a wider shot.

Note that these three factors work together to determine the depth of field.

grasses and mountain landscape using the hyperfocal distance to keep the landscape sharp

No one factor is important than any of the others; instead, they’re three variables in the depth of field equation.

So if you want a deep depth of field, you could use a narrow aperture or move farther away from your subject or use a wide-angle lens.

(You could also do all three of these things for an ultra-deep depth of field.)

And if you want a shallow depth of field, you could use a wide aperture or move closer to your subject or use a telephoto lens.

Keeping the entire scene sharp with hyperfocal distance

If you’re dead-set on capturing a scene with front-to-back sharpness, then you’ll need to understand another key concept:

Hyperfocal distance.

Hyperfocal distance is the point of focus that maximizes your depth of field.

In fact, by focusing at the hyperfocal distance, you can often ensure that the entire scene is sharp, from your nearest foreground subject to the most distant background element.

Look at the graphic below:

Hyperfocal Distance Diagram 2
By focusing at the hyperfocal distance, the entire scene will fall within the depth of field.

Do you see how the area from the point (or plane) of focus onward is sharp?

That’s what the hyperfocal distance will do for you.

And it’s the reason landscape photographers love using the hyperfocal distance.

Because by selecting a narrow aperture, and by moving the point of focus to the hyperfocal distance, you can render the entire scene in focus – for a stunning result!

(By the way, when focusing at the hyperfocal distance, the near acceptable sharpness limit is half of the hyperfocal distance.)

Now, you’re probably wondering:

How do you determine the hyperfocal distance when out shooting?

Technically, you can do a mental calculation, but this can get pretty complex. So I’d recommend you use a hyperfocal distance chart or calculator (there are plenty of apps for this, such as PhotoPills).

Eventually, you’ll be able to intuitively identify hyperfocal distances for common apertures and focal lengths – so you won’t even need to use an app!

Aperture selection and the dangers of diffraction

As you should now be aware, a narrow aperture deepens the depth of field.

So if you want your entire scene sharp, you generally need a narrow aperture.

Unfortunately, choosing your aperture isn’t as simple as dialing in f/22. Thanks to diffraction, if you set such a narrow aperture, you may get the entire scene in focus – but still end up with a blurry image.

For example, the image below shows a comparison of the same scene, shot at f/8 (left) and f/16 (right):

images taken at f/8 and f/16 to illustrate the dangers of a narrow aperture

The frosty fern leaf is an important part of the foreground interest here. And though both images look perfectly sharp when resized and compressed for browser viewing, the 100% crop for each image below shows a significant difference in detail:

100% crops of the f/8 and f/16 images, to illustrate hyperfocal distance for sharp landscapes
The sharpness of the fern leaf at f/8 (left) versus f/16 (right). The image was captured with greater sharpness via a wider aperture of f/8 – though I took care to focus on the hyperfocal distance.

Do you see how the image on the right (taken at f/16) is blurrier than the image on the left (taken at f/8)?

That’s diffraction at work.

And note that, for the scene in question, both apertures resulted in a depth of field that extends from before the fern leaf to infinity.

(In other words: The blurriness has nothing to do with depth of field.)

Diffraction becomes an issue in all lenses as the aperture gets smaller, though it is more pronounced on inexpensive lenses. Typically, the sweet spot, in terms of lens performance, is somewhere between f/8 and f/11.

So when selecting your aperture, you’ll want to keep your lens as close to the sweet spot as possible, while also ensuring sufficient depth of field.

Getting landscapes sharp: conclusion

Now that you’ve finished this article, you can hopefully see that it’s worth understanding hyperfocal distance, aperture selection, and how they affect each other.

So make sure you find a nice hyperfocal distance app.

And remember to avoid tiny apertures (because they cause diffraction).

That way, you can get consistently sharp landscape shots!

Now over to you:

Do you struggle to keep your landscape photos looking sharp? Do you think an insufficient depth of field is the culprit? Or is it diffraction? Share your thoughts in the comments below!

The post Getting Landscapes Sharp: Hyperfocal Distances and Aperture Selection appeared first on Digital Photography School. It was authored by Elliot Hook.


Digital Photography School

 
Comments Off on Getting Landscapes Sharp: Hyperfocal Distances and Aperture Selection

Posted in Photography


ON1 Photo RAW 2021 now available, includes Portrait AI, new selection tools and much more

03 Nov

After unveiling ON1 Photo RAW 2021 in September, ON1 has officially released the new software. ON1 describes the latest version of its flagship software a ‘hassle-free, professional photo organizer, raw processor, layered editor and effects app.’ ON1 promises its software is ‘perfect for those seeking an ultra-convenient all-in-one photo editing solution.’

ON1 Photo RAW 2021 includes numerous additions and improvements, including improved automatic AI adjustments, a new portrait editing workflow, improved color selection technology and much more.

The primary new feature is ON1 Portrait AI. This technology finds each face in a selected image and analyzes the photo to locate the eyes, mouth and skin to allow the user to make many quick adjustments, including frequency separation-based skin retouching and adjustments to lighting. ON1 states that ‘in a few simple clicks, you can quickly brighten up the eyes, whiten the teeth and make your subject glow with very little effort.’

Additional retouching tools added to ON1 Photo RAW 2021 include a new Spot Healing Brush tool. The non-destructive brush allows quick removal of dust spots, power lines and other unwanted objects from your image. With a new filter, you can also quickly change a specific color in your image. ON1 says you can use the new filter to change the color of objects such as eyes, flowers, buildings, clothes and more. A similar framework has been added to Photo RAW 2021 allowing you to quickly select a specific color to create a mask, allowing for very specific, localized edits to different parts of your image.

If you’d like to liven up your landscape images, AI Auto and new brush shapes allow the user to easily add clouds to a dull sky. Further, with the color selection technology in ON1 Photo RAW 2021, you can easily make selective edits to your sunrise and sunset images to bring out or add new colors to a scene.

The new version of the software includes workflow and usability improvements as well. With a new Full Screen Preview mode, you can view your image without any distracting user interface elements. You can also present selected images in a full-screen slideshow with user-adjustable settings. For users with large photo libraries, it is all too easy to accidentally import duplicate files or have a cluttered archive. With ON1 Photo RAW 2021’s new Smart Organize mode, the software can automatically locate duplicate images and clean up your files. You can also use this mode to track down all photos captured at a specific location. ON1 Photo RAW 2021 also includes the ability to batch process HDR and panoramic images provided the source image files are organized within subfolders.

ON1 Photo RAW 2021 can be used as a plugin across a wide range of supported software, including Adobe Photoshop and Lightroom, Affinity Photo, Capture One (coming soon), Apple Photos and Corel Paintshop Pro. Click to enlarge.

If Photoshop is an integral part of your editing workflow, you can also take advantage of ON1 Photo RAW 2021’s powerful portrait editing features inside of Photoshop by using ON1 Portrait AI as a plugin. ON1 Photo RAW 2021 can also be used as a plugin inside Lightroom, Affinity Photo, Corel Paint Shop Pro and Capture One (although this support is coming later).

ON1 Photo RAW 2021 includes support for new cameras and lenses as well. New camera support includes: Canon EOS Rebel T8i (850D), Canon EOS R5 (uncompressed image files only), Canon EOS R6 (uncompressed files only), Fujifilm X-S10, Leica M10-R, Nikon Z5, Olympus E-M10 Mark IV, Olympus E-30, Panasonic DC-S5, Panasonic Lumix DC-G100, Sony A7S III and the Sony A7C. New lens profiles include: Canon EF 85mm F1.4L IS USM, Canon G5 X Mark II, Canon RF 24-105mm F4 L IS USM, Nikon Coolpix P1000, Nikon Nikkor Z 50mm F1.8S, Nikon Nikkor Z 85mm F1.8S, Sigma 14-24mm F2.8 DG DN Art, Sony FE 35mm F1.8, Tamron 17-35mm F2.8-4 Di OSD, Tamron 18-400mm F3.5-6.3 Di II VC HLD and Zeiss Touit 2.8/50M.

ON1 Photo RAW 2021 is available now. If you are an owner of a previous version of ON1 software, you can upgrade to ON1 Photo RAW 2021 for $ 79.99. New customers can purchase a perpetual license to ON1 Photo RAW 2021 for $ 99.99. There is also a bundle that includes an annual membership to ON1 Plus for $ 129.99.

If you subscribe to ON1 Photo RAW 360, which has plans starting at $ 7.99 per month, you will receive ON1 Photo RAW 2021 automatically. This also includes ON1 Photo RAW for Mobile. ON1 Photo RAW 2021 is compatible for Windows and macOS. You can learn more about ON1 Photo RAW 2021 and check out purchasing options by visiting ON1.

Articles: Digital Photography Review (dpreview.com)

 
Comments Off on ON1 Photo RAW 2021 now available, includes Portrait AI, new selection tools and much more

Posted in Uncategorized


Adobe teases new Sensei-powered Object Selection Tool for easy masks and more

31 Oct

Adobe has shared a new sneak peek of its new Sensei-powered Object Selection Tool that will soon be available inside Adobe Photoshop CC.

As demonstrated in the video, the new tool uses Adobe Sensei AI to automatically select an object within the frame when a selection is made via the Marquee or Lasso selection modes. It’s also possible to add or remove individual elements within the image using the same Object Selection Tool for more precise edits.

This new feature appears to be a more refined version of the Select Subject Tool Adobe revealed in early 2018. It’s unknown when this new feature will make its way into Adobe Photoshop CC, but it seems as though teaser videos like this are released no more than a month or two before the feature makes it into the public version of the app.

Articles: Digital Photography Review (dpreview.com)

 
Comments Off on Adobe teases new Sensei-powered Object Selection Tool for easy masks and more

Posted in Uncategorized


Final Cut Pro X 10.4.7 arrives with major performance boosts, GPU selection and Pro Display XDR support

09 Oct

Apple has released Final Cut Pro X version 10.4.7, adding a new Metal-based processing engine designed to speed up various graphics tasks and improve content playback. In addition, the update boosts performance for a number of GPU models, adds support for the new 32″ Retina 6K Pro Display XDR, and more.
According to Apple, users can expect to see performance improvements across ‘a wide range of Mac systems.’ The company’s new Mac Pro in particular offers ‘unprecedented power’ when paired with the software, Apple says. Final Cut Pro X v10.4.7 brings support for up to 28 CPU cores and multiple GPUs, including ‘enhanced performance’ for the Radeon Pro Vega II Duo and Pro Vega II GPUs found on the Mac Pro.

When compared to the previous Mac Pro generation, the new Mac Pro offers up to 3.2 times faster transcoding and 2.9 times faster rendering in Final Cut Pro, plus there’s support for the Mac Pro’s Afterburner card for accelerating ProRes and ProRes RAW playback.

The 15in MacBook Pro is the most commonly used model by video editors, according to Apple. These customers can expect up to 20% faster performance. iMac Pro users, meanwhile, will see a performance boost up to 35% compared to the previous version.

In addition, the new Final Cut Pro X adds support for macOS Catalina’s Sidecar, a new feature that enables Mac users to extend their device’s display to an iPad. Other changes include the ability to choose with external or internal GPU will be used for accelerating graphics processing, the ability to grade HDR videos with ‘enhanced color mask and range isolation tools’ and support for viewing HDR videos tone-mapped to standard dynamic range displays on macOS Catalina.

Existing Final Cut Pro X users can download the new update for free. New customers can purchase the software from the App Store for $ 299.99 USD. In addition, existing Compressor and Motion customers can update to versions 4.4.5 and 5.4.4, respectively, for free; new customers will need to pay $ 49.99 each.

Articles: Digital Photography Review (dpreview.com)

 
Comments Off on Final Cut Pro X 10.4.7 arrives with major performance boosts, GPU selection and Pro Display XDR support

Posted in Uncategorized


Photoshop CC update adds AI-powered subject selection tool and more

24 Jan

The AI-powered Select Subject feature that Adobe demoed back in November has finally arrived in Photoshop CC! The feature was officially released just minutes ago in Photoshop CC version 19.1, which also includes the addition of a Decontamination slider to the Select and Mask workspace and some significant compatibility updates for Windows users.

The major update is, obviously, the arrival of Select Subject to Photoshop CC. When it was first demoed in November, the Photoshop team touted the tool—which is powered by Adobe Sensei AI technology—as a way to “select prominent subjects in an image with one click.” That’s what they hope to deliver today.

A single click of the Select Subject button in the Quick Select tool should easily isolate your subject in images like the one below:

Of course, more difficult scenarios where the subject isn’t so obviously delineated against the background will give Select Subject more trouble—the original demo video, embedded below, showed that—but it promises to “let you get started with your selections faster than ever before.”

In addition to Select Subject, Adobe also added a Decontamination slider to the Select and Mask workspace that allows you to select the amount of color decontamination applied to an image:

For Windows users, version 19.1 brings much-requested support for Windows High Density Monitors—allowing you to switch between displays of varying resolutions and sizes seamlessly. Jerry Harris, principal scientist on the Photoshop team and himself a Windows user, explains what this means in the Adobe blog post:

With this release, Photoshop on Windows 10 Creator’s Edition now offers a full range of choices for UI scale factors from 100% through 400%, in 25% increments. This means that the Photoshop user interface will look crisp, beautiful, and the right size no matter the density of your monitor. Photoshop will now automatically adjust itself based on your Windows settings, making it simple to set up.

[…]

In addition, we worked very closely with Microsoft to provide per-monitor scaling across monitors with different scale factors. This means that a high resolution (HiDPI) laptop now works seamlessly alongside a lower resolution desktop monitor (or vice versa). One monitor can have a scale factor of 175% and another a scale factor of 400%.

And finally, Windows users also get advanced support for the Windows dial, which can now adjust brush settings while you paint. Before this, you could only adjust settings between brush strokes, but you can now adjust brush size, opacity, and other settings as you draw:

As of publication, this update should be live and ready to download if you’re already a Creative Cloud subscriber. If you want to learn more about any of the features above, or dive into bug fixes and other minutia, head over to the Adobe blog. Otherwise, just update your copy through the Creative Cloud app and you’re ready to go.

Articles: Digital Photography Review (dpreview.com)

 
Comments Off on Photoshop CC update adds AI-powered subject selection tool and more

Posted in Uncategorized


Fujifilm expands weather-resistant lens selection with XF 50mm F2 R WR

21 Jan

$ (document).ready(function() { SampleGalleryV2({“containerId”:”embeddedSampleGallery_5180263016″,”galleryId”:”5180263016″,”isEmbeddedWidget”:true,”standalone”:false,”selectedImageIndex”:0,”startInCommentsView”:false,”isMobile”:false}) });

Fujifilm has announced a new weather-resistant prime: the Fujinon XF 50mm F2 R WR. It sits alongside the XF 35mm F2 and 23mm F2 as another compact, lightweight yet sturdy lens for the X-system. Offering dust and water resistance, the 50mm F2 is freezeproof to 14°F/-10°C.

On Fujifilm’s APS-C cameras the 50mm F2 offers a 76mm equivalent view. The lens comprises 9 elements in 7 groups with one aspherical ED element, and uses a stepping motor for autofocus. The whole package weighs in at 7oz/200g.

The Fujifilm XF 50mm F2 R WR will go on sale in February for around $ 450/£450.

Press Release

FUJIFILM X-T20 UPS PERFORMANCE AND ADDS TOUCH CONTROLS FOR ENTHUSIAST PHOTOGRAPHERS; NEW COMPACT FUJINON XF50MMF2 R WR PERFECT TRAVEL COMPANION LENS

Valhalla, N.Y., January 19, 2017 – As the leader in innovation for photographers, FUJIFILM North America Corporation today announced the new FUJIFILM X-T20 interchangeable lens camera that joins the award-winning X Series digital camera lineup. The X-T20 is the successor to the FUJIFILM X-T10 and builds on its outstanding image quality, intuitive design, and versatility with a new APS-C sized 24.3MP X-Trans CMOS III sensor and X-Processor Pro image processing engine. The updated sensor and processor, along with an improved AF algorithm, boost the camera’s startup time and AF performance, dramatically improving its ability to track moving subjects for their best pictures to date. The X-T20 also has a large tilting touchscreen LCD monitor for multi-angle shooting and responds to quick gestures for a variety of efficient controls and picture review.

Also announced today is the new FUJINON XF50mmF2 R WR, a compact, mid-telephoto lens adding to the X Series lineup of interchangeable lenses known for their outstanding image quality. The lens features a focal length equivalent to 76mm (in the 35mm film format) and a maximum aperture of F2.0 for beautiful bokeh. The compact and stylish optic also offers high speed AF and weighs just 200g.

Advanced Imaging for the Discerning Enthusiast
The FUJIFILM X-T20 improves on the X-T10 with a 24.3MP X-Trans CMOS III sensor and a new Video option to the Drive Dial to enable instantaneous switching from still photo shooting to the video recording mode. The Exposure Compensation Dial now has the C position for exposure compensation up to ±5 stops, while the LCD monitor uses a tilting touchscreen panel for intuitive operation at almost any angle. The X-T20 is also equipped with an Auto mode selector lever for selecting the fully-automatic Advanced SR Auto mode where the camera chooses the optimum settings for a given scene.

The new sensor’s enhanced signal processing technology has even greater control over digital noise with an improved ISO sensitivity of ISO12800 available as a regular ISO option. At ultra-high ISO settings, the camera produces low-noise images, with deep blacks and smooth tones, delivering beautiful images even in low light conditions.

The FUJIFILM X-T20 also has a Grain Effect function for reproducing distinctive graininess seen in photographs taken with film cameras. The function can be set to Strong or Weak, and can be combined with any of the Film Simulation modes. You can easily obtain the look of film-based photos, with the effect most obvious when the image is printed out.

Photo enthusiasts will find the very best image results made possible by Fujifilm’s proprietary color reproduction technology, developed through producing photographic films, that helps to reproduce warm skin tones, bright blue skies and rich green foliage, just as you remember seeing in real life.

Compact and Lightweight Body Makes Photography Fun and Easy
With the FUJIFILM X-T20, users will find a compact body that is both strong and light and made from magnesium alloy. The top plate features three precision-milled aluminum dials which give the X-T20 a premium feel and allow users to easily adjust the aperture, shutter speed and shooting functions while concentrating on picture taking.

The X-T20 features a 3.0 inch 1.04M-dot tilting TFT color LCD touchscreen monitor for both above head and close to the ground shooting. By combining the Touch Shot function with the tilt LCD monitor, you can get even more creative. Place the camera on the ground and use Touch Shot for a child’s face or a pet’s eye view, or hold it above a crowd of people or an obstacle for high-angle shooting.

Easy Touch, Swipe and Pinch Controls
The LCD monitor in the X-T20 uses a capacitive touchscreen panel to facilitate high-angle shots, taken from above a crowd of people or an obstacle, as well as low-angle shots simulating the ground level perspective.

Users can also opt to use the LCD monitor as a touchscreen to easily access shooting and playback modes. When shooting with the X-T20, you can use the touchscreen to select the focus area, focus on a specific point, and combine the actions of focusing and shooting in succession.

For playback, users can enjoy swipe to scroll through images, double-tap to enlarge, drag the image once enlarged, along with pinch-out and pinch-in sizing.

Improved AF Performance for Moving Subjects
The FUJIFILM X-T20 has an expanded number of focusing points, up from 49 in the previous model to 91 (up to 325 points). Approximately 40% of the imaging area (the center area containing 49 focusing points) is covered with phase detection AF pixels to form a fast and precise phase detection AF area that can be used in a variety of scenes.

By redesigning the AF algorithm from the ground up, the X-T20 can now autofocus more accurately on points of light, low-contrast objects and subjects with fine details such as bird feathers and animal fur. The read speed of the Contrast AF system has been doubled compared to the previous model to enable faster and more accurate autofocusing. During video recording, the AF point transitions smoothly to track a moving subject to create natural looking footage.

Users can choose from a Single Point mode, useful when accurate focusing on a subject is required, and a Zone mode that allows them to select a 3×3, 5×5 or 7×7 zone out of the 91-point AF area. The centrally positioned 3×3 and 5×5 zones, in particular, deliver fast focusing thanks to the on-sensor phase detection AF. The Wide/Tracking mode is a combination of the Wide mode (during AF-S), in which the camera automatically identifies and tracks the area in focus across the 91-point AF area, and the predictive Tracking mode (during AF-C), which uses the entire 91-point area to continue tracking a subject. This feature enables continuous focusing on a subject that is moving up and down, left and right or towards and away from the camera.

The X-T20 features an AF-C Custom setting, which enhances focus tracking performance when shooting in the Continuous AF (AF-C) mode. In the AF-C Custom setting, users can choose from five AF presets, including:

  • Preset 1 (Standard Setting for Multi-Purpose) is a standard setting that can be applied when shooting moving subjects as a whole. It is similar to the conventional AF-C setting, and is selected by default when no AF-C Custom setting is specified.
  • Preset 2 (Ignore Obstacles & Continue to Track Subject) is suitable when obstacles are likely to come into a selected focus area, blocking a subject.
  • Preset 3 (For Accelerating / Decelerating Subjects) is best suited to situations such as motorsports, which involves a subject that makes major speed changes including rapid acceleration or deceleration. It is particularly effective when using linear motor-driven lenses capable of high-speed AF.
  • Preset 4 (For Suddenly Appearing Subjects) gives focusing priority to a subject closest to the camera in the selected focus area, so as to swiftly focus on a subject that suddenly comes into the frame.
  • Preset 5 (For Erratically Moving & Accelerating or Decelerating Subjects) is suitable for shooting field sports in which subjects accelerate or decelerate rapidly, and also move erratically.

FUJIFILM X-T20 Key Features:

  • 24.3MP APS-C X-Trans CMOS III sensor
    – X-Processor Pro
    – Start-up time of 0.4sec
    – Ultra-fast AF speed of 0.06sec
    – Offers 5.0fps live-view shooting
    – Shutter time lag of 0.050sec
    – Shooting interval of 0.25sec
  • 3.0 inch 1.04M-dot tilting TFT color LCD touchscreen monitor
  • 0.39 inch 2,360K-dot OLED color viewfinder
  • Live View Display to preview pictures where you can
  • New ACROS Film Simulation mode
  • AF-C Custom Settings with five AF-C presets
  • 4K video can be recorded at [3840 x 2160] 29.97p, 25p, 24p, 23.98P, 100Mbps
    – Continuous recording: up to approximately 10min
  • Full HD video can be recorded at 59.94 fps, 50 fps, 29.97 fps, 25 fps, 24 fps and 23.98 fps, and with Film Simulation effects
    – Video can be outputted to external monitor via the HDMI port and input audio from an external microphone
    – Easily connect to external HDMI monitor and turn on HDMI Rec Control to automatically enable a clean HDMI output when the camera’s shutter release button is pressed
    – Touch AF to change the focus area and refocusing according to subject movement functions in video recording
  • 24 high-performance FUJINON X-mount lenses for ultimate versatility
  • Integrated pop-up flash with Super Intelligent Flash to automatically adjust light output
  • Unique Lens Modulation Optimizer (LMO) image processing technology to deliver the best possible image quality
    – LMO corrects optical defects such as diffraction to achieve edge-to-edge sharpness and a realistic three-dimensional effect
  • Nine Film Simulation modes (including ACROS) and Advanced Filter functions for eight different artistic effects
  • Multiple Exposure function combines two separate subjects into one photo
  • Interval timer shooting for time lapse photography
    – intervals of one second to 24 hours, and up to infinity frames
  • Completely silent electronic shutter capable of exposures up to 1/32000 seconds.
  • Digital Split Image for precise manual focusing and Focus Peaking to highlight high-contrast areas of the subject
  • Eye Detection AF function for automatically detecting and focusing on human eyes
  • Auto Macro function automatically activates the Macro mode while maintaining AF speed, eliminating any need to press the Macro button to capture a close-up
  • Built-in Wi-Fi for shooting from your smartphone or tablet devices
  • Free FUJIFILM Camera Remote app for Remote Control function
    – Photos can be sent directly from the camera to the Instax SHARE Smartphone Printer for instant Instax prints
  • Wi-Fi® Transfer is supported, enabling wireless backup of the data to a computer
  • Weather and dust resistant; operates as low as 32 degrees Fahrenheit \ 0 degrees Celsius

FUJINON XF50mmF2 R WR Lens
The new XF50mmF2 R WR is a mid-telephoto lens that is designed to deliver the very best results from Fujifilm’s unique X-Trans CMOS sensor. The XF50mmF2 R WR, perfect for any type of travel photography, is compact and lightweight, and features 9 elements in 7 groups, including one aspherical ED lens, and has an inner focusing system, driven by a stepping motor for fast and silent autofocusing. The premium XF50mF2 R WR is made of metal and glass for a stylish, robust design with a premium feel, while the aperture and focusing rings have been designed to be comfortable and easy to use. The lens is also weather and dust resistant, and operates in temperatures as low as 14°F°C, making it ideal for shooting in a variety of weather conditions.

FUJINON XF50mmF2 R WR Lens Key Features:

  • FUJIFILM X-Mount is compatible with all FUJIFILM X Series interchangeable system cameras
  • Weather-sealed at ten points around the barrel for weather and dust resistance; operates as low as 14 degrees Fahrenheit \ -10 degrees Celsius
  • 9 lens elements in 7 groups including one aspherical ED lens
  • Compact, lightweight lens weighs just 200g
  • Aperture and focusing rings feature precise click stops and smooth damping for easy operation
  • Inner focusing AF system uses a stepping motor to drive lightweight focusing elements for a fast, silent autofocus performance
  • Super EBC (Super Electron Beam Coating) ensures high performance by reducing both flare and ghosting

Availability and Pricing
The new FUJIFILM X-T20 Body (Black and Silver) will be available in February 2017 in the U.S. and Canada for USD $ 899.95 and CAD$ 1,199.99. The X-T20 Body with XF18-55mm Lens Kit will be available for USD $ 1,199.95 and CAD $ 1,599.99; the X-T20 Body with XC16-50mm Lens Kit will be available for USD $ 999.95 and CAD $ 1,299.99.

The FUJIFILM XF50mmF2 R WR (Black and Silver) will be available in February 2017 in the U.S. and Canada for USD $ 449.95 and CAD$ 649.99.

Fujifilm XF 50mm F2 R WR specifications

Principal specifications
Lens type Prime lens
Max Format size APS-C / DX
Focal length 50 mm
Image stabilization No
Lens mount Fujifilm X
Aperture
Maximum aperture F2
Minimum aperture F16
Optics
Special elements / coatings 1 ED element
Focus
Minimum focus 0.39 m (15.35)
Maximum magnification 0.15×
Autofocus Yes
Motor type Stepper motor
Focus method Internal
Distance scale No
DoF scale No
Physical
Weight 200 g (0.44 lb)
Diameter 60 mm (2.36)
Length 59 mm (2.32)
Materials Metal
Sealing Yes
Colour Black, silver
Filter thread 46.0 mm
Hood supplied Yes
Tripod collar No

Articles: Digital Photography Review (dpreview.com)

 
Comments Off on Fujifilm expands weather-resistant lens selection with XF 50mm F2 R WR

Posted in Uncategorized


3 Ways to Make a Sky Selection Using Photoshop

14 Sep

There are many reasons why you would like to select the sky in your image using Photoshop. Maybe you would like to replace it, to add details, change the contrast, etc. Selections give you a precise contour of your subject and facilitate local adjustments, without altering the other elements in your images.

In landscape and architectural photography, the sky is a really important element. It has to be an exciting part of the image. Boring skies translate into boring images, and amazing skies can also translate into solid images because it will make the viewer forget about the foreground or middle ground if they are not that beautiful.

Three different methods for selecting the sky

Depending on the image and the subject, making precise selections of the sky can be quite difficult. That is why is this tutorial, I will show you three different ways to select the sky in three different situations

Select sky image1

I replaced the sky in this image, and I love the results.

I personally love to play around with my skies and most of the time it is a fake one. Sometimes I am able to be at one location just for a day and if I get a solid image with no clouds, I will not hesitate to replace it.

Do not hesitate to try crazy things with your images, photo manipulation is really fun

Select sky image2

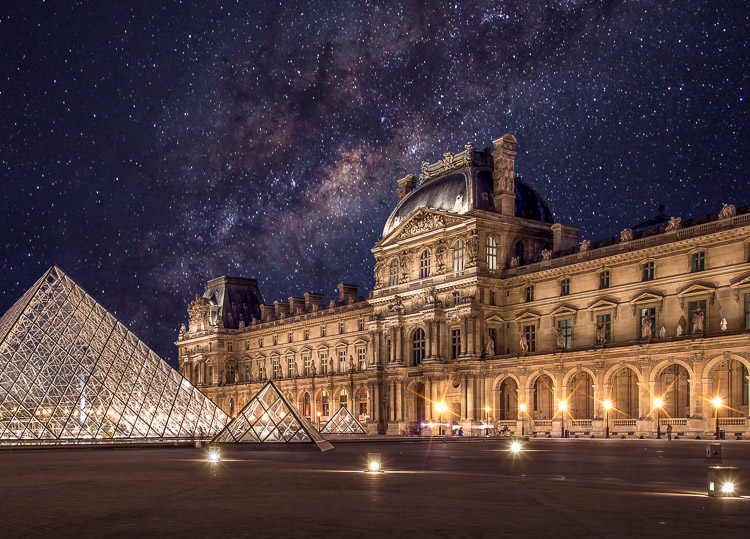
I wanted to get some crazy result, so I added an image of the Milky Way behind the Eiffel Tower.

Be careful to use royalty free images with no copyrights, there are so many websites where you can pick images of skies without having any problems afterward.

Method #1 – Using the quick mask tool

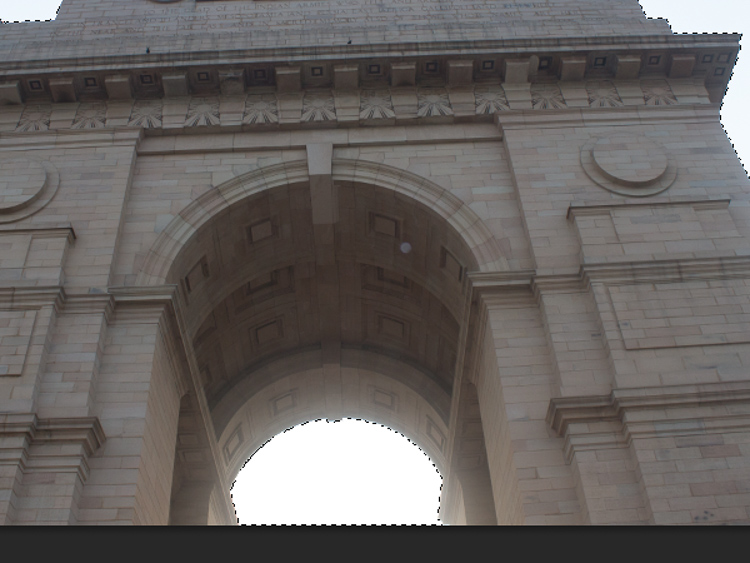
This is the easiest of the three ways, and the most used. We will be working on an image with a blown out sky and a subject with easy contours.

Select sky image3

The sky in this image will be easy to select because of the simple contours of the monument.

The first thing you need to do is open your image in Photoshop and duplicate the layer to avoid any destructive editing. You can always go back to the original layer if you make any mistakes. Do this all the time, it will save you a lot of time and hassle if you make a mistake.

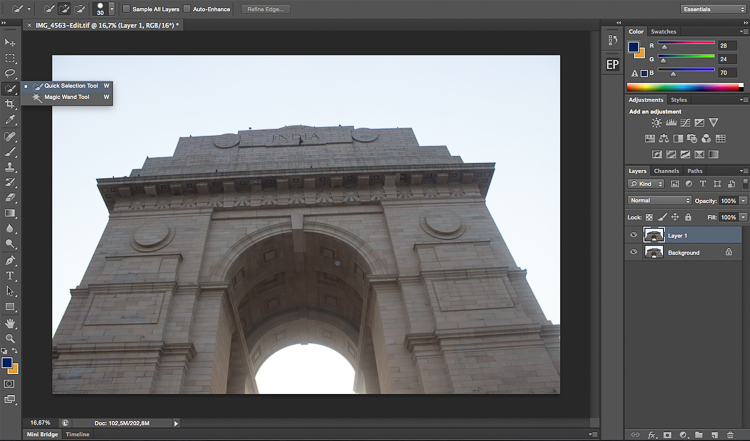
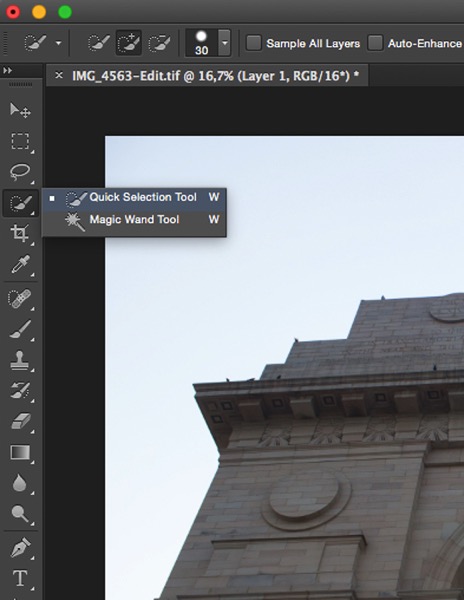
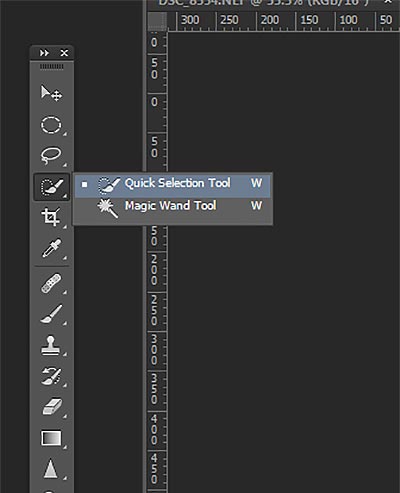
Start by selecting the Quick Selection Tool on the tool’s panel, make sure to increase the size to facilitate the selection.

Select sky image4

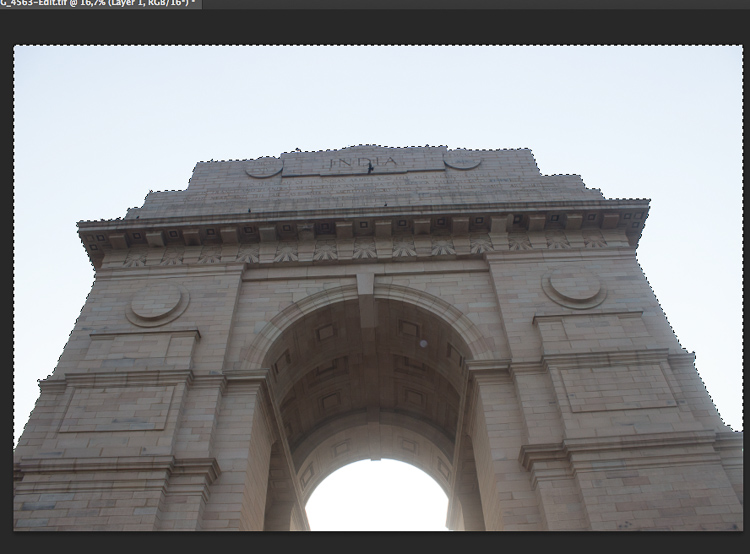
Then simply click on the sky starting at one end. In this case, I started from the bottom left and dragged all the way to the other end (bottom right). With these kinds of images, the selection will work 90% of the time on the first try and it should be pretty accurate. Do not forget to select the other parts of the sky, pay attention to your image and look where there is some sky left that is unselected.

Select sky image5

Select sky image6

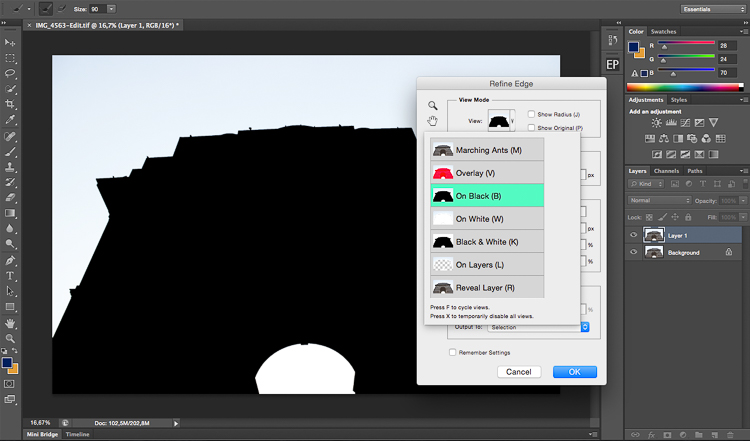
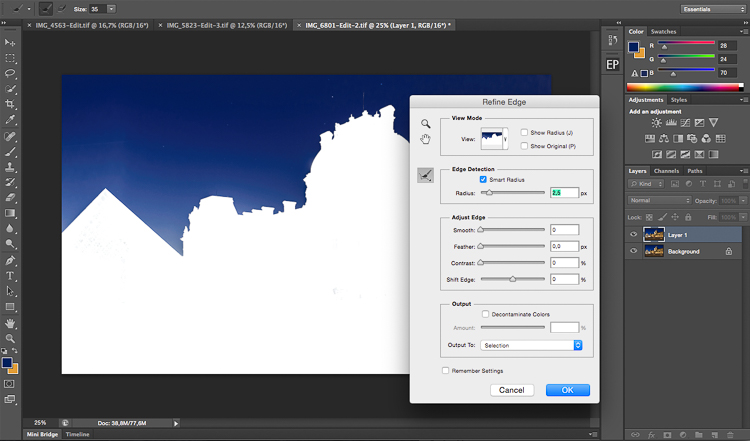
Once you have your selection, you want to click on refine edge to make it more precise (Refine Edge is located on top of the Photoshop window). You will have multiple viewing options, a good one to use is On Black.

Select sky image7

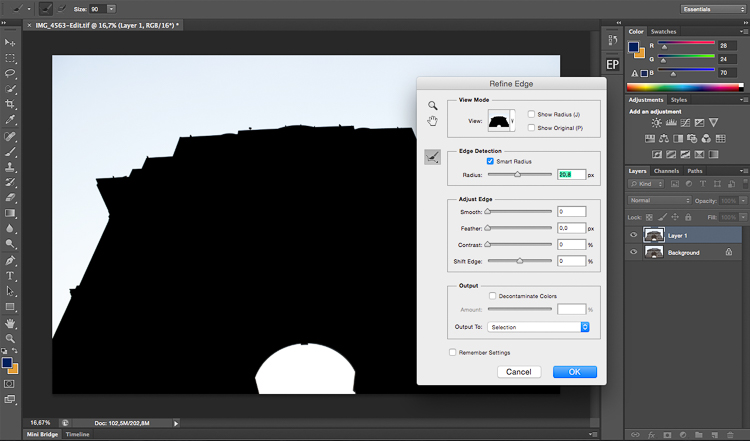
On the edge detection section, click on Smart Radius, then play around with cursor until you find the right radius. This will vary from image to image.

Select sky image8

When you are satisfied with your selection, press on OK and you will go back to your image with your selection. Make sure you are still using the quick mask tool. To save your selection, simply right click and pick save selection. You just need to name it and press OK to confirm. Your selection will be saved and you can use it whenever you want by clicking on select on the top of the Photoshop window then choosing load selection at the bottom

Select sky image9

Method #2 – Using Color Range

This selection is also quite easy to do, but it is very precise. We will basically select the sky while sampling a color. So logically your sky has to be uniform, these types of selections work really well during the blue hour or on clear days, with a vivid blue sky.

Select sky image10

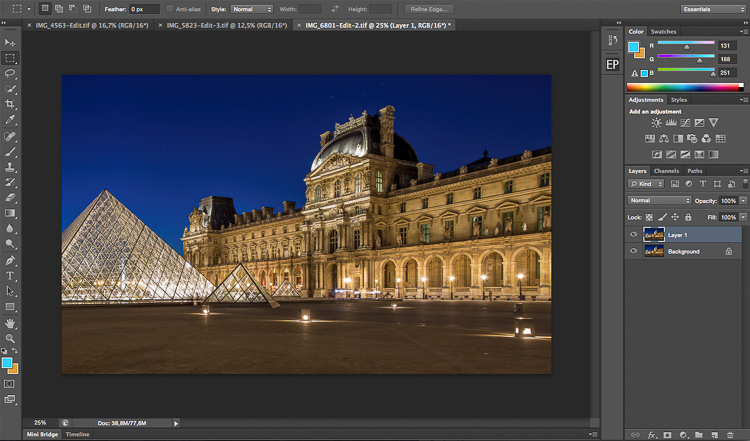
We will be working on this image, the sky is completely blue and easy to select. It would be much more difficult to do this selection with the quick mask (Quick Selection) tool because the image is quite dark and the contours of the building are quite difficult to separate from the sky.

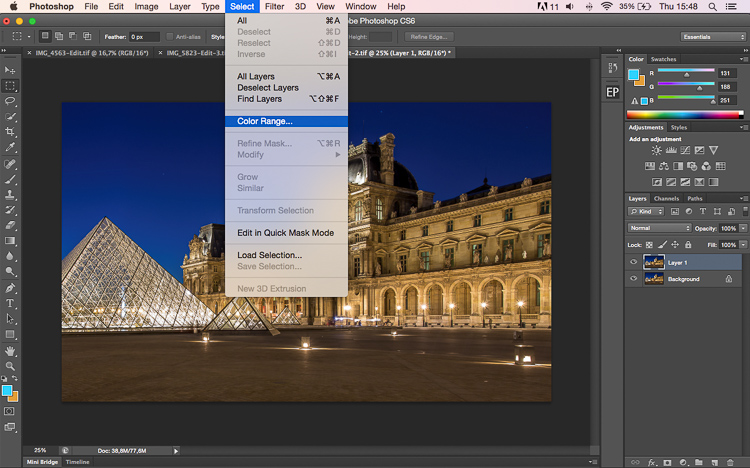
Start the same way as the first image by duplicating the layer. You then want to go to select on the top of your window and select color range.

Select sky image11

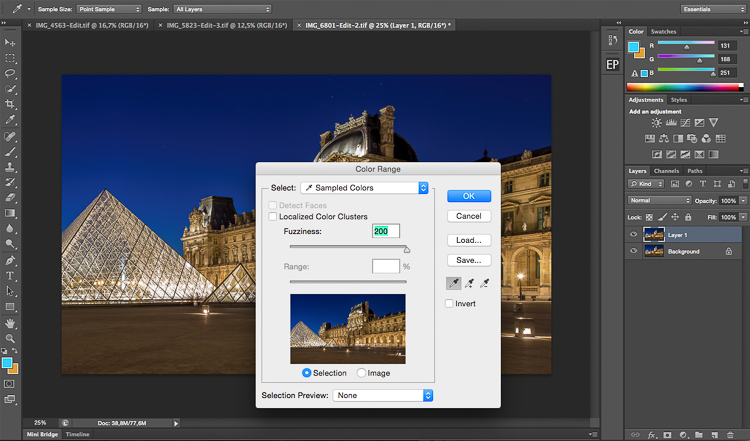
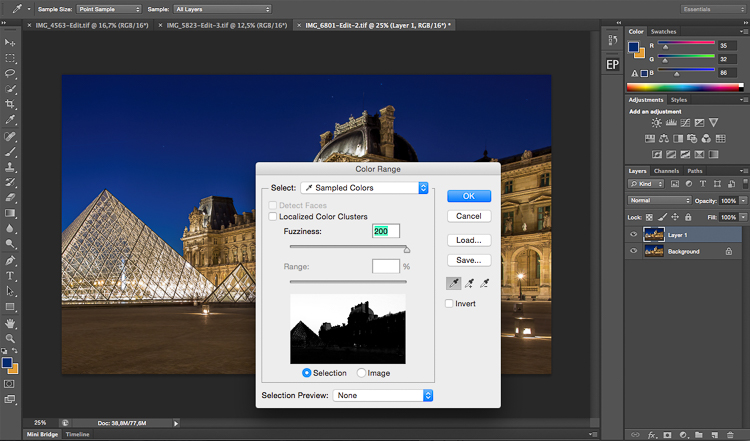
A small window will pop up, and the only thing you need to do is click on the sky in the main layer (not the pop up window) with the eye dropper tool (it will be set automatically as your cursor). Once you have selected your color, you will see a mask being created on the small color range window. Remember that white reveals and black conceals, so whatever is white is being selected: That will be your selection.

Play around with the fuzziness cursor on top of your selection in the color range window to decide how much you want of the sampled color to be selected.

Select sky image12

Select sky image13

Once you are satisfied with your color range selection, press OK. Redo the same thing as the first image with the refine edge tool, then finish off by saving your image.

Select sky image14

Select sky image15

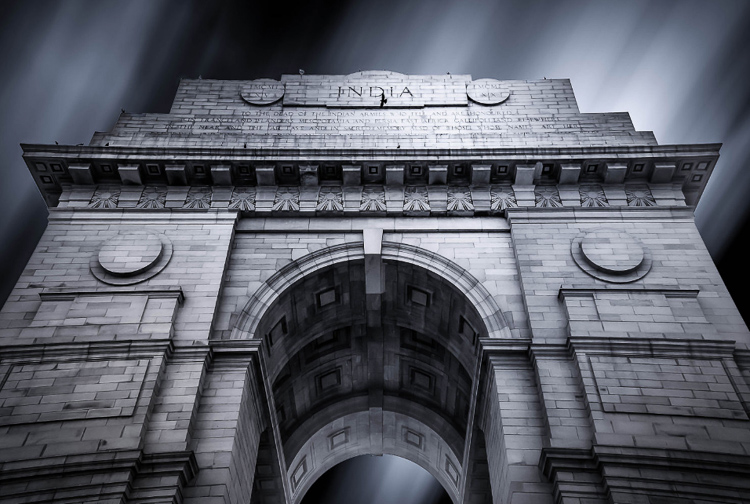
This is the final result with the sky replaced.

Method #3 – Using a Levels Layer to Create a Luminosity Mask

This kind of selection is a bit more difficult to do. Use it when you don’t have only one color in the sky or subject has complex contours that will be difficult to separate from the sky.

This is quite advanced but it’s very easy once you understand how it works. It always works, and if it doesn’t do 100% of the job it will at least do about 90% of the work need. The rest can be completed with a brush and adjusting your mask after you are done with the first selection.

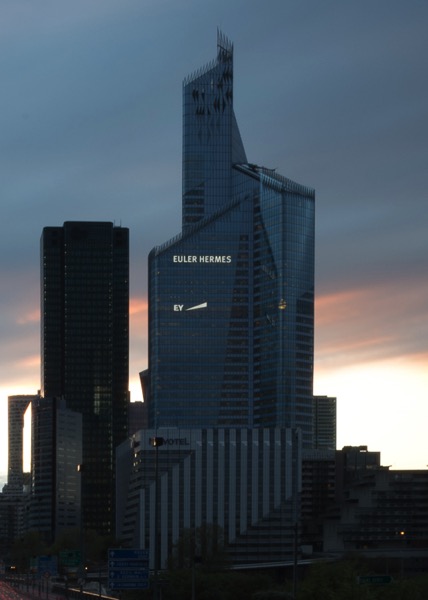
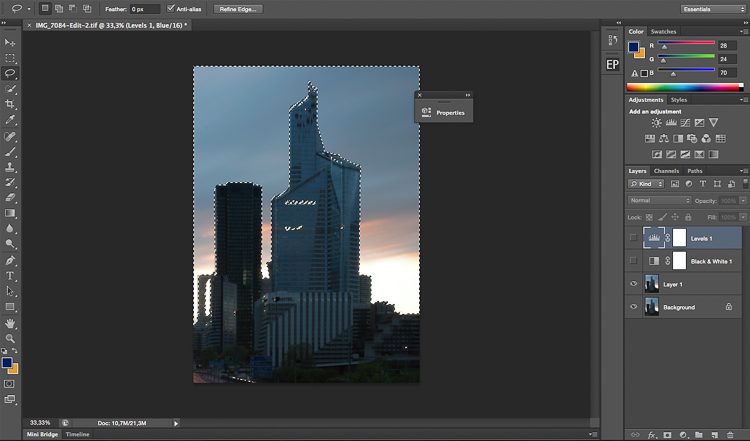
We will be working with this image and as you can see, the sky is quite dark just like the buildings so it will be difficult to use the quick mask tool. The colors in the sky are mixed between blue, orange and white (yes these are blown out highlights).

Select sky image16

What we are going to do is quite simple. We’re going to create a luminosity mask selecting only the highlights, in other words, the brightest pixels of the images. The highlights correspond to the sky so that’s exactly what we want.

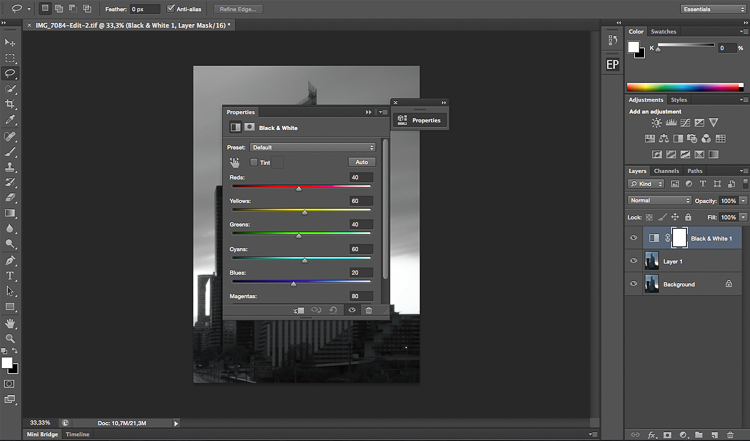
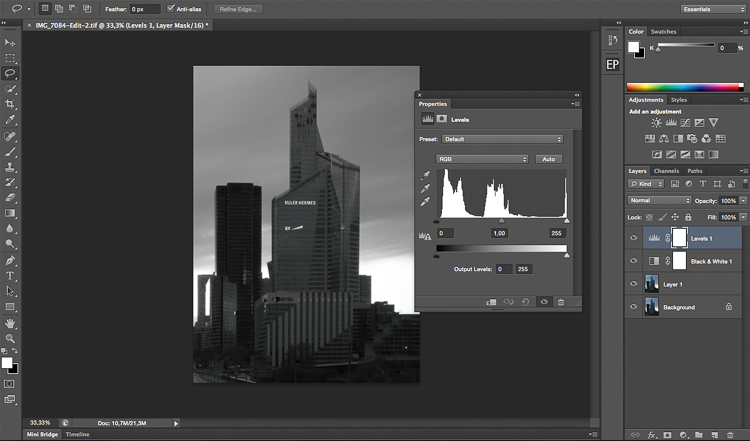
To make the selection easier we’re going to convert the image to black and white so we have an easier visual. We’re basically going to crush our whites and blacks to have a nice separation between the shadows and the highlights. We’ll be doing this using the levels layer adjustment, we are also going to remove all the mid tones from our image. Don’t forget to duplicate the layer first.

Select sky image17

Select sky image18

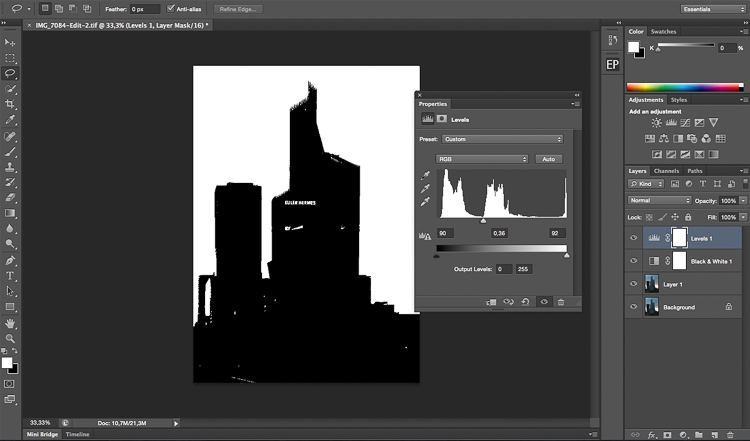
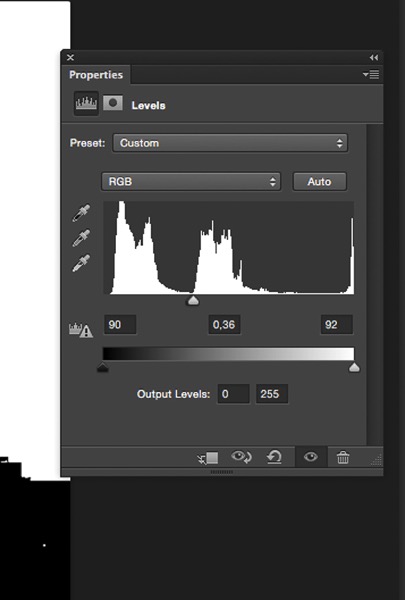
After converting your image to black and white and creating a levels layer, you’re going to play around with the three sliders to have a white sky and everything else black. White reveals and black conceals so your selection will be in white.

The three cursors should all meet at one point, you have to play around and see which selection works best for your image. You’re basically creating a luminosity mask.

Select sky image19

Select sky image20

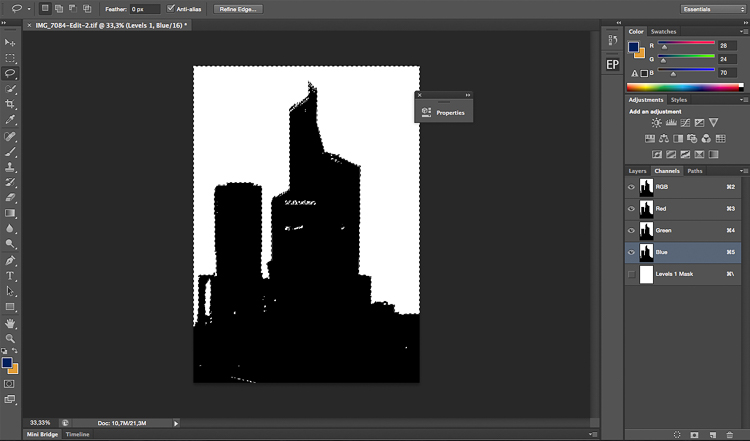
After finding the sweet spot, you just need to close your levels layer and go to channels. Pick any channel, click on it, and type Command/CTRL + A to create the selection from the levels layer you just created.

Once you have done that you can delete the levels and black and white layers to go back to your original image. Your selection is still going to be there. After that it is pretty much the same thing, click on refine edge on top of the Photoshop window and play around with your radius until you get the perfect selection.

Select sky image21

Select sky image22

This is the final image after some adjustments, I used the sky selection to add colors without affecting the rest of the image.

Select sky image23

Whether you want to just edit or completely replace the sky is up to you. But, I hope that gives you some techniques that you can apply to your landscape and cityscape photography to perk up the sky.

Do you have any other methods you use for making a sky selection?

googletag.cmd.push(function() {
tablet_slots.push( googletag.defineSlot( “/1005424/_dPSv4_tab-all-article-bottom_(300×250)”, [300, 250], “pb-ad-78623” ).addService( googletag.pubads() ) ); } );

googletag.cmd.push(function() {
mobile_slots.push( googletag.defineSlot( “/1005424/_dPSv4_mob-all-article-bottom_(300×250)”, [300, 250], “pb-ad-78158” ).addService( googletag.pubads() ) ); } );

The post 3 Ways to Make a Sky Selection Using Photoshop by Yacine Bessekhouad appeared first on Digital Photography School.


Digital Photography School

 
Comments Off on 3 Ways to Make a Sky Selection Using Photoshop

Posted in Photography


In use: Panasonic Post Focus after-capture focus selection feature

25 Nov

As announced on Friday, Panasonic has just released new firmware that enables a post-capture refocusing feature in some of its cameras that run 4K video on a Micro Four Thirds sensor. We got hold of a pre-release copy of the firmware and have been able to try it out on the Lumix DMC-GX8 body. Read more

Articles: Digital Photography Review (dpreview.com)

 
Comments Off on In use: Panasonic Post Focus after-capture focus selection feature

Posted in Uncategorized


How to use Photoshop’s Quick Selection Tool to Change a Background

20 Jan

It’s the question I get asked the most in my workshops and classes – “How do you change the background of an image?” Or “How can I cut my subjects out of an image and place them on a new background?”

A quick capture of my parents at a coffee shop.

A quick capture of my parents at a coffee shop. The BEFORE image.

Perhaps, despite your best efforts at placing your subjects in a pleasing, non-distracting environment, the situation made it impossible. Maybe you used your smartphone to capture a spontaneous moment and now the image needs a little background work? Maybe you want to cut your subjects out of the background to isolate them or use them on a website banner or other marketing material? Whatever the reason, this task has challenged every photographer, beginner or pro, since the invention of the camera! I’m going to show you how to use one of Photoshop’s most underrated tools for easily extracting your subjects from the background.

This photo (above) was a very spontaneous iPhone capture of my mom and dad, the photo itself isn’t great (lots of things wrong with it technically) but it has big sentimental value for me. It’s the last photo I have of my parents together.  But it also has a busy background which typically causes problems for many photographers when trying to use Photoshop’s Selection Tools to remove it. In previous Photoshop versions, selection tools like Magic Wand and Lasso would get confused by the similar colors, and patterns of this type of background, making it a difficult and frustrating project. But with a relatively new selection tool it’s pretty straight forward, so this is a good example photo for learning the technique.

In this demonstration, you can make this a stronger image by removing the cluttered background to make it less like a snapshot and more like a portrait. The secret of any image editing is to use the right tool for the job. In this situation you want to use the Quick Select Tool to remove your subjects from an image and place them on a different background.

How to use the Quick Select Tool

In the past, you may have avoided most of the Selection Tools in Photoshop because they were not easy to use. The Quick Select Tool has changed all that. It has never been easier to make selections that don’t look like they were “cut and pasted.” There are two, or sometimes three steps.

Choose the Quick Selection Tool from the Toolbox palette:

tool

It works like a Brush so you can change the size of the tool by using the [ –  ] keys on your keyboard (  [ to make it smaller, and ] to make it larger).  Give the tool a size that makes it easy to select your subject.

Step 1: Make your selection

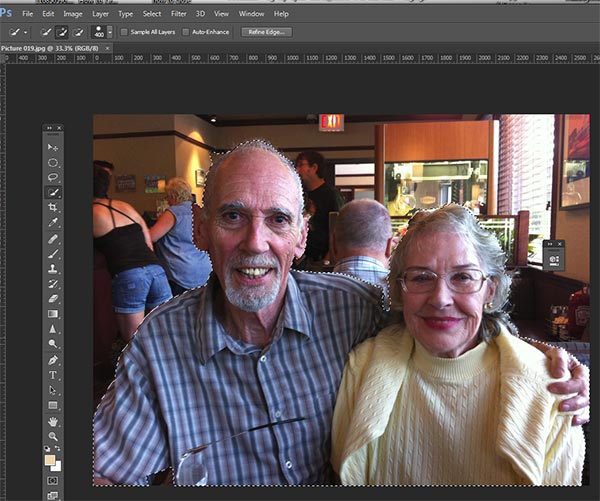
Just drag the tool over your subject and stop when the “marching ants” get to the edge. The tool is smart and can detect the change in pixels so most of the time it will stop on the edge correctly. If it selects something that you don’t want it to, just click on the Alt key to switch to “deselect” mode and drag the selection back to where it should be.

selection

The Quick Select Tool selecting the subject with the “marching ants” outline.

Step 2: Refine the Edge

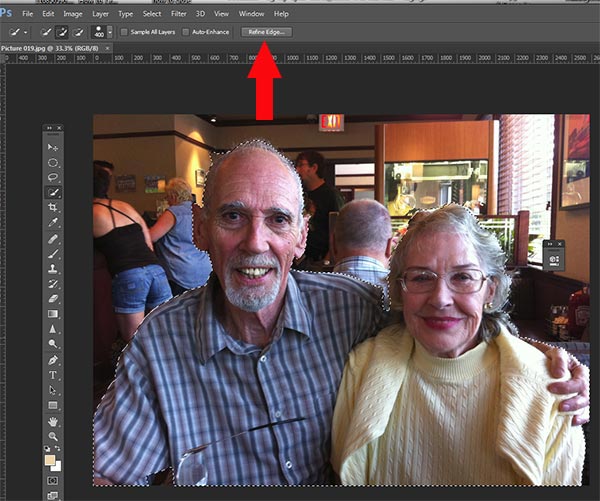
Once you’ve got everything selected as you want it, click on the Refine Edge button on the top menu. In this area, you’ll adjust the pixels around the edges of the selection. This will make the “cut” more smooth and realistic.

refine-edge


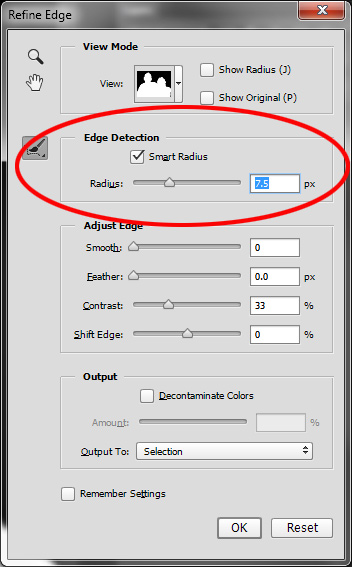
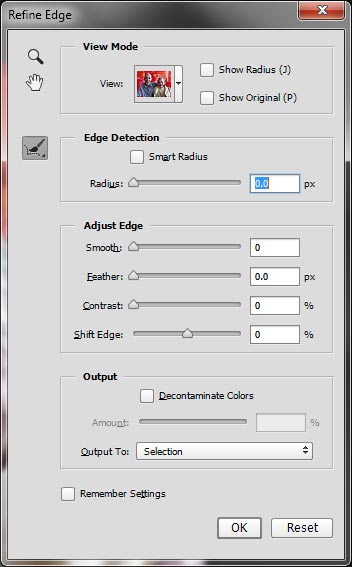
The refine Edge tool opens a pop up that looks like this:

refine-edge-palette

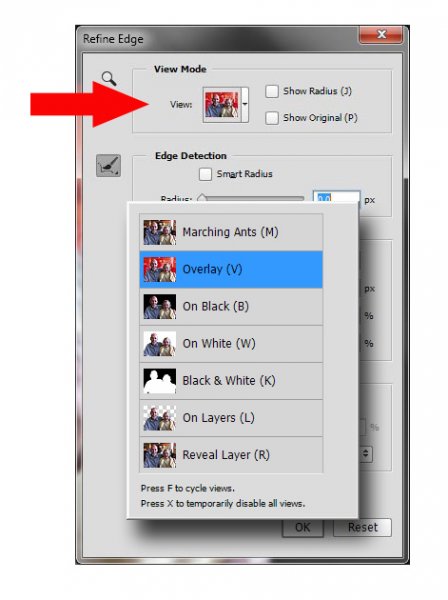
From here you can select how you want to view your selection against a few background options. You can select the Mask overlay which you may be familiar with if you’ve used layer masks before. This view allows you to see the background as well as your selection. But you can also check it against a black background, which I like, so you can clearly see how your edge looks and if you have selected everything accurately. To change views, click the drop-down to get the View Options box. Scroll through these to get a feel for how they display your data. The Adjust Edge sliders give you many options to smooth, feather, and further refine your edge if needed.

For now, select Black & White view mode. Hover over the Black & White Box and click.

popup

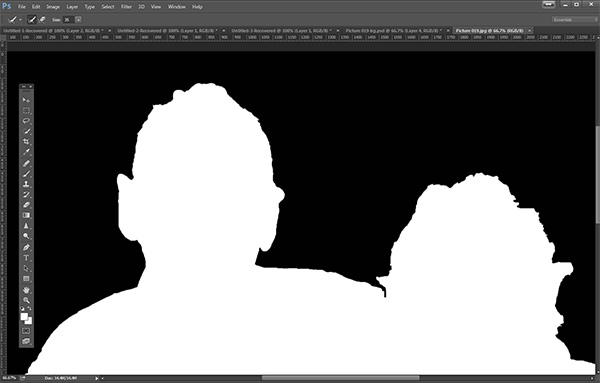
You should see something like this (below). You can see your edges very well against the black. You can see that the edges look okay, they are well defined, and not pixelated or blocky. But what about that hair? My poor dad with his fine and wispy (almost no hair), and my mom who had recently undergone chemo also has fine baby-like hair, making the hair selection task a bit of a challenge. But the Quick Selection Tool has a method for this too!

b+wmask

Click the Edge Detection Smart Radius box and move the slider to the right just a bit. watch how the edge around the hair change to be a bit more transparent. Be sure to watch the rest of your edges to make sure they don’t change too much.

Step 3: If needed, use the Edge Detection Brush

If you still need to get more transparency for hair, make sure the brush icon on the left is selected and carefully brush around where you need more transparency. You can switch between the View modes to see what is being displayed or removed. If you remove too much you can click and hold the Refine Edge brush to reveal the Eraser which lets you undo your brush strokes, much like a regular layer mask.

Untitled-2

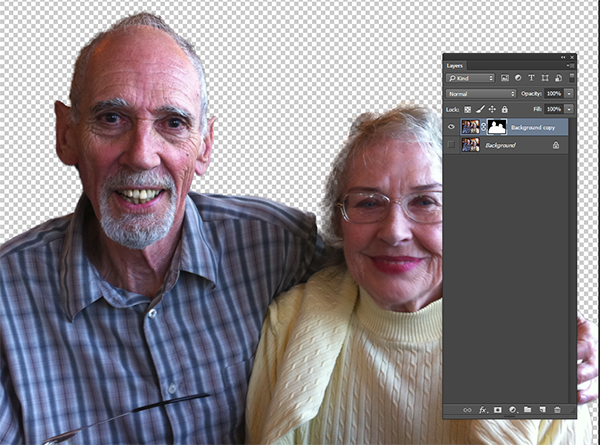
When you’re happy with your results, Look for the Output section at the bottom of the Refine Edge box, and click on Decontaminate Colors and select a small number as the amount, 2 is usually good, depending on your image.  Change Output To: New Layer with Layer Mask.

This is what you should see now:

layermask

Note: to see the transparent background you must turn off the visibility of the bottom layer.

Your cluttered background is gone!  You have a nice transparent background and all on new layer. This will be your main image.

Add your new background layer

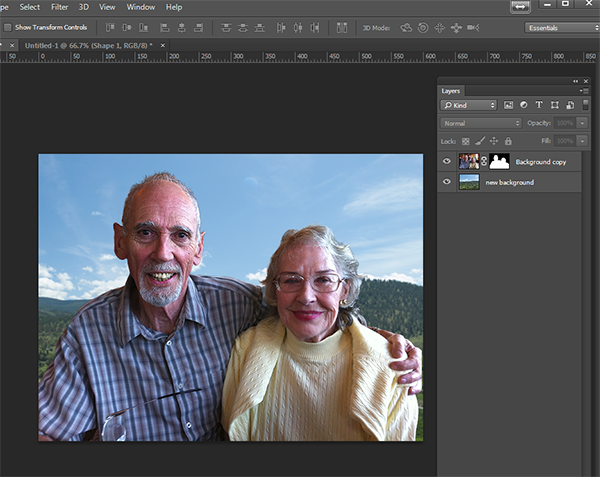
Open the image you want to use as your new background, and using the Move Tool, drag the new background into your main image. Voila! You have a great new background layer and your subjects look very realistic and not like cut and paste paper dolls.

You may have to drag the new background layer under the subject layer – the one with the mask. I’ve deleted the original Background layer and replaced it with the scenery background and called it new background. You could also make any existing background layer invisible if you don’t want to display it.

almost-done

Here’s a 100% close up look at the job the Quick Select tool and Refine Edge brush did on my mom’s hair (yes the image is a bit shaky at 100%, but I think you can see that took works pretty well to give you very realistic extractions, with the right amount of transparency and detail preservation).

100crop-hair

The finishing touches

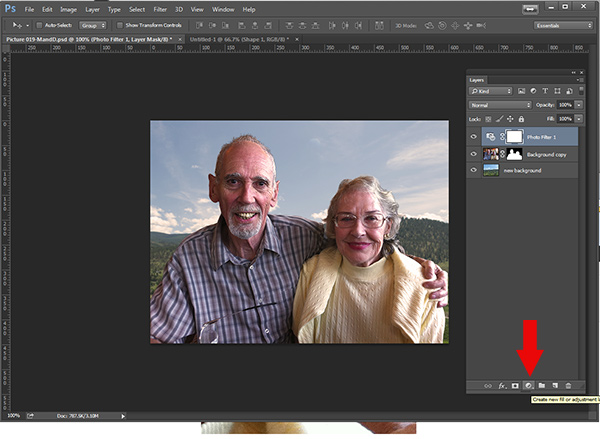
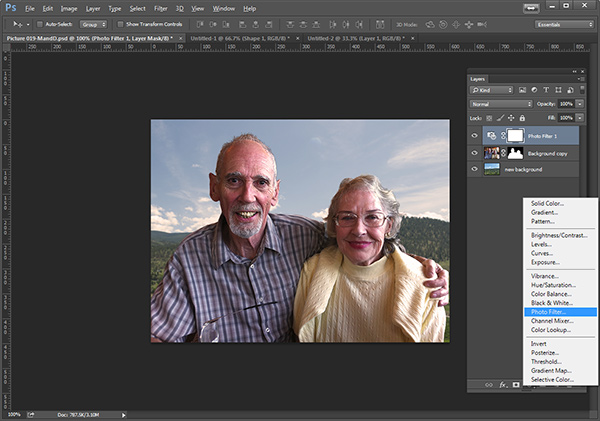
So for the final image, let’s balance the colors a bit and give this photo a nice warm tone, by using a layer mask and a warming Photo Filter.

layermaskto-photofilter

photofilter

And here is the final image:

final-warming-filter

Final image AFTER changing the background. Not a snapshot any more!

What do you think? Is it better than the original? Was it worth the 10 minutes to edit and give it a new background? Just imagine, with a well captured image (not a shaky iPhone capture) think  of all the new possibilities you will have if you master this process.

Why not give this nifty tool a try and post your results here – I’d love to see how you use this. If you have questions or problems, just let me know, I respond to my comments and questions regularly.

googletag.cmd.push(function() {
tablet_slots.push( googletag.defineSlot( “/1005424/_dPSv4_tab-all-article-bottom_(300×250)”, [300, 250], “pb-ad-78623” ).addService( googletag.pubads() ) ); } );

googletag.cmd.push(function() {
mobile_slots.push( googletag.defineSlot( “/1005424/_dPSv4_mob-all-article-bottom_(300×250)”, [300, 250], “pb-ad-78158” ).addService( googletag.pubads() ) ); } );

The post How to use Photoshop’s Quick Selection Tool to Change a Background by Alex Morrison appeared first on Digital Photography School.


Digital Photography School

 
Comments Off on How to use Photoshop’s Quick Selection Tool to Change a Background

Posted in Photography


A Selection of Photos with a Green Theme

08 Aug

Last week I shared a collection of golden images so to continue on the theme of colors today I present:

A selection of photos with a green theme

Quite fitting for summer in my part of the world. What else do you think of when I say green? Here are a few ideas:

Photograph Sunbathing Gekko on Leaf by Leon Dafonte Fernandez on 500px

Sunbathing Gekko on Leaf by Leon Dafonte Fernandez on 500px

Photograph Green tea field by Jaewoon U on 500px

Green tea field by Jaewoon U on 500px

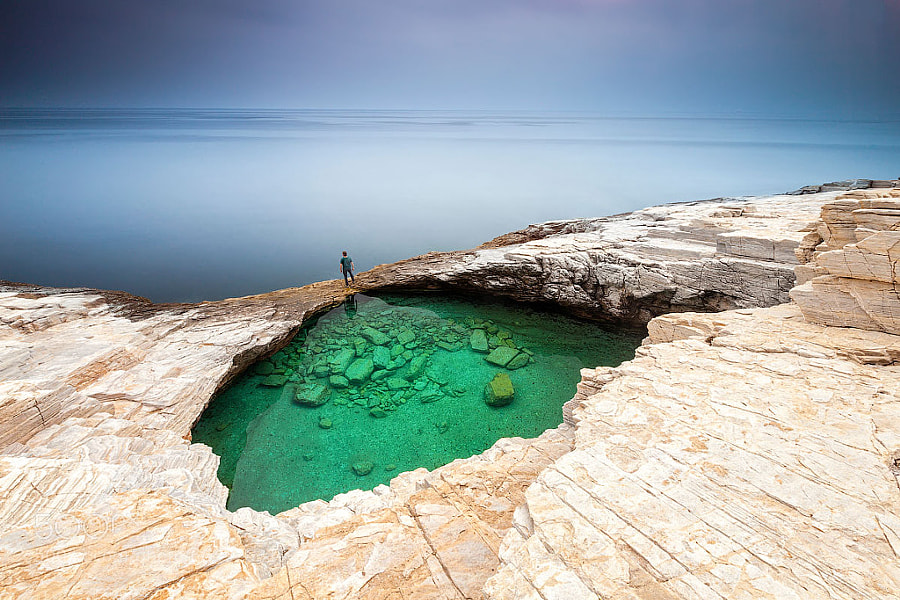
Photograph Green Hole by Evgeni Dinev on 500px

Green Hole by Evgeni Dinev on 500px

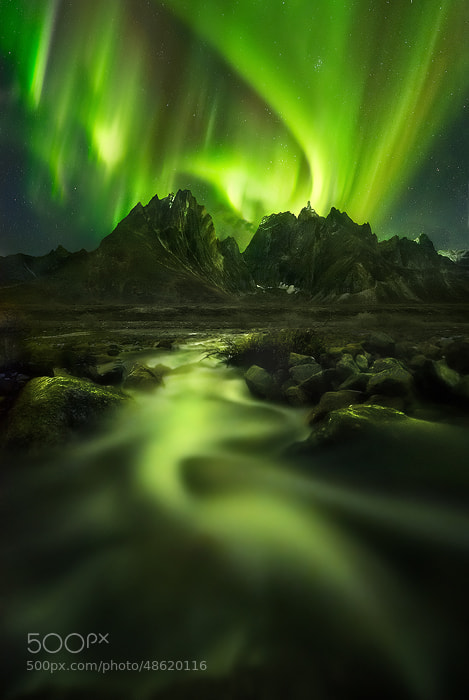
Photograph Peaks of the Lights by Marc  Adamus on 500px

Peaks of the Lights by Marc Adamus on 500px

Photograph *** by Dmitry Marchenko on 500px

*** by Dmitry Marchenko on 500px

Photograph *** by Laura Pashkevich on 500px

*** by Laura Pashkevich on 500px

Photograph Portrait of An Alien 1 by Nhut Pham on 500px

Portrait of An Alien 1 by Nhut Pham on 500px

Photograph Hidden Waterfall by Danny Seidman on 500px

Hidden Waterfall by Danny Seidman on 500px

Photograph Light Beams by Javier Acosta on 500px

Light Beams by Javier Acosta on 500px

Photograph .... by ????????  ??????? on 500px

…. by ???????? ??????? on 500px

Photograph Night bamboo by Ryusuke Komori on 500px

Night bamboo by Ryusuke Komori on 500px

Photograph Path of life by Janek Sedlar on 500px

Path of life by Janek Sedlar on 500px

Photograph well wrapped by Sonja Probst on 500px

well wrapped by Sonja Probst on 500px

Photograph The Green Lantern by Nagesh Mahadev on 500px

The Green Lantern by Nagesh Mahadev on 500px

Photograph fighting !!! by Itamar Campos on 500px

fighting !!! by Itamar Campos on 500px

Photograph kiwi bubbly by Tommy Gamboa Flores on 500px

kiwi bubbly by Tommy Gamboa Flores on 500px

Photograph 90/365  How Many Ways Can You Slice a Kiwi? by Monika Bigelow on 500px

90/365 How Many Ways Can You Slice a Kiwi? by Monika Bigelow on 500px

Photograph Grasshopper Green by Lorraine Hudgins on 500px

Grasshopper Green by Lorraine Hudgins on 500px

Photograph Little Green Tree Frog by Lorraine Hudgins on 500px

Little Green Tree Frog by Lorraine Hudgins on 500px

Photograph Gorging On Grasshopper by Lorraine Hudgins on 500px

Gorging On Grasshopper by Lorraine Hudgins on 500px

Photograph Rose-ringed Parakeet by Doron Hoffman on 500px

Rose-ringed Parakeet by Doron Hoffman on 500px

Photograph Hidden Mode by Suradej Chuephanich on 500px

Hidden Mode by Suradej Chuephanich on 500px

Photograph Mojito by Natasha Breen on 500px

Mojito by Natasha Breen on 500px

Photograph Green apple by Alex Koloskov on 500px

Green apple by Alex Koloskov on 500px

Photograph Green Apple by Alexander Zachen on 500px

Green Apple by Alexander Zachen on 500px

Photograph Self shadow | Laser by Xavier Paillard on 500px

Self shadow | Laser by Xavier Paillard on 500px

Photograph Jagermeister Shot by Andrew Jack on 500px

Jagermeister Shot by Andrew Jack on 500px

Photograph Laser through a glass  by Emil Eddie Andersen on 500px

Laser through a glass by Emil Eddie Andersen on 500px

Photograph My Greeny Eyes..... by Vincent Budi Darmawan Sinaga on 500px

My Greeny Eyes….. by Vincent Budi Darmawan Sinaga on 500px

Photograph I'm Lucky Because I Have You by Niko Vass on 500px

I’m Lucky Because I Have You by Niko Vass on 500px

Photograph Clovers by Redcup2 on 500px

Clovers by Redcup2 on 500px

Photograph Denisa by Vladimir  Dumbrava on 500px

Denisa by Vladimir Dumbrava on 500px

Photograph Al otro lado. / The other side. by Miguel Ángel Sánchez-Guerrero Ros on 500px

Al otro lado. / The other side. by Miguel Ángel Sánchez-Guerrero Ros on 500px

Photograph ## bicycle | | by Paolo Giraudo on 500px

## bicycle | | by Paolo Giraudo on 500px

Photograph Door by Maria Muhtarova on 500px

Door by Maria Muhtarova on 500px

The post A Selection of Photos with a Green Theme by Darlene Hildebrandt appeared first on Digital Photography School.


Digital Photography School

 
Comments Off on A Selection of Photos with a Green Theme

Posted in Photography