RSS
 

Posts Tagged ‘SCARY’

Why Off-Camera Flash Isn’t as Scary as you Think

23 Jul

Flash

The word alone has the potential to cause dread, even among experienced photographers, bringing to mind images of overexposed faces and red eyes. Because of this, many photographers avoid flash altogether, keeping a safe distance at all times. I think that’s too bad.

It’s a missed opportunity. Sure, flash may not always be applicable to your situation – but it’s very helpful to have another tool in your bag of tricks if and when it is needed.

Portrait

Off-camera flash gives you an incredible amount of control. Yes, understanding natural light is an important part of being a photographer – but working with off-camera flash lets you create your own lighting conditions. You can even mimic the elusive golden hour.

This guide will explain off-camera flash in its simplest components, giving you the knowledge to begin to experiment, and to explore how it could help your photography.

What you need to start

When I talk about off-camera flash, you might be picturing something like this:

? ?? / Chris Lim

By ? ?? / Chris Lim

If that’s the case, I don’t blame you for being a bit nervous. In reality, all you need to get started with off-camera flash photography is:

  • A camera
  • An independent flash unit
  • A way to make them fire simultaneously
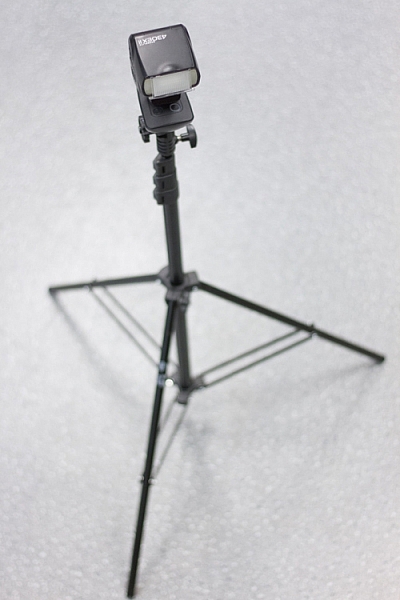
  • Something to hold your flash, like a light stand or a friend
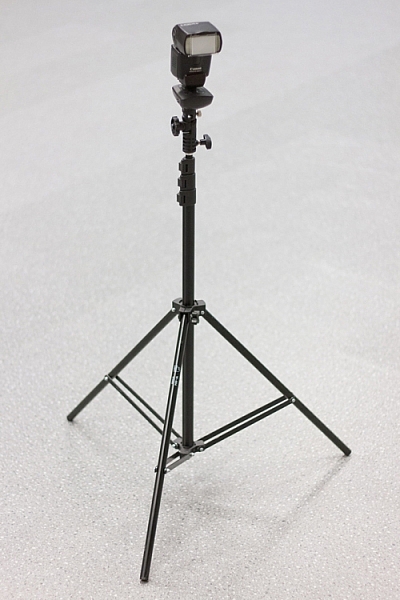
light-stand-1 light-stand-2

Once you take your flash unit off of the camera, it won’t know that it is supposed to fire when you hit the shutter button. Fortunately, there are several ways that you can sync your flash.

Built-In Flash Control: Some cameras have a built-in setting that uses the pop-up flash to tell your off-camera flash to fire. Most flash units have a sensor on the front that recognizes the sudden burst of light (optical sensor), and fires accordingly.
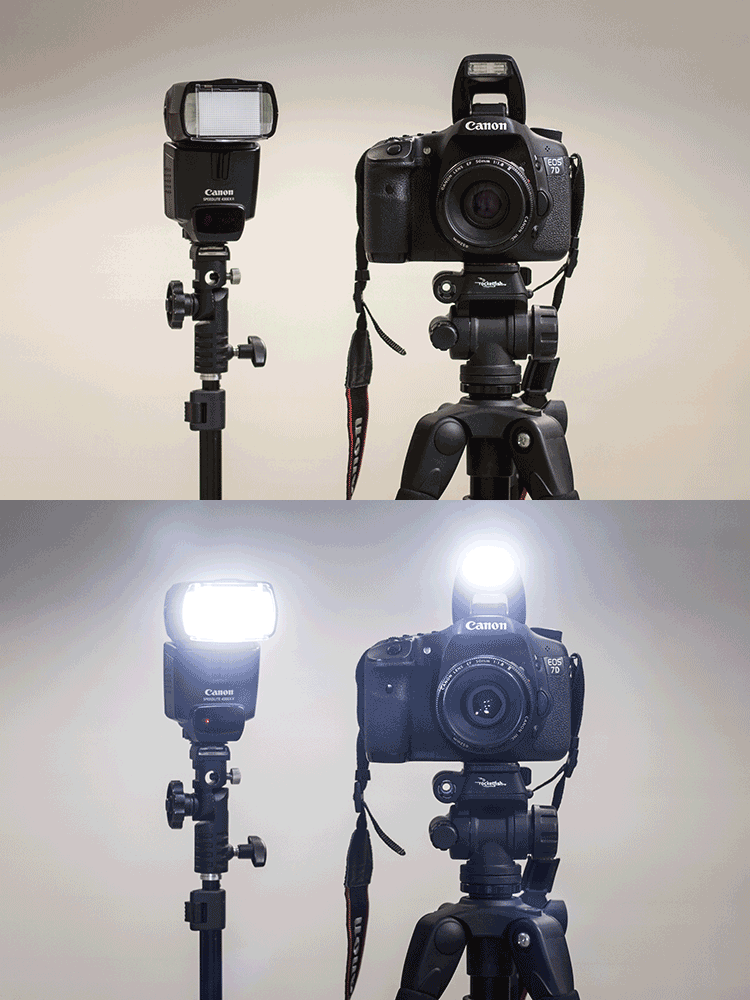
pop-up-flash

Flash Sync Cord: This is a cord that runs from your camera to the flash. Think of it like an extension cord. These are useful and reliable, but it also limits how far away the flash can be from your camera.

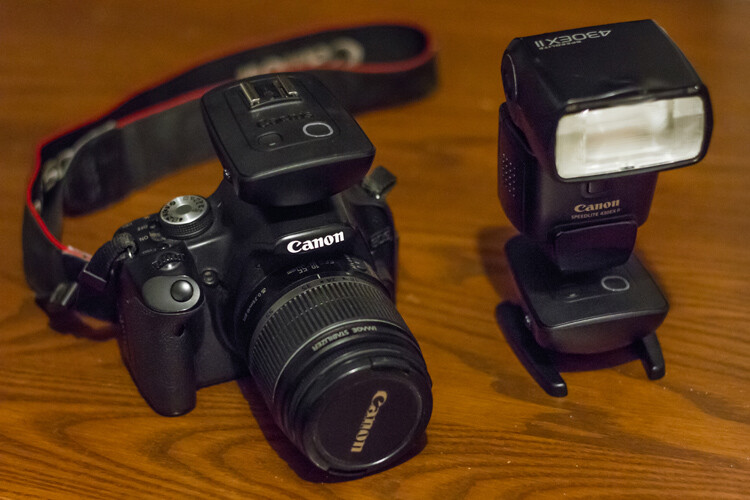
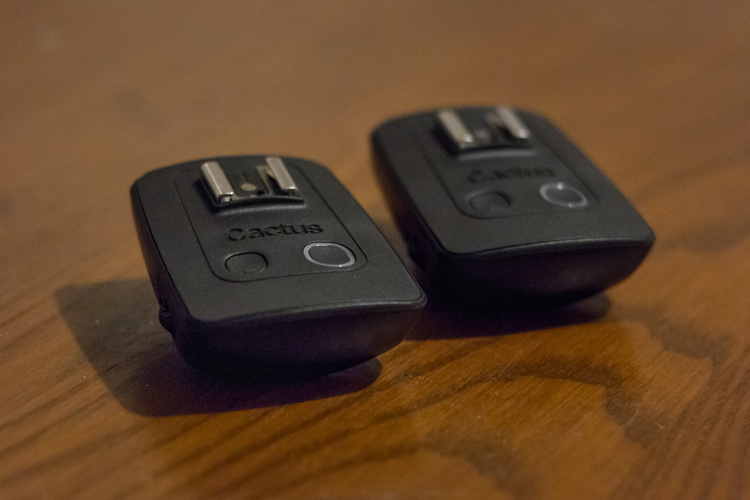
Wireless Radio Transmitters: The preferred option, radio transmitters can sync your flash to your shutter even if they are at a significant distance away.
bts-6855-edit

Cactus brand remote triggers

bts-6859-edit

One remote goes on the camera, the other attaches to the flash. When the camera fires the one on the camera sends a signal to the other remote to fire the flash.

Editor’s note: for more great tips read, A Beginner’s Guide to Working With Flash Off-Camera

The basics – controlling your off-camera flash

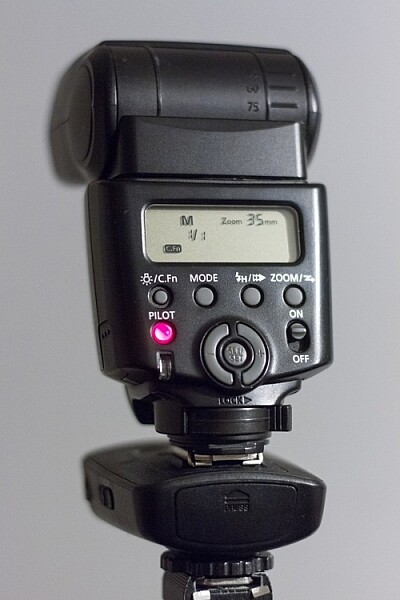
When you use a flash on-camera, it can determine the correct power settings and fire accordingly (TTL). Once you take the flash off the camera, however, you’re going to need to tell both the camera and the flash what to do manually.
bts-6851-edit

M is Manual mode, and 1/1 is full power. Zoom level shows 35mm. Read the user manual for your flash to see how to adjust these items.

If that sounds scary, just take a deep breath – we’ll get through this together.

Fortunately, controlling flashes is quite simple. In manual mode (on the flash), you choose the amount of power at which the flash fires. This is expressed as a fraction: 1/1 means the flash is firing at full power, ¼ means the flash is firing at a quarter of its total power, and so on. Easy, right?

Alright, so now we know how to control the flash. What about the settings on your camera?

This is the cool part. You can control the effects of the flash using your ISO and aperture. Adjusting these two settings controls how sensitive your camera sensor is, and how much light it can collect.

So here are the four ways to make the flash in your image stronger (more flash):

  • Turn up the flash power
  • Move the flash closer to your subject
  • Turn up the ISO
  • Make the aperture wider (smaller f-stop number)

Piece of cake! Is your flash in your picture too strong? Well, simply do the opposite of one of the criteria mentioned above (turn the flash down, move it away from the subject, turn the ISO down, use a smaller aperture).

You’ll notice that I haven’t mentioned shutter speed yet. That’s because your shutter speed doesn’t affect flash at all.

Well, almost not at all. Every camera has a flash sync-speed. This is because if the shutter speed goes too fast, it won’t sync perfectly with the flash (the shutter will open and close before the flash goes off). As a result, part of your picture won’t see the effects of the flash – resulting in a black bar across part of the shot. For most consumer cameras, your maximum flash sync speed will be around 1/200 or 1/250. Keep your shutter speed under that (slower like 1/125th or 1/60th) and you’ll be fine.

flash-sync-1

Correct sync speed used the flash lights the entire image

flash-sync-2

If your shutter speed is too fast (higher than the sync speed) you will get something like this, where part of the image is not lit by the flash and is dark, or even black.

Two exposures: Ambient and flash

This is the key to understanding off-camera flash photography.

Think of every picture taken with flash as being two exposures, overlapped on top of each other. The way you decide to balance the ambient lighting and the flash, sets the tone for the image. Let’s take it one layer at a time, and you’ll see how easy it can be to build an image using off-camera flash.

THE FIRST LAYER: AMBIENT LIGHTING

Ambient light is that which is already available in the area from the sun, window light, street lights, etc. At certain times of the day, your ambient light is going to be quite nice, like at Golden Hour. Other times, you may not be so lucky.

Sunsets, for example, are especially tricky. This is because in order to bring out the colour and texture of a sunset, you need to keep the exposure dark – and as a result, your subject will be completely silhouetted.

Here’s the first step for taking your off-camera flash picture – ignore your flash altogether. Turn it off.

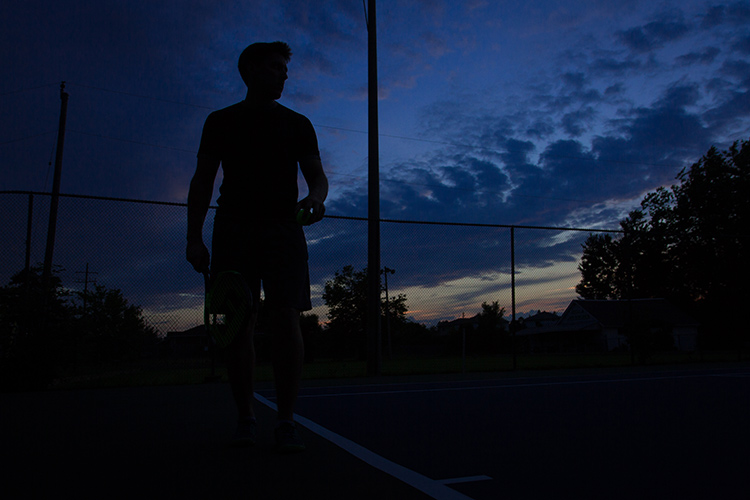
Find the normal, correct exposure for the existing (ambient or available) light, and then adjust your settings to intentionally make your image too dark. The darker your ambient exposure, the more dramatic the light from your flash will be.
1 ambient

Here is my exposure for the ambient light (above). We’re off to a good start! For this shot, I want to keep the dark, dramatic sky in the background, and I will rely on my flash to light up the tennis player.

THE SECOND LAYER: FLASH

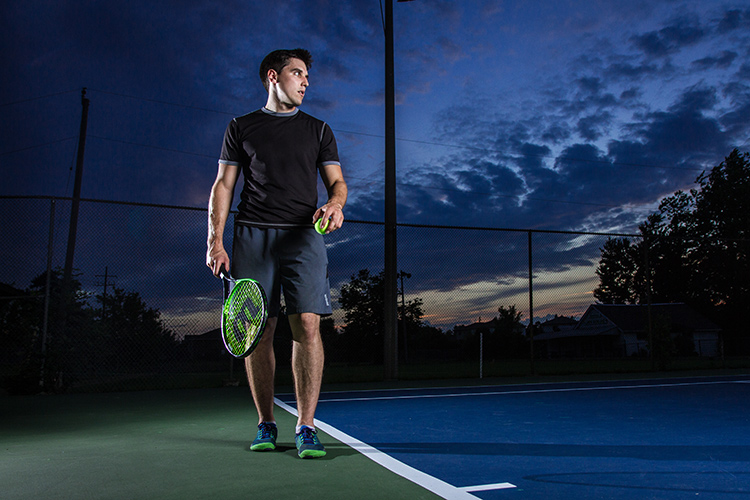
Alright, now turn on your flash. By using flash to light my subject, I can get the best of both worlds – my sky remains dark and dramatic while my subject is well-lit.

It will probably take a few shots to get your lighting right. That’s perfectly normal! Use the tips mentioned in the previous section to add more or less power to your flash.
1 flash

When we add the flashes, we get to keep the dramatic background, with the benefit of crisp lighting on our subject. This shot simply isn’t possible without flash.

You can use what you know about ambient and flash lighting to set the tone of the image.

If you keep your ambient light levels high, the flash will add just a kiss of light. If you start with a very dark ambient image (like the one above), your flash will sculpt and define the image much more strongly.
1 behind the scenes

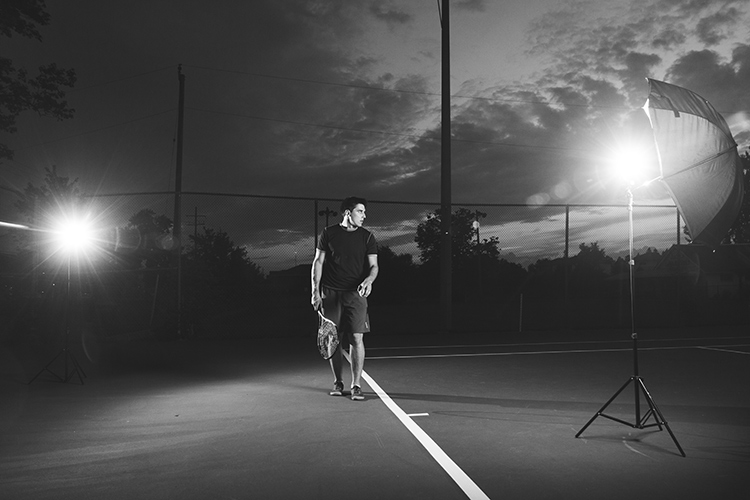
Here’s the behind-the-scenes of our setup. Since the light is hitting the subject from an angle, it is dramatic and shows shape much more effectively than if the flash had been on the camera. One flash is to camera right, bouncing into an umbrella to soften it, the other is to camera left (and behind the subject) to add an accent light.

Putting it into Practice

Here’s another example, this time using flash to give a simple kick, to a liven up a portrait.

2 natural

This was shot with no flash, exposed for the skin tones.

2 ambient

Ambient light only, darkened for the background.

The first step was to push the “correct” exposure down, making the overall image darker, so that we could use flash to highlight the subject.

2 flash 2 double flash

In the image above (left), the flash is coming from just left of the camera. It brightens the subject up (compared to the background), and makes the image seem more three dimensional. The background also pops more than it did with the “correct” exposure.

If we want to, we can play around with the effects of a second flash (above right), maybe letting it aim directly toward the camera to create some lens flare?
2 behind the scenes

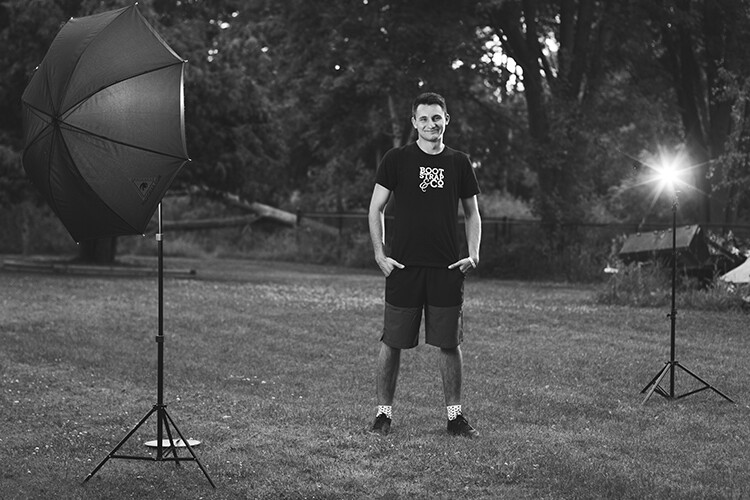
Here’s the simple setup.

Shaping and modifying your light

Well done! You’ve made it through the basics of off-camera flash photography. Next, you can push your newfound skill to a whole new level by learning how to modify the light.

If you’re familiar with how the light on a cloudy day is softer than the light on a sunny day, then you already know nearly everything you need to know about flash modifiers.

The basic rule is this: the larger the light source, the softer the light.

A flash unit is a small light source that creates harsh shadows. That isn’t always so flattering.

The purpose of umbrellas, soft boxes, and other light modifiers, is to make the source of light larger. This softens the light, which is especially useful for portraits.
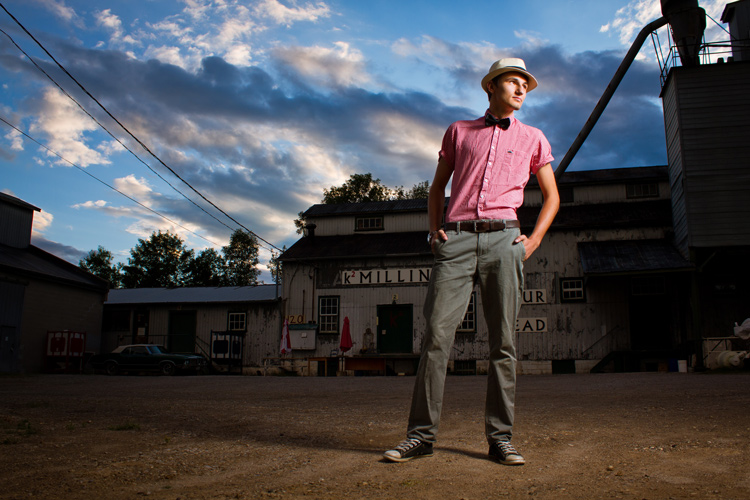
flash-3

Learning how to modify light lets you build a style that matches your image.

Looking for a gritty photo? Shoot with a bare flash (no modifiers) and get sharp shadows. Looking for softer, more flattering light? Use a softbox.

Practice, practice, practice

Once you’ve got a feel for how to use your flash off-camera, you’ll have a whole new world of photography to explore. Try it. The worst thing that can possibly happen is that you’ll learn something.

Using digital equipment gives you the ability to try things without any financial repercussions. Learning flash photography through trial and error was probably pretty expensive back in the days of film; today you can fire as many shots as you need in order to learn, without breaking the bank.

Nobody ever got off-camera flash right on their first try – experiment and stick with it, and you’ll add a valuable new tool to your bag of tricks.
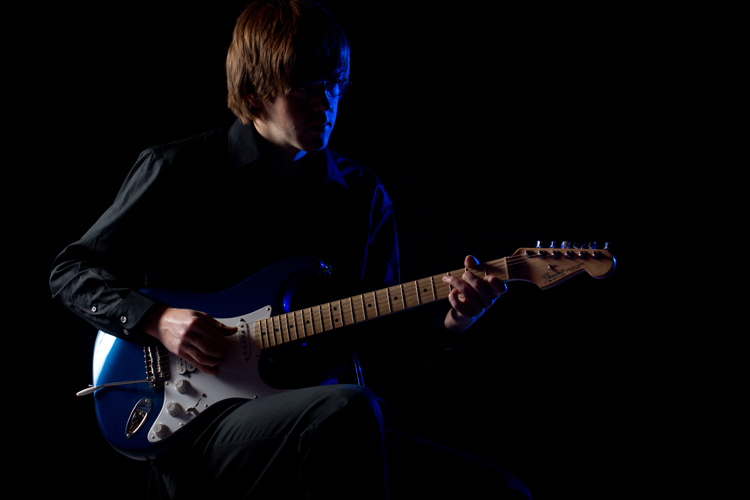
flash-2

More articles for you to read on dPS about off-camera flash:

  • How to Create Compelling Wide-Angle Portraits Using One Off-Camera Flash
  • 9 Steps to Get Over Your Fear of Off-Camera Flash
  • Supporting Your Off-Camera Flash – Tripods, Monopods or Light Stands?
  • Beginners Guide to Using TTL Off-Camera Flash
  • How to Get Started with Off-Camera Flash Photography – Start With One!
  • Getting Started with Off-Camera Flash
  • How to Balance Off-Camera Flash and Ambient Light on Location
  • A Beginner’s Guide to Working With Flash Off-Camera
  • The Ultimate Flash Photography Guide FAST FLASH FOR PORTRAIT PERFECTION a dPS ebook

googletag.cmd.push(function() {
tablet_slots.push( googletag.defineSlot( “/1005424/_dPSv4_tab-all-article-bottom_(300×250)”, [300, 250], “pb-ad-78623” ).addService( googletag.pubads() ) ); } );

googletag.cmd.push(function() {
mobile_slots.push( googletag.defineSlot( “/1005424/_dPSv4_mob-all-article-bottom_(300×250)”, [300, 250], “pb-ad-78158” ).addService( googletag.pubads() ) ); } );

The post Why Off-Camera Flash Isn’t as Scary as you Think by Frank Myrland appeared first on Digital Photography School.
Digital Photography School

 
Comments Off on Why Off-Camera Flash Isn’t as Scary as you Think

Posted in Photography


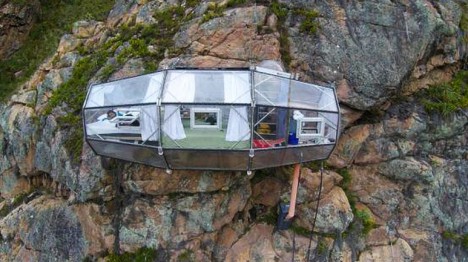
Scary Skylodge: Geometric Glass Hotel Pod Clings to a Cliff

09 Jul

[ By Steph in Destinations & Sights & Travel. ]

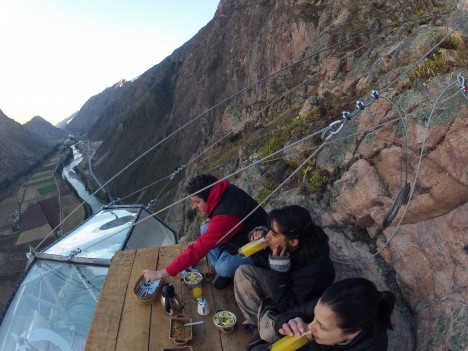
skylodge 1

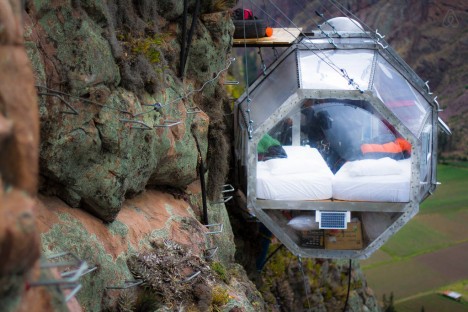
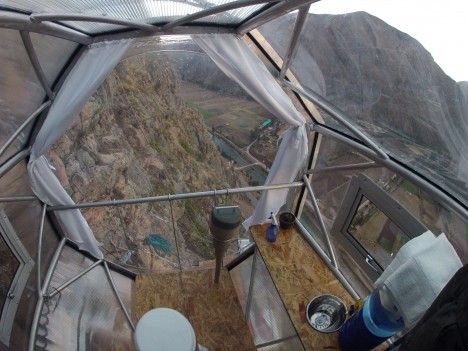
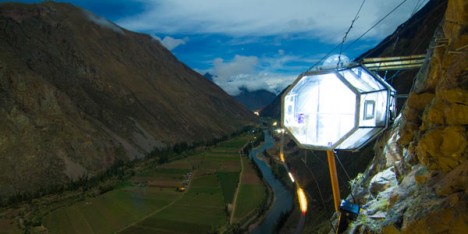
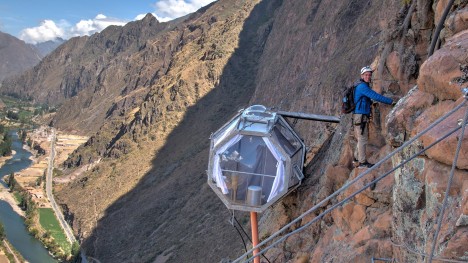
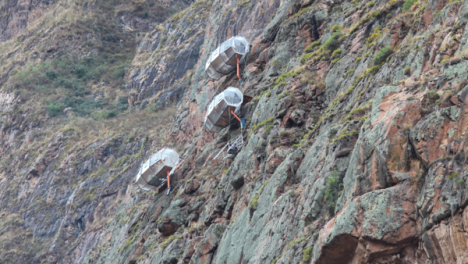
Clinging to a craggy cliff like an oversized artificial barnacle, this pod is only accessible to those willing to scale the 400-foot rock face from the base of a Peruvian mountain. If you’re brave and hardy enough to pull off that feat, you’ll probably do just fine taking up residence in a hotel room that the rest of us will only ever have nightmares about. In addition to its precarious location, the Natura Vive Skylodge is completely transparent, so you can’t exactly forget that you’re hundreds of feet in the air while inside.

skylodge 2

skylodge 5

As fragile as they look, these three pods are made of aerospace aluminum and weather-resistant polycarbonate, so they’re not likely to be blown down or punctured in a storm. At 25 feet long and 8 feet wide, each one is spacious enough to accommodate eight guests, offering comfortable beds, a dining room and even a private bathroom.

skylodge 4


The journey to the pod is actually safer than it looks, as climbers can be tied to a steel cable as they traverse the trails, with ladders and bridges helping them to the top. This zipline route offers alternate access for those who aren’t experienced enough to make the climb. You can even hook yourself to the cables as you perch on a wooden observation deck positioned atop each pod, looking out over the valley.


skylodge 6

Solar panels capture energy to power four interior lamps and a reading light, and the ‘sink’ and toilet are dry. The roughly $ 300-per-person-per-night fee includes transportation to and from your hotel, guides, equipment, snacks, a gourmet dinner with a bottle of wine and an al fresco breakfast.

Share on Facebook


[ By Steph in Destinations & Sights & Travel. ]

[ WebUrbanist | Archives | Galleries | Privacy | TOS ]


WebUrbanist

 
Comments Off on Scary Skylodge: Geometric Glass Hotel Pod Clings to a Cliff

Posted in Creativity


Looking Grave: 12 Spooky & Scary Abandoned Funeral Homes

26 Oct

[ By Steve in Abandoned Places & Architecture. ]

abandoned Ward's Funeral Home Opelika 1
Funeral homes are mortal, much like their clients. When funeral homes are abandoned, however, they’re left to decay, deteriorate and decompose in public.

Built in 1870 during the difficult era of post-Civil War Reconstruction, Ward’s Funeral Home in Opelika, Alabama has long since surrendered to the inexorable march of time. Flickr user Jessica Williams (JessicaNicholex) brings us these images of the former funeral home that, like the neighborhood it still resides in, has seen better days.

abandoned Ward's Funeral Home Opelika 2

abandoned Ward's Funeral Home Opelika 3

It’s not known exactly how long Ward’s Funeral Home has been abandoned; long enough for it to become an eerie urban legend at least. Some Opelika residents claim to have seen haints (haunts, or ghosts in the local parlance) peering through the windows at night. Those brave enough to enter the building itself will find a few caskets in what may have been the business’s showroom. Opening them isn’t recommended… especially to anyone who’s seen a certain scene from Raiders Of The Lost Ark.

Dark Undertakings

abandoned funeral home undertaker Aquasco Maryland

This abandoned “undertakers” establishment can be found in beautiful suburban Aquasco, Maryland – or at least it could be back in mid-March of 2009 when Flickr user ZOOPMON captured it for posterity. Check out the window on the upper left (embiggened view here)… if you weren’t planning on enjoying a sound sleep tonight.

Bodie’s Bodies

Bodie ghost town funeral parlor 1

Bodie ghost town funeral parlor 2

Bodie ghost town funeral parlor 3

Bodie, a California desert ghost town founded in 1876 and designated a National Historic Landmark in 1961, had a working funeral parlor for much of its history – and like most Wild West mining towns, the resident undertaker had plenty of regular business. The funeral home has deteriorated somewhat since the last few Bodieans abandoned the town but enough remains (pardon the pun) to distinguish it as such.

Little Rock Of Ages

OLYMPUS DIGITAL CAMERA

abandoned Miller's Funeral Home Little Rock Arkansas 1

Abandoned funeral homes don’t need to be photographed on gloomy overcast days to bring out their essential creepiness. Just check out these photos of the abandoned Miller’s Funeral Home in Little Rock, Arkansas, snapped by Flickr user Terry Williams (IM2_OCD) on July 25th of 2010. The images cast the business’s decay in gritty focus while bringing out the essential beauty of the sun-washed subject. Especially poignant is the top photo, contrasting the timeless dereliction indoors with the soulless flyover banality glimpsed through the window.

Next Page – Click Below to Read More:
Looking Grave 12 Spooky Scary Abandoned Funeral Homes

Share on Facebook


[ By Steve in Abandoned Places & Architecture. ]

[ WebUrbanist | Archives | Galleries | Privacy | TOS ]


WebUrbanist

 
Comments Off on Looking Grave: 12 Spooky & Scary Abandoned Funeral Homes

Posted in Creativity


Win $100 for Your Scary Halloween Photo

26 Oct

Couple of days ago I wrote a post about Halloween photos, and now it is time to see what you can do! We are happy to announce a Halloween Photo Contest! A winner will get a $ 100 Gift Certificate for http://www.bhphotovideo.com/ The rules are: Send your images to photodoto.contest@gmail.com Only 1 photo per person is allowed, please make sure it Continue Reading
Photodoto

 
Comments Off on Win $100 for Your Scary Halloween Photo

Posted in Photography


How to Prevent Photo Horror Stories — 6 Scary Photo Scenarios & How to Get Through Them

25 Oct

Extra photos for bloggers: 1, 2, 3

As photographers, we plan and plan for big shoots.

But, we all have those days. The ones where that black cat that crossed our path, or we accidentally walked under a ladder.

Despite our best efforts, things can go wrong from time to time.

We’ll show you how to ward off those photoshoot nightmares. Our tips will prevent scary photo scenarios like garlic chases vampires away!

How to Prevent Photo Horror Stories

p.s. Take a peek at our Pinterest today for a chance to win a set of Tattly Temporary Camera Tattoos!

No Memory Cards, No Problem

paint-smDear Photojojo,

I booked a photoshoot, and when I got there, I realized I had forgotten ALL of my memory cards! I apologized to the client and rescheduled, but I felt like such a dummy. How do I prevent this in the future?

Love,
Forgetful in Florida

Dear Forgetful,

This happens to the best of us. Here are some simple ways to keep track of your memory!

  • Make a checklist of all necessary equipment. Leave it by your keys the night before a shoot. Check it off in the morning before you leave.
  • Stash extra memory cards in common places. Leave one in your car, a hidden pocket in your camera bag, or in your wallet. That way you’ll always have a backup!
  • Shoot tethered to your laptop! By connecting the USB cable that comes with your camera to your laptop, images will be saved onto the computer instead of a memory card. This may limit mobility, but it will prevent you from disappointing your client.

Sincerely,
Photojojo

Grain, Grain, Go Away!:

paint-sm Dear Photojojo,

I got home from a shoot only to realize I shot everything at 6400 ISO. The grain and noise is insane! What do I do?

Help!
Grim and Grainy

Dear Grim and Grainy,
Here are a few ways to enhance those grainy images.

  • You can use CameraRaw, Photoshop’s built in file converter for RAW files, to reduce noise in the image. The “filter” menu in Photoshop also has a noise reduction feature.
  • Other editing programs, such as iPhoto, Aperture, and Picassa have similar features or plug-ins you can install.
  • Only sharpen the parts of your photo that really need it. When you sharpen an image, it increases the contrast between the light and dark areas. Sharpening the whole image will increase the appearance of those noisy pixels all over. By selectively sharpening certain areas, you can minimize the grainy look.
  • You can also turn noisy color images into black and white. The grain gives it that good-old-fashioned-film feeling, and black and white takes away the distraction of colored pixels.

Keep your chin up!
Photojojo

White Balance Woes:

paint-smDear Photojojo,

All of my photos have a strange color cast. My indoor photos look orange, and outdoor ones look blue.

I’m guessing I have the wrong white balance settings? What is white balance anyway?

Is there anything I can do?
Blue in Longview

Dear Blue,

White Balance can be tricky, even for the most experienced photogs.

  • Your camera has settings to adjust for the temperature/color of light you are shooting in. Set your camera to the correct white balance while shooting, like daylight outside, and tungsten settings for indoors, to keep the color cast minimal.
  • Keep a gray card or a white balance lens cap in your camera bag for setting your white balance on location. A gray card is a neutral, 18% gray. Place the card in your scene for one shot, and remove it for your the next.
  • By doing this, you can set a custom white balance for each particular scene. Or use it when editing images on the computer later.
  • You can also correct white balance settings after the fact. With editing software like Photoshop, GIMP, or Adobe Lightroom, you can correct for a color cast.
  • If your image looks too blue, adding in yellow can help neutralize the tones. If it is too orange, adding a bit of cyan, green, and blue will make it look normal.

Yours truly,
Photojojo

Eyes Wide Shut:

paint-sm Dear Photojojo,

I photograph weddings. It never fails that during group photos, someone will blink or make a face.

Are there any tricks for getting people to keep their eyes open?

Sincerely,
Eyes Closed in Minnesota

Dear Eyes Closed,

It’s definitely hard to get everyone to look perfect at the same moment.
Here are some tips:

  • Make sure your group shot is in a nice shady place facing away from the sun. It’s even harder for people to keep their eyes open when the sun is shining in them (obvi).
  • Here’s another trick. Use a tripod, and take A LOT of photos of the same group. Numbers can work in your favor. For groups smaller than 20, divide the number of people by three if there’s good light and two if the light’s bad. That’s how many shots you need to take. Then use editing software to swap heads if someone is blinking or making a funny face in the group photo.

Happy Shooting,
Photojojo

Constant Callers:

paint-sm Dear Photojojo,

I recently did a photoshoot for a friend, and now she’s calling me everyday to check on her photos. I want to stay friends with her, but her constant calls are driving me crazy!

How do I tell her that editing takes time?

Sincerely,
Aggravated in Arizona

Dear Aggravated,

You are not alone in this situation. Try to stay positive, and remember she is just anxious to see your amazing work.

  • Remind your friend that you want to give her the best product you can, and in order to do so, you need at least a week or two.
  • If you plan to work with clients more frequently, put a section in your contract that explains the turnaround time. Let them know up front when they can expect to see the finished images.
  • Make a mini blog post on your site to give her a preview of those rad photos!
  • Email her or Instagram one pic a day until you get them all finished. She’ll be excited and check her email more than her texts.

Keep calm,
Photojojo

Cry Babies:

paint-sm Dear Photojojo,

With the Holidays coming up, I’ve started booking more sessions with kids and families.

How do I deal with children that won’t quit crying?

Sincerely,
Cranky in Connecticut

Dear Cranky,

  • How bout penciling a sweet ‘stache on that lil cutie?! Keep one of these in your camera bag and everyone will be laughing.
  • Attach a PEZ dispenser to your camera’s hot shoe to get portraits of kids with a little curiosity on their face.
  • Turn the music up, and use the ioShutter release to dance around with the little one and snap away at candid moments.
  • Another secret weapon… BUBBLES! Who can resist?

Dry those eyes,
Photojojo

Still Puzzled?:

  • Have other photo problems? Send us an email.
  • Share your photo horror story or your advice by tagging us @photojojo on Twitter and Facebook.
  • Send us a link to your favorite photo problem-solving forum!

Related posts:

  1. Halloween Photo Tips — Our Ghoulish Guide to Scary Snaps How can you not love a holiday that encourages you…
  2. Photojojo’s Guide to Scary Photo Pumpkins Live in NYC or San Francisco? Come to our Photo…
  3. Best New Photo Gifts of the Season (2 of 2) Dear friends, ’tis our final installment of photo goodies for…


Photojojo

 
Comments Off on How to Prevent Photo Horror Stories — 6 Scary Photo Scenarios & How to Get Through Them

Posted in Equipment


Minecraft Mods – SCARY ENDERMEN & Crazy Arms !

31 Jul

GameChap and Bertie investigate the jolly amusing Alpha Walk Animation and Old Style Endermen as part of the Old Days modification! Huzzah! TO DOWNLOAD: Visit the Minecraft Mods section at MinecraftForum! The topic name is [1.2.5] NBXlite, OldDays, Spawn human. Updated!, by Exalm.

Pins and needles and bunnies! 30 Second Bunnies. Your favourite movies. In 30 seconds. With Bunnies. Catch the rest at mnc.tv
Video Rating: 4 / 5