RSS
 

Posts Tagged ‘Road’

Warming Signs: Clet Abraham Rewrites Rules Of The Road

07 Aug

[ By Steve in Art & Street Art & Graffiti. ]

Guerrilla street artist Clet Abraham may be the Banksy of the boulevard, hacking road signs with stickers and encouraging people to question authority. Our lead image dated August 31st of 2013 comes courtesy of Flickr member Oilvier Ortelpa, who snapped Abraham’s enhanced traffic sign in Brussels, capital of the EU.

Clet Abraham‘s creative road sign hacks turn everyone’s frowns upside down – well, unless you work for the City – but his subversive street sign stencils are meant to be more than just amusing. The Florence, Italy-based guerrilla artist sees graphic, no-nonsense road signs as uncompromising symbols of authority. His clever stencils facilitate alternate interpretations of the signs’ harsh and uncompromising symbolism, and thus invite the public to think twice before blindly obeying those anonymous commands.

One of Abraham’s favorite targets is the ubiquitous red & white NO ENTRY sign. Possibly alluding to the human tragedy of Europe’s migrant crisis, Abraham hopes to provoke more public debate over the concept of NO ENTRY and what it means to not only those hoping to come to Europe but those already living there. Some examples of the artist’s work in his hometown of Florence are shown above, snapped by Flickr member Marianne (Mariannera) in October of 2013.

When In Rome, Hack The Signs

Now 50 years old, Abraham has lived in Florance since 2005 but originally hails from Brittany, France. He studied at the Ecole des Beaux-Arts in Rennes before moving to Rome, where he honed his skills restoring antique artworks – you won’t find any botched frescoes on his resume!

It was the “omnipresence of street signs” in Italy, however, that spurred Abraham “to intervene, both to notify the public of the absurdity of the situation, and to propose a constructive and respectful alternative.”  Flickr member Philosofia captured a small selection of Abraham’s work on the streets of Rome in January of 2012.

Labor Of Love

“My adhesives are developed to add a further level of reading (to street signs),” adds Abraham, “constructed on the base of their original signification in order to maintain its utility but give it some intellectual, spiritual, or simply amusing interest. The final objective? That traffic keeps flowing without us feeling spoken down to!” Flickr member Irene Grassi snapped the above sun-faded stenciled sign in Florence on January 1st of 2015.

Next Page – Click Below to Read More:
Warming Signs Clet Abraham Rewrites Rules Of The Road

Share on Facebook


[ By Steve in Art & Street Art & Graffiti. ]

[ WebUrbanist | Archives | Galleries | Privacy | TOS ]


WebUrbanist

 
Comments Off on Warming Signs: Clet Abraham Rewrites Rules Of The Road

Posted in Creativity


4 Tips for Post-Processing Images on the Road

28 Jun

In this article I will share some of my tips for post-processing your images on the road or while traveling. That way you can share images and keep up on social media. Let’s see why that’s important.

Social media pressures

Much can be said about social media and its influence on photography. But the hard truth is that for many of us we live under a constant pressure to regularly release new content on various platforms, such as Instagram. Studies show that posting an average of one image per day is what will result in the highest engagement amongst current (and new) followers.

One can say that social media has become just as much about documenting as about presenting your finest work. But still, you do want to maintain a certain quality of your images.

Tips for Post-Processing Images on the Road

An image I processed from the back of our rented caravan on Iceland

In this article, I’ll share several tips on how you can keep up with the pressure of posting new content while being on the road and how you can make sure that the images you post during that period are still of a quality that reflects positively on your overall gallery.

Why Post on the Road

Before we get into the tips on how you can process your images on the road, let’s quickly look at why you want to keep posting new images when you’re traveling.

As I mentioned above, studies show that posting an average of one image per day is what will bring the highest engagement amongst current and new followers. If social media is a big part of your marketing strategy then you should attempt to maintain this average. Of course, there’s no big harm in missing a day or two every now and then but if you’re absent for a week, or even more, you quickly loose engagement with your followers.

Since most photographers follow a lot of people on social media (both friends and people who inspire them), it won’t take much to forget about you and your work, making it harder to regain their engagement on your images.

Tips for Post-Processing Images on the Road

I chose to quickly process this in Lightroom to share something on my Facebook page related to my current travels.

So, if you’re traveling for a week or longer, it’s a good idea to keep posting new content as often as you can in order not to lose too much engagement.

4 Tips for Post-Processing on the Road

The four tips I’ll be sharing will require that you have access to a laptop (or computer) with your preferred editing tool installed. Normally, when I travel I tend to always bring my laptop (except for shorter trips) so that I can quickly process some images on the road and document my current travels.

That being said, the images that I process on the road rarely become portfolio worthy shots and I will go back and reprocess them later on when I’m back at my desk and have access to the equipment I prefer working with.

#1 – Calibrate your Monitor

It’s most likely that your processing images on a laptop when you’re on the road. If you’re a serious photographer and you spend time fine tuning your images it’s also likely that at some point you’ve calibrated the monitor on which you’re working regularly. (If you haven’t calibrated your monitor before I strongly recommend investing in a tool such as Spyder 5 Elite and calibrating ASAP!)

Tips for Post-Processing Images on the Road

I use the Spyder 4 Elite to calibrate both my monitor and laptop (also my iPad when I had one).

However, it’s not only your main monitor that should be calibrated. If you spend time processing images on your laptop as well, it’s equally important that it is calibrated too. You don’t want to process an image and then later realize that the colors are all off, right?

#2 – Find the Time

Time is often limited when you’re on the road as most of the day is either spent traveling, exploring, scouting or photographing. Still, I recommend trying to find the time to process at least one image during the day. This could be while you’re having lunch at a cafeteria or even quickly before going to sleep.

When processing images on the road it’s not crucial to focus on the details. Instead, spend a few minutes in a software such as Adobe Lightroom and adjust the highlights, contrast, and white balance. Often, you don’t need to make big adjustments for an image to look okay.

Tips for Post-Processing Images on the Road

A quick edit done in Lightroom to show the amazing light we had that particular evening. I later reprocessed this image to better suit my style.

If you’re pressured to upload images on the road (this could even due to a client request) it’s better to have something to put out, and then reprocess it when you’re back home.

#3 – Find Balanced Light

If you’re like me and would rather spend a night in a tent or campervan than a hotel, finding a place to process your images isn’t always the easiest. Most places outside are challenging due to harsh light reflecting on your laptop, making it difficult to properly see how the adjustments are applying on the image.

Try looking for a shadowy area to work in, or if you can’t find one, make your own. This may sound (and look) stupid but using a jacket or something similar to cover yourself and the laptop will make it easier to view the screen and see how you’re processing the image.

#4 – Use Presets

To be quite honest, presets are something I very rarely use. In fact, I don’t think I’ve ever used them more than a handful of times. However, I do see the value of them when you need to quickly get content out and you have a certain style to your images.

Tips for Post-Processing Images on the Road

I used the dPS LR presets to process this image from Germany.

Presets are the quickest way to process your images and in many cases, they do a good job. Just make sure that the particular preset works well for the image you’re working on, and if needed, make some minor adjustments.

Last Words

As I’ve mentioned several times in this article, and I want to end with saying, that processing on the road should only be done in order to continuously upload new content on social media either to document, engage or to satisfy a client. The images you sell or include in your portfolio should be reprocessed, as you’ll most likely notice a few errors when you return back home and have more than a few minutes to process the image.

Love it or hate it but this is the world that we (or at least many of us) live in today! How do you work on the road? Do you have any other post-processing tips for when you’re away from home? Please share in the comments below.

The post 4 Tips for Post-Processing Images on the Road by Christian Hoiberg appeared first on Digital Photography School.


Digital Photography School

 
Comments Off on 4 Tips for Post-Processing Images on the Road

Posted in Photography


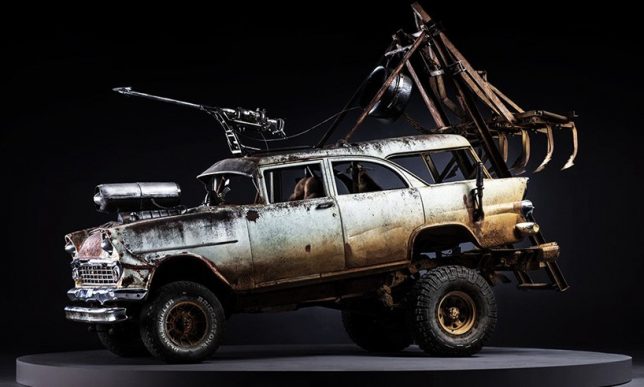
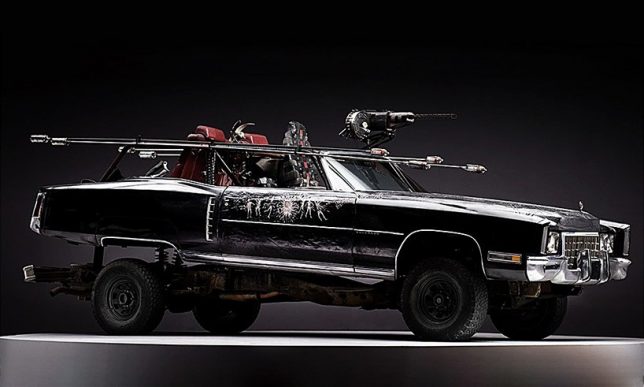
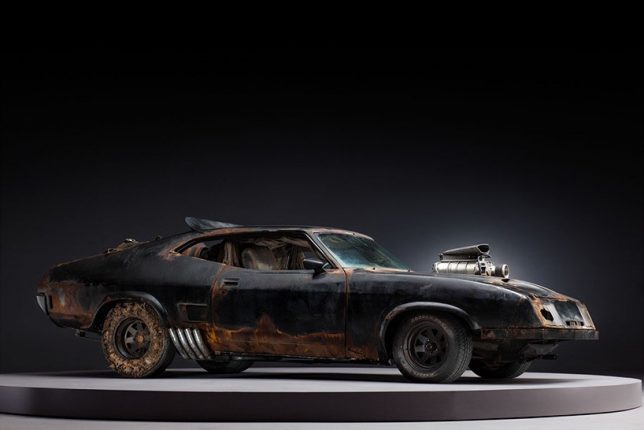
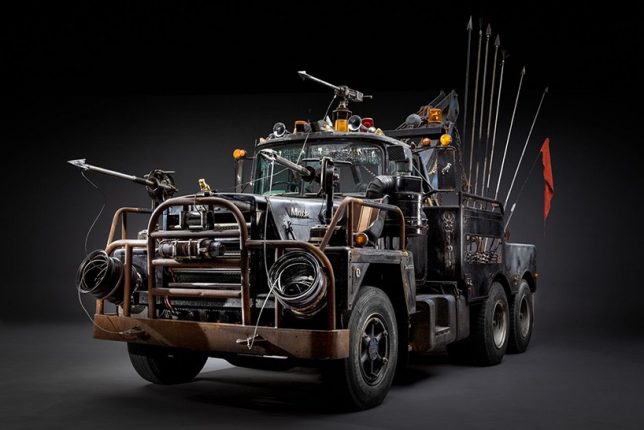
The Cars of Mad Max: Fury Road, Photographed Filth-Free Before Filming

09 Mar

[ By SA Rogers in Technology & Vehicles & Mods. ]

Screen Shot 2017-03-08 at 12.41.40 PM

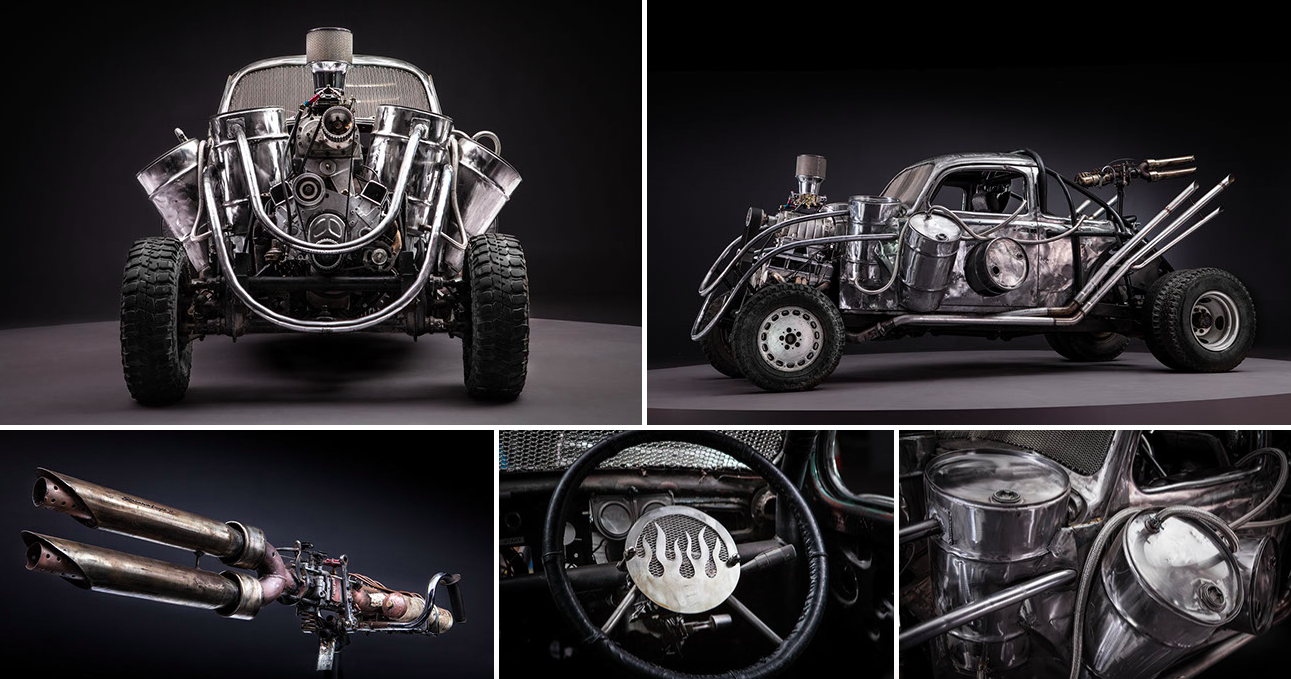
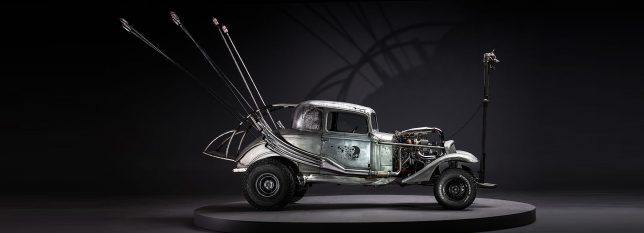
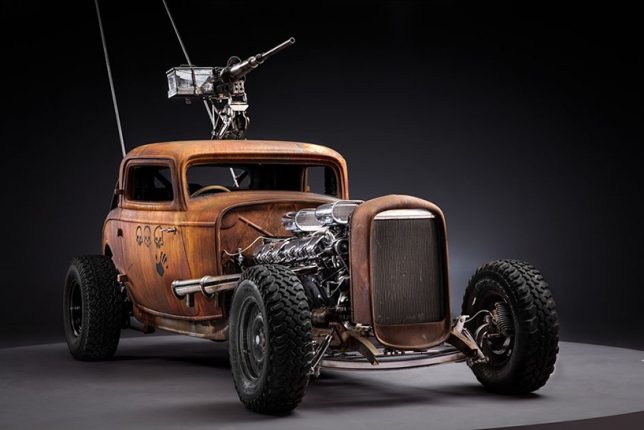
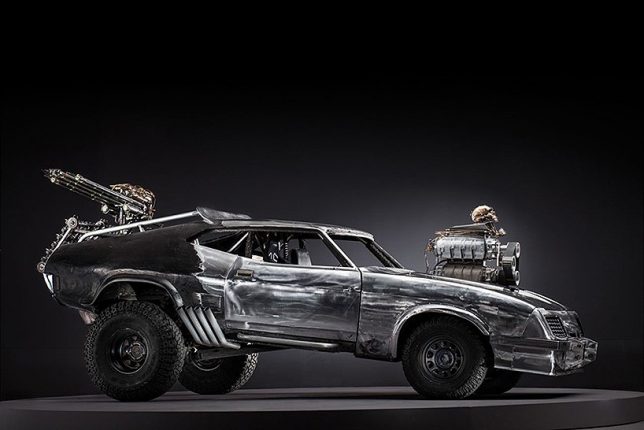
If you’ve ever wondered what the cars of Mad Max: Fury Road would look like all cleaned up, or you want some inspiration for a totally bonkers hot rod creation of your own, check out this photo series by photographer John Platt. Minute details of the vehicles can be seen in shockingly pristine states, as they were just after their creation and prior to the start of filming, giving us a good look at all the custom contraptions welded together into junkyard monsters.

mad max fury road cars 1

mad max fury road cars 2

In the movie, there’s so much desert dust kicked up by the tires of all those vehicles, we miss out on a lot of those details. The cars are appropriately filthy – and in this universe, they probably always would have been.

Screen Shot 2017-03-08 at 12.42.40 PM

mad max fury road cars 3

It’s hard to imagine anyone putting time and effort into washing and shining them up in between epic chases on the sand, and all those parts came from scrap yards anyway.

mad max fury road cars 3

mad max fury road cars 4

mad max fury road cars 5

That makes Platt’s photo series all the more satisfying. He got to photograph some of the movie’s 150 custom vehicles in his studio with proper lighting before they got dirty, and it’s a good thing, too – most of them were utterly destroyed during filming.

mad max fury road cars 6

mad max fury road cars 7

mad max fury road cars 8

Production designer Colin Gibson individually designed and sculpted each car and motorcycle according to writer and director George Miller’s vision. No wonder it took 15 years to complete pre-production. See the whole series here.

Share on Facebook


[ By SA Rogers in Technology & Vehicles & Mods. ]

[ WebUrbanist | Archives | Galleries | Privacy | TOS ]


WebUrbanist

 
Comments Off on The Cars of Mad Max: Fury Road, Photographed Filth-Free Before Filming

Posted in Creativity


Disappearing Road: Cross Quickly, Before It’s Swallowed by the Sea Again

25 Feb

[ By SA Rogers in Destinations & Sights & Travel. ]

passage du gois

Twice a day, when the tides go down, this causeway appears to connect the French mainland to the island of Noirmoutier, but cross quickly or the road will disappear, stranding you in the middle of the Bay of Bourgneuf. The Passage du Gois was built upon a strip of silt that just barely elevates it above the surface during low tide for a little over an hour at a time. Crossers often wait too long to get started, bet that they’ll be able to make it across, and lose.

passage du gois 7

passage du gois 8

passage du gois 2

Once it starts flooding, it happens quickly. That’s why there are elevated rescue towers located along the stretch – you might just have to swim over to one, climb up and wait it out. When the tide is low, abandoned, ruined cars can be seen littering the sand.

Passage du Gois 3

passage du gois alain

passage du gois alain 2

Each year, runners gather for the Foulées du Gois, a race across the causeway. The road also tends to be covered with seashells, making it a popular destination for both souvenir-seeking tourists and locals who look for edible shellfish.

passage du gois wikimedia

Photos via Flickr Creative Commons: garder le cap, ludovic, pics by brian, oliver gobin, alain bachellier, marc bourbon, oliver hankeln, wikimedia commons

Share on Facebook


[ By SA Rogers in Destinations & Sights & Travel. ]

[ WebUrbanist | Archives | Galleries | Privacy | TOS ]


WebUrbanist

 
Comments Off on Disappearing Road: Cross Quickly, Before It’s Swallowed by the Sea Again

Posted in Creativity


Rugged Luxury: Take Your Queen Bed On the Road In This Modern Camper

08 Nov

[ By SA Rogers in Technology & Vehicles & Mods. ]

tvan-mk4-trailer-main

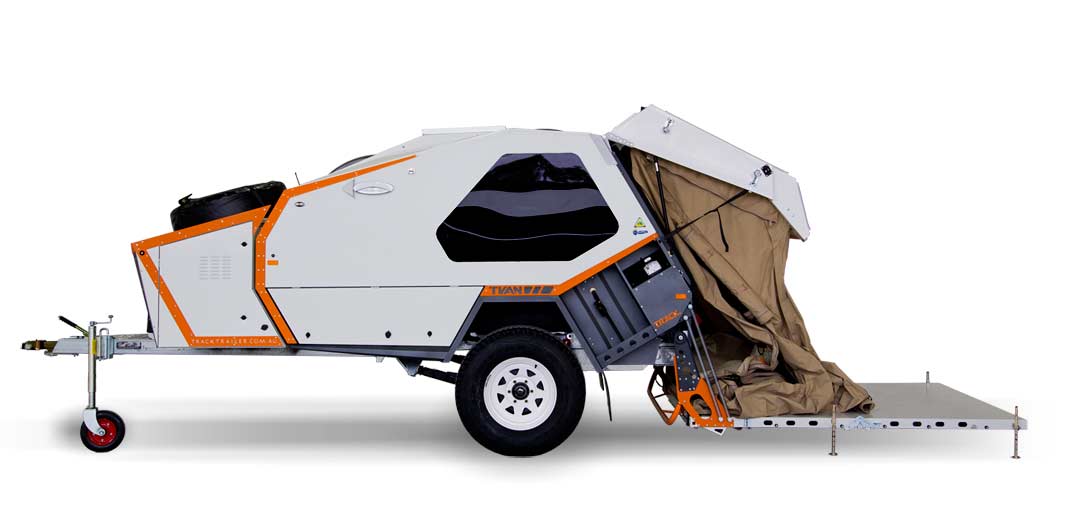
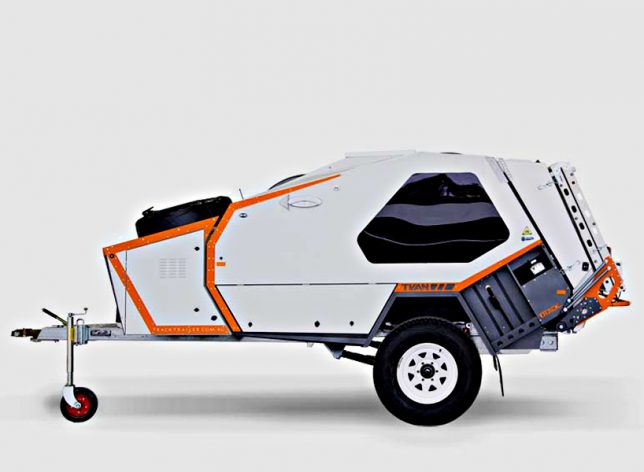
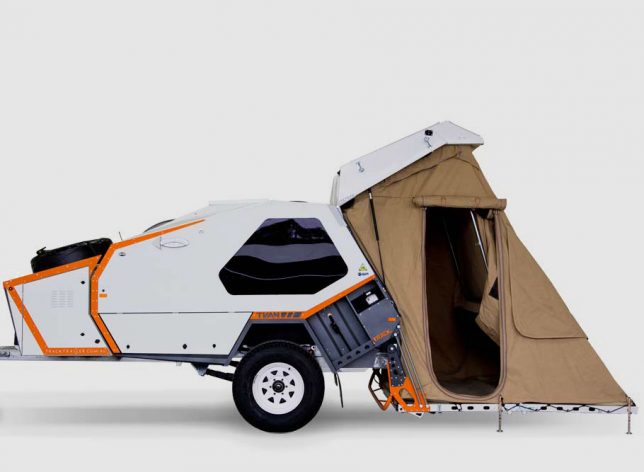
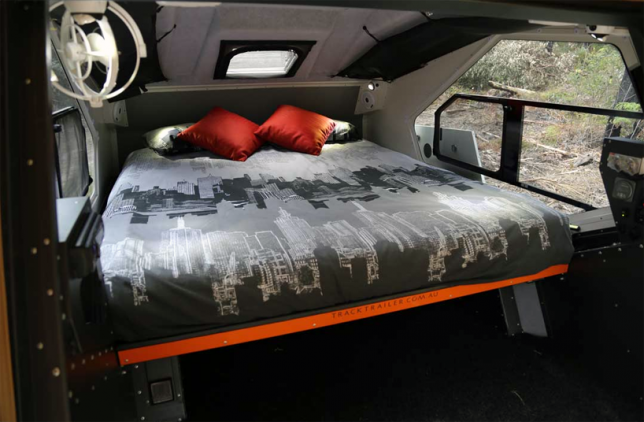
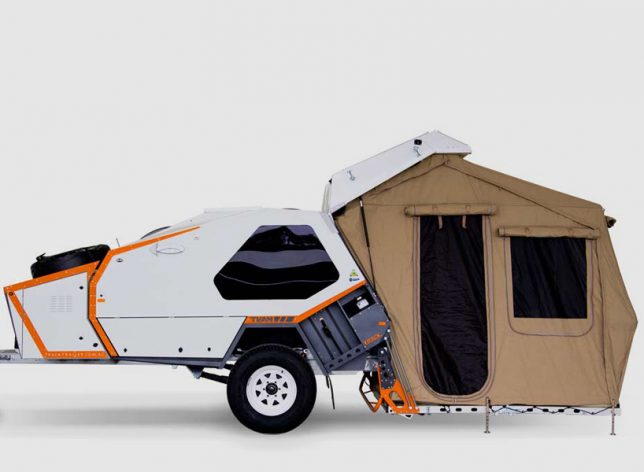
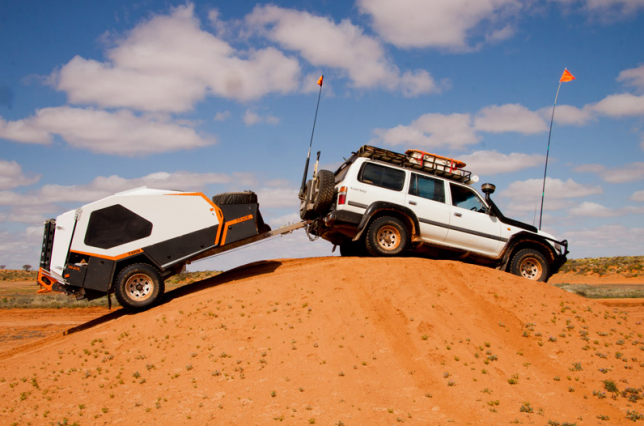
If your camping style is somewhere in between sleeping under the stars and ‘glamping’ with all the comforts of home, Track Trailer’s MK4 ‘Tvan’ camper has your number. Designed to be towed behind standard trucks and SUVs, it’s basically a hotel room on wheels, packing a queen-sized bed, two kitchen configurations, air conditioning and a quick-erect tent to multiply the available space.

tvan-trailer-3

tvan-trailer-7

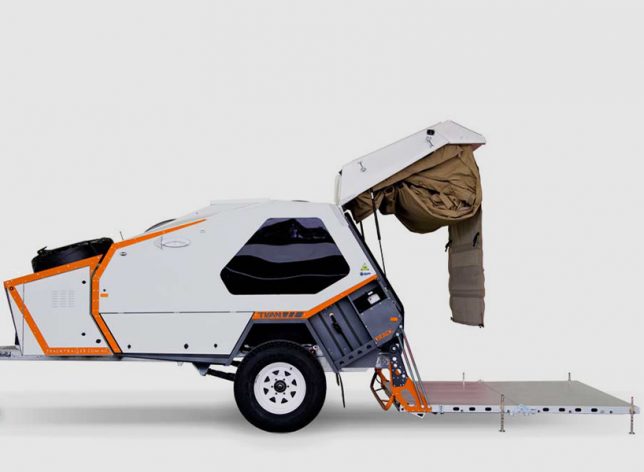
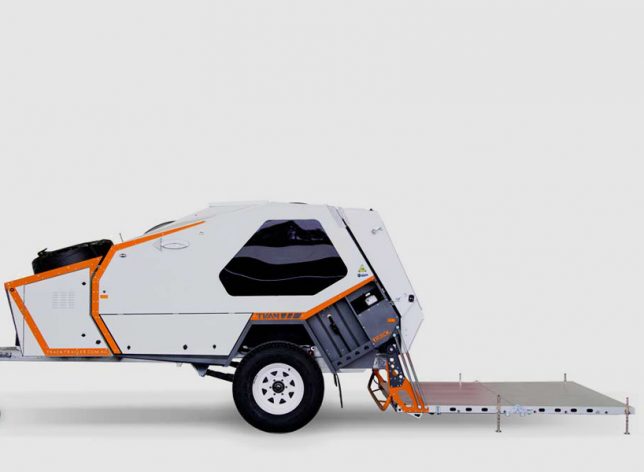
The latest in a series of Tvan designs, this camper trailer enables the most rugged of adventurers to go deep into the wilderness, and it’s gotten a thumbs-up from explorers of Australia’s most punishing desert landscapes. The Tvan is manufactured in Melbourne and has been around since the early ’80s, and features MC2 suspension, a riveted steel and aluminum cabin body, hot-dipped galvanized chassis, and a rear folding platform for the tent, which stows away in its own compartment.

tvan-trailer-4

tvan-trailer-5

tvan-trailer-6

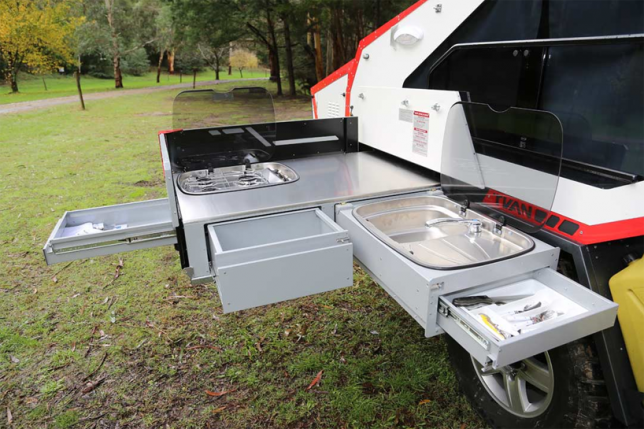
The slide-out kitchen offers a surprising number of features, including four burners, a sink, counter space and three storage drawers, and it all packs up tight for travel, remaining secure even when you’re driving over rocky terrain. There’s an integrated windshield that deploys simply by raising it into position so windy conditions don’t blow out the flames on the range.

tvan-trailer-2

tvan-trailer

tvan-trailer-8

The cabin itself is substantial enough to block out noise, sun, heat, cold and wind, and when the tent is in use, it secures to the hard fold-out floor, keeping it up off the ground. The rear hatch is assisted by gas struts to make it easy to open and close, and the whole thing is aerodynamic, making it easy to tow.

Share on Facebook


[ By SA Rogers in Technology & Vehicles & Mods. ]

[ WebUrbanist | Archives | Galleries | Privacy | TOS ]


WebUrbanist

 
Comments Off on Rugged Luxury: Take Your Queen Bed On the Road In This Modern Camper

Posted in Creativity


Road tripping through New South Wales, Australia

13 Jun

$ (document).ready(function() { SampleGalleryV2({“containerId”:”embeddedSampleGallery_1954449661″,”galleryId”:”1954449661″,”isEmbeddedWidget”:true,”standalone”:false,”selectedImageIndex”:0,”startInCommentsView”:false,”isMobile”:false}) });

Photographer Jason Futrill has already spent three months of this year exploring Australia for various tourism marketing campaigns and social media channels. Based in Tasmania, Jason recently completed an eight-day road-trip from Sydney down to Bermagui, along the Sapphire Coast of New South Wales.

Futrill’s trip took him to Narooma, where he photographed the famous Camel Rock, and to the distinctive Sea Cliff Bridge which connects the coastline between Coledale and Coalcliff, north of Wollongong. The trip culminated back in Sydney, just in time for the annual light festival, ‘Vivid Sydney.’ After looking at his photographs, we’re itching to recreate the trip…

Articles: Digital Photography Review (dpreview.com)

 
Comments Off on Road tripping through New South Wales, Australia

Posted in Uncategorized


3 Tips to Maximize Your Road Trip Photos

29 Feb

Road-Trip-Photo-Tip-Wide-Angle-06

Road trips have been hailed as one of the greatest pastimes ever, and something that everyone should do at least once in their lifetime. It is a great way to experience a lot in a short span of time, and as a photographer, there will be many opportunities and moments awaiting your perspective. Sometimes preserving your creative spin in the midst of all the new discoveries, can become sensory overload and feel overwhelming.

Here are three tips that can help you make better photographs on your journey and maximize your road trip.

Road-Trip-Photo-Tip-Wide-Angle-03

1. Plan, plan … plan?

Most successful photo sessions involve a level of planning, this is no different for road trips. The plan does not have to be detailed, it can start out with some basics, such as final destination and must-see places/events, then you determine what should happen daily. Research your routes, note interesting things along the way, and make a priority list. Keep in mind that when traveling you are subject to the unforeseen, such as inclement weather, or places inaccessible for one reason or another, so be ready to switch to Plan B.

Road-Trip-Photo-Tip-Wide-Angle

As a light chaser, planning should include knowing when the most flattering light will hit your must-see locations or subjects (e.g. sunrise or sunset), and getting there on time. Thankfully there are now many smartphone apps that will help you plan for the golden hours, work out directions, as well as drive times (and distance) between destinations.

Road-Trip-Photo-Tip-Wide-Angle-01

The last part of planning is building flexibility into your days. Sometimes even the best laid plans end up with hiccups and delays, and you still need to make the most of it. The main objective of any road trip is to have fun, so build in a little flexibility, and who knows, you could find something worth exploring, or maybe you will be forced to get creative when you least expect it.

Road-Trip-Photo-Tip-Wide-Angle-05

2. Gearing up

So with your destination(s) planned, it’s time to figure out what gear you need. The last thing you want to do is lug around everything you own, in fact, quite the opposite – you will want to travel light. This is why knowing your destination is key to packing. Will you be driving through amazing scenery? If yes, then you may want to pack a wide-angle lens. If wildlife is your focus, you may decide on a telephoto zoom, which is also great for capturing portraits of people in their natural environment, without being too obtrusive.

Note: Good advice, when it comes to portraits, asking permission is a nice approach.

Road-Trip-Photo-Tip-Zoom-03

Road-Trip-Photo-Tip-Zoom-01

It all depends on what your end game is, and what lens (or two) you will be using the most. There will always be regrets over what you left behind, such as that one photo that would have been awesome if you had packed a fish-eye or macro lens – but think about the extra weight, and whether of not it’s justified for the duration of the trip.

Road-Trip-Photo-Tip-Wide-Angle-04

If you really want to travel light, a mid-range zoom is a great compromise and a good broad spectrum lens to have during your journey, so research your surroundings and decide if this could work for you. A tripod is a safe bet if you plan to do any night photography, but use the same rule and take it only if you need it.

Road-Trip-Photo-Tip-Night

3. Road trip story

When you shoot with a story in mind, it can make your photos take on a life of their own. Are you documenting something specific along the way, such as small towns or diners, breath-taking landscapes, or the road itself?

Road-Trip-Photo-Tip-Zoom-02

There are many different ways to tell a story, and your objective and style will dictate the way you tell yours. If your destination includes places that are prone to lots of tourists – decide how this fits into your vision. Do you make them a part of the photo (i.e. use their presence for a sense of scale) or would you prefer the location desolate (which probably means rising early to beat the rush). What story are you trying to tell?

Road-Trip-Photo-Tip-Wide-Angle-02

Road-Trip-Photo-Tip-National-Park

Conclusion

Road trips are fun, and are a great way to make memories with hundreds of photo opportunities. Planning goes a long way, and will help you determine which gear to travel with, and what photos will make up your story line. So whether you are journeying to a National Park or just venturing out to a new place – a journey that spans two weeks or just two hours – know before you go, have lots of fun, and make awesome photo memories.

What other important tips would you add for fellow photography road trippers?

googletag.cmd.push(function() {
tablet_slots.push( googletag.defineSlot( “/1005424/_dPSv4_tab-all-article-bottom_(300×250)”, [300, 250], “pb-ad-78623” ).addService( googletag.pubads() ) ); } );

googletag.cmd.push(function() {
mobile_slots.push( googletag.defineSlot( “/1005424/_dPSv4_mob-all-article-bottom_(300×250)”, [300, 250], “pb-ad-78158” ).addService( googletag.pubads() ) ); } );

The post 3 Tips to Maximize Your Road Trip Photos by Nisha Ramroop appeared first on Digital Photography School.


Digital Photography School

 
Comments Off on 3 Tips to Maximize Your Road Trip Photos

Posted in Photography


The long, difficult road to Pentax full-frame

19 Feb

Pentax’s road to full-frame has been long, winding and not without a few wrong turns. But it could all have been so different. 

Way back in 2000, when the 21st Century was just beginning to find its feet and photography journalists were starting to get used to putting a ‘D’ into ‘SLR’, Pentax announced that it was making a full-frame (D)SLR. Had it shipped, that camera – which was developed out of the company’s then-flagship film model the MZ-S – would have predated anything from Canon, Nikon, Kodak or (unthinkable at the time) Sony. And Contax, too, but the less said about that, the better. 

Ambitious, powerful, innovative and ultimately doomed, the original Pentax full-frame DSLR was in some ways the Spruce Goose of cameras, but tragically it never even achieved the short, thrilling first and final flight of Howard Hughes’ most famous creation. 

The progenitor. The original, unnamed Pentax full-frame DSLR, which was to be based around a 6MP Phillips CCD sensor, and was originally intended to ship in spring 2001. Officially, the camera (which has become known as the MZ-D) was canceled due to concerns over cost, but it’s likely that the poor performance of the sensor (which made it into the very poorly received Contax N1) played a part.

Instead, like Hughes himself the camera withdrew from public view amid a swirl of rumors. Whispers around the glass case at PMA in 2001 hinted at problems with the troubled 6MP Phillips CCD sensor (later confirmed in the woeful Contax N1). The camera would be too costly to produce, became the official line. The brash confidence behind its announcement at Photokina the previous autumn faded into memory. Meanwhile, Pentax’s projected ship date of spring 2001 came and went, and other full-frame cameras stole the headlines. A nurse was called for, the screens were drawn, and they remained drawn for almost 15 years. 

And we never even knew its name.

Over time, people forgot about the Pentax full-frame DSLR. Pentax representatives (and later, representatives from Hoya and Ricoh) didn’t seem to like talking about it, when they admitted to remembering it at all. A whole generation of tech journalists emerged whose only experience of full-frame photography with a Pentax camera was that one roll of film they tried to put through that old K1000 they found in a junk shop that time. 

And Pentax moved on. 

In 2003, Pentax created the *ist D, its first APS-C DSLR and in 2005, the company announced that it was leapfrogging full-frame altogether in favor of developing a medium-format DSLR. A couple of years later and with no shipping MF camera in sight, the company was acquired by Hoya. Shortly after the takeover we heard that actually, medium format digital was no longer a priority, but two years after that, in 2010, the 645D – with updated specs in the five years since its development was first announced – was officially unveiled.

In 2011, a full ten years after the original Pentax full-frame DSLR should have shipped, the company was bought again, this time by Ricoh. 

The original 645 model, the 645D, saw Pentax branching out into the medium format digital market. The 645Z, which succeeded the original 645D, has proven very popular. 

And all the while, through the course of two buyouts, Pentax was doing what it did best – creating a string of capable, solid, workman-like DSLRs and compact cameras that attracted a small and loyal customer base but which didn’t do much to bother the fortunes of the bigger players in the camera market. The company’s one and (so far) only large-sensor mirrorless camera, the K-01, was not a success, but the medium format 645D did well and was followed by the excellent 645Z. It seemed for a while that with some solid differentiators in the APS-C and medium format spaces, Pentax didn’t really need to create a full-frame camera.

But now, almost 16 years after that fated Photokina announcement, that’s exactly what Pentax (or rather Ricoh) has done. 

‘So why now, and who is the K-1 for?’

So why now? Ricoh claims that the timing is very deliberate. The company seems to recognize that after the late-2000s its chances of making a meaningful dent in the full-frame market were very slim. After leaving the full-frame space to its competitors for more than a decade, it made more sense for Ricoh to attack the much less competitive medium format digital market, and position the Pentax brand as a serious but affordable player in a marketplace that for years has been dominated by stupendously expensive systems from Hasselblad, Phase One and others. 

Meanwhile, although Ricoh / Pentax never managed to wrest a particularly big share of the APS-C market from its competitors, cameras like the K-3 II quietly introduced a host of impressively innovative features. These days we take image stabilization for granted, but Pentax deserves credit for iterating on the basic principle of in-body stabilization over several generations of DSLRs, ultimately leading to the various imaginative and effective sensor-shift features that grace the K-3/II and, now, the new K-1. 

The K-1 becomes the first conventional DSLR to offer a stabilized full-frame sensor. But as well as image stabilization, the K-1’s sensor can also be shifted by minute degrees for higher color resolution capture, AA filter simulation, and star tracking. 

So after all this time, who is the K-1 for? In conversations with DPReview, Ricoh representatives have never tried to deny the fact that after 15 years of inactivity in the full-frame space, a lot of their customers (especially semi-professional and professional photographers) have defected to Canon, Nikon and Sony. But some of these professionals have rediscovered Pentax – and others have discovered it for the first time – thanks to the 645D and 645Z. 

When I spoke to Kazunobu Saiki, general manager of Ricoh’s Marketing and Communication department last year in Japan, he told me that the company’s forthcoming full-frame DSLR was aimed at ‘our existing customers’. I.e. those new 645D/Z fans and a whole generation of DSLR photographers (especially in Asia) who love Pentax cameras for their features, pricing, and custom color options. Plus of course the ultra loyalists around the world who have stuck with the Pentax brand over the years and refused to switch systems in the hope that one day, a camera like the K-1 would eventually be produced. I know they’re out there. They send me emails. 

‘The K-1 is primarily a camera for Pentax fans, and there’s nothing wrong with that at all.’

At this point in time, Mr Saiki’s strategy makes perfect sense. The K-1 is primarily a camera for Pentax fans, and there’s nothing wrong with that at all. It seems highly unlikely that anyone who’s been happily using a full-frame camera from another manufacturer for the past few years will suddenly throw it all away and buy a K-1. The K-1 looks like a pretty good camera, and $ 1800 is a pretty good price, but it’s still a considerable chunk of change, and that’s not including lenses. 

And lenses, it seems to me, is where Ricoh has a real battle on its hands, not only in terms of attracting potential system switchers but (probably more importantly) also catering to its existing user base.

It has been 13 years since the last full-frame Pentax camera, and understandably, neither Pentax nor third-parties have had much incentive to release full-frame K-mount lenses in the intervening time.

The existing audience of digital Pentax users may very well have a collection of autofocus lenses for their DSLRs, but most are designed for the APS-C format (and many contain the notoriously troublesome SDM focus motor). They’ve got modern coatings, they’ll fit on the K-1, and some will offer almost a full-frame imaging circle. But like training wheels on a bicycle, I suspect that most self-respecting photographers will be keen to stop using them as soon as possible in favor of a more authentic, grownup experience. Why rumble along at 15MP when you could be enjoying 36?

I suspect that a lot of former Pentax users still have one of these in a closet somewhere – the 50mm F2 was bundled with mid-range Pentax SLRs in the 70s and 80s, and still gives ok-ish, more-or-less-acceptable performance on digital cameras. As long as you don’t look too closely, especially at the edges.

Before you leave an angry comment, I know there are plenty of better manual focus lenses in Pentax’s historical lineup (we just happened to have this one lying around the office), and the K-1 will work with pretty much all of them. 

But what about the legacy manual focus lenses? Ah yes. With decades of compatible K-mount lenses, Pentax users are very well-served. In theory. I have a collection of 70s and 80s-vintage Pentax primes, and I can’t wait to try them out on the K-1. Unfortunately, while putting old glass on high-resolution cameras is a lot of fun, it does tend to show up the defects in that glass pretty glaringly. There are some excellent lenses in Pentax’s historical lineup, but there is a very real risk that a zoom or even a prime that always delivered lovely 6×4 inch prints on film might not quite live up to customer expectations when paired with a 36MP sensor. 

And unfortunately for the proud new K-1 owner, Pentax K-mount lenses are their only option. Like Nikon F, the Pentax K mount is old, and cursed with a particularly long flange-back distance. What this boils down to its that lenses from other mounts cannot be adapted to work on the K-1 (not without the addition of extra corrective elements, at any rate). So unlike the Sony a7R II, for instance, which will accept pretty much any lens you can think of, made by anyone, ever, with the correct adapter, that’s just not possible with the K-1. 

‘Once you’ve bought a couple of lenses to go with your new K-1, that fairly reasonably $ 1800 has turned into a much, much bigger investment.’

Which for a quality-focused enthusiast K-1 owner arguably leaves only one genuinely safe option. Buy a set of new Pentax full-frame zoom lenses. The new 15-30mm and 24-70mm seem to perform well (they should do, since they’re most likely based on proven Tamron lenses with the stabilization mechanics removed and some proprietary coatings) and we enjoyed using the 70-200mm when we shot with the K-1 recently. But once you’ve bought a couple of lenses to go with your new K-1, that fairly reasonably $ 1800 has turned into a much, much bigger investment.

All that being said, I want the K-1 to succeed, and I think it deserves to. It’s truly innovative, bold, and represents a brave move by Ricoh (and one that I suspect was motivated by a certain amount of justifiable pride on the part of the engineers). To an extent, my investment in the K-1 is emotional. My first proper camera was a Pentax MX, and along the way I’ve owned various other Pentax cameras (including for a few brief, glorious weeks, an LX) all of which I have enjoyed. I was genuinely excited when Ricoh told us, some time ago now, that a full-frame Pentax DSLR was once more being prepared for launch. Hopefully this time it will get a little higher off the ground – and hey – at least this time it has a name. 

Articles: Digital Photography Review (dpreview.com)

 
Comments Off on The long, difficult road to Pentax full-frame

Posted in Uncategorized


Road Trip: The wildlife and nature photography of Dave Welling

13 Sep

Based out of southern California, nature photographer Dave Welling has been volunteer and Director to the Wildlife Waystation hospice center since 1987. This has given him an intimate understanding of wildlife, and he often spends weeks at a time photographing the colorful landscapes and rare specimens that populate his portfolio. Take a look at his work and find out more about him. Read more

Articles: Digital Photography Review (dpreview.com)

 
Comments Off on Road Trip: The wildlife and nature photography of Dave Welling

Posted in Uncategorized


Landscape Photography from the Side of the Road

04 Sep

2-for-1 special

As part of Landscape Photography Week here on dPS, we’re offering TWO for the price of ONE on our best-selling Living & Loving Landscape Photography ebooks!

Click here to take advantage of this offer.


For most people the idea of landscape photography means getting a good backpack that can carry everything, then hiking for miles to a destination. You need to be fit, and prepared for anything that might happen. You might have to camp, and sleep, out in the wilderness. It would be an adventure, and you get to photograph some areas that others never get to see.

I don’t do that. Never have, and I can’t see it happening anytime in the near future. I don’t think there is anything wrong with it, but I would never do that on my own, especially not here in Australia. The hiking part would be okay, but, again, only if I had company. There are just so many other ways of doing landscape photography.

cole-landscape-road-side-photography-0002

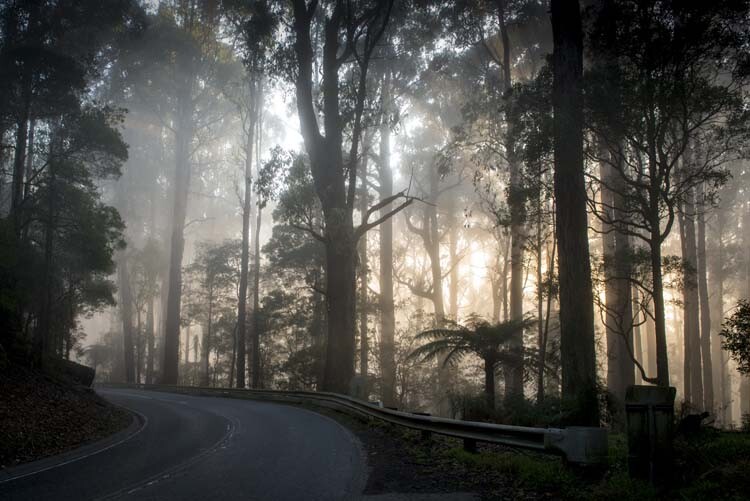
The sun trying to break through the trees meant we had to find somewhere to stop and take some photos.

One of those methods is car trunk photography, also known as roadside photography.

It sounds easy right? It’s simply about doing photography that isn’t far from your car.

cole-landscape-road-side-photography-0004

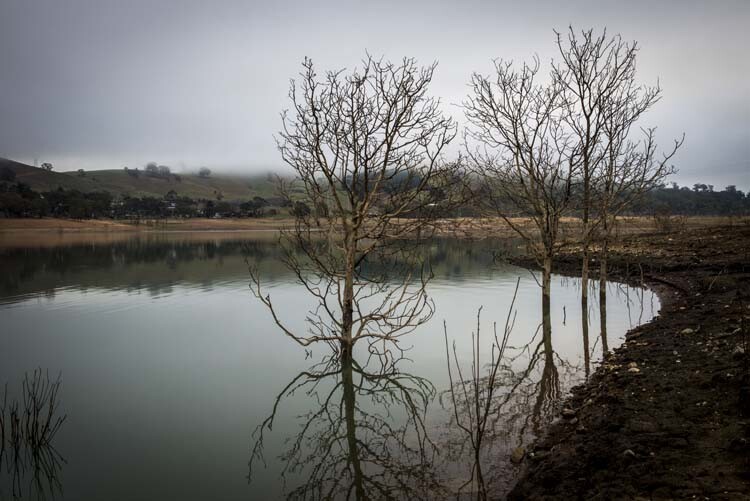
Lake Eildon water level was down and these trees were reflected in the water beautifully, but we had to walk to get to them. We could still see the car in the distance.

One of the most famous photographers of our time was well known for using his car to take photos, Ansel Adams. You likely have seen the photo of him on top of his car with his camera, setting up an image. Boards were put over his roof racks so he could stand up there with his big view camera. My car has roof racks, maybe I should consider doing the same.

Moose Peterson is another photographer that loads up the trunk of his car with his full set of gear, and has a second bag to carry some of it around.  He has full knowledge that the car isn’t too far away if he needs to grab something.

Gear

One of the best advantages of doing this kind of photography is that you can take as much gear as you like with you. You aren’t restricted by how much you can carry, you can take everything you think you might need.

cole-landscape-road-side-photography-0007

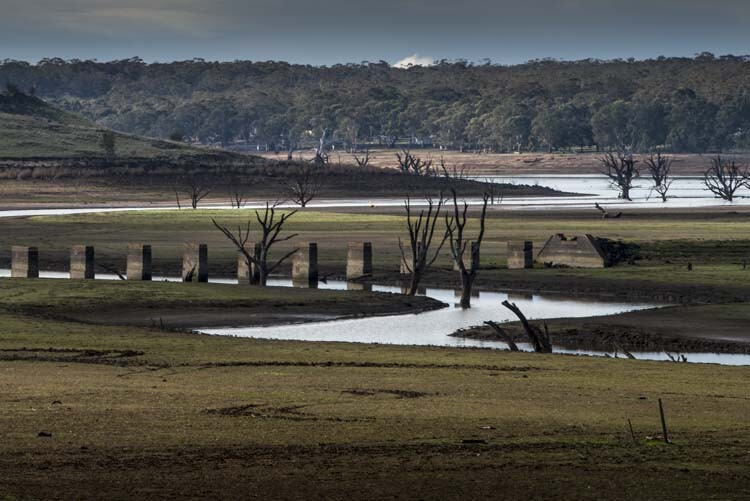
The car was right behind me, I got out my zoom and took this shot of a dam showing an old bridge that had emerged as the dam water level went down.

You may just have a compact camera and not a lot of photography gear, but you may also decide to take your umbrella, coat, scarf, gloves and hat, or other weather appropriate clothing. If it is hot take your sunscreen and sunhat, don’t be silly with the sun.

But if you are doing this type of photography you will likely be using a DSLR or Mirrorless camera, and you might have a lot more to take with you. If you do have a lot of gear, it may be best to use two bags – one as the main bag to hold everything, usually the bigger one, and the second one to carry what you need for any particular place you stop.

Once you get out and look around, you often find you don’t have the right lens, but as the car isn’t that far away you can go and change it easily. This also means you can take tripods, filters, monopods, anything that there might be a possibility of using. You just never know.

cole-landscape-road-side-photography-0001

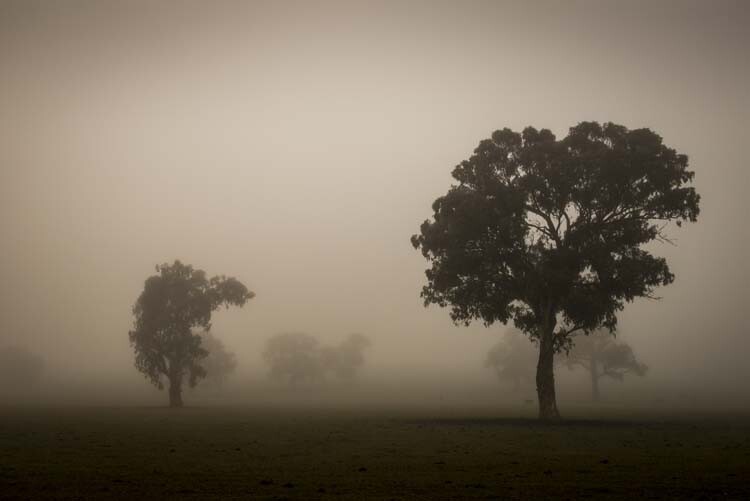
A foggy morning along the road. Just pull over, take some photos and get back in the car before you get too cold.

Safety

It is all very well pulling up on the side of the road to do what you want to do, but you also have to make sure that it is safe as well. When you pull up, get right off the road and as you get out of your car, or back in again, look for cars or trucks that might be driving past so you don’t get hit.

Look at the sides of the road before you pull off. Make sure the road is not wet and you won’t get stuck. Find out if there has been lots of rain. If you are in Australia in summer, be careful about long grass and snakes hiding in it.

When you are moving away from the car, lock it. While someone might not steal the car they might take all the gear you have left inside. You need to take the normal precautions that you would take if leaving your car anywhere else.

cole-landscape-road-side-photography-0006

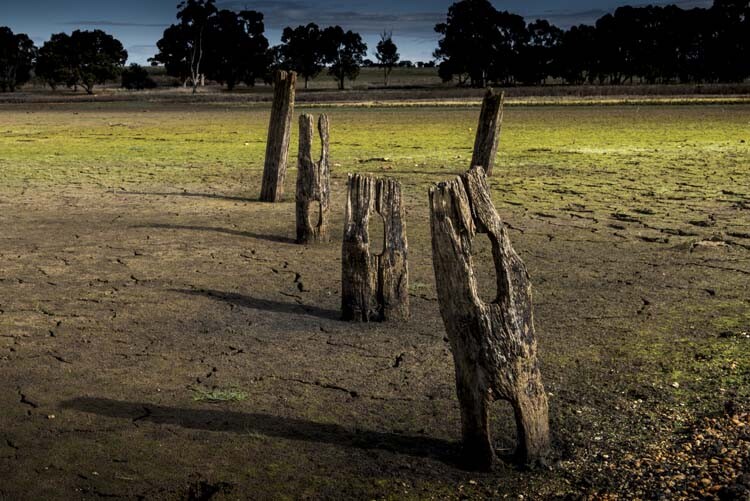
We pulled into the side track, but then had to take a short walk to see these old fence posts in the dried out dam.

Planning Your Trip

It is something you can do on your own, or with others. You can do it on a day trip to somewhere, or go away for a few days exploring countrysides to see what you can find.

The most common way is to pick a day with friends and then decide on a destination. Discuss what are you going to look for and where will you find it. You need to decide if you are going to do any small hikes. Roadside photography doesn’t mean you can’t leave your car on the side of the road while you explore somewhere close.

cole-landscape-road-side-photography-0002

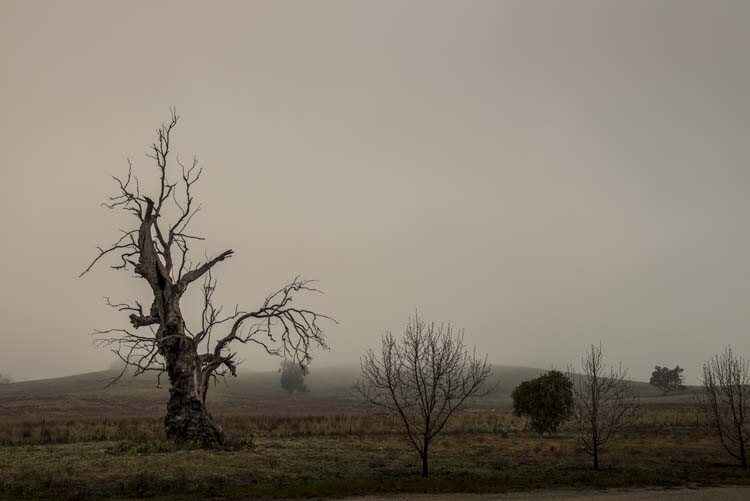
Like a scene from a movie, fog, and a gnarly dead tree. We saw this going to Mansfield and on the way back knew we had to stop.

There has to be a warning, while it is best to take roads that are not the normal route, so no freeways or highways, you can get very distracted. You might find that you want to stop constantly, and if you have a final destination it can mean that when you get there you don’t have enough time or light left to shoot.

It is best to decide one way or the other if you are going to stop on the way. From experience, it is good to decide so you know how much time you will have when you get where you want to go. It can also be fun to drive aimlessly and stop at anything you find interesting along the way. You never know what you might find.

Looking for a Subjects to Photograph

One of the advantages of doing things on the roadside is that you aren’t trespassing, and in most cases, can’t get into trouble for photographing things you see over the fence. As long as you don’t go over the fence you should be fine. Sometimes you might find the person who owns the land and get permission to enter.

cole-landscape-road-side-photography-0005

I see this all the time, but it was the first time I was on the right road to photograph the old flour mill.

There are lots of different things to take photos of, it depends on what you find interesting. There are the beautiful, big landscapes showing the scenery of the area, although one thing that many photographers look for are the old sheds or houses that have been abandoned, and are now falling apart. When you drive on the roads you can often see them, though sometimes you need a big zoom to get good photos.

The coast can be great for this kind of photography too. You nearly always want to explore more than one area. So, with the smaller bag, you can go to one area, then drive to another.

Don’t think that the only way to take landscape photos is to pack the bag and slog through lots of harsh land to get the ideal image. Do it from the luxury of your car, take a friend, and make a day of it.


Here on dPS it is landscape week. You can see the previous ones listed below. Watch for a new article (or two) on landscape photography daily for the next week.
  • 6 Tips for Better Low-Light Landscape Photography
  • Landscape Photography and the Human Element
  • 5 Ways a Telephoto Lens Can Improve Your Landscape Photography

googletag.cmd.push(function() {
tablet_slots.push( googletag.defineSlot( “/1005424/_dPSv4_tab-all-article-bottom_(300×250)”, [300, 250], “pb-ad-78623” ).addService( googletag.pubads() ) ); } );

googletag.cmd.push(function() {
mobile_slots.push( googletag.defineSlot( “/1005424/_dPSv4_mob-all-article-bottom_(300×250)”, [300, 250], “pb-ad-78158” ).addService( googletag.pubads() ) ); } );

The post Landscape Photography from the Side of the Road by Leanne Cole appeared first on Digital Photography School.


Digital Photography School

 
Comments Off on Landscape Photography from the Side of the Road

Posted in Photography