RSS
 

Posts Tagged ‘Reverse’

Reverse Lens Macro Photography: A Beginner’s Guide

20 Jul

The post Reverse Lens Macro Photography: A Beginner’s Guide appeared first on Digital Photography School. It was authored by Andrew S. Gibson.

reverse lens macro photography: a guide

If you want to capture beautiful close-up images but don’t want to spend hundreds (or thousands) on a macro lens, then you’ve come to the right place.

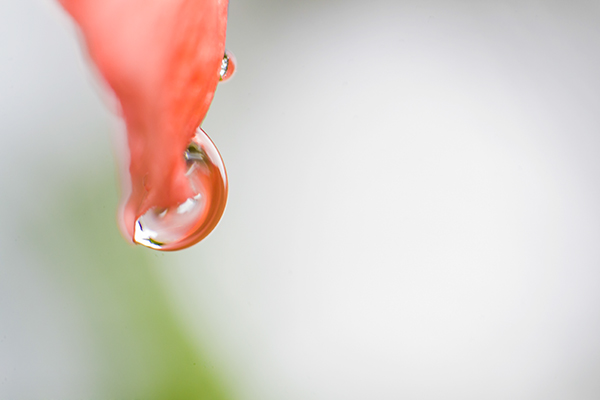
Because in this article, I’m going to explain everything you need to know about reverse lens macro photography. It’s a simple technique that lets you turn a standard lens into a macro lens so you can capture photos like this:

droplet of water on a flower

In fact, if you already own a 50mm prime lens or a standard kit lens (in the 18-55mm focal length range), then the reverse lens macro technique is the least expensive way to capture magnified images.

So let’s dive right in, starting with the absolute basics:

What is reverse lens macro photography?

Reverse lens macro photography is a method of capturing highly magnified images using an interchangeable lens camera, a lens, and a cheap adapter. You turn your lens around so the rear element points outward, then use an adapter to attach the reversed lens to your camera body (or to another lens).

In other words: You take your lens. You flip it around. And you’ll be able to shoot at macro magnifications.

If you’ve never seen the reverse lens macro technique, it may seem a bit strange – after all, why does reversing a standard lens let you shoot at high magnifications?

But it really does work, and the diagram below shows why. In normal use, a 50mm lens focuses light from far away to create a much smaller image, one that fits onto film or a digital sensor (which is often around 35mm wide). Reverse the lens and the opposite occurs: the 50mm lens magnifies what it sees, giving near life-size reproduction:

diagram showing how reverse lens photography works

How to do reverse lens photography

There are two ways you can use the reverse lens macro technique:

1. Single lens reverse macro

This method involves reverse-mounting one lens to the front of your camera. First, purchase a reversing ring (also known as a reverse ring) like this one:

reversing ring for macro photography

You can buy these adapters for cheap on Amazon. One side screws onto the end of your lens like a filter, while the other attaches to your lens mount. Here’s a reversing ring in action:

reversed lens attached to a Canon 40D

Note that the reverse macro technique works best if you use a lens with a manual aperture ring. That way, you can stop down to increase the zone of sharpness (which is very helpful because depth of field decreases as you get closer to your subject).

Unfortunately, if your reversed lens doesn’t have a manual aperture ring, you won’t be able to make any f-stop adjustments and you’ll be forced to work at your lens’s maximum aperture. But while this can be inconvenient, don’t let it stop you – you can use a reversed lens at its widest aperture to take some beautiful photos. You just have to get creative!

2. Twin lens reverse macro

This reverse lens macro technique is less popular but will get the job done. Instead of reverse-mounting one lens to your camera, you mount one lens normally, then reverse mount a second lens on the front of the first, like this:

twin lens reverse macro in action
I’ve attached a reversed 50mm lens to my 85mm prime lens. In this setup, the 85mm lens is called the primary lens and the reversed lens is called the secondary lens.

The actual mechanics are nearly identical to the single lens technique discussed above; simply purchase a coupler ring (shown below). Then use it to mount the second lens to the first.

macro coupler ring for twin lens photography

Now, when using the twin lens reverse macro technique, the reversed lens acts like a powerful close-up filter, except that it’s much stronger than any filter I’ve encountered. In fact, the twin lens technique offers two major benefits over the single lens technique:

  1. It offers insanely close magnifications. Depending on the focal lengths you use, you can achieve up to 3x life-size reproduction. (That’s three times as close as most professional macro lenses!)
  2. It increases your depth of field flexibility. You can leave the reversed lens open at its widest aperture, while stopping down the primary lens to increase depth of field (even if you don’t have a manual aperture ring).

Note that you can do this technique with essentially any lenses, though the longer the focal length, the more magnification you’ll achieve. What’s most important is that the filter thread sizes on the two lenses match – that way, you can buy a coupler ring that will easily join them together.

(If your lenses have different filter threads, you do have the option of purchasing a step-up ring in addition to your coupler ring, but this can be inconvenient.)

Caring for the reversed lens

The reverse macro technique does leave the rear element of your reversed lens open to the elements, regardless of which method you use. So you should always work carefully to avoid scratching the exposed element.

lens with extension tube

If you have an extension tube, you can attach it to the back (now front) of the reversed lens, as I did in the photo above. This helps protect the rear element and also acts as a lens hood.

Also, because of the risks to the lens, I’d recommend using relatively cheap glass, like a 50mm f/1.8.

Image sharpness

The reversed lens technique gets you so close to your subject that it’s virtually impossible to handhold the camera. For the sharpest results, use a tripod to keep the camera steady and use a cable release to fire the shutter.

I find it best to use a reverse lens macro setup indoors, especially for delicate subjects like flowers. If you try it outside, the slightest breeze can move the flower and spoil the photo.

Of course, you can always embrace a blurry result and create some interesting abstract shots – but if your goal is to create magnified-yet-sharp photos, you’ll need to follow this advice closely.

If possible, stop down your primary lens to at least f/4. That way, you’ll get increased depth of field, and if you’re using the twin lens technique, it’ll help you avoid the softening that may happen when the first lens is at its widest aperture setting.

How to light reverse lens photography

close-up of bubbles

As long as you don’t mind using a tripod and long shutter speeds to obtain the required exposure, natural light will work just fine.

However, flash is also an option. And you don’t need a specialized macro flash – I use a Canon Speedlite with a small softbox (though you’ll probably want to make sure you’re using an off-camera flash to avoid shadows cast by the lens).

A flash and a softbox were all I needed to take the photo featured above. Here’s a diagram of the setup:

flash setup for reverse macro photography

In general, I’d recommend you start with natural light, unless you’re relatively familiar with artificial lighting. That way, you can experiment with different lighting qualities and directions and you don’t have to worry about complex lighting techniques.

What lens should you use for reverse macro shooting?

kit lens with 18-55mm focal length

I’ve used a 50mm prime lens for the photos featured throughout this article. And a nifty fifty is a great way to get started with reverse lens macro photography.

But don’t forget that you can try this out with just about any lens (though I do recommend using a cheaper option, just in case your lens gets damaged). Kit lenses like the Canon EF-S 18-55mm f/3.5-5.6 IS II (pictured above) work great.

Reverse lens macro photography: conclusion

Now that you’ve finished this article, you should be able to confidently create a macro photography setup (without spending lots of money on a dedicated macro lens).

Reverse lens macro photography is a lot of fun, so order your reverse ring and get shooting!

Now over to you:

Do you prefer the single lens reverse macro technique or the twin lens reverse macro technique? Do you have any tips for improved macro photography? Share your thoughts in the comments below!

The post Reverse Lens Macro Photography: A Beginner’s Guide appeared first on Digital Photography School. It was authored by Andrew S. Gibson.


Digital Photography School

 
Comments Off on Reverse Lens Macro Photography: A Beginner’s Guide

Posted in Photography


VSCO sues PicsArt for allegedly reverse engineering its filters

09 Apr
An exhibit provided in the complaint that shows PicsArt’s Gold subscription platform, which is where VSCO alleges its reverse engineered filters ended up.

Visual Supply Company, more commonly referred to as VSCO, has filed a lawsuit against the creators of PicsArt, a photo editing application, claiming the company reverse engineered a number of its photo filters found in its mobile application.

According to the complaint, filed in the Northern District of California, 17 PicsArt employees created VSCO accounts and used them to reverse engineer at least 19 presets VSCO offers, a violation of the terms of the VSCO app which state users ‘agree not to sell, license, rent, modify, distribute, copy, reproduce, transmit, publicly display, publicly perform, publish, adapt, edit or create derivative works from any VSCO Content.’

VSCO says it attempted to remedy the situation out of court with a letter, sent to PicsArt in February 2019, demanding the company remove the reverse engineered presets from its app, provide accounting records for all profits and revenue made from the presets and identify all of the PicsArt employees who had opened an account with VSCO. PicsArt subsequently said it would remove all of the filters by March 22, 2019, but as of the complaint’s filing date, only 17 had been removed and two new filters PicsArt is publicizing appear to be reverse engineered as well.

An exhibit in the complaint that details a social media post that shows a pair of filters that VSCO claims PicsArt reverse engineered to sell as part of its own subscription service.

Now, PicsArt employees creating VSCO accounts alone isn’t too suspicious, but VSCO appears to have more than suspicion alone to back up its claims. According to the lawsuit:

VSCO’s color scientists have determined that at least nineteen presets published by PicsArt are effectively identical to VSCO presets that are only available through a VSCO account. Specifically, VSCO determined that those PicsArt filters have a Mean Color Difference (“MCD”) of less than two CIEDE2000 units (in some cases, far less than two units) compared to their VSCO counterparts. An MCD of less than two CIEDE2000 units between filters is imperceptible to the human eye and cannot have been achieved by coincidence or visual or manual approximation. On information and belief, PicsArt could have only achieved this degree of similarity between its filters and those of VSCO by using its employees’ VSCO user accounts to access the VSCO app and reverse engineer VSCO’s presets.


PicsArt has denied these allegations, with a spokesperson sharing the following statement with TechCrunch:

VSCO is not a direct competitor, but they clearly feel threatened by PicsArt. VSCO’s claims are meritless. It’s disappointing that they have made these false claims against us. PicsArt will vigorously defend itself against these baseless claims and all options are under consideration.

VSCO doesn’t mention a specific dollar value in the complaint, but asks for ‘compensatory damages, disgorgement of profits, corrective advertising, and costs and attorneys’ fees.’

Articles: Digital Photography Review (dpreview.com)

 
Comments Off on VSCO sues PicsArt for allegedly reverse engineering its filters

Posted in Uncategorized


Reverse Lens Macro – How to Make Macro Photos with “Backward Thinking”

28 Feb

The post Reverse Lens Macro – How to Make Macro Photos with “Backward Thinking” appeared first on Digital Photography School. It was authored by Rick Ohnsman.

1 - reverse-lens-macro-photography-rick-ohnsman

Occasionally a little “backward thinking” can be a good thing, especially when it comes to coming up with an economical way to do macro photography. Sure, you can shell out a few hundred dollars for a nice macro lens. You might give extension tubes or bellows a try, or even buy some closeup diopter lenses. But what if I told you how you could use that old film camera lens and an adapter easily purchased for under $ 15 to make some nice macro images? Might that not be a great and inexpensive way to explore the macro world? Great… now get ready to “think backwards.”

Yes, literally… You will need to think backward to take advantage of what is called “Reverse-Lens Macro Photography.” You will be mounting a lens backward on your camera so what is normally the front of the lens is the part that attaches to your camera. Before we look at how to do this, let’s first define “macro photography.”

2 - reverse-lens-macro-photography-rick-ohnsman

The Reverse Lens Macro Technique is a great way to enter the world of macro photography economically.

What is “true” macro?

Many lens manufacturers indicate their lens has “macro capability” and they might even put the word “macro” on the lens. These lenses indeed allow you to focus closely on your subject. However, in the true sense of the term, a macro photo is one in which the size of the image recorded on the camera sensor is the same size (or larger) than the physical object photographed – a 1:1 magnification ratio or greater.

3 - reverse-lens-macro-photography-rick-ohnsman

This might be a close-up, but is not a “true” macro photograph.

Here’s a practical example: A U.S. Quarter is 0.955 inches (24.26 mm) in diameter. A full-frame digital camera sensor measures 24mm x 36mm. So shot with a true macro lens on a full-frame camera, the uncropped image below represents a 1:1 magnification ratio or a true macro photograph. On a crop sensor camera where the sensor is 14.9×22.2mm (Canon) a 1:1 shot of a quarter would more than fill the frame. So, if the lens you’re using cannot focus close enough to fill the frame with a quarter, it might be a close-up lens but isn’t a true macro. Don’t be fooled by cropped images either. An image can be cropped tighter in editing, but that alone does not make it a “macro” photo.

4 - reverse-lens-macro-photography-rick-ohnsman

This is a full-frame shot. Notice the width of the shot is about 36mm, the size of the camera sensor. This is a true 1:1 macro shot.

5 - reverse-lens-macro-photography-rick-ohnsman

I shot this image with the reverse Pentax 50mm lens. It’s not giving “true” macro magnification

6 - reverse-lens-macro-photography-rick-ohnsman

This Is how close I could get with the reversed Vivitar zoomed out to 28mm. Remember, the wider the focal length, the closer you can get to your subject.

Does it matter? No, not really. The fun is getting close to your subject. Close enough to see things you might not be able to see with your unaided eye. Whether it is a “true macro” may not matter unless you are entering a contest where only true macro shots are allowed. How close you can get depends on the equipment you have. How close is close enough? Well, that’s an artistic judgment.

Before we start… some cautions

Anytime you take the lens off your digital camera you expose the sensor and the insides to dust. You will be taking your lens off for this procedure. If you aren’t placing another (reversed) lens onto the camera, use a body cap to keep dust out until you are ready.

When you do put the reverse lens on your camera, know that the back end with its associated controls, connection pins, rear element and such will also be exposed. Use a rear cap on it when you’re not working with your set-up. Practice the same cautions you use with regards to dust and all will be fine.

7 - reverse-lens-macro-photography-rick-ohnsman

Ordinary objects like this set of keys become subjects for interesting photos when viewed as macro images.

Macro options

There are several ways to make macro photos.

These include:

  1. A Dedicated Macro Lens – The easiest but the most expensive
  2. Extension tubes or a bellows which increase the distance between the lens and the sensor
  3. Magnifying lenses (diopters) put in front of an existing lens
  4. Reversing a lens on the camera – This is the technique we’ll be teaching here.

What lenses work?

Almost any lens can work for this technique including those you usually use on your digital camera. Do you want to see? Take the lens off your camera, hold it backward and tight to the camera body, turn on the camera and get close – very close to a subject. Move very slightly toward and away from the subject to focus. The focus ring has little impact.

You can see this technique shown on numerous online videos and while it may give you a macro in a pinch, it’s not very practical. Trying to hold the camera with a loose lens and adjusting focus might be okay if you’re in the field and have nothing better, but it’s hardly optimal.

You’ll also note that once you disconnect the lens from the camera, you no longer have autofocus or aperture control. The camera may show a blank where the f/stop would typically be. I’ve seen the technique where you set the aperture with the lens on the camera, push the depth-of-field preview button and then disconnect the lens, so the aperture stays fixed at that setting. Right… funky at best. Let’s teach you how to do this right.

8 - reverse-lens-macro-photography-rick-ohnsman

Old film camera lenses are perfect for this technique as they usually have an aperture ring on the lens.

Got an old film camera lens?

If you’re an old guy like me, you remember film. You might even have your old film camera and a few lenses for it kicking around. If not, film camera lenses are cheap at pawn shops, online, or even at garage sales. For this technique, lens brand or mount type doesn’t matter since you’re not going to be connecting the lens to the camera in the usual way. Almost ANY lens will work so long as it has filter threads on the front.

The lenses I used with my old Pentax ME Super film camera are a 50mm Pentax lens with a 49mm filter ring and a Vivitar 28-105mm zoom with a 72mm filter ring. The thing to remember when using reversed lenses is the wider the focal length, the closer you can get to your subject. A zoom lens gives you a “variable macro.”

The biggest reason old film camera lenses work best for this is, unlike most digital lenses, they have aperture control rings on the lens. You won’t have aperture control from the camera, so having it on the lens is perfect.

9 - reverse-lens-macro-photography-rick-ohnsman

Reversing rings are what you need to mount your lens backward on your camera.

Setting it all up

Here’s where the “backward thinking” comes in. To mount your lens to your camera you need to attach it backward. You need to use an adapter with male threads on one end and the proper mount type for your camera on the other end.

In my case, I used a Canon EOS mount so I could attach the lens to my Canon 6D. I bought two Reversing Ring adapters, one with 72mm threads on one end and a Canon EOS mount on the other. The second, with 49mm threads and a Canon EOS mount on the other. Mine are cheap Fotodiox rings, at $ 7.95 US each for the 49mm, and 72mm from Amazon. The things to remember when buying these is to get the proper filter thread size and camera mount type.

They are available for Canon, Nikon, Sony, Pentax, Panasonic, and many other camera mount types.

10 - reverse-lens-macro-photography-rick-ohnsman

This, shot with the reversed Pentax 50mm might be a close-up, but is not a “true” macro photograph.

11 - reverse-lens-macro-photography-rick-ohnsman

This is shot with the reversed Vivitar at 28mm giving even more than a 1:1 macro magnification. Note how sliver-thin the depth-of-field is

The mechanics of making your macros – a step-by-step approach to making this work

Mount the lens

Screw the adapter to the lens filter threads and then mount the lens (backward of course) to the camera. Choose the lens you want by considering how much magnification you want – Shorter focal lengths allow you to get close to the subject with more magnification, longer focal lengths allow you to be further from the subject.

With my lenses, the 50mm Pentax prime gave a little more than a 1:1 ratio. The Vivitar 28-105mm zoom at 28mm was almost a 2:1 ratio. At 105, it was more a “close-up” rather than a macro lens and around 70mm was 1:1.

12 - reverse-lens-macro-photography-rick-ohnsman

This is the Vivitar 28-105 reverse-mounted on a Canon 6D.

Use a tripod

The magnification of macro greatly amplifies any camera movement and, with very limited depth of field, trying to work handheld will be frustrating, if not impossible. If there’s any wind, shooting outside probably won’t work either.

Subject Selection

Your depth of field with this technique will be sliver-thin, sometimes only a few millimeters. Beginners might want to start with subjects with minimal depth and shoot them, so they lie in the same “focal plane” as the camera. Stamps, coins, paper bills, or other flat objects are great, especially when you’re learning the technique.

Lighting

You’ll often be really close to your subject and in your own light. You’ll also be wanting to use smaller apertures to get more depth of field, further reducing light. Get creative with how you light your subject.

Camera settings – Use Manual Mode

You will be able to control ISO and Shutter Speed, but not Aperture. Remember, that’s on the lens ring.

Open the Aperture Ring all the way while you focus. Move the camera or subject in tiny increments to get focus (the focus ring won’t have much effect.) If you’re using a zoom, you can use the zoom feature to help you focus. If your camera has Live View, use that. Use the Zoom feature of Live View to magnify your image and check the critical focus. If not, you’ll have to use the viewfinder. Also, remember that autofocus doesn’t work here and so LCD screens where you touch to focus aren’t going to help.
Stop down the Lens with the Aperture Ring once you’ve focused. Smaller apertures (like usual with all photography) give greater depth of field.

You will usually be struggling to get more depth of field in macro photography! Also know that as you stop down the lens, things get darker. It’s sometimes hard to adjust the aperture ring without bumping the focus slightly, so be prepared to refocus.

Making your shots

Shoot, “chimp,” adjust exposure, and repeat. To control exposure typically adjusting shutter speed on the camera should be the easiest. Expect to make LOTS of shots, making adjustments as you go to get that “perfect shot.” Macro photography can be “fiddly,” so get used to it.

13 - reverse-lens-macro-photography-rick-ohnsman

A focusing rail, like this one from Neewer, can greatly aid you in making very fine focus adjustments.

Taking it to the next level

If you decide you like macro photography and want to make things a little easier and more precise, you may want to invest in a Focus Rail. Mount this device to your tripod, and mount your camera to it. Using a system of fine gears and adjustment knobs, you can move your camera in tiny increments. Macro is a game of millimeter movements and obtaining more precise control can be a huge help. Taking it up even more, one can buy very sophisticated rails, some with motorized, computer-controlled movement. If you’re ready for that, you’re not as likely to be using the reversed lens technique. I’m quite happy with my Neewer Macro Focusing Rail which cost under US$ 30.00.

14 - reverse-lens-macro-photography-rick-ohnsman

Even at f/22, the depth of field is very limited. Focus stacking would need to be used to get this whole image in focus.

Focus stacking

Sometimes more is better, right? When you can’t get enough depth-of-field with one shot, taking multiple shots (each focused to a just slightly different point), and combining them in editing to get a front-to-back depth of field, may be the answer. Photoshop has focus-stacking capabilities and for a beginner is a good place to start. When you’re ready to dive deep into focus stacking, programs like Helicon Focus or Zerene Stacker are what the pros use.

I have a friend in our camera club who decided to pursue macro photography in a big way. He purchased a motorized, programmable focus rail, a nice macro lens, bellows, extension tubes, and then uses Zyrene Stacker to assemble what are often dozens of images into a single spectacular macro. I’m happy at the moment to use my reverse mounted film camera lenses, (though I did purchase a dedicated Tamron 90mm macro lens too).

15 - reverse-lens-macro-photography-rick-ohnsman

A member of my camera club made this shot using the technique of focus stacking. This shot, razor sharp through the shot, (tough to do in a macro image!) is actually 118 shots combined with the program Zerene Stacker. This online image doesn’t do it justice. As a print, it is absolutely stunning! – Photo by Robert Riddle.

Conclusion

One of the attractions of photography is that it teaches you to see and then share through your photos, things people don’t ordinarily notice or see. Macro photography takes that a step further, opening up a tiny and incredible world of detail. The reverse lens macro trick is one that allows you to get a glimpse into this new world with minimal expenditure. I hope you’ll give it a try!

The post Reverse Lens Macro – How to Make Macro Photos with “Backward Thinking” appeared first on Digital Photography School. It was authored by Rick Ohnsman.


Digital Photography School

 
Comments Off on Reverse Lens Macro – How to Make Macro Photos with “Backward Thinking”

Posted in Photography


LEE’s new Reverse ND filters help you tame that bright horizon

21 Oct

LEE Filters has launched three new Reverse ND filters that are designed to reduce horizon exposure by up to 4 stops, helping you get ‘perfectly balanced’ sunrise and sunset photos.

What distinguishes a Reverse ND from a regular graduated ND filter is that the center of these filters are most opaque, becoming clearer and clearer as you ‘fade’ to the top of the filter. This makes them ideal for scenes where the sun sits close to the horizon. And unlike competing Reverse ND filters, LEE claims that its versions have an “extremely smooth and gradual” transition so that the resulting images don’t appear to have a strong dark stripe in the middle.

Here they are demonstrated by photographer Mark Bauer, who worked with LEE to develop this range of Reverse ND filters that he says, “do the job properly” without the harsh transitions he’s noticed when using other brands:

The new filters are offered in 0.6, 0.9, and 1.2 strengths representing 2, 3, and 4 stops of exposure reduction, respectively. As well, all three filters are hand-manufactured for 100mm, Seven5, and SW150 systems. LEE says its Reverse ND filters work best when used with lenses that are at least 24mm wide.

The filters are currently available for preorder at the following prices:

Seven5: $ 125 / £81.80
100mm: $ 175 / £114.34
SW150: $ 200 / £125.56

To learn more, head over to the LEE Filters website by clicking here.

Articles: Digital Photography Review (dpreview.com)

 
Comments Off on LEE’s new Reverse ND filters help you tame that bright horizon

Posted in Uncategorized


Snow Calligraphy: Reverse Graffiti Artist Tags Parked Vehicles

02 Mar

[ By WebUrbanist in Art & Street Art & Graffiti. ]

snow calligrapher signature work

For years, this graffiti calligrapher has made his mark around New York City, but some of his best work is reserved for special (and somewhat unpredictable) occasions, relying on seasonal snowfall.

Processed with VSCOcam with lv01 preset

Known for his interior and exterior calligraphic murals as well as his signature snow pieces, Faust notes that virtually “everyone has an affinity for writing in the snow as a child. When most people grow up they lose the urge. I guess I just haven’t been able to shake it.”

snow car front artwork

As with other forms of reverse graffiti, his snowy script is ultimately temporary and removes material that would be wiped and swiped away by brushes or wipers, thus leaving no lasting impact or damage.

snowgraffiti car windshield

snow front of car

Some of his messages speak to the season (of snows and ice) while others are simply signatures left on the hood, trunk, windshield or window of a car as a simple surprise to brighten the dark winter days of passers by.

Share on Facebook


[ By WebUrbanist in Art & Street Art & Graffiti. ]

[ WebUrbanist | Archives | Galleries | Privacy | TOS ]


WebUrbanist

 
Comments Off on Snow Calligraphy: Reverse Graffiti Artist Tags Parked Vehicles

Posted in Creativity


Reverse Lens Macro: How to use it as a Great Learning Tool

16 Jan

Reverse lens macro photography 03

Reverse Lens Macro: How to Use It as a Great Learning Tool

Yesterday one of my friends called me late and told me that he was going to buy a DSLR and asked me which one he should choose. As a friend, I knew that this was his first camera and he was in fact a complete stranger to the field of photography. I told him to buy a good compact camera in order to get used to the basic concepts of photography and to buy a DSLR only when he feels his equipment is limiting his creativity.

On the other hand are the people how have already bought an SLR, but get confused and overwhelmed by the level of control these cameras offer, and the sheer amount of effort they have to put in to make their photographs look beautiful. I write this article for those people who bought a DSLR, and are in distress seeing none of their photos looking as good as someone else’s.

Considering that you have bought a DLSR and are delving into some advanced levels of photography, let’s see how an interesting and fun technique known as reverse lens macro can teach you a great deal about your camera, light and in effect make the art of photography.

Reverse lens macro photography 01

The basic trio of photography

Before understanding reverse lens macro let’s take a look the basic trio that every photographer needs to know to take a well exposed shot:

  1. Shutter speedreverse-lens-macro-photography-02.jpg
  2. Aperture
  3. ISO

Shutter speed is in essence the duration for which light falls on the camera’s sensor, shown in most cameras as 1/250th or 1/30, lower the denominator, the longer the duration.

Aperture is the opening in the lens which controls the amount of light entering your camera and the area in your image which is in sharp focus (aka depth-of-field) usually shown as f/5.6 or f/7.1. The lower the number, the more light getting to the sensor, and smaller the area in focus.

ISO determines just how sensitive your camera’s sensor is to the light falling on it. ISO usually ranges from 50 to above 100,000 in number. Large numbers represent high sensitivity.

Macro and reverse lens macro

Macro photography is a beautiful way to capture subjects as it gives you a very different and up-close perspective of photography. What macro photography does is to help us see the small world around us in a big picture. What your lens in its normal state does is to make the big world around you small, so just think what it will do when used reverse mounted? Yes, make the small world even BIGGER. But the fact is that dedicated macro lenses cost a fortune which puts it out of the reach of many of us. Reverse lens macro technique allows you to get really close without having to lighten your wallet on expensive lenses.
To take reverse lens macro shots, you have to reverse mount your kit lens (as depicted in the picture below).

Reverse lens macro photography 07

HOW DOES REVERSE MACRO TEACHES YOU ABOUT THE ART OF PHOTOGRAPHY?

Everything is a double-headed sword. So is reverse macro, though it allows us to get really close to your subject it also means you have less light at your disposal, a very tight frame, and a very narrow area which is in sharp focus (depth-of-field). Less light means you will have to adjust shutter speed, aperture and ISO to get good exposure and nice depth of field.

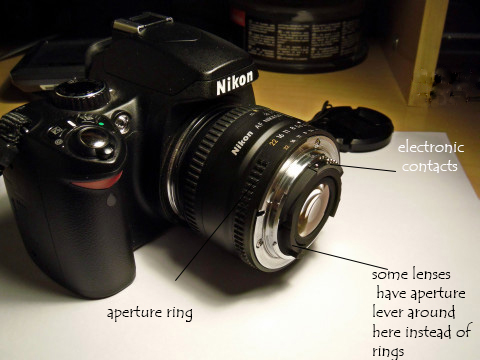
But the best part lies ahead, when you reverse mount your lens, the camera loses all the electronic means to communicate with the lens, so you will have to move your camera back and forth to get your focus right and you have to use the small lever on the back (now front) of the lens for controlling the aperture. An interesting point to be noted is that the actual focal length (55mm gets you closest to the subject for 18-55mm lens) of a lens in normal operation is also reversed, meaning that you can get closest to your subject when the lens is at its widest (18mm for the same lens). Now when you look through the viewfinder you will see the magic unfolding right in front of your eyes!

Reverse lens macro photography 06

Reverse lens macro photography 04

Suddenly your viewfinder becomes a visual textbook through which you will see all the subtle changes that aperture, shutter speed and ISO makes on your image and how subtle changes to these can bring amazing clarity and depth to your images. At first this may seem a difficult task because of the extreme stillness needed to take them successfully and clearly, but “practice makes perfect”, doesn’t it?

The interesting part being that you can apply the information you learn, when you use your camera normally. Obviously this can also be learned with time and effort but rest assured many get bored or disheartened because their photos are not looking good before they understand how to use the camera. Reverse macro, as mentioned earlier, magnifies the world beyond what our eye can see. It is because of this magnification that the effect the changes you make to (shutter speed, aperture, ISO) have on our image becomes more apparent than in “normal” use. When doing reverse macro I recommend not using a tripod because that way you will also learn to keep your hands steady (a boon when shooting in dim light).

Reverse lens macro photography 05

So because you get to see the magic of light unfold right in front of your eyes it registers quickly, and with practice becomes rather instinctive. This will startlingly improve the way you approach photography and ultimately your photos.

As Ansel Adams, a master of photography said “A Good photograph is knowing where to stand”. Understand where you stand now (as a photographer) and where you have to be standing to take photographs that exude beauty and share the emotion of the frame with the viewers.

Happy clicking!

The post Reverse Lens Macro: How to use it as a Great Learning Tool by Sharath Prakash appeared first on Digital Photography School.


Digital Photography School

 
Comments Off on Reverse Lens Macro: How to use it as a Great Learning Tool

Posted in Photography


House in Reverse: Rooftop Driveway Leads to Hillside Home

09 Jan

[ By Steph in Architecture & Houses & Residential. ]

House in Reverse 1

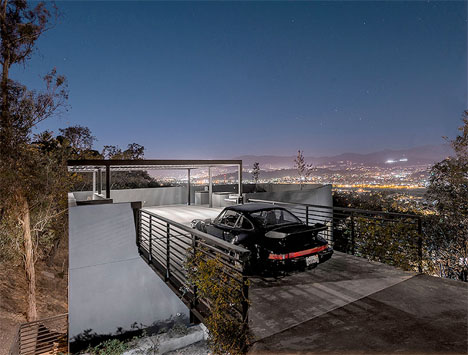
Most people with single-family homes are used to pulling up into their driveways and then ascending flights of stairs to get to the living spaces. But in this case, a ground-level driveway leads directly to an open-air rooftop terrace, and to enter the home, you go down.

House in Reverse 2

House in Reverse 3

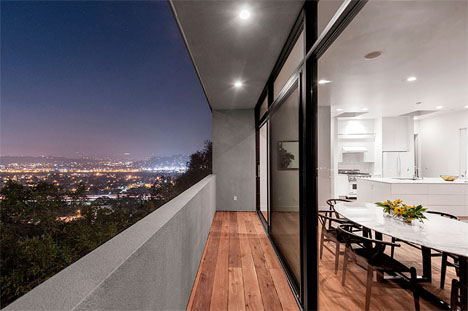
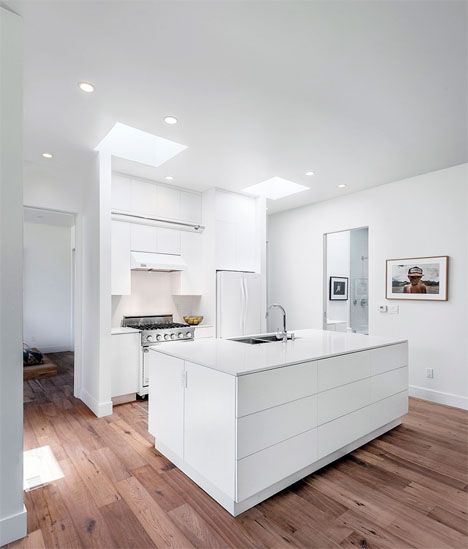
‘Car Park House’ by Anonymous Architects takes advantage of the hilly Los Angeles landscape. Built on a steep plot of land just off a winding road, the home makes the most of a challenging site, maximizing views from every level. Local building code requires the home to have two parking spots.

House in Reverse 4

A steel frame and a series of concrete pillars support the modern house as it projects out from the hillside, with two separate terraces looking out onto the San Gabriel mountains from the kitchen and master bedroom.

House in Reverse 5

House in Reverse 6

Calling it a ‘car park house’ puts the emphasis on the least attractive part of the home, but perhaps it’s appropriate considering Los Angeles car culture. But it’s a lot more than just a driveway with a view.

Share on Facebook


[ By Steph in Architecture & Houses & Residential. ]

[ WebUrbanist | Archives | Galleries | Privacy | TOS ]


WebUrbanist

 
Comments Off on House in Reverse: Rooftop Driveway Leads to Hillside Home

Posted in Creativity


Rein-Vend: 7 Converted, New & Reverse Vending Machines

29 Jan

[ By WebUrbanist in Technology & Vintage & Retro. ]

vending machine reinventions

Things have come a long way since the world’s first vending machine – a 2000-year-old device that dispensed holy water when a coin was slipped into a slot. Some now-vintage models dispense art or books – other new machines can cook food, recognize your face, respond to touch, and allow you to trade in your old gadgets and gizmos for new devices or even cold hard cash.

Art-O-Mat: Art in Cigarette Pack-Sized Packages

vending machines for art

The Art-o-Mat is a pioneer in the realm of vending-machine reuse – a series of retired cigarette dispensers have been converted to vend art. With over 90 recycled machines around the United States, they have sold work from 100s of global artists.

vending retro converted art

The key to submitting your own micro-masterpiece? Making whatever you do – be it sculpture, craft, photography or painting – fit into a cig-sized box. People not near a machine can also order a carton of ten works to be shipped anywhere in the world.

Biblio-Mat: Skip the Sidewalk Discount Shelf

vending book biblio mat

Switching gears, but not styles or machines: here is a lovely vintage machine that vends printed-word art (best known as books). From its creator, Craig Small: “The Biblio-Mat is a random book dispenser built … for The Monkey’s Paw, an idiosyncratic antiquarian bookshop in Toronto.”

As to its operation: “When a customer puts coins into it, the Biblio-Mat dramatically whirrs and vibrates as the machine is set in motion. The ring of an old telephone bell enhances the thrill when the customer’s mystery book is delivered with a satisfying clunk into the receptacle below.”

Swap-O-Matic: Exchange Instead of Buying or Selling

vending swap o matic two

Some vending machines are not about the money at all, like the Swap-O-Matic – a set of one-stop non-shops for trading what you have for something else you want. Added items are turned into credits, which, in turn, can be converted into other objects – reduce, reuse, recycle, swap!

Next Page:
Rein Vend 7 Converted New Reverse Vending Machines

Share on Facebook


[ By WebUrbanist in Technology & Vintage & Retro. ]

[ WebUrbanist | Archives | Galleries | Privacy | TOS ]


WebUrbanist

 
Comments Off on Rein-Vend: 7 Converted, New & Reverse Vending Machines

Posted in Creativity


Knitting in Reverse: Un-Knitting Machine Unravels Sweaters

17 Nov

[ By Delana in Gadgets & Geekery & Technology. ]

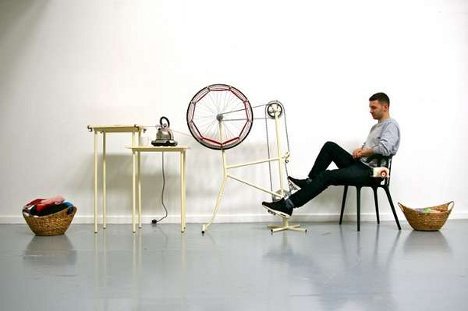
For any knitter who has ever looked at an ugly sweater and thought wistfully of all of the projects they could complete with that wasted yarn, the Un-Knitting Machine is a gift from the crafting gods. It was developed by Kingston University design student Imogen Hedges and is meant to salvage miles and miles of perfectly usable yarn.

According to the designer, her inspiration for the project was twofold. As a child, her grandmother knitted sweaters for her; when she had outgrown them, her mother simply threw them away because she didn’t believe anyone would want a secondhand hand-made sweater. More recently, Imogen discovered that many charity shops spend hours and hours unraveling old sweaters to reclaim the yarn. With this revelation, the designer conceived of a machine to make the process of recycling yarn far simpler.

The rather minimal machine utilizes an old bicycle frame to spin old yarn out of its previous incarnation and into a re-sellable, reusable heap of material. The user sits on a chair and pedals, spinning the bike wheel and causing the yarn to spool on the side of said wheel. As the yarn is pulled from the old project, it passes through the steam of a kettle which helps to straighten out the kinks and get it ready for a brand new life as something else entirely.


Want More? Click for Great Related Content on WebUrbanist:

Mini Rube Goldberg Machine Makes Cool Travel Companion

A Dutch design studio packs an amazingly complex Rube Goldberg machine into two suitcases, two years after producing the world’s largest room-sized machine.
1 Comment – Click Here to Read More
»»


Don’t Call it Knitting: Olek’s Crazy Crocheted World

If you see a man in a crocheted ski mask running down the street, don’t worry: it’s not a bank robber, it’s just one of Olek’s performance artists.
7 Comments – Click Here to Read More »»


Share on Facebook


[ By Delana in Gadgets & Geekery & Technology. ]

[ WebUrbanist | Archives | Galleries | Privacy | TOS ]


WebUrbanist

 
Comments Off on Knitting in Reverse: Un-Knitting Machine Unravels Sweaters

Posted in Creativity


[MODIFIED] Google Search Engine – Reverse Phone Number Lookup Alternatives

31 Jul

A list of services you can use to attempt to reverse lookup a business or person by their phone number.

Did you write down a phone number and forget for whom it was for? Receive a phone call and don’t recognize the number on Caller ID? While typing a phone number into Google sometimes results in useful web results, the ability to directly query white and yellow page results just by typing in a phone number has been removed.

However, various Internet services still offer reverse number lookup, each with varying results. While these may work for persons and businesses that can be found in the phone book, you may not have much luck finding telemarketers. Nevertheless, a list of a few services is below:…

Read more at MalekTips.
New Computer and Technology Help and Tips – MalekTips.Com

 
Comments Off on [MODIFIED] Google Search Engine – Reverse Phone Number Lookup Alternatives

Posted in Technology