RSS
 

Posts Tagged ‘Retouching’

3 Steps to Photoshop Retouching for Natural Looking Portraits

26 Jul

In the world of photography, editing and retouching are just as important as the imagery itself. Every image that you see published has been through its fair share of post-processing before it is seen by the public. If photographers didn’t retouch their images, it would be like a painter presenting his sketches instead of the finished painting.
portrait retouching techniques

With the fast moving technology of today, extraordinary images are everywhere, every day. Even with perfect lighting, and preparation work, a final image always receives some post-production attention. The trick to post-processing is to make it look as if it hasn’t been retouched at all, or as I call it, “refreshed”.

With the endless possibilities of Photoshop retouching techniques available, how do you know what tools to use when, and why? In this article, you will learn professional photoshop tricks that work for any portrait, any time. This is a simple recipe to give your subjects a naturally refreshed look, letting their genuine beauty shine, while keeping the integrity of their expressions, their features, and the clarity of the digital image itself.

Key Steps in the Refreshing Process

  1. Evaluate
  2. Eliminate
  3. Reduce
  4. Repeat

The specific tools and techniques discussed here are tried and tested with over 10 years of retouching experience. It is best to experiment with these concepts, and with practice, develop your own style of retouching.

This process has been designed as a routine that will eventually create habits in your mind, train your eyes to see the details more clearly, and create an overall efficient and effective retouching process. The goal is to spend less time in front of the computer and more time behind the lens (where the real magic takes place).

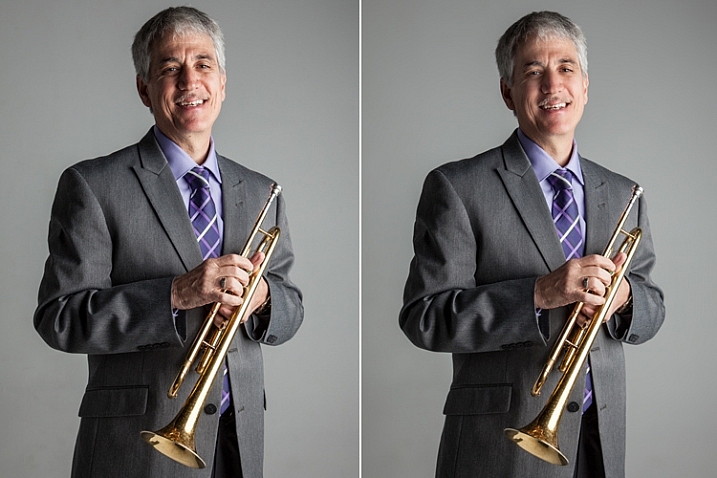
Let’s look at each one of these steps in order. We will use a studio image of a musician as the example throughout this article.

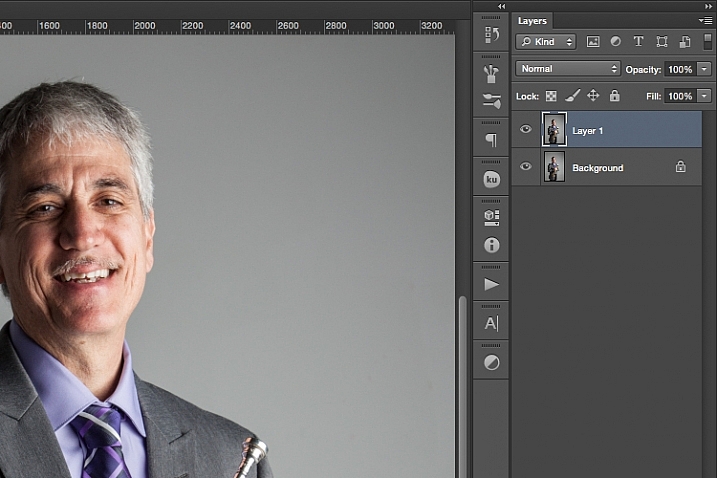
A great tip to keep in mind during this entire process is that with each new step, or even sub-steps, it is best to duplicate your layer before beginning to use the next tool. This way you are creating a back-up of each step for you to return to, if you notice that you are retouching too much on any particular step. It also allows you to see the progression of your workflow in Photoshop.
portrait retouching techniques

Step One: Evaluate

Immediately analyze the image you are about to retouch. How is the lighting? How do the subjects look? What is going on in the background?

When you see the areas of the image that will need your attention ahead of time, you can quickly assess what you will want to accomplish with the retouching process. This is the beginning of training your eye to seek out the details, and look at your image differently, than when you first took the shot.

Look at your image as if it’s not a photograph of a person, but instead consider that it is just shapes, colors, and light. Identify where the light is coming from and how it is affecting the subject.

In this example, the direction of the light is causing more definition, creating harsh shadows across the subject. This was done intentionally to give a more characterized, artistic portrait for this musician.

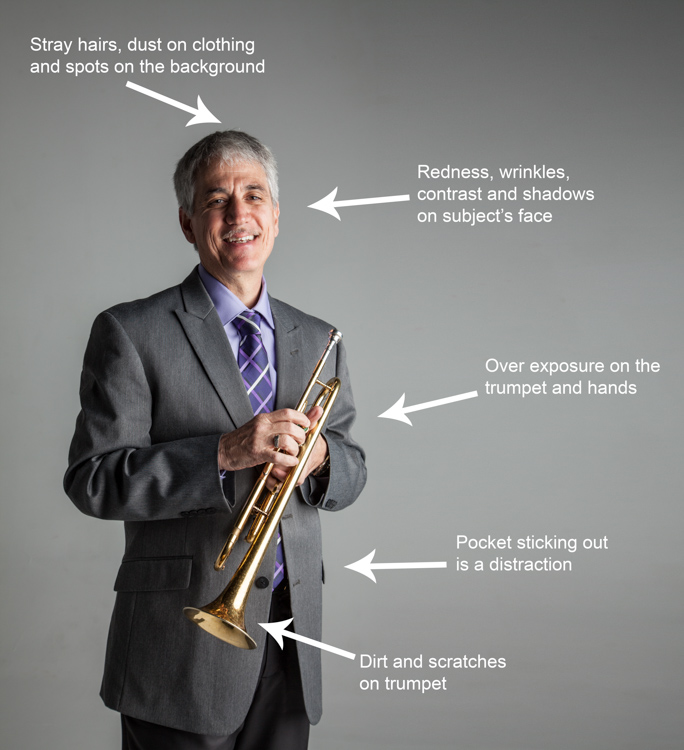
However, its effect can be overpowering at times and cause distraction to the viewer. This is noticeable in the darker shadows around his right eye, and the highlights shining across the left side of his face.
portrait retouching techniques
Here are some additional elements to be aware of.

  • Different textures: The subject is an older man wearing a suit and playing an instrument. All of these textures are different and will require various tools and techniques when the retouching process happens in those areas.
  • Zoom in close: As with any image, zooming in close will allow us to see any skin imperfections, dirt, dust, or scratches that you will want to eliminate all together.
  • Make judgements on distracting elements: There are some parts of the image that could stay or be eliminated, it becomes your choice as the retoucher. What is a distraction? What is a part of the purpose of the image? For instance, the scratches on the trumpet and the left side pocket sticking out could potentially be distractions, but maybe this client would like them to stay.

Once you identify the elements that need attention, decide if each will be removed altogether, or if it needs to be reduced. For instance, the stray hair and the dust on his jacket need to be removed, but the redness and wrinkles are only to be reduced, not eliminated completely. This difference is important for the next steps in the process. So ask yourself, will it be eliminated or reduced?

Step Two: Eliminate

Once you have made your initial evaluation of the image, you can begin the elimination process. This includes but is not limited to: dust, dirt, scratches, pimples, food in teeth, and anything else that doesn’t belong. Zoom in and examine your image up close. Think of each area as shapes and color, allowing yourself to be as accurate as possible when removing these details.

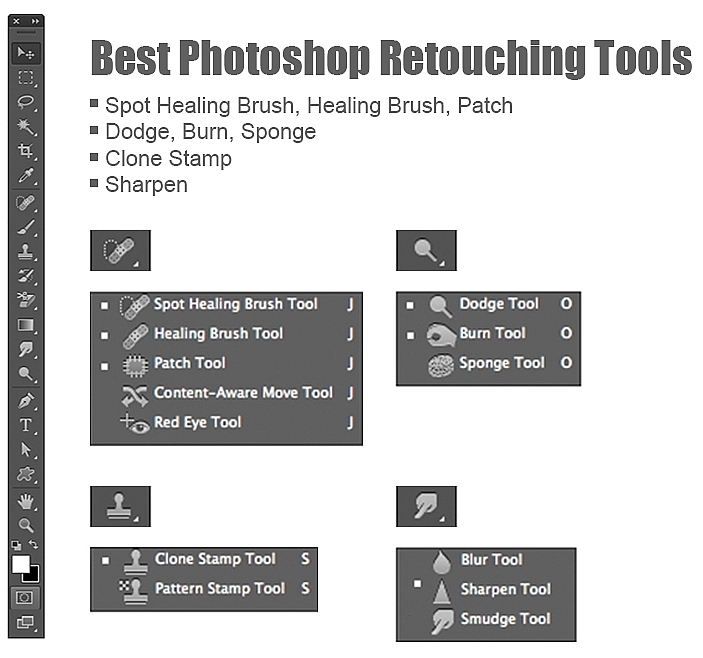
For this first elimination step, it is best to use the spot healing brush, the healing brush tool, the spot tool, the patch tool, and/or any other tool that completely removes things. Don’t rely on just one. Learning how each tool works different will help you use a combination of these removal tools effectively, and efficiently.

For instance, the clone stamp tool copies exactly what you click. The healing brush blends the color and texture of what you click on, with the area you want to fix. The spot healing brush is a genius tool. It has its own way of deciding if you want to blend the area you click on, or remove the unusual pixels within that area (like a stray hair against a solid background).
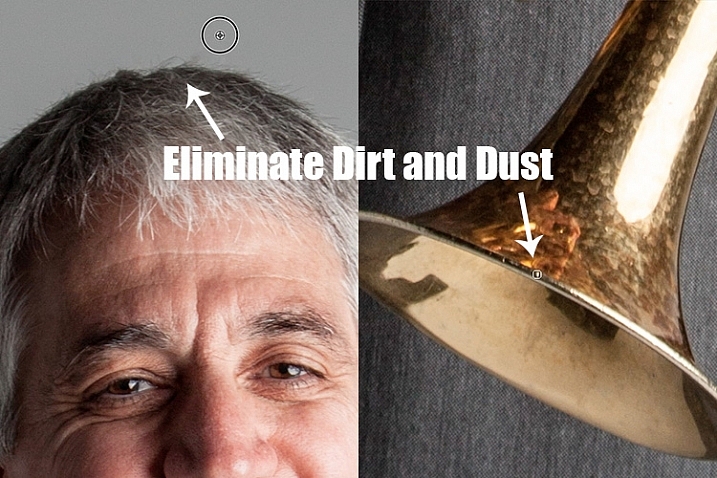
portrait retouching techniques

The more you make effects to a digital image, the more destructive you can be to the clarity of the final file. Using these tools is crucial to the integrity of the image. If you can click it away in less than a few clicks, then this is the time to do it.

Once the “spots” are removed, you can focus your attention on reducing or “refreshing” the imperfections we all know we have, but don’t want to notice in the permanence of a photograph.

Step Three: Reduce

This is where your artistic eye, and attention to detail come into play. Pimples go away, dust and dirt are just distractions, but our wrinkles, smile lines, scars and facial expressions are the details that make each of us unique. Those are the things you will focus on in this stage of the “refreshing” process.

Every subject you see in an image has great qualities that they might not be confident about accentuating. It is your job as the retoucher to keep not just the integrity of the digital image, but the integrity of the special moment and the emotional expressions that have been captured in that image.

For this reason, this second step is crucial. Train yourself to pay attention to the details, the purpose of the image, and the personality of your subject. If you are retouching a very smiley bride who laughed a lot, you don’t want to remove her laugh lines, but you do want to reduce the shadows and shine as her makeup wears off and the night wears on.

In this specific example of the musician, the character lighting has created great contrast that add to the personality of the subject. But in some areas it over accentuates his wrinkles by creating deep shadows and harsh highlights of overexposure.

The Best Trick in Portrait Retouching
portrait retouching techniques

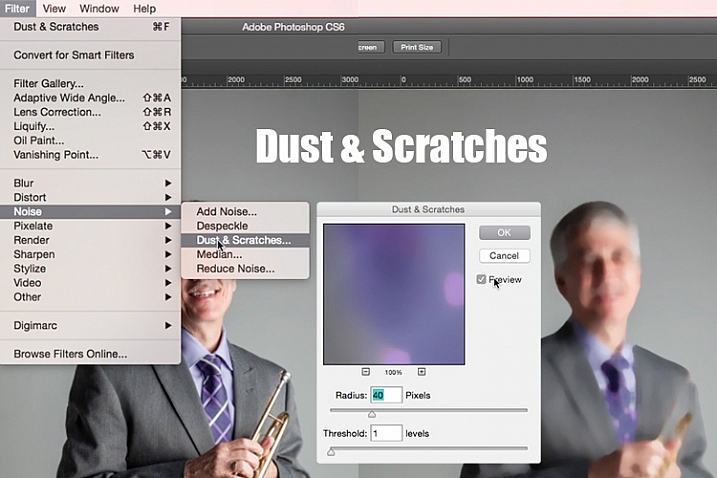
Duplicate your layer after completing step one. With this new top layer highlighted, select from the main photoshop menu: Filter > Noise > Dust & Scratches. A window will pop-up with settings options, and you will notice the image behind that window now shows a preview of this filter effect.

In the Dust & Scratches window, change your Radius to 40px and Threshold to 1. Experiment with these settings and see what works best for your images.

Once you have applied the Dust & Scratches filter (on the top, duplicated layer), you will notice how it blurs the image. But, this is not like using the blur tool. The method that this filter uses specifically identifies differences between pixels and their surrounding area. The Radius is what removes the “dust” and the Threshold is what brings back the details. Dissimilar pixels are modified to achieve a balance between sharpening and hiding defects.

The Dust & Scratches filter provides a more powerful way to remove noise from an image than any other noise removal tool. This is key to keeping the integrity of the textures, color, and overall feel of the digital image as you see it in print or on a screen.

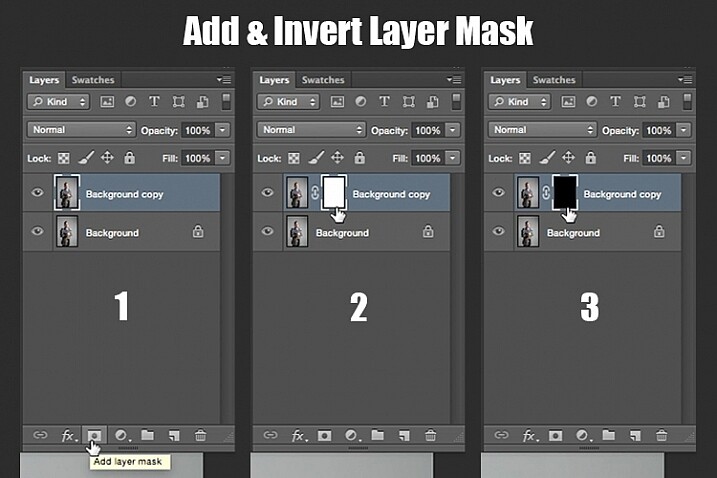
Now that you have a layer with the right effect applied, you are going to add a layer mask to this newly altered layer, and invert the mask. Do this by clicking the icon “Add layer mask” at the bottom of your layers panel. Notice the layer mask shows up as a white box next to your highlighted top layer. Now invert this layer mask by holding the command button and clicking the letter, “i”. This will now change the layer mask to black and bring the original image come back into view.
portrait retouching techniques

Step 1: duplicate the layer
Step 2: add a layer mask
Step 3: invert the mask so it is black

You can see how the image looks unaffected by the Dust & Scratches filter. Really, it is just hidden under the layer mask. Now you can paint back into the areas where you want to reveal the Dust & Scratches filter. The trick is to do this precisely, and not too much.

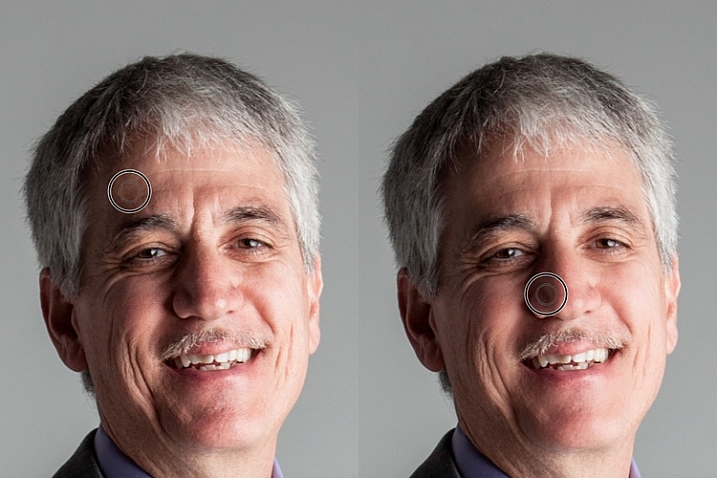
Select your brush tool (keyboard shortcut is B). Making sure the layer mask is selected (not the layer – square brackets will show around the mask when it is selected like shown above), noticing its color is black, paint with the color white to bring back the Dust & Scratches filter effect.

The key to using the brush tool on an inverted layer mask is to experiment with the brush opacity strength. When focusing on the skin areas, start by brushing back at only 30% opacity. Remember, you can always brush back over an area again more or less by toggling back and forth between painting with black or white. Painting with white will reveal the effect, while painting with black with hide it.

Steer clear of teeth, lips, eyes, nostrils, ear folds, and edges like the jaw line and hair lines during this time. These areas have specific edges and textures that are important to the overall image.

Once you have completed the skin areas, you can smooth the background. Change the opacity to 100% to completely smooth out this solid color background. This only works on solid backgrounds that are seamless. Using the brush at 100% will remove any dust spots that show up from the camera lens, or dirt that is actually on the studio backdrop.
portrait retouching techniques

Tips to Keep in Mind During This Step

  1. In general, keep your brush below 50% when painting the effect on skin. This allows more than 50% of the original textures and features to still be noticeable. If you paint more than 50% in these areas, you will see a putty-like effect starting to take over, causing your image to be more retouched than refreshed.
  2. Using the bracket keys on the keyboard [ and ], frequently change the size of your brush as you paint. Keep your brush hardness at 0 unless absolutely necessary. This allows you to move in and around smaller and larger areas of the skin and background with more efficiency and accuracy.
  3. The zoom tool is your best friend during this part of the refreshing process. Remember, instead of thinking of this image as a portrait, consider that you are just seeing shapes, color, and light. Zoom in close and pay attention to the changes you are creating. Force yourself to go too far with some brush strokes so that you know the limit. When you have gone too far, just toggle back to painting with black (set your opacity to 100%) and remove that last brush stroke all the way before beginning again (or use Command+Z to undo the last step).
  4. Be careful around fingers and edges of arms and legs where there are small curved areas. If you paint near these edges the Dust & Scratches will run over the edge and remove the curved areas all together, altering the look of elbows, fingers, shoulders, ankles and knees.
  5. Men can have beards and tend to have rougher looking skin than women. Be careful not to soften too much on a man’s skin. The same goes for grandparents.
  6. With babies and children, who have much smaller features, it is important to be aware of the shadow areas that you paint over. If you change the shape of their skin too much, it will no longer look like them. This is particularly important around the nose, eyes and mouth – their tiniest features.

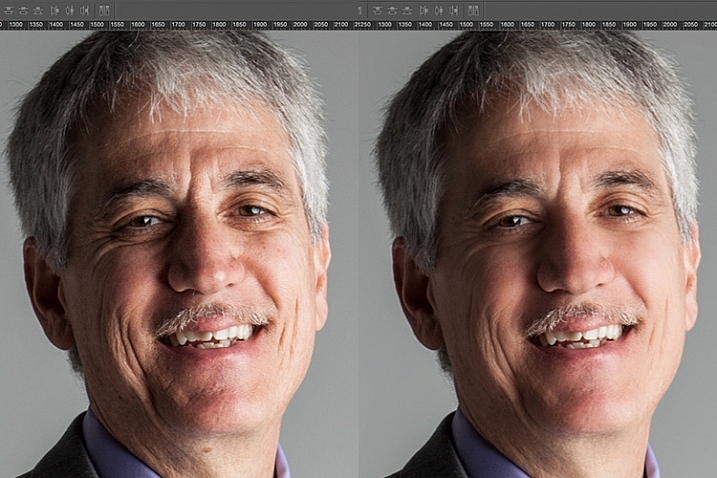
Here is the before and after of the Dust & Scratches filter effect on the musician’s face:
portrait retouching techniques

Notice the softening of the skin and reduction of the shadows in the wrinkles, yet he still looks untouched with most of the original texture still visible.

Now that you have completed the most important task of this post processing technique, it is time to repeat the steps from the beginning. Start again by evaluating the image as a whole. Notice any other areas that need attention. Remember to duplicate the top layer once you have completed any step in the process. Allow yourself to duplicate your layers as many times as you want. It’s always a safe bet.

Next, eliminate. This is your chance to eliminate any larger parts of the image that take more time. Elements to consider removing are:

  • Some (not all) of the scratches across the trumpet.
  • His left-side jacket pocket.

After eliminating for the final time, move on to step three again. In this case, instead of using Dust & Scratches as your reduction tool, you can use other popular items in the toolbox. Tools to consider using are the Healing and Spot Brushes, Dodge and Burn, and Sharpen and Saturate/Desaturate.
photoshop brushes for portrait retouching

Eliminate then Reduce – Repeat.

First, don’t forget to duplicate your layer before starting this step! If you don’t duplicate, this step will not work.

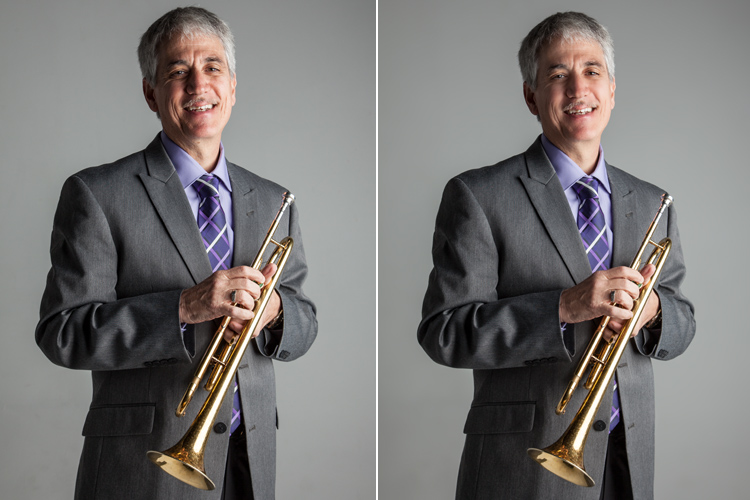
To lighten the shadowed area of the musician’s right eye, the Dodge Tool used at 50% on shadows would look too overly processed. But by allowing it to be over done on this newly duplicated top layer, you can then reduce the opacity of the layer to bring back the layer underneath at 50% or more. Now the over processed shadows look naturally lighter than the original.

This technique is great for all the tools mentioned above. The Sharpen tool can be used on eyes and jewelry. The Healing and Spot tools can be used for under eyes, and shadows that need a bit more attention. Desaturate and Dodge tools can be combined to whiten teeth. Anytime you want to reduce using these tools, just remember to duplicate the layer; make your changes, then reduce the opacity of that newly affected layer until the effect looks natural.

At this point in the retouching process, you have walked through each step of the process twice. It is time evaluate your finished image. This is where all those duplicated layers comes in handy. Keeping the top most layer turned on and the bottom original layer on, turn off every layer in between. Then zoom-in to 100% (accurate view of pixels), and click on and off of your top layer to see all the changes you have made.

If necessary make any other slight adjustments, like cropping to the correct size, then save your image. It’s best to always save the Photoshop layered copy (save as a PSD file) as well as a flattened JPG file, in the quality size you want.

We all know photoshop is full of endless possibilities, and we all love to learn. If you have other techniques that are great for “refreshing” your portraits, please share.

As with all things in life, this process takes practice to perfect. With practice you will gain accuracy, efficiency and train your eyes to see your images (before and after post-processing) in a whole new light, giving you better control over the look and feel of your retouched portraits.
portrait retouching techniques

Remember, as you learn and grow as a photographer, the goal is to always create your best images in the camera, and not just assume that you can just fix it in post. Keep this in mind, and with every click of the shutter you will become a better photographer, and spend less time in front of the computer.

Of course, you will always edit and retouch your very best images. When you do sit down to do so, now you will have a whole new range of techniques you can apply.

googletag.cmd.push(function() {
tablet_slots.push( googletag.defineSlot( “/1005424/_dPSv4_tab-all-article-bottom_(300×250)”, [300, 250], “pb-ad-78623” ).addService( googletag.pubads() ) ); } );

googletag.cmd.push(function() {
mobile_slots.push( googletag.defineSlot( “/1005424/_dPSv4_mob-all-article-bottom_(300×250)”, [300, 250], “pb-ad-78158” ).addService( googletag.pubads() ) ); } );

The post 3 Steps to Photoshop Retouching for Natural Looking Portraits by Danielle Werner appeared first on Digital Photography School.
Digital Photography School

 
Comments Off on 3 Steps to Photoshop Retouching for Natural Looking Portraits

Posted in Photography


Easy Portrait Retouching Tutorial without Losing Skin Texture

18 Jun

When it comes to skin retouching, less is more. Retouching skin is tricky. You want to enhance it, not beat it to death, make it fresh and glow-y, while still keeping the integrity of the skin. You want to soften wrinkles, not obliterate them. And to bring out their eyes and natural beauty while keeping them looking like themselves. Even Continue Reading

The post Easy Portrait Retouching Tutorial without Losing Skin Texture appeared first on Photodoto.


Photodoto

 
Comments Off on Easy Portrait Retouching Tutorial without Losing Skin Texture

Posted in Photography


How to do Frequency Separation Portrait Retouching in Photoshop

27 Apr
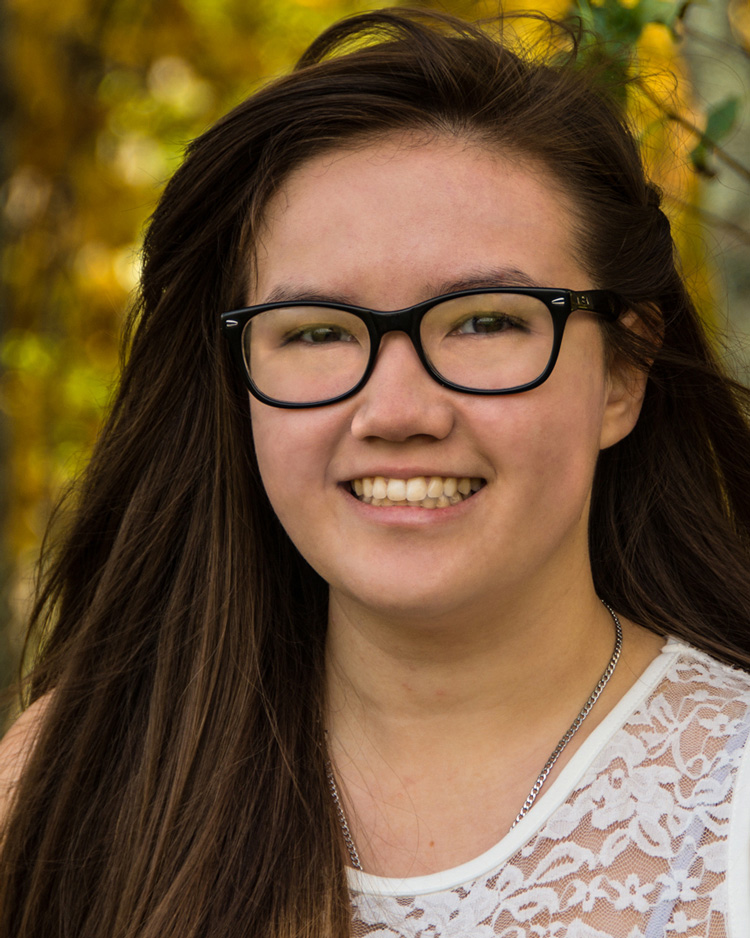
The goal of portrait retouching is to bring out the most naturally pleasing image of the subject. This image is the finished result of Frequency Separation Retouching in Photoshop.

The goal of portrait retouching is to bring out the most naturally pleasing image of the subject. This image is the finished result of Frequency Separation Retouching in Photoshop.

Portrait retouching may be accomplished using many different methods. Still, how often have you seen a portrait image that has been retouched to the point that the subject’s face looks unnatural? Even many of the software packages available for portrait retouching result in an airbrushed effect to skin tones.

What if the detail and color of a portrait could be separated for retouching? Frequency Separation Retouching will allow you to do just that! It will allow you to fix all the usual facial issues like removing wrinkles, bags under eyes, and blemishes. By dividing your image into two separate frequency layers, one layer being high frequency digital data, which contains the information of detail in the image, and a low frequency layer which contains the tonal and color information of the image.  However, the neat thing with Frequency Separation Retouching is that it allows you to make these corrections and retain the natural textures of the skin. By separating the colors and the details you can work on one aspect without affecting the other. Sure, some people will prefer the usual retouching methods, including airbrushing, but Frequency Separation Retouching gives you another option to use for enhancing your portraits. If you have a working knowledge of Photoshop, here’s how to get started:

Setup

#1 Make two copies of the background layer

In Photoshop, open your image, then make two copies of the background layer. Label the first layer “color” as this will be your low frequency layer, then name the second layer “detail” to become your high frequency layer.

#2 Apply a blur to the color layer

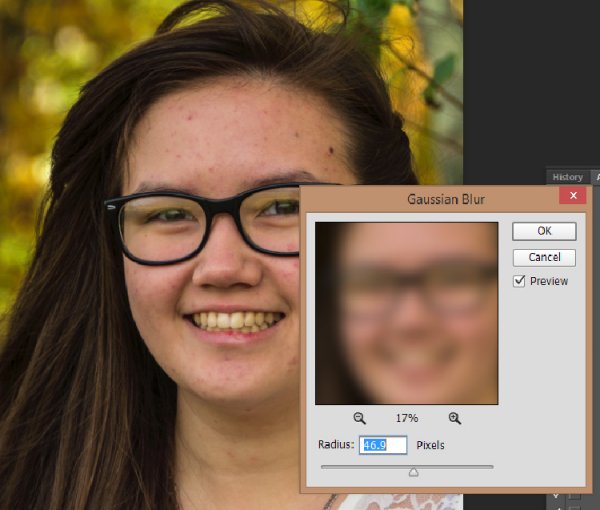
Turn off the detail layer and select the color layer. Apply a Gaussian Blur (found under the Filter menu>Blur) to a setting that blurs all the detail of the image, but leaves features intact (see sample below). This setting will vary from one image to another depending of the size of the image.

3-7-2015-2-21-56-PM750

#3 Setup the detail layer

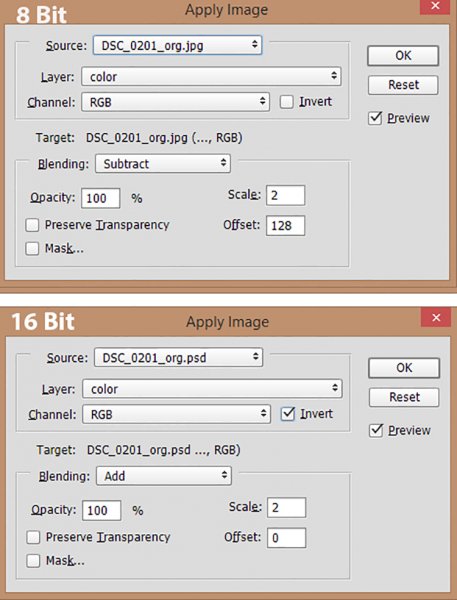
Turn the detail layer back on and select it, then go to Apply Image under the Image tab. Depending on which color depth you are working with, 8 bit or 16 bit, see settings below for Apply Image.

apply-image3Set your Layer to color. For 8 bit images set the Blending to Subtract, Scale to 2 and Offset. For 16 bit images set the Blending to Add, Scale to 2, Offset to 0 and check the Invert box.

Set your Layer to color. For 8 bit images set the Blending to Subtract, Scale to 2 and Offset. For 16 bit images set the Blending to Add, Scale to 2, Offset to 0 and check the Invert box.

  1. Change the blending mode of the detail layer to Linear Light.
  2. Create a layer group, and drag the color and detail layers into the new layer group.

Once you get the hang of this setup, it’s easy to make a Photoshop action to take care of these steps with one click. Download my Photoshop action for the setup HERE (the file is zipped, just unzip and load into Photoshop)

Now you’re ready to start the fun part!

Retouch the Color layer

By retouching the color layer, you are going to even out all the color tones of your subject’s complexion and to remove dark and light areas.

Clone Tool – the Clone tool can be used to even out the color tones or experiment with different blending modes. Normal, Darken and Lighten are very good effect modes to use on the color layer. You may also need to adjust the opacity (the degree of transparency) of these blending modes.

Dodge and Burn Tools are a couple of other useful tools to even out dark and light tones of the skin tones.

As with almost any Photoshop function, there are various ways to get the results you desire. The tools mentioned above are good starting points for working on the color layer, but the possibilities are endless! Don’t be afraid to experiment.

Retouch the Detail layer

Click on the Detail layer, which contains every detail of your portrait image. There are a wide variety of tools you can use to fix skin imperfections, ranging from wrinkles to acne.

Clone Tool – Use the Clone tool with mode set to normal and just clone out imperfections, sampling (ALT/OPT key click) from a desirable area to paint over an imperfection in another area.

Healing Brush Tool –  The Healing Brush tool works similarly to the Clone tool and will sample textures from nearby areas to make a seamless patch.

Spot Healing Brush –  Spot Healing Brush works similarly to the Clone tool and Healing brush, but does not require you to sample a source area. It will automatically sample from another area to repair the target imperfection. Use the adjustable brush sizes to paint over spots and remove them.

Patch Tool – Like the Healing tool, the Patch tool will match the texture of the near-by area for a seamless repair. Make a selection over the area to be repaired and drag the selection over a good area. For best results work on small areas at a time.

Content-Aware Patch –  Similar to the Patch Tool, but with the Content-Aware Patch you select a good area and drag it over area to be repaired, and the tool will match the texture.

After image

After image

Once you have finished retouching the color and detail layers of your image, you can simply turn off the layer group to see the before and after of your work. (This is also a handy review tactic as you are working, to see how your adjustments are affecting the image.) Because all the retouching you have done are applied to the two new layers, it is completely non-destructive to the original image.  So, if you are unhappy with your first results, you can simply delete the retouched group and start over.

frequency-retouching-2-750

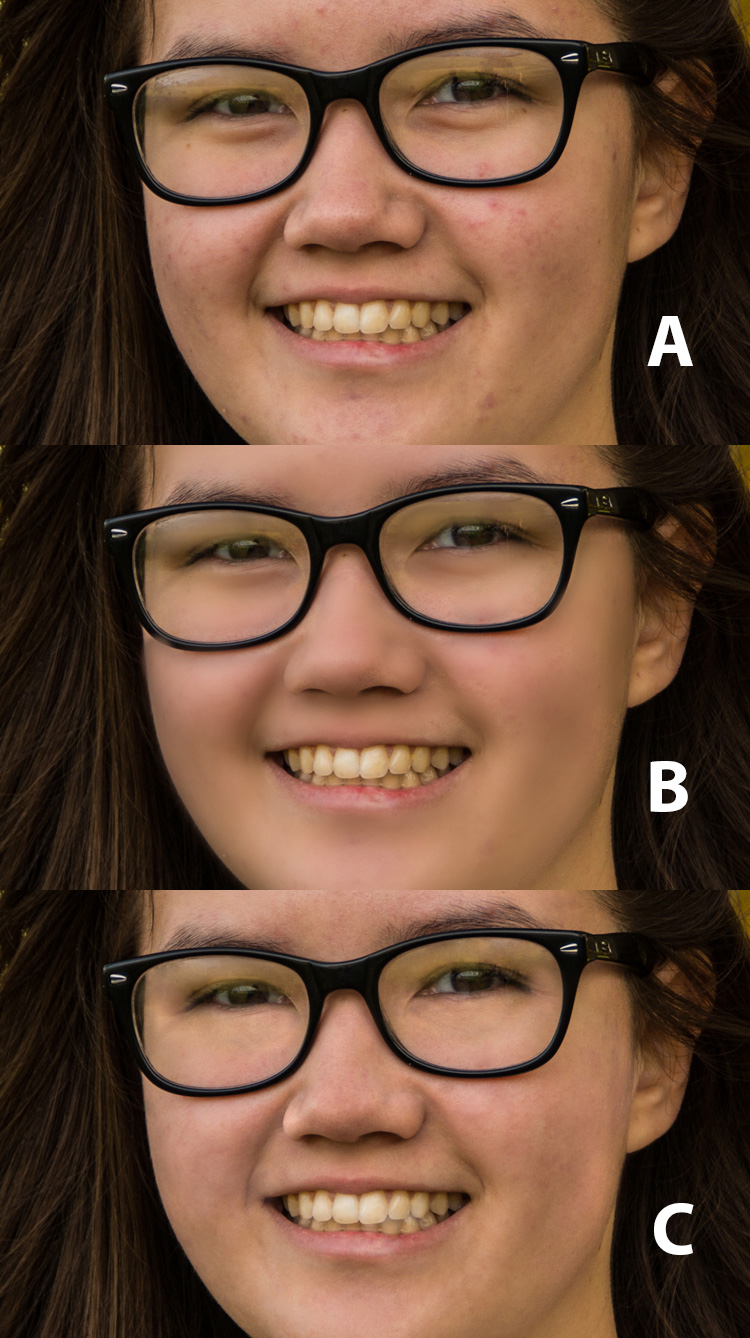
A – Original image B – Air-Brushed look retouching C – Frequency Separation retouching


Conclusion

Portrait retouching can be accomplished by using many different methods, and various software and plugins designed especially for that purpose. This article is meant to give you a Photoshop option for retouching and enhancing your portrait photography. The great feature of this method is the ability to separate the detail from the color and tones before retouching. Do you have any tips for portrait retouching?

googletag.cmd.push(function() {
tablet_slots.push( googletag.defineSlot( “/1005424/_dPSv4_tab-all-article-bottom_(300×250)”, [300, 250], “pb-ad-78623” ).addService( googletag.pubads() ) ); } );

googletag.cmd.push(function() {
mobile_slots.push( googletag.defineSlot( “/1005424/_dPSv4_mob-all-article-bottom_(300×250)”, [300, 250], “pb-ad-78158” ).addService( googletag.pubads() ) ); } );

The post How to do Frequency Separation Portrait Retouching in Photoshop by Bruce Wunderlich appeared first on Digital Photography School.

Digital Photography School

 
Comments Off on How to do Frequency Separation Portrait Retouching in Photoshop

Posted in Photography


Tips for Retouching a Night Photograph using Lightroom

21 Dec

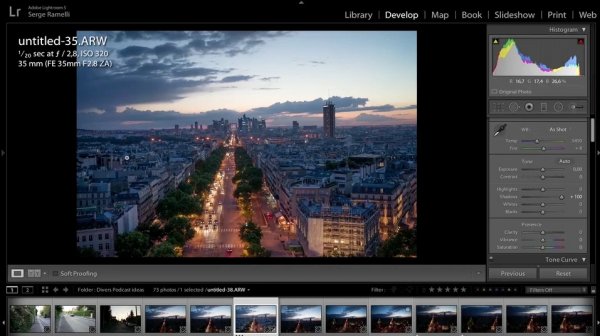
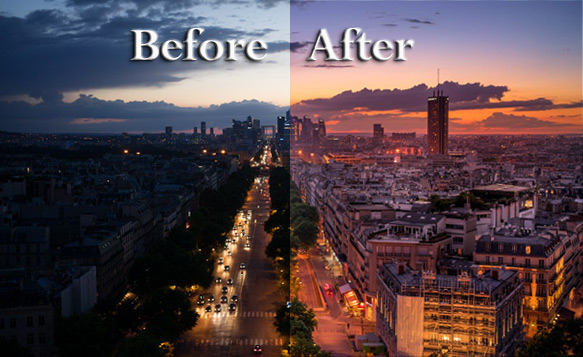
I will show you an experience I had of shooting in the middle of the night after sunset without a tripod. Many monuments don’t allow you to shoot with a tripod but you still want to take a photo. The nicer light in my opinion is usually after sunset or before sunrise, so I will show you how to take and process a photo without a tripod at night.

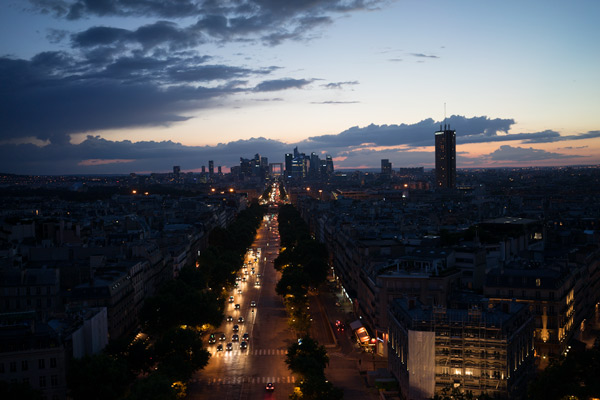
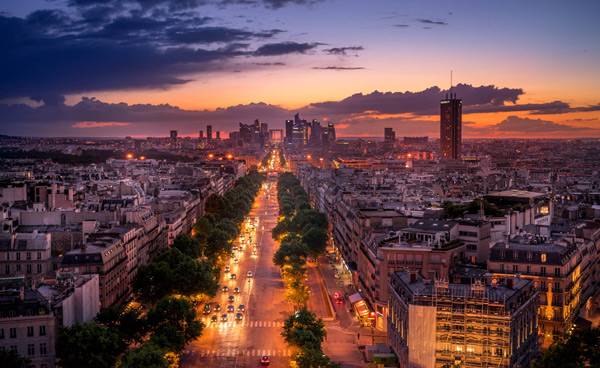
dPS-Before-after

If you have a nice high vantage point to take a beautiful photo but cannot put down your tripod you will see that there
is something we can do about it. The trick is you must put your camera on a timer, (use the built-in 2-second timer) meaning when you press the shutter it counts to two and then takes a photo. This way when you take the photo you are not pressing the button so there is less vibration.

Next go into manual mode and put it on 1/20th of a second. Usually it will be blurry, but if you put your arms on your stomach and stop breathing you should get a sharp photo. Then open the lens as much as you can. As you can see the photo is very sharp and I was only at 320 ISO.

As usual I am always shooting to get the highlights, so what you do is you put your camera at 1/20th of a second, 2 second on timer, approximately f/2.8 aperture (or open as wide as you can), then start going up on the ISO. You take several photos until you see that you have something you like.

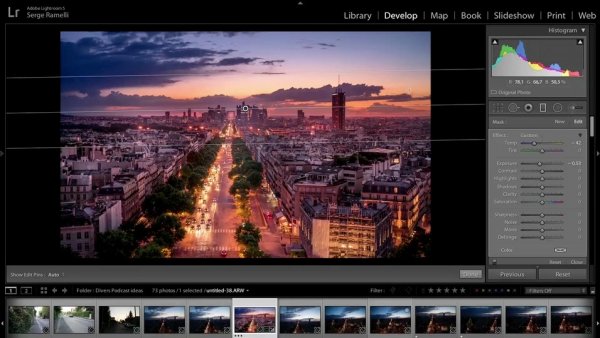
Now let’s see how we are going to retouch this photo. First we are going to open up the shadows; you see how we can see the entire city?

Screen shot 1
Now on the white balance. When you are taking a photo of a sunset in a city there is one white balance that I advise you to use, but it is very difficult to get the right white balance right away. What I usually do is go to the shade preset, and add a bit of magenta, that is something I like.

Then bring down the highlights, and lastly do the white and black points.

Look how incredible this photo is, I took it without a tripod at night, now the only problem is that I don’t have a long exposure so the cars are very sharp, I don’t have the lighting streak behind the cars that I would have liked but it’s still pretty good.

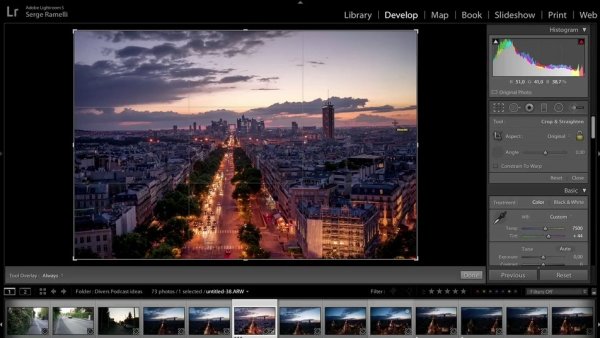
Ok, now let’s crop the photo a bit to get it to look more dynamic.

Screen shot 2

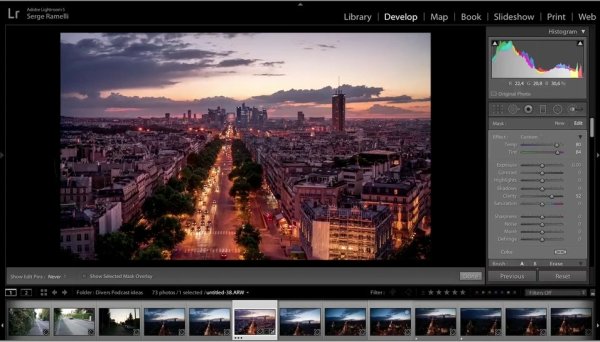
Next, let’s take a brush, select a warm temperature and add some clarity to it and we will now start painting the photo in specific areas where we want to add color.

Screen shot 3

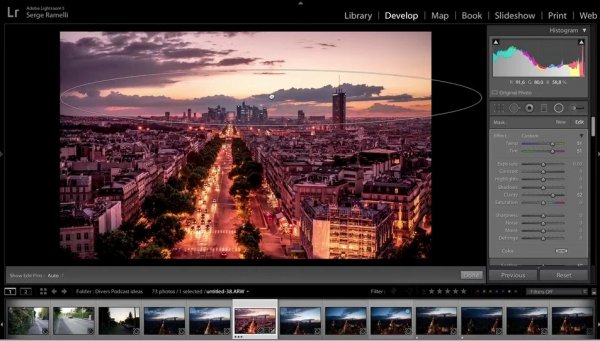
We will now create a graduate filter to accentuate the sunset.

Screen shot 4
Create a new graduate filter to add some highlights to parts of the buildings to make them come out a little bit more.

We will now add a gradient filter on the top of the photo to create more of a blue sky.

Screen shot 5

We will remove some clarity on the overall photo. Last but not least let’s add some sharpness, there is almost no noise as I am using this amazing Sony camera, so we will only remove a bit of noise.

We can now see the end result of this photo that was taken at night without a tripod. I find it quite incredible!

Before

After

For a full walk-through of how this is done check out this video:

If you enjoyed this tutorial you can find more of Serge’s tips and courses here.

PhotoSerge

googletag.cmd.push(function() {
tablet_slots.push( googletag.defineSlot( “/1005424/_dPSv4_tab-all-article-bottom_(300×250)”, [300, 250], “pb-ad-78623” ).addService( googletag.pubads() ) ); } );

googletag.cmd.push(function() {
mobile_slots.push( googletag.defineSlot( “/1005424/_dPSv4_mob-all-article-bottom_(300×250)”, [300, 250], “pb-ad-78158” ).addService( googletag.pubads() ) ); } );

The post Tips for Retouching a Night Photograph using Lightroom by Serge Ramelli appeared first on Digital Photography School.

Digital Photography School

 
Comments Off on Tips for Retouching a Night Photograph using Lightroom

Posted in Photography


Portrait Plus Retouching Software – A Review

26 Jan
Portrait Plus from ArcSoft packs powerful facial retouching tools into a user-friendly program.

Portrait Plus from ArcSoft packs powerful facial retouching tools into a
user-friendly program

One of the most difficult tasks in Photoshop is also one of the most common. Since we are in the business of making people look good, solid portrait retouching skills are perhaps some of the most important tools in your digital bag of tricks. A couple of months ago, I wrote an article detailing one of my favorite techniques for basic skin smoothing in Photoshop. It’s a pretty straightforward approach to smoothing skin and removing blemishes and I use it all the time. As convenient as it is, though, it can have an impact on editing time, particularly when I’m dealing with a lot of photos at once.

Portrait Plus from ArcSoft is a portrait retouching program that works as a stand-alone application (Windows and Mac) or as a Photoshop plug-in under the filters menu (Currently Windows only). It has a simple, user-friendly interface designed for efficient, seamless integration with your portrait workflow.

How does it work?

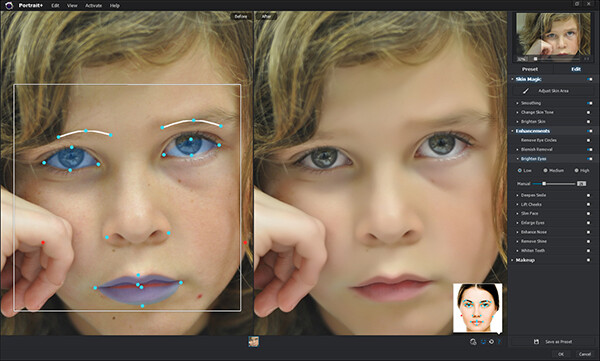
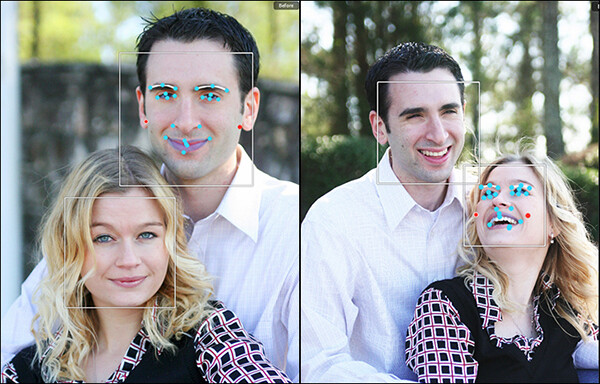
Simply put, Portrait Plus automatically detects the faces in your photos, and then identifies 24 key facial features. While this auto-detection is really pretty amazing, it’s not always perfect (and therefore my only real complaint).  Profiles turned too far away from the camera and semi-obscured features (think bangs over the eyes) will throw auto-detection for a loop. I had a couple of images where the auto-detection did not work, requiring me to manually select the facial features and target areas. While a bit frustrating, I don’t view this as that much of a negative, since you are likely to manually adjust the target areas yourself anyway as you become more comfortable with the software.

The overlay on the left shows the facial features automatically detected by the software.

The overlay on the left shows the facial features automatically detected by the software.

Once an image has been imported, you have a choice of using one of the program’s ten presets, or editing the photo manually, with the option of saving the results as a preset for future retouching work. While the manual editing tools are very extensive, and allow users to select specific areas and facial features, many of the test photos I ran through Portrait Plus for this review achieved excellent results with the presets alone. Facial retouching that could take several minutes or longer can be drastically reduced down to just one or two clicks of the mouse. In order to ensure consistency throughout the photo, Portrait Plus also detects all visible skin, giving the editor as much or as little control over the final image as possible.

Powerful editing tools

Here is a breakdown of the manual retouching tools.

Skin

Some skin retouching software simply blurs over the imperfections.  By identifying very specific areas of the face, however, Portrait Plus gives you extensive control over what to repair and to what degree, for a more natural-looking result. By taking this targeted approach, Portrait Plus eliminates deep scars, pimples, scratches, and other imperfections, while restoring or maintaining one of the most important aspects of all–original skin tone.

  • Skin smoothing
  • Skin tone
  • Brighten skin
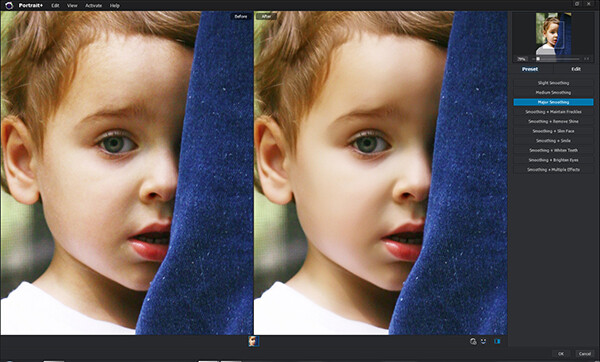
Original on the left. Skin-smoothed on the right.

Original on the left – skin-smoothed version on the right

Enhancements

If you’ve ever wanted to get in touch with your inner plastic surgeon, here’s your chance. By giving the user control over specific areas like the mouth, cheeks, eyes, and nose, reshaping and fine-tuning facial features has never been easier. Tools included are:

  • Remove eye circles
  • Blemish removal
  • Brighten eyes
  • Deepen smile
  • Lift cheeks
  • Slim face
  • Enlarge eyes
  • Enhance nose
  • Remove shine
  • Whiten teeth

Makeup

Depending on your lighting and camera settings, makeup does not always have the look you were going for in the final image. By having the ability to make these adjustments in post-production, you can either save your original idea, or go in a new direction. You’ve got to be very careful with this set of tools, however–a single mouse click can be the difference between a subtle adjustment and “alien eyes”. Effects included:

  • Blush
  • Lipstick
  • Colored contacts
  • Eye color
  • Eye lashes
  • Eye liner
  • Eye shadow
  • Shape eyebrows

Comparison

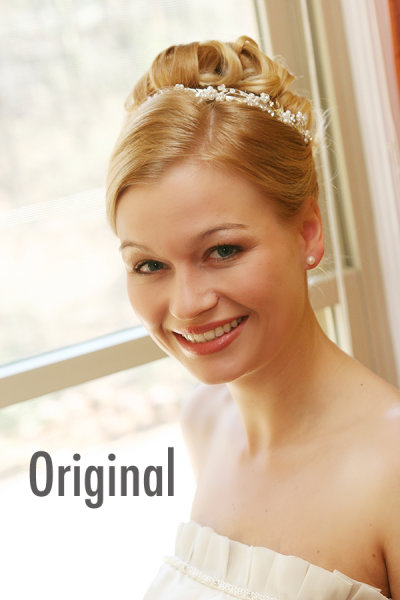
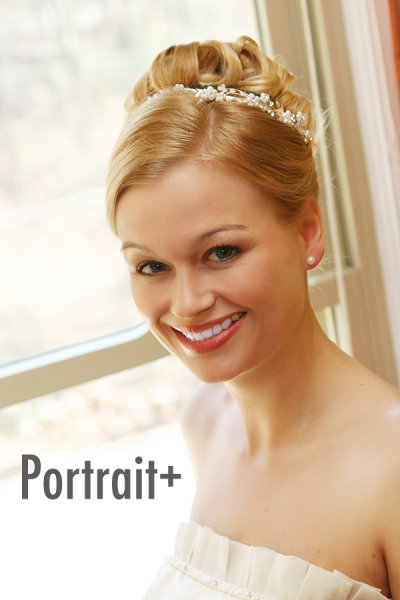
The original version of this portrait is straight off the camera, only edited for size. In the Portrait Plus version, you can see how edits like basic skin smoothing, along with a wider smile, slimmer face, whiter teeth, and digital lipstick provide subtle, but significant changes.

portrait-plus-dps-review-007

portrait-plus-dps-review-006

Many of the effects in this software package would take months to learn, and years to perfect if you were to attempt them yourself in Photoshop. While Portrait Plus does have a bit of a learning curve, it is far less steep than what you’d experience by trying to learn all of these edits on your own.

Multiple Faces

Portrait Plus does a great job of detecting multiple faces within the same image.

Portrait Plus does a great job of detecting multiple faces within the same image.

While I’ve not yet tested it on photos with more than two faces, ArcSoft’s website claims that Portrait Plus can detect up to 20 faces in a single image. This can come in particularly handy for event photographers, who often find themselves editing photos of large groups of people. Portrait Plus also allows you to “lock” faces, selecting which faces in a photo are retouched and which are left alone.

Supported file formats

The Windows stand-alone version can import JPEG, TIFF, PNG, and BMP images of 24 bits per pixel, while the Mac stand-alone imports JPEG, TIFF, PNG, and RAW files with 24 bits per pixel. Both Windows and Mac export JPEG and TIFF files. The Photoshop plug-in will import and export all Photoshop-supported file formats.

Wrap-up and recommendations

As a portrait photographer, I strive to get everything as close to perfect in the camera as I possibly can. While even the best portraits can always use a tweak or two, the reality is that some portraits require significant retouching. As important as the editing is, though, so is time with my family. So, whatever I can do to cut down on my editing time is a bonus. As good as I am at retouching, Portrait Plus is a bit of a game-changer. An intuitive, user-friendly Photoshop plug-in, Portrait Plus can seamlessly add a whole new dimension to any photographer’s editing arsenal.

Portrait Plus is available for download on the ArcSoft website.  Enter coupon code Portrait45 at check-out for a 45% discount. Valid through March 31, 2014.

The post Portrait Plus Retouching Software – A Review by Jeff Guyer appeared first on Digital Photography School.

Digital Photography School

 
Comments Off on Portrait Plus Retouching Software – A Review

Posted in Photography


50 Portrait Retouching Tutorials To Take Your Photoshop Skills To A New Level

24 May

21 face-retouching tutorials are at your service! Realistic perfect skin, teeth and eyes heve never been so easy to reach.

The post 50 Portrait Retouching Tutorials To Take Your Photoshop Skills To A New Level appeared first on Photodoto.


Photodoto

 
Comments Off on 50 Portrait Retouching Tutorials To Take Your Photoshop Skills To A New Level

Posted in Photography


Retouching with Cloning Tools: Part 3

11 Mar

In Part 1 and Part 2 of the Retouching with Cloning Tools series, you learned what cloning tools are used for and the differences between each tool. In this part of the series, you will follow a step-by-step tutorial to learn how to remove power lines (or other unwanted objects) from an otherwise beautiful photograph. This particular image contains distracting Continue Reading

The post Retouching with Cloning Tools: Part 3 appeared first on Photodoto.


Photodoto

 
Comments Off on Retouching with Cloning Tools: Part 3

Posted in Photography


Retouching with Cloning Tools: Part 2

16 Feb

  Welcome back to the Retouching with Cloning Tools series! In Part 1, you learned about how cloning tools are used to retouch and remove imperfections from images. In this part of the series, you will learn more about the specific differences between each cloning tool, what kind of jobs they work best for, and how to use them. By the end Continue Reading

The post Retouching with Cloning Tools: Part 2 appeared first on Photodoto.


Photodoto

 
Comments Off on Retouching with Cloning Tools: Part 2

Posted in Photography


Retouching with Cloning Tools: Part 1

31 Jan

If you look closely at commercial photographs, you will probably notice that they rarely contain random power lines or vehicles in the way of the shot. You’ll probably also notice that the models always have flawless skin, and iconic tourist locations are tourist-free. Photographers don’t spend all of their time searching for perfect-looking models or visiting deserted cities. Instead, they typically Continue Reading

The post Retouching with Cloning Tools: Part 1 appeared first on Photodoto.


Photodoto

 
Comments Off on Retouching with Cloning Tools: Part 1

Posted in Photography


Skin Retouching Photoshop Tutorial

22 Nov

www.sarakiesling.com http NOTE: I do not offer retouching services to others. I do have a good friend who is a professional retoucher though (and an amazing one at that), and is available for outsourcing – as well as teaching! More information on his classes is available at retouchingclasses.com and his portfolio can be seen at www.solsticeretouch.com Thanks to everyone who has commented on the video, and who has emailed me as a result of this video! I am doing my best to get back to all of your messages, and I sincerely apologize if it takes a while!! I would love to make more videos – please comment below telling me what kinds of things you are interested in learning about! Basic skin retouching using frequency separation and dodging & burning. I use this process on every photo that I do, and I usually spend about 4-5 minutes on headshots like this (and less time on full body shots when there is obviously less detail in the face). This is not intended to be a high-end retouching tutorial – but techniques that can help people who want to do natural-looking retouching while maintaining most of the natural skin texture! Here is the final photo – www.flickr.com The final editing was done with one of my Photoshop actions, available at www.sarakiesling.com 🙂
Video Rating: 4 / 5

 
Comments Off on Skin Retouching Photoshop Tutorial

Posted in Photography Videos