The post How to Batch Resize in Photoshop: A Step-by-Step Guide (2021) appeared first on Digital Photography School. It was authored by Helen Bradley.
What’s the easiest way to batch resize in Photoshop?
In this article, I’m going to take you through a simple, step-by-step process for resizing your images. It’ll take seconds – and when you’re done, you’ll be able to resize dozens (or hundreds!) of photos at once.
Let’s get started.
Batch resizing in Photoshop: step by step
Batch resizing isn’t hard, and it takes very little knowledge.
To start, make sure you open some files in Photoshop (though note that you don’t need to open all the files you’re aiming to resize; a random file or an empty canvas will do just fine). As you can see below, I’ve opened a blank document:
I’m going to cover the Image Processor method of batch resizing. Pretty much anyone can do it, and it generally works well. However, if you have more complex batch resizing requirements, consider writing an action; that way, you can tailor the resizing to your particular needs.
Now let’s take a closer look at the batch resizing process, starting with:
Step 1: Open the Image Processor
Choose File>Scripts>Image Processor.
The Image Processor dialog box will open, where you’ll see a simple, four-step process for resizing your images:
Step 2: Select your images for batch resizing
In the first section of the Image Processor dialog box, you’ll need to identify the images you want to batch resize.
You can choose to resize all open images by selecting Use Open Images:
Or you can pick a folder from your hard drive via the Select Folder button:
If you do select a folder, you can tell Photoshop to resize images in all subfolders as well; just hit the Include All sub-folders checkbox:
Step 3: Determine your export location
Now it’s time to determine where you want your resized images to go.
To save the resized versions alongside the originals, simply select Save in Same Location:
Then, when the resizing begins, Photoshop will create a subfolder next to the original files. (Because your resized versions will retain the names of the original files, creating a subfolder – rather than simply saving the images in the original folder – prevents any overwriting.)
Alternatively, you can select a different folder for the resized files:
Step 4: Input your preferred image sizes
This is the most important step of the entire process:
The moment where you dial in resize settings for your files.
First, determine your output file type. You can choose from JPEG, PSD, and TIFF (JPEG is the default and generally works well, but if you’re working with layered files, then PSD is a good choice).
If you do decide to save JPEGs, you can adjust the output quality; 12 will give you large, great-looking photos, whereas 1 will give you tiny, low-quality results.
For better color when displaying your photos on the web, select Convert Profile to sRGB:
I also recommend checking the Include ICC Profile box at the bottom:
Finally, select Resize to Fit, and type in your preferred file size!
Note that the dimensions you dial in are maximums. So if you type in 300 for the width and 300 for the height, the files will be resized so that the longest side of every image is 300 pixels.
(In other words, the images won’t be cropped or skewed to fit your preferred dimensions; they’ll be scaled up or down for the most natural-looking results.)
Also note that the width and height measurements don’t have to be the same. You could specify a width of 400 and a height of 300 – then all images would be constrained to a width of 400 or a height of 300, whichever comes first.
By the way, you do have the option to save your images in a second (or third) format, as well. Just select the Save as PSD or Save as TIFF checkboxes, and PSD and/or TIFF folders will be created alongside your JPEG folder!
Step 5: Run the script
When you’re ready, click Run.
The images will be automatically opened (if they’re not open already), resized, saved, and closed again.
To find your resized images, simply head to the folder you specified in Step 3 (above). If you chose to save JPEGs, the images will be in a subfolder called JPEG; if you chose to save TIFFs, the images will be in a subfolder called TIFF, etc.
Like this:
How to batch resize in Photoshop: final words
Well, there you have it:
The easiest way to batch resize your images in Photoshop.
So whenever you need to resize a lot of images for uploading on the web, use the Photoshop Image Processor.
It makes the job quick and painless!
Now over to you:
Do you have a favorite method of batch resizing images in Photoshop? If so, share it in the comments below!
The post How to Batch Resize in Photoshop: A Step-by-Step Guide (2021) appeared first on Digital Photography School. It was authored by Helen Bradley.
The post How to Correctly Resize Photos to Print Images Big appeared first on Digital Photography School. It was authored by Mark C Hughes.
In this digital age, fewer people are printing their images, missing out on what can be an amazing experience with their images. Many images only exist in the ether (or the internet, if you want to be more literal), or on people’s hard drives. However, there is nothing more impressive than to print images big.
Viewing images on phones and tablets means that the resolution is generally pretty forgiving. However, when you actually take photos and print images big, you need to resize them. Doing so will tend to expose problems related to resolution and color.
When you print images big, your images become even more impressive, with more vibrant colors and detail being visible, which can work for or against you.
Printing big always starts with a great image (f/6.3, 1/800, ISO 320).
Practical and technical issues to enlarging images
Beyond simply printing, there is a question of size.
What if that phenomenal image you took with your camera is so memorable, or of such a decisive moment, that you want to make it big?
There are practical and technical issues you need to address if you want to print those images, particularly when making images that are growing in size.
Questions like, for a given image resolution…how big a print is too big for the camera (or phone) that you used? What are the limiting factors? How do you properly resize your images to make them bigger and appropriate for the size of the print you are looking for?
Printing from a cell phone is typically limited in size.
Camera limits
In this day and age, even cameras on smartphones tend to produce at least 12 MP images. You should be able to print them if the image is good enough (sharp/well lit), to produce a 10 x 13 inch image natively.
With a little help from image processing software, you can improve this to some extent. There are some newer software techniques available to boost those images size, both internally from the cameras (such as high resolution mode and HDR), and externally from image processing software that uses sophisticated algorithms to boost the image size by interpolation.
Cell phones use multiple cameras and computational photography to make images better.
Understanding the fundamentals
The size of digital images is measured in megapixels. Each pixel is a single-colored individual group of photosites that are sensitive to particular colors of light (red, green or blue).
A pixel is the smallest dot that makes up an image. The combining photosites from your sensor produce each pixel. As you add more and more pixels, you eventually get an image.
A megapixel is 1 million pixels (give or take, depending on how it is calculated) for the entire image. When you have a camera with a certain number of pixels (i.e. 16 MP), that tells you how many individual pixels there are within the image. Camera sensors generally come in two flavors (3:2 or 4:3 ratios).
The ratio will affect the overall size relationship. What this also means is the megapixel count tells you how many individual pixels are in each direction.
Crop sensor relative sizes.
Basic math
Megapixels just provides you with the total number of pixels. In order to actually print it, you need to figure out how big you want your print and then do some very basic math to figure out what works best for your image.
When you print, typically, you are looking at print resolution, in dots-per-inch (dpi) rather than megapixels, that is appropriate for the medium and the size of print you are going to make.
For most print media you might hold in your hands, you need a minimum of 300 dpi. This means that megapixels divided by dpi will give you the maximum dimensions natively produced by your sensor.
If you simply use pixels, there is no weird conversion. For example, a 12-megapixel image (common cell phone resolution) on a 3:2 sensor translates into pixels that are roughly 4290 x 2800 on the sensor. If you use 300 dpi to give you a print, the maximum size is 14.3″ x 9.3″ (this is not overly large). Even for a 36-megapixel image, you only end up with printable dimensions of 24.5″ x 16.4″.
Native resolution to size of images.
Hold the Phone
Wait a second, isn’t a 36-megapixel camera a pretty high-resolution camera?
If a 36-megapixel image only corresponds to 24.5″ x 16.4″ that seems really small, how do they print billboards? How do you print something larger than that?
There are two answers to that. First, you don’t hold a billboard in your hands, and you view if from a distance, so the resolution to print can go down. Secondly, to enlarge an image, you use a process called interpolation. Interpolation is the process of how you create new pixels to fill the gaps between the existing pixels so you can enlarge the image.
Nikon D810 (from NikonUSA site) is a 36 megapixel camera.
Confusion in figuring out size
Sometimes, image processing software will tell you the dimensions of your image are 60″ x 39″ at 72 dpi. That seems so much larger. So where does this number come from?
There was a time where it was thought that the resolution you needed for monitors was only 72 dpi (this has changed with technology and time), but the early number of 72 dpi stuck and made the images seem pretty large. The reality is, all you really need to know is that the total number of pixels in each direction will define your image size, not theoretical inches and dpi combined.
The difference between 72 dpi and 300 dpi for the same image (hint: there is no difference) – (f/6.3, 1/800, ISO 200).
Viewing distance matters
To make matters worse, the image resolution of your print is also dependent on how big your image is. A magazine will need a minimum of 300 dpi, whereas a billboard in a subway station may only need 40 dpi. What really matters is how far away from the image you are standing when you view it.
As a general rule of thumb, you need to have a minimum printed resolution of 300 dots per inch (dpi) for most prints.
Printing wall sized images (24″ x 36″ Print).
Real-world example
To make things more clear, let’s start with a simple 20-megapixel image taken on a micro 4/3’s sensor (the proportions are 4:3) and work through the process of printing an image for a wall, say a 36″ x 24″.
The image was taken by an Olympus EM1 mark II, 20-megapixel sensor. The image out of the camera is 5184 pixels wide and 3888 pixels. If you open it with image editing software, it may say that the image is 17.28″ x 12.96″ at 300 dpi (the software has done some simple math). The problem is, this is smaller than the image you actually want to print. I want to print an image that is 36″ x 24″
Sample image for printing big (f/5.6, 1/1250, ISO200).
Interpolation… the magic of resizing
The problem with resizing is that each pixel in an image is discrete. In order to make bigger images to print, we need to create new pixels to fill in the gaps between the existing ones. This sounds much simpler than it is in practice.
The classic example is a sharp edge.
As you enlarge the image, the pixels get jagged. It makes it look like something out of Minecraft. This is called pixelation.
Very early versions of photo imaging software would simply average the color and luminance, and put that new pixel in between the existing pixels. This just made the images soft and mushy.
Currently, Photoshop CC 2020 provides 7 different and discrete ways of changing the size of the image. Plus, it has an automatic setting (that selects from the other 7) to make 8 ways. However, it is limited by the content that is already there.
Each algorithm does something slightly different in its approach to interpolating between pixels. Depending on the type of image, each has varying degrees of success.
As you get close into the image, you can see the pixelation.
Although Photoshop has improved much of its algorithms for image size changes, these work reasonably well for smaller changes in size. However, significant changes in size of images can be particularly problematic.
For scaling larger, I have found the best way to increase the size of an image, as of the beginning of 2020, is to use a product from Topaz called Gigapixel AI.
Gigapixel AI uses artificial intelligence to look at the image compared to millions of similar images and creates new pixels with this algorithm.
This is a slow process and CPU intensive. That is because it uses AI to create the missing pixels to come up with a proper scaling that interpolates new pixels that work with the image. It really does work quite well. Each image can take up to 5 minutes, depending upon size.
The process using Gigapixel AI
To scale the images, here is the process I follow.
I shoot micro 4/3s (MFT), so my image sensor is a 20.1-megapixel sensor that produces raw files that average in size around 17 to 18 megabytes. The resolution of the image is 5184 x 3888 pixels.
Doing the math, for a print at 300 dpi, the largest size for the native image (not resized) is 17.28 inches x 12.96 inches. A fair size, but not a huge image.
Suppose we want to print a 36″ x 24″ image. We need to resize it.
In addition, the proportions are not exactly the same. 36 x 24 is a 3:2 ratio and my image is at a 4:3 ratio. Ideally, to get the 300 dpi, we will want to print an image that is 10,800 x 7200 pixels.
Before you start
Before I start, I always use a RAW file from the camera, not a JPEG. JPEG is a lossy format, so you never want any of your intermediate steps to use JPEG images. Even the final one should be a non-lossy image format like PSD or TIF. You can read more about file formats here.
Image sensors record light, not dark. The dark areas are the absence of light.
That seems obvious, but there are ramifications of this. In general, the majority of the image data is located on the right side of the histogram. This means that to have a successful image it must be properly exposed or slightly underexposed and brought back in a raw editor.
Close up of an image sensor
Calibration
Finally, before you start, you will need to ensure your monitor is calibrated.
Calibration of your monitor will ensure that the printed version of our image will be closer to the version you see on your monitor. In general, uncalibrated monitors are too bright. Using an uncalibrated monitor will result in prints that are much darker than what you see on your monitor.
This can sometimes happen even with a calibrated monitor too, but test prints will help assess how far off your monitor is from your prints.
Color Calibration tool for monitors
Noise
When you enlarge an image, you need to ensure that the noise levels are under control before you start.
Enlarging an image with a lot of noise will only increase the amount of noise present. All resizing programs will do their best to examine the underlying data of your image and use it to scale upward, but the noise on an image will only get worse.
High ISO image ISO 6400 (f/2.8, 1/13, ISO 6400)
Sharpening
The sharpening of your image should only happen at the end of the process of resizing an image. Sharpening is a process of looking at areas of high contrast (these are typically edges) and emphasizing the transition to make those transitions seem more distinct. If you do this early in your editing process or during resizing, the scale of the sharpening will create halos or bizarre artifacts that will be really obvious.
Sharpening can cause a crunchy appearance (f/5.6, 1/250, ISO 200)
Photoshop versus Topaz Gigapixel AI
Although many people use Photoshop to resize, as of 2020, I have found that it does not do as good a job as Topaz’s Gigapixel AI.
Larger scale resizing through Gigapixel AI takes longer, but the results are substantially better. All you need to do is to launch the application and tell it how big you want the new image to be. Press Start and go have a coffee, as it takes a little while. However, the results are really good.
Topaz Gigapixel AI is a tool for resizing images large
Making the Big Print
Finally, once you have resized the image to a larger size you need to print the image. There are basically two main methods to print images big. Chromogenic (C-prints) or Giclee (inkjet) prints.
Both can produce big, high-quality images, but the processes are quite different as is the look of each. I generally prefer inkjet-based, but there are lots of people who still use C-print techniques.
Final product printed and on a wall
Conclusion
When you print images big, there are lots of things to consider when resizing your images and then getting them ready to go to print. However, the results are truly breathtaking.
If you have a great image and you take the proper steps to resize the image and print it big, you will be incredibly satisfied with the result. Moreover, you will create a lot of interest in your images, particularly now that few images get printed anymore.
Do you have any other tips to print images big that you’d like to share? Please do so in the comments.
The post How to Correctly Resize Photos to Print Images Big appeared first on Digital Photography School. It was authored by Mark C Hughes.
The post How to Use Photoshop to Resize and Sharpen Images for the Web appeared first on Digital Photography School. It was authored by Peter Dam.
Do you struggle with getting your images to look super sharp when you use them online? Do they even look blurry? No matter if you share your images on social media platforms or photo sharing sites like Flicker and 500px, you want your images to look as sharp as possible.
Most photographers come across web sharpening issues at some point. But did you know that most of the web sharpening issues you experience come from the resizing process? Resizing your image can make your image look blurry and a lot less sharp than the full sized image. You might have spent a long time processing your image so it would be a shame that it should end up as a less sharp online version.
In this article, you will learn the common pitfalls to sharpening your images for web use, and more importantly, how to sharpen in a way that gives you both full control and the best results.
However, let’s take a look at how not to resize images for online use before we dig into the best way to resize and sharpen in Photoshop.
How NOT to resize and sharpen your images for online use
To get sharp and great looking images online, avoid uploading a full-sized image and relying on the website to handle resizing for you. You don’t have any control over the amount of sharpening (if any) that a website’s upload function add to your image.
You should also avoid just using the export dialogue in Photoshop. Even though it is good, it is not great. You can still end up with blurry images, especially if there is a dramatic size change. Like if you want to resize a 6000px wide image to being only 1200px.
Also, avoid just resizing in Photoshop and then let the export tool do the rest if you want the best results. Even though you resize the image, you have little control of the sharpening process when you only use the export tool.
How to sharpen your images in Photoshop for the best results
To follow along, open a copy of an image that you have already processed in Photoshop, as we go through the best method for resizing and sharpening your photos for online use.
Note: Make sure you use a copy of the image and not the original because you are going to resize your image to a much smaller version. If you accidentally save the image without renaming and close Photoshop, you can’t recover the image back to its full size.
It would be logical to go straight ahead and resize your image to the output size you want. However, this won’t lead to the best results as it may be difficult for Photoshop to properly sharpen an image that suffers from a quality loss when you resize a lot.
Instead, resize in two steps and sharpen in between the steps.
Let’s go through the process step-by-step using the dimensions from above as an example, resizing from a 6000px wide image down to 1200px wide.
The first step is to resize your image down to approx. 1.6 of the final output size that you want to use online. In this case, this would be 1.6 X 1200px = 1920px.
To resize your image in Photoshop, you should go to Image->Image Size and enter the width.
This gives you an image that hasn’t degraded too much from being resized but is still relatively close to the final image size.
Before resizing to the final output size, you should add sharpening. You do this by going to Filter->Sharpen->Sharpen.
If you like to keep track of what each layer does, I suggest renaming the layer to “Sharpened.”
After applying this first layer of sharpening, duplicate the layer. You can do this by pressing CMD+J (on Mac) or CTRL+J (on Windows).
Then apply another round of sharpening by using the menu Filter->Sharpen->Sharpen. Rename this layer to “Extra sharpening.”
Now you are ready to resize to the final image size. You do this by going to Image->Image Size and enter 1200px as the width.
Now that you have resized the image to the final output size, you should see that the image looks very sharp when you view it at its actual size.
If you think that it looks somewhat over-sharpened, you can easily adjust it by just changing the opacity of the of the topmost layer (the one called “Extra sharpening”). Pull down the opacity to around 60-70%.
Now you are done with the sharpening process. However, you should know that there are additional issues that occur when resizing images.
Sharpening an image also tends to make it a tiny bit brighter. If you want to address this, you should add a Levels adjustment layer and pull the midtone point slightly to the right. Usually changing the midtone point to 0.97 brings back the original brightness level. You can also use an Exposure adjustment layer if you prefer to use that instead of a Levels adjustment layer.
The colors in your image also suffer a bit when resizing and sharpening; however, it is not always visible. If you find that your image looks a bit less colorful now that it is resized, you should add a Hue/Saturation adjustment layer and add a bit of saturation back into the image. About +5 to +9 usually brings your image back to the level it was before resizing and sharpening.
That is the end of the web resizing and sharpening method used by many professional photographers using Photoshop.
If you are familiar with creating Photoshop actions, you can record the process of resizing and sharpening images to the dimensions you most often use online. This allows you to speed up the process significantly.
Exporting your image
The final step is to export your image. You can do this by going to File -> Export -> Export As…
The setting you choose when exporting your image depends on where you want to upload your image. For some sites, like image galleries or your portfolio website, image quality is more important than the file size. Whereas, blogs prefer to have smaller file sizes, but with a bit lower image quality.
One of the most important things, as discussed in this article, is that the result is a sharp looking image. You already took care of this by following the sharpening and resizing workflow above, where you resized the image to the output size you need. This means that you don’t have to worry about resizing the image or what resample method to use during export.
The only thing to worry about when following this sharpening and resize workflow is choosing the file format you want and the quality to use. The file format is most likely going to be JPG for web use. The image quality settings depend on whether you prefer a really small file size (so the image loads lightning fast online), or whether you prefer to maintain the best image quality possible. Usually, you can lower the image quality to 80% without a visible drop in image quality. This is my preferred personal setting for image quality. You can optimize the file size even more by using a lower image quality. However, I would never recommend going lower than 50% to get smaller file sizes. There are also some image optimizing sites you can use, such as TinyJpeg, that lower your file size without compromising your image quality too much.
Conclusion
Admittedly, it is a lot more complicated method for resizing your images than using the inbuilt Export feature in Photoshop. However, it also leads to much better results. What use is it to put much effort into capturing and processing an image, if it doesn’t look as great as it could when you show it online?
What method do you use for sharpening your images before using them online? Feel free to share your thoughts in the comments below.
The post How to Use Photoshop to Resize and Sharpen Images for the Web appeared first on Digital Photography School. It was authored by Peter Dam.
While it’s relatively easy to write an Action to resize a series of images in Photoshop, it’s easier still to get Photoshop to do all the work for you. Photoshop comes with an image processor script that will open, resize, and save a series of images for you – very quickly. Here are the steps to make the batch resize process work for your images.
Batch resizing images in PS CC 2019 is fast and easy – no need to run an action. You can just run a script in the Image Processor menu option.
Step 1 – Image Processor
The Image Processor option lives under the Scripts tab in the main File menu of Photoshop.
Choose File -> Scripts -> Image Processor. The image processor dialog shows a simple four-step process for resizing the images.
Step 2 – Choose images
In Section 1 of the Image Processor dialog, select to either resize the images already open in Photoshop (if you have them open) or click ‘Select Folder’ and choose a folder of images to resize. Select ‘Include all Subfolders’ if you wish to also include them.
I prefer to open my images prior to resizing in Photoshop. That way I am not hunting for the folder I need. But if you have all your images organized in a folder you can choose the ‘Select Folder’ option in Step 1 of the Image Processor window.
Step 3 – Save images location
In Section 2 of the Image Processor dialog box, you can select where to save the images. When selecting ‘Save in Same Location,’ Photoshop creates a subfolder to save the images in so you don’t have to worry about overwriting them. When a subfolder of the same name already exists with images of the same names in it, Photoshop saves to that folder but adds a sequential number to the file. That way, you won’t lose your other files. Alternatively, you can select a different folder for the resized images.
Indicate where you want Photoshop to save the resized images.
Step 4 – File Type and Size
In Section 3 of the Image Processor dialog box, select the file type you want Photoshop to save your image as. For the web ‘Save as JPEG’ is the obvious choice. You can set a Quality value in the range 0 to 12 where 12 is the highest quality and 0 the lowest.
For better color on the web, you can also select ‘Convert profile to sRGB.’ Ensure that ‘Include ICC Profile’ at the foot of the dialog is checked so the profile will be saved with the image.
Option 3 in the Image Processor dialog box is where you can select the type of file you want to save the resized image. You can choose the size in terms of W (width) and H (height) in pixels.
To batch resize the images, select the ‘Resize to Fit’ checkbox. Set the desired maximum width and height for the final image. For example, if you type ‘300’ for the width and ‘300’ for the height, the image will be resized so that the longest side of the image (whether it be in portrait or landscape orientation) will be 300 pixels.
The images are scaled in proportion so they aren’t skewed out of shape. If desired, you can save in another format as well. Just select its checkbox so you can save the same image in different formats and at different sizes in the one process.
The Width and Height measurements do not have to be the same. So you could, for example, specify a Width of 500 and a Height of 700 and no image will have a width greater than 500 or a height greater than 700.
Step 5 – Run Action
In Section 4 of the Image Processor panel, you can also select ‘Run an Action’ on the images if desired.
Step 6 – Run
Once you’re ready, click ‘Run’ and the images are automatically opened (if they are not already), resized, saved, and closed.
To see your resized images, choose File -> Open and navigate to the folder that you specified the images to be saved to. If you chose to save as a JPEG, the images will be in a subfolder called JPEG. PSDs are in a folder called PSD and so on.
In conclusion, whenever you need to resize a large number of images for uploading to the web, for example, the batch resize in the Photoshop Image Processor script makes the job fast, efficient, and painless.
The post How to Batch Resize Your Images Quickly Using Photoshop appeared first on Digital Photography School.
Size, resolution, and formats… What do pixels have to do with it?
Do you buy your camera based on its number of megapixels? Are you having problems sharing your photos online? Does your print look low quality even if it looks great on the screen? There seems to be a lot of confusion between pixels and bytes (image size and file size), quality and quantity, size, and resolution.
So let’s review some basics to make your life easier, your workflow more efficient, and your images the correct size for the intended usage.
This image is sized to 750×500 pixels at 72 dpi, saved as a compressed JPG which is 174kb. Let’s look at what all that means.
Is resolution the same as size?
One of the biggest misunderstandings comes from the concept of resolution. If this is your case, believe me you’re not alone.
The problem is that resolution can refer to many things, two of them relate to the problem at hand. Further on I’ll explain these two resolution concepts, however, they have one thing in common that I need to clarify first. They both have to do with pixels.
You’ve probably heard a lot about pixels, at least when you bought your camera. This is one of the most available and “valued” specs on the market so I’ll start there.
What is a pixel?
A digital photo is not one non-dividable thing. If you zoom in far enough you’ll see that your image is like a mosaic formed by small tiles, which in photography are called pixels.
The amount of these pixels and the way they are distributed are the two factors that you need to consider to understand resolution.
Pixel count
The first kind of resolution refers to the pixel count which is the number of pixels that form your photo. In order to calculate this resolution you just use the same formula you would use for the area of any rectangle; multiply the length by the height. For example, if you have a photo that has 4,500 pixels on the horizontal side, and 3,000 on the vertical size it gives you a total of 13,500,000. Because this number is very unpractical to use, you can just divide it by a million to convert it into megapixels. So 13,500,000 / 1,000000 = 13.5 Megapixels.
Pixel density
The other kind of resolution is about how you distribute the total amount of pixels that you have, which is commonly referred as pixel density.
Now, the resolution is expressed in dpi (or ppi), which is the acronym for dots (or pixels) per inch. So, if you see 72 dpi it means that the image will have 72 pixels per inch; if you see 300 dpi means 300 pixels per inch, and so on.
The final size of your image depends on the resolution that you choose. If an image is 4500 x 3000 pixels it means that it will print at 15 x 10 inches if you set the resolution to 300 dpi, but it will be 62.5 x 41.6 inches at 72 dpi. While the size of your print does change, you are not resizing your photo (image file), you are just reorganizing the existing pixels.
Imagine a rubber band, you can stretch it or shrink it but you’re not changing the composition of the band, you’re not adding or cutting any of the rubber.
In summary, no resolution is not the same as size, but they are related.
So quantity equals quality?
Because of the aforementioned correlation between size and resolution, a lot of people think that megapixels equal quality. And in a sense it does because the more pixels you have to spread out, the higher the pixel density will be.
However, on top of the quantity you should also consider the depth of the pixels, this is what determines the amount of tonal values that your image will have. In other words it is the number of colors per pixel. For example, a 2-bit depth can store only black, white and two shades of grey, but the more common value is 8-bit. The values grows exponentially so for example with an 8-bit photo (2 to the power of 8 = 256) you’ll have 256 tones of green, 256 tones of blue, and 256 tones of red, which means about 16 million colors.
This is already more that the eye can distinguish which means that 16-bit or 32-bit will look relatively similar to us. Of course, this means that your image will be heavier even of the size is the same, because there is more information contained in each pixel. This is also why quality and quantity are not necessarily the same.
Therefore quantity helps, but also the size and depth of each pixel determine the quality. This is why you should look all the specs of the camera and its sensor and not just the amount of Megapixels. After all, there’s a limit to the size you can print or view your image, more than that it will only result in extra file size (megabytes) and no impact in the image size (megapixels) or the quality.
How to choose and control image size and file size?
First of all, you need to choose the outlet for your photo, there is a maximum density that you need. If you are going to post your image online you can do great with only 72 dpi, but that is too little for printing a photo. If you are going to print it you need between 300 and 350 dpi.
Of course, we are talking about generalizations because each monitor and each printer will have slightly different resolutions as well. For example, if you want to print your photo to 8×10 inches you need your image to have 300dpi x 8″ = 2400 pixels by 300dpi x 10″ = 3000 pixels (so 2400×3000 to print an 8×10 at 300dpi). Anything bigger than that will only be taking up space on your hard drive.
How to resize in Photoshop
Open the menu for the image size and in the popup window, you need to tick the Resample Image box. If you don’t activate “resample” you will only be redistributing the pixels like I explained at the beginning of the article.
You can also choose to tick the Constrain Proportion if you want the measure to adjust according to the changes you make. So the width adjusts when you change the height and vice versa.
8×10 inches at 300 ppi, this is the size needed for printing an 8×10. Notice the pixel size is 3000 x 2400.
750×500 pixels at 72 ppi. This is web resolution and is the exact size of all the images in this article. The size in inches is irrelevant when posting online – only the pixel size matters.
On the top of the window, you’ll also see how the file size changes. This is an uncompressed version of your image, it’s the direct relationship I explained in the first part of the article: fewer pixels means less information.
Now, if you still want to change the file size without resizing anymore, you have to do it when you save the image. Before saving your photo you can choose the format you want:
If you don’t want to loose any information you need to save an uncompressed format. The most common, and therefore easier to share is TIFF.
If you don’t mind losing a little information as long as you have a lighter file, then go for a JPEG and choose how small you want it. Obviously the smaller you set it, the more information you will lose. Fortunately, it has a preview button so you can see the impact of your compression.
JPG high quality.
JPG low quality. Notice how it’s pixelated and breaking down? If you crunch it too much or go too low quality you risk degrading the image too far.
Conclusion
So there you have it. So quality, quantity, size and resolution explained and they all have to do with pixels, as they are the basic units that constitute your image. Now that you know you can make the best choices to print, share and save your photos.
The post How to Understand Pixels, Resolution, and Resize Your in Photoshop Correctly by Ana Mireles appeared first on Digital Photography School.
Have you ever found yourself with a batch of photos that you needed to have edited in the same way? Rather than editing each image one-by-one, Adobe Photoshop offers batch editing processes that can help you save time, while preserving consistent quality among your images.
This tutorial will show you how to use Photoshop Actions to resize and edit multiple photos, along with a quick tip on how to replicate this process in Lightroom.
What You Need
The bulk editing process is pretty easy and straightforward, requiring just a handful of things:
A batch of images you want to bulk edit
Adobe Bridge
Adobe Photoshop
Basic Photoshop working knowledge
Get Started: Record an Action in Photoshop
The very first step is to determine the process or edit that you wish to have automated, and record it as an Action in Photoshop. In this case, let’s use the example of resizing an image. Then you’ll use Bridge to select your set of images and apply the Action to all of them at once.
Step 1: Open Photoshop and have a sample image open to perform this action on. Go to the main menu bar and click Window > Actions.
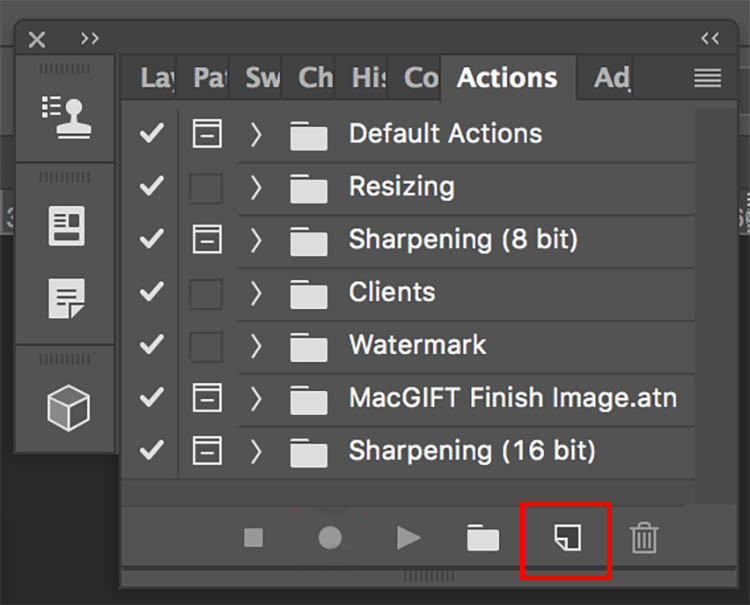
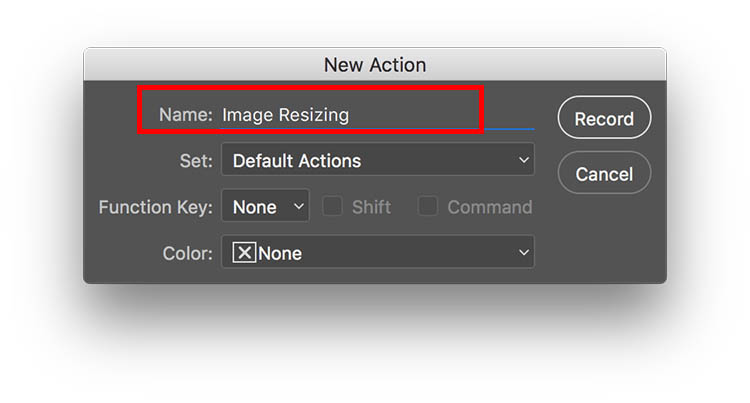
Step 2: When the Actions panel pops up, click the bottom right button next to the trash can icon that says “Create New Action.” Enter a name for your action, such as “Image Resizing.” Then start recording your new action by clicking the “Record” button.
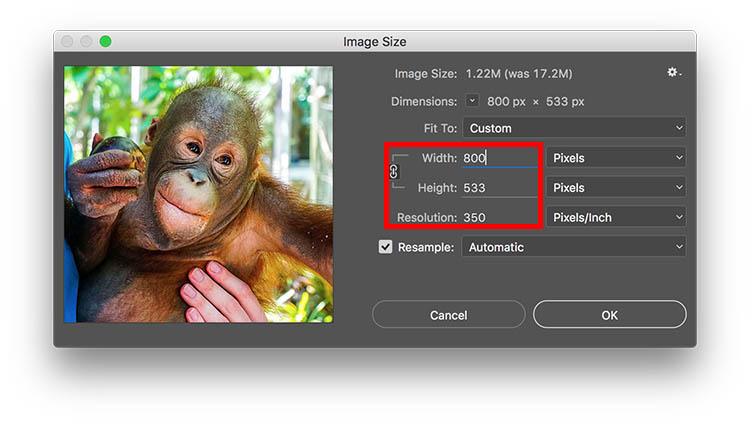
Step 3: Now begin the series of steps that you want to have recorded. For resizing, head up to the main Photoshop menu bar and go to Image > Image Size. Input your ideal photo size, such as 800 pixels wide.
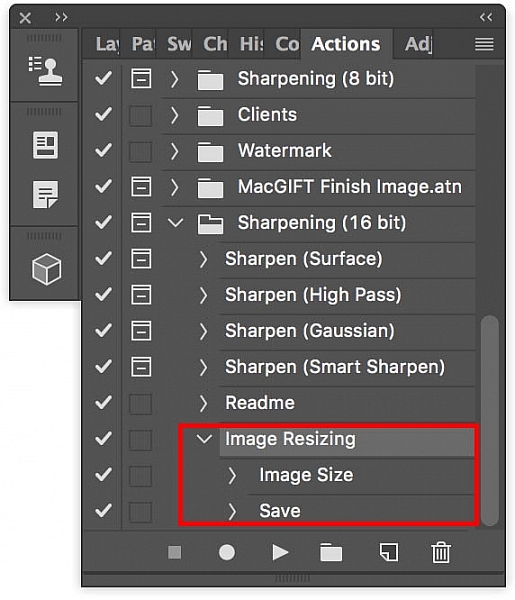
Step 4: After you’ve completed all of the steps for your action, go back to the Actions panel and click on the Stop button to end recording. You should now see your saved action within the panel.
Run A Batch of Images Through Photoshop
After you’ve created your action, it’s time to apply it to your batch of images.
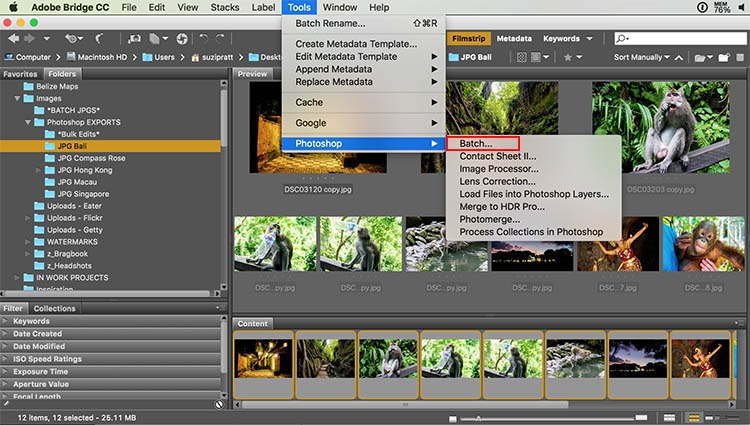
Step 1: Put all of the photos you want to batch edit into one folder. Open Adobe Bridge and find your folder of images. Click on the folder and select all of the content.
Step 2: Within Bridge, go to Tools > Photoshop > Batch.
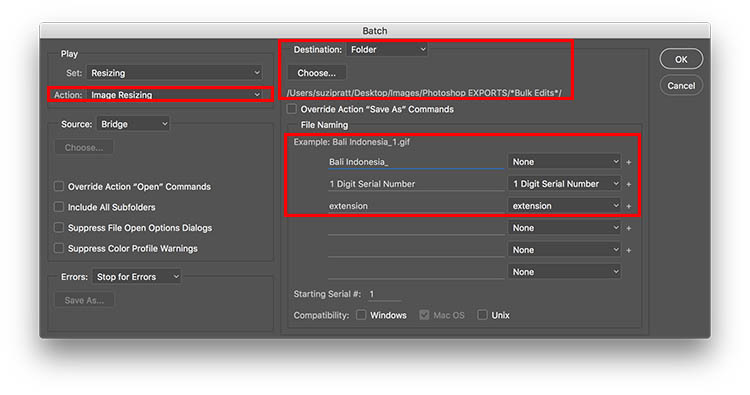
Step 3: A Batch dialogue box will appear and you’ll want to adjust these settings in particular.
In the top left corner, select the action that you want applied to your images (in our case, “Image Resizing.”).
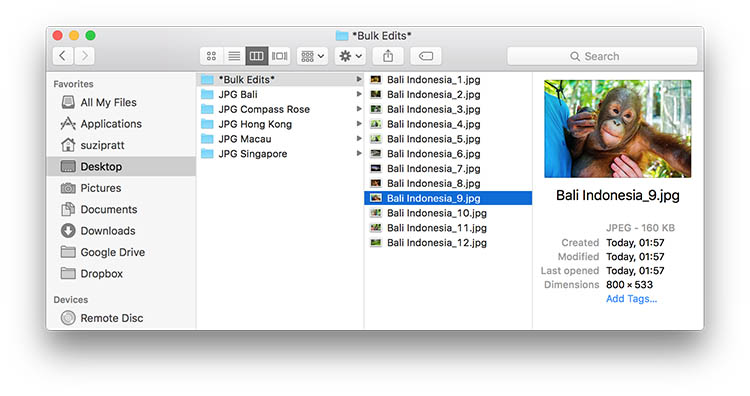
In the middle of the dialogue box, specify the folder where your bulk edits should end up. I always have a folder called *Bulk Edits* where I automatically have all of my bulk edited images saved.
Finally, you can specify a particular image name that you want to give to your batch of images, as well as assign unique identifiers, such as numeric order. Then click OK to have the action applied to your batch of photos.
Step 4: After your batch of images are processed, go to your specified folder to check out the results.
Making bulk edits in Lightroom
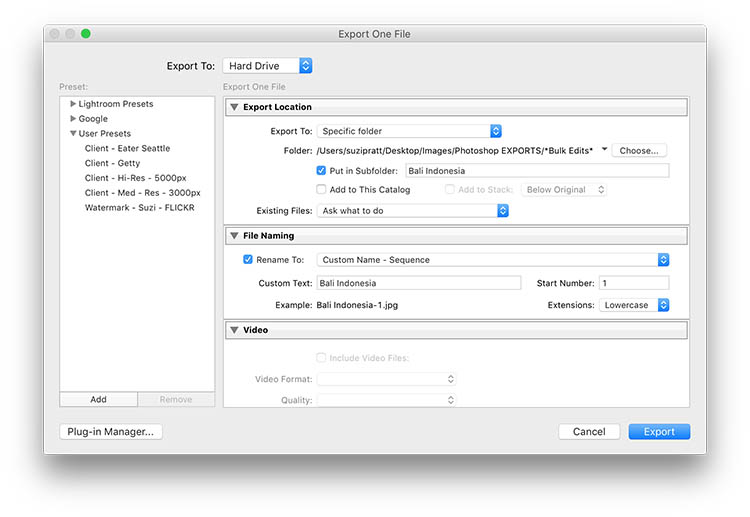
While doing bulk edits in Photoshop is relatively easy to do, it’s even quicker in Adobe Lightroom. If using Lightroom, import your images and select them all. Then go to File > Export. A pop up dialogue box will then appear with fields where you can specify where to save the images and also rename, resize, and watermark the images (you can also save that as an export preset)
Over to You
Do you perform many bulk edits in Photoshop or Lightroom? If so, what are the types of processes you tend to bulk edit? Let me know in the comments below!
Change the size of tiles on your Windows 8.1 Start screen to show or hide live tile details.
Are some of the tiles on your Window 8.1 Start screen taking up too much room and you’d like to fit more on the screen simultaneously? Or do you only have a few apps installed (or a large monitor with lots of free space) and want to show as much information and pictures as possible from live tiles such as News, Store, and Weather?
To resize tiles on your Start Screen, just do the following:…
If you’re working on a large shoot and need to output a lot of images at a fixed size then Lightroom can do the work for you. It isn’t obvious how you can crop all your images to a fixed size and output them at a certain set of pixel dimensions but it is easy to do when you know how. Here’s how to do it:
Step 1
First locate the folder with your images in it. I prefer to make virtual copies of my images and put them in a new collection but you can do whatever makes sense to you.
Step 2
Select all the images in Grid view in the Library module in Lightroom.
Open the Quick Develop panel on the right and, from the Crop Ratio dropdown list, select the crop ratio that you want to crop to. For example you can crop to fixed ratios such as 1 by 1 or printing sizes such as 5×7, 4×6 and so on.
Here I’ve selected 5×7 and when I do so all the selected images are automatically cropped to this 5 x 7 ratio.
Lightroom is smart enough to understand that some images are portrait orientation and others are landscape. Portrait images are cropped to 5 x 7 and landscape orientation images to 7 x 5.
Step 3 (optional)
If desired, you can now move to the Develop module and check the crop for all the images. By default, Lightroom will center the crop rectangle on the image and this may not be exactly what you want for some images. However, it is easy to go to the Develop module, click the first image and click on the Crop Overlay Tool so you see the crop marquee in position on the on the image.
Now from the filmstrip you can click on each image in succession to preview it in the crop window and you can easily identify if any of them need an adjustment to the crop rectangle. If they do simply drag on the crop rectangle to reposition it. When you’re done return to the Library view.
Step 4
As the images are now all cropped to size, press Ctrl + A to select them and then click Export. Choose a folder to export the images into or click New Folder to create a new folder.
You can now set your desired preferences in the Export dialog.
To control the output size – in pixels wide and tall – of the images easily because you already know the crop ratio. To do this, select the Resize to fit checkbox and choose Long Edge from the dropdown list. Then type a pixel dimension for the long edge. So, for example, to prepare 5 by 7 ratio images for printing at 300 dpi the longest edge will need to be 2,100 pixels (7 x 300) so type 2100 and set the resolution to 300.
Step 5
Click Export to export your images and they will be exported to a folder at the chosen size and resolution.
This process allows you to quickly and effectively prepare a batch of images for printing. It manages portrait and landscape images so that you don’t have to separately handle each type. It’s a simple workflow and a fast way to prepare images from a large shoot.
Post originally from: Digital Photography Tips.
Check out our more Photography Tips at Photography Tips for Beginners, Portrait Photography Tips and Wedding Photography Tips.
A couple of ways to make more information visible when viewing file details via Windows 7 Explorer.
These tips are for Windows 7 beginners – though some who have used the operating system for a while still may not know about them!
When viewing file information in Explorer’s “Details” view (right-click an empty area in a folder and select “View” – “Details”), more information may be available than can fit on the screen without having to use the horizontal scroll bar. If a particular column is too large, move your mouse pointer to the column edge until the pointer turns into an arrow pointing to the left and right. Then double-click the left button to resize the column to the width of the widest item in the column. Or……


You must be logged in to post a comment.