RSS
 

Posts Tagged ‘Replace’

NVIDIA Research develops a neural network to replace traditional video compression

06 Oct

NVIDIA researchers have demonstrated a new type of video compression technology that replaces the traditional video codec with a neural network to drastically reduce video bandwidth. The technology is presented as a potential solution for streaming video in situations where Internet availability is limited, such as using a webcam to chat with clients while on a slow Internet connection.

The new technology is made possible using NVIDIA Maxine, a cloud-AI video streaming platform for developers. According to the researchers, using AI-based video compression can strip video bandwidth usage down to 1/10th of the bandwidth that would otherwise be used by the common H.264 video codec. For users, this could result in what NVIDIA calls a ‘smoother’ experience that uses up less mobile data.

In a video explaining the technology, researchers demonstrate their AI-based video compression alongside H.264 compression with both videos limited to the same low bandwidth. With the traditional video compression, the resulting low-bandwidth video is very pixelated and blocky, but the AI-compressed video is smooth and relatively clear.

This is made possible by extracting the key facial points on the subject’s face, such as the position of the eyes and mouth, then sending that data to the recipient. The AI technology then reconstructs the subject’s face and animates it in real time using the keypoint data, the end result being very low bandwidth usage compared to the image quality on the receiver’s end.

There are some other advantages to using AI-based compression that exceed the capabilities of traditional video technologies, as well. One example is Free View, a feature in which the AI platform can rotate the subject so that they appear to be facing the recipient even when, in reality, their camera is positioned off to the side and they appear to be staring into the distance.

Likewise, the keypoints extracted from the subject’s face could also be used to apply their movements to other characters, including fully animated characters, expanding beyond the AI-powered filters that have become popular some video apps like Snapchat. Similar technology is already on the market in the form of Apple’s AI-based Animoji.

The use of artificial intelligence to modify videos isn’t new; most major video conferencing apps now include the option of replacing one’s real-life background with a different one, including intelligent AI-based background blurring. However, NVIDIA’s real-time AI-based video compression takes things to a new level by using AI to not only generate the subject in real time, but also modify them in convenient ways, such as aligning their face with a virtual front-facing camera.

The technology could usher in an era of clearer, more consistent video conferencing experiences, particularly for those on slow Internet connections, while using less data than current options. However, the demonstration has also raised concerns that largely mirror ones related to deepfake technologies — namely, the potential for exploiting such technologies to produce inauthentic content.

Artificial intelligence technology is advancing at a clipped rate and, in many cases, can be used to imperceptibly alter videos and images. Work is already underway to exceed those capabilities, however, by fully generating photo-realistic content using AI rather than modifying existing real-world content.

The Allen Institute for AI recently demonstrated the latest evolution in this effort by using both images and text to create a machine learning algorithm that possesses a very basic sense of abstract reasoning, for example. NVIDIA Research has also contributed extensively to this rapidly evolving technology, with past demonstrations including generating landscapes from sketches, generating photo-realistic portraits and even swapping facial expressions between animals.

A number of companies are working to develop counter technologies capable of detecting manipulated content by looking for markers otherwise invisible to the human eye. In 2019, Adobe Research teamed up with UC Berkeley to develop and demonstrate an AI capable of not only identifying portrait manipulations, but also automatically reversing the changes to display the original, unmodified content.

The general public doesn’t yet have access to these types of technologies, however, generally leaving them vulnerable to the manipulated media that permeates social media.

Via: NVIDIA

Articles: Digital Photography Review (dpreview.com)

 
Comments Off on NVIDIA Research develops a neural network to replace traditional video compression

Posted in Uncategorized


Virtual trade show from Cinema5D in the works to replace canceled NAB 2020 April event

18 Mar

The canceled NAB 2020 event will live on in the form of a ‘virtual trade show’ from Cinema5D, according to Johnnie Behiri and Nino Leitner. The team first revealed intentions to hold a virtual trade show in the place of NAB 2020 on March 12, stating at the time that they were approaching manufacturers about the plan.

As with Mobile World Congress, GDC and multiple other events before it, the NAB 2020 show originally scheduled to take place in April has been canceled. The announcement was made by NAB President and CEO Gordon Smith last week, who cited the ongoing coronavirus outbreaks as the reason for the cancellation.

In a statement to DPR, Behiri explained:

‘We were not shocked to hear that NAB was canceled because of the current developments, but we were surprised that no alternatives were offered to manufactures and visitors alike. Other canceled trade show events are moving to some kind of online event but NAB seems unable to do so too.’

GDC 2020 is one of the previously canceled events that is now holding online talks in substitution for the physical gathering. Cinema5D’s virtual trade show will be similar, according to Behiri, who said the talks will take place in hosted, moderated live streams on April 20 – 22 from 9 AM to 6 PM PST.

The hosted broadcasts will be mixed with prerecorded new product announcements and virtual studio talks with various guests; topics will include trends, new products and industry analyses. As well, Behiri says that the team plans to integrate streamed live press events from major manufacturers into the virtual trade show.

According to Behiri:

‘All of this is an evolving plan but we invite manufacturers to get in touch with us via our contact page to share NDAs about new products so we can interview them beforehand and align plans to integrate them into our coverage. We are also happy to consider working together with other online publications.’

Though the virtual trade show will attempt to offer ‘a bit’ of coverage on a broad range of subjects, Behiri says that it will focus on production tech aimed at aspiring and professional filmmakers.

Articles: Digital Photography Review (dpreview.com)

 
Comments Off on Virtual trade show from Cinema5D in the works to replace canceled NAB 2020 April event

Posted in Uncategorized


Rock Bar is a sleek and slim weighting system designed to replace sandbags

24 Sep

California company Rock Bar has introduced a much tidier solution to weighing down tripods and light stands with a new weight case that straps securely to legs and center columns to provide extra stability.

The Rock Bar system comprises a nylon zip-up tube that comes filled with seven pounds of recycled steel and which uses straps at either end of its body to attach to legs without swaying in windy conditions.

The number of weights in the body can be adjusted by the user depending on the conditions and the equipment being supported, and the slim-line pouch is designed not to get in the way or to catch the wind itself. Rock Bar is aimed at tripod users, and those hanging lights on high stands and boom arms, and is intended to replace sandbags and other types of hanging ballast.

The case measures 31.75×6.35×6.98cm (12.5×2.5×2.75in) and costs $ 45. For more information see the Rock Bar website.

Articles: Digital Photography Review (dpreview.com)

 
Comments Off on Rock Bar is a sleek and slim weighting system designed to replace sandbags

Posted in Uncategorized


Here’s why I’m not quite ready to let the Pixel 3 replace a dedicated camera

18 Apr
Modern architecture abounds in Palm Springs, mid-century and otherwise.
Olympus Pen F ISO 200 | 1/1600 sec | F6.3 | Olympus M.Zuiko 12mm F2.0

On the topic of “When will smartphones make most dedicated cameras obsolete?” I tend to be in the “We’re pretty much there already” camp. In my own day-to-day photography, and even for some special occasions where I expect to take more than a few photos, I’ll stick with my smartphone rather than bringing along a dedicated camera.

That wasn’t the case on a recent trip to Palm Springs. I shot with both the Pixel 3 and a Micro Four Thirds camera (the Olympus Pen F, specifically). Here’s where each of them shine, and why I’m glad I had a dedicated camera at my side.

My photographic priority in Palm Springs was the city’s veritable smorgasbord of mid-century modern buildings. Banks, hotels, liquor stores – all housed in stunning modern buildings that are extremely Instagrammable. You know you’ve hit the architectural jackpot when you’re excited to photograph the town BevMo!.

Literally the roof of a BevMo! liquor store.
Olympus Pen F ISO 200 | 1/800 sec | F5.6 | Olympus M.Zuiko 12mm F2.0

There are obvious benefits to any smartphone, including of course the Pixel 3. It’s always with you, even by the pool, photos are automatically backed up to your image library, everything is immediately shareable. But the Pixel 3 presents a few unique advantages: it handles high-contrast scenes particularly well, and the multi-shot Night Sight mode captures a level of detail well beyond what we’re used to seeing from smartphones, even in the daytime.

The Pixel 3 does a fine job balancing scenes like this one, and its IP68 waterproof rating means it’s safe poolside.
Google Pixel 3 XL ISO 59 | 28mm equiv. | F1.8

There are some disadvantages though, which figured into my decision to bring along the Olympus Pen F and 12mm lens. First, the Pixel’s main camera wasn’t quite wide enough for the kind of photography I wanted to do. Photographing mid-century modern buildings from the sidewalk along a busy road doesn’t make it easy to just back up to get the whole thing in the shot.

Using panorama mode for a wider shot isn’t a great option either – image quality is pretty poor. This year’s smartphones are addressing this problem with wide-angle lenses, so if Google ever decides to add another rear camera, who knows what will be possible!

Stuff like this is just lying around everywhere in Palm Springs!
Olympus Pen F ISO 200 | 1/1250 sec | F4.5 | Olympus M.Zuiko 12mm F2.0

Editing Pixel 3 Raws isn’t my favorite experience at the moment, either. Editing Pen F files is familiar and comfortable to me, while handling Pixel Raw files seems to be a quirky process in its current state. When I use Camera Raw I start with a very flat, overexposed image, and when I edit Raw photos in Snapseed I encounter a couple of bugs along the way (and don’t love the small-screen edit experience). It’s more than good enough for something I’ll post on social media, but I wanted a little more control with my Palm Springs photos.

I also found myself taking advantage of a few Pen F features that were handy, if not necessarily must-haves. A viewfinder really came in handy under the bright mid-day sun. I also like a tilting LCD to compose shots from higher and lower angles. Also, the digital level was pretty huge for me, a person with (apparently) a crooked brain who is unable to keep horizons straight.

If every Bank of America looked like this I’d be a member tomorrow.
Olympus Pen F ISO 200 | 1/1250 sec | F4.5 | Olympus M.Zuiko 12mm F2.0

To be sure, there are some third-party workarounds that would have adapted the Pixel 3 to my purposes better. I could have brought a wide-angle attachment lens along and used a camera app with a level. There are trade-offs when using either of these options, though.

I also prefer the anonymity of the Pixel 3. One morning I walked from the center of town a mile and a half to the visitor’s center, a futuristic-looking building that used to be a gas station and is one of the most recognizable structures in town.

Roof of the Tramway Gas Station, currently home of the Palm Springs Visitor’s Center.
Olympus Pen F ISO 200 | 1/1250 sec | F6.3 | Olympus M.Zuiko 12mm F2.0

I was quite conspicuous on this journey for several reasons. For starters, nobody walks a mile to get anywhere in 80°+ heat if they can help it. I’m also incredibly pale and probably a danger to motorists walking under a beaming sun on the side of the road. I also had a Real Camera in my hand, and on top of that, am a lady.

Being a lady alone in public doing something out of the ordinary is, in my experience, an invitation for commentary, usually of the harmless “What are ya doin’ there with that big ol’ camera little missy??” variety. Well-meaning I’m sure, but my male colleagues don’t quite experience the same interruptions.

Palm Springs: they aren’t kidding about those palms.
Olympus Pen F ISO 200 | 1/1000 sec | F4.5 | Olympus M.Zuiko 12mm F2.0

I wish I’d been shooting with the Pixel when I saw the Photo That Got Away. Traffic in the street was stopped at a red light, and I was walking parallel to a pickup truck towing a camper van with a majestic purple mountain on the side. Behind it was a backdrop of actual majestic mountains. It was perfect, except the driver was staring right at me staring at him.

Maybe I would have gotten away with it shooting with the phone. As it happened, it just felt too conspicuous, almost invasive, to pull the camera up to my eye and take a picture. The light turned green and I thought about that photo through the rest of the trip.

In any case, I made it to the visitor’s center, which is a lovely building but I actually ended up taking my favorite picture around the back of it. Funny how that happens.

I walked a mile and a half through the desert to take this photo of a bench, I guess.
Olympus Pen F ISO 200 | 1/1250 sec | F6.3 | Olympus M.Zuiko 12mm F2.0

I liked the experience of carrying the Pen F at my side. It put me in a mindset of taking photos that’s harder to get into when I’m using my phone. But I don’t think we’re far from a future where the Pixel 3 satisfies almost all of the photographic needs I had on a trip like that, and there are real benefits to shooting with the Pixel 3 that traditional cameras don’t provide now. The Pixel automatically backed up all of the trip photos I took with it to my Photos library, where they were instantly shareable, searchable and photo-book-printable. The Pen F sure didn’t do any of that.

When I can get 90% of the image quality from a smartphone that I would from a traditional camera, and the experience of using it as a photographic device – from capture through editing – is 90% as good, I’ll be ready to leave the camera at home when I go on a trip like the one I just took. That day probably isn’t far off at all.

Articles: Digital Photography Review (dpreview.com)

 
Comments Off on Here’s why I’m not quite ready to let the Pixel 3 replace a dedicated camera

Posted in Uncategorized


How to Replace Colors in Your Images Using Photoshop

15 Jan

The post How to Replace Colors in Your Images Using Photoshop appeared first on Digital Photography School. It was authored by Megan Kennedy.

Have you ever taken a photograph and wondered what it would look like in a different color? Or perhaps you find a particular color distracting and want to swap it for a more subtle tone? Maybe you want to ramp up the impact, using more vibrant colors to make your image pop?

With the help of Photoshop, swapping the colors of different elements in a photograph is quick and easy. Here are two ways to switch the colors in your image to make them more dynamic.

Method one – Using the Replace Color Panel

The Replace Color panel is a simple tool designed to tweak color selections. When you select a specific color in the image, the Replace Color function grabs similar colors, allowing you to change them within the same action.

Step 1 – Preparing your image

First, open your image in Photoshop. To edit non-destructively we need to duplicate the layer. That way, we can go back to the original image at any time. Select your image in the Layers Pallet, then go to Layer -> Duplicate Layer. Alternatively, you can right-click on your image in the layers panel and click Duplicate Layer or drag your layer onto the New Layer icon.

Step 2 – Selecting a Color to Replace

With your duplicate layer selected in the Layers Pallet go to Image -> Adjustments -> Replace Color and the Replace Color panel will pop up. Check the Localized Color Clusters and Preview options. The cursor will automatically be converted to an eyedropper icon, so click on the color in the image that you want to replace. This highlights the color in white in the preview thumbnail, so you can see how much of the color is selected.

Go to Image -> Adjustments -> Replace Color to open the Replace Color panel


Click on the color in the image that you want to replace. This highlights the selection in white in the preview thumbnail

Step 3 – Adjusting the range

The next step is to add further shades of your chosen color to the selection so it looks more natural. With the Replace Color panel still open, hold down the shift key and click on more shades of your selected color in the image. This adds new shades of your selected color to the preview thumbnail.

If you accidentally select an area, hold down the alt key and click the area again to deselect the selection. You can adjust the edges of the selection with the Fuzziness slider, this dictates the sharpness of the edges in the selection.

Step 4 – Swapping the color

In the Replace Color panel, use the Replacement Hue slider to adjust the color of your selection. Once you’re happy with the color, use the Saturation slider to increase or decrease the intensity of the replacement color. You can also adjust the Lightness slider which tweaks the shade of the replacement color.

Use the Replacement Hue slider to adjust the color of your selection

To make sure the edges of the selection have adequate coverage, you may need to readjust the Fuzziness slider.

Once you’re happy with your results, click OK. Your adjustments will be applied to your image and you’re good to go!

Method two – Using the Color Replacement Tool

The Color Replacement Tool is an alternative to using the Replace Color panel. With the Color Replacement Tool, you can apply a replacement color to a more targeted area in the image.

Step 1- Preparing Your Image

Just like in the first method, we need to duplicate the original layer so we can return to the original image if required. Select your image in the Layers Palette then go to Layer -> Duplicate Layer or right click on the layer in the Layers Pallet and click Duplicate Layer.

Step 2 – Selecting the Color Replacement Tool

Accessing the Color Replacement Tool is a little tricky. Click and hold the cursor over the Brush Tool on the left toolbar and several brush options will appear. Select the Color Replacement Tool.

Step 3 – Setting your foreground color

With the Color Replacement Tool selected, set your foreground color to the color you want to replace your current color with. So if you want to change a red subject to blue, select blue as your foreground color.

Set your foreground color to the color you want to replace your current color with

Step 4 – Applying color with the Color Replacement Tool

With the Color Replacement Tool selected, brush over the area of color you want to replace. You can adjust the settings of the brush (size, shape, tolerance) in the top menu bar.

With the Color Replacement Tool selected, brush over the area of color you want to replace

Conclusion

Color is a wonderful and versatile element of composition. But sometimes the right color scheme is elusive. That’s where the Color Replacement tools come in handy. Now you’ve read the guide, why not give it a go? Post your results in the comments below!

The post How to Replace Colors in Your Images Using Photoshop appeared first on Digital Photography School. It was authored by Megan Kennedy.


Digital Photography School

 
Comments Off on How to Replace Colors in Your Images Using Photoshop

Posted in Photography


Two Ways to Replace the Sky Using Photoshop

23 Jun

There are many things that you can control when shooting a photograph, but the weather is not one of them! If you have a great landscape or architecture photo but the sky is too dull it will bring down the entire image, so just keep reading to learn how to replace the sky with Photoshop.

Paste sky Photoshop tutorial before after - Two Ways to Replace the Sky with Photoshop

“Give the clouds an assignment.” said photographer Werner Mantz.

He was right, sometimes you can have the best weather and end up with a flat blue sky. Even worse if you have a horribly cold day that gives you a dull grey sky. Either way it can be the win or lose element of the image. No need to panic though, you can composite two photos into one perfect shot and replace the sky with a better one.

Method #1 – Sky Replacement in Photoshop

Most importantly you need an image from a cloudy sky that matches the mood of the image onto which you’re going to paste it. I’m going to work with a vertical shot so it’s better if the one from the sky has the same format. The subject is a ship aground in iced waters so my sky should be ideally from a stormy day.

Paste sky Photoshop tutorial subject clouds - Two Ways to Replace the Sky with Photoshop

With the image of the subject open, make a selection of the sky that needs to be covered by the new one. For this you can use any tool with which you feel comfortable. I usually start with a broad selection using the Magic Wand and then get closer with the different types of Lasso tools. You’ll see a dotted line (marching ants) around the area that is being selected.

Paste sky Photoshop tutorial selection tools - https://digital-photography-school.com/3-ways-make-sky-selection-photoshop/

Refine the selection

I find it’s also useful to go into Menu > Selection > Edit in Quick Mask. This will show the parts that are not selected in a red mask, so you can paint with the Brush tool what you want out and use the Erase tool to include in the selection.

Paste sky Photoshop tutorial quick mask selection- https://digital-photography-school.com/3-ways-make-sky-selection-photoshop/

Now open the sky image and select it all (Cmd/Ctrl + A), then go to Menu > Edit > Copy. Turn back into the first image and go to Menu > Edit > Paste Into. Notice that it becomes a new Layer and it has a Layer Mask with the shape of the selection you made, therefore you can now scale it and move it around and your subject won’t be affected, you’ll see the new sky directly as it would be fit in the image.

Paste sky Photoshop tutorial transform - Two Ways to Replace the Sky with Photoshop

Once you’re happy with the montage, you can add some adjustment layers so that the two parts have the matching brightness, tone, etc., and the result seems as natural as possible.

Paste sky Photoshop tutorial before after - Two Ways to Replace the Sky with Photoshop

Method #2 – Sky Replacement in Photoshop

When your landscape has a diffused horizon line like one with trees, for example, especially if you just need the sky to have a few more clouds instead of completely replacing the original sky then this technique is much more efficient because you don’t have to do the precise selection needed in the previous method. So go ahead and open both images on Photoshop.

Paste sky Photoshop tutorial before sunny day - Two Ways to Replace the Sky with Photoshop

In the image of the sky go to Menu > Selection > Edit in Quick Mask Mode and then choosing the Gradient tool draw a line from bottom to top, this will make the image appear with a red mask, faded gradually from one edge to the other.

Paste sky Photoshop tutorial quick mask selection gradient - Two Ways to Replace the Sky with Photoshop

Now go back to Menu > Selection > Edit in Quick Mask Mode and click again, this will turn the Quick Mask off, and you’ll see a rectangular selection on your image without noticing the gradient. But don’t worry, it’s still there.

Now pull the tab of the image to the side so that you can access the two images simultaneously, then drag the sky selection and drop it on top of the first image.

Paste sky Photoshop tutorial drag subject clouds

Now pick the Eraser tool and with a soft brush start erasing the part of the new layer that is covering the subject. You can also decrease the opacity of the layer so that it blends in a bit more smoothly.

Paste sky Photoshop tutorial erase opacity

There you go, you can do the final touches with adjustment layers so that levels and colors match.

Paste sky Photoshop tutorial after sunny day

Conclusion

So there you have two methods to replace the sky using Photoshop.

Have you tried this technique before? Please share your questions and comments about it below.

The post Two Ways to Replace the Sky Using Photoshop appeared first on Digital Photography School.


Digital Photography School

 
Comments Off on Two Ways to Replace the Sky Using Photoshop

Posted in Photography


GoPro’s updated Plus subscription will now replace two broken cameras per year

01 Feb

GoPro has announced an expansion to its Plus subscription service, now offering subscribers “no questions asked” camera replacements in the event their own camera breaks. The new benefit started on January 31st, and is available to both existing and new Plus customers. The camera replacement offer is in addition to Plus’s other various perks, including mobile backups and priority customer support.

For now, GoPro’s $ 5/month “enhanced” Plus plan is only available to US customers, though expansions into other markets are expected to start later on in 2018. The camera replacement perk is available for customers who have a Hero5 or newer, though it is not a free replacement. GoPro charges the following “exchange fees” for the four replaceable GoPro camera products:

  • HERO5 Session: $ 39
  • HERO5 Black: $ 59
  • HERO6 Black: $ 79
  • Fusion: $ 139

Per GoPro’s FAQ, Plus customers must return their old camera to get the replacement—which is done using a return shipping label the company provides—so the replacement program doesn’t cover cameras that are lost. Additionally, subscribers are limited to two camera replacements per 12 billing cycles, though the exchanges can happen any time during those 12 months.

In addition to device replacement, Plus subscribers will soon also have access to mobile cloud backups for photos and videos—unlimited image backup and up to 35 hours of video backup. Apple customers get the backup feature first via its February 20th iOS availability, while Android users will get the same backup benefit on an unspecified date this Spring.

Finally, GoPro Plus includes front-of-the-line customer support priority status and a 20% discount on accessories on the GoPro.com website.

A free 30-day trial is available now for new customers. To learn more, visit the GoPro website.

Press Release

GoPro Rolls Out Enhanced Subscription Service: Plus

New Benefits. No Additional Cost. Damage Replacement, Mobile Cloud Backup and Unlimited Photo Storage Added to $ 4.99 Monthly Service

SAN MATEO, Calif., Jan. 31, 2018 /PRNewswire/ – GoPro, Inc. (NASDAQ: GPRO) is building on the success of its Plus subscription service with the introduction of new benefits that deliver significant value to GoPro customers at no additional cost.

Today, the company announced details of the expanded Plus monthly service:

  • Camera replacement – If you break your GoPro we’ll replace it, no questions asked
  • Mobile cloud backup – The GoPro App now automatically backs up your photos and videos, eliminating the need to connect to a computer or buy new SD cards
  • Unlimited photo storage
  • 35 hours of video storage
  • 20% off accessories at gopro.com
  • Front-of-the-line priority phone and chat support

Mobile cloud backup will be available on iOS February 20 and on Android in the spring.

“Plus streamlines the GoPro experience and delivers outsized value for our customers,” said GoPro Founder and CEO Nicholas Woodman. “Our subscription business, Plus, has proven popular with consumers and the roll out of our enhanced service marks the first of several subscription initiatives we will introduce this year.”

The new GoPro Plus is now available in the US for $ 4.99 a month with a 30-day free trial and will expand to global markets later this year. Visit The Inside Line for more details on all the benefits of becoming a subscriber and the GoPro Plus page to sign up.

Articles: Digital Photography Review (dpreview.com)

 
Comments Off on GoPro’s updated Plus subscription will now replace two broken cameras per year

Posted in Uncategorized


Snapchat ‘sky filters’ use augmented reality to replace the sky with stars, sunsets and more

27 Sep

File this one under minor smartphone photography news: it seems Snapchat is using its augmented reality powers to expose non-photographers to the magic of dropping a new sky into your photos. The newly released feature—dubbed ‘sky filters’—can take a regular boring old blue sky and replace it with a colorful sunset, starry night scene, and more.

Sky Filters are already rolling out now to both iOS and Android users, and like their other AR features, this one will rotate daily so you can experience a variety of world-bending effects.

Articles: Digital Photography Review (dpreview.com)

 
Comments Off on Snapchat ‘sky filters’ use augmented reality to replace the sky with stars, sunsets and more

Posted in Uncategorized


iPhone 8 expected to replace Touch ID with 3D facial recognition

18 Feb

Given 2017 is the tenth anniversary of the iPhone, many expect Apple to come up with a few special features for this year’s generation of its smartphones. A high-end model with 5.8″ edge-to-edge OLED display is widely rumored and according to a note from J.P. Morgan analyst Rod Hall, this top-of-the-line device could do away with the Touch ID fingerprint reader and introduce 3D-facial recognition with a front-facing laser scanner as a security feature to Apple smartphones.  

Removing the fingerprint reader would be an important step to make the edge-to-edge display possible and would also reduce user frustration in wet conditions when Touch ID doesn’t work well. Additionally, it could potentially be more secure, making it ideal for Apple Pay and other mobile commerce applications. Eventually the technology could also be used for augmented reality purposes but according to JPMorgan this is not expected to happen before 2018. 

The research note also claims that, based on economies of scale, the 3D recognition technology could also make it onto the lower level models of the 2017 iPhone line. The scanner is said to add $ 10 to $ 15 per module to the iPhone 8’s bill of materials. In combination with the OLED display, glass casing, and related increased production cost this could mean that the new top-model will cost upwards of $ 1000.

What’s your view on the new technology? Would you prefer it over a fingerprint reader, and be willing to pay a premium for it? Let us know in the comments.

Articles: Digital Photography Review (dpreview.com)

 
Comments Off on iPhone 8 expected to replace Touch ID with 3D facial recognition

Posted in Uncategorized


Recycling Genius: Shrunken Plastic Bottles Replace Furniture Joints

28 Jan

[ By SA Rogers in Design & Furniture & Decor. ]

joining-bottles-main

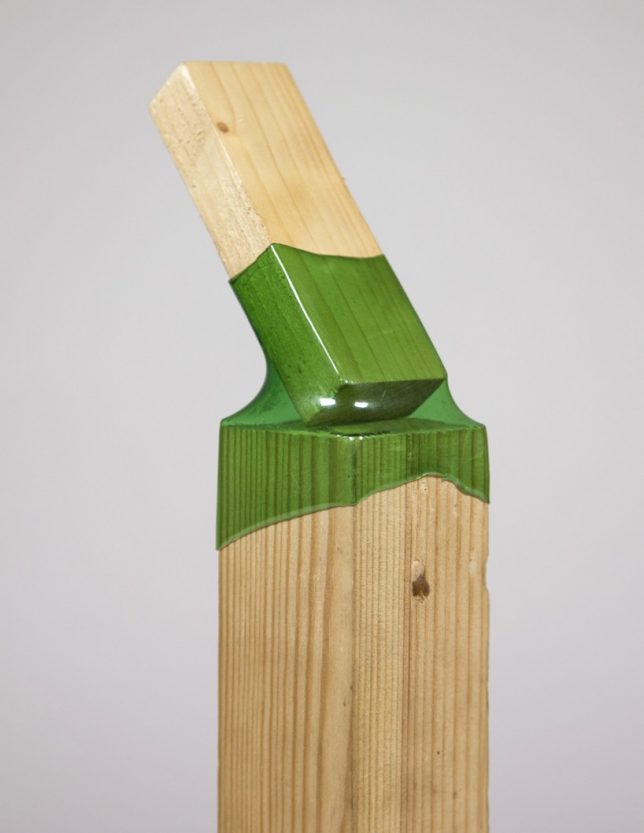
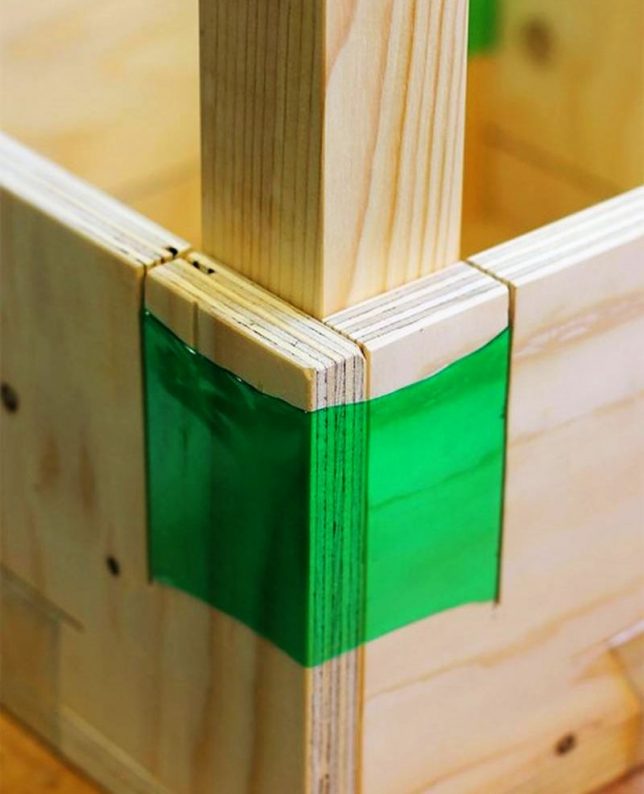
Assembling furniture DIY-style, without the skills, tools or fasteners used to produce conventional joints, becomes remarkably easy with shrink-wrapped pieces of discarded plastic bottles. While joinery is certainly an art – especially the complex forms found in Japanese furniture making – traditional methods aren’t necessarily accessible to anyone. This new project, Joining Bottles, offers a way to assemble functional furniture in minutes with trash and a heat gun.

shrunken-joints-4

Created by product designer Micaella Pedros, ‘Joining Bottles’ aims to provide a model for producing useful objects using materials that are affordable and widely available. A pile of junk sitting on a curb suddenly becomes valuable in a new way, even if it’s a seemingly irreparable chair and a bin full of materials headed to the recycling plant.

shrunken-joins-2

joining-bottles-4

The individual pieces created for a series show how adaptable the concept can be. Use clear bottles if you want the joints to be unobtrusive, or colored bottles to highlight the ingenuity of the system. Wood waste of all kinds, including fallen branches, is assembled into stools, tables, shelves and other objects.

shrunken-joints-3

“The different types of wood and plastic bottles available are dictating the final aspect and composition of the work,” say the creators. “In that sense, a unique conversation is engaged within each piece. It creates more space for randomness and spontaneity, in other words, for human attributes in the creative process.”

Share on Facebook


[ By SA Rogers in Design & Furniture & Decor. ]

[ WebUrbanist | Archives | Galleries | Privacy | TOS ]


WebUrbanist

 
Comments Off on Recycling Genius: Shrunken Plastic Bottles Replace Furniture Joints

Posted in Creativity