RSS
 

Posts Tagged ‘Remove’

Google strikes deal with Getty, will remove direct image links from search

13 Feb

Getty Images has announced a licensing deal with Google that resolves a 2016 lawsuit filed by the photo agency against the Internet giant. The lawsuit accused Google of “promoting piracy” by linking to high-resolution copyrighted images without watermarks, enabling anyone to save and use the images without paying the related fee.

At the heart of the issue was Google Image Search, and how it directly links to high-resolution images found in articles and other online destinations. Because the high-resolution images could be readily found on Google Images, users had little motivation to hunt down the proper image source. This resulted in many “accidental pirates” infringing image copyrights, the lawsuit claims.

To settle the matter, Getty and Google have jointly announced a new multi-year agreement last week, with Getty’s CEO Dawn Airey explaining that Getty “will license our market leading content to Google, working closely with them to improve attribution of our contributors’ work and thereby growing the ecosystem.” That, unfortunately, is as far as official details go.

Fortunately, The Verge elaborated on the agreement, reporting that Google will start removing direct links to image URLs and more prominently displaying copyright disclaimer—good news for all photographers and photo agencies, assuming this practice will go beyond images licensed by Getty.

Getty Images has formally withdrawn its legal complaint against Google.

Articles: Digital Photography Review (dpreview.com)

 
Comments Off on Google strikes deal with Getty, will remove direct image links from search

Posted in Uncategorized


How to Remove People from Your Photos Using Photoshop

19 Jul

The worst part about taking photos of monuments and city streets is that you always get cars and people blocking the architecture behind them. It can be very distractive, and they take away from the real subject. In this Photoshop tutorial, you will learn a technique that will allow you to quickly remove people and cars from your photos. You do need to plan ahead and take multiple photos, but the results will be amazing!

Photoshop has this little-known feature that has been around for over a decade called Image Stack Modes.
The Image Stack Modes are sort of like a Blending Mode that blends layers inside of a Smart Object in a certain way depending on the algorithm that you select.

One of those Stack Modes is Median, which takes a statistical average of the content found in all the photos in the stack. It will keep identical areas and remove everything that changes between the different shots. It is very likely that cars and people will move and change locations from one shot to the next. Thus, you can remove people and unwanted traffic when the algorithm is applied, leaving only the background.

The tricky part is to get the right photos for this Stack Mode to work. Ideally, you should take your photos on a tripod so that the images line up better during the blend. However, if you do not have a tripod, hold your camera as steady as possible when shooting your images and you will still get great results.

The pictures that we will be using in this tutorial were shot by hand with a mobile phone. I wanted to use photos that were less than perfect so that you could see the power of this technique.

How to Remove People from Your Photos Using Photoshop

When you take your photos, wait about 20 seconds or so in between each shot. You want to give people and cars enough time to move. In most cases, you will need between 8 to 25 photos.

Bring Your Photos into a Single Photoshop Document

The first step is to bring the image files into Photoshop as layers in a single document. To do so, go to File > Scrips > Load Files into Stack…

In the “Load Layers” window select “Folder” from the “Use” drop down. Then click on the “Browse” button, and look for the folder containing your images. Press OK after you have selected the folder.

The file names will appear within the window (as shown below). If all the files are there, press the OK button. Photoshop will then take all the files and place them in a single document as layers.

How to Remove People from Your Photos Using Photoshop

Auto-aligning Layers

For the Image Stack to work, the layers need to be aligned as best as possible. If you used a tripod when shooting the images, then your layers should already be aligned. The photos used in this tutorial were shot without a tripod, so we will need Photoshop to align them for us.

To align the layers, select them all by pressing Cmd + Option + A (Ctrl + Alt + A on PC). Then go to the Edit menu and select “Auto-Align Layers.” Make sure that “Auto” is selected, and press “OK.” Photoshop will then look through all your layers to find similar pixels and align them accordingly.

How to Remove People from Your Photos Using Photoshop

Put Aligned Layers into a Smart Object

Now that all the layers are aligned, you need to put them into a Smart Object so that you can apply the Stack Mode. Select all your layers again by pressing Cmd + Option + A (Ctrl + Alt + A on PC). Then right-click the space on the left side of any selected layers and choose “Convert to Smart Object.”

You should now only have a single Smart Object in your Layers Panel.

The Median Stack Mode

Now that all the layers are inside a Smart Object you can control how the set blends by using a “Stack Mode.” Go to Layer > Smart Objects > Stack Mode > Median.

This Stack Mode takes a statistical average of the content found in all the photos. It keeps identical areas and removes everything that changes between the different shots, such as people walking through the scene.

Faster Way of Doing This – The Statistics Script

You can get to this point in the tutorial by only using one single command!

The reason that I took the long approach was so that you could see what Photoshop was doing behind the scenes. If you get into trouble, then you’ll know what the steps were to create the effect, and you can backtrack to fix the problem.
To do this whole process in a single command, go to File > Scripts > Statistics…

In the Image Statistics window, select Folder you want to use. Click on the Browse button to find the images that you want to use in the Image Stack.

Once the images load, select Median as the Stack Mode, and check “Attempt to Automatically Align Source Images.”

How to Remove People from Your Photos Using Photoshop

This will Auto-Align the images, put them in a Smart Object using the Median Stack Mode. Getting you to this part of the demo all within one window!

How to Remove People from Your Photos Using Photoshop

Fixing Image Stack Errors

Problems may arise when dealing with background elements that are always moving, such as water, clouds, or flags. In this example, the two flags on top of the Tribune Tower disappear. We can bring them back by copying and pasting a flag from one of the original images.

To see the original images, go to Layer > Smart Object > Edit Contents. A new tab will open that contains the contents of the Smart Object. Then look through your layers to see which of the original layers contains the best version of the item you would like to replace.

Select the Lasso Tool and make a selection around the objects. With the selection active press Cmd/Ctrl + C to copy.

How to Remove People from Your Photos Using Photoshop

Go back to the working document and press Cmd/Ctrl + Shift + V to “Paste in Place.” Repeat these steps with any other object that you need to fix.

Create a Smart Object to Hold it All Together

Select the all the layers by pressing Cmd + Option + A (Ctrl + Alt + A on a PC), right-click on the side of any selected layer and choose “Convert to Smart Object.” This Smart Object can now be adjusted or manipulated as if it were a single layer. You can apply the Camera RAW filter non-destructively to enhance the image color and tone.

Camera RAW Filter to Adjust Tones and Color

Select the Smart Object containing all the layers and open Adobe Camera Raw by going to: Filter > Camera RAW. This filter works a lot like Adobe Lightroom. The controls are in a similar layout and do the same things. Lightroom is built from the Camera RAW engine, so it will be familiar to you if you are a Lightroom user.

How to Remove People from Your Photos Using Photoshop

You can create an HDR effect by darkening the Highlights and brightening the Shadows. Slide the Highlights slider to the left, and the Shadows slider to the right. Slide the Clarity slider to the right. Clarity adds contrast to the mid-tones.

Finalize the effect by adding Vibrance which is a controlled saturation. Vibrance adds less saturation to already saturated areas, and it protects skin tones in portraits.

Crop Your Photo

If you did not use a tripod, you will see that the edges of the photo are likely misaligned. To remove these imperfections, you can simply crop them out by using the Crop Tool. Press C on the keyboard, then use the handles to adjust the size of the crop. Press Return when you’re done.

This is how the final image looks:

How to Remove People from Your Photos Using Photoshop

Conclusion

Give this technique for and go try and remove people and cars from your images. Let me know how you make out and if you have any questions, please post them in the comments area below.

The post How to Remove People from Your Photos Using Photoshop by Jesus Ramirez appeared first on Digital Photography School.


Digital Photography School

 
Comments Off on How to Remove People from Your Photos Using Photoshop

Posted in Photography


How to Remove Objects and Add Punch to Your Images with Photoshop

31 May

In this article, we’ll look at an image I reprocessed after my initial edit. I’ll also share with you some tips on how to use Photoshop to remove objects from your scene that are unwanted and add some punch to your image.

Original processed version

Have you ever created an image, processed it, shared it with the world, and then decided it wasn’t quite finished? I have! In fact, I do it more often than I’d like to admit. A while back, I created a video tutorial for On1 Software showing how I used that software to process an image I took at Queen’s Bath on the island of Kauai. I was super excited to share the image because it was an incredible sunset, at an incredible location, shot during some incredible conditions, with a completely random and unscripted local in the scene to top it all off. Here’s a look at the image after processing it and creating the initial video.

How to Remove Objects and Add Punch to Your Images with Photoshop

After watching the video and looking at the final image, I decided I wasn’t 100% satisfied with the edit. I’ve used On1 Software for nearly a decade now, and still use it in my everyday workflow. It wasn’t any fault of On1, I just felt the image could be taken up another notch so decided to take it over into Photoshop to give it another go. I decided the image needed two adjustments…

#1 Remove the local at the bottom climbing up the rocks.

  • Queen’s Bath is notorious for the massive waves that crash against the shore in the winter. Nearly 30 people have drowned at this location from being washed out to sea and this guy was close to being added to the list! I decided to remove him because his movements caused him to become blurred and I felt he ended up being more of a distraction in the image than a complementary part of it.

#2 Add a bit more contrast and punch to the overall image.

  • I felt the sky and rocks were still a bit too washed out and needed a very subtle boost to bring it all together.

Second edited version completed in Photoshop

After a few minutes in Photoshop, I came up with this final (really this time!) result.

How to Remove Objects and Add Punch to Your Images with Photoshop

After working extensively in Photoshop over the past decade, I’ve developed a few tricks along the way. I’m not sure how mainstream some of them are, so I like to share them in hopes that they’ll help you as well. One of those tricks is how I remove objects that are up against other objects(as opposed to being out in the open). To do this, I use a combination of the Quick Selection Tool, Masking, and the Clone Stamp. Adding contrast and punch to the image is a bit more basic in this case, but still advanced if you aren’t super familiar with masking and brush techniques.

Here’s the video where I walk through the process step-by-step.

Let me know what you think and if you have any questions please put them in the comments section below.

Get James’ video course POST II where he walks through his entire workflow in Lightroom, Photoshop, and more from start to finish with 10 of his favorite portfolio images. Be sure to use coupon code DPS25 at checkout for an exclusive DPS discount!

The post How to Remove Objects and Add Punch to Your Images with Photoshop by James Brandon appeared first on Digital Photography School.


Digital Photography School

 
Comments Off on How to Remove Objects and Add Punch to Your Images with Photoshop

Posted in Photography


How to Quickly Remove Dirt Spots Using Median in Photoshop

07 Sep

You’ve rolled out your white background for your shoot; whether it’s vinyl or paper. It’s a bit dirty from shoes, but you’re under pressure to get the shoot done, so you carry on regardless. When the shoot is over and the photos are back on the computer, that’s when you see how bad it really was. The scuff marks, the footprints, the stray hairs, these are going take ages to clone out. You’re sorry now that you didn’t clean it up, or cut off some paper. Sigh. Better just getting going on the processing.

But wait! There’s a better way.

It doesn’t have to all be cloned out. There’s an easy way, using one of Photoshop’s lesser known tools called Median. Median is a form of blurring, where groups of pixels get changed to the middle value of the pixels. Higher values are reduced, lower values are increased, averaging out the values.

Steps for cleaning up your white background

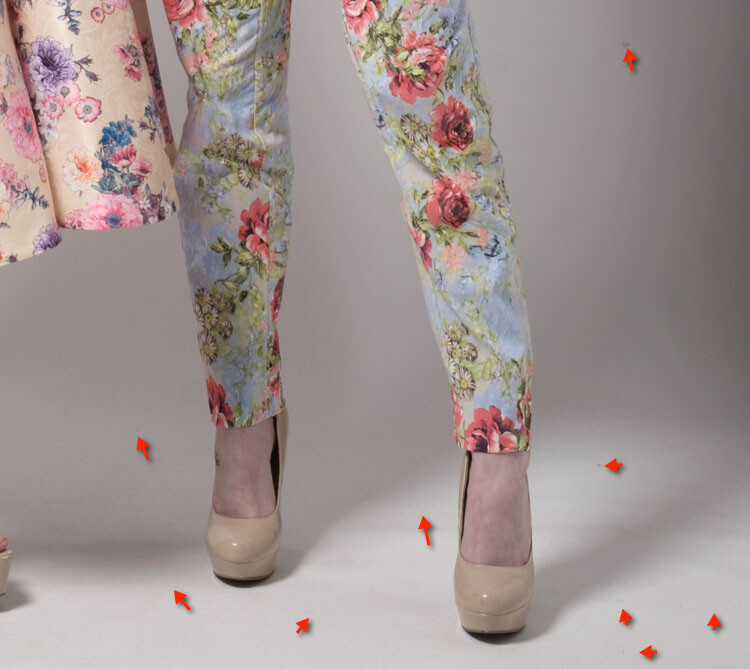
So your floor has specs of dust, hair, and just general footprint dirt on it.

cleaning-a-white-background-1.jpg

Step one – duplicate layer

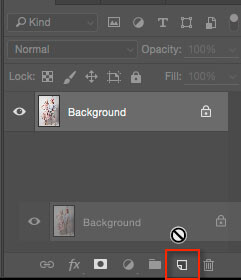
Duplicate your background layer by dragging it on to the New Layer icon at the bottom of the Layers panel.

Cleaning a white background 2

Alternatively, use the shortcut Command/Control + J. If you’ve got a set of layers, then use the shortcut Shift + Cmd/Cntrl + Option + E to stamp them into a new layer.

Step two – Median

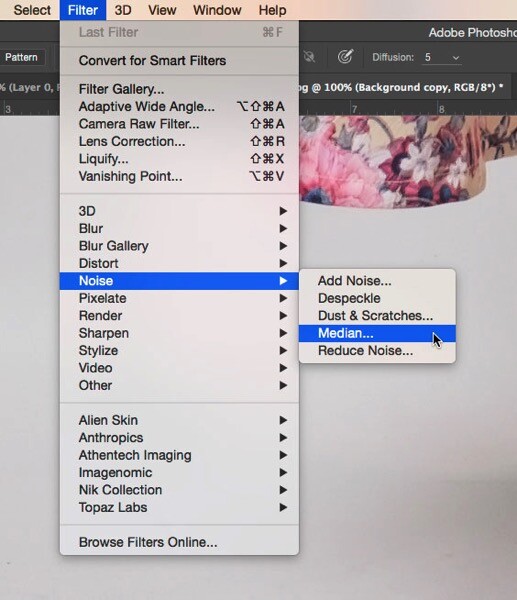
Go to Filter>Noise>Median.

cleaning-a-white-background-3.jpg

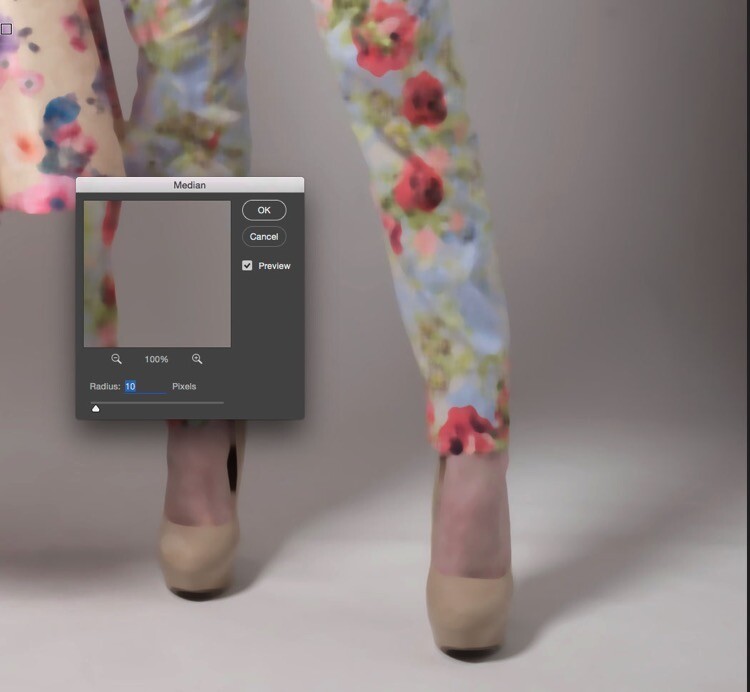
Move the Radius slider until the dirt disappears. I’ve used 10 here.

Cleaning a white background 4

Step three – apply a layer mask

If you’re not familiar with Layer Masks, you can use the Erase brush to bring remove the areas you don’t want blurred, but I recommend using Layer Masks.Cleaning a white background 6

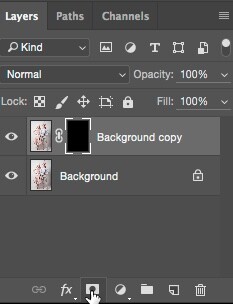
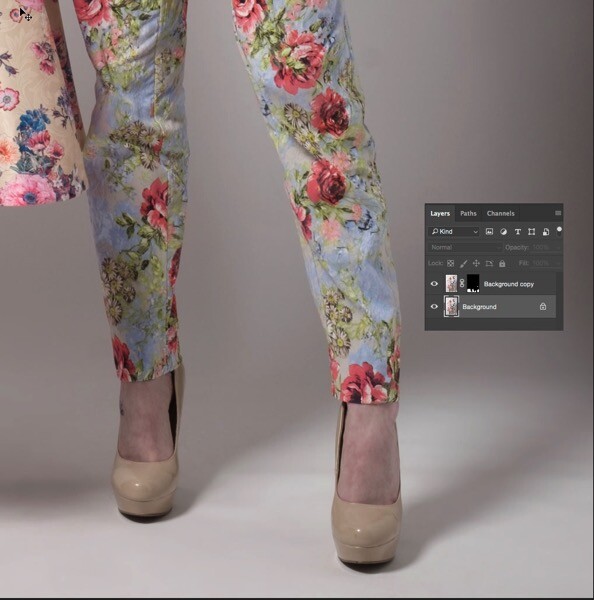
A white Layer Mask reveals everything on the layer, while a black mask conceals the contents of the layer. You want a black mask for this layer, so hold down the Option key on Mac (Alt for PC), and click the New Layer Mask icon at the bottom of the Layers Panel. A black mask appears on the layer and the Median filter is concealed.

Next, select the Brush Tool (or use the shortcut B), then hit D for Default colours. Then use the shortcut key X to swap foreground and background until the foreground (i.e. the top swatch in the tools panel) is white. With a soft brush, paint over the dirt to reveal the Median filter’s affect. Don’t go too close to the edges of your subject. If you make a mistake, press X to swap the brush to black, and paint it back to hide that area again. This is the beauty of Layer Masks, you can reveal or conceal over and over again without having to undo (this is called non-destructive editing).

cleaning-a-white-background-5.jpg

This trick isn’t limited to backgrounds. You can be use it on any areas of continuous tone, for a quick result. I’ve had to use it on skies, where I’d accidentally used a dirty sensor cleaning brush and left marks on the sensor. Here’s how you could fix such an issue using Median.

Fixing a dirty sky with Median

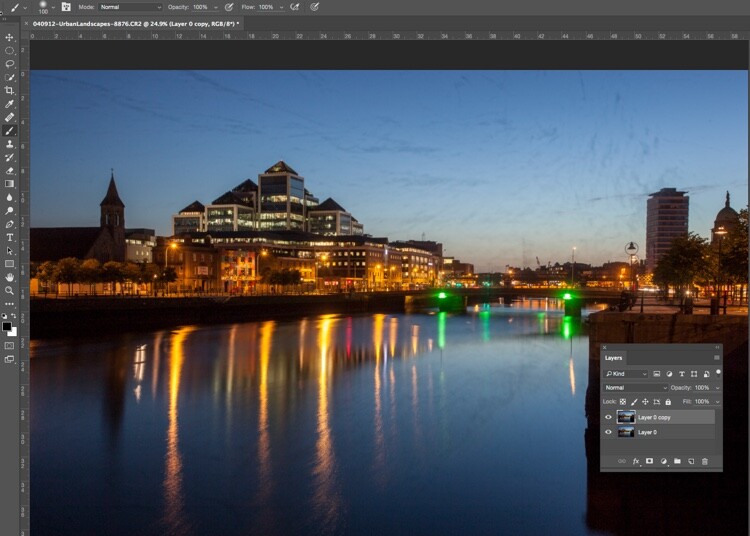
As with the background cleaning technique, start by duplicating the background layer. You can see the issue quite clearly in the sky (below), and in the smooth parts of the river.

cleaning-a-sky-1

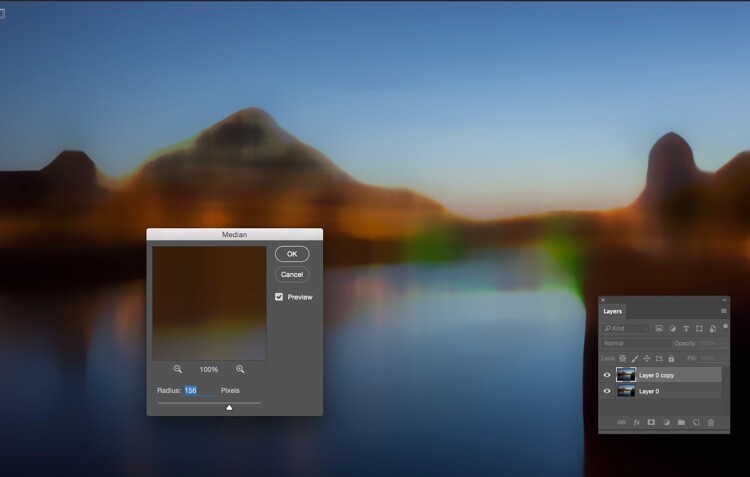
Next, apply Filter>Noise>Median. The issue will need a far higher Radius than the background required.

cleaning-a-sky-2

Select only the sky area

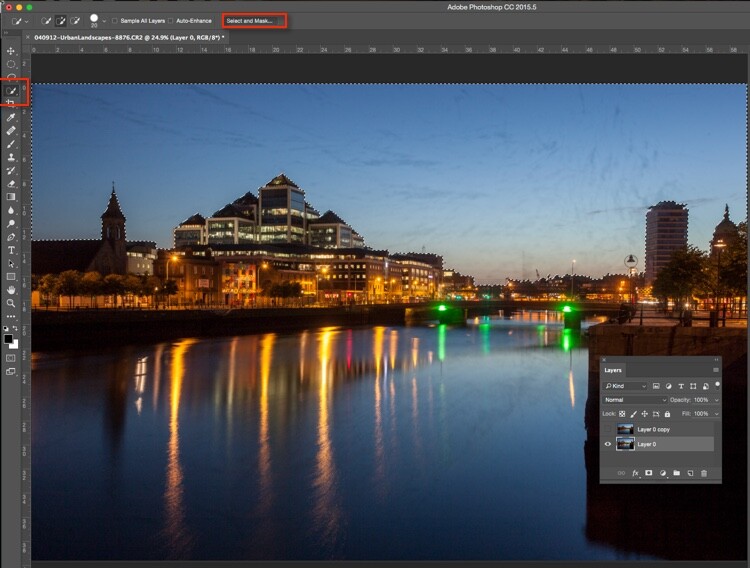
Next, hide the Median layer by clicking on the eye on the layer, then select the layer underneath. From the tools panel, choose the Quick Selection tool or press W. From there, drag the cursor along the sky, close to the buildings. Because of the hard edges against the sky, the selection is made easily.

cleaning-a-sky-3

Next click “Select and Mask” (outlined in red above). You’ll see the sky clearly, and the rest of the image faded. Brush the cursor over the tips of the buildings, street lamps and other things that need to be protected from the blurring effects of the Median filter. Press return (enter) to create a selection with marching ants visible.

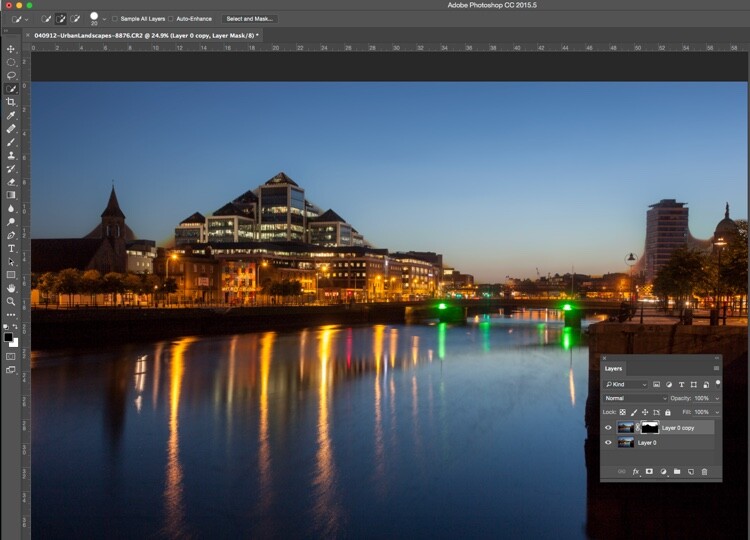
Turn the visibility back on for the Median layer. Press the Layer Mask icon in the Layers panel to create a mask.

cleaning-a-sky-4

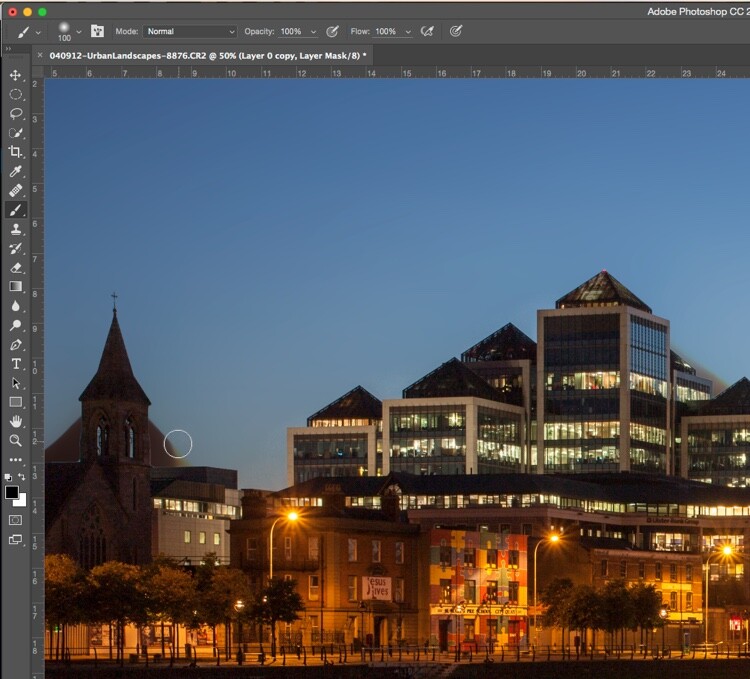
You will see areas where the Median filter has blurred edges, so you’ll need to brush the mask with a black brush to hide these. You don’t need to be precise, using a large soft brush along the edge of the buildings will make it a quick job.

cleaning-a-sky-5

Remove the Median where it has blurred the edges of the city buildings.

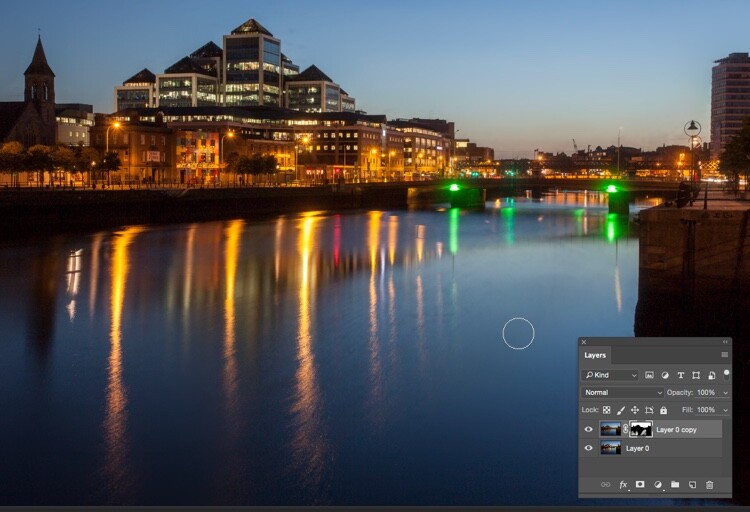
The final part is to go along the water with a white brush, set to 50% Opacity, to hide the dirt in the water.

cleaning-a-sky-6

The final image looks far better than the original.

cleaning-a-sky-7

Much quicker than manually cloning the dirt out, right?

Have you tried this method, how did it go? Do you have another fast way of removing dirt? Please share your thoughts in the comments section below.

googletag.cmd.push(function() {
tablet_slots.push( googletag.defineSlot( “/1005424/_dPSv4_tab-all-article-bottom_(300×250)”, [300, 250], “pb-ad-78623” ).addService( googletag.pubads() ) ); } );

googletag.cmd.push(function() {
mobile_slots.push( googletag.defineSlot( “/1005424/_dPSv4_mob-all-article-bottom_(300×250)”, [300, 250], “pb-ad-78158” ).addService( googletag.pubads() ) ); } );

The post How to Quickly Remove Dirt Spots Using Median in Photoshop by Sean McCormack appeared first on Digital Photography School.


Digital Photography School

 
Comments Off on How to Quickly Remove Dirt Spots Using Median in Photoshop

Posted in Photography


Magnetic Notebook: Add, Remove & Reorganize All Kinds of Pages

08 Nov

[ By WebUrbanist in Design & Products & Packaging. ]

magnetic-notebook-design

Like a combination classic journal and digital text file, this physical notebook has a magnetic spine that allows you to pull out pages without ripping and add in fresh blank, lined or graph sheets as well.

magnetic paper types

Dubbed Rekonect, the product is designed to look like a traditional notebook with an elastic cover band, but comes with a variety of page types for sketching, writing, graphing or alternating between activities.

magnetic pen page holder

magnetic notebook

Book binding is left to the magnetic spine, which also doubles as a de facto pen or mechanical pencil holder (as long as your writing or drawing device contains some metal for the magnet to grab).

magnetic print to go

The project was inspired in part by the versatility of computer files and types, recognizing our increased assumption of flexibility when it comes to creative pursuits in the digital age. Printed pages can also be slotted into the book, letting you mix and match hand- and computer-based creations.

Share on Facebook


[ By WebUrbanist in Design & Products & Packaging. ]

[ WebUrbanist | Archives | Galleries | Privacy | TOS ]


WebUrbanist

 
Comments Off on Magnetic Notebook: Add, Remove & Reorganize All Kinds of Pages

Posted in Creativity


Google and MIT team up on clever method to remove reflections and obstructions from photos

06 Aug

Researchers at MIT and Google have developed a technique for removing unwanted reflections and obstructions from photos. Taking advantage of the parallax effect, this method could prove quite useful in locations where shooting behind glass or a fence is the only option. Read more

Articles: Digital Photography Review (dpreview.com)

 
Comments Off on Google and MIT team up on clever method to remove reflections and obstructions from photos

Posted in Uncategorized


How to Use LAB Color in Photoshop to Remove an Unwanted Color Cast

15 Dec

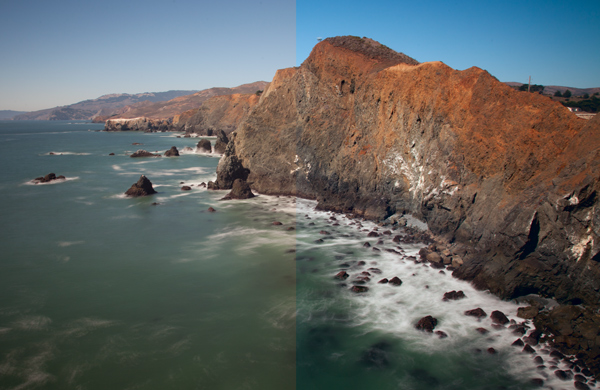
Marin County Headlands with LAB adjustments

In a recent article about the LAB colorspace, I covered the basic LAB move to enhance colors. Hopefully that gave you an idea of the power of the LAB colorspace to manipulate color in Photoshop. In this article we are going to build on that a little bit. Whereas in the last article we simply used the basic LAB color move to enhance color, now we will get into color manipulation. Specifically, I will show you how to remove an unwanted color cast from your photos using LAB. In many ways doing this in LAB is simpler and more powerful than doing it in your normal color space (RGB).

Setting the stage

Removing color casts and manipulating color will be simple for you once you know a little bit about how LAB color works, so first let’s make sure you understand what is going on in the LAB colorspace. Once you understand how LAB works, everything else will be easy.

LAB stands for Lightness, A channel, and B channel. The L channel strictly controls lightness and we won’t be working with it for purposes of this article. All color in the LAB colorspace is within the A and B channel. The A channel consists of greens and magentas. The B channel consists of blues and yellows. The histogram in both of these channels almost always looks like a spike in the middle of the histogram. Because LAB is such a ridiculously broad color space, there will be a lot of empty space on either side of the histogram. As you saw in the last article, this empty space is what gives us the opportunity to enhance color so effectively in the LAB colorspace.
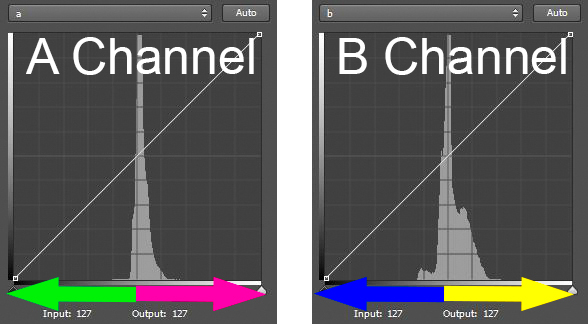
LAB color graphic

Now let’s look at the histogram of the A channel more closely so that you can see how this works. The A channel is a combination of green and magenta. The further to the left you are in the histogram, the more green is present. Conversely, the further to the right you are in the histogram, the more magenta is present (see diagram above).

The middle of the histogram is a gray tone without any real color. It is designated as zero. As you move away from the zero (gray) point in the middle, more color is added. To the left, the numbers go into negatives (all the way down to -128) and things get more green. To the right, you move into positive numbers (toward a max of +127) and things get more magenta (pinkish).

It works exactly the same way in the B channel, only the colors are different. In the B channel you still have a starting middle point of zero, which is also gray. But, as you move to the left on the histogram towards -128, the colors get bluer. As you move to the right towards +127, the colors get more yellow.

Also note that the center line of the histogram runs right through the zero in the center of both the A and B channels. This will be important for identifying and correcting color casts.

If you are still with me thus far, everything will be easy from here. Now you can take what you just learned and see how to identify and fix color casts easily in LAB.

Identifying color casts easily

It is easy to identify a color cast in LAB mode. Just look at the A or B channel. If the colors are more or less evenly distributed on either side of the midpoint of the histogram, your picture will probably not have a color cast. But if the histogram values are skewed to the left or to the right of the histogram, you are probably have a color cast. Here is how it works in the A and B channels:

  • In the A channel, if the colors are more on the left side, you will have a greenish color cast in your image. If they are to the right, you will have a magenta color cast.
  • Similarly, in the B channel you know if the histogram appears shifted to the left, you will have a bluish cast to your picture. If the values are to the right of the histogram, your picture will appear more yellow.

LAB color cast chart

In this way, the LAB colorspace makes it super simple to determine if you have a color cast. Just look at the middle of your histogram, and if the colors are skewed to one side or the other, you know you have a color cast or shift. This is important because a slight color cast is not always apparent to the naked eye. Your eye gets acclimatized to seeing the picture in a certain way, and accepts that as normal. Now this we’ve identified a color cast, let’s set about fixing it.

Fixing  color casts in LAB

Much of the power of the LAB colorspace comes from scooting in the endpoints on either side of the histogram. In the last article, we did that to separate the colors, which enhances them. We moved the endpoints in toward the center the exact same amount on each side of the histogram. That enhanced colors without affecting the overall color cast of the picture. This time, however, we are going to move the endpoints in different amounts to fix color casts.

For example, let’s say your picture has a blue color cast. When you open up the B channel, the spike showing color is skewed to the left of center on your histogram. To fix it, you simply scoot in the right endpoint of your histogram more then the left endpoint. It’s as simple as that.

Let’s try another example, let’s say you open the A channel of one of your pictures, and noticed that the values are skewed to the left of center on the histogram. That means that you likely have a green color cast. To fix it, simply scoot in the right endpoint a little bit. Don’t do it too much, usually three to five points will make a major shift in color.

Identifying and fixing a slight color cast

This might make more sense to you if we walk through an actual example. So here’s a good example of everything we have been talking about in this article so far. We will start with a photo that I was in the process of editing:
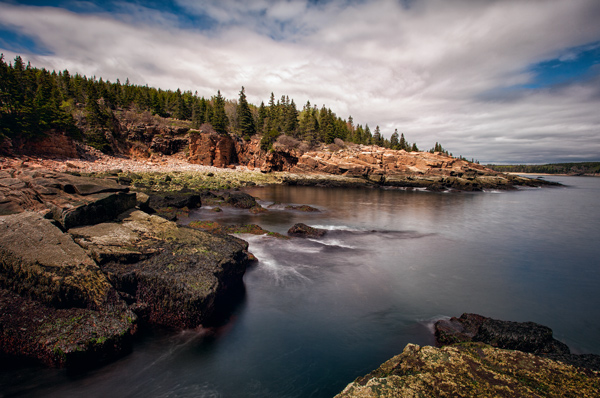
Original photo with color cast

I frankly did not see a color cast, however, I decided to check it out. I converted to LAB, opened a Curves Adjustment Layer, and looked at the histogram of the A channel and the B channel. Here is what I saw:
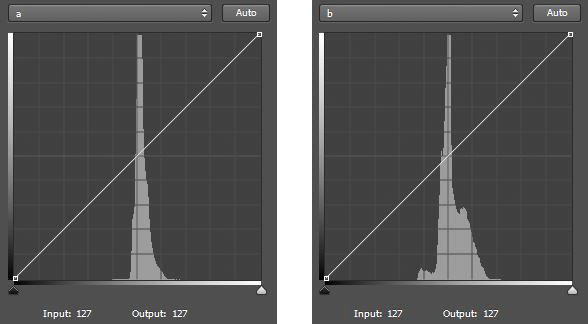
Histogram showing A & B channels

Two histograms in LAB. The left histogram is the A channel. The right histogram is the B channel. Notice that both are skewed to the right of the centerline – a sure sign of a color cast in the picture.

Notice that in the A channel most of the pixels are stacked up to the right of the center line on the histogram. That is a sure sign that there are more magenta pixels than green in the picture. Notice also that in the B channel most of the pixels are also stacked up to the right of center, which means there are more yellows than blues in the picture. Neither necessarily means there is anything wrong with the image, but that might mean a color cast. So let’s make an adjustment as described above and scoot in the left endpoints a little bit in each channel. Here are the two minor moves I made:
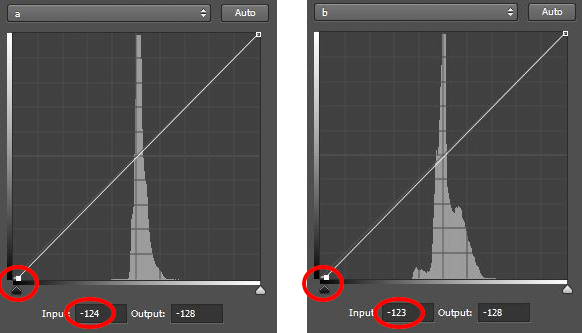
Histograms of A & B channels - after adjustment

Here are the histograms after the adjustments. Notice that I pulled in the left endpoints of each to the center.

All I did was pull the left endpoint of each histogram to the center a little bit to offset the fact that the colors are skewed to the right of the histogram in each channel. As mentioned above, a change of three to five points will create a large adjustment, so that is all I did. As the numbers below the histograms reflect, I made the following adjustments:

  • A Channel:  I pulled the left endpoint to the center by four points (from -128 to -124).
  • B Channel:  I pulled the left endpoint to the center by five points (from -128 to -123)

After the adjustment, here is the resulting picture:
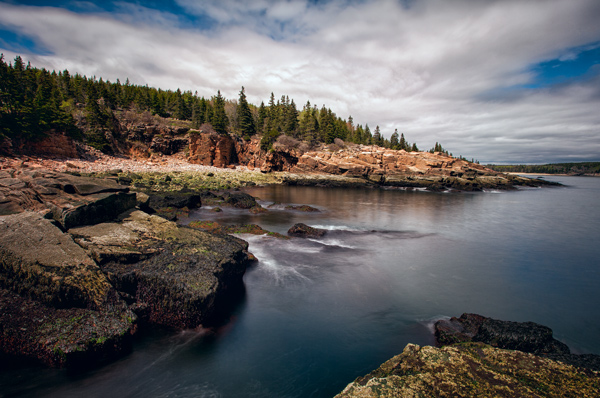
Acadia After LAB adjustment

I think it looks better now. To me, it had a color cast that I just wasn’t seeing. The difference is subtle, but significant. In particular, look at the clouds. Here are the before and after pictures side-by-side:

Comparison

The original picture is on the left. The picture on the right had is after a minor LAB adjustment. I did not even see the original color cast, but I think it looks better after the adjustment.

Incorporating this into the LAB color move

Sometimes, you will notice that the spike in the A or B channel is to one side of the center of the histogram, but you do not really want to change the overall color of the picture. It is still important to understand what is going on when you are making your normal LAB color move.

If you ignore the shift to one side or the other, then when you scoot in your endpoints by equal amounts, you may be exacerbating the color shift. Therefore, keep an eye on your histogram and try to make your shift pivot around the spike rather than on the center of the histogram. In other words, if the pixels are to the right of the histogram, scoot in your left endpoint a little bit more (and vice versa). In this way, you can make your normal LAB color move, but at least not add any color cast to your picture.

Why not just do this in RGB?

You may be asking, can’t I just remove color casts in RGB? The answer, of course, is yes. But the LAB colorspace has advantages that I want to make sure are clear to you.

First, because LAB separates Lightness from all color adjustments, LAB allows you to fix these casts without any impact on lightness or contrast. This is not possible in RGB. When you affect the red channel, green channel, or blue channel in RGB, you are necessarily affecting lightness. It is all tied together in RGB.

Second, LAB makes it easier to identify color casts. As you saw above, you just open up the A or B channel and see if the spike is shifted to one side of the histogram. If it is, you likely have a color cast. If it isn’t, you do not. In RGB, you have to compare channels and see how one channel appears compared to the other two channels.

Isn’t this like setting your white balance?

You may have noticed that the LAB colors correspond with the sliders in Lightroom or Adobe Camera Raw (ACR) that are used to set the white balance in your picture. You can think about LAB in those terms and it might help you to understand how the colors work together. But using LAB to manipulate color offers certain advantages over just setting your white balance. For one thing, you can change the colors later in your workflow, and are not compelled to do it right up front. For another thing, you can take advantage of Photoshop’s layers and selections in manipulating color. Although Lightroom and ACR have very helpful aids in setting the while balance, like the White Balance Selector (the little dropper) or the presets, there is no histogram to allow you to really see and fine-tune your changes.

Applying this to your worklflow

What the technique shown in this article will allow you to do, is make your normal LAB color move in a more nuanced fashion. In the last article, I showed you how to make the LAB color move in a basic, unthinking way. You simply moved the endpoints of your A channel and B channel by equal amounts. It is sort of a one-size-fits-all approach, which doesn’t always work in photography. Now, you can use this to manipulate color a little bit or at least keep it from getting worse as you edit.

I have talked about correcting color casts as if there was a special correct way. But of course that isn’t really true and what looks correct to me might not look exactly right to you. Use your own judgment and do what seems right to you. As you make these moves, however, you might want to bias them in one direction or another. Remember that sometimes a color cast can add effect or mood to your picture. Sometimes a slight color cast just looks good. For example, a warmer tone created by a yellow or magenta cast can actually enhance your picture. Sometimes, but less often, a bluish cast can be appropriate. Also remember that a greenish cast never looks good and should be avoided.

I know it can sometimes be confusing knowing where colors reside, and how to fix them within the LAB color space. To try to make it easier for you, here is a chart:

LAB Color Casts Chart

Conclusion

The LAB colorspace is a powerful beast. You previously learned how to unleash that power by using the basic LAB color move. Using the technique in this article will allow you to tame that beast a little bit. It will allow you to use the power of LAB without getting garish effects or color casts in your pictures. It will also allow you to fix these color casts simpler and easier than anything that RGB allows. Give it a try and see if it corrects your colors.

googletag.cmd.push(function() {
tablet_slots.push( googletag.defineSlot( “/1005424/_dPSv4_tab-all-article-bottom_(300×250)”, [300, 250], “pb-ad-78623” ).addService( googletag.pubads() ) ); } );

googletag.cmd.push(function() {
mobile_slots.push( googletag.defineSlot( “/1005424/_dPSv4_mob-all-article-bottom_(300×250)”, [300, 250], “pb-ad-78158” ).addService( googletag.pubads() ) ); } );

The post How to Use LAB Color in Photoshop to Remove an Unwanted Color Cast by Jim Hamel appeared first on Digital Photography School.


Digital Photography School

 
Comments Off on How to Use LAB Color in Photoshop to Remove an Unwanted Color Cast

Posted in Photography


How To Remove Infinity Focus Glass From Canon FD To Nikon Adapter

20 Nov

annnd heres the vid on how to remove the infinity focus glass from this canon fd to nikon adapter. like i said, it should work with other adapters that have a similar design ^_^
Video Rating: 5 / 5

 
Comments Off on How To Remove Infinity Focus Glass From Canon FD To Nikon Adapter

Posted in Nikon Videos


Remove wrinkles in Photoshop CS 5 (tutorial) [HD]

01 Nov

Buy cool t-shirts on: buycooltshirt.com Best games online: www.games-365.com Play shooting games: supershootinggames.com remove wrinkles photoshop tutorial blur photoshop retouching professional retouching photoshop plugin adobe photoshop tutorials removing wrinkles photo retouching photoshop…
Video Rating: 3 / 5

 
Comments Off on Remove wrinkles in Photoshop CS 5 (tutorial) [HD]

Posted in Retouching in Photoshop


Photoshop tutorial: How to remove garment wrinkles | lynda.com

19 Oct

This Photoshop tutorial discusses how to retouch folds and reduce wrinkles that appear on garments. Watch more at www.lynda.com This specific tutorial is just a single movie from chapter two of the Photoshop CS5: Fashion Retouching Projects course presented by lynda.com author Chris Orwig….
Video Rating: 4 / 5

 
Comments Off on Photoshop tutorial: How to remove garment wrinkles | lynda.com

Posted in Retouching in Photoshop