RSS
 

Posts Tagged ‘Reflection’

Learn How You Can Easily Create the Perfect Reflection Photos

02 Feb

The post Learn How You Can Easily Create the Perfect Reflection Photos appeared first on Digital Photography School. It was authored by Simon Bond.

learn-to-create-perfect-reflection-photos

In this article, you’ll discover how to create the perfect reflection photos. You’ll learn how to find reflection photos in locations near to you, and then how best to capitalize on these reflections in your photo. Use the correct equipment, the right angle, and you’ll be taking stunning photos in no time.

What is reflection?

First, the science behind reflection photography. Knowing why reflections form will help a lot when it comes to finding and taking these types of images.

The most obvious object you’ll come across on a day-to-day basis that reflects is a mirror. So in reflection, the angle of the incident light will be equal to the angle of the reflected light.

That means when you stand directly in front of a mirror, you’ll see yourself. However, if you stand to the side, you’ll see the scene that’s to the side of you.

When you reach the extreme edge of the mirror and look across it, you’ll see the room you’re standing in duplicated in a mirror image.

In the majority of cases, you’ll want to get down to the angle of the reflection to create this duplicate image in your photo. Repetition always works well in photography.

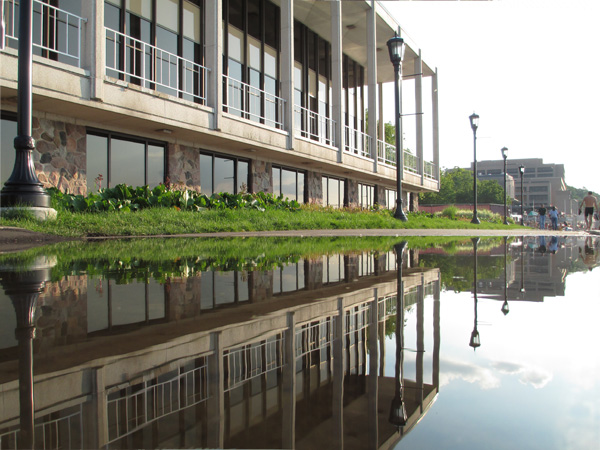
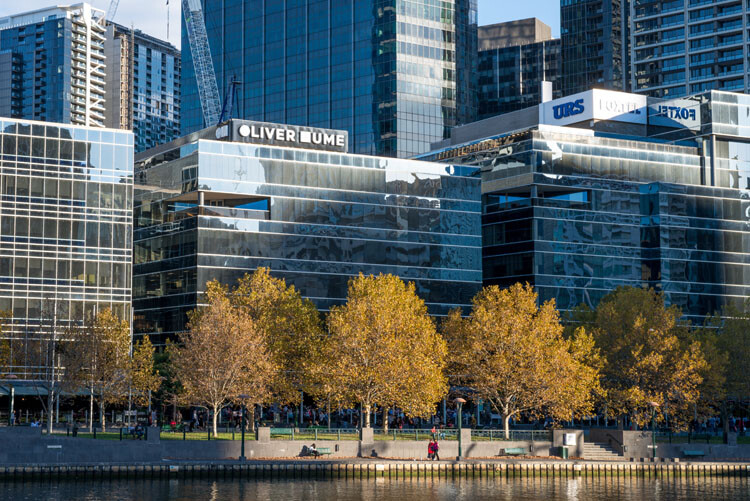
Image: A strong subject like architecture can work well for reflection photography.

A strong subject like architecture can work well for reflection photography.

Which materials have a reflective surface?

Now you know what reflection is, you’ll need to know where to find it. There are lots of things that have a reflective surface – the mirror is the most extreme of these and is designed to reflect. You’re really looking for something with a smooth, shiny surface. So look for the following to get a reflection:

  • Metal – Any metal surface will reflect. Surfaces with less scratches are best.
  • Glass – Glass will also reflect. The shallower the angle you use, the stronger the reflection will be.
  • Marble – Shiny smooth stone surfaces will reflect, but not as much as glass or metal. That said, with water on top of the marble, the reflection will be better.
  • Water – Where water forms a flat surface, there will be a reflection. Puddles often do this, ponds also work, and even larger bodies of water can work when there is no wind.
Image: The glass on this shop window becomes more reflective the shallower the angle.

The glass on this shop window becomes more reflective the shallower the angle.

How to take the perfect reflection photos.

Now you know what reflection is, and the materials that produce it, you’re ready to take the perfect reflection photos. Take a look at the following steps, and you’ll be in a position to get the best results.

Finding locations with reflection

Knowing which surfaces cause reflection is only half the story. You need to combine finding one of these surfaces in a location that has an interesting reflection. Going out and finding these is sometimes easy, and sometimes more of a challenge.

Look to the following to improve your chances:

  • Clear surfaces – Windows on high streets, or glass protecting commuters from the track in subway stations, all have the potential to be good reflection surfaces.
  • Bodies of water – Permanent bodies of water like ponds or lakes can be great for reflection photos. The moat around a castle can also work very well. You’ll want to choose a calm day for best results.
  • Puddles – After it’s finished raining, but before the puddles drain away, it is a great time to look for reflections that would not normally be there.
Image: After it’s finished raining get out looking for puddles that will then be reflection po...

After it’s finished raining get out looking for puddles that will then be reflection pools.

Create your own reflection

There are, of course, times when you’d like to photograph a reflection where one doesn’t usually form. In that case, you could experiment by taking a mirror with you to a location. It might not be practical to bring a large mirror with you, but by using a wide-angle lens, you can make the reflection look much larger than it actually is.

Another solution is to bring a bottle of water with you or even a bucket. If there is a readily available source of water nearby, like a lake or the sea, you might be able to carry buckets of water to a location where you wish to create a reflection.

Image: This location is a popular location to photograph reflections. It’s next to the sea, so...

This location is a popular location to photograph reflections. It’s next to the sea, so it’s possible to make your own reflections. I’m thankful to my friend for helping make the puddle.

Enhance your reflections

There are a couple of things you can do to enhance your reflection photo in-camera. These mainly involve the equipment you use. Look to do the following to create the perfect reflection photos.

  • Circular polarizing filter – One of the best items you can use in reflection photography. Using this filter will greatly increase the strength of the reflection.
  • Wide-angle lens – Use a wide-angle to increase the scope of the reflection within your photo. Even a small puddle can fill an entire frame if you get close enough to the puddle.
  • Shallow angle – The shallower the angle, the greater the reflection will be. So get side-on to a window, or down on the ground near a puddle for best results.
Image: This is the result of making a reflection using buckets of water.

This is the result of making a reflection using buckets of water.

Good subjects for reflection

Now just because a place has a reflection doesn’t mean it’s going to be the best place to take a reflection photo.

As with all photography, you need a strong main subject. That main subject might already be there in the form of architecture. If that’s not the case, you may need to wait for a moment of capture, a person walking past your reflection location, for instance.

While a mirror image reflection could hold your photo, a single person, single tree, or an iconic landmark that also reflects will dramatically improve your results.

Use post-processing for reflections

In addition to the steps you can take in-camera, there are further steps you can use in post-processing. These involve enhancing your existing photo or creating a reflection within your image.

Enhancing a photo

This involves taking a photo that already has a reflection and then making that reflection stand out more. 

You’ll be looking to make local adjustments to your image. To do that, you can either use graduated filters to adjust the image or layer mask and reveal only the area of the image that you wish to effect. 

Adjustments you can consider making are brightening, sharpening, and adding more contrast to the reflection in an attempt to mimic the image that the reflection is from.

Image: This sunset had the perfect reflection pool. It could be better with a stronger main subject.

This sunset had the perfect reflection pool. It could be better with a stronger main subject.

Creating a reflection

Lastly, in your bid to create the perfect reflection photos, you could turn to post-processing.

You’ll need to choose an appropriate image to do this – one that has some nice sky would work best.

Then it’s a case of increasing the canvas size of your image, duplicating the image, flipping it, resizing it, and then making the reflection look realistic by adding some imperfections. You can look to create this by using the following guide.

How will you create the perfect reflection photos?

Now you have the knowledge needed to go out and create stunning reflection photos in your neighborhood. Are there any techniques you use to enhance your results either when you take the photo or post-process it?

Here at digital photography school, we value your ideas and opinions, so please share those in the comments section. Likewise, if you have images you’ve taken that show reflections, please share those as well!

The post Learn How You Can Easily Create the Perfect Reflection Photos appeared first on Digital Photography School. It was authored by Simon Bond.
Digital Photography School

 
Comments Off on Learn How You Can Easily Create the Perfect Reflection Photos

Posted in Photography


How to Add a Reflection in Photoshop

10 May

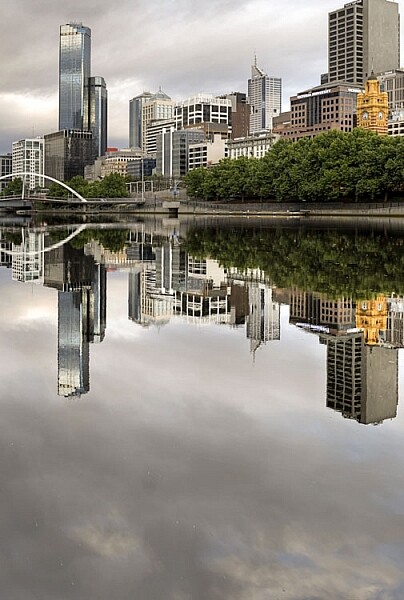
There is one thing in photography that seems to be universally loved – reflections. They aren’t always easy to get, especially if water is involved. The wind only has to be blowing slightly to create ripples in the water, and you will lose the chance of a reflection.

Take the following image, a real reflection taken one morning just before it started raining on the Yarra River in Melbourne. It was almost perfect, but after repeated efforts to get something similar it has never happened again, well not for me.

LeanneCole-reflections-18

One of those magical times when the river was so still the reflection just happened.

If you love that look, then there are ways to do it without having to wait for the perfect conditions. You can fake it in Photoshop, with the right image. Finding the right image is hard, especially when you start, but as you get more experienced at doing it you will find it easier to put reflections in other images.

Find an image that is straight on, like the following one.

LeanneCole-reflections-14

The basic image.

Adding a reflection layer

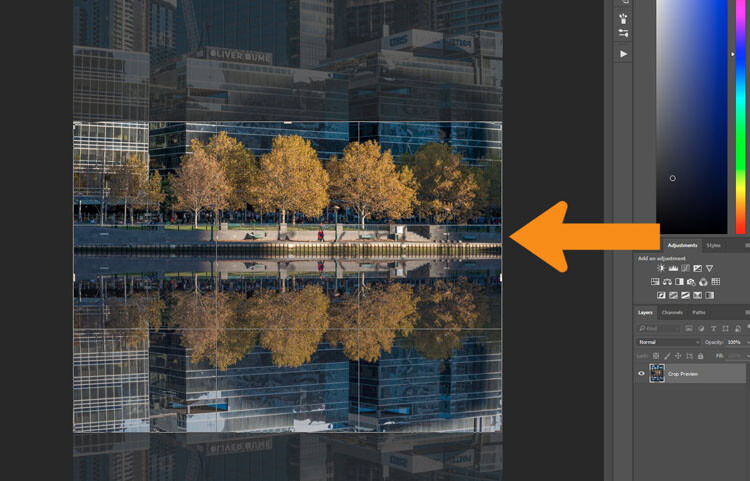
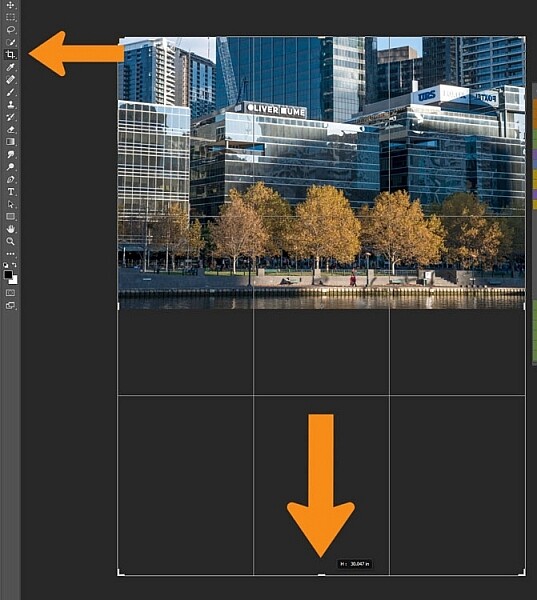
Open the image in Adobe Photoshop, or any program that will allow you to work in layers. You could use Adobe Photoshop Elements or even GIMP to do this tutorial. Once the image has been opened in Photoshop, you will need to make it bigger to fit the reflection. You can do this by using the Crop tool.

LeanneCole-reflections-1

Extend the area of the image with the Crop Tool

You can double the size of the original image, simply by dragging down the point at the bottom of the image using the Crop tool. If the overall size is too big, you can always crop it down once you are finished with the photo.

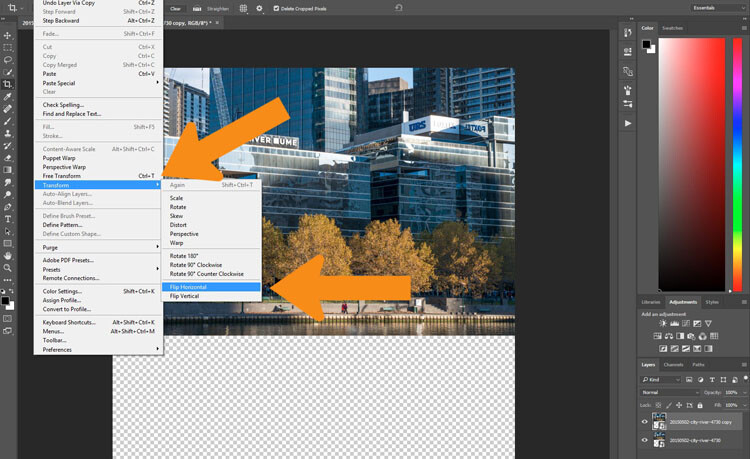
Press Ctrl J to duplicate the original image to new layer, or go to the main menu at the top, to Layer > Duplicate. Go to Edit > Transform > Flip Vertical.

LeanneCole-reflections-2

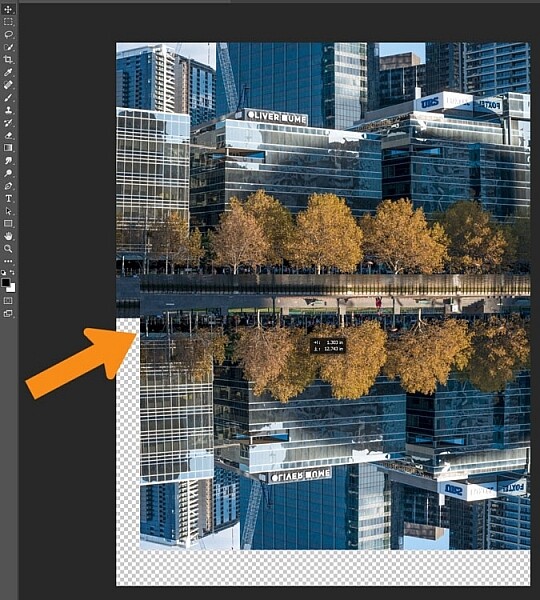
Flip the duplicate image.

If you do the vertical flip in the Image menu you will flip all layers, and for this you only want to flip the one layer. Select the Move tool, the first one in the tool bar on the left, the cross shape (keyboard shortcut is V). Click on the duplicate layer and move the image down, as in the following.

LeanneCole-reflections-3

Move the flipped vertical image down to where the reflection will begin.

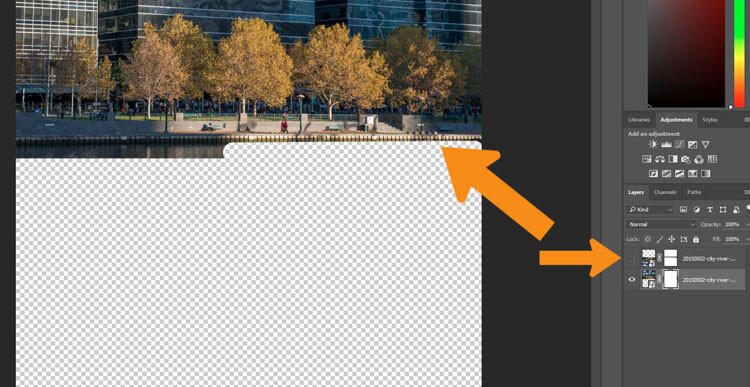
You will need to figure out where the image finishes, and the reflection will start. In the example image for this tutorial, the river edge has a wooden panel which seemed to be the perfect place to start the reflection. However, to do this you will need to erase or delete the water in the image.

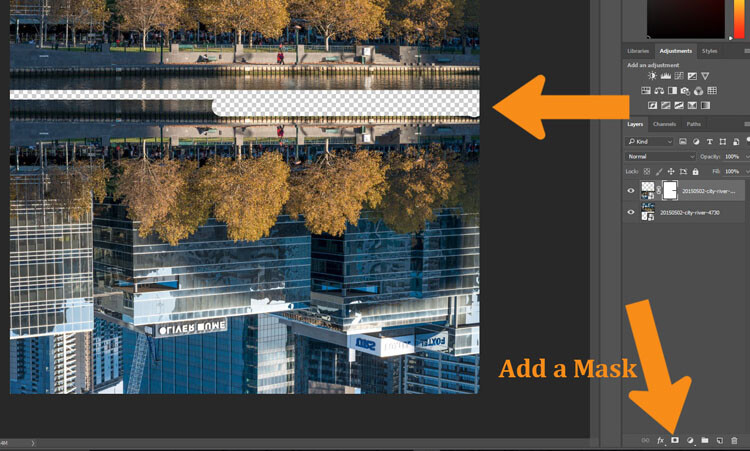
You will need to add a mask to the flipped layer and click on the brush tool so you remove some of the image. You can add a mask by using the icon at the bottom of the layers panel or go to the Main Menu > Layer > Layer Mask > Reveal all.

LeanneCole-reflections-4

Remove or mask out part of the image that won’t be needed.

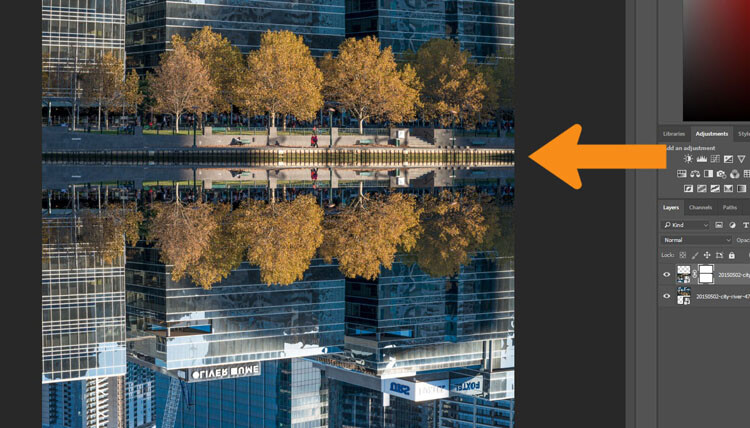
Using the Move tool, shift your image up to meet the original, at the line between the image and the reflection.

LeanneCole-reflections-5

See where the reflection will begin.

You will need to remove the water, or the area underneath the reflection. To do this click the Eye next to the reflection layer so that you can no longer see it (turn off that layer). Add a layer mask to the original image and using your brush, hide those areas away as you did on the duplicate layer.

LeanneCole-reflections-6

On the original image, hide the area that is covered by the second photo.

Turn the reflection layer on again. Now you will have a basic reflection, but you can take it a lot further than that.

Refining your reflection

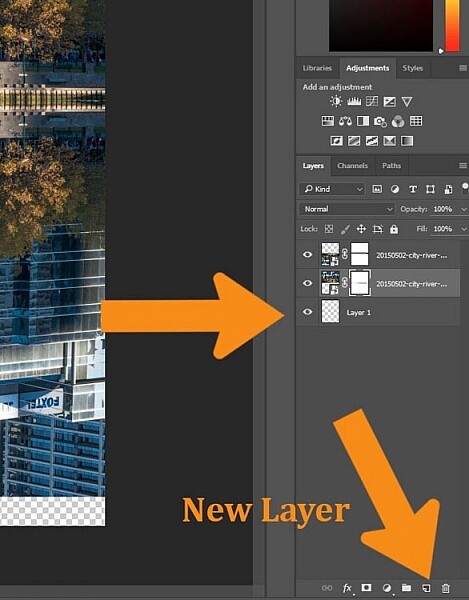
Add a blank layer to your image, then drag it down to be the bottom layer. If you are unable to do that, it may be because the original image layer is locked and called the Background layer. To remove that, double click on the word Background, you should be able to change the name to something else. This will allow you to move the new blank layer to the bottom.

LeanneCole-reflections-7

Add the new layer at the bottom.

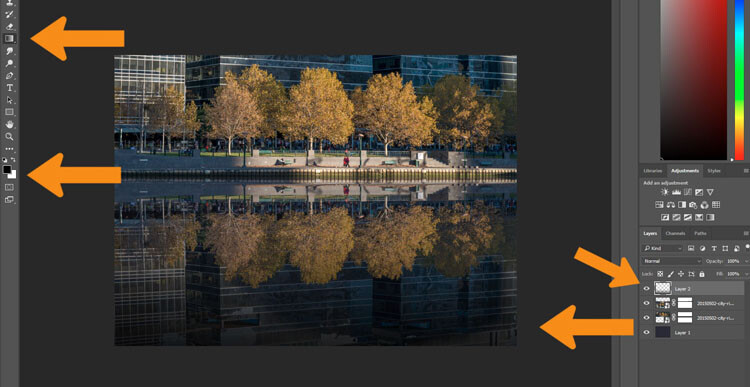
Turn off two image layers so they disappear (click the eyeballs on each). Select the Paint Bucket Tool, it is with the gradient tool, right click and you will see the bucket tool.

LeanneCole-reflections-8

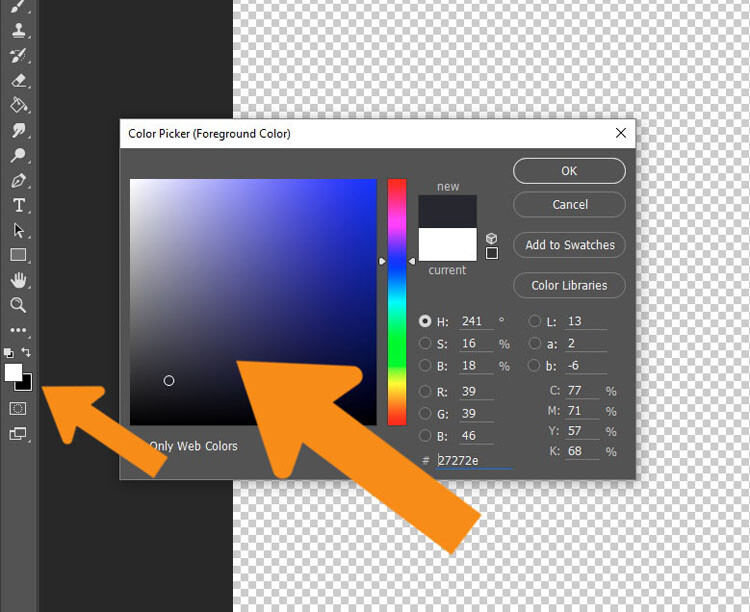
Select the Paint Bucket Tool and click on the foreground color.

Click on the foreground and background color selectors and a window will pop up for you to select the background colour of your reflection. It is good to go with something dark, and a similar colour to your image.

LeanneCole-reflections-9

Select the color to go under the image.

When you have chosen your color, fill the layer with it and turn the other two layers back on.

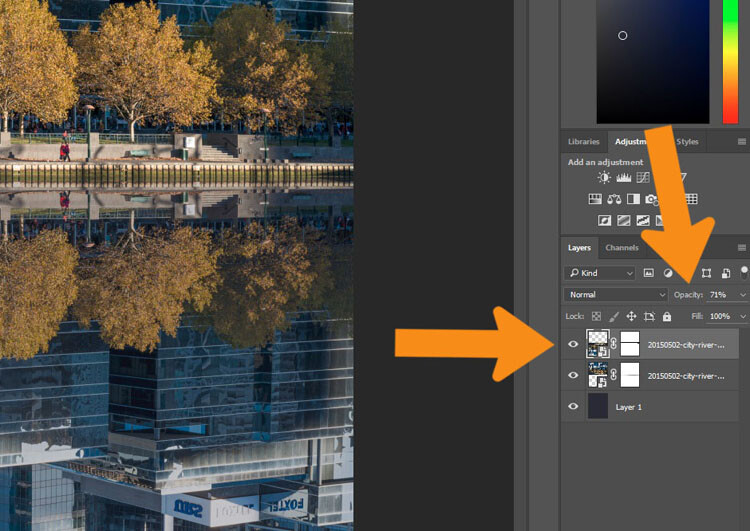
Select the layer that is the reflection and go up to the Opacity Slider which is just above the layers panel. Turn the reflection layer opacity down a little. Just make it slightly less bright than the original. For this tutorial it was turned down to 71%.

LeanneCole-reflections-10

Change the opacity of the reflection.

Select the Crop tool so you can remove any part that is now no longer needed. You may also want to crop the image so it is doesn’t look like there is just one image on top of another.

LeanneCole-reflections-11

Select the crop tool to get the final image.

Fade the reflection

For the final part, add one more blank layer, then select the gradient tool. Make sure that black is the foreground colour. Add some Gradient to the bottom of the image to help it blend in. If you are not getting the gradient to work so that you are getting the foreground to transparent, you will need to select that option in the tool options bar at the top under the main menu. You may also want to change the opacity of the tool to around 50%.

LeanneCole-reflections-12

Add a gradient to the bottom.

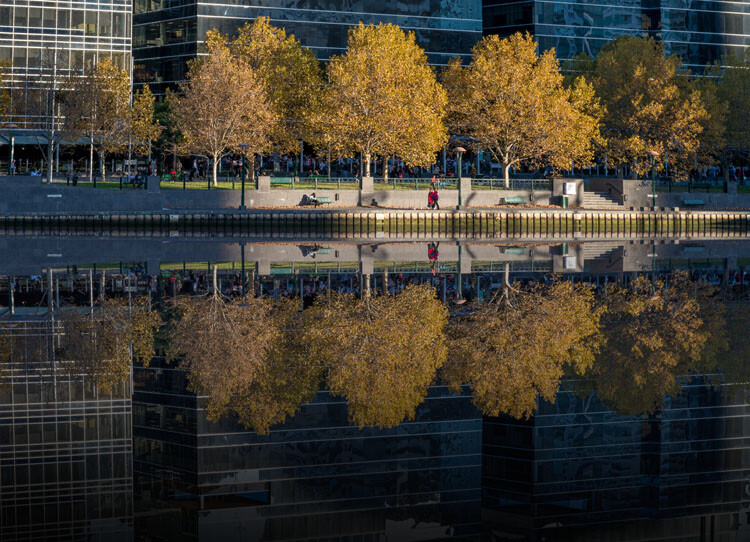
Here is the final image.

LeanneCole-reflections-13

The final image

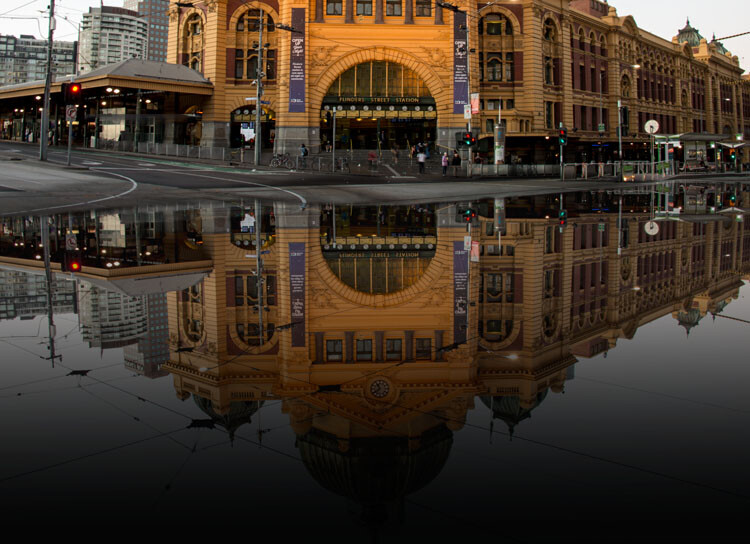
This can be done for many things and you don’t have to have a body of water to do it. Here is an image of a train station in Melbourne where I have tried to make it look like the street is flooded.

LeanneCole-reflections-16

Flinders Street Station as though the street in front were flooding.

Here are a couple of other images in different situations for you to look at and give you inspiration. Let your imagination go wild and see how else you can use this technique.

LeanneCole-reflections-17

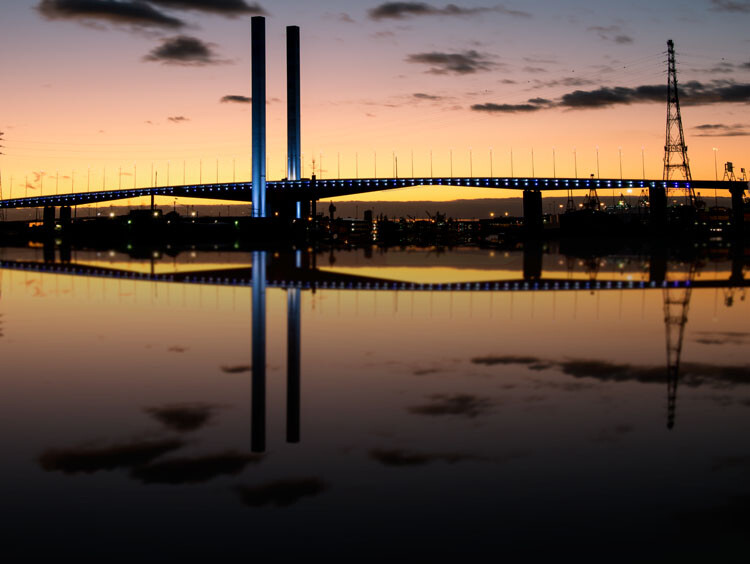
Bolte Bridge at sunset with a reflection in the harbour.

LeanneCole-reflections-15

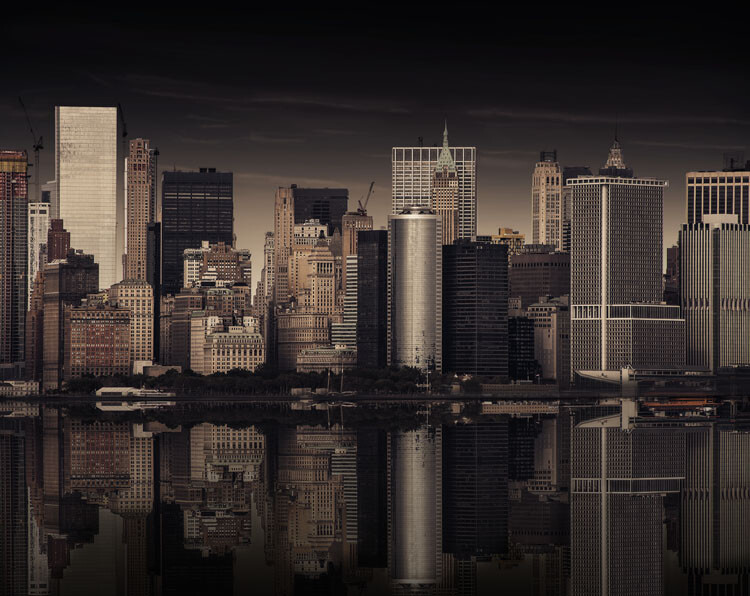
The New York skyline with reflection in the water.

googletag.cmd.push(function() {
tablet_slots.push( googletag.defineSlot( “/1005424/_dPSv4_tab-all-article-bottom_(300×250)”, [300, 250], “pb-ad-78623” ).addService( googletag.pubads() ) ); } );

googletag.cmd.push(function() {
mobile_slots.push( googletag.defineSlot( “/1005424/_dPSv4_mob-all-article-bottom_(300×250)”, [300, 250], “pb-ad-78158” ).addService( googletag.pubads() ) ); } );

The post How to Add a Reflection in Photoshop by Leanne Cole appeared first on Digital Photography School.


Digital Photography School

 
Comments Off on How to Add a Reflection in Photoshop

Posted in Photography


Using Smart Objects to Add Text With a Reflection in Photoshop

21 Dec

Photoshop is a massive program, with many ways to do things. To help you learn Photoshop it’s great to just pick one thing, one new tip, and try it out.

In this video from Phlearn Aaron Nace will show you how to add text with a reflection to an image, but with a neat little twist that allows you to edit the text any time and have it update your finished image automatically using Smart Objects. Have a look:

He even goes over the steps as a summary at the end of the video.

This is a fun project to try on a rainy day – give it a go.

If you want more Photoshop tutorials check out these:

  • Create Your Own Watermark using a Custom Shape in Photoshop
  • Photoshop Tip: Using the High Pass Filter to Sharpen Images
  • How to use Color Grading for Effect and Tone Control in Photoshop
  • 5 Tips for Using the Blend If Feature in Photoshop
  • 5 Photoshop Tips You Probably Didn’t Know

googletag.cmd.push(function() {
tablet_slots.push( googletag.defineSlot( “/1005424/_dPSv4_tab-all-article-bottom_(300×250)”, [300, 250], “pb-ad-78623” ).addService( googletag.pubads() ) ); } );

googletag.cmd.push(function() {
mobile_slots.push( googletag.defineSlot( “/1005424/_dPSv4_mob-all-article-bottom_(300×250)”, [300, 250], “pb-ad-78158” ).addService( googletag.pubads() ) ); } );

The post Using Smart Objects to Add Text With a Reflection in Photoshop by Darlene Hildebrandt appeared first on Digital Photography School.


Digital Photography School

 
Comments Off on Using Smart Objects to Add Text With a Reflection in Photoshop

Posted in Photography


Reflection Perception: 12 More Mirrored Art Installations

24 Aug

[ By Steph in Art & Installation & Sound. ]

mirror art main

Mirrors can disrupt our perception of our environment, especially when they’re positioned to blur the lines between land and sky, up and down, reality and reflection. These 12 (more) mirrored art installations dazzle us with glinting light, confuse us with illusions and invite us to question the difference between what we are shown and what we believe to be true.

Mirrored Ziggurat by Shirin Abedinirad

mirror art ziggurat 4

mirror ziggurat

mirror art ziggurat 3

Slivers of the sky seem to hover in mid-air if you approach this mirrored ziggurat from one of its corners, the steps reflecting the sky while the walls reflect the grass. “In this installation I have been inspired by the pyramidal structure of Ziggurat, a common form of temple in ancient Mesopotamia, attempting to connect earth and sky, so humans could be nearer to god,” says artist Shirin Abedinirad. “The Mirrored Ziggurat acts as a staircase, which seeks to connect nature with human beings and to create union of ancient history and today’s world. The installation offers a transformative view of the self.”

Dazzling Wolf by Tomoko Konoike

mirror wolf

mirror wolf 2

mirror wolf 3

mirror wolf 4

Tiny shards of mirrors reflect light all over the surrounding surfaces as they form a silvery fragmented coat for a six-legged wolf. Titled ‘Donning Animal Skins and Braided Grass,’ the sculpture by Tomoko Konoike draws inspiration from both tradition and pop culture in the form of manga and Shinto animism.

Landscapes Turned Upon Themselves
landscapes 1

landscapes 2

landscapes 3

landscapes 4

landscapes 5

Portions of a three-dimensional landscape are cut out and pasted on top of themselves in a large-scale mirror series called A Moment’s Reflection by Cody William Smith. The effect is most striking at night, when one side of the sky is dramatically different from the other. “My intention is to draw new connections between familiar forms by interdicting specular reflections to environments where none would typically exist. The mirrors serve as a focal point within a given scene and also function as a window to provide an entirely unique perspective on the same location.”

Maze of Mirrors at Hyde Park

mirror art maze

mirror art maze 2

Visitors carefully navigate a maze full of mirrors in Sydney’s Hyde Park, as it would be far too easy to just walk right into one of the reflective columns. Architecture firm Out of the Dark installed 81 mirrored posts with 423 reflective surfaces at the park as an interactive exhibit encouraging visitors to question what’s real and what’s an illusion.

Next Page – Click Below to Read More:
Reflection Perception 12 Mirrored Art Installations

Share on Facebook


[ By Steph in Art & Installation & Sound. ]

[ WebUrbanist | Archives | Galleries | Privacy | TOS ]


WebUrbanist

 
Comments Off on Reflection Perception: 12 More Mirrored Art Installations

Posted in Creativity


Using Rain Puddles to Create Unique Reflection Photos

17 Dec

6

Implementing water into a shoot ratchets up the drama in the images but also the difficulty in the execution. I equate the learning curve of lighting water to learning how to light metal objects and other reflective surfaces. It’s not a quick learn, so be patient with yourself.

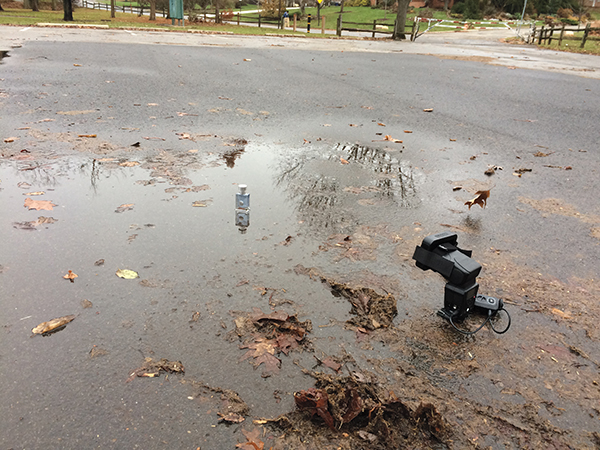
Rain puddles are awesome. I bet you never thought to run out after it rained to hunt for decent puddles. But as you can see in the image below, that’s exactly what I was working with. Since the product I was shooting was a cologne bottle, which is rather small, the puddle didn’t need to be very wide or long. If I was shooting something larger, like a person, I would need a much larger puddle to pull off this technique of making reflection photos.

1

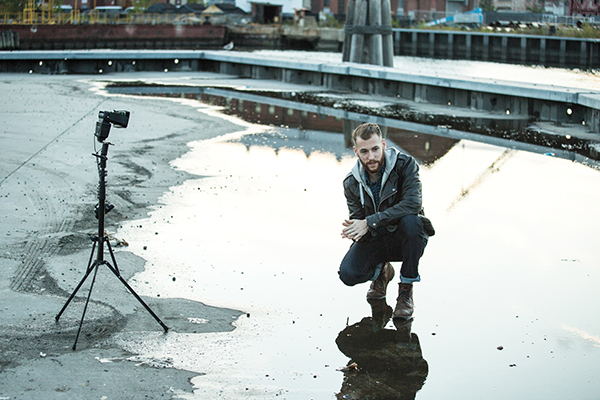
The setup: I was working with a rain puddle in a parking lot, on a patch of blacktop. I added a grid to my flash to keep light from spilling onto the foreground.

The first thing I was looking for was a puddle on a patch of blacktop, or dark asphalt. Typical asphalt or concrete is much lighter in color, and you need something darker to really make this work. The next thing to keep in mind is the height of the flash. Notice I placed it on the same level as the product – on the ground. If I were to light it from a higher angle instead, the light would illuminate too much of the ground around the product, resulting in a less than dramatic image. I also added a honeycomb grid to the flash to further contain the light spill.

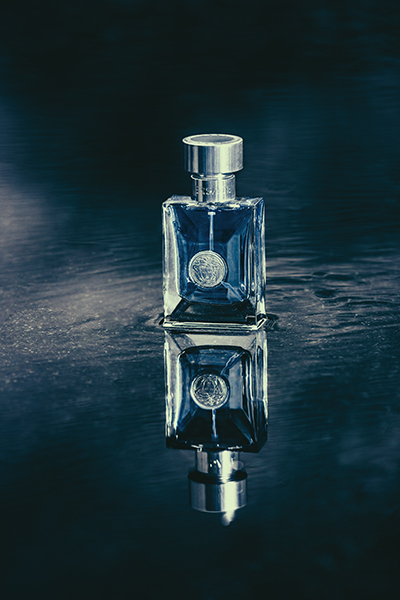
Since the day I photographed this was particularly drab and dark, I had no problem dialing down the ambient with a moderate exposure. With a flash output of ¼ power I had all but eliminated the ambient light, leaving me with an exposure of 1/60 at f/7.1. On a brighter day, I’d likely need a neutral density filter to get rid of the extra ambient light.

Though the ambient has been lowered to an almost night-time quality, there are still some reflections of the sky and trees visible in the puddle. The lower shutter speed allowed these tones and shapes to remain. Though the puddle was not especially wide or deep, it sufficed in allowing me to achieve the glassy surface that I was going for, see below.

2

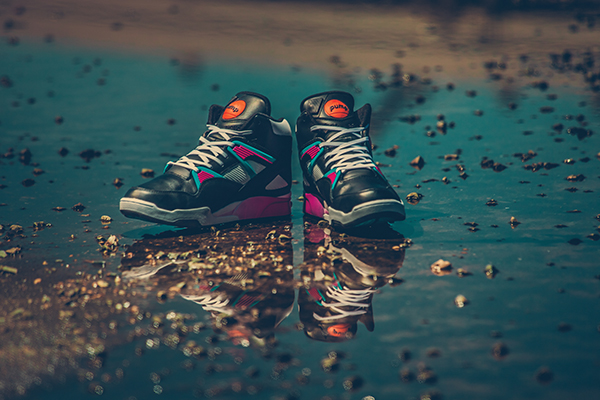
The final shot: This rain puddle, shot on a drab, gray, day has been transformed into a dramatic, glassy surface.

If the sky had been clear, rather than dark gray, the surface of the puddle would have been a nice, vibrant blue, as seen below. In this shot you can see that while the blue tone is nice, the illuminated foreground is pretty distracting, not to mention the dozens of small rocks. This was because the light was elevated, lighting the concrete in front of the shoes as well, which is why it’s important to lower your lights, so that they’re parallel to the ground.

3

When the sky is clear, the surface of the puddle changes to a lovely blue color. However, be sure not to light from above, because as seen in this image, the illuminated concrete makes for a distracting foreground.

4

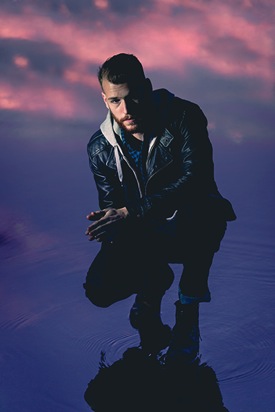
The setup: A puddle, this time a large one, is the setting for this portrait. The shoot took place right after the sun dropped below the skyline.

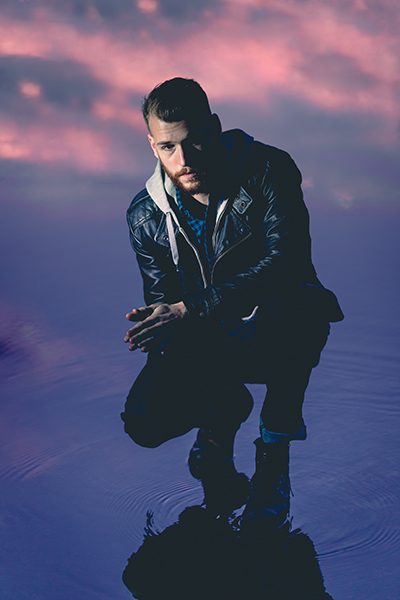
In this next image I was using a rather wide puddle, which was large enough to allow me to isolate my subject, Max. Once again, to minimize light spill, I set my light at the same level as the subject, rather than above, as well as used a grid. The puddle reads really well, though the reflection shows a bit of the building in the background. After I finished color grading the image in Lightroom, I opened up the file in Photoshop to remove the building.

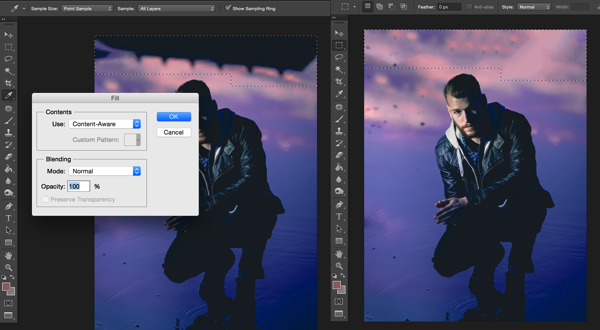
To do this, select the trouble area and simply hit the delete key. As long as you are using Adobe Photoshop CS6 or CC, you’ll see the option to use Content Aware Fill (see below). It will typically do a decent job at filling in the selection, but minor cleanup is often needed. I used the Spot Healing Brush tool to clean up any remaining trouble areas.

5

I quickly removed the building reflection by using the Content Aware Fill option in Photoshop CC.

6

The final shot: After removing the building reflection, the water surface looked seamless.

Have you got any other tips for creating reflection photos? Please share them and/or your images in the comments below.

googletag.cmd.push(function() {
tablet_slots.push( googletag.defineSlot( “/1005424/_dPSv4_tab-all-article-bottom_(300×250)”, [300, 250], “pb-ad-78623” ).addService( googletag.pubads() ) ); } );

googletag.cmd.push(function() {
mobile_slots.push( googletag.defineSlot( “/1005424/_dPSv4_mob-all-article-bottom_(300×250)”, [300, 250], “pb-ad-78158” ).addService( googletag.pubads() ) ); } );

The post Using Rain Puddles to Create Unique Reflection Photos by Nick Fancher appeared first on Digital Photography School.


Digital Photography School

 
Comments Off on Using Rain Puddles to Create Unique Reflection Photos

Posted in Photography


How to use the Art of Self Reflection to Make Better Photos

06 Aug

Have you ever “hit the wall” with your photography? Do you sometimes get the feeling your images aren’t improving as much, or as fast as you’d like? Have you ever thought about what you must do to cross that chasm from being a pretty good photographer to being a WOW photographer?

Is this a WOW shot? How do you know?

Is this a WOW shot or not? How do you know?

ONE SKILL FITS ALL

There’s really only one ability that you need to develop to help you advance your talents, and it will serve you well in any creative pursuit, not just your photography. This skill is reflection.

No, not THAT kind of reflection (although reflections in images can be captivating), I’m talking about introspective reflection, the thoughtful self-analysis of your work.

  • What worked well in the image?
  • What is not working?
  • Was your vision translated accurately into your photo, did you achieve your goals?
  • Is it a WOW shot?
  • How can you tell?
  • How can you be objective about your own photos?

Reflection is so important for improvement. Yet many aspiring and seasoned photographers alike, go out and shoot, come back to their computers and fire up Lightroom (or another image processor) and start editing. They edit until they have an image they like; save it, print it and share it. And that’s the end of the workflow. I’d like to encourage you to add reflection to your photographic post-processing methods.

dinosuar_sunset

IT’S CRITICAL TO BE CRITICAL

It’s not easy to be critical about one’s own creative work. Our hearts and souls are embodied in every shot we take and it can be difficult, if not almost impossible to be objective. But I have a handy and easy checklist, to help you critique your images. It’s fast, almost painless, and it works. You can use this checklist as well if your friends or other photographers ask you to critique their images. You can be objective, you can back up your opinion using the checklists items, it  works for almost all genres of photography and it will help you fully absorb new information, and rapidly advance your photography skills.

PPOCMB_comp1-copy

BEING OBJECTIVE – THE CHECKLIST*

This checklist will help you evaluate your images, and those of other photographers in an objective way. It’s the prefect way to reflect on your shots and absorb those things you did well. It also allows you to understand why an image isn’t working.

Ask yourself:

Does the image have:

1) Impact

This is the immediate feeling the viewer gets when they first see the image. Compelling images evoke laughter, sadness, anger, pride, wonder or another intense emotion.

Reality Check: When you show someone your image, what is their immediate reaction? Do they instinctively take a breath, or inhale quickly? This is a good sign your image has made an impact.

2) Storytelling

Storytelling refers to the ability of the image to evoke imagination. One beautiful thing about art is that each viewer might collect his own message or read her own story in an image.

Reality Check: WHAT is the story your image tells? This need not be complicated but perhaps as simple as one sentence. For the image Prairie Sundown, the old house above, is there a story in that photo for you?

3) Creativity

This is the original, fresh, and outward expression of the imagination of the maker by using the photographic techniques to convey an idea, message, or thought. Does your image display something in a very creative and original way?

Reality Check: Have you ever seen an image similar to yours? Why is yours different and better than the similar one?

dps_DSC4830W

4) Style

Style is defined in a number of ways. It might be a specific genre or simply recognizable as the characteristics of how a specific artist applies light to a subject.  It can impact an image in a positive manner when the subject matter and the style are appropriate for each other, or it can have a negative effect when they are at odds.

Does your image show a sense of YOUR style? Describe your style? Look at the works of famous photographers and see if you can identify the elements that make up their style.

Reality Check: What have you done in taking this image, or in post-processing it, that makes it uniquely YOUR image? Do you use a certain angle a lot of the time so people start to recognize certain images as being yours? This uniqueness is your style.

5) Composition

Composition is important to the design of an image, bringing all of the visual elements together in concert to express the purpose of the image. Proper composition holds the viewer in the image and prompts the viewer to look where the creator intends. Effective composition can be pleasing or disturbing, depending on the intent of the image maker.

Does your image have leading lines that help the viewer come into your image? Is there enough contrast, pattern, white space, repetition, or tension to keep them looking once they are there?

Reality Check: Have you used any rules of composition in this image (Rule of Thirds, Golden Triangle, etc.). Which one and why did you use this particular one? Have you purposely broken any rules? Which ones and why did you break them?

6) Center of Interest

This is the point, or points, on the image where the photographer wants the viewer to stop as they view the image. There can be primary and secondary centers of interest. Occasionally there will be no specific center of interest and the entire scene collectively serves as the center of interest.

Reality Check: There is a clear and obvious centre of interest with no distracting elements; or the viewer can tell you in a second what is the point of interest. If they can’t then you must score yourself lower.

7) Lighting (the use and control of light)

Light is how dimension, shape and roundness are defined in an image. Whether the light applied to an image is man-made or natural, proper use of lighting should enhance an image.

Have you used unique, or unusual lighting angles? Is the image taken at a time when the sun is NOT directly overhead or using flat light?

Reality Check: The light is a key component of this image. If the light were different would the image be better or worse? If this image had been shot at sunset it would be a better image? If you could do better, score yourself lower for use of lighting.

8) Subject Matter

The subject is appropriate to the story being told in an image.

Reality Check: Is your subject realistic for the story it is telling? Is the symbolism evident? Is there continuity between the logic of the elements you’ve used in your image?

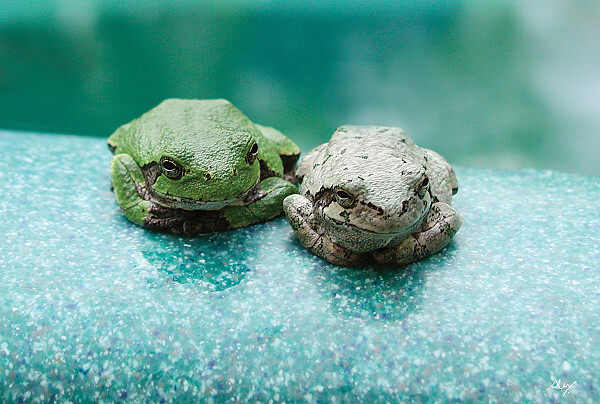
frogbuddiesW

9) Color Balance

Color balance supplies harmony to an image.  An image in which the tones work together effectively supporting the image, can enhance its emotional appeal. Color balance is not always harmonious and can be used to evoke diverse feelings for effect.

Reality Check: The tones and colors you have used in your image are coherent with the type of emotion you want to convey. Dark, shadowy, purples, blues, deep reds etc., evoke a different emotion than whites, pastels and semi-saturate tones. Is your use of color consistent with your story?

10) Technical Excellence

This is quality of the image itself as it is presented for viewing. Sharpness, noise, pixelation, exposure, printing, mounting, and correct color all speak to the qualities of the physical print.

Reality Check: The extreme reality check for this is viewing your image at 100% in Photoshop or other image editor. Is your subject sharp at 100%? If so then it’s sharp. Is there visible noise in the shadows? If yes your exposure is off. Are there “blown-out highlights”, if yes your exposure is off. Check your histogram for clipping. If your images are of people, are the skin tones pleasing and natural?

11) Technique

Technique is the approach used to create the image. Printing, lighting, posing, paper selection (if printed) and other elements are part of the technique applied to an image.

Reality Check: Is everything you have done to create and make this image technically good?

CRITIQUE ME

To help you get the hang of this, I would be delighted to accept your objective assessment of the images in this article, using the points from checklist of course.

Here are a couple more for for you to reflect on, and critique:

cave-Ver-3-small

What’s working in this image? What’s not?

Does this image have impact, storytelling, anything else? WOW shot or not?

Does this image have impact, storytelling, anything else? WOW shot or not?

Once you have the “feel” for this, give the Reflection Checklist a try on some of your images, and feel free to share your self assessment with us here. You can post your checklist results and images in the comments section.

 You can even download a PDF of the Photographer’s Reflection Checklist with a scoring guide here.

* This checklist has been adapted from the PPA’s 12 Elements of  Merit Image and used with their permission.

The post How to use the Art of Self Reflection to Make Better Photos by Alex Morrison appeared first on Digital Photography School.


Digital Photography School

 
Comments Off on How to use the Art of Self Reflection to Make Better Photos

Posted in Photography


How to Create Amazing Reflection Photos using Puddles

17 Jul

People are captivated by reflections, and photographers eagerly seek out still bodies of water in order to capture stunning reflection shots. But a perfect reflection may be closer than you think, especially if it has just been raining.

puddle, reflection, symmetry, how to

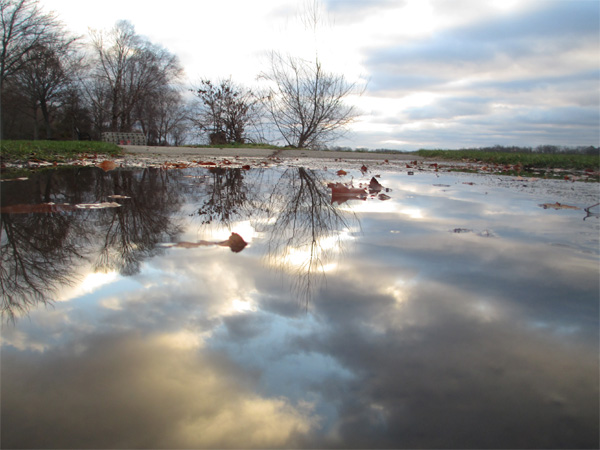
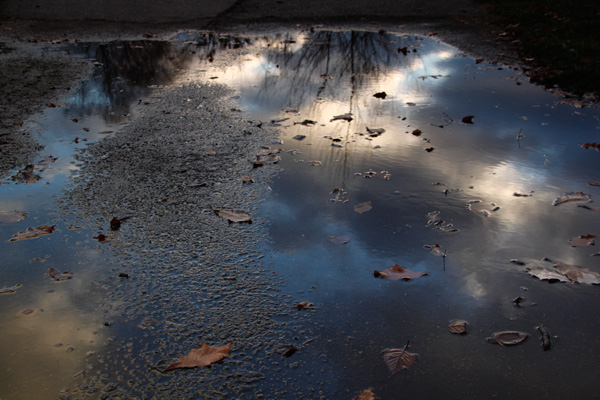
Puddle reflection

Photographing puddle reflections

Puddles are an incredibly useful if perhaps surprising source for reflections. Puddles are generally shallow and found in protected areas or depressions, which means that they are likely to hold smooth, still water. They can also be found in many different locations, providing a variety of options for subjects and compositions. Finally, puddles are so mundane and small that they are often overlooked, so you can create unique and surprising images that others likely missed.

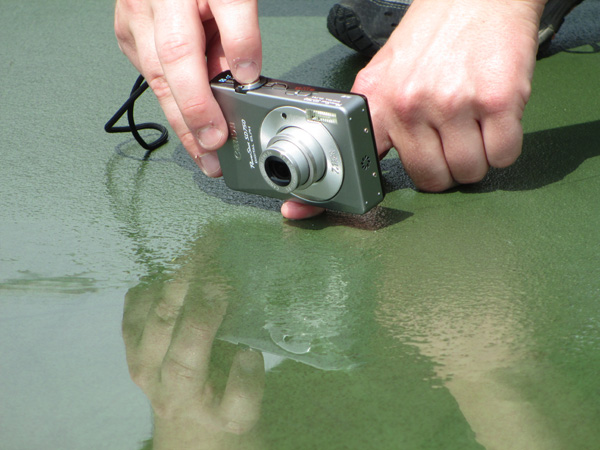
The trick with capturing amazing reflection photos using puddles, is to get down low. You want your camera to get as close to the surface of the puddle as possible. This will make even a small puddle appear expansive in your final image. I recommend putting your hand or a finger under your camera to steady it and keep it out of direct contact with the water. It is also useful to have a small bubble level attached to your camera to judge whether your composition is level.

puddle, reflection, symmetry, how to

This puddle reflection technique works equally well whether you have a DSLR camera or a point-and-shoot. I often use my point-and-shoot for these types of shot, as it is much easier to simply lean down and hold it near, or over, the puddle when shooting, and I am much less worried about it getting wet. When shooting puddles with my DSLR, I am much more likely to squat down to better support the camera with both hands and keep it out of the water or mud.

puddle, reflection, symmetry, how to, sunset

puddle

Puddle used for the reflection above

Puddles do not need to be very large for such photographs, but an ideal puddle would be at least a foot or more, long and wide. Puddles that have formed naturally on roads, or on the ground, provide a better transition from subject to reflection than puddles that are surrounded by a set boundary like a curb or a bank. You can also think beyond traditional puddles and try the same technique with wet roadways or stone pillars, which often become highly reflective when wet.

An example: puddle versus puddle reflection

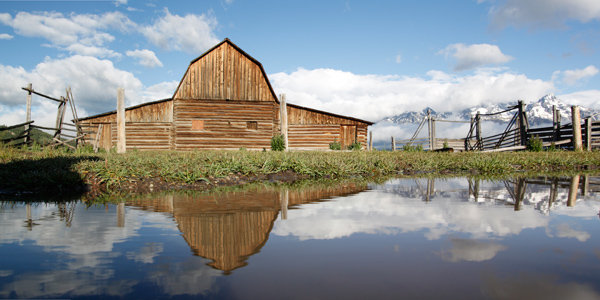
Grand Teton National Park, Tetons, Mormon Row, mountains, landscape, barn

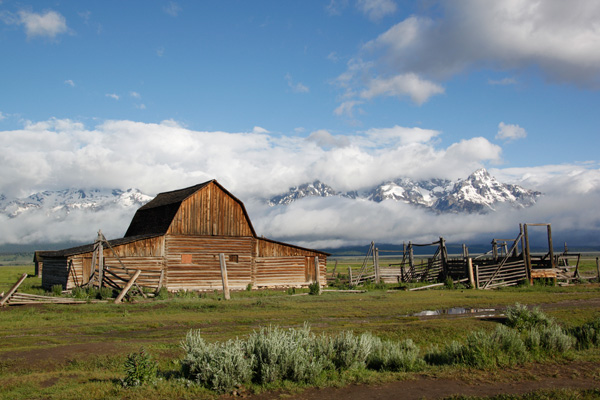
Above is one of the classic scenes from the Grand Tetons: the abandoned houses of Mormon Row. It had rained the previous day, and much of the night, and in the lower right-hand section of the photograph, you will notice a fairly unassuming puddle remaining in the mud.

Grand Teton National Park, Tetons, Mormon Row, mountains, landscape, barn, reflection, puddle

Getting down low and holding my camera just above the surface of that puddle allowed me to capture this shot. Despite the slight breeze and rippling of the water, this reflection clearly highlights both the abandoned building and the incredible mountain view behind it. Merging three different compositions provided the panoramic view below.

McEnaney-Tetons-panorama-final

Seek out puddle reflections

Next time you find yourself in a wet situation, make the most of the puddles around you. Get down low, and you may be surprised at what your camera captures compared to what the scene looks like to you standing up higher. Do not limit yourself to taking the same shots as everyone else – try something new!

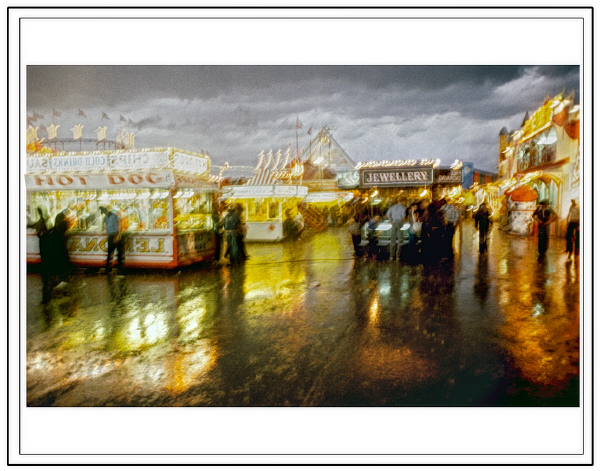
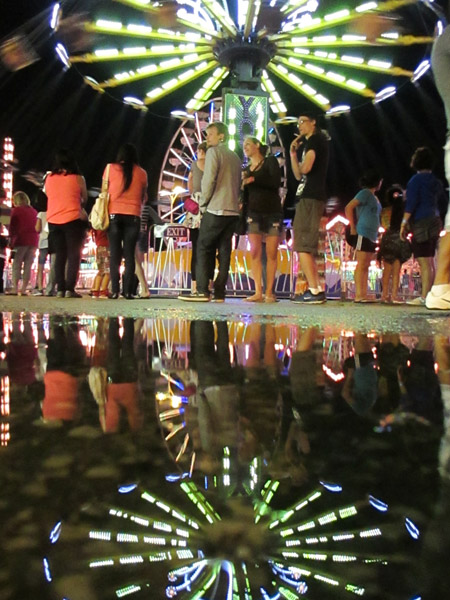
puddle, reflection, how to, carnival, night, street photography

The weekly photography challenge a little while ago was reflections. If you’re still working on that one try these tips out. Want to see more reflections – try this collection.

The post How to Create Amazing Reflection Photos using Puddles by Katie McEnaney appeared first on Digital Photography School.


Digital Photography School

 
Comments Off on How to Create Amazing Reflection Photos using Puddles

Posted in Photography


Reflection Photos to get you Motivated

04 Jul

A puddle in the road, plate glass windows, or a shiny car – what do they all have in common? They provide great opportunities to get reflection photos.

This set of images of reflections is to give you some ideas to go shoot your own reflection photos.

Enjoy!

Photograph Black Lotus by Mathijs van den Bosch on 500px

Black Lotus by Mathijs van den Bosch on 500px

Photograph Arc de Triomphe Etoile Water Mirror Reflection by Loïc Lagarde on 500px Arc de Triomphe Etoile Water Mirror Reflection by Loïc Lagarde on 500px

Photograph Dawn by David D on 500px

Dawn by David D on 500px

Photograph In the Morning Light by Teguh S on 500px In the Morning Light by Teguh S on 500px

Photograph Louvre at dusk by Tomáš Vocelka on 500px

Louvre at dusk by Tomáš Vocelka on 500px

Photograph Reflections by Marco Britto Photography on 500px Reflections by Marco Britto Photography on 500px

Photograph Louvre Pyramid by Night by Csilla Zelko on 500px

Louvre Pyramid by Night by Csilla Zelko on 500px

Photograph brooklyn.bridge.two by Robert Pfeuffer on 500px brooklyn.bridge.two by Robert Pfeuffer on 500px
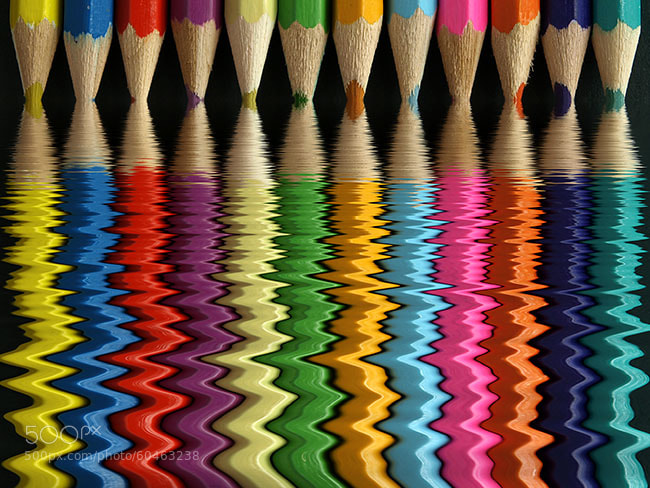
Photograph St. Peter's reflection by Daniele Forestiere on 500px

St. Peter’s reflection by Daniele Forestiere on 500px

Photograph Watercolours by Whatshisname  on 500px Watercolours by Whatshisname on 500px
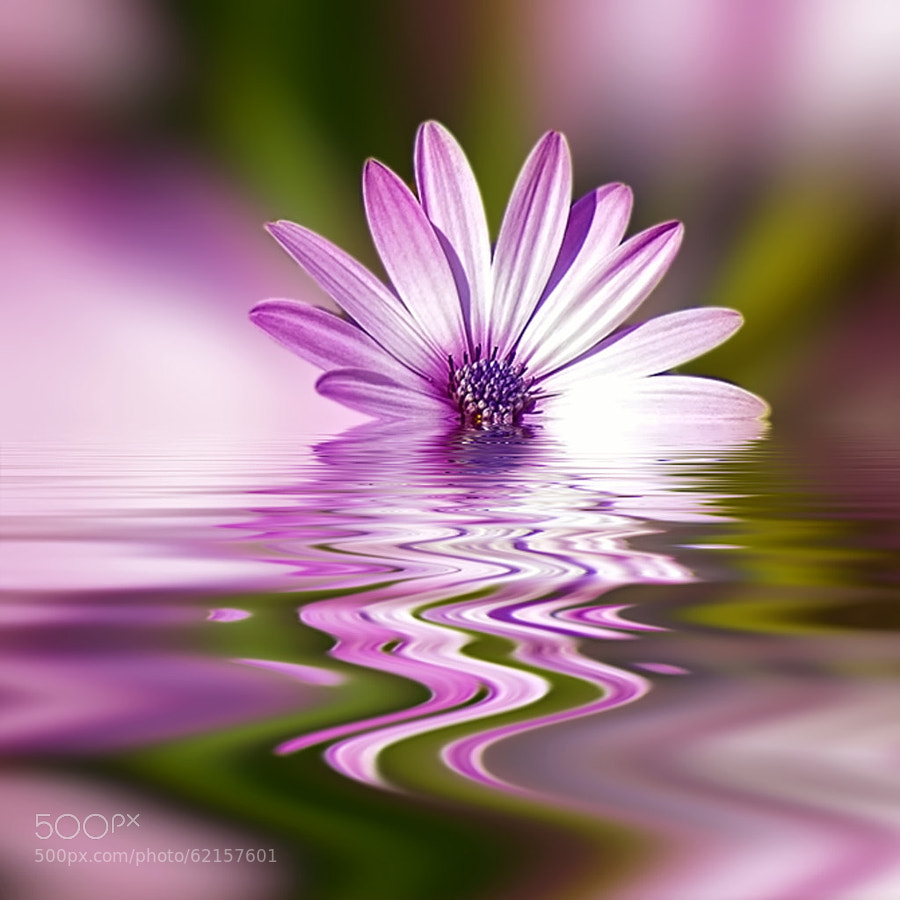
Photograph Atmaniksepa by Josep Sumalla on 500px

Atmaniksepa by Josep Sumalla on 500px

Photograph Blue Honey by Lorenzo Cassina on 500px Blue Honey by Lorenzo Cassina on 500px

Photograph Who?... by Ewa Frye on 500px

Who?… by Ewa Frye on 500px

Photograph Positive Vibes by Josep Sumalla on 500px Positive Vibes by Josep Sumalla on 500px

Photograph My Sky... by Ewa Frye on 500px

My Sky… by Ewa Frye on 500px

Photograph Surreal by Lorenzo Cassina on 500px Surreal by Lorenzo Cassina on 500px

Photograph Huntington Beach Pier at Sunset by Nhut Pham on 500px

Huntington Beach Pier at Sunset by Nhut Pham on 500px

Photograph illusion by Vasilis  Athanasopoulos on 500px illusion by Vasilis Athanasopoulos on 500px

Photograph Dreamworld by Matt Payne on 500px

Dreamworld by Matt Payne on 500px

Photograph Couple by Joanna Lemanska on 500px Couple by Joanna Lemanska on 500px

Photograph Kad?köy Vapuru by Hakan Akkuzu on 500px

Kad?köy Vapuru by Hakan Akkuzu on 500px

Photograph The Biking Dutchman by Roeselien Raimond on 500px The Biking Dutchman by Roeselien Raimond on 500px

Photograph Ride on Mirror by Praveller B.S on 500px

Ride on Mirror by Praveller B.S on 500px

Photograph Captured Clouds by Petter Lidbeck on 500px Captured Clouds by Petter Lidbeck on 500px

Photograph Flipping Lifestyles by Drew Hopper on 500px

Flipping Lifestyles by Drew Hopper on 500px

Photograph En el calor de la noche by Gemma  on 500px En el calor de la noche by Gemma on 500px

Photograph reflection in the water by Ali ilker Elci on 500px

reflection in the water by Ali ilker Elci on 500px

Photograph Back to the HotRod by KAMERAKIND  on 500px Back to the HotRod by KAMERAKIND on 500px

Photograph two ropes by Brian Denton on 500px

two ropes by Brian Denton on 500px

Photograph trio . . . by Brian Denton on 500px trio . . . by Brian Denton on 500px

Photograph 'Cuda by Brian Krouskie on 500px

‘Cuda by Brian Krouskie on 500px

Photograph Hot Air Reflection by Gladner  on 500px Hot Air Reflection by Gladner on 500px

Photograph Reflection by Gavriela Marantidi on 500px

Reflection by Gavriela Marantidi on 500px

Photograph Morning Glory by Samuel Sharpe on 500px Morning Glory by Samuel Sharpe on 500px

Photograph Car Reflections by Simon Cresdee on 500px

Car Reflections by Simon Cresdee on 500px

Photograph GT Sunset by Simon Brown on 500px GT Sunset by Simon Brown on 500px
Here’s some ideas on using reflections:

  • How To Photograph Reflections In Water
  • 5 Reasons Why Bad Weather Days are the Best Times for Photography

The post Reflection Photos to get you Motivated by Darlene Hildebrandt appeared first on Digital Photography School.


Digital Photography School

 
Comments Off on Reflection Photos to get you Motivated

Posted in Photography


50 Smashing Reflection Photography Examples to Boost Your Creativity

07 Apr

Reflection is a great way to spice up a lifeless photo and create a beautiful composition. Using water, mirrors, windows or any other kind of reflective surface can change an image into a work of art. The best thing about using reflection is that you can turn something really simple and straightforward into something abstract, richer and even mysterious. However, Continue Reading

The post 50 Smashing Reflection Photography Examples to Boost Your Creativity appeared first on Photodoto.


Photodoto

 
Comments Off on 50 Smashing Reflection Photography Examples to Boost Your Creativity

Posted in Photography


How to create a reflection in Photoshop in 6 easy steps

21 May

Creating a reflection using Photoshop is one of those things that at first glance looks really hard, but really isn’t, once you break down the steps (just light Light Painting which I covered in another two part series). In this article I’m going to demystify creating a reflection, a technique that works particularly well on images with open pavement, and HDR processed images which tend to make the pavement look wet already.

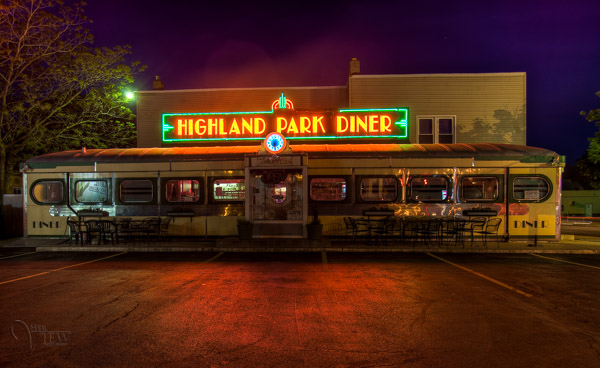
We’re going to learn how to go from this . . .

reflection-before

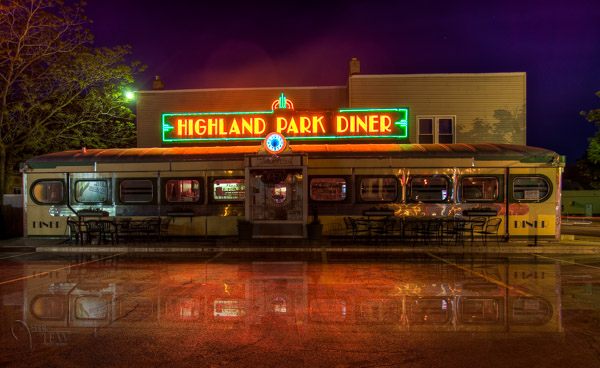
To this!

reflection-after-photoshop

In less than 10 minutes!

I recently showed one my HDR classes how to do this, and they all followed along with me step by step.  Some of them were using Elements (which works just fine, but you may find the menus and choices look slightly different), and this technique can be done using that program too, so if you use Elements, not to worry. Many of my students were also self proclaimed “Photoshop novices” and when I asked them if they thought they’d be able to this when I showed the before and after images, most said “no”!  But they all did, and we were done in less than 10 minutes. **Note that also included me going super slow to ensure each of the 12 people in the class were on the same page with me. I’m going to guess this will take less than 5 – ready GO!

Here are the six easy steps to follow in Photoshop.  This is the super condensed version for those quick readers and skimmers.

  1. copy a section of the image
  2. paste it as a new layer
  3. flip it
  4. position it
  5. change the layer blend mode
  6. mask it

That’s it! You want a few more details?
Let’s dive in a little deeper into each step

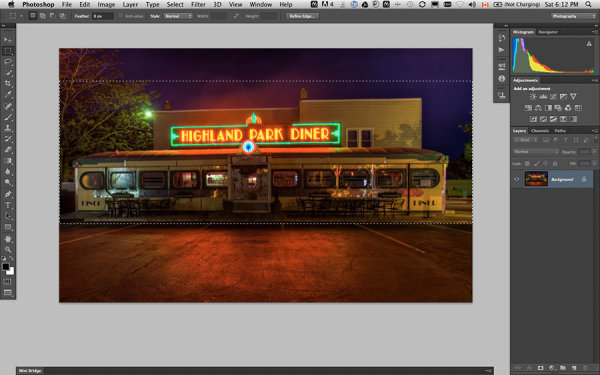
STEP ONE – COPY

Using the marque tool (“M” is the keyboard shortcut) draw a box around an area of your image that will become the reflection (see Figure #1 below). Make sure you go edge to edge on the sides, and get enough of the image vertically. If you grab more than you need that’s fine we’ll be moving it around and masking later anyway.

select-section

Figure #1 make a selection

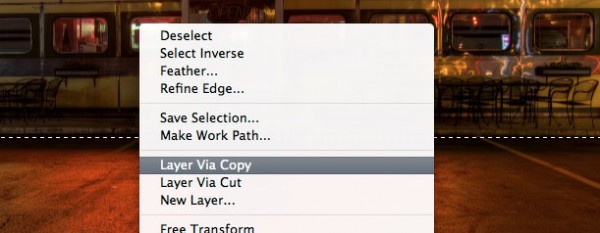
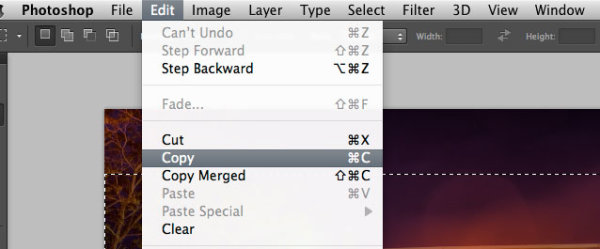
Copy the selection as a new layer. You can do that a few ways.

  • right click on the image and from the menu that pops up choose “layer via copy” (see Figure #2 below)
  • from the edit menu choose “copy” or using the keyboard shortcut “command/control+c”  (see Figure #3 below)
layer-via-copy2

Figure #2 right click>Layer Via Copy

Figure #3

Figure #3 Copy from Edit menu

STEP TWO – PASTE AS NEW LAYER

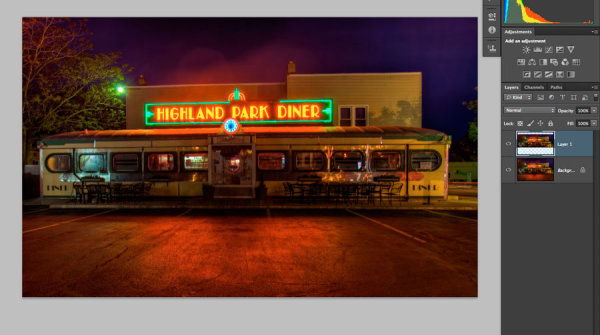
If you chose the “layer via copy” method above you already have the selection pasted as a new layer. If you haven’t already done that go ahead and paste either from the Edit>Paste menu option of the keyboard shortcut “command/control+v”. You will end up with something that looks like this, Figure #4 below.

Figure #5

Figure #4 paste new layer

Doesn’t look much different right? Right! Because it’s basically on top of itself.  But look at your layers, it is there on a new layer and it only grabbed part of the image. Now the magic begins!

STEP THREE – FLIP IT

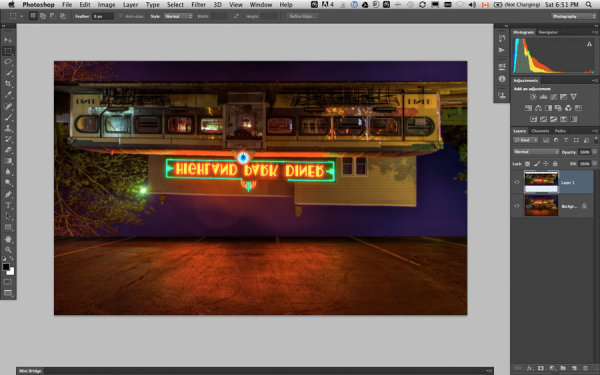
Next from your Edit menu choose “Edit>Transform>Flip vertical” to flip this new layer upside down. You should end up with something funny looking like Figure #5 below.

flip-layer

Figure #5 flip vertically

STEP FOUR – POSITION IT

Figure #5 move tool

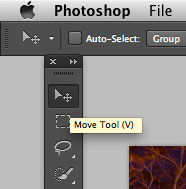
Figure #6 move tool

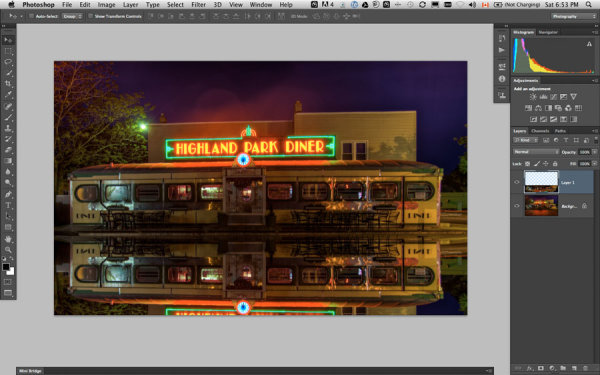
Next select your MOVE tool from your tool palette (see Figure #6 right – “v” is the keyboard shortcut) and grab the flipped layer and drag it down until the images start to line up where the reflection will begin. In my image I’m using the edge of the sidewalk in front of the diner. If it doesn’t line up perfectly don’t worry about it, you can mask any imperfect bits out later in step six.

Now you want to have something that looks like Figure #7 below. The reflection is in roughly the right position. Make sure you don’t move side to side, just down, otherwise you’ll have gaps on the edges of your reflection.

NOTE: once you’ve selected the Move Tool, you can also use the up and down arrows on your keyboard to move the layer up and down. This works great for smaller adjustments when you get it close to position.

Figure #6

Figure #7 position the layer

STEP FIVE – CHANGE THE BLEND MODE

layer-blend-modes

Figure #8 Lighten blend modes

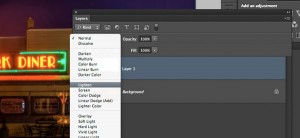
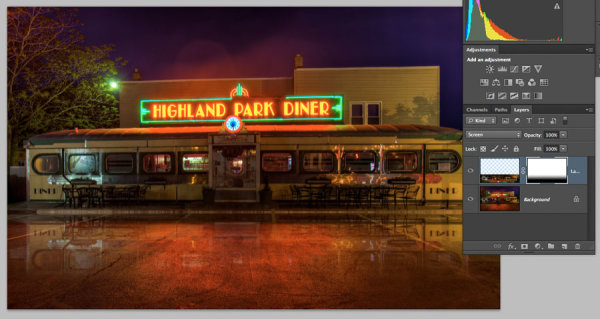
From your layers panel change the layer blend mode to one of the “lighten mode”.  You will find the layers blend modes near the top of your layers panel, next to “opacity”. By default the blend mode is “normal”.

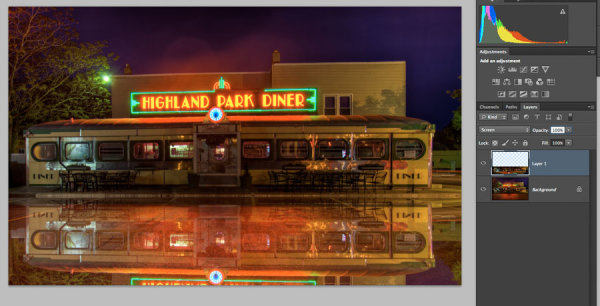
The Lighten modes are the ones in the third section down (see Figure #8 right), they include: Lighten, Screen, Color Dodge, Linear Dodge, Lighter Color. Layer blend modes change how the selected layer interacts with the one below it (the original image). By selecting one of the options in this section it will only show areas of this layer that are lighter than the one below it, and any areas darker will not appear.  For reflections I usually choose Lighten or Screen, depends on the image. Try them all and choose the one that looks best for your image. For this example I’m using Screen mode.

Now I have something that looks a little closer to a real reflection  (see Figure #9 below).

Are you still with me!?  Do you have something reasonably similar?

Figure #

Figure #9 change the layer blend mode

STEP SIX – MASK IT

add-layer-mask2

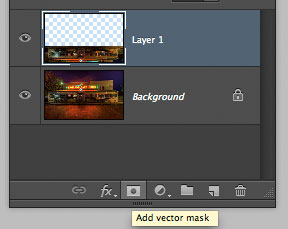
Figure #10 add a layer mask

Okay we’re almost done and it’s looking pretty good. But in my image the neon sign in the reflection is too bright. It doesn’t look natural because reflections are usually darker than the original – so we’re going to tone it down using a mask and the gradient tool.

First, make a layer mask by clicking on the “add layer mask” icon at the bottom of your Layers Panel (Figure #10 right). You can also do it by going to the Layers menu>Layer mask>Reveal all.

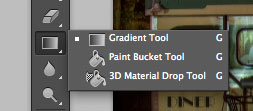
Figure #11 gradient tool

Figure #11 gradient tool

colors-foreground-background

Figure #12 foreground/background colors

Next select the Gradient tool from your tools panel. Keyboard shortcut is “g”  but make sure you have the gradient tool and not the paint bucket.  See Figure #11 above. Hit the “d” key on your keyboard to set your foreground/background colors to default, then hit “x” to switch them. Make sure you see black as your foreground color and white as the background color (see Figure #12 right).

Once you have your colors set to black and white, and your gradient tool selected and ready for use – make sure you are on the layer mask not the layer. You can tell because whatever is active has corner brackets around it. If you layer thumbnail is selected, just click on the white layer mask thumbnail to make it active. We need to make sure we are doing this on the mask, NOT the layer.

How masks work is that anything in white on the mask reveals the contents of the layer.  Where ever there is black on the mask it hides that area of the layer. So we want to hide the outer edges of this layer so it fades out gradually towards the bottom of the image and looks more natural.

With the gradient tool, by default it paints from the foreground color, to the background – fading from one to the other depending on how we create the gradient. Sometimes it takes a little experimenting to get it just right but you can always “undo” using the handy “command/control+z” shortcut on your keyboard and it goes back one step or undoes what you just applied.

NOTE:  ”undo” is your best friend in Photoshop, if you learn no other keyboard shortcuts, memorize this one!

So, to apply it to our reflection start with the cross hairs for the tool in the middle of your image, near the bottom.  TIP: holding the SHIFT key down will keep the gradient from applying at an angle, it will just go straight up. Click and drag the tool up (you’ll see a line drawing the gradient spread) and let go when you get near the top of your reflection. If it’s not exactly how you want it you may have to start a little more away from the bottom edge, or drag it up higher, or other variations.

NOTE: with the gradient tool on a mask you don’t actually even need to “undo” if you just drag another one overtop it replaces the first one. But it’s still good to know how to undo!

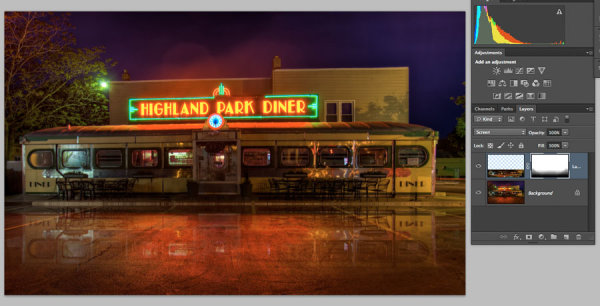
Here’s the image with my gradient applied to the layer mask.  Notice on the mask it goes from black to white? So it’s hiding the bottom area of this layer which is what we want. See Figure #13 below.

Figure #13 gradient applied to mask

Figure #13 gradient applied to the layer mask

OPTIONAL FINISHING TOUCHES

Now if you want to do any other masking to show or hide certain areas of the reflection just use your brush tool (“b” shortcut) at a lowered opacity (10-20%) and paint with black on the mask over areas you want to hide, and white on areas you want to show.  In this image I painted over the edges of the diner where I felt it was still a bit too bright. You can also change the opacity of your layer to adjust it that way too.

SeeFigure #14 below for my final version. Notice my mask where I painted a little up the sides to hide those areas just a little bit more.  You could also paint away a little in the middle of the reflection where the pavement is the darkest if you wanted. That’s the neat thing about photography – it’s all subjective!

It’s really easy to get upset or hurt feelings when someone else says something that we perceive as negative about one of our images, something we put blood, sweat and tears into, right!?   Well my personal opinion is that it is just their opinion, one person, and you don’t have to agree with them. If they have a valid, or constructive criticism YOU get to decide if you want to take it on board or, just agree to disagree and move on. Life is too short to worry about pleasing other people.

Do photography for you!  If other people like it, then great!

If not, oh well!  Move along and life goes on.

Figure #14

Figure #14

OKAY YOUR TURN!

So, think you can do this? Give it a try!

Here is my image to play with, in case you don’t have one that will work.  It’s 2000 pixels wide which is plenty big enough for this test.

Download diner image – just click on this link and save the image that opens in a new tab.

A few trivial things FYI about this image:

  • it was taken in Rochester, NY, USA when I was in the area and visited Eastman Kodak House. If you’re ever there, do go, it’s worth the trip to see where photography took roots and grew
  • it is a 5 image HDR, tone mapped in Photomatix and finished using LR4
  • during the longest exposure of my bracketed series a kid on a skateboard, carrying a goldfish in a bag skated right through the parking lot in front of me. Why didn’t he show up? Because my exposure was 30 seconds long and if you aren’t there for more than 1/2 the time you will not appear.

Okay, off you go and let’s see your results! 

Cheers Darlene


Post originally from: Digital Photography Tips.

Check out our more Photography Tips at Photography Tips for Beginners, Portrait Photography Tips and Wedding Photography Tips.

How to create a reflection in Photoshop in 6 easy steps


Digital Photography School

 
Comments Off on How to create a reflection in Photoshop in 6 easy steps

Posted in Photography