RSS
 

Posts Tagged ‘Reduction’

How to Do Noise Reduction in Lightroom (2021 Guide)

26 May

The post How to Do Noise Reduction in Lightroom (2021 Guide) appeared first on Digital Photography School. It was authored by Helen Bradley.

A guide to noise reduction in Lightroom

Are you struggling with noisy photos? You’re not alone.

Noise is a huge problem, and it can easily ruin an otherwise great photo – but fortunately, Lightroom’s noise reduction tool allows you to quickly and easily remove unwanted noise. Once you’re done, you’ll be left with clean, beautiful-looking images.

That’s what I talk about in this article. I’m going to show you the step-by-step process for getting rid of noise in Lightroom. And I’ll share plenty of tips along the way!

So if you’re ready to master noise reduction in Lightroom, then let’s get started.

Lightroom noise reduction before and after

A word of (noise reduction) warning

Noise reduction is great, and it can easily improve your images.

At the same time, it’s important to note that noise removal is generally achieved at the expense of image detail.

This is because the noise removal process smooths out noisy areas; this compromises fine detail. Also, the main Lightroom noise removal tool applies its fix to the entire image and not just the areas where noise is most visible – meaning that you’ll lose image quality even in low-noise locations.

Because of this, if you are a purist and noise reduction is an ongoing and significant need, then you should consider a dedicated program such as DeNoise AI, Neat Image, or Photo Ninja.

However, for most photographers – including many professionals – the noise reduction tools offered in Lightroom, assuming they’re applied judiciously, will suffice.

The two kinds of noise

There are two types of noise in photos: color noise and luminance noise.

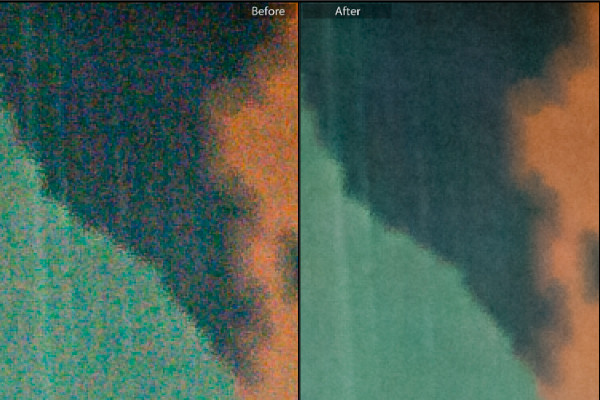
Color noise appears as multicolored pixels. In the crop below, you can see many flecks of color, yet the area is supposed to be a solid blue:

Lightroom noise reduction step 1

Luminance noise is monochromatic, so it’s less colorful and more like grain. Here is luminance noise in an early morning sky:

Lightroom noise removal step 2

Lightroom noise reduction: step by step

Now let’s take a look at how you should approach noise reduction in Lightroom.

Step 1: Open the Detail panel

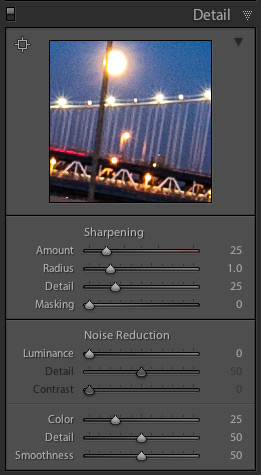
First, to remove noise from a photo, you’ll need to open the Detail panel in the Develop module. You’ll find sliders for luminance noise and for color noise:

Lightroom Detail panel

For RAW images, Lightroom automatically applies color noise reduction during the import process. By default, the Color slider will be set to 25 (with Detail and Smoothness set to 50). The Luminance slider will be set to 0, with Detail set to 50 and Contrast set to 0 (see the screenshot above).

Step 2: Identify the noise

Now comes the fun part. You’ll need to carefully observe your image – I recommend zooming in to 100 percent or more – with the aim of determining the type of noise present. In some cases, you may have both noise types; in other cases, only one noise type will be a problem.

(Quick tip: If you’re not sure what type of noise is in an image, boost both the Color and Luminance sliders to their maximum values and see what happens. If you have a lot of color noise, adjusting the Color slider should make a big difference, and if you have a lot of luminance noise, the Luminance slider will have the greater effect.)

Step 3: Increase the corresponding sliders

Once you know the type of noise you are trying to remove, drag the corresponding slider to the right. Aim to reduce the noise to an acceptable level, but avoid going too far. After all, the more noise reduction you use, the more detail you lose.

Step 4: Fine-tune additional sliders

Once you’ve adjusted the Luminance slider, adjust the Detail and Contrast sliders just below it. The Detail slider controls, well, detail – the higher the value, the more detail that’ll remain in the image. Of course, the more you boost the Detail slider, the less you’ll remove the actual noise. (And if you use a low Detail value, you will get a smoother result but with less detail).

Lightroom noise reduction step 4

The Contrast slider controls luminance contrast. The more you boost this slider, the more contrast you’ll get in the final image. You’ll also end up with more noise and mottling. Of course, lower Contrast values will give you a smoother, lower-noise result, but at the expense of reducing contrast.

For color noise, you also get two extra sliders: Detail and Smoothness.

The Detail slider controls the amount of detail left alone by Lightroom’s color noise reduction; boosting the slider will protect detail. Lower Detail values will give you some added smoothing of the color noise, but you may notice that colors bleed into each other. (Adjust the Smoothness slider to help reduce low-frequency color mottling artifacts.)

In this image, removing color noise leaves some luminance noise:

removing color noise

Then, once the color noise is removed, the Luminance slider can remove the remaining luminance noise:

removing luminance noise

When removing noise from an image, it helps to zoom to 100 percent. That way, you can see what is happening on a pixel level. (Though you also want to look at your image zoomed out! I recommend periodically zooming in and out to check the result.)

Local noise reduction

What if you want to target your noise reduction to a specific part of your image? Is that an option in Lightroom?

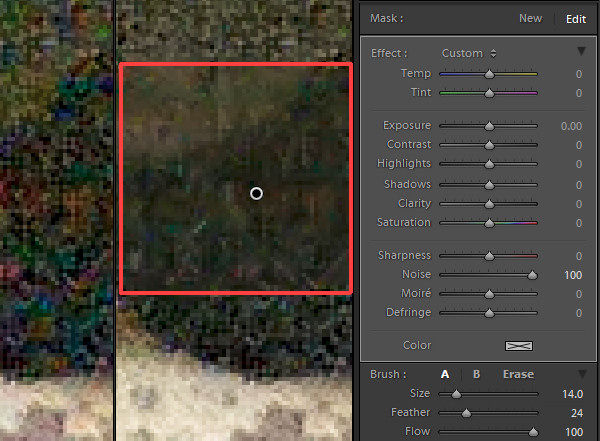
Yes, you can do this – sort of. You see, Lightroom does offer a Noise slider as part of its targeted adjustment panel. So you can apply noise reduction via the Adjustment Brush, the Radial Filter, or the Graduated Filter, and you’ll be able to limit noise reduction to the areas you want to affect, leaving the rest of the image unchanged.

targeted noise removal

But there is a major downside to this feature:

It only removes luminance noise (not color noise), and there’s no additional Detail or Contrast slider to help you fine-tune the results.

Still, for images suffering from luminance noise, it can be useful, so I do recommend you try it out.

Select the area you want to denoise, then boost the Noise slider. The selected area of your image will instantly become less noisy.

By the way, if you sharpen your images after removing noise, make sure to use a light touch – increasing sharpness can increase noise. I’d recommend using the Masking slider in the Detail panel to keep the sharpening applied only to areas with lots of detail.

How to do noise reduction in Lightroom: conclusion

Now that you’ve finished this article, you can confidently reduce noise in Lightroom – for clean, beautiful files.

So grab some noisy images, then test out your new noise reduction skills. And don’t be afraid to experiment with different slider strengths; if you don’t like a change, you can always adjust it right back.

Now over to you:

How do you do noise reduction to your images? Do you struggle? Share your thoughts in the comments below!

The post How to Do Noise Reduction in Lightroom (2021 Guide) appeared first on Digital Photography School. It was authored by Helen Bradley.


Digital Photography School

 
Comments Off on How to Do Noise Reduction in Lightroom (2021 Guide)

Posted in Photography


Mastering Noise Reduction in Lightroom: The Essential Guide

04 Nov

The post Mastering Noise Reduction in Lightroom: The Essential Guide appeared first on Digital Photography School. It was authored by Simon Ringsmuth.

Shooting at a high ISO is a great way to retain control over other exposure parameters such as aperture and shutter speed while still getting a usable image.

However, even today’s digital cameras still produce noise and grain when shooting at values like ISO 6400, ISO 12800, and beyond. While an ISO 6400 photo is never going to look as clean as a photo taken at ISO 100, you can use Lightroom noise reduction to clean up your high ISO images.

Mastering noise reduction in Lightroom involves a few tradeoffs. But it’s a great solution for people who need the flexibility of shooting at high ISO values while still getting great results.

Mastering noise reduction in Lightroom infant
Nikon D750 | Nikon 85mm f/1.8G | 85mm | 1/500 sec | f/1.8 | ISO 6400

To understand how to use Lightroom noise reduction, it’s important to learn a little more about ISO.

In a nutshell, ISO is a measure of a camera’s sensitivity to light. When shooting with film, each roll has a single value and cannot be changed until you use up all your exposures and put in a new roll. Digital photography, on the other hand, lets you alter your ISO any time you want.

Higher ISO values let you use smaller apertures or faster shutter speeds because your camera produces a brighter exposure. As a result, you don’t need as much light coming through the lens in order to take a picture. This means that you can use a smaller aperture, faster shutter speed, or both. (Or you can use Auto ISO and let your camera figure out the rest.)

The tradeoff is that increasing your camera’s ISO inevitably leads to noise being introduced to the picture. (Digital noise is kind of like the static you might remember seeing on old television sets.) High ISO shots aren’t as sharp, and colors aren’t as vibrant, thanks to noise. But if shooting at ISO 6400 means you can use a fast shutter speed to avoid motion blur, then it’s generally a tradeoff worth making.

Mastering noise reduction in Lightroom man portrait
Nikon D750 | Nikon 85mm f/1.8G | 85mm | 1/90 sec | f/4.8 | ISO 6400

The best of both worlds would be a high-ISO shot that retains the color and sharpness of a low ISO shot. Unfortunately, that’s not actually possible (at least not with current technology). But mastering noise reduction in software such as Lightroom gives you a great deal of control over reducing high-ISO artifacts while keeping as much detail as possible.

A closer look

The effects of high ISOs aren’t always visible when photos are downsized for the web. To really see what happens at high ISOs, and to understand how to clean it up, you should look at images up close.

Here’s a zoomed-in view of the above image; you can now see the effects of shooting at high-ISO values:

Mastering noise reduction in Lightroom portrait close-up
Up close you can see the speckled background on the left and the lack of definition in the eyebrows. These are just some of the effects of shooting at ISO 6400. Noise reduction settings are at their default values: Luminance 10, Detail 50, and Contrast 0.

Lightroom lets you remedy these ISO artifacts, at least partially, through the Detail panel in the Develop module.

There are two types of noise reduction available: Luminance and Color.

Luminance is the most common form of noise in digital photography and refers to the slight speckled variations in brightness from one pixel to the next. You can see this most clearly in the brown background on the left side of the above photo.

Color noise is often obvious at very high ISO values like 25600 or greater. It looks like random splotches of color scattered around the brightest or darkest portions of an image. In modern digital photography, color noise isn’t nearly as much of an issue in most instances. Most of the time you won’t need to use the Color, Detail, and Smoothness sliders. For most practical purposes, it’s best to stick with luminance noise reduction adjustments.

Lightroom noise reduction sliders mastering noise reduction

To access the noise reduction sliders, click the Detail panel in the Develop module. The noise reduction sliders are grouped with sharpening adjustments because these often go hand-in-hand. Boosting noise reduction can have a smoothing effect on your images which can be somewhat mitigated by adjusting the sharpening sliders.

Getting detailed

When working with luminance noise, there are three sliders to adjust:

  • Luminance
  • Detail
  • Contrast

Luminance is a measure of how much noise to remove, while Detail and Contrast give you finer control over the effects of the noise reduction.

You might notice that Lightroom automatically applies a small amount of noise reduction to every RAW file by default. This is generally a good starting point because RAW files, due to their unprocessed nature, inherently contain more noise than in-camera JPEG files. And it’s almost always recommended to remove some of that noise even if just a tiny bit.

To start the noise removal process, move the Luminance slider to the right. The farther you go, the more pronounced the noise removal effect will be. I generally don’t push it past 50, but your settings will depend on your image and your personal preferences.

Mastering noise reduction in Lightroom portrait close-up
This is the same image as above, but with Luminance set to 50. Notice how the background is much smoother, as are the cheeks. However, the eyelashes have lost much of their sharpness.

After adjusting the Luminance slider to your liking, use Detail and Contrast to bring back parts of your image that might have been lost by the noise reduction algorithm. Move the Detail slider to control the threshold at which the noise reduction starts to kick in. This can help retain some of the details in your image but end up leaving some of the noise intact.

Mastering noise reduction in Lightroom portrait close-up
Bumping the Detail slider up to 80 brings back some of the sharpness around the eyelashes and other areas of the face.

As you adjust the Luminance slider, you will see some parts of your picture get muddy, almost like a layer of petroleum jelly has been smeared across the shot. Use the Contrast slider to bring back some of the high-contrast parts of your image that are most affected by the Luminance slider.

Mastering noise reduction in Lightroom portrait close-up
Moving the Contrast slider up to 40 helps mitigate a bit more of the effects of software-based noise reduction. However, the more you use the sliders, the more processed and artificial your images will look.

As with many aspects of photography, there is no single correct answer for how much noise reduction to use in Lightroom. Some high-ISO images will look fine without too much tinkering, while others require more drastic measures. Mastering noise reduction isn’t about finding one solution that works for every image. It’s about understanding how to use the editing tools to create the best possible outcome for any given photo.

Low ISO versus noise reduction

To really understand how Lightroom noise reduction works, it helps to look at some comparisons of images so you can see the results for yourself.

The following images show different versions of the same scene; one base shot is taken at a very low ISO, while another is taken at a high ISO. I then apply varying degrees of noise reduction and display the results.

I took the first image at ISO 100:

test scene
Nikon D7100 | Nikon 50mm f/1.8G | 50mm | 1 sec | f/8 | ISO 100

Here’s the same scene shot at ISO 6400 for comparison:

test scene
Nikon D7100 | Nikon 50mm f/1.8G | 50mm | 1 sec | f/8 | ISO 6400

When resizing images for the web, some of the issues with shooting at a high ISO are difficult to notice. However, a few artifacts do stand out, such as the muddiness of the solid blue radio toy, and a clear lack of definition in the intricate parts of the ball maze on the left.

For a closer look, here are 100% crops of each image:

test scene crop
A 100% crop of the original ISO 100 image. Note the fine detail in the cactus and the overall clarity of the picture.
test scene crop ISO 6400
A 100% crop of the original ISO 6400 image. Colors are washed-out and subtle texture is obliterated. Note that the green paint lines at the borders of the white lines are completely gone.

When looking at these images close-up, it’s clear that the ISO 6400 photo is noticeably worse. However, if shooting at ISO 6400 or greater will give you the ability to get the shot you want, then it’s a tradeoff worth making.

High-ISO shooting becomes even more practical when you learn to eliminate some of these issues in Lightroom. Using the noise reduction options won’t fix a high-ISO image entirely, but it can go a long way toward cleaning things up.

test scene with noise reduction
A 100% crop of the ISO 6400 image with these adjustments applied: Luminance 80, Detail 60, and Contrast 55. While the ugly noise artifacts have been smoothed out, the image still isn’t as rich and detailed as its low-ISO counterpart.

Mastering noise reduction in Lightroom isn’t just limited to moving three sliders in the Detail panel. It’s best paired with other adjustments such as Texture, Clarity, Contrast, Saturation, etc. There is no one-size-fits-all preset to magically make your ISO 6400 images look as good as ISO 100 images. But with a little work, you can bring back some of the punch and brilliance of your originals.

test scene noise reduction and edits added
A 100% crop of the high-ISO image with previous noise reduction edits applied along with the following: Contrast -15, Shadows +34, Blacks -35, Texture +42, and Saturation +22.

Noise reduction isn’t a cure-all, and it won’t resurrect parts of the image that were never captured to begin with. In the ISO 6400 shot above, no amount of software-based noise reduction can bring back the green paint along the white lines that were clearly present in the low-ISO image.

But careful use of the tools available to you can go a long way toward making a messy picture more than usable.

Mastering noise reduction in Lightroom test scene
Nikon D750 | Nikon 85mm f/1.8G | 85mm | 1/250 sec | f/2.8 | ISO 6400. The sun was setting and I needed a fast shutter speed, so I chose to shoot at ISO 6400 and was able to adjust it in Lightroom. My clients loved the results.

Mastering noise reduction in Lightroom: Conclusion

Mastering noise reduction in Lightroom isn’t a science; each image is different and your own preferences matter most of all. Shoot some test images at ISO 6400 or higher, then see what you can do to clean them up using the tools available to you.

You might be surprised at how much latitude you have when editing. The more you experiment, the more skilled you will get.

And soon you’ll be transforming your photos from noisy messes into near-masterpieces.

The post Mastering Noise Reduction in Lightroom: The Essential Guide appeared first on Digital Photography School. It was authored by Simon Ringsmuth.


Digital Photography School

 
Comments Off on Mastering Noise Reduction in Lightroom: The Essential Guide

Posted in Photography


Panasonic’s new Lumix S Pro 70-200mm F2.8 offers up to 7 stops of shake reduction

06 Nov

$ (document).ready(function() { SampleGalleryV2({“containerId”:”embeddedSampleGallery_1550322233″,”galleryId”:”1550322233″,”isEmbeddedWidget”:true,”selectedImageIndex”:0,”isMobile”:false}) });

Panasonic has officially unveiled the Lumix S Pro 70-200mm F2.8 for its full-frame L-mount system, adding a fast-aperture, stabilized telephoto zoom to the native lens lineup. The lens will go on sale early next year for $ 2600.

The 70-200mm F2.8 includes optical stabilization, which can be combined with in-camera ‘Dual IS 2’ system for a total of 7 stops of shake reduction. It’s dust and water-resistant, and offers a minimum focus distance of about 1m (3ft).

The lens weighs 1570g (3.5lbs) and accepts 82mm filters. Optical construction comprises 22 total elements in 17 groups, including one aspherical, three Extra-low Dispersion and two Ultra Extra-Low Dispersion lenses to reduce chromatic aberration.

The Panasonic Lumix S Pro 70-200mm F2.8 will arrive alongside the also-announced 16-35mm F4 in January at a price of $ 2600.

Press release:

Panasonic Launches Two New L-Mount Interchangeable Lenses for the LUMIX S Series Full-frame Digital Single Lens Mirrorless Camera

Newark, NJ (November 6, 2019) – Panasonic is proud to introduce two new interchangeable lenses based on the L-Mount system for the LUMIX S Series Full-frame Digital Single Lens Mirrorless Cameras. Designed for professional use, the LUMIX S Series offers uncompromising photographic expression with its high-quality cameras and lenses.

The LUMIX S PRO 70-200mm F2.8 O.I.S. (S-E70200) is a large-aperture telephoto zoom lens that boasts high descriptive performance across the entire zoom range. The LUMIX S PRO 16-35mm F4 (S-R1635) is a versatile wide zoom lens that provides high resolution images and a beautiful bokeh despite its compact, light-weight profile. Both high-performing LUMIX S PRO lenses achieve LEICA’s stringent standards.

LUMIX S PRO/S Lens Lineup as of November 2019

  • LUMIX S PRO 50mm F1.4 (S-X50)
  • [NEW] LUMIX S PRO 16-35mm F4 (S-R1635)
  • LUMIX S PRO 24-70mm F2.8 (S-E2470)
  • LUMIX S 24-105mm F4 MACRO O.I.S. (S-R24105)
  • [NEW] LUMIX S PRO 70-200mm F2.8 O.I.S. (S-E70200)
  • LUMIX S PRO 70-200mm F4 O.I.S. (S-R70200)

In addition to Panasonic’s existing portfolio of first-class lenses for the LUMIX S series family of cameras, the company is committed to designing and developing 11 or more lenses with the emphasis on the “LUMIX S PRO” class by March 2021. Currently, more than 46 interchangeable L-Mount lenses are available or will be available from Panasonic, Leica Camera AG and Sigma, opening up a virtually limitless spectrum of new creative possibilities.

LUMIX S PRO 70-200mm F2.8 O.I.S. (S-E70200)

Designed and developed for professional field shooting, the LUMIX S PRO 70-200mm F2.8 O.I.S. (S-E70200) uses 2 UED (Ultra Extra-low Dispersion) lenses, 3 ED (Extra-low Dispersion) lenses and optimum alignment comprising 22 elements in 17 groups, effectively suppressing both axial chromatic aberration and chromatic aberration of magnification. Astigmatism is also corrected with an aspherical lens, achieving high resolving performance. Adoption of a double focus system suppresses fluctuation of aberration even at close distances, which results in high descriptive performance from the center to the corners over the entire zoom range despite its large aperture.

Covering from 70mm to 200mm, the use of a Teleconverter allows a maximum 280mm (1.4x, with DMW-STC14) and 400mm (2x, with DMW-STC20) super telephoto shooting*1, with maximum 480 fps focus control for high-speed, high-precision auto focus. The O.I.S. (Optical Image Stabilizer) in the lens complies with the camera’s Body I.S. and the 5-Axis Dual I.S. 2*2 makes it possible to use a 7-stop slower shutter speed*3. Adoption of a focus clutch mechanism enables instant AF/MF switching and accurate manual focusing.

The constant F2.8 large aperture provides smooth defocus gradation from the focus peak to the neighboring area of the image to achieve a beautiful bokeh effect as well as a rich perspective. The LUMIX S PRO 70-200mm F2.8 O.I.S. also excels in video recording performance with a mechanism that suppresses focus breathing, which was a fatal problem in all interchangeable lenses designed for still image photography.

The rugged, dust/splash-resistant*4 design withstands use under harsh conditions even at 10 degrees below zero for high mobility. The filter size is 82 mm, with an 11-blade circular aperture diaphragm.

LUMIX S PRO 16-35mm F4 (S-R1635)

The LUMIX S PRO 16-35mm F4 (S-R1635) is a versatile wide zoom lens boasts high descriptive performance in both photo shooting and video recording.

Comprising 12 elements in 9 groups, the use of 3 aspherical lenses, an ED (Extra-low Dispersion) lens and a UHR (Ultra-High Refractive Index) lens and the optimum alignment achieves high MTF performance despite its compact size and light weight. It boasts stunningly high resolution toward the corners even at wide open as well as a beautiful bokeh, suppressing double line bokeh and vignetting.

A double-magnet linear motor is integrated for the AF actuator, featuring high power despite its small size, achieving a maximum 480 fps high-speed sensor drive. This realizes fast, high-precision AF to ensure that photo opportunities are never missed. Like the 70-200mm F2.8 O.I.S. (S-E70200), the 16-35mm F4 (S-R1635) adopts a focus clutch mechanism, enabling instant AF/MF switching and accurate manual focusing, as well as excels in video recording performance thanks to a mechanism that suppresses focus breathing.

It is also rugged dust/splash-resistant, *4 withstanding harsh conditions even at 10 degrees below zero for high mobility. The filter size is 77 mm, with a 9-blade circular aperture diaphragm.

Both lenses will be at retail in January. The LUMIX S PRO 16-35mm F4 will available for $ 1,499 and the LUMIX S PRO 70-200mm F2.8 is $ 2,599.

*1 Use of the tele converter reduces the effective aperture by one f/stop (DMW-STC14) or two f/stops DMW-STC20)
*2 5-Axis Dual I.S. 2 can be used with the camera LUMIX S1R, S1 and S1H, as of November 6, 2019.
*3 Based on the CIPA standard [Yaw/Pitch direction: focusing distance f=200mm, when
LUMIX S1R/S1/S1H is used.]
*4 Dust and Splash Resistant does not guarantee that damage will not occur if this lens is subjected to
direct contact with dust and water.

Panasonic Lumix S Pro 70-200mm F2.8 O.I.S. specifications

Principal specifications
Lens type Zoom lens
Max Format size 35mm FF
Focal length 70–200 mm
Image stabilization Yes (up to 7 stops with Dual IS 2 compatible bodies)
CIPA Image stabilization rating 7 stop(s)
Lens mount Leica SL
Aperture
Maximum aperture F2.8
Minimum aperture F22
Aperture ring No
Number of diaphragm blades 11
Optics
Elements 22
Groups 17
Special elements / coatings 1 aspherical + 3 ED + 3 UED elements
Focus
Minimum focus 0.95 m (37.4)
Maximum magnification 0.21×
Autofocus Yes
Motor type Linear Motor
Full time manual Yes
Focus method Internal
Distance scale Yes
DoF scale No
Focus distance limiter Yes
Physical
Weight 1570 g (3.46 lb)
Diameter 94 mm (3.7)
Length 209 mm (8.23)
Materials Magnesium alloy
Sealing Yes
Colour Black
Zoom method Rotary (extending)
Power zoom No
Zoom lock No
Filter thread 82 mm
Hood supplied Yes
Tripod collar Yes

Articles: Digital Photography Review (dpreview.com)

 
Comments Off on Panasonic’s new Lumix S Pro 70-200mm F2.8 offers up to 7 stops of shake reduction

Posted in Uncategorized


Major ON1 Photo RAW update adds tethered shooting, better noise reduction and more

10 Mar

ON1 just released a major update to its photo editing software ON1 Photo RAW. The update, version 2018.1, brings with it a host of feature upgrades, including: better auto-alignment for the HDR mode, improved high ISO noise reduction, and more detailed image sharpening. The update also includes a new tethered shooting function for certain Nikon and Canon DSLRs, as well as a new import utility that allows metadata to be added as images are sucked in from the camera.

Video files can now be seen in the browser, and new sort features allows user to browse imported images in a number of ways, such as by file type, date, file name or rating. Users can also batch rename groups of images, and a date-and-time editing function lets you adjust the recorded moment an image was shot.

Finally, the company has also made some changes to the way images are debayered to improve the amount of micro detail preserved in the final render.

ON1 says its priorities are image quality and processing/handling performance:

“Version 2018.1 isn’t just about the new features, although there are many powerful new additions,” says ON1 Director of Product Dan Harlacher. “Image quality and performance are the top priorities in every update, and we are very excited for our customers to experience these improvements for themselves in this update.”

New users can take advantage of a free trial, or purchase the software in its entirely (usually $ 120) for a special limited-time price of $ 80. If you’re already using Photo Raw 2018, the new version is free.

For more information, visit the ON1 website.

Press Release

ON1 Photo RAW 2018.1 – New Update Available

Portland, OR – March 1, 2018 – ON1, Inc. is pleased to announce the immediate availability of the new ON1 Photo RAW 2018.1, the first major free update to Photo RAW 2018. Version 2018.1 includes image quality enhancements, performance improvements, and key features to optimize the photographer’s workflow.

“Version 2018.1 isn’t just about the new features, although there are many powerful new additions. We’ve been very focused on image quality and the results customers get from using ON1 Photo RAW. Image quality and performance are the top priorities in every update, and we are very excited for our customers to experience these improvements for themselves in this update,” says Dan Harlacher, Director of Product at ON1.

New Improvements

  • Debayering – The algorithms have been improved to increase the amount of micro detail while reducing aliasing, yielding photos that are noticeably crisper with less color artifacts.
  • HDR – HDR alignment and deghosting have improved, yielding sharper results with less ghosting, noise, and color fringe. Users now have the ability to select which frame is used for deghosting and can also adjust the amount of motion visible in water and clouds.
  • Faster Cataloging – The thumbnail and preview generation of images is now faster. Searching photos has also been improved.
  • Noise Reduction – Improvements to reduce large noise from very high ISOs. Automatic hot-pixel removal has been added, and green and purple color aberration reduction has improved.
  • Sharpening – The sharpening algorithms have been improved to enhance micro details and provide sharper initial results.
  • Panorama – The panorama merge dialog now does a better job with vertical panoramas as well as really large ones. It can now stitch together up to 25 photos at a time. Blending of photos to compensate for differences in exposure and white balance have been improved.
  • Preview Quality – The preview window has been improved to more accurately reflect the details and sharpness in photos at different zoom levels.

New Features

  • Import – Get photos from your camera to your computer, choose where you want the photos to go, assign metadata, and more.
  • Tethered Shooting – Get your photos to your computer instantly and apply import settings. Currently supports Canon and Nikon.
  • Soft Proofing – Simulate what your photo will look like when it’s printed.
  • Metadata Templates – Add metadata to a group of photos using presets. This allows you to choose and save only the information you want applied to your photos.
  • Video Browsing & Organizing – Now supports viewing video files so you can organize those as well. Copy, move, name, add metadata, and more.
  • Custom Sorting – This option in Browse allows you to put your photos in any order you choose.
  • Batch Rename – Rename all of your photos in a batch to add unique information to filenames.
  • Edit Capture Date – Adjust date and time on your photos so they match the actual date and time they were taken.
  • Auto Advance – Automatically switch to the next photo during the culling process when rating or tagging photos.
  • Additional Camera & Lens Support — Added support for several new cameras and many new lenses. See the full list here.

About ON1 Photo RAW

ON1 Photo RAW 2018.1 is the only photo editor designed by photographers for photographers. ON1’s unique community-driven development approach via The Photo RAW Project gives customers a voice in how it’s designed, allowing users to submit ideas and vote on new features. With fast photo management, hundreds of customizable photo effects, powerful masking tools, HDR, panos, layers, and other Lightroom and Photoshop-like features, Photo RAW 2018.1 is the ultimate all-in-one photo editor and raw processor with no subscription.

Craig Keudell, CEO of ON1 says “Our vision for Photo RAW has always been that it would the fastest, most flexible, and easiest-to-use raw processor and photo editor on the market. A single photography centric photo editor with powerful Lightroom® and Photoshop®-like features photographers can own and enjoy for many years. Photo RAW has come a long way in a short time and we are both excited and very busy building new exciting technologies for our next update.”

ON1 Photo RAW 2018.1 isn’t just for raw files. Supported file formats include JPEG, TIF, PSD, PSB, PNG, and DNG are supported and benefit from the speed, performance, and abundance of editing tools in the app. Photo RAW 2018.1 continues to work seamlessly within current photography workflows. The app integrates as a plug-in for Adobe® Lightroom® Classic CC and Photoshop® CC and further builds its case as a complete standalone photo editor or alternative to the Adobe Photography Plan. Version 2018.1 also integrates with the major cloud services to allow for uploading, managing, and editing photos across multiple computers. This allows users to sync photos and their edits across multiple computers or in a studio setting.

Price and Availability

ON1 Photo RAW 2018.1 is available now for an introductory price of $ 79.99 for a limited time (Reg: $ 119.99). A free and fully functional 30-day trial is also available on the ON1 website. A single purchase of ON1 Photo RAW 2018.1 will include both Mac and Windows installers and activation for up to five computers. It comes with a 30-day money-back guarantee, world-class customer support, hundreds of free video tutorials, and free ON1 Loyalty Rewards every month.

For More Information

* ON1 Photo RAW 2018.1 Introductory Special
* Free 30-Day Trial
* The Photo RAW Project
* About ON1

Articles: Digital Photography Review (dpreview.com)

 
Comments Off on Major ON1 Photo RAW update adds tethered shooting, better noise reduction and more

Posted in Uncategorized


Good, Better, and Best Noise Reduction Techniques

07 Aug

When it comes to noise reduction, you always have two goals. First, obviously, you want to get rid of any digital noise in your picture. But secondly, you want to preserve detail. These often work against each other because increasing noise reduction often leads to a loss of image detail, but if you focus on preserving the detail then you may end up with a noisy picture.

Good, Better, and Best Noise Reduction Techniques

So what can you do about it? Different people have different methods, but for me, there is a good, better, and best way to go about noise reduction. As you might imagine, my good way is simple, the better way involves a little more effort, and my best way requires a lot more effort (and can be rather complicated). In this article, I will walk through my favorite options so that you can decide if one of them is appropriate for your own noise reduction workflow.

“Good” Noise Reduction

Lightroom has very good noise reduction tools. They are powerful and really easy to use. They reduce noise and do a decent job of preserving detail. Further, the noise reduction in Lightroom seems to get a little better with each new iteration. If you want a good noise reduction tool that will take up almost none of your time, simply use Lightroom.

Good, Better, and Best Noise Reduction Techniques

Lightroom noise reduction sliders.

The primary slider is the top one labeled Luminance. I think of that as the amount of noise reduction being adding to your photo. From there, you can fine-tune your noise reduction using the additional sliders below it. Frankly, however, if I am using Lightroom for noise reduction, it is because I want it to be quick and easy, so I usually just use the Luminance slider.

Suggested starting points

You may be wondering about a starting point for the amount of noise reduction to apply. Of course, that is hard to do, and it depends on a lot of things. First of all, it depends on the ISO value you used. It also depends on the low-light performance of your camera. However, I hate the “it depends” answer, so to give you an idea of a starting point taking into account those variables, here is a chart with some suggested values for the Luminance slider.

Good, Better, and Best Noise Reduction Techniques

Suggested starting points for noise reduction settings in Lightroom.

Of course, there are other factors involved as well, which this chart does not take into consideration. For example, dark tones will show noise much more than lighter tones, so you may need to increase the amount where you have darker tones. Just use this chart as a starting point, and don’t take it as a definitive range that you must stay within.  Always do whatever the picture requires, even if it is drastically different than what is set forth here.

Read more on noise reduction in Lightroom here: How to do Noise Reduction in Lightroom

Selective Adjustments in Lightroom

The noise reduction settings within Lightroom will apply to your entire picture. We are going to get into selective noise reduction later, but I should mention here that you can also use the Adjustment Brush in Lightroom to selectively add noise reduction.

Select the Adjustment Brush and find the slider labeled Noise. That’s right – you only have one slider for this, so think of it as the equivalent of the Luminance slider you used above. From there, just set your brush size (you can use your left and right bracket keys for this) and paint in the effect where you want it. You’ll see better ways to selectively apply noise reduction in a minute, but if you aren’t too picky about the selection then the Adjustment Brush might be the tool for you.

Good, Better, and Best Noise Reduction Techniques

Noise reduction slider inside Lightroom’s Adjustment Brush.

“Better” Noise Reduction

Normally, when I want to bring out the heavy artillery in any aspect of post processing, I find that I need to head into Photoshop. That is sort of true here, in that we will be heading to Photoshop, but then again not true in that we won’t be using Photoshop’s noise reduction. I find that Photoshop’s noise reduction tools aren’t that great, and Lightroom actually works better (there are plenty of people that disagree with me though, so make up your own mind about that as you use them both).

Instead, I merely use Photoshop to take advantage of third party noise reduction software that works within Photoshop. Yes, you could also use them from Lightroom, but using them within Photoshop will allow you to take advantage of Photoshop’s powerful masking techniques (which you will see in a minute).

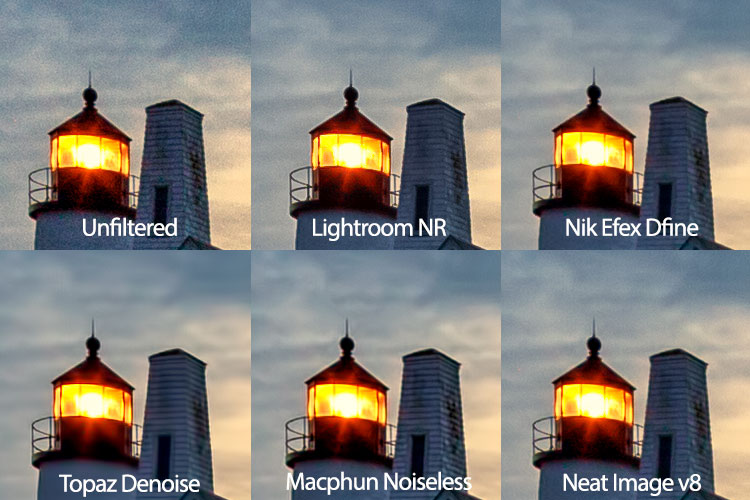
Noise reduction plugins

What are these noise reduction applications that are available?  Let’s take a look.

  • Noiseware: First, we have Noiseware by Imaginomic. I mention this first because it is the application I have used for my own noise reduction for the past several years. It works really well, does a great job eliminating noise, is simple to use, and it preserves a lot of detail. There are several presets to choose from and then a few sliders to make adjustments from there.
  • Nik Define: A free option is Nik Define. It is part of the Google Nik Collection, which is now free. It does a nice job of reducing noise, and if you are looking for a free option this is a good one. The downside is that it appears this software is no longer being updated and its days are numbered.
  • Noise Ninja: This is part of the Photo Ninja Suite by Picture Code. The entire suite costs $ 129. I personally have not used it, but the reports I have heard from others and the reviews have always been positive. Read: How to Reduce Noise with Photo Ninja for more info.
  •  Topaz Denoise: Topaz makes a series of plug-ins that do a variety of functions really well. Their noise reduction software is called Denoise and it costs $ 79 (or you can get the whole suite of apps for $ 500).  I haven’t used this one either, but the reviews have been good and my experience with other Topaz apps has been very good.
  • Macphun’s Noiseless: Inside Macphun’s Creative Kit you will find the Noiseless plugin (you can also buy it alone). Read this for more info on this option: Macphun Noiseless Pro Software Review

Any of these will do a nice job.

Good, Better, and Best Noise Reduction Techniques

Screenshot of Noiseware interface.

“Best” Noise Reduction

The best way I have found to apply noise reduction is exactly the same as the way you just saw, except that you apply it selectively. The reason is that noise reduction reduces detail in your image. It is often hard for noise reduction software to tell the difference between noise and important detail. That is particularly true in night sky photos, where the many stars can resemble the random flecks that constitute noise.

Basic Masking

To avoid having your noise reduction software reduce detail, you can use Photoshop to mask off the more important areas of the sky. To accomplish that, you just create a layer mask so that the noise reduction only applies to certain parts – which will be white in the mask – of your image.

A simple, but admittedly imprecise, way to do this is with a brush. If you start with a “reveal all” (white) layer mask, you will then use the brush (color set to black), which will keep the noise reduction from reducing detail in the areas you choose. On the other hand, if you start with a “hide all” (black) layer mask, you will paint the entire mask with white except the part where you want to preserve detail. You can get as course or fine as you want (or time allows).

An example of masking off noise reduction in an area where you want to preserve detail in the picture. This applies to the cliffs picture at the top of this article.

How to do you do it? First create a new layer copy (Ctrl/Cmd+J if your picture only has one layer, or Ctrl/Cmd+Shift+Alt+E if you have multiple layers already), then apply your noise reduction as you normally would. After that, just click on the Add Layer Mask icon at the bottom, which will create a white (reveal all) layer mask (or press Alt while doing so to create a black layer mask to hide all). Then just use your Brush (B) to paint with the opposite color as your mask.

You can get as involved as you want with masking. You likely have your own favorite ways already, so go ahead and use them. There is no right or wrong way to mask.

Applying Noise Reduction

So those are my three ways to apply noise reduction. You can add some quick noise reduction in Lightroom, which takes only a second. For slightly more involved but also more powerful noise reduction, add the addition application of your choice. For your most important pictures – or the ones with the biggest problems – add noise reduction and then use masking to limit the effect to the specific areas you want.

These are just my ways though. Do you have your own special methods that are different?  If so, let us know about it in the comments below.


If you found this article helpful it is just one of 31 tips you will get if you grab Jim’s new dPS course: 31 Days to Becoming a Better Photographer.  Enrollment for this course is only opened for a limited time and closes August 11th (5 more days) so get it now.

The post Good, Better, and Best Noise Reduction Techniques by Jim Hamel appeared first on Digital Photography School.


Digital Photography School

 
Comments Off on Good, Better, and Best Noise Reduction Techniques

Posted in Photography


Ricoh announces Pentax KP with new Shake Reduction system and 24MP sensor

26 Jan

$ (document).ready(function() { SampleGalleryV2({“containerId”:”embeddedSampleGallery_6919353376″,”galleryId”:”6919353376″,”isEmbeddedWidget”:true,”standalone”:false,”selectedImageIndex”:0,”startInCommentsView”:false,”isMobile”:false}) });

Ricoh has announced the Pentax KP, the follow-up to the K-3 II, which features a new ‘high sensitivity’ 24MP sensor and improved in-body image stabilization system.

The new CMOS sensor brings with it a top ISO of 819,200 and an electronic shutter that tops out at 1/24000 sec (the mechanical shutter goes to 1/6000 sec). The KP uses the new 5-axis ‘Shake Reduction II’ IBIS system, first seen on the K-1 full-framer, which offers up to 5 stops of stabilization according to Ricoh. As with other Pentax models, the KP supports Pixel Shift Resolution as well as AA Filter Simulation. The KP uses the same SAFOX 11 autofocus system as the K-3 II, meaning that it has 27 points, 25 of which are cross-type.

The KP’s body is relatively compact, sealed against dust and moisture, and functional down to +14F/-10C. It has a pentaprism viewfinder with ‘nearly’ 100% coverage and a 0.63x equivalent magnification, as well as a tilting 3″ touchscreen display. A nice extra is the ability to change the camera’s grip, with three sizes to choose from.

Typical of Pentax DSLRs, the KP is heavily customizable and features both Sensitivity and Shutter & Aperture Priority modes, a star tracking feature and built-in wireless flash control. The KP has added new Motion and Depth-of-Field options to the already large selection of bracketing modes it’s inherited from its predecessors. It can capture Full HD at 60i, 50i, 30p, 25p and 24p. The KP can shoot continuously at up to 7 fps. It also has built-in Wi-Fi. Something the KP doesn’t have is an HDMI port, instead using something called SlimPort, which can send HD video over a microUSB port. If you want HDMI, you’re going to have to drop $ 25 on a dongle.

The KP’s battery life is rated at 390 shots/charge – which is on the low end for a DSLR – though an optional battery grip can hold an additional D-LI109 battery or the significantly more powerful D-LI90.

The KP will be available in your choice of silver or black in late February for $ 1099/£1099 body-only.

Ricoh Unveils Ultra-Compact PENTAX KP, a Weatherproof DSLR That Provides Outdoor Photographers with New Standard for Quality, Customization and Ease of Use

Heir to K-3 legacy, Slim-Body Camera Incorporates New Features and Controls Optimized to Deliver Outstanding Images, Even in the Most Challenging Conditions

First PENTAX APS-C Camera to offer Shake Reduction II

WEST CALDWELL, NJ, January 25, 2017—Ricoh Imaging Americas Corporation today announced the PENTAX KP, an ultra-compact and highly portable DSLR with features and controls that facilitate capturing outstanding images, even in the most demanding conditions. The PENTAX KP packs many of the advanced capabilities of the award-winning PENTAX K-3 series into a modern, slim-body design that lends itself to applications from casual snapshots to serious outdoor photography while mountain climbing or trekking. The PENTAX KP also adds a new generation of innovations including a new, highly sensitive APS-C CMOS sensor and is the first PENTAX APS-C camera to incorporate Shake Reduction II (SR II), which features a five-axis mechanism to compensate for camera shake up to 5 steps.

The new 24-megapixel CMOS sensor enables shooting in extremely low-light conditions, with sensitivity to ISO 819200, making the camera ideal for night photography. The PENTAX KP features an electronic shutter option in live-view to enable high-speed shooting up to 1/24,000-second, which greatly broadens shooting capabilities when using large aperture lenses to achieve a shallow depth of field on a bright sunny day.

The PENTAX KP’s compact body is the result of a complete internal re-design to produce an advanced DSLR camera with an extremely slim profile for optimal comfort and handling. The KP’s rugged exterior is dustproof and weather-sealed to enable use in the most challenging outdoor conditions. The camera will perform in temperatures as low as 14 degrees F (-10 degrees C).

The PENTAX KP incorporates additional advanced technologies and ease-of-use features that have long been the hallmark of PENTAX cameras and enable them to be used comfortably and reliably in a wide range of conditions. These include:

  • 5-Axis Shake Reduction System: The PENTAX KP is the first PENTAX APS-C DSLR to offer the new generation SR II system, which uses a five-axis mechanism to compensate for camera shake caused by horizontal and vertical shift (often generated in macro photography), roll (difficult to handle by lens-installed shake reduction mechanisms), as well as pitch and yaw. The SR II unit is controlled with great precision as soon as the camera’s power is turned on, providing a wide compensation range—as much as five shutter steps—to further expand the limits of handheld shooting. With the addition of an optional accessory GPS module (O-GPS1 GPS unit), the PENTAX KP, simplifies astro-photography, making it possible to record stars as points of light rather than star trails during extremely long exposures.
  • Pixel Shift Resolution: This acclaimed PENTAX technology enables producing color-accurate still-life subjects with the highest resolving power. The technology uses the KP’s in-body Shake Reduction System to move the image sensor in single-pixel increments, to capture four separate images that are subsequently combined into a single, high-definition image.
  • A vertical-tilt LCD monitor that facilitates high- and low-angle shooting.
  • A grip replacement system that lets photographers choose their preference of grip based on shooting style or lens choice. In addition to the standard grip that comes with the PENTAX KP, accessory grips include medium (M) and large (L) grips (these will come packaged with KP bodies sold in North America), as well as the optional D-BG7 Battery Grip.
  • Control panels, button settings and dial controls that can all be customized, based on a user’s preference.

“We designed the PENTAX KP to appeal to the world’s most discerning outdoor photographers, who will appreciate its rich and powerful feature set and rugged, compact design, whether they are shooting a landscape on a trek in Patagonia or capturing an eclipse,” said Kaz Eguchi, president, Ricoh Imaging Americas. “From Pixel Shift Resolution to our new generation of Shake Reduction, PENTAX proudly continues to lead the way in photographer-friendly innovation.”

| Pricing and Availability |

 The PENTAX KP camera will be available on February 25 for a suggested list price of $ 1,099.95 at www.us.ricoh-imaging.com as well as at Ricoh Imaging-authorized retail outlets throughout North America.

Main Features 

1?Super-high-resolution images assured by approximately 24.32 effective megapixels and super-high-sensitivity photography at a top sensitivity of ISO 819200

The PENTAX KP features a new-generation APS-C-sized CMOS image sensor with approximately 24.32 effective megapixels to produce super-high-resolution images. By coupling this sensor with an AA-filter-free optical design, it optimizes the image sensor’s imaging power to deliver well-defined images with true-to-life reproduction of gradation and texture. Thanks to the combination of the PRIME IV imaging engine and a state-of-the-art accelerator unit, it assures dependable, high-speed operation and highly effective noise reduction to optimize both image resolution and super-high-sensitivity performance. As the result, it allows the photographer to handhold it in snapshot photography of night scenes at the super-high sensitivity of ISO 819200.

2?Compact, portable body perfect for snapshots, with a weather-resistant structure for harsh outdoor shooting

After a thorough review of the camera’s internal structure, PENTAX designed a completely new body that was far more compact and slim than existing models to optimize the PENTAX KP’s performance, operability and portability. When combined with a compact, lightweight PENTAX-DA-series lens, it can be carried comfortably and effortlessly for a wide range of applications, from casual snapshots to serious outdoor photography while mountain climbing or trekking. Its front, back and bottom exterior panels are all made of durable, lightweight magnesium alloy. With 67 sealing parts applied across the body, it provides a dustproof, weather-resistant structure, with outstanding cold-proof performance at temperatures down to -10°C. Thanks to these features, the PENTAX KP performs superbly and dependably even in such demanding settings as in the rain or at locations prone to dust and freezing temperatures. 

3?A range of customization features, including an exchangeable grip

The PENTAX KP provides a grip replacement system for easy, quick change of a grip to accommodate the photographer’s shooting style or a mounted lens. In addition to the standard Grip S, it offers a choice of two replacement grips (Grip M and Grip L). It also provides a variety of customization functions to simplify and enhance camera operation, including Smart Function for speedy selection and easy setting of desired camera functions using the Fx (Function) and setting dials; and control panel customization to change the panel’s layout to suit the photographer’s preference. 

4?PENTAX-original SR II five-axis shake-reduction system featuring the Pixel Shift Resolution System

(1) In-body SR mechanism

Thanks to the built-in SR II shake-reduction mechanism, the PENTAX KP effectively minimizes camera shake and delivers sharp, blur-free images, even in camera-shake-prone conditions such as when using a telephoto lens, shooting low-light scenes without flash illumination, or photographing sunset scenes. In addition to more common camera shake caused by pitch and yaw, this five-axis mechanism also compensates for camera shake caused by horizontal and vertical shift (often generated in macro photography) and camera shake caused by roll. It assures a compensation effect of approximately five shutter steps (CIPA standard compliant, smc PENTAX-DA 18-135mmF3.5-5.6ED AL [IF] DC WR?f=135mm) — a level equivalent to that of PENTAX’s flagship model — to expand the limits of handheld photography. When taking a panning shot, this mechanism efficiently controls the SR unit to compensate for all affecting factors without requiring any switching action. 

(2) Pixel Shift Resolution System

The PENTAX KP features Pixel Shift Resolution System,* the latest super-resolution technology, which captures four images of the same scene by shifting the image sensor by a single pixel for each image, then synthesizes them into a single composite image. Compared to the conventional Bayer system, in which each pixel has only a single color-data unit, this innovative system obtains all color data in each pixel to deliver super-high-resolution images with far more truthful colors and much finer details than those produced by conventional APS-C-sized image sensors. To make this system more useful with a wider range of scenes and subjects, the PENTAX KP also provides ON/OFF switching of the motion correction function,** which automatically detects a moving object during continuous shooting and minimizes negative effects during the synthesizing process.

(3) PENTAX-original AA filter simulator

By applying microscopic vibrations to the image sensor unit at the sub-pixel level during image exposure, the PENTAX KP’s AA (anti-aliasing) filter simulator*** provides the same level of moiré reduction as an optical AA filter. Unlike an optical AA filter, which always creates the identical result, this innovative simulator lets the user switch the AA filter effect on and off and adjust the level of the effect, making it possible to set the ideal effect for a particular scene or subject based on the prevailing photographic conditions.

* When using this system, the user is advised to stabilize the camera firmly on a tripod. When a moving subject is captured in the camera’s image field, its image may not be reproduced clearly, either in part or as a whole.

** The movement may not be sufficiently corrected when the object is moving in a certain direction and/or pattern. This function does not guarantee that the movement is properly corrected with all subjects.

*** This function works more effectively with a shutter speed of 1/1000 second or slower. This function may not be compatible with some shooting modes, including the Pixel Shift Resolution System.

5?Electronically controlled shutter unit for super-high-speed shooting at 1/24000 second

The PENTAX KP’s shutter unit combines a reliable mechanical shutter mechanism (with a top speed of 1/6000 second) with an electronically controlled shutter mechanism.* The electronic shutter mode provides a super-high shutter speed of 1/24000 second with reduced noise and vibration at shutter release, making it ideal for low-noise, low-vibration shooting in Live-view and mirror-up applications. The camera also provides a high-speed continuous shooting function with a top speed of seven images per second.

* In the electronic shutter mode, the camera’s SR II mechanism and AA filter simulator are inoperable. During high-speed continuous shooting, the subject may suffer some deformation.

6?Optical viewfinder with nearly 100% field of view

Within its compact body, the PENTAX KP incorporates a glass prism finder featuring the same optics and coatings as those used in higher-class models. With a nearly 100-percent field of view and magnification of approximately 0.95 times, it provides a wide, bright image field for easy focusing and framing.

7?High-speed, 27-point autofocus system with the SAFOX 11 module

The PENTAX KP features the high-speed SAFOX 11 phase-matching AF sensor module to deliver dependable, responsive autofocus operation. Of its 27 focus sensors, 25 are cross-type sensors positioned in the middle to assure pinpoint focus on the subject at a minimum brightness level as low as -3 EV. A completely new, much-improved algorithm assures better autofocusing accuracy and speed than models equipped with the conventional SAFOX 11 module. The camera also provides useful customization features to assist in autofocus operation, such as a choice of operation modes—focus-priority, release-priority or advance-speed-priority—and the Selected-area Expansion function to automatically refocus on a subject when it moves away from the initial point.

8?Full HD movie recording with a range of functional settings

The PENTAX KP captures flawless, high-resolution Full HD movie clips (1920 x 1080 pixels; 60i/30p frame rate) in the H-264 recording format. It also provides an external microphone terminal for manual setting of the audio recording level and monitoring of the sound pressure level for microphone input. In addition to various visual effect modes available during movie recording,* it features a range of movie recording functions, including a 4K Interval Movie mode that connects a series of 4K-resolution still images (3840 x 2160 pixels) at a fixed interval to create a single movie file, and the Star Stream mode to record the traces of stars in the Interval Movie mode. 

* When a special visual effect is applied, the frame rate may differ depending on the selected effect mode.

9?Vertical-tilt-type LCD monitor

The PENTAX KP’s 3.0-inch LCD monitor has approximately 921,000 dots, and provides a vertical tilt function to facilitate high- and low-angle shooting. In addition to its wide-view design, it features an air-gapless construction, in which the air space between LCD layers is eliminated to effectively reduce the reflection and dispersion of light for improved visibility during outdoor shooting. It also comes equipped with such convenient features as: the Outdoor View Setting mode, which instantly sets the optimum monitor brightness level for a given lighting condition; and a red-lighted monitor display function, which facilitates monitor viewing when the photographer’s eyes have become accustomed to a dark location during nighttime photography.

10?PENTAX Real-time Scene Analysis System

Supported by the combination of the approximately 86,000-pixel RGB light-metering sensor and the high-performance PRIME IV imaging engine, the PENTAX Real-time Scene Analysis System accurately and efficiently analyzes such factors as a brightness distribution in the image field and the subject’s primary color and motion. By adopting a breakthrough artificial intelligence technology called deep learning to its image detection algorithm,* this system assesses each individual scene more accurately while selecting the most appropriate exposure level and finishing touch for a given scene.

* Deep learning technology is available when the exposure mode is set to Scene Analyze Auto, or when the Custom Image mode is set to Auto Select. 

11?Other features

  • Switching lever to activate various settings during still-image and Live-view shooting and movie recording
  • New Motion Bracketing and Depth-of-field Bracketing functions to capture three images of same scene by automatically shifting aperture and/or shutter-speed settings in user-selected steps.
  • Wireless LAN connection to support operation with smartphones and tablet computers
  • DR II?Dust Removal II? mechanism to shake dust off from the image sensor surface using ultrasonic vibrations
  • Clarity control and Skin Tone correction functions, two of the latest image processing technologies developed by RICOH Central Laboratory
  • Compatibility with the optional O-GPS1 GPS Unit for the recording of shooting position data and simplified astronomical photography
  • A selection of imaging tools, such as Custom Images, Digital Filters
  • Compatibility with the optional PENTAX IMAGE Transmitter 2 tethering software

Optional Accessories 

Grip M (O-GP1671) and Grip L (O-GP1672)

Designed for exclusive use with the PENTAX KP camera body, these grips can be easily replaced with the standard Grip S (O-GP167) to accommodate the photographer’s shooting style or a mounted lens, or improve the camera’s operability and holding comfort. (Note: In North America, these accessory grips will come with the PENTAX KP.)

D-BG7 Battery Grip

Designed for exclusive use with the PENTAX KP, this battery grip features a dustproof, weather-resistant structure, and provides an extra set of control buttons (shutter release, AF/AE lock, exposure compensation/Fx3, and green), and a pair of electronic dials to facilitate vertical-position shooting. It comes with the Grip L for improved handling when a telephoto or large-aperture lens is mounted on the camera. In addition to the exclusive D-LI109 Lithium-ion Battery, it can also be powered by the large-capacity D-LI90 Lithium-ion Battery (a dedicated battery tray included), which is used to power the PENTAX K-1 and K-3II digital SLR cameras.

Pentax KP specifications

Price
MSRP $ 1099 (body only)
Body type
Body type Mid-size SLR
Body material Magnesium alloy
Sensor
Max resolution 6016 x 4000
Other resolutions 4608 x 3072, 3072 x 2048, 1920 x 1280
Image ratio w:h 3:2
Effective pixels 24 megapixels
Sensor photo detectors 25 megapixels
Sensor size APS-C (23.5 x 15.6 mm)
Sensor type CMOS
Processor PRIME IV
Color space sRGB, Adobe RGB
Color filter array Primary Color Filter
Image
ISO Auto, 100-819200
White balance presets 9
Custom white balance Yes (3 slots)
Image stabilization Sensor-shift
Image stabilization notes 5-axis, up to 5 stops
Uncompressed format RAW
JPEG quality levels Best, better, good
File format
  • JPEG (Exif v2.3)
  • Raw (Pentax PEF or DNG)
Optics & Focus
Autofocus
  • Contrast Detect (sensor)
  • Multi-area
  • Center
  • Selective single-point
  • Tracking
  • Single
  • Continuous
  • Touch
  • Face Detection
  • Live View
Autofocus assist lamp Yes
Manual focus Yes
Number of focus points 27
Lens mount Pentax KAF2
Focal length multiplier 1.5×
Screen / viewfinder
Articulated LCD Tilting
Screen size 3
Screen dots 921,000
Touch screen Yes
Screen type TFT LCD
Live view Yes
Viewfinder type Optical (pentaprism)
Viewfinder coverage 100%
Viewfinder magnification 0.95×
Photography features
Minimum shutter speed 30 sec
Maximum shutter speed 1/6000 sec
Maximum shutter speed (electronic) 1/24000 sec
Exposure modes
  • Program
  • Sensitivity priority
  • Shutter priority
  • Aperture priority
  • Shutter & aperture priority
  • Manual
  • Bulb
Built-in flash Yes
Flash range 6.00 m (at ISO 100)
External flash Yes (via hot shoe)
Flash modes Auto, auto w/redeye reduction, flash on w/redeye reduction, slow sync, trailing curtain sync, manual, wireless
Flash X sync speed 1/180 sec
Drive modes
  • Single
  • Continuous
  • Self-timer
  • AE bracketing
  • DoF bracketing
  • Motion bracketing
  • Mirror-up
  • Multi-exposure
  • Interval shooting
  • Interval composite
  • Interval movie record
  • Star stream
Continuous drive 7.0 fps
Self-timer Yes (2 or 12 secs)
Metering modes
  • Multi
  • Center-weighted
  • Spot
Exposure compensation ±5 (at 1/3 EV, 1/2 EV steps)
AE Bracketing ±5 (2, 3, 5 frames )
WB Bracketing Yes
Videography features
Format MPEG-4, H.264
Microphone Stereo
Speaker Mono
Storage
Storage types SD/SDHC/SDXC (UHS-I supported)
Connectivity
USB USB 2.0 (480 Mbit/sec)
HDMI No (requires SlimPort adapter)
Microphone port Yes
Headphone port No
Wireless Built-In
Wireless notes 802.11 b/g/n
Remote control Yes (via remote cable or smartphone)
Physical
Environmentally sealed Yes
Battery Battery Pack
Battery description D-LI109 lithium-ion battery & charger
Battery Life (CIPA) 390
Weight (inc. batteries) 703 g (1.55 lb / 24.80 oz)
Dimensions 132 x 101 x 76 mm (5.2 x 3.98 x 2.99)
Other features
Orientation sensor Yes
Timelapse recording Yes
GPS Optional
GPS notes O-GPS1

Articles: Digital Photography Review (dpreview.com)

 
Comments Off on Ricoh announces Pentax KP with new Shake Reduction system and 24MP sensor

Posted in Uncategorized


Review: Neat Image 8 Noise Reduction Software

07 Nov

In the early days of digital cameras, noise was a much bigger problem than it is these days. DSLRs routinely top out at high ISO ratings that film shooters and early DSLR users could only dream of. In those early days (the early 2000s), when ISO 800 was typically the upper usable limit of high ISO, noise reduction software became a must-have for those of us who were post-processing our files and wanted them to look less like sandpaper and more like something we’d be willing to display. Neat Image was one of the first noise reduction applications I used at that time.
Neat Image 8 Review

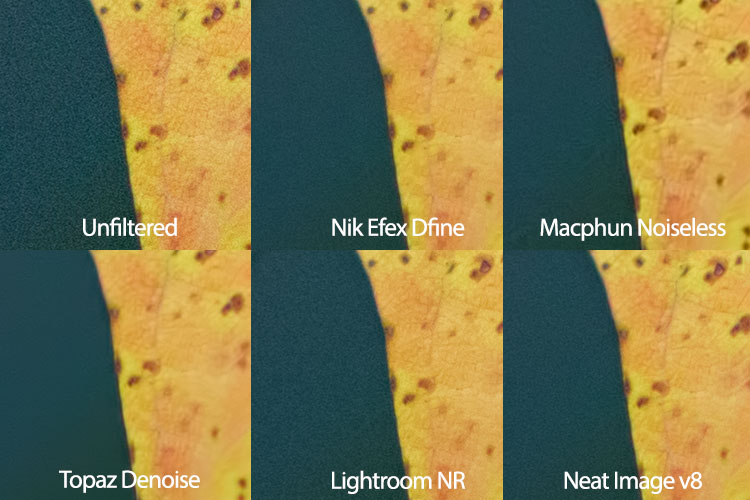
While it did a nice job, at that time, all noise reduction software was problematic in that it tended to give images an overly smooth, almost plastic or painted look that did a lot of damage in the fine details of an image. Neat Image was no exception in this regard, so I used it sparingly. Over the years, I found myself gravitating to other noise reduction plugins and applications, such as Nik DFine, Topaz DeNoise, and more recently, Macphun’s Noiseless. When I saw that Neat Image had recently been updated to version 8, I was excited to give it a try and see how it stacked up against the others. While Neat Image 8 is available as a standalone app or a Photoshop and Lightroom plugin, I will be focusing on the plugin version, as that suits my workflow better.

Overview of Neat Image 8

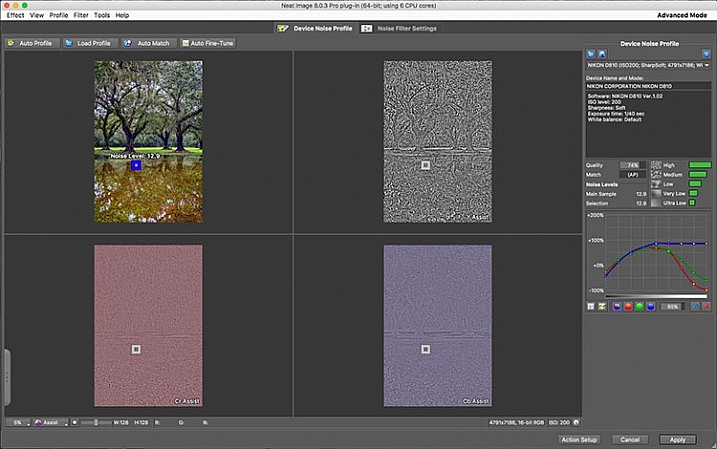
Neat Image Profile Screen

Upon opening Neat Image 8, the Device Noise Profile screen is the first thing you see.

Neat Image 8 is a fairly simple software to use, although upon first opening the plugin it can appear a bit confusing. You will be presented with multiple views of the image you are working on; a full-color preview, and the R, G, and B components of the image. There are four buttons at the top left of the screen; Auto Profile, Load Profile, Auto Match, and Auto Fine Tune. In the center are two tabs, Device Noise Profile, which is the tab the plugin starts in, and Noise Filter Settings.

Analyze image

Once the plugin is open, you’ll see the four different versions of your image. The easiest way to get started is to simply click “Auto Profile” and let Neat Image analyze the image. Once complete, a box will highlight the area that Neat Image has selected to use for noise analysis. Neat Image looks for an area with minimal detail for best results. If you select your own area to analyze, make sure it’s an area that contains minimal detail.

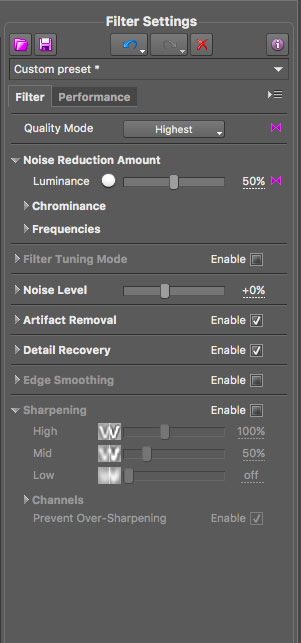
Neat Image 8 Adjustment Sliders

These sliders allow you to tweak the noise reduction to your liking after Neat Image has applied the noise profile to the image.

Filter settings in Neat Image

Now that you’ve analyzed the noise levels in the image, you’ll want to click on the Noise Filter Settings Tab. The preview will switch to the full-color image in the center and the R, G, and B channels will disappear. At the bottom left is a zoom toggle to zoom in or out of the image as desired. You’ll also have the ability to change the preview to various other options, including the RGB preview, a Luminance and Chrominance preview, as well as individual channels. Neat Image will then apply the noise filter settings based on the analysis as done above.

You can tweak the settings using the sliders at the right side of the app window. You’ll have the ability to adjust quality, the noise reduction amount, recover detail, smooth edges, sharpen, and fine tune the filter itself. In addition to the sliders, Neat Image comes with some presets, such as Recover Fine Details, Apply Less Noise Reduction, Apply More Noise Reduction, Reduce Noise and Sharpen, and more. You can also create your own presets for future use. These settings put Neat Image among the most customizable noise reduction applications I’ve used.

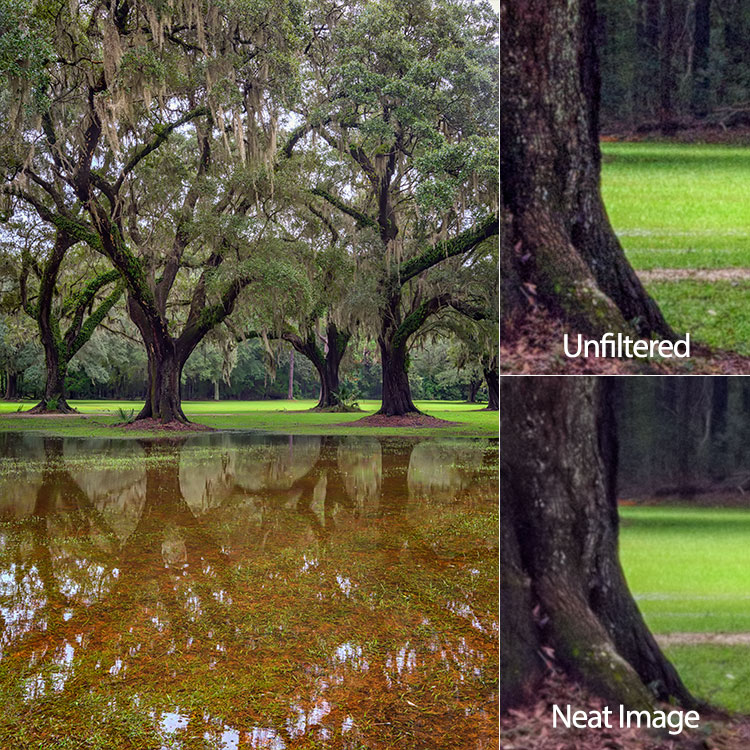
oaks-neat-image

Pros

For me, noise reduction has always been a love-hate relationship, always battling with a balance between preserving detail and reducing unsightly noise. One of my favorite things about Neat Image is the software’s auto profiling ability, customizing the noise reduction to each image as needed. While Nik Collection’s Dfine 2 also does its own image analysis, it doesn’t offer the customizability that Neat Image does. And Neither Topaz’s Denoise 5, nor Macphun’s Noiseless offer any kind of image profiling, with both requiring you to simply select a preset on your own and go from there.

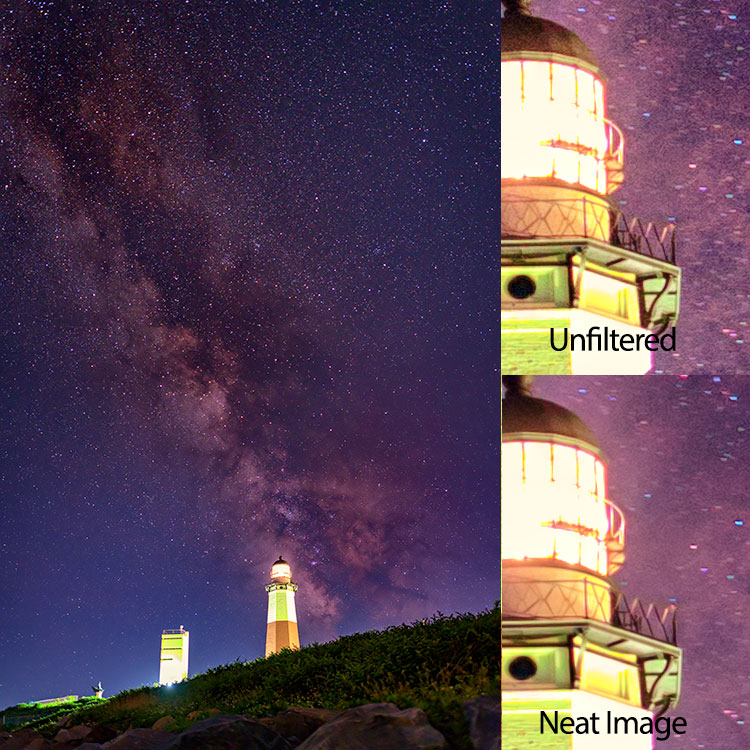
Neat Image 8 does an excellent job of maintaining detail while reducing noise in an area with little or no fine detail, such as skies.

night-sky-neat-image

Cons

With all the customizability, of course, comes a bit of a learning curve in terms of use. Neat Image does offer tutorial videos on their website to help get you started, but for those of us who are less patient and just want to dive in, it can be frustrating. I had one or two false starts when I first downloaded Neat Image 8, before finally going to their video tutorial to give me a jumpstart.

Neat Image 8 side-by-side comparison.

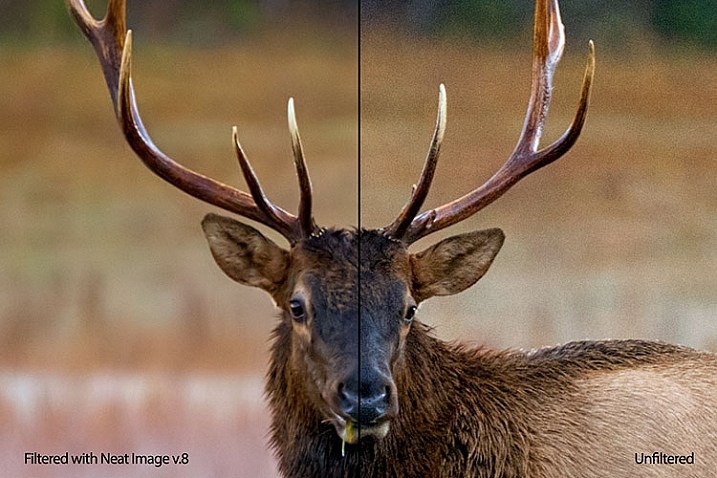
Side by side comparison of an image shot at ISO 2500, before and after Neat Image 8.

Conclusion

Ultimately, the ability to auto profile an image, adjust settings to personal taste, and use presets for repeatability of noise reduction, makes Neat Image an excellent choice for photographers who battle noisy images for any reason, including shooting long exposures, low light photography, or high iso photography such as indoor sports, events, or weddings. Neat Image is available starting at $ 39.90 per license.

lighthouse-neat-image-v8

neat-image-comparison

leaf-neat-image

leaf-neat-image-comparison

googletag.cmd.push(function() {
tablet_slots.push( googletag.defineSlot( “/1005424/_dPSv4_tab-all-article-bottom_(300×250)”, [300, 250], “pb-ad-78623” ).addService( googletag.pubads() ) ); } );

googletag.cmd.push(function() {
mobile_slots.push( googletag.defineSlot( “/1005424/_dPSv4_mob-all-article-bottom_(300×250)”, [300, 250], “pb-ad-78158” ).addService( googletag.pubads() ) ); } );

The post Review: Neat Image 8 Noise Reduction Software by Rick Berk appeared first on Digital Photography School.


Digital Photography School

 
Comments Off on Review: Neat Image 8 Noise Reduction Software

Posted in Photography


Nikon releases new firmware for D5: Improves video and adds flicker reduction

23 Jun

Nikon has released new firmware for its flagship D5 DSLR. There are four main improvements included in firmware v1.10, which address some of the frustrations that we had with the D5 in our full review.  

Video Recording Upgrades:

  1. Movie maximum recording time extended to 29 minute 59 seconds, including for 4K UHD video
  2. Electronic VR for more stable hand-held Full-HD*1/HD video recording added

Still Photography Upgrades:

  1. Flicker reduction function for still photography added, minimizing exposure variations
  2. 9-point dynamic-area AF added, offering more selective focus on a moving subject 

Press release:

Further advance of Nikon D5 digital SLR camera performance through expanded functions

Tokyo – Nikon Corporation has released new firmware, C: Ver. 1.10, that expands the functions of its flagship Nikon FX-format digital SLR camera, the D5.

The D5 has been extremely well received on all fronts, winning such globally prestigious photo and imaging awards as the TIPA Awards 2016, and the Camera GP (Grand Prix) 2016 Readers Award (sponsored by Japan’s Camera Journal Press Club), which is selected through voting by users.

Nikon has released new firmware for the D5, C: Ver. 1.10, that enhances D5 performance even further. The new firmware offers a major upgrade to the camera’s shooting capabilities, delivering four key improvements. First, the maximum recording time of movies, including for 4K UHD movies, is extended, and three functions — Flicker reduction for still images, 9-point dynamic-area AF AF-area mode, and Electronic VR for movies — are added. In addition to these four major changes, some additional updates* have been applied to the new firmware.

  • *Details regarding “additional updates” are provided on the firmware’s free download page (Nikon Download Center).

Release overview

The new firmware is available for download from June 23, 2016. It can be downloaded free of charge from the following URL.

  • *The camera’s current firmware version can be checked using the Firmware version option in the setup menu.

Four major improvements

1. Maximum movie recording time, including for 4K UHD movies, extended to 29 min. 59 s

Movies up to 29 minutes 59 seconds in length can now be recorded at all Movie quality and Frame size/frame rate settings. The new firmware increases the maximum recording time of even 4K UHD (3840×2160) movies from 3 minutes to 29 minutes 59 seconds. In addition, movies are recorded to up to eight separate files, each of which has a file size of up to 4 GB. Separate movie files can be combined to create a single movie using ViewNX-Movie Editor.

  • The maximum recording time for 4K UHD time-lapse movies is 3 minutes.

2. Flicker reduction for still images added for more stable exposure under lighting that flickers

When shooting under fluorescent and some other types of artificial lighting, flickering may cause uneven exposure in parts of images and/or variations in exposure and color reproduction characteristics between individual images captured continuously or in quick succession. We have equipped the new firmware with a Flicker reduction function for still images*1 that reduces these effects. When Flicker reduction is enabled, the camera detects peak brightness as light flickers and automatically times shutter release with these peaks in brightness for stable exposure and color reproduction characteristics. This function is effective when continuous shooting is used for indoor sporting events or similar situations captured at fast shutter speeds*2.

  • *1Still images captured during viewfinder photography (not available with mirror up mode).
  • *2The continuous shooting rate may decrease.

3. 9-point dynamic-area AF AF-area mode added for focusing on a limited portion of a moving subject

With dynamic-area AF, the camera focuses based on information from surrounding focus points* if the subject briefly leaves the focus point selected by the photographer. The D5 originally supported 25-point, 72-point and 153-point dynamic-area AF. A 9-point dynamic-area AF option has been added with the new firmware. This new option is effective for focusing on a more specific portion of a moving subject.

  • *In dynamic-area AF with 9, 25 or 72 points, the number of focus points actually used may be fewer than 9, 25 or 72, depending on the selected primary focus point.

4. Electronic vibration reduction function, effective with hand-held recording, added (for HD and full-HD*1 movie recording)

The new firmware has been equipped with an Electronic VR function that reduces the effects of camera shake with hand-held recording of movies in the FX- or DX-based movie formats (image areas)*2. The effects of camera shake in three directions — vertical (up and down), horizontal (left and right), and rotational (around the center of the lens) — are reduced. This function is effective when recording movies in places or situations in which use of a tripod is prohibited or inconvenient, or when there simply isn’t time to set one up. In addition, electronic VR can be used in combination with the optical vibration reduction (VR) built into a NIKKOR lens for more effective reduction of the effects of camera shake.

  • *1Not available with 1920 x 1080 crop settings.
  • *2The angle of view will be reduced slightly.
  • The effects of electronic VR are also reflected when photos are captured during movie recording (Live frame grab).
  • When Electronic VR is enabled, the maximum sensitivity allowed is ISO 102400, even if ISO sensitivity is set to Hi 0.3 or higher.

Articles: Digital Photography Review (dpreview.com)

 
Comments Off on Nikon releases new firmware for D5: Improves video and adds flicker reduction

Posted in Uncategorized


DxO OpticsPro 11 brings advanced Raw noise reduction

02 Jun

DxO has updated its OpticsPro software to version 11. OpticsPro 11 brings improvements to one of the last generation’s headline features – ‘PRIME’ noise reduction. DxO promises that PRIME 2016 offers improved bokeh protection and better detail retention, particularly in shadows. Processing times have decreased, and users can expect up to 4X faster performance.

A new spot-weighted option is now offered under ‘DxO Smart Lighting’, limiting the effects of ‘Smart Lighting’ tone-mapping to local areas of the image (that you can define). This helps preserve overall contrast, particularly in detected faces. DxO demoed the feature for us, and it really helped curb the flattening effect of too high a ‘Smart Lighting’ setting.  

The hallmark of DxO OpticsPro is the profile-based automatic corrections the software performs simply reading the metadata of your Raws. On top of that, smart algorithms like ‘Smart Lighting’ really help get you a good starting point, while remaining customizable in their effect. Do you rely on DxO OpticsPro for your images and, if so, what’s your favorite aspect of the software?

Let us know in the comments below the Press Release.


Press Release:

DxO OpticsPro 11 introduces new innovations in advanced RAW image processing

DxO PRIME 2016 noise reduction technology and automated spot weighted corrections are indispensable tools for photographers

Special discounts on all DxO software through June 30, 2016

PARIS & SAN FRANCISCO—June 1, 2016—DxO, a world leader in digital imaging technologies, announces the immediate availability of DxO OpticsPro 11, a major update to its award-winning photo software for Mac and PC. DxO OpticsPro 11 introduces important enhancements to DxO PRIME, the industry-standard for noise reduction, and new automated tools, such as spot weighted correction, auto microcontrast and auto red-eye that leverage face detection to help bring out the subtle nuances in images — all in just a few clicks and regardless of the original shooting conditions.

DxO PRIME 2016, better and faster

DxO OpticsPro 11 features DxO’s proprietary DxO PRIME 2016 noise reduction, which enables photographers to salvage noisy photos thought previously unusable. With DxO OpticsPro 11, photographers can capture new images at an even higher ISO by using a new version of PRIME that is better and faster than ever. DxO PRIME 2016 better preserves bokehs and smooth transitions, retains more details, and more faithfully preserves colors in dark areas, and it does this all automatically by reading each camera’s precise calibration data. And through an intense effort to adapt and optimize this technology, DxO PRIME 2016 is now able to process RAW files up to 4x faster than before — in fact, the higher the ISO, the bigger the benefit of processing time.

“The new DxO PRIME noise reduction is nothing short of amazing,” said professional photographer Mike Mezeul, “it gives me the ability to capture images at incredibly high ISOs and still render out incredibly rich, detailed, and noise-free images.”

Automated Spot Weighted Corrections

The image scientists at DxO have designed a new enhancement to DxO OpticsPro’s Smart Lighting tool that uses face detection to apply an intelligent tone map on the entire image, to better extend the dynamic range, add fill light, and improve contrast while optimizing illumination on faces. The result is genuine spot processing—after capture—with the very same results as spot metering typically provides in camera, but with the added benefit of fine-tuning flexibility.

“The image scientists at DxO have done it again,” said Camilla Ferrari, professional photographer and DxO ambassador, “by using face detection, the new spot weighted correction is able to apply even a very strong level of Smart Lighting, while keeping the people in my images looking much more natural and pleasing to my eye.”

Other enhanced tools, including new full screen mode

DxO OpticsPro 11 also adds a number of other useful tools for photographers, including an auto microcontrast mode that enhances image content while taking care to preserve faces and keep noise under control. The selective tone control produces more natural results, efficiently recovering information in shadows and highlights while avoiding flattening midtones, and there’s also a new tool that uses face and eye detection to automatically apply red eye correction, even as a batch process on multiple photos. In addition, a brand new full screen viewer removes distracting clutter so you can focus more on selecting, rejecting and rating your images, while using new shortcuts designed to help speed up the culling process.

Even more cameras supported

Without any user intervention (apart from simply viewing your image) DxO OpticsPro will read the metadata in your photo, and prompt you to download the appropriate camera/lens module. With that module, OpticsPro automatically and intelligently applies corrections such as distortion, chromatic aberration, vignetting, and lens softness. And with this latest release, DxO OpticsPro 11 adds support for a number of new cameras, including Nikon’s new flagship D5, bringing the total number of supported camera/lens combinations to well over 28,000!

Pricing & Availability

The ESSENTIAL and ELITE editions of DxO OpticsPro 11 for Mac and Windows are immediately available in the DxO online store (shop.dxo.com) and at photo resellers at a special discount through June 30, 2016:

GBP:

• DxO OpticsPro 11 ESSENTIAL Edition : £79 instead of £99
• DxO OpticsPro 11 ELITE Edition : £119 instead of £159

(Suggested retail prices, including VAT)

Photographers who acquired or upgraded a DxO OpticsPro license on or after April 1, 2016, are entitled to a free upgrade to version 11.

A fully-functional trial version of DxO OpticsPro 11, good for one month, is available on the DxO website: http://www.dxo.com/en/photography/download

About DxO

DxO develops the world’s most advanced image processing technologies, which have enabled over 300 million devices to capture the highest quality images achievable. DxO’s award-winning OpticsPro software lets serious photographers quickly and easily make their best photos look even better, and the DxO ONE miniaturized camera has redefined mobile photography with a design that pairs perfectly with iPhone and iPad to capture DSLR quality images that are instantly available to share with family, friends and followers.

Articles: Digital Photography Review (dpreview.com)

 
Comments Off on DxO OpticsPro 11 brings advanced Raw noise reduction

Posted in Uncategorized


How to do Noise Reduction in Lightroom

08 Sep

Lightroom-noise-removal-before-after

When you capture images using a high ISO setting you will invariably end up with some noise in your photos. If the noise is distracting and if you want to remove it, then Lightroom can help.

A word of warning

Before start using any noise removal tool it will pay to understand that noise removal is generally achieved at the expense of losing some detail in the photo. This is because the noise removal process involves smoothing the image pixels, and this in turn compromises fine detail. In addition, the main Lightroom noise removal tool applies the fix to the entire image not just the areas where it is most visible, meaning that you can’t mask the result and limit it to only those areas you want to apply it.

Because of this, if you are a purist and noise reduction is an ongoing and significant need, then you may consider a dedicated and specialist noise reduction program such as Topaz DeNoise, Neat Image or Photo Ninja a worthwhile investment. However, for most photographers, the tools in Lightroom judiciously applied will suffice.

Identifying noise

Noise in photos comes in two types; color noise and luminance noise. Color noise is evidenced by multicolored pixels in an area of the photo that should show as a flat color. In the image below you can see that there are multicolor pixels in an area which should be solid blue.

Lightroom-noise-removal-step1

Luminance noise is monochromic so it will be less colorful and more like grain. Here is luminance noise in the sky of a photo captured at an ISO of 6400 in early morning light:

Lightroom-noise-removal-step2

Process versions

Whenever you import an image into Lightroom some noise removal will be performed automatically by the process version which is the camera raw technology Lightroom uses to adjust and render your photos. In each process version the technology has improved over that of the earlier versions. So each will render your photos differently and, in particular, Process Version 2010 included better noise reduction technology than the earlier 2003 version. This was carried forward to the 2012 version.

The current process version for Lightroom 4 and 5 users is 2012 so, if you have images in your catalog that you imported using an earlier version of Lightroom (versions 1, 2 or 3) which are still set to process version 2003 then you can achieve some immediate benefits in noise reduction by simply updating those images to the new process version. To do this select the images and in the Develop module from the Camera Calibration panel select 2012 (Current) as the process version (use the Sync option to copy the setting to all selected images).

Lightroom-noise-removal-step3

Removing noise

To remove noise from a photo, open the Detail Panel in the Develop module to display the noise reduction sliders. There you will find sliders for Luminance noise and for Color noise.

noise-default-LRFor raw images Lightroom automatically applies color noise reduction in the import process. So the Color Noise Reduction slider will be set, by default, to 25 with Detail and Smoothness set at 50 for all raw images. The Luminance noise slider will be set at 0, with Detail at 50 (see screenshot on the right)
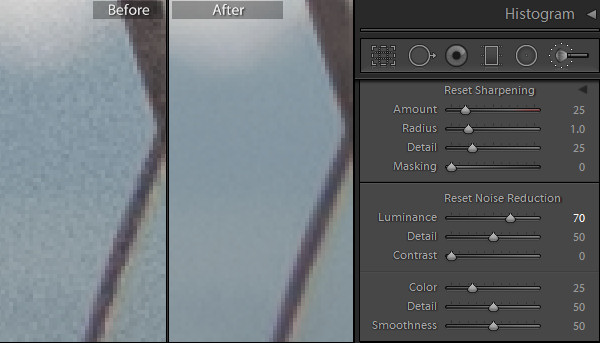
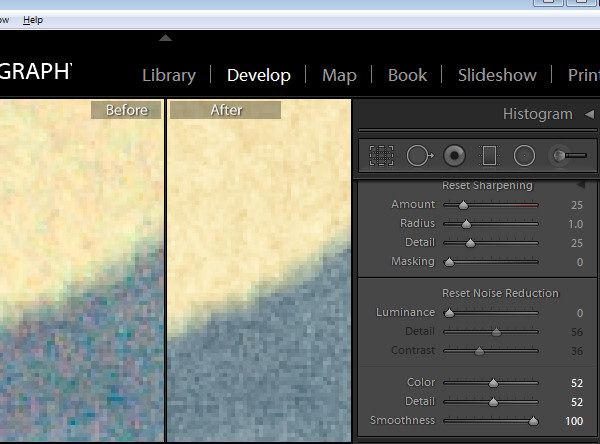
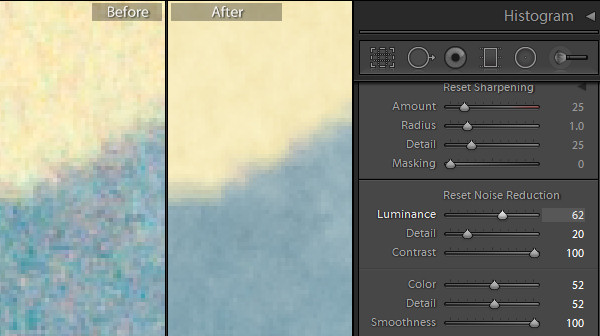
Adjust the slider for the type of noise you are seeing in the image, either color or luminance. If you are unsure what type of noise you have, adjust each slider in turn to the maximum value to see which removes the noise. In some cases you may have both types of noise, in other cases one type may predominate.

Once you know what type of noise you are trying to remove, adjust the slider for that type of noise by dragging it to the right. Aim to reduce the noise to an acceptable level, but avoid going beyond that point because, in doing so, you will lose some detail in the image.

Once you have adjusted the Luminance Noise slider you can then adjust its Detail and Contrast sliders. The Detail slider controls the luminance noise threshold – the higher the value the more detail in the image but, as a result, you may experience some residual noise. If you use a lower value you will get a smoother result but with less detail.

Lightroom-noise-removal-step4

The Contrast slider controls luminance contrast so high values will retain more contrast but you may also see more noise and mottling in the image. Lower values will give you a smoother result but again at the expense of reducing contrast.

For Color Noise there are two additional sliders: Detail and Smoothness (the latter was added in Lightroom 5.2). The Detail slider controls the color noise threshold, so adjusting this to a higher value will protect detail in thin colored edges but often at the expense of removing speckled color. Lower values will give you some added smoothing of the color noise but, as a result, you may notice that colors bleed into each other. Adjust the Smoothness slider to help reduce low-frequency color mottling artifacts.

In this image, removing Color noise leaves some Luminance noise apparent:

Lightroom-noise-removal-step5

Once the color noise is removed, the Luminance slider will remove the remaining Luminance noise:

Lightroom-noise-removal-step6

When you are removing noise from an image it helps to be viewing the image at a 1:1 size ratio so you see clearly what is happening. Periodically zoom out to check the result.

Local Noise Reduction

If your image has luminance noise you can remove this from selected areas of the image using any of the three local adjustment tools: the Adjustment Brush, the Radial Filter or the Graduated Filter. These tools let you limit noise reduction to only those areas you want to affect, leaving other areas of the image unchanged. The downside to this feature is that there is no additional Detail or Contrast slider to fine tune the result, and it only works to remove luminance noise (not color noise).

Lightroom-noise-removal-step7

Using any of these tools select the area from which to remove noise, and then adjust the Noise adjustment slider. Drag to the right to remove luminance noise from the image. If you drag to the left then you will add noise to the image.

When you go to sharpen an image that you have removed noise from, pay attention to the Masking slider in the Detail panel. Using this you can apply sharpening to only the edges in the image and avoid sharpening areas of flat color where the noise was most apparent.

Here is a video tutorial showing how to reduce noise in photos in Lightroom:

If you have questions or comments please leave them in the space below. Hope this helps you with removing some of the noise in your images.

The post How to do Noise Reduction in Lightroom by Helen Bradley appeared first on Digital Photography School.


Digital Photography School

 
Comments Off on How to do Noise Reduction in Lightroom

Posted in Photography