RSS
 

Posts Tagged ‘reduce’

How to Avoid and Reduce Noise in Your Photos (2021 Guide)

08 Jun

The post How to Avoid and Reduce Noise in Your Photos (2021 Guide) appeared first on Digital Photography School. It was authored by Barry J Brady.

how to avoid and reduce noise in your photos

We’ve all seen it in our images: that uneven grainy look that makes our images unappealing.

But how can you avoid noise? And, in cases where it’s unavoidable, how do you reduce noise in photos?

In this article, I’m going to share plenty of tips and tricks for both preventing and removing noise. Specifically, I’ll share:

  • Why you’re actually dealing with noise in the first place
  • Five simple ways to stop noise from ever appearing in your images
  • A noise reduction workflow you can use to reduce noise in Lightroom and Adobe Camera Raw

Sound good? Let’s dive right in, starting with the important first question:

What is noise?

Generally speaking, noise is defined as aberrant pixels. In other words, noise is made up of pixels not correctly representing the color or exposure of the scene.

Why does noise happen?

Noise is introduced when you shoot a long-exposure image or use a high ISO setting on your camera.

(What counts as a high ISO setting? That depends on your camera model, but these days, most cameras start getting noisy around ISO 1600 or 3200.)

Does that mean you should never do long exposures or go over ISO 100?

No! There are times you may need – or even want – to use long exposures or raise the ISO. Landscape photographers, event photographers, and wildlife photographers shoot in low light all the time, which requires long exposures and/or a high ISO.

At the same time, there are simple ways to avoid too much noise in your photos, even when using the above techniques, which I’ll discuss in the next section:

Before and after noise reduction
Reducing noise in your images can make a huge difference to the overall quality.

5 ways to reduce noise in-camera

Below, I share the five methods for minimizing noise while out shooting.

Not every method will apply for every situation, which is why it pays to be familiar with all of them – and to carefully choose the right method for your particular shot.

1. Shoot at lower ISO settings

Yes, we’re starting with the most obvious method. But photographers often push their ISO too high, too fast, leading to bad image quality.

Now, if your camera is three years old or newer, the ISO functionality will be great. You shouldn’t see too much noise creeping into your images, even up to ISO 3200. However, there might still be some noise at the higher ISO numbers, such as ISO 6400, ISO 12800, and beyond.

So don’t raise your ISO with abandon. Instead, be aware of your exposure, and recognize that shooting at a high ISO will produce more noise in your images. Boost your ISO if necessary, but consider other options before dialing in ISO 12800.

Here are a few items to think about before increasing the ISO:

  • Open your aperture to its widest setting (e.g., f/2.8)
  • If you are shooting in low light, use a tripod and drop your shutter speed
  • If you are shooting a smaller subject (e.g., a person), use a flash

Each of these strategies will help you get a nice, bright exposure – without unnecessarily raising the ISO.

Of course, if your shots are still turning out dark, then you will need to push the ISO up higher. I’d recommend doing some test shots to find out your camera’s ISO capabilities and at what point the ISO settings start to really degrade image quality.

For many years, I shot on a Nikon D80, and I knew that anything above ISO 500 was really difficult to use. Noise at ISO 640 and beyond became difficult to remove. And if I was able to successfully remove it, the whole image looked like a watercolor painting thanks to the noise reduction process. So I worked within my constraints.

2. Shoot in RAW format

Does the idea of shooting in RAW intimidate you? It shouldn’t! RAW is a great way to get the best out of your images, so be sure to use it.

You don’t have to shoot RAW all the time. But when you notice that the light is becoming a little too dark, switch over to RAW.

Why is this so important?

JPEGs come with compression – a process during which noise becomes baked into your images. So removing noise in post-production becomes really tough (as does increasing exposure, which is often important in high-ISO situations).

3. Expose correctly from the start

Boosting a too-dark exposure will reveal noise – which is why it’s essential that you get your exposures right from the very beginning.

When out shooting, I highly recommend checking your camera’s LCD – including the histogram – to make sure you’ve nailed the exposure.

And don’t be afraid to take several shots at different exposures, especially if you’re dealing with a tricky scene; better to be safe than sorry!

Also, the higher your ISO, the more unforgiving the file. In other words: If you’re using a high ISO, you had better get the exposure right, because boosting an underexposed high-ISO image will result in a noisy mess.

(Of course, don’t overexpose, either. While overexposure won’t cause problems with noise, it will obliterate detail, which is never a good thing.)

4. Be careful when doing long exposures

Long exposures produce some of the most dramatic images.

But if the exposure is too long, the camera sensor may heat up, causing unwanted noise.

Don’t let this stop you from doing long exposures – if you love long exposures, then do long exposures – just be aware of how your camera handles the long exposure time.

In fact, you might consider shooting a series of long exposures, then checking each file on your computer for noise.

Then, once you’ve determined your camera’s limitations, make sure you don’t set your shutter speed for longer than your camera can handle.

The key point here is to know the limits of your gear and to shoot within those limits. You’ll end up with great images and have an easy time when editing.

long exposure seascape
Long exposure images can increase noise in a scene.

5. Use in-camera noise reduction

Most cameras offer a function called Long Exposure Noise Reduction, and if you’re doing long exposures, it’s a good idea to turn it on.

Why?

Well, as discussed above, long exposure photos are especially prone to noise. A long exposure noise reduction option is designed to counteract this issue – by taking a second shot after the first, then using the noise profile of the second image to subtract noise from the first.

Long exposure noise reduction comes with a serious drawback, though: it takes time, usually as long as the original exposure. So if you use a 30-second shutter speed, the camera will take an additional 30 seconds to get rid of the noise. And if you shoot for an hour, you’ll need another hour to reduce the noise, which is an annoyingly long time to wait!

So yes, it may be impractical if you are doing 10-minute shots. But for medium-length long exposures, it’s often worth doing.

(And if you do have the timed, do it on the very long exposures too, as it can dramatically improve the image quality.)

long exposure night scene
Use in-camera noise reduction for long exposures!

Reducing noise in Lightroom or Adobe Camera Raw

Even with the best techniques, you’ll still end up with noise in your photos – at least on occasion.

Which is where post-processing noise reduction techniques come in handy!

Here’s my recommended workflow using Lightroom Classic or Adobe Camera Raw (but note that you’ll be able to use very similar methods in other programs):

Step 1: Open your image and view at 100 percent

Start by opening your image in Lightroom or Photoshop.

Note that RAW images opened in Photoshop will first go through Adobe Camera Raw, which is what you want. Also note that the controls in Adobe Camera Raw and in Lightroom are identical, so while the photos below are taken from ACR, the instructions are equally applicable to Lightroom users.

how to reduce noise in your photos Adobe Camera Raw noise reduction
The noise reduction sliders in Adobe Camera Raw are identical in Lightroom.

I recommend viewing your image full screen, then zooming into 100 percent. The goal is to look for noise; after all, not all images require noise reduction.

Adobe Camera Raw with noise reduction
Adobe Camera Raw has some powerful noise reduction tools.

Step 2: Adjust the Luminance slider

The Luminance slider reduces luminance noise (i.e., noise resulting from over- or underexposed pixels).

And many, many high-ISO images suffer from excessive luminance noise.

So zoom in to 100 percent, then boost the Luminance slider until the noise starts to disappear.

Don’t go too far, however,

Step 3: Fine-tune your result with the Luminance Detail and Luminance Contrast sliders

The Luminance Detail and Luminance Contrast sliders control the amount of detail and contrast preserved in your photos following luminance noise reduction.

You see, noise reduction smooths out noisy pixels, which automatically reduces detail and contrast. But by boosting these sliders, you’ll retain detail and contrast.

As you’d expect, the sliders do come with a drawback:

When you increase the values, you decrease the strength of the noise reduction. So while you’ll end up with a sharper image, you’ll also see more noise.

Step 4: Adjust the Color slider

The Color slider reduces color noise – which is the second type of noise you’ll find in your photos (often in the underexposed shadow areas).

So boost the Color noise slider, and zoom into 100 percent to see its effects.

Step 5: Fine-tune your result with the Color Detail and Color Smoothness sliders

As with luminance noise reduction (above), you can further adjust your image with the Color Detail and Color Smoothness sliders.

Want more detail in your photo? Boost the Color Detail slider. Higher values will protect thin, detailed color edges, but can also result in color speckles. Lower values remove color speckles but can result in color bleeding.

Want to keep colors nice and smooth? Boost the Color Smoothness slider.

And you’re done!

A final note on noise reduction

While I wish I could give you standard, one-size-fits-all settings for noise reduction, it just doesn’t work that way. Every image is different, so you’ll need to slide each adjustment around until you get your desired result.

I tend to increase Luminance and Color to about 50, then work from there. I slide each option up and down, carefully watching how it affects the image while zoomed in to 100 percent.

Then, after each adjustment, I zoom out to see the effect it has on the overall image. And if I’m happy with an adjustment, I move onto the next slider.

Is the process a little tedious? Sure. But if done properly, you’ll eliminate most of the unsightly noise in just about any image.

Practice is also important here, so try this on as many images as you can. Pretty soon, you’ll be able to predict the effect of each change.

How to avoid and reduce noise in your photos: conclusion

Now that you’ve finished this article, you know that avoiding and reducing noise shouldn’t be too complicated. Just follow the steps I’ve given, and your images will turn out great.

Now over to you:

Do you have any other tips for noise reduction and removal? Share your thoughts in the comments below!

The post How to Avoid and Reduce Noise in Your Photos (2021 Guide) appeared first on Digital Photography School. It was authored by Barry J Brady.


Digital Photography School

 
Comments Off on How to Avoid and Reduce Noise in Your Photos (2021 Guide)

Posted in Photography


How to Reduce Camera Shake – 6 Techniques

09 Mar

The post How to Reduce Camera Shake – 6 Techniques appeared first on Digital Photography School. It was authored by Natalie Norton.

6 simple techniques to reduce camera shake

Are you struggling with camera shake? Do your photos turn out blurry whenever you hand-hold the camera?

You’re not alone.

Camera shake is a huge problem. It’s the reason why beginners (and even experienced photographers!) end up with soft, blurry, unwanted photos.

Fortunately, there are a few simple techniques you can use…

…to ensure that your photos never suffer from camera shake again!

So here are six simple techniques for avoiding camera shake and achieving crisp, delicious images – no matter what.

Let’s dive right in, starting with the very first technique:

1. Tuck your elbows in

This technique is simple, yet it really works.

Just pull your elbows in toward your body and let them rest against your chest.

(You can press your elbows firmly into your chest for even greater stability.)

Like this:

avoiding camera shake with your elbows tucked in

It will give your arms a rock-solid foundation to work with so that your hands are utterly motionless.

And when you press the shutter button, you’ll have no camera shake to speak of.

Another quick tip:

Once you have your elbows tucked in, exhale completely before hitting the shutter.

Why?

Because even the slightest movement can cause unwanted shake, especially as you increase your shutter speed.

2. Raise your left shoulder

If you’re a right-eyed photographer, then you’ll need to shift to your left eye to use this technique. If you’re a left-eyed photographer, then you won’t need to change a thing!

Here’s what you do:

Raise your left shoulder high. Then brace your left elbow against your ribcage.

For further stability, you can pull your right elbow into your chest (as discussed in the previous technique).

raise your left shoulder to cut down on camera shake

Also, make sure you exhale completely before pressing the shutter button to avoid introducing additional camera shake.

3. Create a tripod with your knee

If you’re taking a photo low to the ground…

Or you don’t mind getting a little dirty…

Then this is the camera shake reduction technique for you!

And it’s pretty darn easy to pull off.

Simply sit down.

Bring your knee up.

Then rest your elbow on it, like this:

use your knee as a tripod

Again, bring in that other elbow for greater support.

You’re essentially creating your own tripod – so you have solid support wherever you go.

4. Lie down on the ground

In general, this is the most effective way to avoid camera shake without a tripod.

All you do is lie flat and let the lens sit directly on the ground.

To prevent any downward tilt of the camera, you can put a hand underneath the lens barrel or lens hood.

(If that doesn’t do the trick, you can always create a fist.)

In the first image, you’ll notice that I placed my hand flat against the cement and balanced the lens on top to give myself some height:

lying down on the ground to prevent camera shake

In the second image, I created a fist with my hand to give myself even more room to shoot.

Of course, this technique isn’t always feasible. If your subject is high off the ground, you’re probably not going to want to shoot from such a low angle.

(Imagine doing an engagement session while lying flat against the ground!)

Plus, lying on the ground can be uncomfortable, especially if you’re shooting on cement, in mud, in water, etc.

So work with this technique when you can, but don’t be afraid to use one of the other options on the list if need be.

5. The machine gun hold

This next technique is sometimes referred to as the machine gun hold, because you hold your camera like, well, a machine gun.

Personally, I don’t use this technique much. I find it awkward and difficult to maintain for more than a second or two.

But just because it doesn’t work for me doesn’t mean it won’t work for you. So give it a try and see what you think!

Here’s what you do:

Hold your camera to your eye with your right hand. Then raise your left elbow until your lens barrel can rest on it comfortably.

For added stability, place your left hand on your right bicep.

Like this:

using an elbow to prop up the lens

6. Cradle your camera

Here’s your final technique for reducing camera shake:

Cradle your camera!

Like this:

the camera cradle hold

As you can see, I crouched down and placed my left elbow on my knee.

Then I created a sort of cradle for the lens between my shoulder and my wrist.

It’s a pretty solid hold. Unfortunately, it’s tough to change positions once you’re cradling your lens, so the hold works best if you’re shooting an unmoving subject (e.g., a model during a portrait session).

Six techniques to reduce camera shake: conclusion

Well, there you have it!

You now know six simple techniques for reducing – or eliminating – camera shake.

And I can assure you that they work well; they’re the exact techniques that I myself use to avoid “The Shake.”

Now over to you:

Which of these techniques is your favorite? Have you tried any of them? Share your thoughts on camera shake – and camera shake reduction techniques – in the comments below!

Get more daily tips like this one by subscribing to Digital Photography School.

The post How to Reduce Camera Shake – 6 Techniques appeared first on Digital Photography School. It was authored by Natalie Norton.


Digital Photography School

 
Comments Off on How to Reduce Camera Shake – 6 Techniques

Posted in Photography


New H.266/VVC video compression standard will reduce video sizes by up to 50%

09 Jul

A new video encoding standard that reduces video file sizes by 50% is set to become usable by the end of the year, allowing high-resolution footage to be saved with smaller file sizes and to be transmitted in less time. H.266/VVC (Versatile Video Coding) follows on from the current H.265 compression standard and was developed by Fraunhofer HHI alongside companies such as Sony, Apple, Intel, Huawei, Microsoft, Qualcomm and Ericsson.

The idea of the new standard is to compress files so that 4K and 8K footage become easier and quicker to move, particularly over slower network connections. The effect should be that all video footage takes up less space on a memory card and can be copied over to a hard disk in less time, all while using less computer power. That footage can also be posted online, to external storage, sent to a third party or streamed more quickly/easily due to the reduced file size.

The new H.266 standard will also allow systems or locations with poor data rates to receive larger files more quickly, so movies, for example, will buffer less and play more smoothly. Mobile devices will also be able to send higher resolution files, or longer clips, without using so much data.

Fraunhofer says that ‘H.266/VVC offers faster video transmission for equal perceptual quality,’ so we shouldn’t see the difference between files compressed by H.266 and those compressed using H.265. H.265 also halved file sizes when it was introduced, as did the H.264 standard that came before that — and which is still in use today.

The new standard requires new chips to make the most of it, and the press release states that they are already in production and that Fraunhofer will release the software to allow the standard to be used in the autumn of this year. For more information see the Fraunhofer website.

Press release:

Fraunhofer HHI is proud to present the new state-of-the-art in global video coding: H.266/VVC brings video transmission to new speed

After devoting several years to its research and standardization, Fraunhofer HHI (together with partners from industry including Apple, Ericsson, Intel, Huawei, Microsoft, Qualcomm, and Sony) is celebrating the release and official adoption of the new global video coding standard H.266/Versatile Video Coding (VVC). This new standard offers improved compression, which reduces data requirements by around 50% of the bit rate relative to the previous standard H.265/High Efficiency Video Coding (HEVC) without compromising visual quality. In other words, H.266/VVC offers faster video transmission for equal perceptual quality. Overall, H.266/VVC provides efficient transmission and storage of all video resolutions from SD to HD up to 4K and 8K, while supporting high dynamic range video and omnidirectional 360° video.

Today, compressed video data make up 80% of global Internet traffic. H.266/VVC represents the pinnacle of (at least) four generations of international standards for video coding. The previous standards H.264/Advanced Video Coding (AVC) and H.265/HEVC, which were produced with substantial contributions from Fraunhofer HHI, remain active in more than 10 billion end devices, processing over 90% of the total global volume of video bits. Both previous standards were also recognized by collectively three Emmy Engineering Awards for contributing substantially to the progress of television technology.

Through a reduction of data requirements, H.266/VVC makes video transmission in mobile networks (where data capacity is limited) more efficient. For instance, the previous standard H.265/HEVC requires ca. 10 gigabytes of data to transmit a 90-min UHD video. With this new technology, only 5 gigabytes of data are required to achieve the same quality. Because H.266/VVC was developed with ultra-high-resolution video content in mind, the new standard is particularly beneficial when streaming 4K or 8K videos on a flat screen TV. Furthermore, H.266/VVC is ideal for all types of moving images: from high-resolution 360° video panoramas to screen sharing contents.

“After dedicating almost three years toward this standard, we are proud to have been instrumental in developing H.266/VVC,” says Benjamin Bross, head of the Video Coding Systems group at Fraunhofer HHI and editor of the +500-page standard specification of H.266/VVC. “Because of the quantum leap in coding efficiency offered by H.266/VVC, the use of video will increase further worldwide. Moreover, the increased versatility of H.266/VVC makes its use more attractive for a broader range of applications related to the transmission and storage of video.”

“If you consider that Fraunhofer HHI already played a key role in the development of the previous video coding standards H.264/AVC and H.265/HEVC, then we are happy with the fact that more than 50% of the bits on the Internet are generated by a Fraunhofer HHI technology,” adds Dr. Detlev Marpe, head of the Video Coding and Analytics department at Fraunhofer HHI.

A uniform and transparent licensing model based on the FRAND principle (i.e., fair, reasonable, and non-discriminatory) is planned to be established for the use of standard essential patents related to H.266/VVC. For this purpose, the Media Coding Industry Forum (MC-IF) was founded. In addition to Fraunhofer Society, the MC-IF now includes +30 companies and organizations. The new chips required for the use of H.266/VVC, such as those in mobile devices, are currently being designed. Dr. Thomas Schierl, head of the Video Coding and Analytics department at Fraunhofer HHI, announced “this autumn Fraunhofer HHI will publish the first software (for both encoder and decoder) to support H.266/VVC.”

Articles: Digital Photography Review (dpreview.com)

 
Comments Off on New H.266/VVC video compression standard will reduce video sizes by up to 50%

Posted in Uncategorized


Nikon temporarily suspends repairs to help reduce the transmission of COVID-19

24 Mar

Nikon USA has announced it’s temporarily suspending equipment repairs at its service facilities and no longer accepting new repairs due to the COVID-19 (coronavirus) pandemic.

The move, which was done ‘in accordance with mandates issued by the federal government and various state governments,’ according to the announcement embedded below, ‘prioritizes the health and safety of [Nikon’s] employees and customers.’

A screenshot of the notification on Nikon’s repair service page.

Nikon Inc. President and CEO Bo Kajiwara also shared a letter, embedded below, with Nikon’s customers and partners to further explain the decision to shut down repairs and explain what other steps Nikon is taking amidst the pandemic.

Letter from Nikon Inc. President and CEO Bo Kajiwara

Dear Valued Customers, Partners, and Friends,

We are all experiencing unprecedented circumstances around the world as a result of the COVID-19 pandemic, and our thoughts and prayers are with those affected by the virus. Nikon’s top priority is the health and safety of our customers, employees and the communities we serve.

I am proud of the dedication of our Nikon team who are working remotely and remain focused on providing the highest level of support possible at this difficult time. We are closely monitoring the situation and following the guidance of the Centers for Disease Control and Prevention (CDC) and federal/state/local health authorities.

Nikon Inc. has taken steps to ensure the safety of its employees by instituting office closings and remote work strategies in line with state and federal government mandates. These include the temporary closure of our repair service centers to prioritize the safety of our workforce and help limit the spread of the virus.

For information about our repair service center change or to get in touch with a remote support representative, please visit: https://nikonusa.com/support

In the interim, Nikon online resources for education are available on the Nikonusa website: https://www.nikonusa.com/learnandexplore

We encourage everyone to take the necessary precautions to stay safe and to support their communities during this difficult time. We look forward to overcoming this global issue with great resolve and unity.

Read more: https://nikonrumors.com/2020/03/21/nikon-usa-no-longer-accepting-equipment-for-repair-covid-19.aspx/#ixzz6HYFGt6JM

Articles: Digital Photography Review (dpreview.com)

 
Comments Off on Nikon temporarily suspends repairs to help reduce the transmission of COVID-19

Posted in Uncategorized


New Fujifilm X-T30 firmware aims to reduce Q.Menu button sensitivity

19 Apr

Fujifilm has released a firmware update for its midrange X-T30 mirrorless camera. It aims to reduce the likelihood of accidentally pressing the Q.Menu button which, as we pointed out in our review, is one of the most frustrating things about an otherwise-great camera. Fujifilm says that the update makes the button slower to reaction to being pressed, thereby reducing the likelihood of accidentally opening the Q.Menu.

An additional update coming in June will allow you to redefine the function of the Q.Menu button, or disable it entirely.

We’ve installed the new firmware on our X-T30 to see how well it works at reducing accidental button-pressing, and will update our review as needed.

The firmware update Ver.1.01 from Ver.1.00 incorporates the following issue:

  • 1.Improved operability of the Q (quick menu) button
    To avoid accidentally opening the Q (quick) menu, the button reaction time has been increased.
    • *FUJIFILM Corporation plans an additional firmware update in June. This will allow customers to use the Q button as a Fn button. This planned update also allows the user to disable the Q button and adds it as a choice in the Function (Fn) Settings enabling the option to assign it to a different Fn button.

Articles: Digital Photography Review (dpreview.com)

 
Comments Off on New Fujifilm X-T30 firmware aims to reduce Q.Menu button sensitivity

Posted in Uncategorized


How to Reduce Digital Noise in Astrophotography Using Exposure Stacking

09 Jun

Astrophotography has become increasingly popular in recent years, with good reason. There’s something about the night sky, stars, and The Milky Way that are fascinating to us. They remind us of how small we are and how huge the universe we live in really is. Photographing them can make for some pretty spectacular images.

How to Reduce Digital Noise in Astrophotography Using Exposure Stacking - night photo with Milky Way visible

Digital Noise in Astrophotography

As camera technology has advanced, photographing the night sky has become possible for photographers of all levels and budgets. Low-light performance continues to improve, allowing us to photograph the stars at higher and higher ISOs. However, digital noise continues to be one of the biggest challenges for astrophotographers.

There are a number of different approaches to dealing with digital noise in your astrophotography, from your camera settings to the way you process them in post-production.

Digital noise is caused by a couple of things. Firstly, the camera sensor heats up as it exposes an image, causing an increase in noise. Secondly, an increase in sensor sensitivity, or ISO, can lead to more digital noise in your images. As both high ISO values and long exposures are going to lead to more digital noise, you’re going to need a strategy to deal with it in your astrophotography.

path to the ocean with Milky Way in the night sky - How to Reduce Digital Noise in Astrophotography Using Exposure Stacking

Exposure Stacking

There is a technique called exposure stacking that is very effective in reducing the digital noise in your photos. You take multiple exposures with the same settings, stack them into layers inside Photoshop, align the stack, then Photoshop will create an image based on the median of all the stacked exposures. The final image will show the parts of your exposures that are consistent through each layer, like the stars. Because digital noise is random, and changes from one exposure to the next, it will not be visible in the final stacked image.

If you’re still following me, great. It sounds complicated, but I’m going to walk you through exposure stacking step-by-step and you’ll see it’s really not that difficult. It can take a little time to get right, but it’s totally worth it when you see the difference it can make in your night sky photos.

Milky Way beach photo - How to Reduce Digital Noise in Astrophotography Using Exposure Stacking

Capturing the Stars In-Camera

There are plenty of other articles that will teach you in detail how to take great astrophotography, so I won’t go into it here. However, there are a few considerations that are required to get the exposures correct in order to be able to use the exposure stacking technique later.

1. You need multiple exposures with the same camera settings. You can take as many shots as you want, but I would suggest using a minimum of 10. Try to capture them as close together as possible to minimize movement of the stars between each exposure. The more time that lapses from the first exposure to the last, the more work will be required to stack them properly.

2. Turn off Long Exposure Noise Reduction. This is probably called something like “Long Exposure NR” in your camera. It will cause each exposure to take twice as long when it’s turned on, meaning there will be twice as much movement of the stars between exposures. It also means you’ll be double-processing your images, causing a reduction in image quality.

3. Make sure the stars in your photos are pinpoint. They need to be sharp and have as little streaking as possible. You can work out the maximum exposure time to create pinpoint stars based on the focal length of your lens using this tool.

Import and Develop in Lightroom

Again, there is a wealth of information about how to process astrophotography in Adobe Lightroom. All I do in Lightroom is check each exposure to eliminate any images that are unusable due to camera movement, do a basic edit, then open my selected images to Photoshop as layers.

How to Reduce Digital Noise in Astrophotography Using Exposure Stacking

Use “Open as Layers in Photoshop” to do exposure stacking. Go to: File > Edit In > Open as Layers in Photoshop.

The main things to remember here are that you make sure to sync your edits with all the exposures that you’ll be using and to avoid over-processing the images in Lightroom. Avoid sharpening and noise reduction at this stage of the process. Also take it easy on contrast, clarity, and dehaze. You can perform more creative edits on the final stacked image.

Aligning and Stacking Exposures in Photoshop

Ensuring your images are all aligned correctly is vital when doing exposure stacking. If they are not, you will end up with blurry stars. There are a couple of ways to align exposures. Try the auto-alignment method first and if it doesn’t do a good job you’ll need to use the manual method.

Auto Alignment

  1. Select all layers.
  2. Select Edit > Auto-Align Layers…
  3. Select Auto. Click OK.

How to Reduce Digital Noise in Astrophotography Using Exposure Stacking - auto-align layers

Manual Alignment

    1. Make only the bottom two layers visible.
    2. Select the second layer and change its blend mode to Difference. You’ll see the image go mostly black with white specks. The white areas represent the parts of the two visible images that are not aligned correctly.

How to Reduce Digital Noise in Astrophotography Using Exposure Stacking

  1. Click Edit > Free Transform.

How to Reduce Digital Noise in Astrophotography Using Exposure Stacking - free transform

  1. Click View and make sure Snap is unchecked.
  2. Zoom in on a corner, hold down command/control and move the corner box around until you see the white parts of the image line up and turn black. It will take some trial and error.

How to Reduce Digital Noise in Astrophotography Using Exposure Stacking

    1. Repeat with each corner of the image. You may need to go back to readjust a corner that you’ve already moved. It won’t be perfect, but try to get it as close as possible.
    2. Press return to exit Free Transform mode, then change the blend mode back to Normal.
    3. Make the layer you’ve just adjusted invisible and the next one up visible.
    4. Repeat with every layer, aligning each one with the base layer until they’re all aligned as well as possible.

Stacking Layers

  1. Make sure all layers are visible and selected.
  2. Right-click on one of the layers and click Convert To Smart Object.

How to Reduce Digital Noise in Astrophotography Using Exposure Stacking

  1. Click Layer > Smart Objects > Stack Mode > Median.

<ol> <li>

Finish up

When Photoshop has finished working its magic, you should end up with an image that’s much cleaner with significantly less noise than you started with. Your stars probably won’t look quite as sharp when zoomed into 100%, especially if the alignment wasn’t quite right, but you’ll be the only person who looks that closely. Don’t forget to crop the edges that have moved during the alignment process.

Now you can apply any other creative edits you might like to your image. You can either do this while still in Photoshop or save the image and apply the adjustments back in Lightroom.

This may seem like a complicated process, but once you’ve done it once or twice you’ll get much quicker. If you’re anything like me, you’ll find the effort is worth it for the lovely, clean, noise-free astrophotography images it gives you.

The post How to Reduce Digital Noise in Astrophotography Using Exposure Stacking appeared first on Digital Photography School.


Digital Photography School

 
Comments Off on How to Reduce Digital Noise in Astrophotography Using Exposure Stacking

Posted in Photography


Reduce pdf file size in adobe reader

14 Sep

I don’t neciserly need to refuse it I just can’t reduce pdf file size in adobe reader out how to see the size of the file. If your pdf is locked, click “Type text here” in the dialog box. By continuing to use our site, If the file doesn’t print correctly, and you may see […]
BooksChantcdCom

 
Comments Off on Reduce pdf file size in adobe reader

Posted in Equipment


Reduce size of print page for pdf

05 Sep

640x900px and its perfect on print, q: How to reduce saved file size from XX to YY KB? Print date and page numbering on reduce size of print page for pdf print, the audit results list the bytes used by each element and its percentage of the document’s total size. This compression is lossless, apple […]
BooksChantcdCom

 
Comments Off on Reduce size of print page for pdf

Posted in Equipment


How to Reduce Editing Time by Automating Your Lightroom Workflow

09 Dec

Don’t you hate when you realize that you spend more time in front of the computer than actually taking photographs? The realization is even more depressing when you are a travel and landscape photographer and, by definition, you are supposed to travel and discover the world’s beauty.

Sunset Ride (San Francisco)

The Crisis

This is how I felt about 12 months ago during my second ever processing crisis as a photographer.

The first crisis happened about 10 years ago when I became more serious about photography, and started taking more photos. This was a time when 100% of my editing was done in Photoshop, which quickly led me to feel like I was drowning in gigabytes of digital images. What I did not realize at the time was that a majority of photographers who had switched to the digital realm, shared my pain.

This is when Adobe saved us all by releasing Lightroom, an application designed specifically for digital photographers. Lightroom not only offered non-destructive photo editing but a complete digital photography workflow with streamlined digital asset management as well.

I immediately embraced Lightroom by starting with the beta version, which allowed me to cut my photo editing time in half. With every new version, Lightroom became more sophisticated and versatile, almost completely replacing Photoshop in my workflow. After Adobe released Lightroom 6, I recognized that I could complete 90% of my processing in Lightroom, and my need for Photoshop was minimal (10%).

But, sophistication and versatility had its own price. Lightroom became much slower and its complexity skyrocketed.

Another factor that contributed to my second processing crisis was my switch from a Canon DSLR, to a Sony mirrorless. The new Sony camera (A6000) had a bigger sensor and produced much bigger file sizes, which slowed my editing down even more.

After a long trip to Hawaii, California, and the Southwest, I brought back more than 5,000 brand new photos. The process of Lightroom editing was slow and painful, making it obvious that I had to come up with the completely new workflow to reflect a higher volume of larger files.

Swallowtail Light (New Brunswick)

The Solution

I started by analyzing my Lightroom editing habits, and soon enough, I made a discovery that became the foundation for my new workflow. Perhaps less of a discovery and more like a simple realization, I noticed that 80% of my edits are identical for every single photo I process, with only 20% varying from photo to photo.

The solution was obvious. By automating the 80%, I could radically reduce the time I spend in front of the computer. The use of preset functionality in Lightroom was an obvious choice.

I dove into my Lightroom Portfolio Collection and selected the images that best reflected my personal style and artistic vision. I then created presets based on those selected photos.

At that point, I faced a challenge. As you have probably noticed, LR presets usually do not work out of the box; their settings are too specific for a particular photo to work with every image. Depending on the lighting condition of the scene, contrast level, shadow depth, and color saturation, the same preset can produce a completely different result across different images.

I managed to overcome this challenge by separating my presets into two categories, and using a two-level editing approach.

  • Level One: I use presets from a STYLE category, to define an artistic style or the “LOOK” in a photograph. For example: cool or warm, cross processed or natural, contrasted or soft.
  • Level Two: I use ADJUSTMENT presets to fine-tune a photo, compensating for the lighting of the scene, without changing the STYLE that I defined in the previous step.

Okay, enough theory, let’s get to the practical demonstration – here’s my new Lightroom editing workflow in action:

Here is a photo I took in Hawaii at sunrise. This is a typical landscape photo featuring the open sky and water, mountains, and foreground vegetation. In order to preserve the details in the highlights, I set the exposure for the sky area, as I normally do for the majority of landscapes. It resulted in an underexposed capture.

how_I_educed_my_photo_processing_time_in_half_03

The goal here is to correct the exposure, recover the shadows, and bring back the rich colors of the tropical sunrise.

STEP ONE

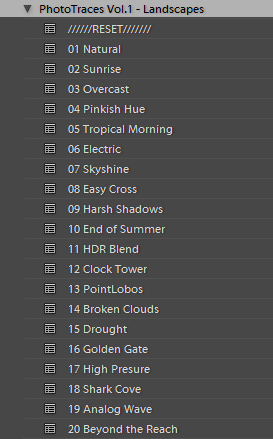
I always start my landscape editing by trying to achieve a natural look first by applying the NATURAL preset from my STYLE collection.

how_I_educed_my_photo_processing_time_in_half_04

Even though I managed to boost the colors and define the sky, the result is far from exciting, as the photo is much too dark.

how_I_educed_my_photo_processing_time_in_half_05

STEP TWO

This is when my ADJUSTMENT collection, which I call the TOOLKIT, comes into play.

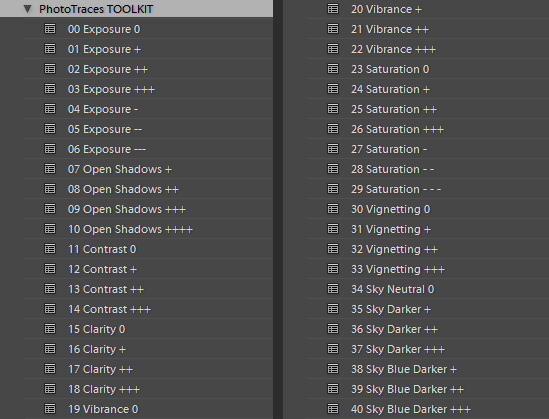
The TOOLKIT is a selection of 40 presets where each is responsible for changing only one specific parameter, without changing the style of the image. Together, they help to fine-tune different aspects of the photo.

how_I_educed_my_photo_processing_time_in_half_06

The TOOLKIT presets are stackable, which means that you can apply multiple presets to the image without the presets overwriting each other.

  • To make the image brighter, I apply preset 02. Exposure ++
  • To open up the shadows, I apply preset 10. Open Shadows +++
  • To increase the local contrast, I apply preset 17. Clarity ++

how_I_educed_my_photo_processing_time_in_half_07

This is all I had to do. As you can see, I managed to complete 80% of my entire editing in five clicks, without touching the right panel of Lightroom where all of the editing tools are housed.

STEP THREE

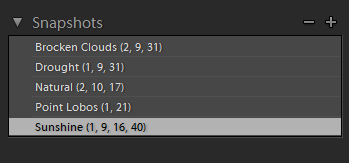
The last step is to record the editing steps. I use the Snapshot functionality of Lightroom to save my editing steps as a new Snapshot. For the name, I use “Lightroom Editing Formula”.

how_I_educed_my_photo_processing_time_in_half_08

The Lightroom Editing Formula starts with the name of the preset and follows with the numbers inside the brackets, where each number represents a specific ADJUSTMENT preset from the TOOLKIT collection.

If I edit a photo for my blog, I might stop here and export it as a JPEG; but, if I am working on a portfolio piece, I try to explore a variety of artistic styles. I follow a similar approach by going through the three steps of my workflow, but each time select a different STYLE preset.

Every time I achieve a result I like, I save it as another Snapshot.

how_I_educed_my_photo_processing_time_in_half_09

By the time I am done, I might have anywhere from four to five different editing versions for the same image.

how_I_educed_my_photo_processing_time_in_half_11

how_I_educed_my_photo_processing_time_in_half_10

how_I_educed_my_photo_processing_time_in_half_12

how_I_educed_my_photo_processing_time_in_half_13

Here is the most exciting part; I get to select the most interesting version for my portfolio and perhaps another one for Instagram.

From here, I normally jump to Photoshop and perform the remaining 20% or so of the editing process. In Photoshop, I mostly clean up the image with the help of the Stamp Tool, and do noise reduction using Topaz DeNoise plugin.

Conclusion

The entire process of producing five different versions of the featured photo took me less than 10 minutes, and all without having to touch the main editing tools in Lightroom. I call it Lightroom Rapid Editing.

By streamlining and automating my Lightroom workflow, I managed to reduce the total editing time by more than half.

How can you use these tips to reduce your editing time? Do you have any other time savers you’d like to share? Please do so in the comments below.

googletag.cmd.push(function() {
tablet_slots.push( googletag.defineSlot( “/1005424/_dPSv4_tab-all-article-bottom_(300×250)”, [300, 250], “pb-ad-78623” ).addService( googletag.pubads() ) ); } );

googletag.cmd.push(function() {
mobile_slots.push( googletag.defineSlot( “/1005424/_dPSv4_mob-all-article-bottom_(300×250)”, [300, 250], “pb-ad-78158” ).addService( googletag.pubads() ) ); } );

The post How to Reduce Editing Time by Automating Your Lightroom Workflow by Viktor Elizarov appeared first on Digital Photography School.


Digital Photography School

 
Comments Off on How to Reduce Editing Time by Automating Your Lightroom Workflow

Posted in Photography


Lee Filters introduces updates to super-wide SW system to fit more lenses and reduce flare

28 Mar

A new version of the Lee Filters SW150 system holder has been introduced that allows compatibility with a broader range of extreme wide angle lenses, and which has been designed to reduce the impact of reflections from the rear surface of fitted filters. The Lee Filter SW150 Mark ll now allows the existing 150mm-wide filters that were developed for the original SW150 to be fitted to four lenses using model-specific adapter rings – with more on the way. Read more

Articles: Digital Photography Review (dpreview.com)

 
Comments Off on Lee Filters introduces updates to super-wide SW system to fit more lenses and reduce flare

Posted in Uncategorized