RSS
 

Posts Tagged ‘Ratios’

A Lighting Ratios Guide: How to Make (or Break) Your Portraits

28 Mar

The post A Lighting Ratios Guide: How to Make (or Break) Your Portraits appeared first on Digital Photography School. It was authored by Darlene Hildebrandt.

lighting ratios how to make or break your portraits

Want to take your portraits to the next level with lighting ratios?

You’ve come to the right place.

Because in this article, I’m going to share everything you need to know about lighting ratios for amazing portraits, including:

  • What lighting ratios are
  • Basic ratios for portrait photography
  • Tips for using ratios

(And much more!)

So if you want to become a portrait photography master, then let’s get started.

lighting ratios portrait photography

What is a lighting ratio in photography?

As a math term, a ratio is a comparison of one thing to another.

So when calculating lighting ratios, you measure the light falling on the light or highlight side of the face and compare it to the light falling on the shadow side of the face.

For instance, if you have twice as much light falling on the highlight side of your portrait, then the lighting ratio would be 2:1. If you have four times as much light falling on the highlight side of your portrait, then the lighting ratio would be 4:1.

But how exactly do you measure light?

While you can do it with the built-in meter in your camera, it is much easier and more accurate to use a handheld incident light meter. You see, your in-camera meter takes a measurement of the light reflecting off your subject – whereas a handheld meter can measure the amount of light falling on your subject and therefore gives you a more accurate value.

Lighting ratios: key concepts

To properly measure and understand lighting ratios, you need to know a few things.

First, light is measured by f-stops. The aperture dial on your camera generally goes up in 1/3-stop increments, though the full stops for aperture are f/1, f/1.4, f/2, f/2.8, f/4, f/5.6, f/8, f/11, f/16, f/22, f/32, etc.

(A simple way to remember all the numbers is to memorize f/1 and f/1.4; all the other pairs are doubled from these with a few rounded off.)

You also need to understand that shutter speeds are also representative of f-stops, with the full stops at 1s, ½s, ¼s, 1/8s, 1/15s, 1/30s, 1/60s, 1/125s, 1/250s, 1/500s, 1/1000s, etc. Shutter speed full stops are easier to remember as they are generally doubled (with a couple instances of rounding, such as 1/8s to 1/15s).

Finally, know that each full stop is double (or half, depending on whether you go down or up) the amount of light compared to the previous one.

For example, if you are shooting at f/4 and want to shoot at f/5.6, you will need to double the amount of light to get an equivalent exposure (you’ll need one more full stop of light). If you want to narrow your aperture by 2 stops, you’ll need to add 2×2 – or 4 – times more light. Likewise, 3 stops correspond to 8 times more light (2x2x2) and so on.

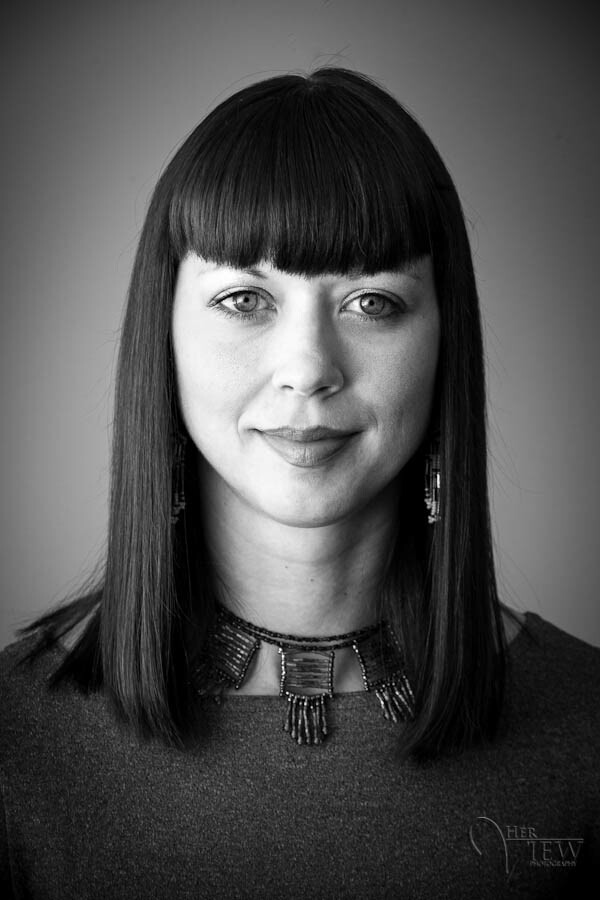
Knowing this, you can figure out how to create and measure ratios. In the next series of photos, I will demonstrate four different lighting ratios and how they were achieved.

1:1 ratio

1:1 lighting ratio

A 1:1 ratio is even lighting.

In other words, there is no difference in the meter readings on both sides of the face. As you can see in the photo above, 1:1 lighting is very flat, and it can be achieved in a couple of different ways.

First, you can use fill flash and make the flash equal to the main light source. This is harder to achieve until you’ve had some practice, and you’ll often end up overpowering the light with flash.

Secondly, you could use a reflector. It will need to be very close to the subject, and the goal is to eliminate all shadows on the subject’s face.

This is a 1:1 ratio, and it’s pretty easy to see and recognize visually.

2:1 ratio

2:1 lighting ratio portrait photography

As the numbers suggest, a 2:1 ratio occurs when one side has twice as much light compared to the other.

So knowing that plus what you know about f-stops, we can set up this lighting ratio.

First, put your subject into the light where you are going to photograph them.

Using a light meter, measure the light falling on the side of their face closest to the light source (i.e., the highlight side). Let’s say that measures f/8. (Keep your shutter speed the same for all measurements to maintain consistency.)

Then bring in your reflector and use the light meter again, but this time measure the light falling on the side of the subject’s face that is farther away from the light source (from here on in, this will be referred to as the shadow side).

Note: If you are using a handheld meter, make sure to shield it from excess light that comes from the other side of your subject. So if you are metering the shadow side nearer the reflector, shield the meter so the main light source isn’t hitting it.

Now, you know that your highlight side has a reading of f/8. To achieve a 2:1 lighting ratio, you’ll need to get your meter to read f/5.6 (which is one stop less light) on the shadow side. So adjust the reflector distance until the meter settles on f/5.6.

Also, it may help to study the image above and recognize the contrast range from the highlight to the shadow side of the face. It’s subtle, but you should be able to see it.

4:1 ratio

4:1 lighting ratio portrait photography

A 4:1 ratio is double a 2:1 ratio. So if 2:1 featured twice as much light – or one stop – how much light will a 4:1 ratio require?

The answer is four times as much light (2×2), which is a 2-stop difference from the highlight side to the shadow side of the face.

I teach an available light class, and I always recommend working with natural light before you advance on to speedlights. With available or natural light and a reflector, it is much easier to learn and practice lighting because you can see what happens as you make changes (WYSIWYG). Flash is harder to predict as you can’t see it without actually taking a photograph.

So if our main light (the window) is still at f/8, what should be the value of our fill light/reflector (or the shadow side) to achieve a 4:1 ratio? Let’s do the steps again: f/8>f/5.6>f/4.

Therefore, two stops less than f/8 is f/4 (and this is the desired measurement to create a 4:1 ratio). Look at the photo above and compare it to the 2:1 image; do you see how the shadow side is getting darker?

8:1 ratio

8:1 lighting ratio

The last ratio we’ll look at is 8:1.

The 8:1 ratio requires 8 times as much light, or 3 stops, on the highlight side of the face compared to the shadow side.

As you can see in the image above, 8:1 lighting is quite dramatic, and anything greater than 8:1 will not hold much detail on the shadow side of the face at all.

In fact, prints have a maximum contrast range of 4-6 stops, so unless you want one side of the face overexposed or the shadows pure black, I suggest keeping your lighting ratios at 8:1 or smaller.

Note that an 8:1 ratio can be a bit tough to create. You may need harsher lighting and possibly a black reflector to add blacks into the shadow side (rather than reflecting light onto it).

We calculate it the same way as above: if 4:1 is 4 times the light, then 8:1 will be 8 times the light, or 3 stops.

So if we are still at f/8 on our highlight side, we need to get our shadow side to read: f/8>f/5.6>f/4>f/2.8.

How to use lighting ratios

Now that we have this knowledge of ratios, let’s put it to use! Remember: The ratio can add to the success of your portrait, or it can ruin it.

If you look at the example images again, pay attention to how the mood of the image changes with the ratio. Notice how the higher ratios create more drama and power. Notice how the lower ratios are softer and more innocent.

Generally somewhere between 2:1 and 4:1 is the commonly used ratio for most portraiture. It’s enough to create three-dimensionality on the face, but not too much to create unattractive, deep shadows. I personally like a 3:1 ratio (1.5 stops) or a 4:1 ratio, myself.

For a child or baby, you often want a lower ratio because the softer result goes well with the subject matter. But a grizzled old cowboy with weathered, wrinkled skin and unkempt whiskers looks much better with 4:1 or 8:1 lighting. Why? He’s rougher, tougher, and can handle the increased contrast, plus it’s suitable for his look.

If you’re worried about not owning a handheld meter, you don’t necessarily need to go out and buy one. I’d only suggest you do that if you plan on getting into studio lighting. Otherwise, just practice seeing the difference between the various ratios (which is why I suggest natural light), and if they aren’t a perfect 4:1 or 8:1 or whatever, then it doesn’t matter. Just learn to recognize when it’s too strong and when it’s too weak for the effect you want to create.

Here’s another example of ratios at work. None of it is right or wrong, but which do you think is the most appropriate ratio for my subject? Figure that part out, and you’ll be ahead of the game!

headshot without a reflector
My first shot had no reflector, and I found the shadows too dark and the overall portrait too contrasty. So I brought in a reflector for the next shot.
headshot with a reflector
This is the second image I took, this time with a silver reflector. I found the ratio to be almost 1:1, and I wanted a bit more drama for a man’s portrait.
headshot with a white reflector
For this last image, I switched to a white reflector and backed it off a bit to get a ratio that I was happy with.

Note: I’d like to thank my subject, Gabriel Biderman from B&H Photo Video, for these shots.

Lighting ratio tips

Now that you understand the lighting ratio basics, let’s take a look at some quick tips that’ll make your photos look better.

First, get your subject out of the sun. Shooting in bright sunlight makes it almost impossible to control your ratios, plus the light won’t be desirable or flattering on the subject’s face. Use natural light from a window with indirect lighting (no direct sun coming in) if you can. And if the sun is streaming in, try adding sheer curtains or even stretching a white bed sheet across to diffuse the light.

Second, here are some lighting ratio starting points:

  • For babies and small children, use a lower ratio like 1:1 or 2:1. Children move so quickly that keeping them in the light and facing in the right direction is exceedingly difficult, and even light helps mitigate this issue.
  • For women, use a medium ratio like 2:1 or 3:1.
  • For men and business portraits, use a slightly stronger ratio, such as 4:1 or 6:1.
  • For artists, bands, and other dramatic portraits, use a higher ratio.

Finally, keep in mind that there are no steadfast rules on how to do ratios in portraiture. Like everything in photography, it’s about learning the techniques, then using them as suggestions while you experiment and find your own style or voice.

For instance, can you put 8:1 lighting on a glamorous movie star or 1:1 lighting on a coal miner? Absolutely!

(I’ll even give you some homework that’ll prove both ratios can be effective if they are done well.)

Homework and action steps

Your homework assignment is to research the following photographers. Tell me how they broke the general rules I’ve mentioned above, yet still had great success and amazing images:

  • George Hurrell
  • Richard Avedon
  • Yousuf Karsh

Those three photographers right there are some of the greatest portrait artists to ever live. Learn from them.

A lighting ratios guide: conclusion

Now that you’ve finished this article, you know all about lighting ratios – and you know how to use them for stunning results.

So what’s the next step?

Practice! If you simply dedicate a few minutes per day to working with portrait lighting, you’ll become a master in no time at all.

Now over to you:

What do you think of these lighting ratio concepts? Will they help you in your portrait photography? Share your thoughts (and images) in the comments below!

The post A Lighting Ratios Guide: How to Make (or Break) Your Portraits appeared first on Digital Photography School. It was authored by Darlene Hildebrandt.


Digital Photography School

 
Comments Off on A Lighting Ratios Guide: How to Make (or Break) Your Portraits

Posted in Photography


Aspect Ratios in Landscape Photography

22 Nov

The post Aspect Ratios in Landscape Photography appeared first on Digital Photography School. It was authored by Elliot Hook.

Composition is often the difference between a good landscape photograph and a great landscape photograph. There are oft-quoted rules that we all try to adhere to and break in equal measure (the rule of thirds, leading lines, golden spiral, etc.), yet when considering what we are trying to capture, we don’t always think about the frame itself.

The aspect ratio of a photograph can make or break the composition by either emphasizing the subject and removing distractions, or by putting the whole scene off-balance. When looking through the viewfinder, about to press the shutter, it’s a good idea to try and envisage the final shot, including the aspect ratio, in order to optimize your composition. Too often, the aspect ratio is an afterthought, applied during post-processing to correct for poor compositional choice.

But how does each aspect ratio impact compositions in landscape photography?

That’s where this article comes in. I’m going to discuss a few common aspect ratios (with examples). I’ll show the benefits and drawbacks for each, and explain where each aspect ratio may be applied.

Note that there is an argument for cropping your photo without sticking to a defined ratio; in other words, that you should give an image a custom ratio based on your subject matter. But that can make printing and framing awkward, so I will therefore be sticking to well-defined ratios that most should be familiar with.

1:1 – Square format

The square format can often be used to simplify an image and give your subject a striking presence at the center of the frame. 

By keeping the width equal to the height, the way in which we read the photograph changes, as there is less of a need to move from left to right through the frame. 

The square format also offers a good opportunity to break the rules we so often follow; place the horizon along the center of the image or place a subject in the center of the frame, and the composition may only get stronger. 

You’ll often see a 1:1 aspect ratio used to emphasize minimalism (again, it’s the theme of simplification).

Derwent Water, Lake District, UK presented in a 1:1 aspect ratio

4:3 – Four thirds format

This format is the default aspect ratio of cameras that use Four Thirds sensors. 

An image with a 4:3 aspect ratio is wider than it is tall, meaning that the eye naturally wants to move left to right through the image. However, given that the image is still fairly tall in relation to the width, this ratio is perfect for drawing the eye into the scene through leading lines. 

The relative height of a 4:3 image encourages the use of wide-angle focal lengths to capture the depth of a scene, without including excess details at the edge of the frame.

Lavender field at sunrise presented in a 4:3 aspect ratio

6:4 – 35mm format (also called 3:2)

This is the default aspect ratio for 35mm film, and therefore for full-frame and APS-C sensors used in most Nikon and Canon cameras. 

With a 6:4 image, the width is significantly wider than the height. This encourages viewing the image from left to right, meaning diagonal leading lines can work quite well.

A limitation of this aspect ratio is that the height is that much shorter in relation to the width. So capturing foreground detail using a wide-angle lens becomes more difficult due to the limited vertical space with which you can work. A 6:4 aspect ratio can even cause the subjects within the frame to become too disparate and therefore lose impact. 

The 6:4 ratio can, however, be suited to capturing scenes where there is little to no foreground interest, especially if you’re using midrange focal lengths (e.g., 35mm).

Rain over Lake Como presented in a 6:4 aspect ratio

16:9 – Widescreen panoramic

The widescreen panoramic format was supported in film by the Advanced Photo System (APS) upon its introduction, and has recently become more popular due to the prevalence of 16:9 aspect ratio displays in the home on TVs, computer monitors, and mobile devices. 

With this format, the width of the image is dominant, so leading the viewer in from the foreground is difficult.

But the format is ideally suited to presenting portions of landscape scenes captured with longer focal lengths (e.g., zoom lenses) from a distance.

Beach abstraction presented in a 16:9 format

12:6 or 18:6 – Panoramic (also called 2:1 or 3:1)

I’ve chosen to adopt 12:6 or 18:6 as the panoramic format here for a few reasons.

First, both 2:1 and 3:1 seem to be fairly well supported in that panoramic picture frame options are typically either 2:1 or 3:1. 2:1 is a panoramic format supported by a number of medium format film cameras and 3:1 was supported by the APS. 

Typically, panoramic ratios will be used to present the result of stitching two or more images together; it’s quite challenging to capture a 3:1 aspect ratio image in one frame and still be able to print at any meaningful size.

Often, frames to be stitched will have been captured using a longer focal length in order to pick out distant details in the landscape. There is no real option to include foreground detail here.

Chalkfields at sunrise presented in a 3:1 aspect ratio

Portrait mode

I’m aware that I’ve discussed a number of different aspect ratios in “landscape” format, and not in “portrait” format.

But that is because I believe the options for the successful presentation of landscapes in “portrait” format are much fewer in number. For a landscape to work, you need to balance the composition throughout the frame, and aspect ratios such as 6:4 make that very difficult, due to the image being too tall relative to its width. 

For “portrait” landscapes to work, fatter rectangles, such as 4:3, 7:6, or 5:4, are ideal. In fact, 5:4 is heavily used by professional landscape photographers with medium and large format cameras. This aspect ratio allows the eye to be taken through the image from left to right, without having an excess amount of sky knocking the frame off-balance.

Bwlch Y Groes, Wales, UK presented in three different portrait formats

Conclusion

While I have tried to describe specific uses of certain aspect ratios, I am aware that not all scenes will follow the suggestions I’ve made. Some images may work well with a certain ratio that’s contrary to what I’ve suggested.

However, I’m hoping this introduction to aspect ratios will encourage you to think about them when composing your shot, before pressing the shutter. It isn’t always ideal to fill the frame with the landscape in front of you.

And knowing that the aspect ratio you choose is not dictated by which camera you use means that you may be able to use aspect ratios effectively to boost the impact of your landscape photographs.

The post Aspect Ratios in Landscape Photography appeared first on Digital Photography School. It was authored by Elliot Hook.


Digital Photography School

 
Comments Off on Aspect Ratios in Landscape Photography

Posted in Photography


Mastering Aspect Ratios in Photography

18 Mar

The post Mastering Aspect Ratios in Photography appeared first on Digital Photography School. It was authored by Tim Gilbreath.

mastering aspect ratios in photography featured image

Aspect ratio is a phrase that you’d normally expect to hear when discussing movies or televisions, but as it is a measurement of image proportions, it’s also important in photography. It is also one of those things that is always there, even if you don’t think about it.

Aspect ratio in photography is a description of an image’s vertical and horizontal proportions expressed as two numbers separated by a colon, and composed of similar units of measurement, whether it be inches, centimeters, or feet.

You’ve seen these numbers before, such as 16:9, which is commonly known as widescreen format, and used to describe many TV’s and computer monitors.

16:9 would be an image (or in the case of a TV or monitor, a screen) that is 16 units wide and 9 units tall. Aspect ratio doesn’t describe actual size, as a 16:9 ratio could be 16 inches wide by 9 inches tall, or 16 feet wide and 9 feet tall. The numbers only describe the proportions.

aspect ratios in photography graphic

Although it’s not in the scope of this article, movies and film sometimes also use what’s known as cinema terminology to express aspect ratios, such as 1.85:1 (cinema standard widescreen) and 2.39:1 (anamorphic widescreen).

Although you can convert these expressions to standard ratios, for our purposes, we’ll only stick with standard x:y expressions that relate to camera sensors or photographic images.

So why are aspect ratios important to photography?

Primarily, they are important because every image we shoot, as well as every camera we shoot with, has a base aspect ratio. Our camera bases the aspect ratio on the proportions of the sensor, which you cannot change.

However, you can change the resulting image’s aspect ratio, and most importantly, you can change it for creative reasons.

There are actually two types of aspect ratio in photography we need to familiarize ourselves with; the aspect ratio of the camera we’re shooting with, and more importantly, the final aspect ratio we will present our image in.

We, of course, can change the latter in post-processing, for whatever reason we decide.

Some cameras also have settings that allow you to change aspect ratio in-camera before shooting, but this is made possible by the camera software cropping. It’s always better to change the ratio yourself and crop later in post-processing.

Why would we want to change the aspect ratio of a photo?

The main reason – composition.

Changing the aspect ratio in Photoshop or Lightroom is essentially cropping the image to a specific proportion that makes the photo more pleasing to the eye. A wide, sweeping shot of a beach and sky will not look as wide and sweeping in a standard 3:2 presentation as it would in a 16:9 widescreen format. Composing the image in widescreen proportions gives the scene a more open, cinematic feel.

Let’s take a look at the most popular aspect ratios in photography, and what they are commonly used for.

Breakdown of aspect ratios in photography

3:2 ratio

The 3:2 ratio is probably the most commonly used aspect ratio in photography, due to the fact that it is the standard proportions used with modern DSLR camera sensors.

The reason for this is because it is also the ratio used by classic 35mm film cameras. Digital camera sensors were originally designed to replicate that ratio.

aspect ratios in photography
An image captured with a DSLR in native 3:2 format. Modern DSLR cameras usually capture images in this format.
EXIF: Canon 60D, EF 50mm 1.8 II, 50mm, f/8, 1/100 sec, 800 ISO, Manual Mode

Before photography, artists generally used a set of proportions similar to this because of its visual appeal. The 3:2 format is a great general use ratio, and allows for a fairly wide feel while still capturing vertical elements of a scene.

4:3 ratio

The 4:3 ratio is a classic format that has its roots in digital point and shoot cameras, which were developed to basically match the proportions of video monitors of the time.

The format is used in point and shoots, many compact cameras, and micro four-thirds systems.

Aspect ratio in photography - mushroom image in 4:3 format.
The 4:3 format allows for more vertical space and can better focus attention in on a specific area of a scene. Here we’ve used the 4:3 ratio to remove distracting portions of the scene and isolating the flower and mushroom.
EXIF: Canon 60D, EF 50mm 1.8 II, 50mm, f/8, 1/100 sec, 800 ISO, Manual Mode

Just as with old TV and video monitors, the 4:3 format has a taller, slimmer look that appears more square to the eye. It is a good creative choice when you need to capture vertical elements of a scene.

16:9 ratio

The 16:9 ratio is more commonly known as the “widescreen” format.

It was developed as a replacement for the old 4:3 ratio during the advent and implementation of HDTV. Most TV’s and monitors now are created with this format in mind.

The longer, more horizontal format is great for displaying landscapes and other vistas, and creates a cinematic look and feel when used in photography.

aspect ratios in photography - empty beach scene
This image is expansive in native 3:2 format, and contains too much empty space.
EXIF: Canon 60D, EFS 24mm 2.8 STM, 24mm, f/8, 1/320 sec, 250 ISO, Manual Mode
Aspect ratio in photography - beach scene in 16:9 format.
Adjusting the aspect ratio to 16:9 allows for a much more flowing, cinematic look and feel. This format is especially good for displaying wide fields of view.
EXIF: Canon 60D, EFS 24mm 2.8 STM, 24mm, f/8, 1/320 sec, 250 ISO, Manual Mode

1:1 ratio

The 1:1 ratio, or square format, might be mistaken as a newer format, as it is well-known for its use on the Instagram platform (although photos are no longer forced in that format with the service). However, square images are also the usual ratio for medium-format cameras, as well as a few toy cameras.

This format is a good choice for cropping close and isolating a subject or a scene that doesn’t involve an expansive landscape.

Aspect ratio in photography - mushroom image in 1:1 (square) format.
Returning to our mushroom photo, the 1:1 (or square) format lets us crop in close to a particular subject and remove any distracting elements. Here, we are focusing on the mushroom itself, and nothing else.
EXIF: Canon 60D, EF 50mm 1.8 II, 50mm, f/8, 1/100 sec, 800 ISO, Manual Mode

5:4 ratio

The 5:4 ratio formatted images are primarily used in large-format photography, as many of those cameras use sheet film with dimensions of 5×4 inches.

From a creative standpoint, images using this ratio are almost as tall as they are wide, and are great for capturing vertical elements of a scene.

Aspect ratio in photography - mushroom image in 5:4 format.
The 5:4 ratio is very similar to the 4:3. Again, we can use it to remove distracting elements on the sides of a scene.
EXIF: Canon 60D, EF 50mm 1.8 II, 50mm, f/8, 1/100 sec, 800 ISO, Manual Mode

2:3 ratio

Finally, the 2:3 ratio is a specialty aspect ratio that is used for images in vertical or portrait orientation.

It is primarily used for portraiture, when elements of the scene (in most cases, a person), align in a vertical orientation.

You can also use vertical formats like 2:3 for landscape photography to capture tall elements within the frame, such as trees and mountains.

aspect ratios in photography - a forest full of trees in the 2:3 ratio
This image was framed and captured vertically, and later cropped in post-production to 2:3 format, to accentuate the height of the trees and the vertical expansiveness in the scene.
EXIF: Canon 60D, EFS 24mm 2.8 STM, 24mm, f/8, 1/80, 400 ISO, Manual Mode

Creative cropping

Before the advent of digital photography and software, aspect ratios of the camera being used generally dictated what ratio the image would be in.

In the digital age, however, we have the ability to simply and quickly crop in whatever photo software we’re using.

Changing aspect ratio in Adobe Lightroom.
Changing aspect ratio of an image in Adobe Lightroom. Not only are several presets available to you, but you can enter a custom ratio as well.

Conclusion

Instead of being bound to a specific format, you can change it. Therefore, changing the look and feel of an image for creative reasons, even after pressing the shutter and recording the image on the sensor.

So now you know a little more about aspect ratios in photography, and why it’s important. What formats do you find yourself using? Do you alter the aspect ratio during post-production? Leave us your comments below!

The post Mastering Aspect Ratios in Photography appeared first on Digital Photography School. It was authored by Tim Gilbreath.


Digital Photography School

 
Comments Off on Mastering Aspect Ratios in Photography

Posted in Photography


LumaFusion 2.1 video editing app adds external drive support, new aspect ratios and more

24 Oct

Mobile video editing app LumaFusion has been updated to version 2.1 to take advantage of new iOS 13 and iPadOS features. With LumaFusion 2.1, users can import and export media from external drives, including SD cards, flash drives, and portable HDDs/SSDs. In addition, the updated app also adds support for the iOS 13 system font selector, 27 new blend modes, aspect ratios and resolutions for the latest iPad and iPhone models, and an improved iOS 13 Dark Mode.

In addition to the new features, LumaFusion 2.1 brings a number of improvements, including dozens of UI ‘refinements,’ the ability play and pause previews with a single tap, rapid clip previewing using two-finger swipes, default ‘recommended’ export settings, improved project package format and exporting process, and the ability to long-press to quickly remove Network Drive servers.

Users can also expect general stability and performance improvements, as well as fixes for the level meters and the addition of text and color markers in library search. LumaFusion is available for iPad and iPhone from the App Store now for $ 29.99.

Articles: Digital Photography Review (dpreview.com)

 
Comments Off on LumaFusion 2.1 video editing app adds external drive support, new aspect ratios and more

Posted in Uncategorized


Free online tool helps photographers visualize and compare aspect ratios

27 Nov

Developer and photographer Christopher Kalafarski has created a free tool that enables users to compare and preview various aspect ratios with their own images. Unlike comparisons in an application like Lightroom, Kalafarski points out that his ratio.party tool is simple to use and offers a wide range of sample ratios.

Users can add their own image to the tool by dragging and dropping them onto the Web page. Ratio.party features an input format box at the bottom, which can be clicked to cycle through multiple format options. Users can enable and disable horizontal and vertical lines, and click lines to crop the image at them.

Though the tool works on mobile devices, Kalafarski explained in a Reddit post that he designed ratio.party for desktop browsers. The tool operates locally in the browser, meaning user images are not uploaded to a server.

Articles: Digital Photography Review (dpreview.com)

 
Comments Off on Free online tool helps photographers visualize and compare aspect ratios

Posted in Uncategorized


Aspect Ratios in Landscape Photography

31 Oct

Composition is often the key to the difference between a good landscape photograph and a great landscape photograph.  There are oft quoted rules that we all try to adhere to and break in equal measure (rule of thirds, leading lines, golden spiral etc.) yet when considering what we are trying to capture within the frame, we don’t always consider the frame itself.

The aspect ratio of the photograph can make or break the composition by both emphasising the subject and removing distractions, or by putting the whole scene off-balance.  When looking through the viewfinder, about to press the shutter, it’s a good idea to try and envisage the final shot, including the aspect ratio, in order to optimise your composition (too often the aspect ratio is an after-thought, being edited and applied during post-processing to correct for poor compositional choice).

But how does each aspect ratio impact our composition?  Hopefully, that’s where this article comes in.  I’m going to discuss a few common aspect ratios, with examples, and show the benefits and draw backs for each, considering where each one may be applied.

(Note, there is an argument for cropping your photo without sticking to a defined ratio to give an image a custom ratio based on your subject matter.  I believe that can make printing/framing awkward so will therefore be sticking to well-defined ratios that most should be familiar with).

1:1 –Square format

The square format can often be used to simplify an image and give a subject a striking presence at the centre of the frame.  By keeping the width equal to the height, the way in which we read the photograph changes, as there is less of a need to move left-to-right through the frame.  The square format lends a good opportunity to break the rules we so often follow – place the horizon along the centre of the image or place a subject in centre of the frame, and the composition may only get stronger.  You’ll often see a 1:1 aspect ratio used to emphasise minimalism (again, along the theme of simplification).

Derwent Water, Lake District, UK presented in a 1:1 aspect ratio

A 1:1 aspect ratio used to add to the simplicity of this image

4:3 – Four-thirds format

This format is the default aspect ratio of cameras that use four-thirds sensors.  The image is wider than it is tall, meaning that the eye naturally wants to move left-to-right through the image.  However, given that the image is still fairly tall, in relation to the width, this ratio is perfect for leading the eye into the scene through leading lines from foreground interest.  The relative height of the image encourages the use of wide-angle focal lengths to capture the depth of a scene within an image, without capturing excess details at the edge of each frame.

Lavender field at sunrise presented in a 4:3 format

A 4:3 format allows for capturing close foreground detail and leading lines to draw the eye into the image

6:4 – 35 mm format (also called 3:2)

This is the default aspect ratio for 35 mm film, and therefore for full frame and APS-C sensors used in most Nikon/Canon cameras.  The width of the image is significantly wider than the height that, again, encourages reading through the image from left-to-right, meaning diagonal leading lines can work a treat.  A limitation of this aspect ratio is that the height is that much shorter in relation to the width, meaning that capturing foreground detail using a wide-angle lens becomes more difficult due to the limited vertical space with which to work.  It can cause the subjects within the frame to become too disparate and therefore lose impact.  The 6:4 ratio can however be a format that is suited to capturing scenes where there is little to no foreground interest, with mid-range focal lengths (e.g. 35 mm).

Rain over Lake Como presented in a 6:4 aspect ratio

A 6:4 aspect ratio is used here as no close foreground detail is being captured, yet the scene still benefits from a wide aspect

16:9 – widescreen panoramic

This format was supported in film by the advanced photo system (APS) on its introduction and has recently become more popular due to the prevalence of 16:9 aspect ratio displays in the home – tvs, computer monitors, mobile devices.  With this format, the width of the image is dominant, meaning leading the viewer in from the foreground is difficult, but the format is ideally suited to presenting portions of landscape scenes captured with longer focal lengths (i.e. zoom lenses) from a distance.

Beach abstraction presented in a 16:9 format

A wide and narrow 16:9 format was used here to emphasise the horizontal bands of colour

12:6 or 18:6 – panoramic (also called 2:1 or 3:1)

I’ve chosen to adopt 12:6 or 18:6 as the panoramic format here for a few reasons.  Both 2:1 and 3:1 seem to be fairly well supported in that panoramic picture frame options are typically either 2:1 or 3:1.  2:1 is a panoramic format supported by a number of medium format film cameras and 3:1 was supported by the APS.  Typically, panoramic ratios will be used to present the result of stitching 2 or more images together – it’s quite challenging to capture a 3:1 aspect ratio image from one frame and it sill be large enough to print at any meaningful size – and often frames to be stitched will have been captured using a longer focal length in order to pick out details distant in the landscape.  There is no real option of including foreground detail here.

Chalkfields at sunrise presented in a 3:1 aspect ratio

An ultra-wide 18:6 (3:1) aspect ratio was used to present this panorama of 7 stitched images, captured using a focal length of approx. 140 mm

‘Portrait’ mode

I’m aware that I’ve discussed a number of different aspect ratios in the ‘landscape’ format and not in ‘portrait’ format.  That is because I believe the options for successful presentation of landscapes in ‘portrait’ format to be much fewer in number.  For a landscape to work, you need to balance the composition throughout a frame and aspect ratios such as 6;4 make that very difficult due to the image being too tall, relative to its width.  For ‘portrait’ landscapes to work, fatter rectangles such as 4:3, 7:6 or 5:4 are ideal, 5:4 being heavily used by professional landscape photographers using medium and large format cameras.  These formats allow the eye to be taken through an image, still from-left-to-right, without having an excess amount of sky putting the frame off-balance.

Bwlch Y Groes, Wales, UK presented in three different portrait formats

From left to right: 6:4, 4:3, 5:4. Which one looks best?

Conclusion

Whilst I have tried to describe specific uses to certain aspect ratios, I am aware that not all scenes will follow the suggestions I’ve made, and some images may well work in one ratio, not another, contrary to what I’ve suggested.

However, I’m hoping this introduction to aspect ratios will encourage you to think about them when composing your shot, before pressing the shutter.  It isn’t always ideal to fill the frame of your camera with the landscape in front of you, and knowing that the aspect ratio you choose is not dictated by which camera you use means you may be able to use them effectively to boost the impact of your landscape photographs.

Post originally from: Digital Photography Tips.

Check out our more Photography Tips at Photography Tips for Beginners, Portrait Photography Tips and Wedding Photography Tips.

Aspect Ratios in Landscape Photography


Digital Photography School

 
Comments Off on Aspect Ratios in Landscape Photography

Posted in Photography