RSS
 

Posts Tagged ‘Rain’

dPS Weekly Photography Challenge Rain

04 Sep

The post dPS Weekly Photography Challenge Rain appeared first on Digital Photography School. It was authored by Sime.

Rain! There’s a lot of it around right now (Depending on where you are obviously) so let’s see your take on this week’s photography challenge theme ‘Rain’ I chose to photograph the raindrops that had run down my window all afternoon, with a macro lens.

#dPSRAIN is the hashtag for this week’s challenge if you’re posting on social media (make sure you follow us!)

Rain Drops from the Melbourne Rain
Raindrops not so crystal clear | Friday’s rain in Melbourne, Australia

If you live somewhere that it’s not raining, and there’s no rain forecast, you can bend the rules and do ‘water’ in general. (Hey, a garden hose and some creativity and you’re making your own rain!) when photographing rain (or water) remember that it looks good with light shining through it, or maybe as a reflective pool, perhaps even glistening on some skin, the options aren’t endless, but with a little creativity, there are a lot of them!

Kids Riding in the rain
Kids being kids in the rain | Kew Traffic School

You can opt to capture a detail (top and below) or a whole scene (above) for this theme, really whatever takes your fancy.

dPS Weekly Photography Challenge Rain

Make sure you tag us on social if that’s where you choose to post your entry for the weekly challenge.

As ever, some help with sharing your photo into the comments section below (don’t click on this photo to upload your photo, scroll down to the Disqus section, log in, THEN click on the little camera icon in the comments)

Weekly Photography Challenge – How To Submit Your Photo

Simply upload your shot into the comments field (look for the little camera icon in the Disqus comments section) and they’ll get embedded for us all to see. Or, if you’d prefer, upload them to your favorite photo-sharing site and leave the link to them.

Dance in the rain.

The post dPS Weekly Photography Challenge Rain appeared first on Digital Photography School. It was authored by Sime.


Digital Photography School

 
Comments Off on dPS Weekly Photography Challenge Rain

Posted in Photography


Weekly Photography Challenge – Rain

02 Feb

The post Weekly Photography Challenge – Rain appeared first on Digital Photography School. It was authored by Caz Nowaczyk.

This week’s photography challenge topic is RAIN!

Nikolay Zakharov

Your photos can include anything that has rain. It can be storms, lightning, after the rain, cities soaked from rain, forests, people in the rain. Have fun, and I look forward to seeing what you come up with!

Some Inst-piration from some Instagrammers:

View this post on Instagram

A post shared by Ronan Setias (@setias11) on

View this post on Instagram

A post shared by mojtaba_sarmadi (@mojtaba_sarmadi) on

View this post on Instagram

A post shared by Cristiano Provini (@ph4mkr) on

View this post on Instagram

A post shared by Will Eades ? Australia (@willeadesphotography) on

View this post on Instagram

A post shared by Sarah ? (@bitsnbobs19) on

View this post on Instagram

A post shared by R?MIRO (@desdigital) on


Check out some of the articles below that give you tips on this week’s challenge.

Tips for Shooting RAIN

Tips for How to Make the Most of Rainy Days as a Photographer

A Portrait Lighting Project for a Rainy Day

7 Ideas for Rainy Day Photographic Activities at Home

7 Things I’ve Learned from Photographing Storms

Video Tips: How to Photograph Lightning

5 Incredible Storm Photographers and Their Best Images


Weekly Photography Challenge – RAIN

Simply upload your shot into the comment field (look for the little camera icon in the Disqus comments section) and they’ll get embedded for us all to see or if you’d prefer, upload them to your favorite photo-sharing site and leave the link to them. Show me your best images in this week’s challenge.

Share in the dPS Facebook Group

You can also share your images in the dPS Facebook group as the challenge is posted there each week as well.

If you tag your photos on Flickr, Instagram, Twitter or other sites – tag them as #DPSRain to help others find them. Linking back to this page might also help others know what you’re doing so that they can share in the fun.

The post Weekly Photography Challenge – Rain appeared first on Digital Photography School. It was authored by Caz Nowaczyk.


Digital Photography School

 
Comments Off on Weekly Photography Challenge – Rain

Posted in Photography


Think Tank updates its Hydrophobia rain covers, introduces new compact ‘Emergency’ line

19 Sep

Think Tank Photo has released the latest versions of its Hydrophobia rain covers and introduced a new pair of compact rain covers it calls the Emergency Rain Cover.

The Hydrophobia V3.0 Rain Covers come in five different configurations to fit various DSLR cameras and Sony full-frame mirrorless camera setups. In Think Tank Photo’s own words, the Hydrophobia V3.0 Rain Covers are ‘considered the most protective weather protection on the market.’

Hydrophobia V3.0 Rain Covers are made of a three-layer material and feature a DWR coating for extra protection against moisture. The stitches across the entire cover are seam-sealed and a rainproof front element cover is included so your lens doesn’t get splashed when sitting idle.

If you don’t feel like carrying an all-out solution for keeping your gear dry, Think Tank Photo has also released a new thinned-out version of its rain covers. They’re called Emergency Rain Covers and as the name suggests, they’re a more compact, lightweight solution for keeping your gear safe from the elements in emergency situations.

Emergency Rain Covers come in two sizes: small and medium — and they weigh just 99g/3.5oz and 114g/4oz, respectively. Compared to the approximately 300g/10.5oz of the full-size Hydrophobia Rain Covers, it’s quite the weight savings.

The small is meant to keep a gripped or standard camera body protects with smaller primes or zooms attached. Specifically, Think Tank Photo mentions 16–35mm F2.8, 14–24mm F2.8, 24–105mm F4 and 24–70mm F2.8 lenses, but it’s safe to say most super-wide to standard lenses (35-70mm) should work fine. The medium Emergency Rain Cover can also keep a gripped or standard camera body protected with a 24–70mm F2.8 or 70–200mm F2.8 lens attached. Again, there are plenty of other lenses that would work beyond the two Think Tank Photo mentioned.

All of the rain covers are currently available to purchase through Think Tank Photo’s online shop. The Hydrophobia Rain Covers start at $ 115 for the 24-70 size and go up to $ 150 for the massive 300-600 version. The small and medium emergency rain covers retail for $ 35 and $ 40, respectively.

Articles: Digital Photography Review (dpreview.com)

 
Comments Off on Think Tank updates its Hydrophobia rain covers, introduces new compact ‘Emergency’ line

Posted in Uncategorized


What to do When it Starts to Rain – Are you Prepared to Keep Shooting?

17 Dec

I live in a country where the climate is described as temperate. This is just another euphemism for not so great weather! Typically, the seasons sort of merge together and the annual rainfall can dampen anyone’s spirits, pun intended.

It was when living in Paris, France for a couple of years that I truly understood the real meaning of the four seasons. Spring in Paris is actually spring – chilly but with clear blue skies and sunshine. And in summer, my favorite season, it is gloriously hot.

Rain and water, in general, are not a good mix when it comes to camera equipment, especially when it comes to your camera bodies and lenses. But there are times when you can get caught literally out in the rain. So what do you do? Panicking is an option, albeit not a practical solution.

What to do When it Starts to Rain - Are you Prepared to Keep Shooting?

In this article, I aim to provide some useful tips to keep you and your gear protected from the elements. The following tips are for when you find yourself caught out in a light rain shower that doesn’t last long, but want to stay on location to continue shooting.

The first thing to do before stepping outside your door is to check the weather forecast. If you have to travel to your chosen destination, the weather may change when you arrive, so be prepared for that. Most smartphones have a weather app built-in. I recently downloaded the rain radar app. It’s free too (for Android here – for iOS as well, just search for the right one for your area).

5 Useful items to have in case it rains

  1. Rain pack and a towel
  2. Lens hood
  3. Camera rainsleeve or a Ziplock bag
  4. Silica gel packs
  5. Umbrella
What to do When it Starts to Rain - Are you Prepared to Keep Shooting?

Hiking boots plus my stuff bag which has my waterproofs and a towel.

Preparation is key here. Inevitably, when shooting outdoors, you are at the mercy of the weather. I have a designated rain pack that I can throw into the boot (trunk) of my car along with my hiking boots. I use this type of bag so as I can stuff my waterproofs and towel inside at short notice. Plus, the bag itself takes up so little space for storing away afterward.

What to do When it Starts to Rain - Are you Prepared to Keep Shooting?

My waterproofs & hiking boots ready to go in the boot of my car

What to do When it Starts to Rain - Are you Prepared to Keep Shooting?

My handy stuff bag, otherwise known as a dry bag for storing scuba fins!

The towel is for wiping surface water off your gear, especially your tripod legs, before collapsing the legs down. Or indeed yourself!

What to do When it Starts to Rain - Are you Prepared to Keep Shooting?

Handy anti-rain items for cameras

The humble lens hood can sometimes get overlooked for its usefulness. This small lightweight bit of plastic is key in not only preventing unwanted strong light hitting the lens at an angle, which produces lens flaring and ghosting. It can also help stop the rain from hitting the front of the lens element. Another bonus for the lens hood is protecting your expensive glass against a fall or knock.

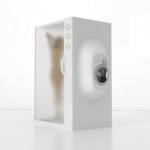
Another permanent fixture in my camera bag is the camera rainsleeve by OP/TECH USA. However, I haven’t yet had to use it but knowing that it’s there is reassuring. It is probably the cheapest camera gear item you will ever buy. I think it’s worth paying $ 6.95 USD. It is inexpensive and takes up so little room in your camera bag. Of course, you can always improvise and use a ziplock bag instead.

What to do When it Starts to Rain - Are you Prepared to Keep Shooting?

Camera Rainsleeve by OP/TECH USA – a great inexpensive solution to protect your camera in the rain.

Moisture absorbent silica gel packets, the little 5g packets that are used for storage or dispatch of electronic products. I tend to keep them when I get a parcel delivered, so I have a couple in my camera bag at all times. You can also buy these silica gel packs online quite cheaply too.

What to do When it Starts to Rain - Are you Prepared to Keep Shooting?

Silica Gel Sachets – a handy item in your camera bag for keeping moisture away from your camera. Just make sure to check them from time to time for wear and tear. Inside the sachets are very small hard translucent gel balls, which can get lodged in unusual places.

Tip: Do check these little sachets from time to time for wear and tear. Recently, I had one split open not in my camera bag but in my laptop case. I tried to insert a flash drive into the USB Port. The USB key wouldn’t insert completely. Thankfully, I didn’t try to force it. I couldn’t see anything obvious when I checked the USB Port. However, when I got a flashlight to have a better look. I could see this very small translucent ball stuck in the corner. Luckily, I was able to get it out without damaging the USB Port.

Cover yourself too

Last but not least on my list is the ubiquitous umbrella. If you are by yourself, you might be able to hold a small umbrella to protect your camera while shooting. A little awkward at best but it could work in a pinch. On the other hand, if you are with someone else. It’s ideal, as he/she can hold the umbrella over you and your camera.

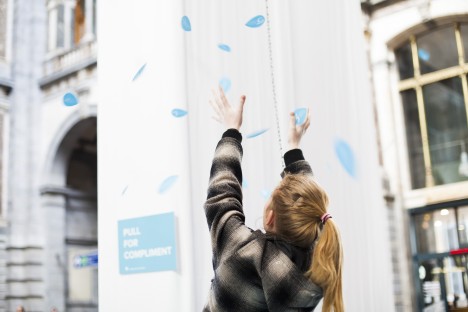
Umbrellas also act to protect your subjects from getting wet. On one occasion, I used my shoot-through-white umbrella to protect my model from getting wet. It also acted as a great backdrop for the shot.

What to do When it Starts to Rain - Are you Prepared to Keep Shooting?

Girl holding a white see thru umbrella that I used to keep my model dry and it provided a great backdrop too.

Tip: An umbrella can be used as a great prop for an image. For example, a red umbrella or a differently shaped umbrella can really add an interesting dimension to your image.

Summary

Shooting outdoors does indeed bring its own challenges but with a bit of planning and having a few essential items to hand, all may not be lost. We can’t control the weather, so at best all we can do is prepare for it.

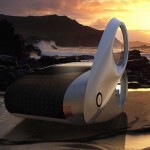
For example, for the shot of the Sony camera inside the waterproof case (see top photo). The camera is sitting on the bonnet (hood) of my car and I was nice and dry underneath the front porch of my house four feet away. If the rain persists or is simply too heavy to venture out, use this time to take actual shots of the rain against the window of your house or car.

Before

After

Before

After

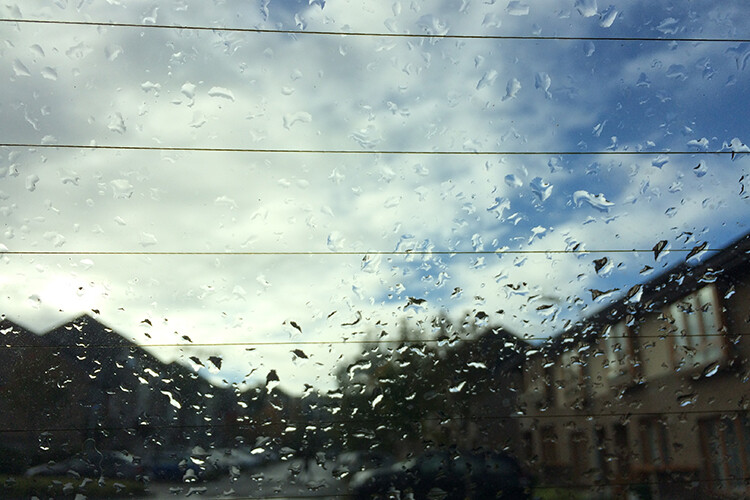
What makes these shots more interesting is the type of background and the light reflecting off the rain droplets. For example, in the following image. I was in my own car and shot the car in front of me with my iPhone. I switched the wipers off to let the rain build up on the windscreen. The lights from the oncoming traffic gave it this Blade Runner abstract type shot.

Before

After

Disclaimer: I wasn’t driving the car when I took these shots. The traffic was at a standstill.

I hope you found this article useful. I’d love to hear your tips and advice on how you battle the elements when out shooting in the rain or other inclement weather. Please leave your comments below.

The post What to do When it Starts to Rain – Are you Prepared to Keep Shooting? by Sarah Hipwell appeared first on Digital Photography School.


Digital Photography School

 
Comments Off on What to do When it Starts to Rain – Are you Prepared to Keep Shooting?

Posted in Photography


Inverted Roofs: Bowl-Shaped Rain Collectors Naturally Cool Desert Homes

13 Jan

[ By WebUrbanist in Architecture & Public & Institutional. ]

rainwater-roof-system

Iranian architects have developed a Concave Roof system to collect rainwater in arid climates with low precipitation, helping cool buildings in hot and dry regions of the world. The water can in turn be filtered for drinking or integrated into interior graywater systems.

roofs-at-night

These systems help reduce reliance on artificial air conditioning (or work were it is unavailable). They could ultimately help keep people in their home regions who might otherwise have to move due to climactic changes.

roofs-from-above

BMDesign Studios’s addresses rapid evaporation with the bowl-shaped roof additions, designed to channel even the smallest amounts of accumulated rain, coalescing them into drops big enough to harvest before they evaporate.

desert-roof-bowls

These inverted shells also provide shade while allowing air to pass between upper and lower roofs, acting as a cooling system in the process.

roof-in-arid-climate

wall-reservoir

Reservoirs tied into the system are situated between building walls to take advantage of the thermal capacity of the water to regular interior temperatures.

concave-roofs

sunken-courtyard

circulation

The courtyard and circulation spaces are also sunken to further cool the complex. Temperatures are higher and precipitation in parts of Iran is as much as 2/3 lower compared to global averages, so every drop counts.

Share on Facebook


[ By WebUrbanist in Architecture & Public & Institutional. ]

[ WebUrbanist | Archives | Galleries | Privacy | TOS ]


WebUrbanist

 
Comments Off on Inverted Roofs: Bowl-Shaped Rain Collectors Naturally Cool Desert Homes

Posted in Creativity


14 Essential Rain Photography Tips for Creating Dramatic Images

16 Apr

Wherever you travel, you are always free to take that perfect shot from the best angle. Not when it’s pouring down heavily, though. Winter is not always the best climate for comfortable outdoor photography. But guess what, if you are a clever photographer, you can take even better photos in the rain than on sunny days. Cold and stormy weather Continue Reading

The post 14 Essential Rain Photography Tips for Creating Dramatic Images appeared first on Photodoto.


Photodoto

 
Comments Off on 14 Essential Rain Photography Tips for Creating Dramatic Images

Posted in Photography


Rain or shine: Fujifilm XF 35mm F2 R WR real-world sample gallery

30 Nov

Fujifilm’s XF 35mm F2 strikes an appealing balance between size, cost and durability. It’s sealed against moisture and dust, making it a great candidate for use with the weather-resistant X-T1, and at $ 399 is a fairly affordable ‘normal’ prime for Fuji’s X-system. The Pacific Northwest is just the place to test weather-resistant gear, though thankfully we’ve had enough unseasonably dry and sunny days to put together a real-world sample gallery with the 35mm F2. Read more

Articles: Digital Photography Review (dpreview.com)

 
Comments Off on Rain or shine: Fujifilm XF 35mm F2 R WR real-world sample gallery

Posted in Uncategorized


Eco Capsule: Mobile Grid-Free Home Harnesses Sun, Wind & Rain

14 Aug

[ By WebUrbanist in Architecture & Houses & Residential. ]

ecocapsule off grid unit

With stylistic nods to classic rounded Airstream trailers, this next-generation mobile pod dwelling is powered by solar and wind energy and provides drinkable water by recycling and filtering the rain.

ecocapsule interior design finishings

Designed by Nice Architects, the Ecocapsule shelter is intended to accommodate two people, providing basic necessities and bonus amenities including a fold-out bed, living and dining space, cozy kitchenette, working shower and flush toilet.

ecocapsule on beach

ecocapsule floor plan diagram

A 750-watt wind turbine attaches to the exterior and the roof is clad in a series of built-in solar cells providing multiple means of generating energy for the home. Power can be stored in an onboard battery with close to a 10,000 watt-hour capacity.

ecocapsule rain sun wind

ecocapsule transportation options

The entire structure is road-worthy as well: just under 15 feet long, 8 feet wide and 8 feet tall and weighing a bit over 3,000 pounds. It can be fit into a standard-sized shipping container or towed behind a vehicle. Currently in a prototype phase, the company plans to put these units on the market within the next year.

ecocapsule alternative interior finishing

ecocapsule winter pod layout

Its makers envision a great variety of potential uses: “Ecocapsule is a portable house offering an unmatched dwelling experience. With its immense off-grid life span, worldwide portability and flexibility it is suitable for a wide range of applications: from an independent research station or a tourist lodge to an emergency housing or a humanitarian-action unit.”

Share on Facebook


[ By WebUrbanist in Architecture & Houses & Residential. ]

[ WebUrbanist | Archives | Galleries | Privacy | TOS ]


WebUrbanist

 
Comments Off on Eco Capsule: Mobile Grid-Free Home Harnesses Sun, Wind & Rain

Posted in Creativity


Compliment Shower: Kind Words Rain Down from Giant Spigot

10 Mar

[ By Steph in Art & Installation & Sound. ]

compliment shower 1

Would reading a message like “You could make a lemon laugh” make you feel good enough about yourself to spread kindness to others? That’s the idea behind the world’s biggest compliment shower, a massive spigot installed in Antwerp’s Central Station in honor of International Compliments Day 2015.

compliment shower 3

compliment shower 4

Dreamed up by creative agency FRIENDSHIP and commissioned by fashion retailer e5, the installation features what looks like the most absurdly oversized shower head in existence looming over commuters as they pass through the station. A sign simply says, ‘Pull for compliment.’

compliment shower 6

compliment shower 7

Anyone who does so (not minding the fine print, which reads ‘Smile, you’re on camera,’) instantly gets hundreds of complimentary phrases rained upon them and everyone watching. The little blue waterdrop-shaped papers bear messages like “You look like a million bucks today.”

Share on Facebook


[ By Steph in Art & Installation & Sound. ]

[ WebUrbanist | Archives | Galleries | Privacy | TOS ]


WebUrbanist

 
Comments Off on Compliment Shower: Kind Words Rain Down from Giant Spigot

Posted in Creativity


Using Rain Puddles to Create Unique Reflection Photos

17 Dec

6

Implementing water into a shoot ratchets up the drama in the images but also the difficulty in the execution. I equate the learning curve of lighting water to learning how to light metal objects and other reflective surfaces. It’s not a quick learn, so be patient with yourself.

Rain puddles are awesome. I bet you never thought to run out after it rained to hunt for decent puddles. But as you can see in the image below, that’s exactly what I was working with. Since the product I was shooting was a cologne bottle, which is rather small, the puddle didn’t need to be very wide or long. If I was shooting something larger, like a person, I would need a much larger puddle to pull off this technique of making reflection photos.

1

The setup: I was working with a rain puddle in a parking lot, on a patch of blacktop. I added a grid to my flash to keep light from spilling onto the foreground.

The first thing I was looking for was a puddle on a patch of blacktop, or dark asphalt. Typical asphalt or concrete is much lighter in color, and you need something darker to really make this work. The next thing to keep in mind is the height of the flash. Notice I placed it on the same level as the product – on the ground. If I were to light it from a higher angle instead, the light would illuminate too much of the ground around the product, resulting in a less than dramatic image. I also added a honeycomb grid to the flash to further contain the light spill.

Since the day I photographed this was particularly drab and dark, I had no problem dialing down the ambient with a moderate exposure. With a flash output of ¼ power I had all but eliminated the ambient light, leaving me with an exposure of 1/60 at f/7.1. On a brighter day, I’d likely need a neutral density filter to get rid of the extra ambient light.

Though the ambient has been lowered to an almost night-time quality, there are still some reflections of the sky and trees visible in the puddle. The lower shutter speed allowed these tones and shapes to remain. Though the puddle was not especially wide or deep, it sufficed in allowing me to achieve the glassy surface that I was going for, see below.

2

The final shot: This rain puddle, shot on a drab, gray, day has been transformed into a dramatic, glassy surface.

If the sky had been clear, rather than dark gray, the surface of the puddle would have been a nice, vibrant blue, as seen below. In this shot you can see that while the blue tone is nice, the illuminated foreground is pretty distracting, not to mention the dozens of small rocks. This was because the light was elevated, lighting the concrete in front of the shoes as well, which is why it’s important to lower your lights, so that they’re parallel to the ground.

3

When the sky is clear, the surface of the puddle changes to a lovely blue color. However, be sure not to light from above, because as seen in this image, the illuminated concrete makes for a distracting foreground.

4

The setup: A puddle, this time a large one, is the setting for this portrait. The shoot took place right after the sun dropped below the skyline.

In this next image I was using a rather wide puddle, which was large enough to allow me to isolate my subject, Max. Once again, to minimize light spill, I set my light at the same level as the subject, rather than above, as well as used a grid. The puddle reads really well, though the reflection shows a bit of the building in the background. After I finished color grading the image in Lightroom, I opened up the file in Photoshop to remove the building.

To do this, select the trouble area and simply hit the delete key. As long as you are using Adobe Photoshop CS6 or CC, you’ll see the option to use Content Aware Fill (see below). It will typically do a decent job at filling in the selection, but minor cleanup is often needed. I used the Spot Healing Brush tool to clean up any remaining trouble areas.

5

I quickly removed the building reflection by using the Content Aware Fill option in Photoshop CC.

6

The final shot: After removing the building reflection, the water surface looked seamless.

Have you got any other tips for creating reflection photos? Please share them and/or your images in the comments below.

googletag.cmd.push(function() {
tablet_slots.push( googletag.defineSlot( “/1005424/_dPSv4_tab-all-article-bottom_(300×250)”, [300, 250], “pb-ad-78623” ).addService( googletag.pubads() ) ); } );

googletag.cmd.push(function() {
mobile_slots.push( googletag.defineSlot( “/1005424/_dPSv4_mob-all-article-bottom_(300×250)”, [300, 250], “pb-ad-78158” ).addService( googletag.pubads() ) ); } );

The post Using Rain Puddles to Create Unique Reflection Photos by Nick Fancher appeared first on Digital Photography School.


Digital Photography School

 
Comments Off on Using Rain Puddles to Create Unique Reflection Photos

Posted in Photography