RSS
 

Posts Tagged ‘Quickly’

Disappearing Road: Cross Quickly, Before It’s Swallowed by the Sea Again

25 Feb

[ By SA Rogers in Destinations & Sights & Travel. ]

passage du gois

Twice a day, when the tides go down, this causeway appears to connect the French mainland to the island of Noirmoutier, but cross quickly or the road will disappear, stranding you in the middle of the Bay of Bourgneuf. The Passage du Gois was built upon a strip of silt that just barely elevates it above the surface during low tide for a little over an hour at a time. Crossers often wait too long to get started, bet that they’ll be able to make it across, and lose.

passage du gois 7

passage du gois 8

passage du gois 2

Once it starts flooding, it happens quickly. That’s why there are elevated rescue towers located along the stretch – you might just have to swim over to one, climb up and wait it out. When the tide is low, abandoned, ruined cars can be seen littering the sand.

Passage du Gois 3

passage du gois alain

passage du gois alain 2

Each year, runners gather for the Foulées du Gois, a race across the causeway. The road also tends to be covered with seashells, making it a popular destination for both souvenir-seeking tourists and locals who look for edible shellfish.

passage du gois wikimedia

Photos via Flickr Creative Commons: garder le cap, ludovic, pics by brian, oliver gobin, alain bachellier, marc bourbon, oliver hankeln, wikimedia commons

Share on Facebook


[ By SA Rogers in Destinations & Sights & Travel. ]

[ WebUrbanist | Archives | Galleries | Privacy | TOS ]


WebUrbanist

 
Comments Off on Disappearing Road: Cross Quickly, Before It’s Swallowed by the Sea Again

Posted in Creativity


How to Quickly Remove Dirt Spots Using Median in Photoshop

07 Sep

You’ve rolled out your white background for your shoot; whether it’s vinyl or paper. It’s a bit dirty from shoes, but you’re under pressure to get the shoot done, so you carry on regardless. When the shoot is over and the photos are back on the computer, that’s when you see how bad it really was. The scuff marks, the footprints, the stray hairs, these are going take ages to clone out. You’re sorry now that you didn’t clean it up, or cut off some paper. Sigh. Better just getting going on the processing.

But wait! There’s a better way.

It doesn’t have to all be cloned out. There’s an easy way, using one of Photoshop’s lesser known tools called Median. Median is a form of blurring, where groups of pixels get changed to the middle value of the pixels. Higher values are reduced, lower values are increased, averaging out the values.

Steps for cleaning up your white background

So your floor has specs of dust, hair, and just general footprint dirt on it.

cleaning-a-white-background-1.jpg

Step one – duplicate layer

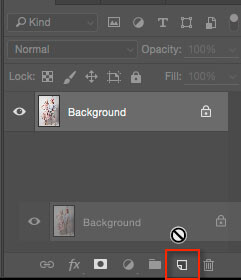
Duplicate your background layer by dragging it on to the New Layer icon at the bottom of the Layers panel.
Cleaning a white background 2

Alternatively, use the shortcut Command/Control + J. If you’ve got a set of layers, then use the shortcut Shift + Cmd/Cntrl + Option + E to stamp them into a new layer.

Step two – Median

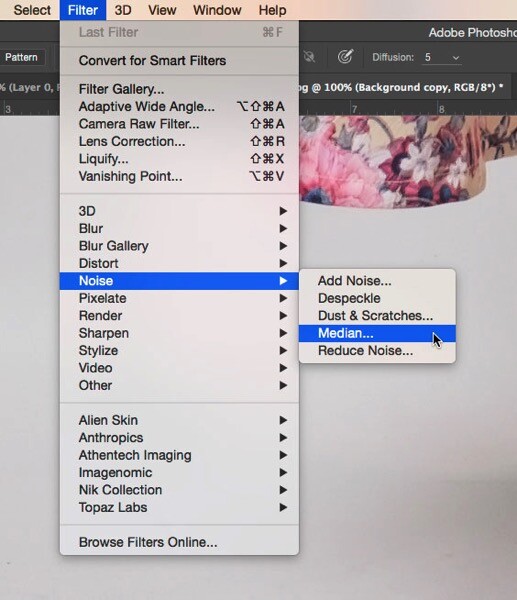
Go to Filter>Noise>Median.
cleaning-a-white-background-3.jpg

Move the Radius slider until the dirt disappears. I’ve used 10 here.

Cleaning a white background 4

Step three – apply a layer mask

If you’re not familiar with Layer Masks, you can use the Erase brush to bring remove the areas you don’t want blurred, but I recommend using Layer Masks.Cleaning a white background 6
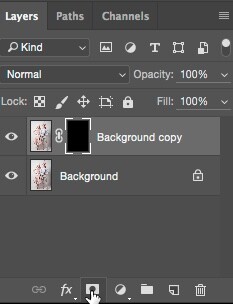
A white Layer Mask reveals everything on the layer, while a black mask conceals the contents of the layer. You want a black mask for this layer, so hold down the Option key on Mac (Alt for PC), and click the New Layer Mask icon at the bottom of the Layers Panel. A black mask appears on the layer and the Median filter is concealed.

Next, select the Brush Tool (or use the shortcut B), then hit D for Default colours. Then use the shortcut key X to swap foreground and background until the foreground (i.e. the top swatch in the tools panel) is white. With a soft brush, paint over the dirt to reveal the Median filter’s affect. Don’t go too close to the edges of your subject. If you make a mistake, press X to swap the brush to black, and paint it back to hide that area again. This is the beauty of Layer Masks, you can reveal or conceal over and over again without having to undo (this is called non-destructive editing).

cleaning-a-white-background-5.jpg

This trick isn’t limited to backgrounds. You can be use it on any areas of continuous tone, for a quick result. I’ve had to use it on skies, where I’d accidentally used a dirty sensor cleaning brush and left marks on the sensor. Here’s how you could fix such an issue using Median.

Fixing a dirty sky with Median

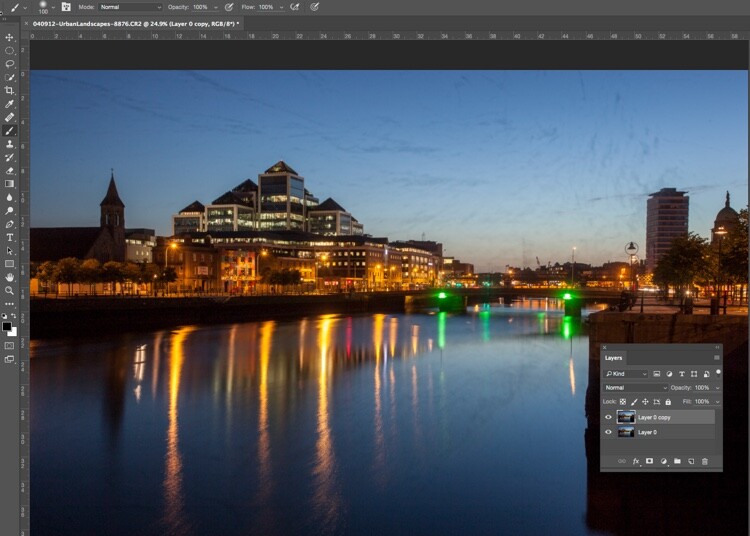
As with the background cleaning technique, start by duplicating the background layer. You can see the issue quite clearly in the sky (below), and in the smooth parts of the river.
cleaning-a-sky-1

Next, apply Filter>Noise>Median. The issue will need a far higher Radius than the background required.
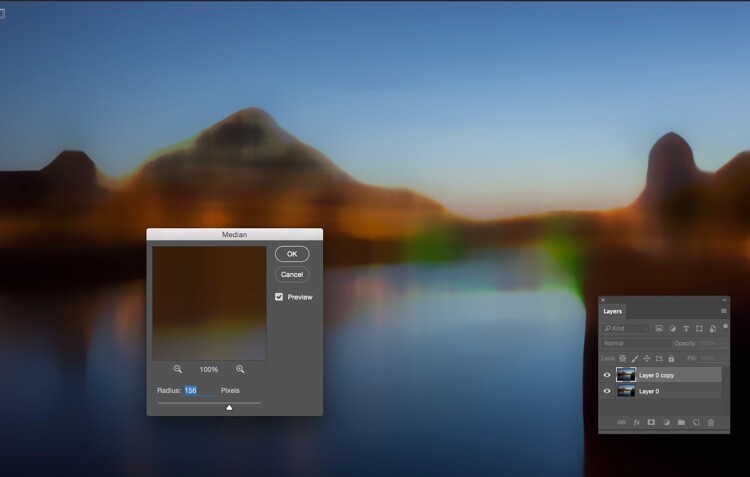
cleaning-a-sky-2

Select only the sky area

Next, hide the Median layer by clicking on the eye on the layer, then select the layer underneath. From the tools panel, choose the Quick Selection tool or press W. From there, drag the cursor along the sky, close to the buildings. Because of the hard edges against the sky, the selection is made easily.
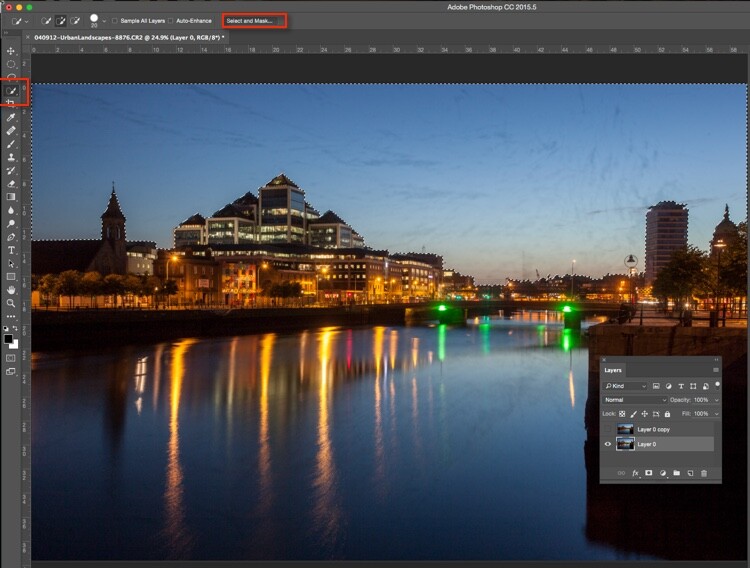
cleaning-a-sky-3

Next click “Select and Mask” (outlined in red above). You’ll see the sky clearly, and the rest of the image faded. Brush the cursor over the tips of the buildings, street lamps and other things that need to be protected from the blurring effects of the Median filter. Press return (enter) to create a selection with marching ants visible.

Turn the visibility back on for the Median layer. Press the Layer Mask icon in the Layers panel to create a mask.
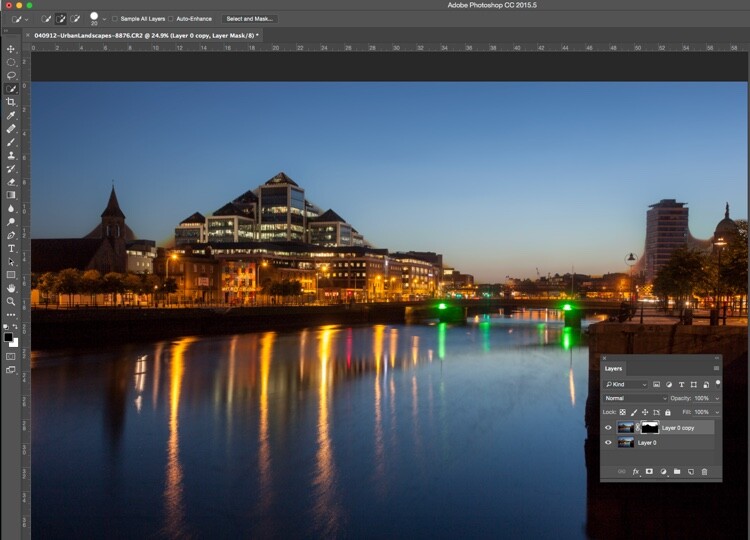
cleaning-a-sky-4

You will see areas where the Median filter has blurred edges, so you’ll need to brush the mask with a black brush to hide these. You don’t need to be precise, using a large soft brush along the edge of the buildings will make it a quick job.
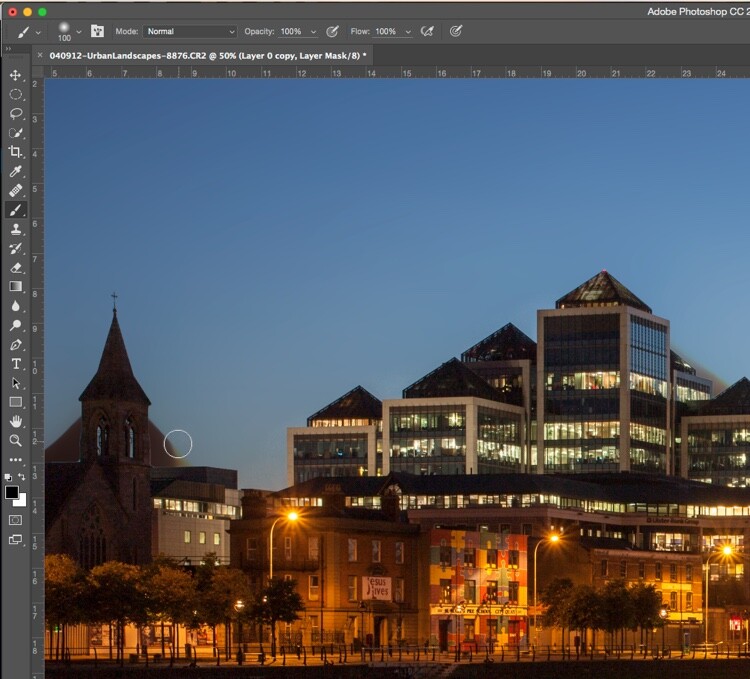
cleaning-a-sky-5

Remove the Median where it has blurred the edges of the city buildings.

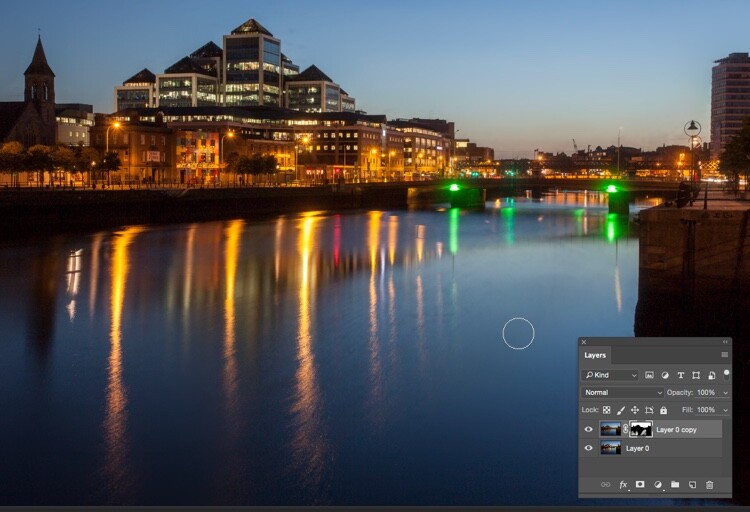
The final part is to go along the water with a white brush, set to 50% Opacity, to hide the dirt in the water.
cleaning-a-sky-6

The final image looks far better than the original.

cleaning-a-sky-7

Much quicker than manually cloning the dirt out, right?

Have you tried this method, how did it go? Do you have another fast way of removing dirt? Please share your thoughts in the comments section below.

googletag.cmd.push(function() {
tablet_slots.push( googletag.defineSlot( “/1005424/_dPSv4_tab-all-article-bottom_(300×250)”, [300, 250], “pb-ad-78623” ).addService( googletag.pubads() ) ); } );

googletag.cmd.push(function() {
mobile_slots.push( googletag.defineSlot( “/1005424/_dPSv4_mob-all-article-bottom_(300×250)”, [300, 250], “pb-ad-78158” ).addService( googletag.pubads() ) ); } );

The post How to Quickly Remove Dirt Spots Using Median in Photoshop by Sean McCormack appeared first on Digital Photography School.


Digital Photography School

 
Comments Off on How to Quickly Remove Dirt Spots Using Median in Photoshop

Posted in Photography


24 Hour Deal: Become a Lightroom Expert Quickly and Easily

15 Dec

Today we have an amazing deal for you as deal 2 in our 12 Deals of Christmas.

It’s 85% off Cole Joseph’s Lightroom Training Workshop.

NewImage

Cole Joseph has processed over half a million photos in his career and so certainly knows a thing or two about Lightroom.

In this workshop he’ll share his best tips and tricks with you to help you prices the highest quality final edits to your images in no time at all.

Walking you through Lightroom step by step, Cole will demonstrate exactly how to use Lightroom to its full potential. You’ll not only learn how to edit more quickly, but see how to get the same results he does.

Buy today at a crazy 85% off, and by this time tomorrow, you’ll be a Lightroom master!

PS: Cole is offering this training with a no risk 30 day money back guarantee. If you buy it and don’t find it meets your expectations – simply ask for your money back. What could be better than that!

googletag.cmd.push(function() {
tablet_slots.push( googletag.defineSlot( “/1005424/_dPSv4_tab-all-article-bottom_(300×250)”, [300, 250], “pb-ad-78623” ).addService( googletag.pubads() ) ); } );

googletag.cmd.push(function() {
mobile_slots.push( googletag.defineSlot( “/1005424/_dPSv4_mob-all-article-bottom_(300×250)”, [300, 250], “pb-ad-78158” ).addService( googletag.pubads() ) ); } );

The post 24 Hour Deal: Become a Lightroom Expert Quickly and Easily by Darren Rowse appeared first on Digital Photography School.


Digital Photography School

 
Comments Off on 24 Hour Deal: Become a Lightroom Expert Quickly and Easily

Posted in Photography


How To Quickly Focus Stack an Image in Photoshop

04 Aug
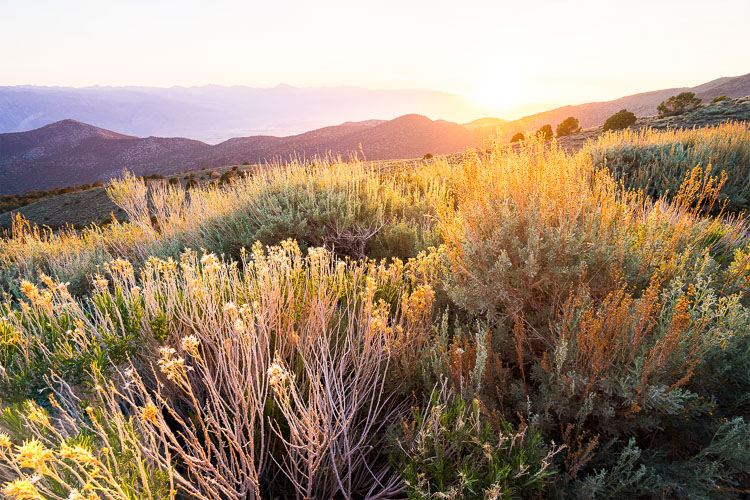
Four-image focus stack of sunset in Bishop, California. The foliage in the foreground was just inches away from the camera.

Four-image focus stack of sunset in Bishop, California. The foliage in the foreground was just inches away from the camera.

When you take into account all the different ways to get a tack sharp image, it can be quite overwhelming. I’ve been photographing landscapes as a full time photographer for six years now, and have tested just about every method out there. Focus stacking is just one more option, but it is one of my favorites, if the conditions are right.

Focus stacking is a life saver when you have a foreground subject that is very close to the frame, and a background subject that is equally important to the image. This happens quite a bit in landscape photography when using super wide angle lenses! Some will argue that hyperfocal calculations work in these situations too, and while they certainly can, I personally don’t like hassling with the charts and measurements unless I really have to.

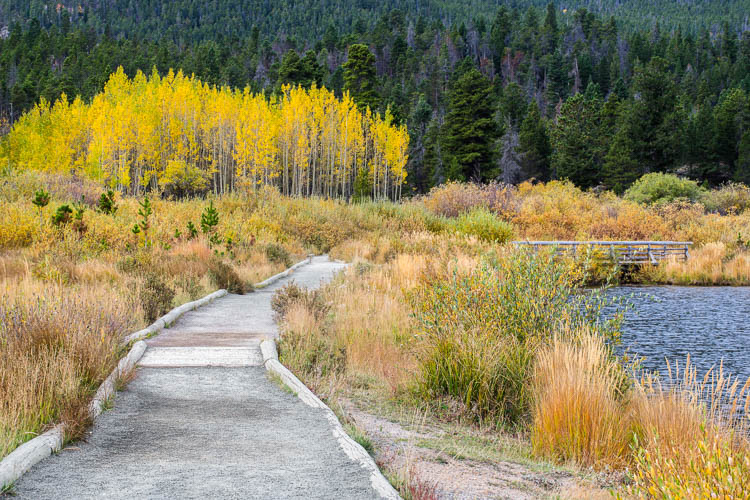
Two image focus stack of Lily Lake near Estes Park, Colorado.

Two image focus stack of Lily Lake near Estes Park, Colorado.

One of the most important things you can do out in the field is to inspect your shots instead of just assuming you nailed it. You’ll find articles all over the place making fun of photographers for chimping, but the ability to zoom in on all the tiny details of your shot is a major advantage over the film days.

When I’m taking pictures of a magnificent sunset, I’m working fast and keeping my head on a swivel. When I take a shot, I’ll quickly review it and zoom in all the way on my main subject. Then, I’ll zoom in on the other parts if they need to be sharp as well (sometimes they don’t). If you have a really close foreground subject and it’s tack sharp, but the mountains in the background are just a bit soft; this is a good time to consider focus stacking.

Two image focus stack at Great Sand Dunes National Park in Colorado. One for the sand that was less than a foot from the lens, and one for the background.

Two image focus stack at Great Sand Dunes National Park in Colorado. One for the sand that was less than a foot from the lens, and one for the background.

The best part about focus stacking is that it’s super easy! Just put your camera on a tripod and set your lens to manual focus. I use live view on the back of my camera to zoom in as close to my subject as possible and turn the focus ring on my lens until I see the subject become tack sharp. Once you’ve gotten that shot, scroll around the image and see what is soft in the background. If the mid-ground is soft, turn your focus ring until it’s sharp and take the same picture with the same settings. Then, dial the focus ring for the background and take another shot. That’s it until post processing!

Stacking the Images Together in Photoshop

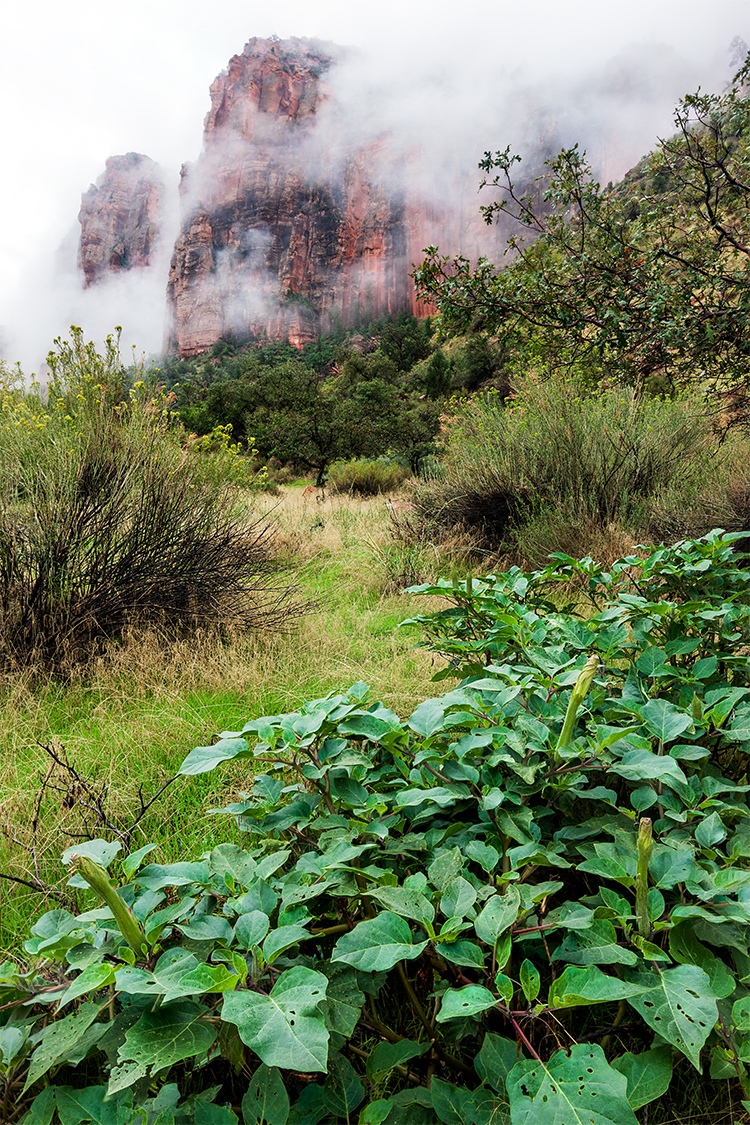
Final image from the video. Three image focus stack from Zion National Park.

Final image from the video. Three image focus stack from Zion National Park.

When Focus Stacking Doesn’t Work

In all the images above that had foliage in them, there was virtually no wind at the time I took the shots. The foliage was perfectly still. If the wind is blowing and the leaves are swaying back and forth, focus stacking is going to be a nightmare, and isn’t even worth bothering with in most cases.

It’s also important to note that having the entire image in sharp focus isn’t always the best artistic approach to a scene. Sometimes having your subject sharp and the background soft will do a much better job of drawing the viewer’s eye where you want. It really just depends on the situation.

Conclusion

Focus stacking is just one trick to have in your bag, and this is just one method of doing it. There are also third party programs like Helicon Focus to consider. I personally haven’t used the program but have heard great things about it.

Have anything to add to the article? Let me know in the comments below!

googletag.cmd.push(function() {
tablet_slots.push( googletag.defineSlot( “/1005424/_dPSv4_tab-all-article-bottom_(300×250)”, [300, 250], “pb-ad-78623” ).addService( googletag.pubads() ) ); } );

googletag.cmd.push(function() {
mobile_slots.push( googletag.defineSlot( “/1005424/_dPSv4_mob-all-article-bottom_(300×250)”, [300, 250], “pb-ad-78158” ).addService( googletag.pubads() ) ); } );

The post How To Quickly Focus Stack an Image in Photoshop by James Brandon appeared first on Digital Photography School.


Digital Photography School

 
Comments Off on How To Quickly Focus Stack an Image in Photoshop

Posted in Photography


Photographer hits #1 on Reddit with Mt Fuji picture, and quickly regrets it

27 Jul

British photographer Kris Boorman summited Mount Fuji in 2012 and took a photograph from the top, showing the shadow cast by the giant mountain at sunrise. The image has since been used as a background for the Bing search engine and last year won a competition held by Gettty Images. A couple of days ago he posted the photo at low resolution on Reddit, and within a few hours it had garnered more than 6000 upvotes. Although this might sound like good news, Boorman quickly came to regret posting the picture. Click through to learn why. 

Articles: Digital Photography Review (dpreview.com)

 
Comments Off on Photographer hits #1 on Reddit with Mt Fuji picture, and quickly regrets it

Posted in Uncategorized


Quickly toggle Ai Servo Focus on the Canon 5D Mark III

17 Mar

Here’s a quick tip for Canon 5D MkIII users.

Canon EOS 5D MkIII with EF 50mm f/1.2L

Canon EOS 5D MkIII with EF 50mm f/1.2L

If you don’t use this camera, this tip probably isn’t very helpful for you. Instead you might be interested to read about how I shot the above photo. Also, I recommend skimming through your camera manual to see what customizations are available. Customizing your camera’s button configuration can help taylor the camera to your shooting style.

With the 5D Mark III, Canon added the ability for users to change the function of several of the buttons on the camera body. In addition to this new functionality, Canon also moved the Depth of Field (DoF) preview button. It’s now on the left side of the lens, in approximately the 8 o’clock position, as you look at the camera’s front.

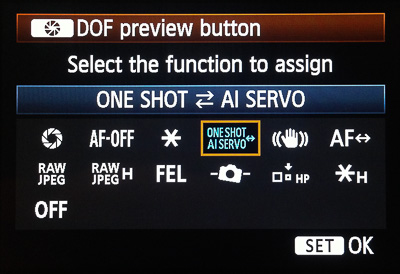
The new location of the DoF preview button and the ability to assign different functions to the standard buttons brings an interesting new shooting option. As I rarely use the DoF Preview Button, I’ve changed it’s function to toggle Ai Servo Focus when held down. To re-assign the DoF Preview Button to toggle Ai Servo focus mode on the 5D MkIII follow these steps:

1. Navigate to menu C.Fn2:Disp/Operation

Step 1

Step 1

2. Select the DoF Preview Button from the list of buttons

Step 2

Step 2

3. Change the button’s function to ONE SHOT AI SERVO

Step 3

Step 3

This customization allows me to stay in Single Shot AF mode, and toggle Ai Servo focus with my right ring finger if my subject starts moving. This is an incredibly flexible way to handle moving subjects and I like being able to toggle between two AF modes without moving the camera from my eye.

Give this a try and let me know how you like it. It took me a couple weeks to train myself to use my ring finger to toggle Ai Servo, but now that I’m used to it, I love shooting this way. As always, you can find me on Facebook.

Post originally from: Digital Photography Tips.

Check out our more Photography Tips at Photography Tips for Beginners, Portrait Photography Tips and Wedding Photography Tips.

Quickly toggle Ai Servo Focus on the Canon 5D Mark III


Digital Photography School

 
Comments Off on Quickly toggle Ai Servo Focus on the Canon 5D Mark III

Posted in Photography


Photography Tips, Essential Skills, Quickly Transform Your Photos, by Karl Taylor

23 Mar

www.photography-tips-online.com Photography tips revealed by professional photographer Karl Taylor. This knowledge will probably change the way you plan your photography composition from now on! Get More FREE Training at my website: www.photography-tips-online.com
Video Rating: 4 / 5