RSS
 

Posts Tagged ‘Putting’

Do’s and Don’ts of Putting Together a Photography Portfolio

30 Jul

The post Do’s and Don’ts of Putting Together a Photography Portfolio appeared first on Digital Photography School. It was authored by Ana Mireles.

Are you having trouble landing a job? Do you keep showing your work but are not getting any clients? Maybe it’s time to review your photography portfolio. Whether you’re doing a digital or printed portfolio, here are some do’s and don’ts to improve the way you present your photography.

Travel photography example portfolio

Putting together a portfolio

It doesn’t matter what kind of photographer you are, a good portfolio is the most important tool you have to secure a job. The first thing to understand is that putting together a bunch of nice pictures isn’t enough. Your photography portfolio should be a sample of your work that showcases your technical abilities as well as your personal style.

Flower and nature portfolio

DON’T put watermarks

Let’s face it, if someone wants to steal your photograph, they will find a way to do so. A watermark can be cropped or deleted. Instead, it will make it more difficult for the viewer to appreciate your image. Also, watermarks give an amateurish look to your portfolio as a whole. See at the difference:

putting-together-a-portfolio

Watermarks can ruin a photo and don’t really protect your rights

To legally protect your images, you can have them copyrighted. To get familiar with this concept, read ImageRights – Finding and Pursuing Copyright Infringement. Another safety measure is to never publish or hand out high-resolution images. For this, I recommend my previous article on How to Understand Pixels, Resolution, and Resize your Images in Photoshop Correctly.

DON’T stick to one portfolio

Another big mistake is to collect all of your best photos and display them in one portfolio. You may think this shows quality, as they are a “best-of,” but it can make you look like a master of none. It is also a waste of time for your client. They want to see relevant examples that show how you would do their job, not how good you may be at other things.

You can specialize in different kind of photography

Take these two photos, for example – they don’t even look good together. And let’s face it, someone who needs a food photographer, doesn’t really care about how I can photograph a street fair and vice-versa. If you’re not convinced about limiting your practice, have a look at these 5 Things to Consider Before Deciding to Specialize or Not in Your Photography.

DO feature what you’re selling

I was talking before about the importance of having different portfolios. This means that each one should display a different specialty that you offer. It’s always important to be coherent and properly organize your work. For example, a portrait portfolio shouldn’t just include any kind of photography that features people. Let me illustrate this:

Different kinds of photography. Photography specialization

Take the two photos above, the one on the left comes from a photo-shoot I did for the press kit of a theater play. The one on the right is a behind-the-scenes job I was doing for a short movie. If I’m preparing a portfolio for a movie or theater producer I can include both. If I’m preparing a portrait portfolio then I shouldn’t include the one on the right.

DO ask for help

It’s always helpful to ask for opinions once you’ve shortlisted the images you want to use. If you can reach out to a colleague or an expert it would be great, but if you don’t, at least ask a friend. Often we have an emotional attachment to a photo we took that is actually not great. An external point of view can help you sort out your best images.

putting-together-a-photography-portfolio

Try putting two similar images from the same subject and asking them which one they prefer. A friend can also help you decide if you are putting too many or too few images in your portfolio. Keep in mind that you should never include something that is not good enough just to reach a certain number. Also, don’t overdo it – editors are busy people and have many portfolios to review.

Conclusion

To sum up, there is no specific formula for putting together a photography portfolio that is great, but I hope you found these tips useful and time-saving. DO remember that the most important thing is for you to have a strong body of work.

If you still need to work on that, here are some great readings to help you out:

  • How To Build A Portfolio Without Clients.
  • 6 Easy Photography Techniques to Diversify Your Portfolio.
  • How to Use a Photography Project to Build Your Portfolio.


putting-together-a-photography-portfolio

The post Do’s and Don’ts of Putting Together a Photography Portfolio appeared first on Digital Photography School. It was authored by Ana Mireles.


Digital Photography School

 
Comments Off on Do’s and Don’ts of Putting Together a Photography Portfolio

Posted in Photography


4 Reasons Why Putting Your Camera Down Can Help You Take Better Photos

15 May

We’ve all been there; in a new country, a new city or just a new part of your local town. Camera in hand, you shoot and shoot and shoot as your memory card never seems to fill up. It’s thrilling and you don’t want to waste a moment because there is so much to capture. But what if putting your camera down, even just for 20 minutes, can help you take better photos?

I don’t mean leave it unattended. But I do mean put it away or leave it behind as you go for a walk in your new environment.

group of photographers shooting - What Happens When You Put Your Camera Down

I know some of you are getting the shakes at the mere thought of being without your camera in a new area, but indulge me for a moment. In this article, I will bring to light a few thoughts on why putting away your camera might actually help your photography.

1 – Greater Awareness

How can you truly capture the essence of a location without first experiencing it? There are always bright and colorful things to shoot. But if you go around grabbing each little scene like a bird grabbing nectar from a cherry blossom, you risk miss seeing the whole tree.

Jordan ruins at night in candlelight - 4 Reasons Why Putting Your Camera Down Can Help You Take Better Photos

I had time to visualize the shot above while watching an evening program at the Treasury in Petra, Jordan. While the program played, I was seated and limited in my movements, so I looked around at the space and tried to imagine photos from each location. At the end of the program, I was only allowed 10 minutes to get my shot (which took one minute to set up and 30 seconds to take), so my time spent gaining a greater awareness for my surroundings helped me greatly to take better photos in the time allotted.

Being aware of your surroundings is also important for safety. We all know the feeling of looking through our viewfinder, or camera screen, and losing all sense of what’s going on around us. It’s the feeling of “flow” when everything else melts away and there is just the joy of photography. That lack of awareness can work against you when in unfamiliar locations.

Beyond safety, having an awareness of your surroundings will also alert you if the clouds are about to cover the sun or if your scene is becoming more or less active. Watching others around you for clues on what to shoot is the next step.

2 – Observe Others

I love people watching in new environments. Even at home, if I go shopping with my wife I will typically end up on a bench just taking in the plethora of different shoppers passing by. Even we introverts can enjoy watching how people interact.

Look for clues about relationships and friendships while observing others. Do most people seem aloof or is there a lot of interaction? Watch how transactions are negotiated in markets. Is there a lot of haggling over price before money changes hands? These clues will help you anticipate when you can get those key shots when you return with your camera.

hat selling in Peru - take better photos

Because I took some time to people watch when the previous train came through town in the Urubamba Valley of Peru, I knew this colorful hat-seller would work the crowd when the next train arrived. So I waited and watched and was able to capture this image.

Is there a flow to the traffic of people around you? If so, look for a good location to set up and get some candid street photos. While crowds always draw attention, look for those standing back from the bustle if you want to capture a variety of everyday life.

Now is also a good time to realize who around you might not want their picture taken. Or who is charging photographers to pose for photos?

4 Reasons Why Putting Your Camera Down Can Help You Take Better Photos - officers in Jordan

In this shot of officers in Jordan, I hung around for a few moments with my camera down, said “Hi” and let the men get back to their conversations before taking the shot. I had noticed that they all looked intently at anyone new coming through the door and that wasn’t the shot I wanted. This more relaxed version was my goal.

3 – Observe Patterns

With patterns, I don’t mean just the cool shapes made by architecture or found in nature. I also mean the patterns humans create as they go about their day. Observing patterns will help you return with your camera (or simply get it out of your bag) and better anticipate the moment for shutter release and ultimately you will take better photos.

4 Reasons Why Putting Your Camera Down Can Help You Take Better Photos

For instance, watching a worker at the leather tannery in Fez, Morocco or a gentleman unloading chickens in Kathmandu, Nepal, with my camera down for a minute or two, helped me to visualize the action I wanted to capture and better time my shots.

4 – Interact Differently

Imagine someone came up to you on the street and instantly lifted a camera to snap a photo of your face. How would you feel?

Empathy for strangers and how they will react to my camera pointed in their direction is why I will typically recommend you ask permission first before taking a shot. Or better yet, with your camera down or put away, interact with your subject first. See what they are doing and ask questions if you can. Something about them made you want to take their photo, so take it one step further and interact before snapping away.

Peruvian kids - 4 Reasons Why Putting Your Camera Down Can Help You Take Better Photos

I played with these kids in Peru for a bit before having them ham it up for the lens. I don’t speak Quechuan and only poor Spanish, but I can recognize kids playing “shop” with weeds and flowers when I see it. I could tell who was in charge and I played along for a few minutes, trying in vain to get a good deal on my ugly weeds, before snapping this photo.

People will interact differently with you if you approach them first with your camera down or put away. Sometimes there is a fleeting moment that most feel needs to be caught candidly. But far more often a richer image can be created when you make human-to-human contact first. Rather than human-to-camera-to-human contact.

Conclusion

If you’ve never left your camera behind for even 10 minutes, I suggest giving it a try. It’s unnerving, I know! But it can lead to seeing your new environment in a way not possible with a camera constantly popping up to your eye.

Now you tell me; do you think you can take a walk and experience a new location without your camera? Do you think it might change the way you see the world before photographing it? Will it lead to helping you take better photos?

The post 4 Reasons Why Putting Your Camera Down Can Help You Take Better Photos appeared first on Digital Photography School.


Digital Photography School

 
Comments Off on 4 Reasons Why Putting Your Camera Down Can Help You Take Better Photos

Posted in Photography


Putting the Fine Art into Travel Photography

18 Dec

“Fine Art” when it comes to travel photography is not an often used term and few photographers define themselves as “fine art travel photographers”. Genre definitions in photography can be highly subjective, and the fine art line can be very fine indeed. For me as a travel shooter, the fine art approach is just a natural extension of who I am and how I see and share the world through my images.

Vietnam is one of my favorite places to photograph, not only because of its remarkable aesthetic qualities but because of my great fondness for its people. And so when asked talk about my photography through the fine art lens, using Vietnam as the focal point was an easy choice to make.
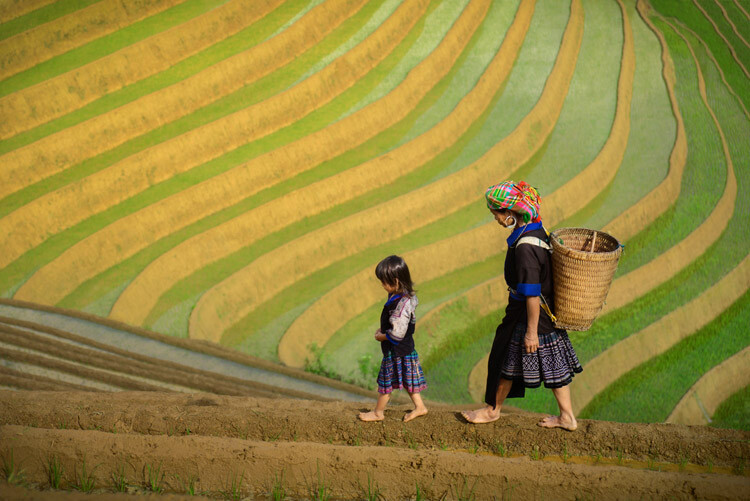
Putting the Fine Art into Travel Photography - Vietnam rice terraces

Flower H’mong mother and daughter walking a rice terrace berm in Mu Cang Chai, northern Vietnam. Exposure settings: f/4, 1/2000th, ISO 400, 70mm lens.

fishermen resting on Boats - Putting the Fine Art into Travel Photography

Fishermen resting. Shot from a bridge near Lang Co Bay. Exposure settings: f/8, 1/320th, ISO 800, 56mm lens.

The Fine Art of Travel Photography – People and Landscapes

Fine art photography, at least the way I see it, is about focusing on a specific style or look that reoccurs in every image with a goal to create aesthetically pleasing and engaging work.

Fine art travel photography implies that each travel-themed photo is of a very high artistic standard with consistent consideration to an effective composition, use of tonal range (lights and darks), and a balanced or focused color scheme throughout the photo.

Personally, I use natural light, and again, approach a photo to be a work of art. The goal is to create a visually striking image that looks similar to what a painter might have created, while still also looking completely like a photograph.

Fishermen in Halong Bay - Putting the Fine Art into Travel Photography

Fishing amidst the thousands of karst limestone formations of fabled Ha Long Bay. Exposure settings: f/9, 1/200th, ISO 800, 35mm lens.

Fishermen Ballet - Putting the Fine Art into Travel Photography

Four fishermen raise their nets on the Perfume River in Hue, central coastal Vietnam. Exposure settings: f/11, 1/160th, ISO 800, 30mm lens.

Showcase the people and culture

I aim to do this while still faithfully representing a country’s culture, with the goal to accurately, if ideally, portray the personality and lives of the people within the photos. I have always been most interested in the artistic side of travel photography, and less so in the traditional or documentary approach.

That said, I can see myself taking on more singularly focused projects in the future, where I can apply my artistic sense to the challenges of documentary storytelling within the travel space.

Vietnamese Monk - Putting the Fine Art into Travel Photography

A Khmer-Vietnamese monk daydreams at his monastery window in the Meklong Delta region. Exposure settings: f/4, 1/125th, ISO 640, 40mm lens.

Set your intention of making art

Although it may seem obvious, I think it’s critically important when adopting the fine art style to have the intention of making art throughout the process – from preparation to post-production. I take this mindset into the field and shoot a variety of subjects in various ways.

Portraiture is my first love, but I also enjoy landscape, wildlife, and cultural documentary photography. The purpose is to showcase scenes of life and culture for others to observe and enjoy. And of course I enjoy it as well, or I wouldn’t be doing it!

Playing in the River - Putting the Fine Art into Travel Photography

Ladies from the Cham ethnic group in Phan Rang having their own water festival. Exposure settings: f/36, 1/15th, ISO 400, 90mm lens.
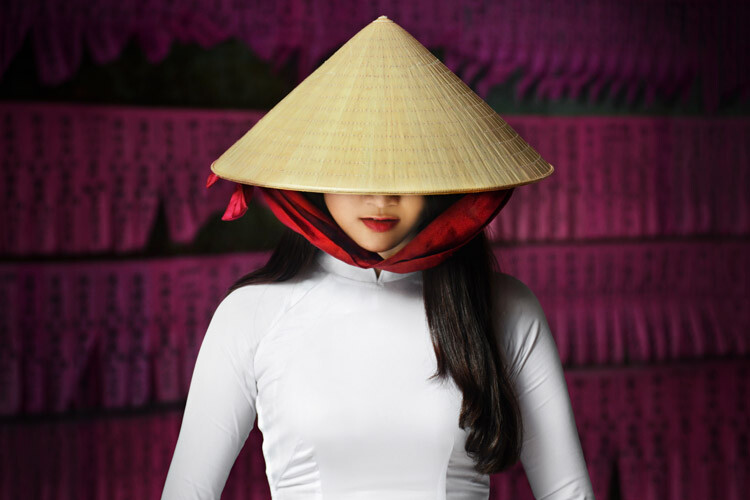
Lady in Conical Hat - Putting the Fine Art into Travel Photography

Vietnamese lady wearing the traditional white “Ao Dai” and Non La (conical hat), Saigon. Exposure settings: f/4, 1/125th, ISO 640, 70mm lens.

Have a vision and shoot with a purpose

In each work, I try to have a vision and understand what the photo will be about and how it will look in my mind before I take it. There is nothing in the frame that shouldn’t be there – everything included serves a purpose.

I also like to look for patterns in the scenes and feature these in the composition. Careful composition allows for clean backgrounds, no unnecessary distractions from the subject, and a clear focal point that is immediately identifiable against a complementary background that helps to tell the story or set the mood for the piece.

Below is some insight into how I approached photographing some of my favorite Vietnam images taken over the last few years.

Forever in Love

Forever in Love - Putting the Fine Art into Travel Photography

“Forever in Love” – A loving couple in Hoi An share a moment of joy and happiness together in their garden as the sun sets. At the time of photography, they had been married for 66 years. Exposure settings: f/7.1, 1/200th, ISO 500, 50mm lens.

I met a fellow travel photographer who now resides in Vietnam, Réhahn Croquevielle, and he generously invited to show me around his hometown of Hoi An. I was lucky to meet a lovely old couple who live in his village. When I met them they were smiling widely and happy be photographed by us.

To take this photo, I first observed the direction of light. Then I made sure to position them in front of the setting sunlight so their faces would be bright and the details on their skin well exposed.

I also had to consider the background and overall scene, and I found an area near one of their vegetable patches which was clean (consistent colors and even patterns without clutter) while also providing context and a backstory for the couple. So I asked them to sit there. They found this all very funny and were laughing constantly as we kept the mood light and fun, which I think is important to help make subjects enjoy a portrait session.

Interesting subject matter is the most important element to a successful photograph, in my opinion, followed by good composition and lighting. But a background that complements and doesn’t distract from the focal point is also crucial for a powerful photograph, and perhaps too often overlooked.

Playing in a Sea of Fishing Nets

Playing in a Sea of Fishing Nets - Playing in a Sea of Fishing Nets

A happy boy playing in a blue sea of fishing nets in the Mekong Delta region of southern Vietnam. Exposure settings: f/8, 1/250th, ISO 500, 24mm lens.

I was in search of a workshop where fishing nets are made by hand in the Mekong Delta region of Vietnam. When I arrived, I noticed a boy and his friends were curious about my presence and wanted to meet me and help out if they could. They led me to the net weaving shop, which was a large open-ended structure with a corrugated tin roof.

Inside were seated ladies spread about busily creating these nets. I was immediately struck by the blue color and knew it would be very photogenic, but it was important to get the right light to make them come to life. I noticed all the ladies were in shaded, darker areas where the light wasn’t strong enough. There was an area that was close to an opening in the rooftop, under a natural skylight. I saw that the light was good there, but without a human subject the photo wouldn’t be so interesting.

Since I had created a rapport with the boy and his friends and they were still hanging around, I encouraged them to play in the fishing nets. Demonstrating myself, I ran and jumped into the nets, making everyone laugh, and the kids started to do the same themselves. I captured this photo knowing that the frame had to be filled with the blue fishing nets to bring attention to the boy. It’s his genuine smile and action that makes this photo all the more interesting and enjoyable to view.

Patterns on the Streets of Hanoi

Patterns on the Streets of Hanoi - Putting the Fine Art into Travel Photography

A busy street scene in Hanoi photographed from a bridge on a rainy morning. Exposure settings: f/14, 1/40th, ISO 1250, 35mm lens.

It was raining one morning that I was to be exploring the city of Hanoi, which could have been considered a problem for photography. I went to the Long Bien Bridge after visiting a nearby market and observed the traffic passing by underneath me. I saw the potential for a really interesting pattern of cyclists with the high volume of motorbike traffic and the occasional bicycle. The rain had stopped, but the wet roads were creating reflections which would ultimately be beneficial and make for more dynamic lighting in the picture.

I waited a long time and photographed many combinations and patterns of commuters. I felt it was important to have an interesting focal point that was different from the rest of the scene. That was either going to be a person walking across the road or riding a bicycle amongst the sea of cars and other traffic.

I decided to use a slightly slower shutter speed to blur the traffic and capture the human subject sharper than the surroundings. It took a lot of patience and time on the bridge to finally capture an interesting pattern. It was fun to find the art in simple, everyday life.

Old Man with a Lute

Old Man with Lute - Putting the Fine Art into Travel Photography

Exposure settings: f/4, 1/160th, ISO 1000, 70mm lens.

I met this old man in the small idyllic village of Ninh Binh where he was walking by a lake. When he learned that I would like to make his portrait, he invited me into his home close by. We drank some tea and I spent some time together with his family.

Before I photograph someone, I always look around the scene and try to find the right place where I will take their picture, depending on the lighting and the background. I noticed near a window there was strong natural light coming into his otherwise dark home, and I placed a chair in this spot for him to sit. There was enough light on the man to not require a tripod in this position.

I noticed an old lute hanging on the wall. I found out that it was his and he could play, so I asked if he could show me. As he played, I took some pictures, but I noticed that the light would be stronger on his face, which is the main focal point if he were looking out the window. The breeze from the window blew his beard gently to one side, creating some movement in this portrait of an interesting, old and very friendly Vietnamese man who I was privileged to meet and photograph.

Here are a few more example images of my fine art travel photography.

Fisherman at Sunrise

Girl with Blue Eyes

Lady with Fan

Mekong Breakfast

Running and Playing

Salt Harvesters


The post Putting the Fine Art into Travel Photography by David Lazar appeared first on Digital Photography School.


Digital Photography School

 
Comments Off on Putting the Fine Art into Travel Photography

Posted in Photography


Putting Image Microadjust to the test on the Canon 5D Mark IV

30 Aug

One of the most discussed features of the Canon EOS 5D Mark IV is Image Microadjust. This uses the slight difference in perspective between the left and right-facing halves of the split ‘dual’ pixels to fine-tune the effective focus point of the images.

Like everyone else, we were interested to see what degree of refocusability this gave.

If you’re wondering: ‘will this let me correct which eye my portrait is focused on?’ The answer is a resounding ‘no’. Indeed, even if the question is: ‘can I shift the focus back from the eye lashes to get the iris sharp,’ the answer isn’t much more positive.

Dual Pixel Image Microadjustment

We set up the 5D Mark IV with EF 35mm F1.4L II USM at F1.4, set up at approximately 25x focal length distance from our LensAlign target. The Dual Pixel Raw file was then processed in Digital Photo Professional (DPP) to see how much the maximum backward and forward adjustments could move focus.

+5 (Max backward adjustment) 0 (No adjustment) -5 (Max forward adjustment)

AF (Lens) Microadjustment

For comparison, here’s the amount of adjustment that can be achieved using AF microadjustment – the traditional method for calibrating your lens to your body to correct back/front-focus issues. The rollover starts at +1 as this is the degree of adjustment needed by this lens on this body.

 +20  +10  +3  +2  +1  0  -1  -2  -3  -10  -20

Real-world difference

To demonstrate the real-world impact image microadjust might have on a traditional head-shot portrait, we shot Carey with an EF 85mm F1.8 at F1.8.

This portrait was very slightly front focused, so we tested the degree to which it can be refocused, backwards. For each of the adjustments, ‘Strength’ was set to 10 to maximize the input from one set of pixels.

+5 (Max backward adjustment) 0 (No adjustment) -5 (Max forward adjustment)

Interestingly, it appears the images become noticeably softer when you apply forward or backward adjustment, which may mask some of the advantages of the focus shift (there’s a chance that slightly better-looking results will be possible if you apply higher levels of sharpening to the microadjusted images). However, the degree of correction we’re seeing is so small that we wonder whether it’s worth the additional effort of having to incorporate the DPP software into your workflow, especially given the relatively long opening times required for each image, even on a fast computer. Or the doubling in file size.

Overall, traditional ‘AF microadjustment’ is a much more powerful tool for achieving pinpoint sharpness and ensuring any particular lens is properly calibrated to your body. Dual Pixel Raw’s primary value, in this particular incarnation, is questionable, as it will only be useful for very minor focus shifts, rather than as a general tool for correcting focus error. That said, the technology itself is promising, and we hope to see more capable future iterations as Canon iterates on the technology.

Articles: Digital Photography Review (dpreview.com)

 
Comments Off on Putting Image Microadjust to the test on the Canon 5D Mark IV

Posted in Uncategorized


Putting You Into Your Landscape Photography

28 Apr

Photographing the landscape is one of the oldest forms of photography, along with others like portrait and street photography. Since the advent of digital photography the possibilities of what can be done seem almost endless. It also means that photography has become more accessible, so with more people taking it up it is becoming harder to be original, and make your images your own. There are ways of creating landscapes that have your style, but it usually means throwing away a lot of what you first learn about photography.

Perhaps the only time a photographer is really free to do whatever they please is when they first begin, before they are told what they should or shouldn’t be doing.

Learning About Photography

However, that might be true, but it isn’t long before the beginner starts to learn what we all learn. We start wanting to know how to use the camera properly, and how to get the best out of it. So they might begin by doing a course to learn about aperture, shutter speed and ISO. No one is denying how important it is to learn about those things, and learning how to correctly expose an image is not something that anyone ever regrets.

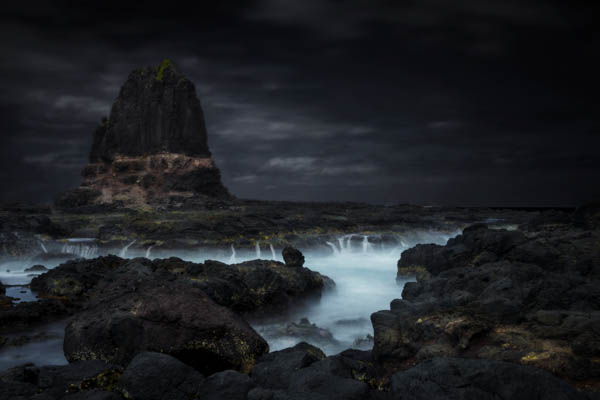
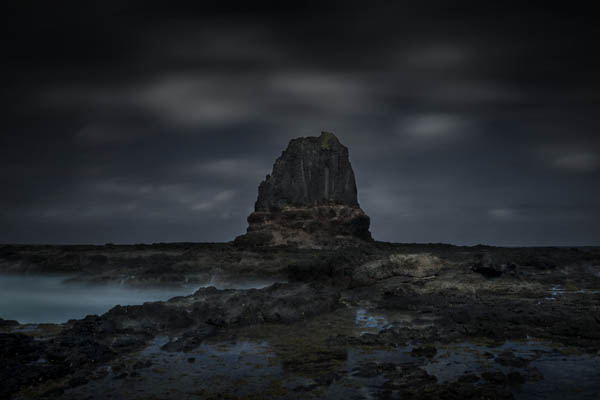
image1-cape-schanck-leannecole

Then there is composition and what is meant to make a good or perfect image. There is the rule of thirds – placing everything in that third, or on the third lines. You learn that when you are composing the image that the horizon should be on one of those thirds, or that the lone tree in the paddock or field should also be on one. Never put things in the middle of an image.

If you really get into it then you might learn about the golden ratio or the Fibonacci Spiral. This principle is about using a curve that determines where the subject should be placed for the perfect image; the spiral placement is very similar to the intersection of the third lines.

Then there is post-processing and again, there are rules about what is appropriate for landscape photography and what isn’t. Landscape photography is steeped in history and your photos should be true to what you see.

There are theories or rules that suggest you shouldn’t do any more processing to your images other than the very basic; that your images should represent the reality of what you saw. It is okay to fix exposure, horizon line, but you shouldn’t move pixels, like removing things from the image, or replace a sky.

No one is going to deny that learning all of that is wrong, and we should all learn it all. The next stop is working out if you are happy to follow the rules and do the same images that everyone else is doing.

The first thing you will find is that other people will start to criticize you. The tree is in the middle of the photo, or you shouldn’t have the horizon line in the middle. The one I get all the time is that I over process or my images are too dark.

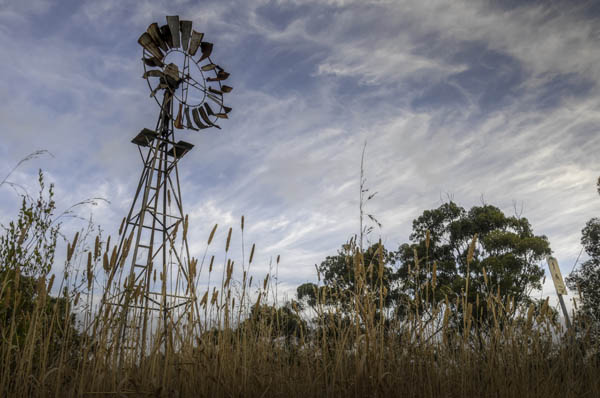
image2-inverleight-windmill-leannecole

My answer to that is: don’t listen.

Creating Your Own Style

There is a growing movement of photographers doing work that is not traditional and pushes the concept of landscape photography a whole lot more. It is where rules are broken, and new things are done that change what is considered traditional landscape photography.

Things like the rule of thirds are often forgotten, and you might see the subject placed firmly in the middle of the image. The horizon line may be in the middle of the image, cutting the image in half, as we’ve constantly been told is wrong and we shouldn’t do it.

How often do you get told that an image needs to be in focus, that if the subject isn’t sharp then you should delete the image? There are art photographers who take out of focus images and use them for art. Perhaps you shouldn’t go around taking a heap of photos that are out of focus, but sometimes the feeling or something else is just as important.

If we consider those things, then what does it mean for landscape photography, and how does it affect us? Perhaps it means that the world is your oyster and fine art is more about your interpretation of the world around you than the reality of it, then the possibilities of what you can do are endless. You can do whatever you like.

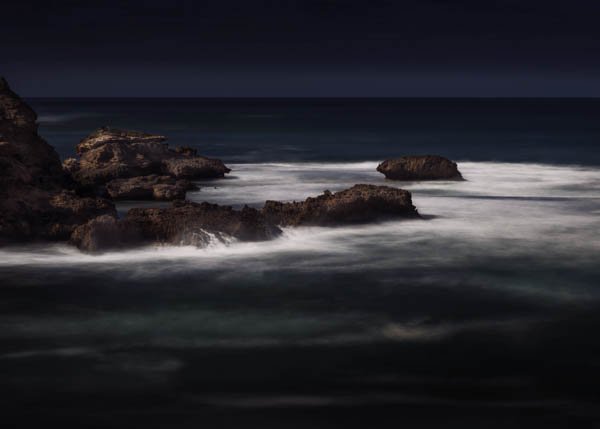
image3-flinders-blowhole-leannecole

Let’s look at what you can do, first out in the field and then back at home with post-processing.

Out in the Field

When you are out taking photos, look for odd angles. Think about how everyone else would take the image and see if you can come up with other ways to do it that are different. It isn’t always going to be possible, but it is a good practice to get into.

You could try using props in your images. I’ve heard of a couple of photographers that will place a person in their landscapes to help give it scale. You could do something like that, or start adding a prop of some sort that gives you a signature.

Photographing the same area time and time again can give you an edge too. You learn the area and discover things that people who rarely go there would find. Of course you have to also open your mind to the idea of finding new things. Try photographing the same thing over and over; see if you can find different ways of interpreting it.

It can help looking at what other photographers are doing to find styles you like. Study what they do. Work out what it is that you like about their work. I wouldn’t recommend copying them, but take some of it and use bits to help make your work your own.

An important thing to remember is that you don’t have to use photo editing to create images that are uniquely yours.

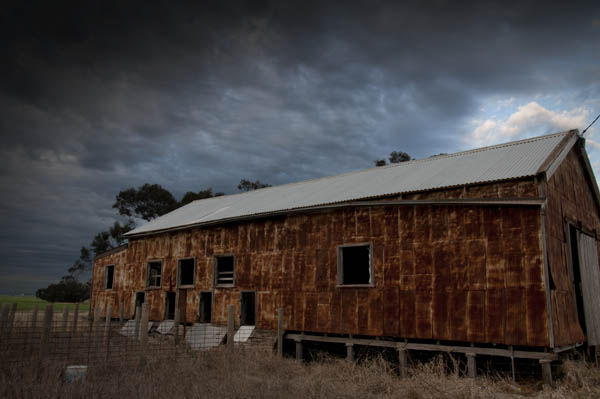
image4-woomelang-shearingshed-leannecole

Back in the Digital Darkroom

Once you get your images onto the computer, anything goes really. How far you take your images is completely up to you, but you also have to be prepared for heavy criticism from others. You are always free to ignore that – I do – but be polite about it.

You can do so many things in post-processing, such as selective focusing. Really make the viewer look where you want them to look. You can do this in many ways, with added blur or with lighting. It can be a strong technique; one that is used by painters all the time.

Selective saturation is a style that a few landscape photographers have started employing as well. You select areas of focus and give them a little more saturation, or you can desaturate the area around it. Make that area brighter or give it more vibrancy so it will stand out and attract attention, which is what you want.

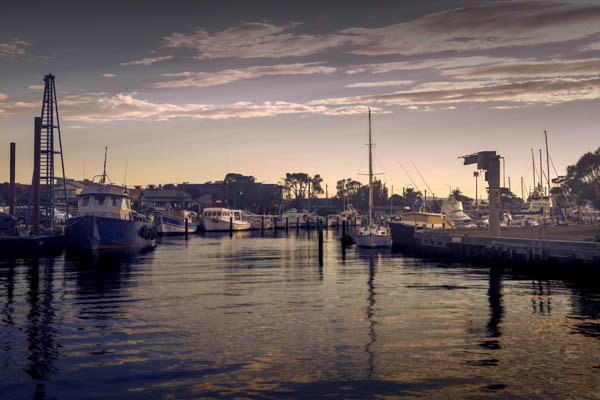
image5-mordialloc-marina-leannecole

Controlling the lighting is another technique that many use, myself included, meaning you take an image then try to find a way of completely changing the lighting so that the viewer can’t work out when it was taken.

Having an idea of what you want to achieve is also good, describing what you want people to see, or how you want your audience to view your work. Telling stories with your images is a great thing to do.

Again finding other photographers whose style you like is good too. Learn from them and see what you can do; it is encouraged in art schools all the time. Do what they do, but don’t pass it off as yours, find your own style, your own voice.

Through fine art landscapes you are showing an interpretation of the landscape around you, or wherever you take photos. The rules don’t always apply, but if you want to break them then do so in a way that will help you develop your own unique style.

Good luck.

image6-capes-schanck-leannecole

If you have any other comments or tips please share in the comments section below.

googletag.cmd.push(function() {
tablet_slots.push( googletag.defineSlot( “/1005424/_dPSv4_tab-all-article-bottom_(300×250)”, [300, 250], “pb-ad-78623” ).addService( googletag.pubads() ) ); } );

googletag.cmd.push(function() {
mobile_slots.push( googletag.defineSlot( “/1005424/_dPSv4_mob-all-article-bottom_(300×250)”, [300, 250], “pb-ad-78158” ).addService( googletag.pubads() ) ); } );

The post Putting You Into Your Landscape Photography by Leanne Cole appeared first on Digital Photography School.


Digital Photography School

 
Comments Off on Putting You Into Your Landscape Photography

Posted in Photography


Putting Personality Into Your Pictures: A How-to Guide

05 May

What makes a great photograph? There a hundreds of fundamentals – from lighting to image structure, depth, color, personality and composition. Mastering the art of photography is what evokes emotions and makes people’s jaws drop when they see that image. Art is not what you see, but what you can make others see – Edgar Degas. Adding, revealing and capturing Continue Reading

The post Putting Personality Into Your Pictures: A How-to Guide appeared first on Photodoto.


Photodoto

 
Comments Off on Putting Personality Into Your Pictures: A How-to Guide

Posted in Photography


Putting iPhone in Water

25 Jan

June 3, 2009 – Hello everyone! In this video, I put my iPhone through water to see if it would work perfectly. When I was done, I noticed the ear speaker no longer worked because I assume the water ruined it. Finally, after 4 weeks of doing this, the whole entire phone did not cut on. But it’s no problem because I will just buy a new iPhone 🙂 Please subscribe & check out my channel! 🙂
An animation I made of Aesop’s little known fable ‘The Middle-aged Man and his Mistresses’. I hope you enjoy it. www.glitterorpolish.blogspot.com
Video Rating: 5 / 5


Putting the Post in Post-Processing

01 Aug

When I switched over to digital photography from film there was a lot of discussion on new approaches and changing mindsets required to get good photographs (ex. Shooting or Exposing to the Right). While most photographers focused on techniques that could only go as far as the software or hardware of the time I always looked to the future. Never being satisfied with the current state of software or hardware I always knew that the technology powering the digital photography movement would catch up to what I had in mind. Much of what I was striving to accomplish revolved around improved image processing and higher resolution images. In a nutshell I knew that if I was using an 8 megapixel camera I’d be able to stitch multiple images together to make a 100 or 1000 megapixel image and so I started gathering images during my travels for giant digital panoramic photos. The same was true of images that might have been difficult or impossible to process to expectation with early raw converters. I took and sought after those challenging photos knowing I’d make them into something I had envisioned when the time was right. In both of these cases I knew that over time the software would improve and computers would get more powerful. While I held great optimism the technology would catch up over time I had to live with the fact that many of my images would have to sit idle for sometime. The gap between taking my photos and processing them would range from few months and to several years.

When I upgrade to new software, as was the case with my move to Lightroom 4, I like to revisit older photos to see what impact the new software can have on them.  I’m almost always wowed by the improvements I see across each upgrade for Lightroom and Photoshop, but the changes to Lightroom 4’s RAW converter (and Adobe Raw 7) has especially impressed me.  It’s truly astonishing to see how much more latitude there is in working with images that are not ideally exposed or contain a great deal of digital noise. Below are a couple of recent examples of images taken with my Canon 1D Mark II back in 2006. While these images aren’t particularly extreme to highlight how much Lightroom 4 or Adobe Raw 7 can do, they do work to highlight the general philosophy: take photos to satisfy what you envision, versus what you feel you can work with given existing post-processing limitations. The “post” in post-production has no time limit so always look back to your older work to see how newer technology can breath new life into your photographs. You might just rediscover a lost gem.

Example 1:
Canon 1D Mark II, Canon 70-200mm f/2.8, ISO 400, f/3.5, 1/2000 sec
Processed with Adobe Lightroom 4

Before Edits: Na Pali Coast and Surf

After Edits: Na Pali Coast and Surf

Example 2:
Canon 1D Mark II, Canon 70-200mm f/2.8, ISO 400, f/3.2, 1/2000 sec
Processed with Adobe Lightroom 4

Before Edits: Na Pali Coast Spire Detail

After Edits: Na Pali Coast Spire Detail

Note: Both images were taken from a boat in choppy surf hence the super fast shutter speeds

Copyright Jim M. Goldstein, All Rights Reserved

Putting the Post in Post-Processing

flattr this!


JMG-Galleries – Jim M. Goldstein Photography

 
Comments Off on Putting the Post in Post-Processing

Posted in Equipment