RSS
 

Posts Tagged ‘PURE’

Seven Steps for Post-Processing a Pure White Background

21 Mar

The post Seven Steps for Post-Processing a Pure White Background appeared first on Digital Photography School. It was authored by Kevin Landwer-Johan.

Photographs with clean, white backgrounds are extremely popular with

  • Stock agencies
  • Amazon
  • Graphic Designers
  • Magazines and websites
Seven Steps for Post Processing a Pure White Background Three Mangoes in a Bowl

The original background with a white border around it to clearly illustrate the contrast between pure white and off white

Producing pure white backgrounds is imperative. A background that’s not quite white looks terrible on a white page.

In this article, I will walk you through one method of post-processing I use to isolate subjects and give them a white background.

Choosing your photos carefully

Some photos are far more difficult to work with than others when you want a white background.

Any subject that’s fuzzy or hairy will be problematic. As will any blurred subject. Whether it’s focus or motion blur, you will have difficulty in obtaining a good clean transition with the background.

Smooth, clean edges are the easiest to work with. So if you want to sell wigs on Amazon, you are in for a tough time. It’s better to make sure you have a pure white background that requires no post processing with such subjects.

Seven Steps for Post Processing a Pure White Background Chicken Nerd


Step # 1

Choose your subject and photograph it against a clean, contrasting background. If the background is too busy, it will make isolating on white more difficult.

Keep your subject a good distance from the background. Use an aperture setting that keeps all your subject in focus, but the background is out of focus.

If your subject happens to be moving, make sure to choose a fast enough shutter speed to stop the motion. Making sure your subject is sharp will make post-processing much more straightforward.

Step # 2

Open your file in Photoshop. Make sure it’s the highest resolution jpeg file it can be. Working with low-resolution images is more challenging, but larger ones will slow your computer down.

You need to find a balance here. If you start working through these post-processing steps and find your computer is not handling it, downsize your photo and start again.

Choose the Select and Mask tool. You’ll find this in the Select Menu at the top of your window. Change the View Mode to an option that allows you to see your changes easily. I prefer the Overlay Mode.

Seven Steps for Post Processing a Pure White Background Select and Mask Menu

Choose the Select and Mask option from the drop-down menu.

Step # 3

With the Quick Selection tool, draw around the inside of your subject. Do this slowly, so Photoshop has time to render your action.

Pay careful attention to the areas you are selecting. You do not want to have any part of the background selected. If parts of the background are selected, paint over them with the Refine Edge brush.

Zoom in so you can see what you’re working on more clearly.

Seven Steps for Post Processing a Pure White Background Overlay Mode

Step # 4

When you’re all done and are satisfied your subject is masked, it’s time to output again to the main window in Photoshop.

Select New Layer with Layer Mask from the Output options and click OK.

Step # 5

Add a white background by clicking on the New Fill or Adjustment Layer icon at the bottom of the Layers Panel. Choose Solid Color and set it to pure white.

Step # 6

Check around the edges of your subject. Can you see any of the old background?

If you can, select the mask on your main layer in the Layers Panel. Choose the Brush tool and make the color Black.

Seven Steps for Post Processing a Pure White Background Mask Icon

Make sure the mask is selected.

Paint carefully over the areas where you can still see the old background. You may need to lower the opacity of the brush and adjust the feathering to achieve the best results.

If you have not done this before it can be challenging. However, don’t worry, if you erase parts of your subject, switch the brush color to white and paint back over them. They will re-appear.

There are various other methods and tools for erasing unwanted backgrounds. This is the best way I have found for images which are not too complicated.

Seven Steps for Post Processing a Pure White Background Clean Edges

Step # 7

Crop out any extra white space and save your new photo with your subject isolated on white.

Seven Steps for Post Processing a Pure White Background Clean White Background


Conclusion

This is one way to achieve a white background. As with most post-processing procedures, there is more than one sequence of steps which will provide an acceptable result.

Practice and experiment to find the workflow which works best for you.

Are you experienced in creating clean white backgrounds using other methods? Do you have any tips to share? Please share them in the comments section below.

The post Seven Steps for Post-Processing a Pure White Background appeared first on Digital Photography School. It was authored by Kevin Landwer-Johan.

Digital Photography School

 
Comments Off on Seven Steps for Post-Processing a Pure White Background

Posted in Photography


Make it Snow with Pure Photoshop Actions Winter Wonderland Set

18 Nov

winter-wonderland-action-1

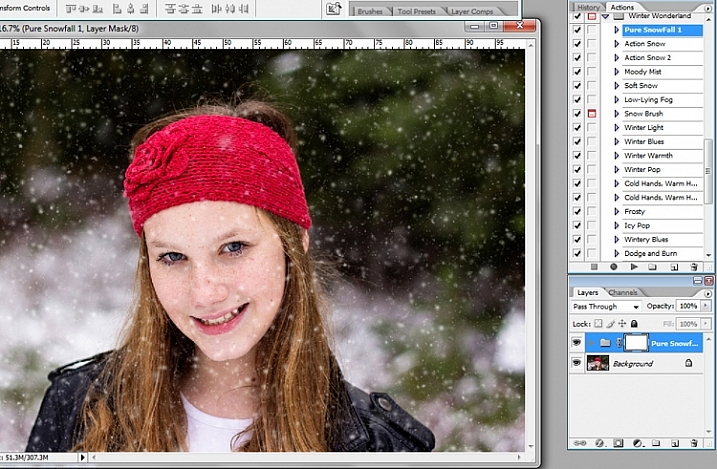
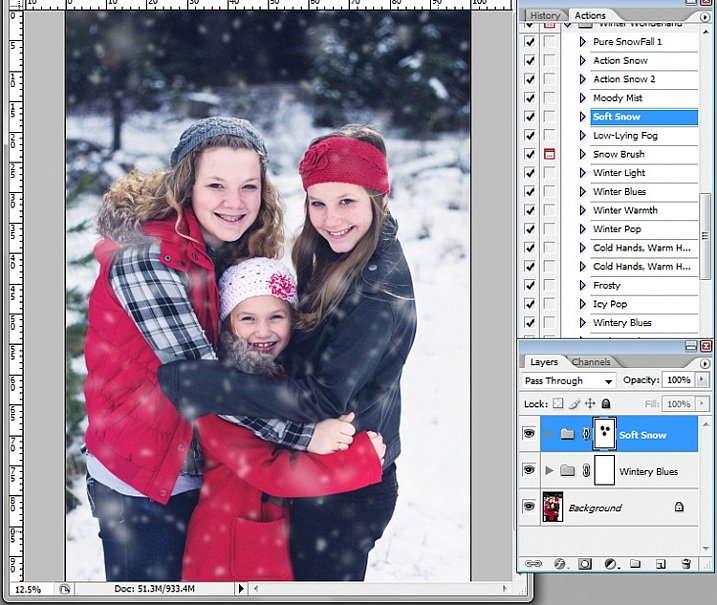
When it comes to post-processing, photographers definitely have opinions about Photoshop Action sets. Some photographers love them, others consider them cheating. For me personally, Actions are most valuable when they either (a) make the editing that I would do by hand more efficient and/or (b) offer something unique and fun that may be outside my normal editing style, but fits a particular session.

In this case, the Winter Wonderland Action Set by Pure Photoshop Actions (available for Photoshop CS and above, and Elements 6-11 for $ 25 regular price) fits a bit of both those criteria. It’s not something that I use every day, but it really is a fun action set to have on hand during the winter months!

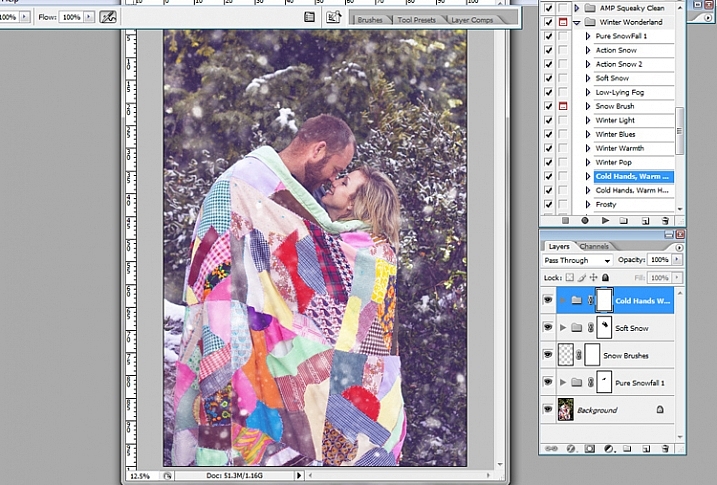
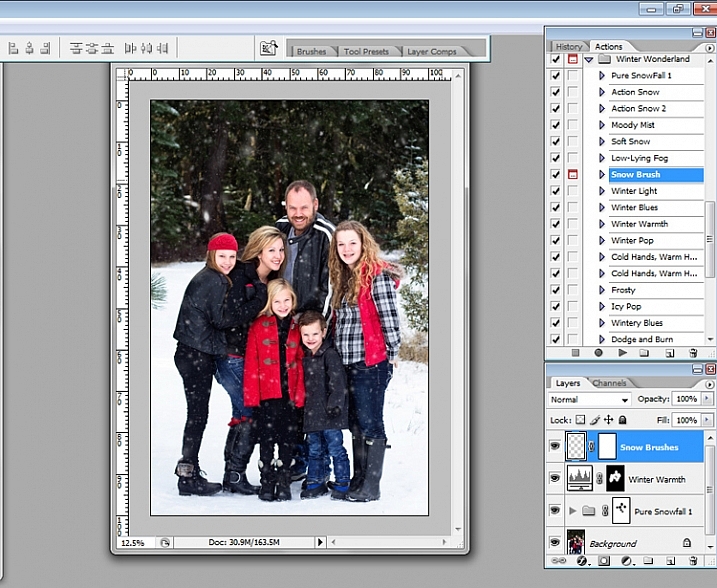
Essentially, the Winter Wonderland Action Set allows you to add snow with one click during post-processing. It includes several different kinds of snow, fog, and mist that can add a little something extra to your winter images. It also offers some tints and adjustments that allow you to tweak the final images towards your normal style of editing, whether you lean towards natural and clean, or a faded vintage look.

winter-wonderland-action-2

The first thing that I should mention, right off the bat, is that some of these actions run very slowly. The “Pure Snowfall 1” action in particular always seems to take several minutes to run. On the other hand, the “Soft Snow” action runs quickly every time. That said, even with “Pure Snowfall 1” taking several minutes to run, it’s still much faster than adding in individual snowflakes by hand, so it’s a win in my book.

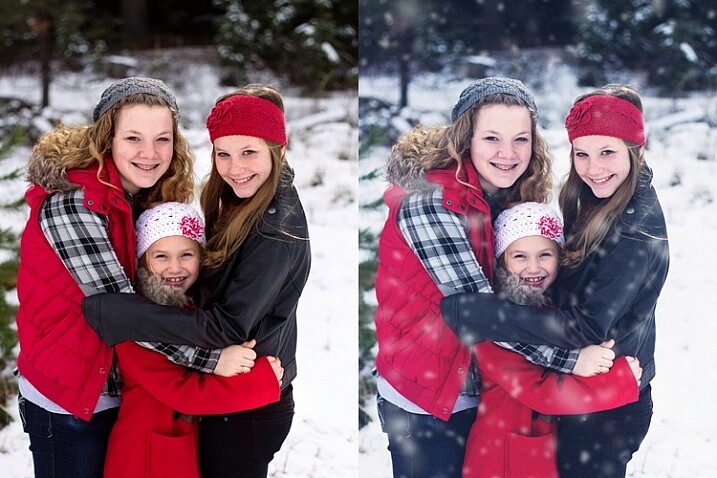
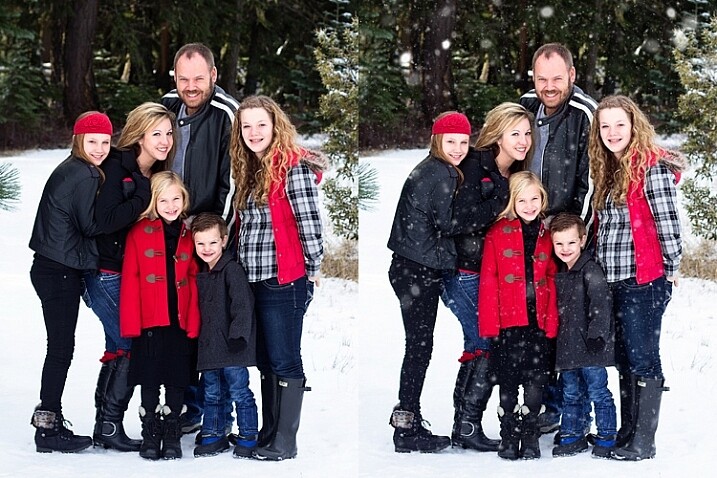
Original image on the left, final image using PPA Winter Wonderland on the right.

Original image on the left, final image using PPA Winter Wonderland on the right.

As with most action sets, you should be prepared to tweak Winter Wonderland to fit your particular image. Winter Wonderland adds masks to most of the actions after they’ve run, and I find that I use them quite often. The most common tweak that I make to the Winter Wonderland set is to remove the added snowflakes from the subject’s eyes, nose, and mouth. I prefer the “snow” to look as natural as possible, so I do tend to leave the snowflakes around the hairline, and sometimes even on the cheeks.

winter-wonderland-action-4

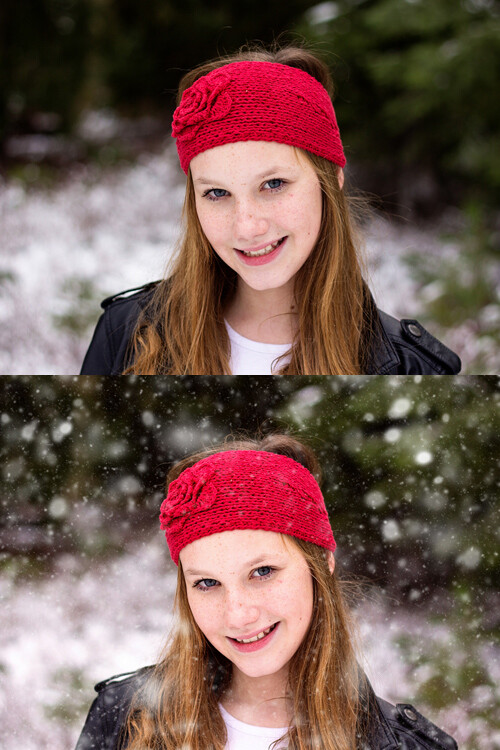
The actions in this set tend to do a pretty good job of varying the size of the snowflakes in order to give a more realistic foreground and background, but there is also a snowflake brush included with the set, which allows you to pick the overall size of snowflake you want, and then scatters additional snowflakes in that size randomly over the image.

Original image on top, final image edited with PPA Winter Wonderland on the bottom.

Original image on top, final image edited with PPA Winter Wonderland on the bottom.

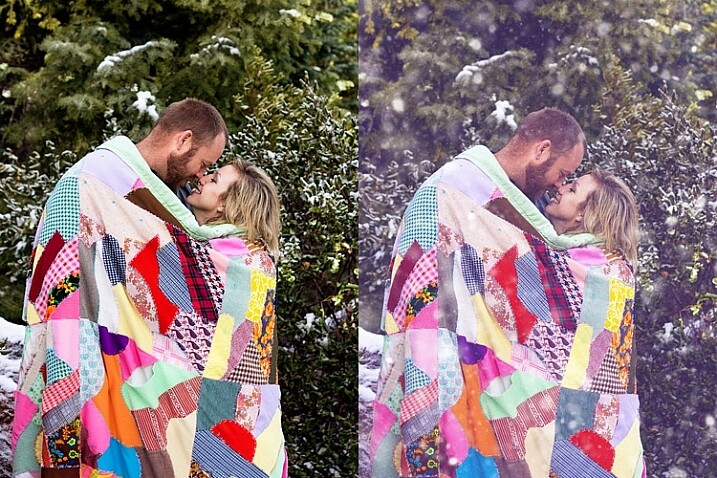
My editing style tends to be pretty clean, so that is about where I usually stop with this action set. However, the set also includes a number of actions that allow you to achieve a subtle vintage feel to your final images, and I’ve also enjoyed testing those options out as well.

winter-wonderland-action-6

Original image on the left, final image edited with PPA Winter Wonderland on the right.

Original image on the left, final image edited with PPA Winter Wonderland on the right.

When I use the Winter Wonderland action set, my ultimate goal is that if I were to post the image on Facebook, the majority of my client pool would not readily be able to tell that the snow was added in post-processing. Of course, some of my photographer friends are likely to be familiar with this particular action set, and others may be familiar enough with Photoshop to know that something’s up, but my hope is to create images that look natural enough that they could easily pass as being real. So, in order to accomplish that goal, one of the key pieces is to only use images in which your model is dressed appropriately for snow, and there could feasibly actually be snow in that location.

This particular set of images is my favorite set that I’ve ever edited with Winter Wonderland, and I think that’s due in large part to the fact that there was actually snow on the ground during our session. So, it’s not too much of a leap for a casual viewer to see snow on the ground, and find it feasible that snow could be falling at the same time. On the other hand, if I were to run this same action set on an image taken at sunset during the summer months, it would likely look ridiculous…which would really only work if you’re going for a super campy “Christmas in July” themed session.

winter-wonderland-action-9

winter-wonderland-action-10

Original image on the left, final edited image with PPA Winter Wonderland on the right.

Although I’ve seen Winter Wonderland marketed almost exclusively towards photographers doing portraits or family photography, don’t underestimate this set for landscape and nature images as well. As long as the content, and coloring of your landscape or nature image, would be appropriate for a photograph taken in the winter, there’s no reason not to give it a try!

winter-wonderland-action-8

Just for the record, I purchased the Winter Wonderland Action Set on my own, and Pure Photoshop Actions has no idea that I’m writing this article. I have just enjoyed the Winter Wonderland set quite a bit, and thought that it was worth sharing (and reasonable price at $ 25) as we head into the winter months in the northern hemisphere.

Have you tried the Winter Wonderland Action Set? If so, what did you think? If not, is there an image you’re eager to try it on?

googletag.cmd.push(function() {
tablet_slots.push( googletag.defineSlot( “/1005424/_dPSv4_tab-all-article-bottom_(300×250)”, [300, 250], “pb-ad-78623” ).addService( googletag.pubads() ) ); } );

googletag.cmd.push(function() {
mobile_slots.push( googletag.defineSlot( “/1005424/_dPSv4_mob-all-article-bottom_(300×250)”, [300, 250], “pb-ad-78158” ).addService( googletag.pubads() ) ); } );

The post Make it Snow with Pure Photoshop Actions Winter Wonderland Set by Meredith Clark appeared first on Digital Photography School.


Digital Photography School

 
Comments Off on Make it Snow with Pure Photoshop Actions Winter Wonderland Set

Posted in Photography


Motorola Moto X Style / Pure Edition camera review

02 Oct

Replacing the 2014 Moto X, Motorola’s flagship Moto X Style has received a complete overhaul in the camera department. It comes with a Sony IMX 230 1/2.4-inch 21MP BSI CMOS sensor and a dual-LED flash, while an F2.0 aperture and 4K video recording remain unchanged from the predecessor. We put its camera through our range of studio and field tests for this full review. Read more

Articles: Digital Photography Review (dpreview.com)

 
Comments Off on Motorola Moto X Style / Pure Edition camera review

Posted in Uncategorized


Pure Gold: 24-Karat Art Center Highlights ‘Haunted House’

05 May

[ By Steph in Drawing & Digital. ]

gold art center 1

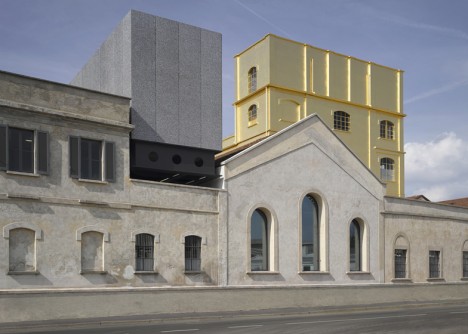
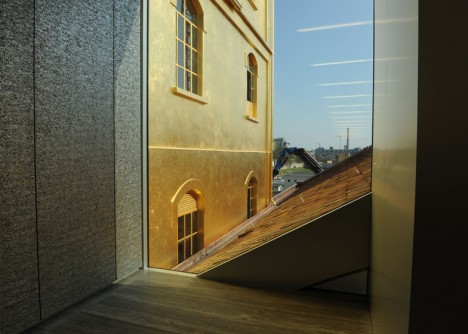
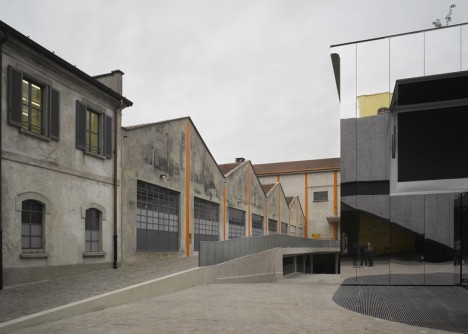
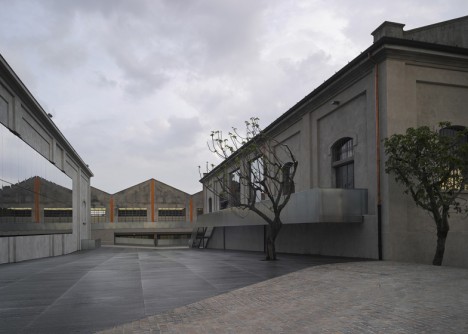
Part of a century-old distillery, a structure known as the ‘Haunted House’ now glimmers in the faintest of light thanks to its real 24 karat gold coating. Dutch architecture firm OMA adapted a complex of seven buildings in Milan for Fondazione Prada’s new arts center and added three new buildings, blending them all together with the goal of making it hard to tell which are historic and which aren’t.

art center 2

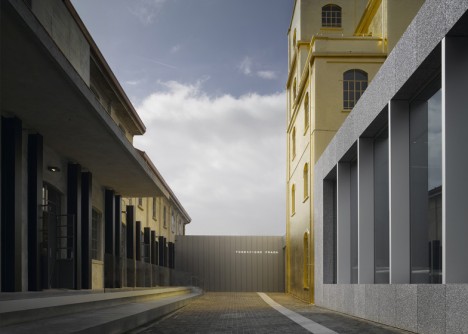
The coat of gold paint makes the old factory building look like it could be as new as the glazed Podium building that was constructed around it, which will host temporary exhibitions. This striking detail was actually a last-minute decision, as lead architect Rem Koolhaas sought a way to “give value to a seemingly mundane and simple element.”

art center 4

When the sun is shining bright, gold-tinted light reflects off that structure onto the rest of the complex, which also includes a cinema camouflaged by mirrors. OMA upgraded the historic structures with modern finish materials and carried an industrial aesthetic throughout the new buildings for a cohesive result. It’s not clear exactly how this could be possible, but according to Koolhaas, “gold is actually a cheap cladding material compared to traditional claddings like marble and even paint.”

art center 5 art center 6

Established by the Italian fashion house, Fondazione Prada aims to provide exhibition space for more diverse art than you’d normally see in a modern museum. The new complex, which is still under construction, will be its first permanent exhibition space.

Share on Facebook


[ By Steph in Drawing & Digital. ]

[ WebUrbanist | Archives | Galleries | Privacy | TOS ]


WebUrbanist

 
Comments Off on Pure Gold: 24-Karat Art Center Highlights ‘Haunted House’

Posted in Creativity


The Photodoto Library: Your One-Stop Shop for Pure Photography Awesomeness

24 Jun

Are you sick and tired of photography sites claiming that they can provide you with a wealth of photography resources that’ll make you a much better photographer…only to be lied to and disappointed each and every time? We hear you and feel your pain, too! That’s why we at Photodoto have come up with something that’s bound to turn your Continue Reading

The post The Photodoto Library: Your One-Stop Shop for Pure Photography Awesomeness appeared first on Photodoto.


Photodoto

 
Comments Off on The Photodoto Library: Your One-Stop Shop for Pure Photography Awesomeness

Posted in Photography


PURE WHITE With Yannick Wolff

29 May

Yannick Wolff on Fashion Photography Blog showcasing images from his PURE WHITE photo shoot (FashionPhotograhyBlog.com)

Yannick Wolff returns to FashionPhotographyBlog.com with a stunningly gorgeous shoot with model, Agneta Kuhne, entitled “PURE WHITE“. In this angelic series, Yannick shows, yet again, another side of his photographic versatility depicting clear fashion, but also both the strength and vulnerability of the model in his photos.

The inspiration behind PURE WHITE was the collaboration between the photographer and Tina Hoffmann, the make-up artist, Yannick explained his process, “We thought about a new fashion editorial story. We had searched for several pictures to create our own mood board. The whole styling was done by Tina herself and I found a great location to shoot in.”

Yannick Wolff on Fashion Photography Blog showcasing images from his PURE WHITE photo shoot (FashionPhotograhyBlog.com)

When asked about how this fashion series differs from his previous shoots Yannick pointed out that the contrast between the styling and the setting with the natural light streaming in makes this editorial shoot so enchanting, “I think this golden, warm color tone and the contrast from these pure white clothes to the quite industrial location creates a special flair with what is going on through the whole series.”

Based on what Yannick shared with me the shoot came together well, it was like as though it was meant to be. Agneta Kuhne, the model, was a friend of a friend of Yannick‘s who also was a photographer, and assembling the team after being on many shoots together was relatively simple he explained “That’s quite easy, in general, because over time you create your own pool of connections of make up artists, stylists and assistants, but for this shoot, Tina Hoffmann, asked me if I´m interested in a photo shoot like this, so we came together for this project.”

Yannick Wolff on Fashion Photography Blog showcasing images from his PURE WHITE photo shoot (FashionPhotograhyBlog.com)

It seemed like the only hardest part of the shoot was finding the perfect location and it’s a common issue for Yannick on his shoots as he expressed that “Finding good locations is one of the hardest things for me – especially in Germany it is very hard to find topical or even beach like locations.“ So the photographer is constantly challenged to think outside the box and make do with the settings around him, and aren’t we glad that he found the industrial warehouse setting for this shoot that adds just the right amount of rawness that contrasts the purity of the model’s facial features and the styling so well. Does anyone else see a bit of Cate Blanchett here in these pictures?

Utilizing the surroundings around him, Yannick takes advantage of the natural light penetrating through the industrial windows. The photographer revealed that “I´ve used mostly the incoming sunlight with a Profoto reflector. On some other sets I used a simple two light setup to light up the scenery a little bit.” For this shoot, Yannick used two Priolite MB 500 flash lights with several light formers, a Profoto reflector and a Nikon D800 with the Nikkor 85mm lens.

Yannick Wolff on Fashion Photography Blog showcasing images from his PURE WHITE photo shoot (FashionPhotograhyBlog.com)

To find out more about Yannick Wolff’s work or to contact him you can visit his website www.yannickwolff.com as well as on his Facebook fan page www.fb.com/yannickwolffphotography, Twitter and on Instagram @yannickwolff. What do you think of Yannick’s latest shoot? Check out his behind the scenes video below. Feel free to post your comments in the comments section underneath.

PHOTO CREDITS:

Photographer – Yannick Wolff

Make-up/Styling – Tina Hoffmann

Model – Agneta Kuhne

Assistant – Admir Suljanovic


Fashion Photography Blog

 
Comments Off on PURE WHITE With Yannick Wolff

Posted in Uncategorized