RSS
 

Posts Tagged ‘Publish’

How to Publish a Photography Zine to Promote Your Photography

30 May

The post How to Publish a Photography Zine to Promote Your Photography appeared first on Digital Photography School. It was authored by Matt Murray.

dps-how-to-publish-a-photography-zine

Until a couple of years ago, I’d never considered publishing a photography book or zine. Years ago, the self-publishing options weren’t very attractive to me: they were either expensive and complicated or offered templated cookie-cutter style books that didn’t appeal.

In recent times, new publishers specialising in short-run zines have sprung into the marketplace, making it much easier for photographers to get their work into print. Inspired by other photographers producing zines, I have just published my own. Here is my guide on how to publish a photography zine to promote your photography.

What’s a zine?

A zine is a self-published booklet of images and text, often produced in limited edition print runs. The word zine (pronounced zeen) is derived from both the word magazine and also the word fanzine – unofficial publications produced by fans of a particular movement in popular culture. Zines were usually put together by hand, then photocopied and stapled.

Every Summer photography zine
Copies of my first film photography zine Every Summer. I also had limited edition art print postcards created to celebrate the launch.

These days the term zine is commonly used to refer to any short-run booklet of photography and/or images. There are so many creative choices that you can make when you publish a photography zine. The look and feel of the final product are up to you, and the lines between a zine and a book are often blurred.

For example, my first photography zine Every Summer is perfect bound, meaning the pages are glued together into the spine without a staple. It’s full-color, printed on uncoated paper, and the cover has a smooth laminate finish. It falls somewhere between the extremes of a do-it-yourself stapled zine and a high-end coffee table book.

So now you know what a zine is, your next question might be, why publish a photography zine? I’ve outlined a few reasons below.

Seeing your images in print is magical

One of the most frequently said things about photography in the digital age is that we’ve ended up with tens of thousands of images on devices and hard drives that are hard to access and view. There’s nothing quite like having an image in your hands – whether it’s an instant photo, a print, or your own book or zine.

Every Summer photography zine
Close-up of my first photography zine Every Summer. Holding it in my hands for the first time was magical.

Seeing my first photography zine in print was so much more satisfying than seeing images on a computer screen. Creating a zine also ties together the set of images as a collection, with a single narrative throughout. A zine is a perfect way to showcase your images to others.

Use a zine to promote your photography

Publishing a photography zine is a fantastic way to promote your photography. A zine could be used as an alternative to (or in addition to) your digital offerings.

I recently showed my first zine to a professional photographer friend and he said it was a really interesting concept he’d consider for promoting his wedding photography business.

In this digital age, a zine could be a way of standing out from the crowd by providing something tangible people can hold in their hands that promotes your photography.

Creating a zine as a tool for personal growth

Publishing a zine is such a rewarding project. As a photographer, there are many other skills you’ll potentially need to learn or improve to get your zine into production. Design, editing, writing, printing and marketing: these are just some of the skill sets you’ll use.

Once you create your zine, you can send it to your favorite clients, give it away to leads at events and shows, and, of course, send it as a gift to family and friends. You never know who might end up seeing it.

Publish a photography zine
Blurring the lines between a zine and a book, my first self-published work “Every Summer” is perfect bound.

Creating a zine is also addictive – once you create your first, you’ll no doubt be thinking of your second. So, if you’d like to publish a photography zine, where do you start?

Zine ideas

The concept of most zines or books revolves around an idea. Your zine could be made up of images from a road trip, a wedding, your favorite city, or your neighborhood.

A zine could also show off a photographic style, a personal project, tell a story through images, or be a showcase of your best work. It can also be a combination of all of those things or none of them – it’s up to you.

My first zine is a collection of images that I took on the Isle of Wight in England. When I reviewed the images in the weeks after my holiday, I felt there was a certain magic to them, so I decided to put together a zine.

It’s also becoming increasingly common for photographers to collaborate on zines together, typically with the same subject or style in mind.

Choose your images

Choosing and editing your images is a process in itself.

It’s not necessarily about choosing all the best images but choosing images that work well together and continue a narrative throughout your publication. For example, there were some images that I loved from the Isle of Wight, but there didn’t seem to be a point in the zine where it made sense to include them, so I left them out in favor of other images.

Publish a photography zine
The first 20 pages of my zine Every Summer in a contact sheet view. Choose images that work well together and continue a narrative. Also, note the double-page spread on pages 6-7.

Some people find it beneficial to print out small copies of their images and arrange them on the floor to work out an image order. I tried this approach, but I found that it just left me with a stack of paper to put in the recycling bin. I found it easier to rate images in Lightroom and then drag them onto pages in InDesign, where I could play around with the layout.

To add text or not to add text?

There are two schools of thought around adding words to a photo zine or book. The first is that the photos should do the talking and everything else is a distraction. The second is that well-thought-out text adds context to the images and makes it a more rewarding experience for the reader.

Generally, I fall into the latter school of thought.

I decided to add passages of text to my zine for one simple reason – I wanted to introduce locations by recounting anecdotes from when I visited these places on the Isle of Wight. These passages detailed what attracted me to photograph those locations.

Every Summer film photography zine by Matt Murray
Adding text throughout my zine gave me the opportunity to provide context to the locations I photographed on the Isle of Wight.

Either way, it’s commonplace to write an introduction at the start of your zine or book. This should introduce yourself to the reader and explain your motivation behind producing the zine and your relationship to the images.

For example, in my photography zine Every Summer, I reflected on my relationship with England, my home for over a decade, and how travel photography has influenced the style of images I take. In my introduction, I also added my contact details so readers could send me feedback about the zine.

Zine design

The design of your zine can be as simple or as complex as you like. Some online publishing companies have their own software that makes it as easy as possible for you to choose a layout, drag and drop photos, and add some text.

With other zine publishers, you can create your own design in software programs like Adobe InDesign and then upload them as a PDF for printing. Always make sure you read and understand the instructions your printer gives you about document set-up and exporting your publication – especially with regards to the quality of your images, color space, page bleed, and margins.

Of course, you can also work with the book module in Lightroom too.

Publish a photography zine
Many pages in my zine follow a standard layout. This is broken up by double-page spreads and full-page photos throughout the zine.

Creating your zine in InDesign also gives you the flexibility to produce an electronic PDF version of your zine to distribute to people. You can also do that with the first option, but some online publishing companies charge an extra fee to download a PDF copy of your work. You can also create a PDF version in the Lightroom Book Module too.

Whichever road you go down, remember that simplicity is often at the heart of good design. Try and stick to a standard way of displaying your photos throughout the book, with the occasional breakout from that design for a double-page spread or full-page photograph.

Simplicity should also be front of mind when working out your choice of font. Don’t choose too many fonts to work with and always make sure they’re easy to read. For my photography zine Every Summer, I chose two fonts.

Publish a photography zine
Part of the introduction to my first photography zine. I explained who I was, my motivations for putting the zine together, and my relationship to the subject matter.

For headings, I chose a retro font that captured the spirit of the 1970s. This matched the subject matter of some of my images such as the retro ice-cream van and the seaside pier at Sandown. For body text, I used a typewriter-style font that is easy to read, and also conveys some of that retro charm.

Print vs screen

Looking at images on a screen is not the same as looking at images in print. Digital images are usually in the RGB color space, which has a wider color gamut than the CMYK color space used for printing. Our screens are also back-lit, so often digital images look brighter and more saturated than images exported for print.

At some stage, your publication will be converted to the CMYK format. Some online publishers do this process automatically for you, but if you are uploading a PDF to a printer, they will typically ask you to supply a PDF in the CMYK color space. Always check with your printer on the exact settings to use.

Seeing your images in the CMYK color space for the first time can be a bit of a shock: it has a narrower gamut than RGB, which means that not all colors from the RGB color space can be displayed when printed. This means some colors may look slightly different in the printed version. For example, the vivid blues, yellows, and oranges of the ice-cream van on the front of my zine are not quite that vivid in the print version, but they’re close.

Publish a photography zine
Laying out images and text for my zine in Adobe InDesign. A lot of people shy away from InDesign, but it really isn’t difficult to pick up, especially if you’re familiar with Adobe Photoshop.

Zine format and size

When you publish a photography zine, you will also need to decide on the dimensions of your zine and how many pages it will have. Remember, the more pages your zine has, the more expensive it will be to produce and potentially ship to customers.

For my first zine, I chose a square 210mm by 210mm format (just over 8 inches). I’d seen a friend’s zine using the same dimensions and it felt like a good size to me. Square pages also have an advantage: they suit portrait-orientation images, landscape-orientation images, and square images.

Another consideration is the type and weight of paper you want your zine printed on. There is usually a range of types including satin, gloss, uncoated, and even recycled. Many publishers will send you a sample of their papers for free. This sample pack will also help you decide on the weight (thickness) of different paper stocks.

Publish a photography zine
Many online printers offer a wide range of choices for your publication.

Final review

When you’ve finished your layout and have a zine ready to publish, check everything as many times as you can. After you’ve completed your checks, ask a trusted friend to do the same. I made one small error with my zine and it still annoys me. As it turns out, a couple of people I sold my zine to didn’t even notice it.

If you’ve never printed anything before, you can also get in contact with your printer to ask for their advice on your publication. For example, you could ask them if the images are good enough quality to print, if the layout will work, if you’ve done the page bleed and margins correctly, and if you exported your PDF in the correct color space.

When you’re satisfied that everything is correct, it’s time to print.

If you’re a little nervous about the final product, order the smallest quantity that is financially practical. This will give you the opportunity to check you’re happy with everything before another print run.

After that, it’s time to show your zine to the world! I’ve sold my zine via my website to friends, family, listeners of my podcast, and others in the photography community. For the launch, I even had some art print postcards created featuring three images from the zine as a bonus for my customers.

Every Summer film photography zine by Matt Murray
Exporting my zine from Adobe InDesign. Find out what settings you should be using from your printer for the best results.

Conclusion

I hope this article has been helpful for those wishing to publish a photography zine. Self-publishing can be a lot of work, but ultimately, it’s a very rewarding process. There are so many skills related to photography that you can learn and improve, adding to the creative challenge.

Seeing your images in print for the first time in a publication that you’ve created is very special. I’ve learned so much creating my first photography zine and plan to create another in the coming months.

Whether it’s just for fun, a creative challenge, or to promote your business, learning how to publish a photography zine is a fantastic way to get your images in front of other people and reach a wider audience.

If you have any questions about the zine-making process, please let me know in the comments below.

The post How to Publish a Photography Zine to Promote Your Photography appeared first on Digital Photography School. It was authored by Matt Murray.
Digital Photography School

 
Comments Off on How to Publish a Photography Zine to Promote Your Photography

Posted in Photography


How to Publish Images Directly to Instagram From Lightroom

29 Nov

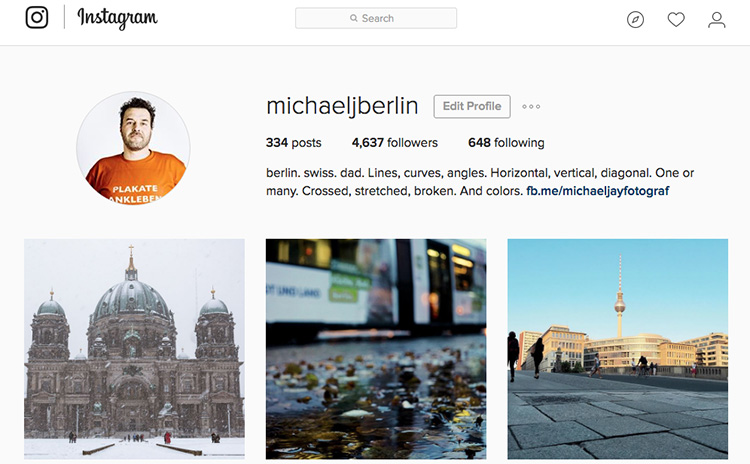
The Lightroom Library module offers more than just the option to organize your images. With its Publish Services, it allows uploading content to online services from within its interface. The best known Publish Services might be connections to Facebook or Flickr built into the software by Adobe. Since the summer of 2016, you can add Instagram to this list. The LR/Instagram plugin allows publishing on the popular sharing platform through a direct connection from the Library module.

From Lightroom to Instagram

This comes in pretty handy since Instagram does not allow uploads from desktop computers directly. Until now you had to find ways to export images from Lightroom and transfer them to your smartphone before being able to publish them on Instagram.

Installation of the LR/Instagram plugin

The plugin is free to download and try, and there is no time or volume limit to the usage. The publisher, however, asks for a $ 10 payment if you like it. The payment can be done through the plugin manager in Lightroom with a PayPal transaction.

Please also note that this plugin is programmed by a third party, neither Adobe nor Instagram can offer any support, and the plugin may fail at times when either Lightroom or Instagram change their code. So keep yourself updated through the author’s website.

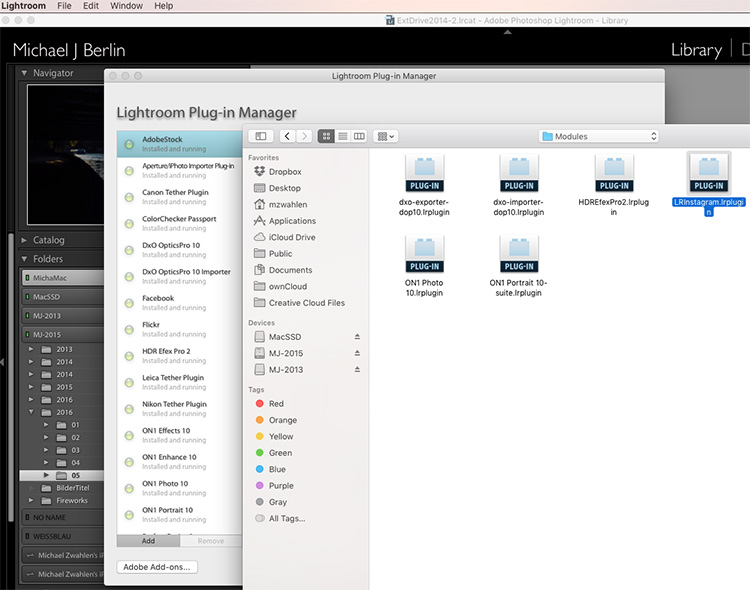
The LR/Instagram plugin acts as a publishing service within the Lightroom Library module. To install the plugin, you first need to download a ZIP file from the website and unpack that to your hard drive.

Lightroom Module folder

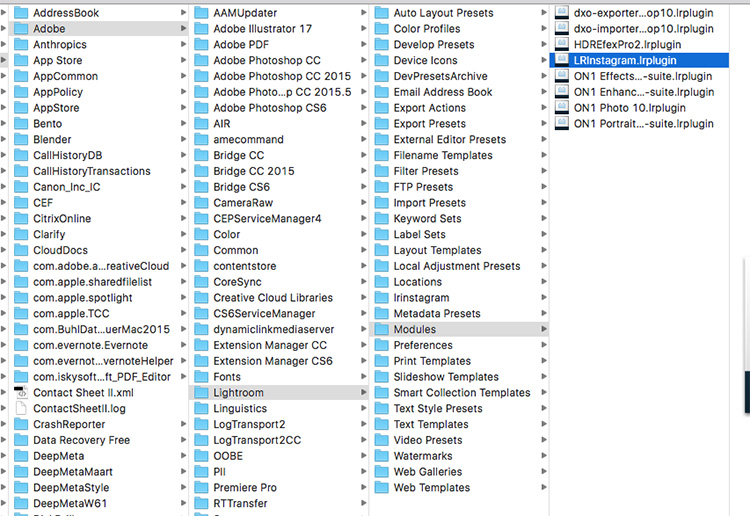
While Lightroom allows you to install the plugin from that location, I recommend first moving it from your download folder or desktop to a more permanent location. I use the “Modules” subfolder in the Application Library structure on my hard drive to store my LR plugins. But as your system may vary, make sure it is located in a folder that is related to your Lightroom installation.

Now in Lightroom, open the Plug-In Manager through the File menu structure. Below the list of existing plugins you can find an “Add” button. Point Lightroom to the location of the plugin and tell it to “Add Plug-In”.

Add LR/Instagram Plug-In

How to set up your Instagram Publish Service in Lightroom

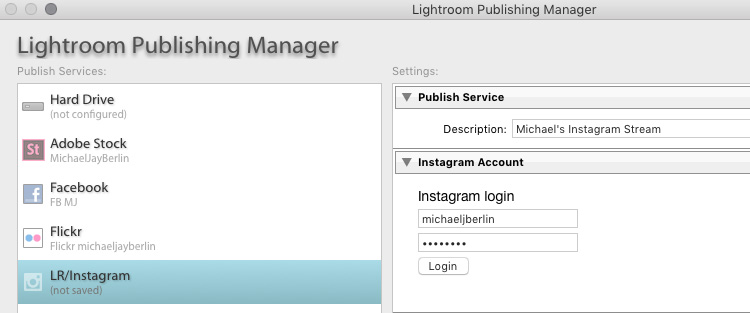
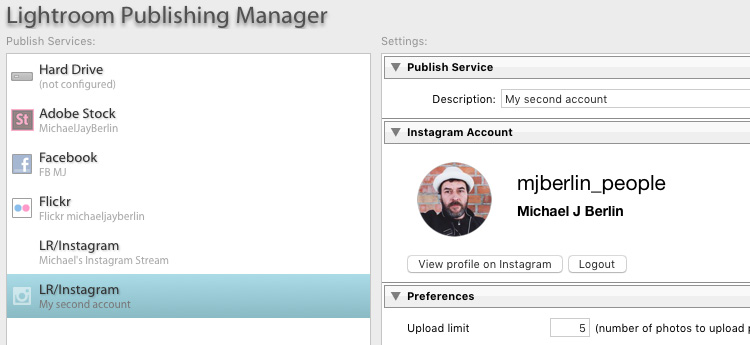
Once it is installed, you have to set up a Publish Service using that plugin. For this, press the Plus button on top of the Publish Services section in Lightroom’s Library module. The Publishing Manager will show up and offer LR/Instagram as an additional service. You can name the new service and enter your Instagram username and password.

Please note that the plugin does not work with a Facebook connection login, you need to have a password directly on the Instagram site.

Setting up the LR/Instagram Plug-In

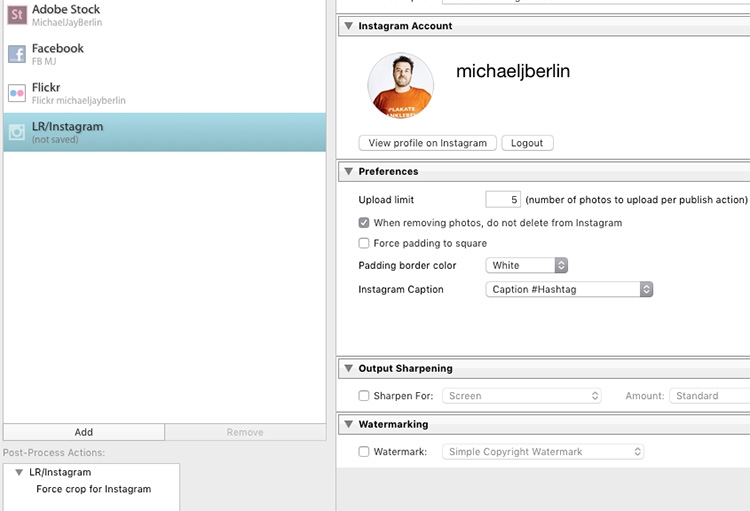
If you now press the Login button, the plugin will show your Instagram profile picture if successful.

Configure settings

In the Preference section, you can limit the number of images published at once. As Instagram and its users might react negatively to one user filling up pages of images at once, it is recommended to set this to a value of around five.

Since Instagram changed their platform to also allow non-square images, you could upload portrait or landscape oriented images to the platform. Still, some users prefer to make their images all appear in the commonly known square format. For this, you can have the plugin add a white or black padding border for images that are not natively in square format.

However, I prefer to crop my images to square format before uploading them to Instagram. For this, I usually create a Virtual Copy of my image in Lightroom before making the Instagram crop. I might upload the original format to other platforms like Facebook and want to avoid going back and forth between different formats.

As Instagram widely relies on #hashtags for users to find content outside of their followings, the LR/Instagram plugin offers a separate metadata field with the option to add these hashtags within the Lightroom interface. You can find the hashtag field in the Metadata section through the drop down menu selecting the LR/Instagram section.

LR/Instagram Preferences

In the preferences area of the Publishing Manager, you can choose to “Caption #Hashtag” as an option to publish the image on Instagram using your caption and add the hashtags from that separate field. If preferred, you can also just publish the image using Title or Caption from your metadata as you also could enter hashtags in a second stage on the Instagram platform directly.

Publishing images to Instagram from Lightroom

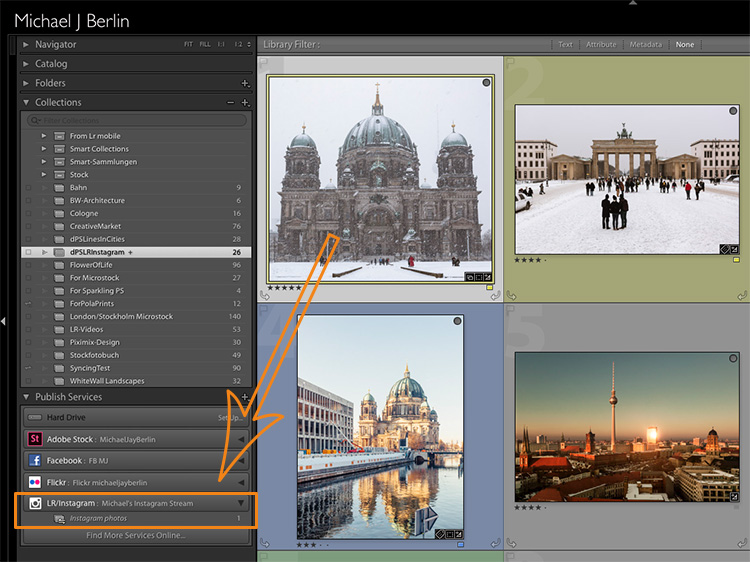
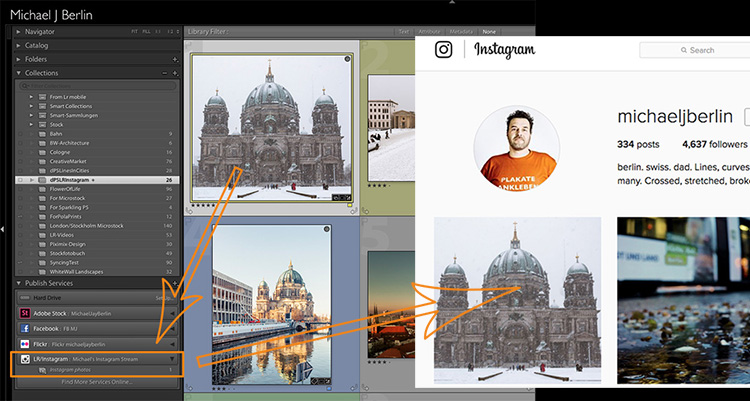
Once set up, the new Publish Service will appear in your Library module. You can now simply drag the image you want to publish to the “Instagram photos” collection. This serves as a collection like all others in Lightroom. If you prefer, you can also set this as your Target Collection which allows you to use the B shortcut to directly add images from anywhere in your library into it.

Drag and drop images in Lightroom

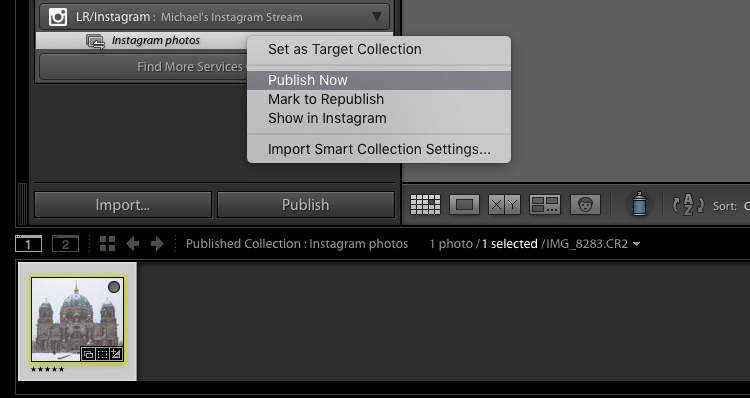
When you are finished adding images, you can now tell Lightroom to publish those images. Personally, I try to limit myself to one new image each time. But if preferred, the plugin will now publish as many images as you have recently added to its collection or the limit you have set in the Preferences as explained above. The Publish Service will now run in the background and use Instagram’s API to publish your image.

Publishing from Lightroom to Instagram

Instagram Stream with photo from Lightroom

If you ever want to change the settings you have originally entered, just press the Plus button on the Publish Services section in the Library module and open the Publishing Manager again.

You can also set up multiple different publishing streams, either with different settings or even for a separate Instagram account.

Multiple Publishing Streams for second account

Give it a go

So if you’re on Instagram you might want to have a look this the LR/Instagram plugin. If you’ve used it tell us about your experience. Please share your profile so others can see your work, and follow dPS on Instagram as well.

Read this on how to get more Instagram followers too.

googletag.cmd.push(function() {
tablet_slots.push( googletag.defineSlot( “/1005424/_dPSv4_tab-all-article-bottom_(300×250)”, [300, 250], “pb-ad-78623” ).addService( googletag.pubads() ) ); } );

googletag.cmd.push(function() {
mobile_slots.push( googletag.defineSlot( “/1005424/_dPSv4_mob-all-article-bottom_(300×250)”, [300, 250], “pb-ad-78158” ).addService( googletag.pubads() ) ); } );

The post How to Publish Images Directly to Instagram From Lightroom by Michael Zwahlen appeared first on Digital Photography School.


Digital Photography School

 
Comments Off on How to Publish Images Directly to Instagram From Lightroom

Posted in Photography


The AP and British Movietone publish more than 1 million minutes of historic footage to YouTube

24 Jul

The Associated Press and British Movietone have announced the addition of more than 1 million minutes of digitized historic footage to YouTube. The AP says that this project represents the largest ever upload of historic news content to YouTube, and will serve as a ‘visual encyclopedia’ for witnessing some of the biggest moments in recent world history. Read more

Articles: Digital Photography Review (dpreview.com)

 
Comments Off on The AP and British Movietone publish more than 1 million minutes of historic footage to YouTube

Posted in Uncategorized


How I Will Publish One Million Photographs Before I Die

07 Mar

Waiting for the Mother Ship -- Death Valley, CA

My friend Chris Guillebeau sent me an email this morning about my uploads to Flickr. One of the things I love about Chris is that like me he is a big dreamer/achiever. For those of you who don’t know him, you should get to know him. He’s a huge motivation and someone who can help you achieve great things as well. Chris wrote up a really nice interview on my photography a few years back.

One of the things that Chris wanted to do was to visit every country in the world by April 7, 2013. For this goal he is using the United Nations list of 193 member states. You know what? He’s visited 192/193 so far. WOW! His Brief Guide to World Domination should be required reading for every person in the world. It should be taught to students especially.

I sincerely believe human beings are capable of so much more than they think they are. Unlocking our true potential and power comes from some very basic tools and techniques that can be learned. In 2005 I read a book that dramatically changed the way I think about my own life by Brian Tracy called Focal Point. I’d encourage you to buy this book and read it. It’s probably the most important book I’ve ever read. If you’ve got kids buy it for them and give it to them as well. It teaches you how to accomplish great things.

One of the things that I’ve decided that I want to do with my own life is to publish one million photographs before I die. When I talk about publishing a million photographs, I’m not talking about simple shutter actuations — I’ve already taken over a million frames. Anyone can push a shutter a million times. You could probably train a monkey to do this. Anyone can even publish a million meaningless photo clicks to the web — many in fact already have.

My quest is not simply quantity over quality. What I’m focused on is publishing one million *quality* photographs that I believe in and care about as personal art — photos that I can be proud of. Each photo I choose to publish is carefully selected amongst many different frames from a shoot. Each photo is individually worked with, processed, edited with software, keyworded, and frequently hand titled and geotagged (although not always, for those last two points). Occasionally I will create more than one version of a single frame, but each photo is unique and different.

Although I publish my photos to many different sites on the web, Flickr is where I’m presently maintaining my larger body of work. What a deal Flickr is — unlimited high res photos for $ 24.95/year. Nobody comes close to touching this. In addition to this great value, Flickr comes with great presentation tools, an awesome new iPhone app and a pretty terrific social network too.

At present I’ve published 79,783 photographs to Flickr. In addition to these published photos, I’ve got an archive of about 22,000 fully completed and finished photos in a folder ready to go to Flickr. Each day I publish about 30 more of these to the site, pretty much at random — or about 11,000/year.

Which brings me back to Chris’ email earlier this morning. Chris is working on a new book right now and for the book had asked me some questions last month about my photography. He was following up today to confirm that last year I published about 11,000 new photos to Flickr — which I’m going to confirm with him shortly after finishing this post — but in considering this, I realize that the 11,000 number for 2012 is problematic. It’s problematic because if you assume that I continue on at this pace, I will need to live 84 more years to realize my goal of 1,000,000 photos. At age 45 today, it is highly unlikely that I will live to be 129, and so at my present pace, this sets my goal up for failure if people take my publishing rate today at face value.

My goal is much more complex than simply 11,000 photos per year for the rest of my life though. I’ve thought about my lifetime goal for many, many hours and my plan to achieve it is more complicated than a simple number for 2012 might suggest.

I’ve actually worked out my lifetime achievement goal in rough form with a spreadsheet as I’ve developed my thinking. At present what I plan on doing is increasing my publishing rate of photos by 2% per year during the next 10 years. The reason why I’m publishing less photos today is primarily because I’m so focused on actually shooting the photos today. I want to spend the time in my life when I’m most physically fit shooting the most. I also think that time/age frequently add interestingness to many photos. So I’d rather capture photos here and now today than in the future.

If I increase my publishing 2% each year for the next 10 years (something I’m very confident I’d be able to do even with my current unpublished archive alone) I should have about 200,000 photos published 10 years from now.

10 years from now my last of four children, Kate, will (hopefully) be leaving us for college. With all four of my kids out of the house, I will likely spend less time on my children than I do today. So 10 years from now I will increase my publishing rate even more, about 5% per year — more time for shooting but more importantly, more time for processing. In 10 years I’ll have approximately 370,000 photos published.

20 years from now, not only will my kids (again, hopefully) be done with college, but I’ll also be able to retire from my day job at around age 65. This will then free me up 100% to focus my time and energy on photography. I plan to increase my publishing rate by 10% per year then.

After age 65 the proportional rate of time spent shooting vs. processing will likely flip flop from what I’m doing today as well. Instead of spending 80% of my time shooting and 20% of my time processing, like I do now, I’ll likely spend 20% of my time shooting and 80% of my time processing. When you’re an old man (not that 65 is old, but I’ll get older likely after that) it’s a lot easier to sit in front of a computer and process than it is to run around the country staying up 20 hours at a stretch and shooting.

If I follow this strategy, and the part between age 65 and 80 is super important, I will publish 1 million photos when I am 80. Government life expectancy tables today give me until age 83 to live, but I wanted a few years as a buffer in case I kicked the bucket early.

My biggest challenge in all of this is maintaining my unpublished archive. I want this archive to grow larger and larger and larger, even as my published work grows as well. By growing my unpublished archive larger, I ensure that greater and greater diversity will be represented in my daily publishing. This is a secondary goal of mine, to have as much diversity with what I publish as possible. 20 years from now I like the idea of a photo from 2010 being published alongside a photo from 2015 and one from 2020. I like the idea of my photos been diversified not just by time, but by location (I’ll shoot more and more locations over my lifetime), subject matter (I’ll shoot more and more different things), style (my style will evolve and change), etc.

As I pursue this lifetime goal I’m also cognizant of a powerful tailwind at my back — technology. Technology will make my goal easier and easier to achieve. Already in 2013 I’m blown away at how much faster I can process my work than two years ago. Going from hard drives to flash storage, going from USB to Thunderbolt, faster macs, better cameras, all contribute to ensuring that I will be able to keep pace in the future even as I grow my publishing rate. For the first time, this year, I’ve felt like the only thing holding me back with my processing is actually me. For the first time with the hardware and software advances, I feel like I’m working and editing my work in real time. The future is indeed bright for the future tools that will not only continue to make our images look better, but which will also help us do more faster.

One final note — this goal is intensely personal for me and me alone. I created it, I live it, I fuel it. Over the years I’ve had many who have been critical of my goal. Many don’t understand that quantity can also be quality. Many have expressed an opinion that taking so many photos somehow diminishes my work. Many people have a desire to produce less, not more. All of this is fine. Everyone can do whatever they want. This is just what *I’m* doing. I’m not saying that this is the right path for anyone other than me and me alone. I’m not making a larger statement about photography in general, or saying that people that don’t keep my path/pace are in any way less significant as artists or photographers.

While I’ve personally admired many of the most prolific artist/photographers in the world (Warhol, Eggleston, Winogrand, Friedlander, etc.), I also admire many photographers and artists who make great art in smaller but more intense doses too. Whatever YOU do is fine. Be true to yourself and follow the artist that is inside of you.


Thomas Hawk Digital Connection

 
Comments Off on How I Will Publish One Million Photographs Before I Die

Posted in Photography