RSS
 

Posts Tagged ‘PROPER’

Canon announces Rebel T8i with revamped AF and (proper) 4K video

13 Feb

$ (document).ready(function() { SampleGalleryV2({“containerId”:”embeddedSampleGallery_9298385550″,”galleryId”:”9298385550″,”isEmbeddedWidget”:true,”selectedImageIndex”:0,”isMobile”:false}) });

Canon has announced a new DSLR, aimed at ambitious beginners and enthusiasts. The Rebel EOS T8i is Canon’s latest Rebel-series flagship, and packs a pretty impressive set of features, including a new Digic 8 processor, which enables 7 fps continuous shooting and 4K video capture (including 24p). Like the PowerShot G7 X Mark III, the T8i also supports vertical video.

The T8i is built around a 24MP APS-C format CMOS sensor, with Dual Pixel CMOS autofocus. Face and Eye-detection is available in live view and video modes. In viewfinder shooting mode, autofocus is handled by a new 45-point all cross-type AF system, which works in concert with a 220,000-pixel AE sensor to allow ‘iTR’ tracking AF and face detection.

Hands-on with Canon EOS Rebel T8i / 850D

$ (document).ready(function() { SampleGalleryV2({“containerId”:”embeddedSampleGallery_6228532660″,”galleryId”:”6228532660″,”isEmbeddedWidget”:true,”selectedImageIndex”:0,”isMobile”:false}) });

Previously only available in Canon’s higher-end DSLRs, these features make the T8i the most powerful Rebel-series camera yet, at least on paper. Meanwhile, Canon will be hoping that the usual suite of wireless connectivity options, plus a vlogging-friendly vari-angle touchscreen will make it accessible to first-time ILC buyers.

The EOS Rebel T8i will cost $ 749.99 body only, and $ 899.99 in a kit with the EF-S 18-55mm F4-5.6 IS STM.

Press release:

BRING THE FIRSTS, THE LASTS AND THE IN-BETWEEN MOMENTS TO LIFE: CAPTURE PHOTOS AND VIDEOS WITH THE NEW EOS REBEL T8i CAMERA

New Camera Delivers Vertical Video and Advanced Control for Maximum Creative Output

MELVILLE, N.Y., February 12, 2020 –– Whatever your family dynamic, there are certain moments with the ones you love that deserve to be remembered. In the spirit of capturing powerful moments that last a lifetime, Canon U.S.A., Inc., a leader in digital imaging solutions, unveiled today the Canon EOS Rebel T8i. The newest and highest-performing Rebel camera within the Canon lineup features the DIGIC 8 Image Processor, eye-detection in live view, 4K video, clean 4K HDMI outputˆ, and is the first EOS DSLR with vertical video1 all within a compact and lightweight body to bring photography and videos to life.

“Our commitment to high-quality and high-performing DSLR cameras is unwavering,” said Kazuto Ogawa, president and chief operating officer, Canon U.S.A., Inc. “Visual storytelling is not one size fits all, and in order to encourage our current and future customers to explore their content creation journey and make it easier for people to explore the art of photography and the power of an image, it is imperative that the next EOS Rebel provide high-quality still imagery, high-speed shooting capabilities as well as top notch video functionality.”

The Greatness Within the EOS Rebel T8i
The compact and lightweight EOS Rebel T8i camera is ideal for documenting the early days on the soccer field and aspiring shutterbugs looking to go beyond the “Auto” feature. This camera includes:

  • Optical Viewfinder with a 45-point All Cross-type AF System with Face Detect to ensure images are in focus
  • 24 Megapixel CMOS (APS-C) Sensor• Continuous Shooting at up to 7.0 fps
  • 4K UHD, Full HD up to 24P
  • Equipped with an Approx. 220,000 Pixel New AE Sensor and EOS iTR AF (Face Detection)
  • Fast & Accurate Dual Pixel CMOS AF with Eye-detection (Servo)
  • Vari-angle, 3.0-inch LCD Touch Screen
  • Advanced Control with AF-ON Button and Quick Control Dial
  • Built-in Wi-Fi®2 and Bluetooth®3 Connectivity

Compatible with an extensive line of Canon EF and EF-S lenses, this model can capture vertical video and has multiple connectivity options using Bluetooth® and WiFi® technology, making it ideal for vlogging, uploading content to social media platforms, and web services or for day-to-day usage when capturing life’s most precious moments.

Pricing and Availability

The EOS Rebel T8i camera body has an estimated retail price of $ 749.99 and the EOS Rebel T8i kit with EF-S 18-55mm F4-5.6 IS STM lens has an estimated retail price of $ 899.99. For more information and the full list of product specifications, visit http://shop.usa.canon.com

About Canon U.S.A. Inc. Canon U.S.A., Inc., is a leading provider of consumer, business-to-business, and industrial digital imaging solutions to the United States and to Latin America and the Caribbean markets. With approximately $ 33 billion in global revenue, its parent company, Canon Inc. (NYSE:CAJ), ranks third overall in U.S. patents granted in 2019† and was named one of Fortune Magazine’s World’s Most Admired Companies in 2020. Canon U.S.A. is dedicated to its Kyosei philosophy of social and environmental responsibility. To keep apprised of the latest news from Canon U.S.A., sign up for the Company’s RSS news feed by visiting www.usa.canon.com/rss and follow us on Twitter @CanonUSA


ˆ Output of images in 4K UHD resolution without shooting information. If monitor does not support 4K UHD, the resolution of the output format is lowered for display.

  1. Vertical Video Support is available for playback on the following compatible smart devices: iOS® versions 9.3/10.3/11.2-11.4/12.2, Android™ smartphone and tablet versions 5.0/5.1/6.0/7.0/7.1/8.0/8.1/9.0.
  2. Compatible with iOS® versions 9.3/10.3, Android™ smartphone and tablet versions 4.4/5.0/5.1/6.0/7.0/7.1. Data charges may apply with the download of the free Canon Camera Connect app. This app helps enable you to upload images to social media services. Please note that image files may contain personally identifiable information that may implicate privacy laws. Canon disclaims and has no responsibility for your use of such images.
  3. Compatible with select smartphone and tablet devices (Android™ version 5.0 or later and the following iOS® devices: iPhone 4s or later, iPad 3rd gen. or later, iPod Touch 5th gen. or later) equipped with Bluetooth® version 4.0 or later and the Camera Connect.
  4. Availability, prices and specifications are subject to change without notice. Actual prices are set by individual dealers and may vary.

†Based on weekly patent counts issued by United States Patent and Trademark Office.

Articles: Digital Photography Review (dpreview.com)

 
Comments Off on Canon announces Rebel T8i with revamped AF and (proper) 4K video

Posted in Uncategorized


Avoid Blurry Long Exposure Images with Proper Tripod Setup

05 Apr

A tripod is an important piece of gear for all photographers, but even more so for those who are hooked on shooting long exposure photography at the blue hour like myself (I primarily shoot waterfront cityscapes). Those photos require exposures lasting for minutes with a use of neutral density (ND) filter. Therefore, a sturdy tripod is absolutely essential to keep photos sharp.

Avoid Long Exposure Photographers’ Worst Nightmare by Setting Your Tripod Low

A sturdy tripod is a must for long exposure photography, as there is no chance at all of shooting sharp photos by hand-holding a camera for minutes.

Get a Best Tripod Within Your Budget

This article is not your ultimate tripod buying guide (dPS already has an excellent article on that here), but let me mention a few brief pointers first.

First of all, unlike your camera body, a tripod isn’t something you will upgrade very often. In fact, a good one could last a lifetime, so it’s advisable to get the best possible tripod within your budget. Here are a few other things to look out for when choosing your tripod.

Load Capacity:

The maximum load capacity of your tripod should be at least twice or preferably three times the maximum weight of your camera body and biggest lens combined. For example, my trusty Manfrotto MT190CXPRO3 Carbon Fiber Tripod supports up to 7kg, which is more than sufficient for my Nikon D610 (850g) and Nikon 18-35mm (f/3.5-4.5) (385g) combined (1.25kg).

Tripod Head:

Your tripod head also has a maximum load capacity, and it should at least match that of your tripod. If your tripod supports up to 7kg, but the head only supports up to 5kg, then the load capacity of the entire tripod system is to be 5kg, as the maximum load comes from the weaker component. For your information, I own the SIRUI K-20X Ballhead, which supports a whopping 25kg.

Tripod Weight:

Decent tripods are commonly made of aluminum or carbon fiber. Both are equally good, but carbon fiber tripods are lighter yet more resistant to vibration (hence they are also pricier, too). My Manfrotto Carbon Fiber Tripod weighs 1.6kg (3.5 lbs.) while its aluminum counterpart the Manfrotto MT190XPRO3 weighs 2kg (4.5 lbs.), with all the other specs being pretty much identical).

Tripod Leg Sections:

While 3-section legs provide a more stable platform, tripods with 4-section legs have a shorter closed (folded up for transportation) length and make it easier to pack into a suitcase when traveling. For example, closed length for my 3-section leg Manfrotto MT190CXPRO3 Carbon Fiber Tripod is 61 cm (24 inches), but its 4-section counterpart the Manfrotto MT190CXPRO4 is only 52 cm (20.5 inches).

If you ask me, I recommend choosing nothing but 3-section tripod legs. I personally won’t compromise stability for convenience. That said, my tripod still fits into my check-in luggage (after taking out the center column). Before purchasing, I even tested it by bringing my luggage to the camera shop!

Tall Isn’t Always Cool

Having a good tripod is one thing, but using it correct way is another. I see way too many photographers fully extending tripod legs even when it’s not necessary. The rule of thumb is that the higher the tripod legs are extended, the less stable it gets, leaving more prone to high winds and undermining your chance of taking sharp photos. The photo below (at Victoria Peak in Hong Kong, with an altitude of 552m) is a good example.

Victoria peak - Avoid Long Exposure Photographers’ Worst Nightmare by Setting Your Tripod Low

To take blur-free shots here, I kept the tripod low and put the lens through the bars, rather than fully extending the tripod legs and center column to shoot from above the railing.

Instead of fully extending the tripod legs (and even the center column, which is a big NO-NO) to position the camera above the railing, I put the lens through the bars and kept the tripod as low as needed to minimize the risk of vibration.

Actually, I learned this from a previous mistake. I shot at this exact location the previous year but screwed up the opportunity by setting up the tripod too tall (over the railing by extending the center column) in high winds, and none of the photos came out sharp.

Center column - Avoid Long Exposure Photographers’ Worst Nightmare by Setting Your Tripod Low

Extending the center column in high winds or when shooting long exposure photography is a recipe for a disaster. It’s very unlikely that you’ll be able to capture sharp photos this way.

Long Exposure Photographers’ Worst Nightmare

Let’s say you’re shooting waterfront cityscapes at blue hour with a few minutes of long exposure at a tourist-centric area (places like Victoria Harbour in Hong Kong, The Bund in Shanghai, etc.) on your holiday. It may be your once-in-a-lifetime trip, and the weather is clear and perfect.

Such places are always crowded especially at sunset and dusk times with herds of tourists flocking to take snaps, selfies, and groupies. Extending all the tripod legs inevitably takes more space on the ground, which has a huge risk of someone accidentally kicking it during long exposure and ruining your potentially epic shot. This is long exposure photographers’ worst nightmare (and happened to me once).

Crowded spot - Avoid Long Exposure Photographers’ Worst Nightmare by Setting Your Tripod Low

At a crowded photography location like this (Merlion Park in Singapore), keep your tripod setup as low as possible so that it takes less space on the ground and reduces the risk of someone accidentally kicking your tripod legs.

Tripod Alternatives

To avoid such a nightmare, I’m also using a sort of a tripod alternative that helps stabilize my camera setup. A clamp tripod like the Manfrotto 035 Super Clamp without Stud comes in handy at places with high winds or at crowded city shooting locations where you feel worried about someone accidentally kicking your tripod legs.

It’s not that you can use a clamp tripod anywhere you want, as it needs a railing or something that it can be clamped onto. But where possible, this setup can be rock solid (with a load capacity of 15kg) and the resulting long exposure photos are appreciably sharper than those shot using a regular tripod.

Super clamp in use - Avoid Long Exposure Photographers’ Worst Nightmare by Setting Your Tripod Low

A Super Clamp is like a game changer, it’s small and strong.

Set up clamp - Avoid Long Exposure Photographers’ Worst Nightmare by Setting Your Tripod Low

To mount a DSLR on a Super Clamp, first, plug a separately-sold Manfrotto 208HEX 3/8-Inch Camera Mounting Platform Adapter (or a cheaper alternative Manfrotto 037 Reversible Short Stud) into a Super Clamp socket and secure it with the double lock system. Then mount a tripod head with DSLR on the mounting platform adapter, just like you do with your regular tripod.

Conclusion

I hope these tips help you avoid making the same mistakes I did. Don’t blindly follow the mantra that says, “Extend your tripod and place the viewfinder at your eye level” (you’ve probably heard about that before!).

There’s nothing wrong with setting up your tripod low and bending down. This increases your chance of capturing sharp long exposure photos in high winds and also prevents your tripod legs from getting accidentally kicked.

If you have any other tips or experiences to share, please do so in the comments below.

The post Avoid Blurry Long Exposure Images with Proper Tripod Setup appeared first on Digital Photography School.


Digital Photography School

 
Comments Off on Avoid Blurry Long Exposure Images with Proper Tripod Setup

Posted in Photography


Tips for Getting Proper Exposure for Night Photography

24 Jun
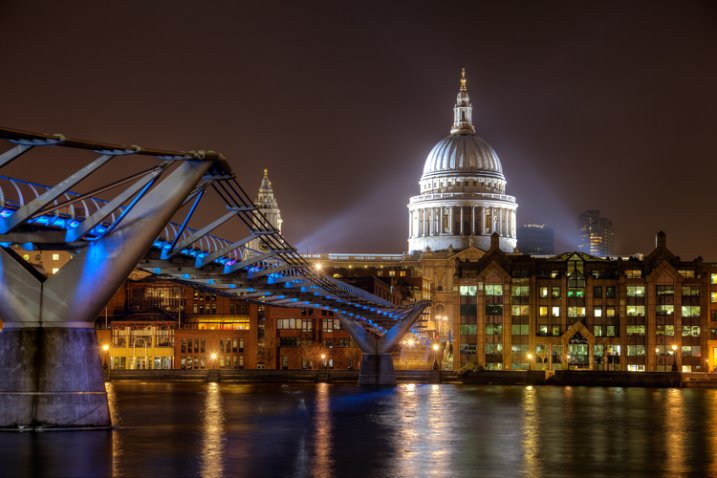
Proper Exposure at Night - Millenium Bridge example

Exposure settings for this shot: Shutter speed of 4 seconds; aperture at f/5.6; ISO 400.

Night photography can be much more rewarding than photography during the day. Because everything looks different at night, you don’t need to go somewhere exotic to get great pictures. Bridges, attractions, and buildings are usually brightly lit at night, and places that might seem rather pedestrian during the day – can make stellar photography subjects at night. Further, you can take your time when photographing at night, more so than during the day. There are generally less people out, and you don’t have to worry about the light changing.

The main challenge when photographing at night is getting a proper exposure. During the day, you can just walk around and hand hold your camera without worrying about camera shake. In addition, because of the amount of available light during the day, you don’t need to worry about shooting at a high ISO and the resulting digital noise. At night, however, hand holding is generally not an option and digital noise can be a major problem.

The principles of exposure work the same way at night as during the day – you will just need a lot more time to allow light into your camera. It goes without saying that you will need a tripod to stabilize your camera, and a remote shutter release to keep from moving anything during the exposure. But with these changes made, you can get out and explore the night with your camera. When you do, here are some tips to keep in mind to help you maximize the experience.

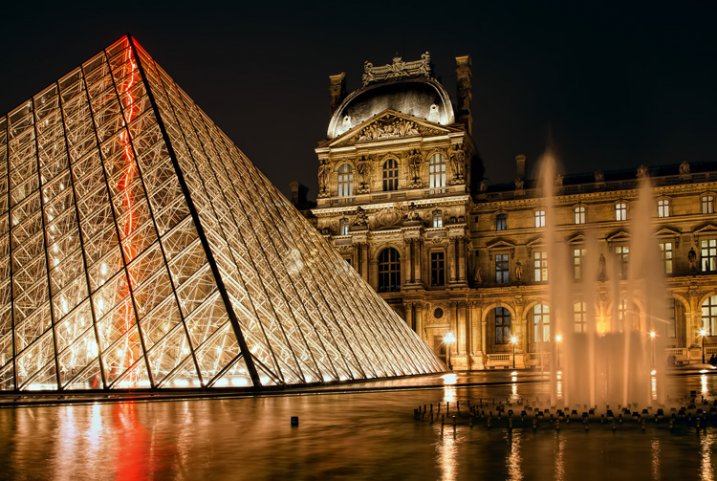
Proper Exposure at Night - ouvre example

Exposure settings for this shot: Shutter speed of 4 seconds; aperture at f/11; ISO 400.

# 1.  Work in Manual Mode

The first tip is to make sure you are shooting in Manual mode. In Manual mode, you will set the shutter speed, aperture, and ISO. This puts you in complete control over you camera.

When shooting at night, your camera will be on a tripod and you will be working slowly. There is no need to use any automatic mode because of the speed provided. Further, there might be a little trial and error with the exposure settings (the camera can be easily fooled by the great differences in bright and dark areas of the picture) and you want to make sure you have plenty of control over this process. Manual mode gives you that control.

#2.  Make sure you are comfortable with Bulb Mode

Manual mode only works for exposures up to 30 seconds. If you need a shutter speed that is longer than 30 seconds, the only option for getting a proper exposure is Bulb mode. Therefore, while you should generally shoot in Manual mode, you should also be comfortable with Bulb.

In Bulb mode, the shutter stays open as long as you hold the shutter button down. When you press the button, the shutter opens. When you release the button, the shutter closes. To avoid introducing any shake or movement into the exposure, using a remote shutter release is imperative when using this mode.

With Bulb mode you can make your exposure several minutes long. If your remote shutter release does not have a timer built-in to it, make sure you keep another timer handy (your phone may have one). If your remote does not have a timer, make sure it has a locking feature so you do not have to hold it the entire time.

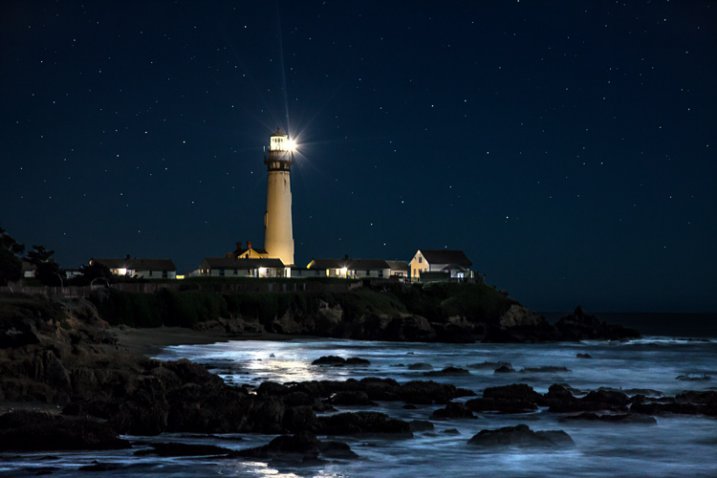
Proper Exposure at Night - Pigeon Point example

Exposure settings for this shot: Shutter speed of 6 seconds; aperture at f/5.6; ISO 1600.

#3.  Shoot in Raw

When shooting at night, it is particularly important to make sure you are shooting in Raw format. The Raw files coming out of most cameras are 14 bit files, whereas JPEGS are only 8 bit files. The more bits, the higher the range of available colors and the smoother the transitions between them.

The reason shooting in Raw is even more important at night, is that most of the colors that a camera can capture are at the top (bright) end of the scale. The range of available colors at the low (dark) end of the scale is extremely limited. At night, your pictures will almost always include a large dark portion. A JPEG file, with its reduced color options, you will likely introduce banding in your pictures.

#4.  Bring a flashlight

Knowing your camera controls really well pays dividends at night. You can make changes to the settings without being able to see everything. Nevertheless, a small flashlight is tremendously useful. Keep one handy to make sure you can see everything on your camera and tripod. It occasionally comes in handy for lighting areas of your picture as well.

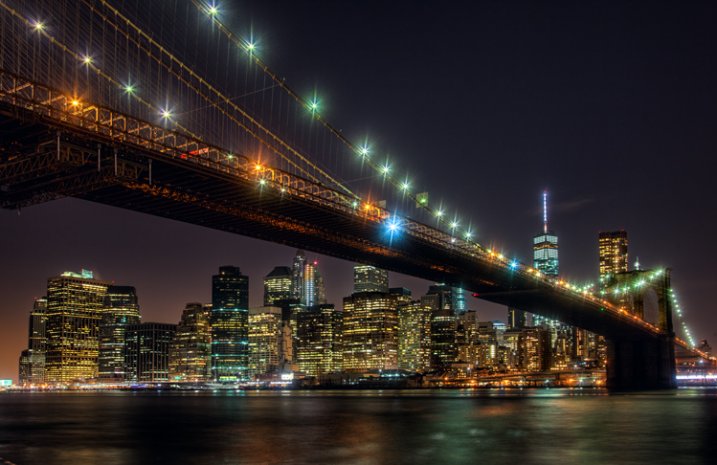
Proper Exposure at Night - Brooklyn Bridge

Exposure settings for this shot: Shutter speed of 10 seconds; aperture at f/9.0; ISO 200.

#5.  Choose proper settings

Proper settings will always depend on the situation. Nevertheless, there are some ways you should bias your settings when shooting at night. Here are a few:

  • Aperture: Open up your aperture more at night than you would during the day (i.e., use a lower f/number). Most night photographs tend to be of shots on a narrower plane than shots during the day. Further, the background and sky will be black anyway and you will not need as large a depth of field. The larger aperture also has the benefit of letting more light into the camera.
  • ISO: Keep your ISO setting as low as you can. Night photography always means there will be dark areas in your pictures, and these dark areas inevitably lead to digital noise. Raising the ISO will compound the problem.
  • Shutter speed: Whereas shutter speed might be the first exposure setting you worry about during the day, it should generally be the last one you think about at night. Since you will be shooting from a tripod, you can let the shutter stay open as long as you need. If you have traffic (streaking lights), a fountain, or running water in your picture, the longer shutter speed will actually benefit your pictures anyway. The only exception is high winds, or other instability impacting your rig.

One other setting to check is the Long Exposure Noise Reduction, which will be in your camera’s menu. If you enable this option, the camera will make two exposures, one normal and one with the shutter closed, which the camera will use as a comparison to filter out noise from the normal picture. Photos taken with this option enabled will take twice as long to expose, but will be less noisy.

#6.  Meter for the highlights

Determining the proper exposure level can be tricky at night. Each metering mode presents its own challenges. If you use evaluative metering, the camera is likely to be confused. If you use spot or partial metering, the meter will jump around depending upon whether you are aimed at a bright light or the dark background.

One answer to this problem is to use spot metering and to expose for the highlights. Set your meter between +1 and +2 as you meter on the highlights. The +1 -2 setting will keep your highlights looking bright, but at the same time, will keep the highlights within the dynamic range of the camera. Do not worry as much about the dark portions of the picture. If the dark areas happen to turn black, well, it is nighttime after all, and there is supposed to be some black. Take a test shot and adjust as necessary.

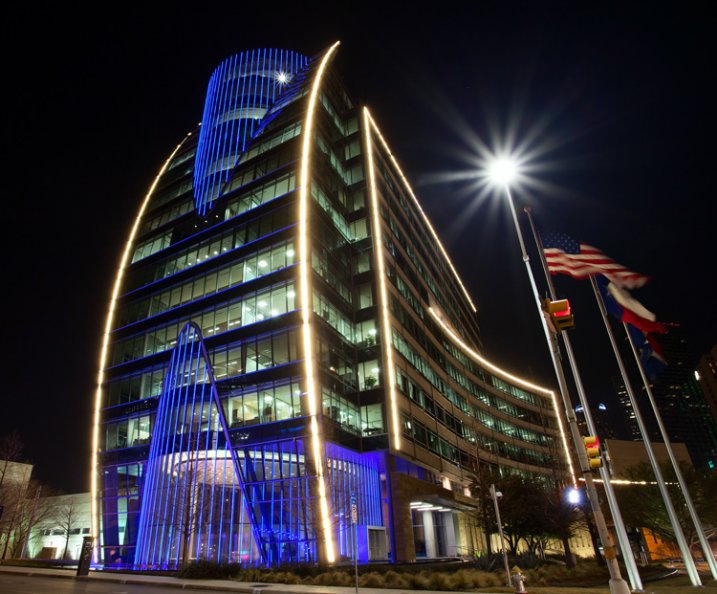
Proper Exposure at Night - Dallas example

Exposure settings for this shot: Shutter speed of 5 seconds; aperture at f/16; ISO 400.

#7.  Take a test shot at a high ISO

Speaking of test shots, you should make liberal use of them when shooting at night. However, you don’t want to sit around for 30 seconds, a minute, or even longer, waiting to see if the test shot is going to work out. The best way to get a test, without wasting a lot of time doing so, is to take tone at a much higher ISO than you would ordinarily use.

For example, let’s say you think the proper exposure settings for a given shot are: 30 seconds at f/5.6 with an ISO of 400. Rather than taking that shot and waiting around 30 seconds for the exposure, crank up the ISO and speed up the shutter speed by the same number of stops. The exposure level will be the same, but it will take a lot less time to expose the test picture. In this case, I would raise the ISO by four stops to ISO 6400 (raising it one stop to moves it to ISO 800, one stops increases it to ISO 1600, three stops to ISO 3200, and four stops gets you to ISO 6400). That allows you to reduce your shutter speed by four stops to only 2 seconds (reducing the shutter speed by one stop shortens it to 15 seconds, two stops shortens it to 8 seconds, three stops to 4 seconds, and four stops gets the shutter speed down to 2 seconds).

When you are satisfied with your exposure, just decrease the ISO and increase (lengthen) the shutter speed by an equal amount to get back to the final settings.

#8. Bracket your photos

Night photography is one area where you will want to bracket your photos. Blending and HDR can work wonders at night, but even if you are against such processing, bracket your photos anyway. Think of it as exposure insurance.

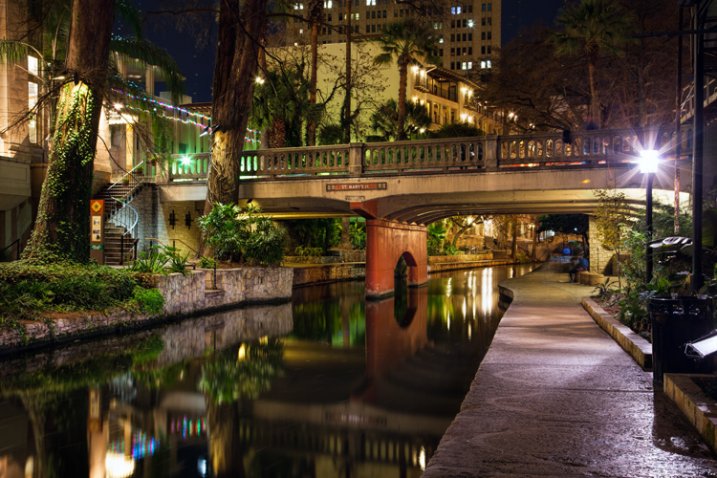
Proper Exposure at Night - San Antonio Riverwalk example

Exposure settings for this shot: Shutter speed of 30 seconds; aperture at f/11; ISO 200.

#9.  Verify the exposure with the Histogram

After you have taken your exposures, check them on the LCD on the back of your camera. The picture on the LCD will show you if the exposure is close to correct, but it is better to also check the histogram to make sure the exposure is within the dynamic range of your camera. Remember to keep the highlights on the right side of the histogram, but avoid a spike on the far right. If the dark areas spike on the left side the histogram, that is okay since parts of your picture are supposed to be black. In general, however, keep as much of the image as possible within the range of the histogram, but err on the side of keeping the highlights from blowing out.

Exposing at Night

If you are not totally comfortable with exposure, then doing some night photography will get you there in a hurry. You will have your camera on a tripod in unchanging light, so you can take as much time as you need to think through the exposure, and get it right. You’ll be forced to take into account the highlights and shadows when you meter, then study them on your histogram. Taking test shots, and making adjustments, will help you see the interrelationships between the exposure controls.

When you follow these steps, you are likely to get some great shots. Every city lights up its major attractions, bridges, and museums – often in colorful ways. A scene that might be boring during the day could be a great photo at night. Often, because of the effects of the lights, you’ll actually be surprised at what you end up with. Taking your time and applying these tips to nail the exposure will help you maximize the experience.

googletag.cmd.push(function() {
tablet_slots.push( googletag.defineSlot( “/1005424/_dPSv4_tab-all-article-bottom_(300×250)”, [300, 250], “pb-ad-78623” ).addService( googletag.pubads() ) ); } );

googletag.cmd.push(function() {
mobile_slots.push( googletag.defineSlot( “/1005424/_dPSv4_mob-all-article-bottom_(300×250)”, [300, 250], “pb-ad-78158” ).addService( googletag.pubads() ) ); } );

The post Tips for Getting Proper Exposure for Night Photography by Jim Hamel appeared first on Digital Photography School.


Digital Photography School

 
Comments Off on Tips for Getting Proper Exposure for Night Photography

Posted in Photography


Proper Disposal of Outdated Media: A Cautionary Tale

17 Sep

If I were to guess, I’d say it’s safe to assume that you’ve accumulated quite a sizable image library. Regardless of whether you’ve been shooting digitally for a decade or even just a year or two, all of those ones and zeros dancing happily inside your computer as image files are piling up. Don’t forget about all of those photos you’ve scanned in from your film days. Digitized any slides lately? How about the photo stream from your phone? Megabytes become gigabytes, gigabytes become terabytes, and over time the sheer volume of data can become mind boggling.

You’re backing it all up, right? Of course you are.

I think that being neurotic about backing up our images is pretty much a universal character trait of photographers. Or should be. When I shoot a wedding the cards are all backed up once before I even leave the venue. When I get home they are dumped from the cards to the computer. Then again to an external hard drive. I can’t think about anything else until the entire shoot exists in three places. I’m a little less uptight about commercial shoots, but only a little. For those, I only require a double backup. But it doesn’t end there. The catalog on my main drive automatically syncs to an external hard drive. Once a month it all gets synced to a second external drive which is stored off-site. And if that’s not enough, I’m starting to use the Copy cloud storage service as well. It’s like wearing a belt AND suspenders.

But technology changes over time, which means that our methods of backing up our data also change. In the grand scheme of things, it wasn’t that long ago that you were backing up your images on CDs. Towering piles of them. The piles began to shrink just a bit when DVDs became a viable option. External hard drives? Awesome. But then the clouds parted and we were suddenly able to store our prized data among them. Over time, those piles of shiny discs become obsolete. Once everything is backed up on current media, the obvious thing to do would be to trash the discs and outdated media, right?

Not so fast. And this is where our cautionary tale really begins.

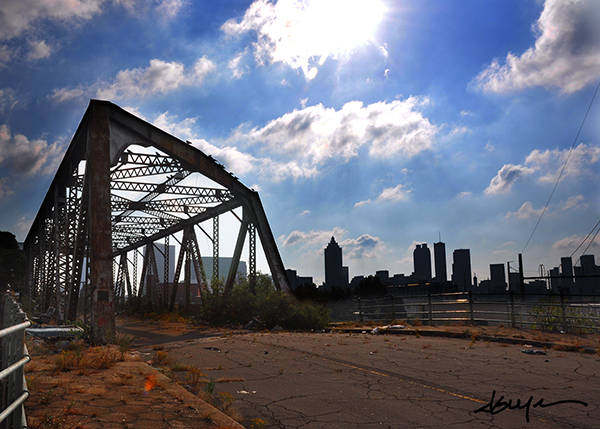
First, a little background. The photo below is the bridge at Northside Drive and Bankhead Highway in downtown Atlanta. Originally built in 1912, it was a major thoroughfare into the city long before the interstate highway system was even an idea on a drafting board. Years of progress, neglect, and shifting priorities– as well as the fact that the far end of the bridge now simply stops in mid-air 100 feet above some railroad tracks– have transformed it into “The Bridge to Nowhere.”  The bridge has become a haven and encampment for some of Atlanta’s homeless population. I’ve photographed it several times over the years.

bridge-to-nowhere-guyer-photography

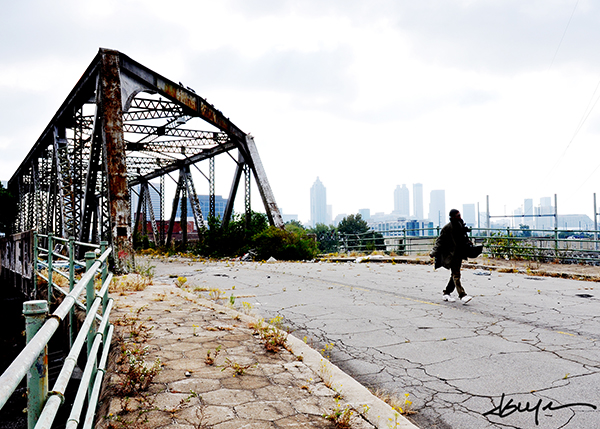
This particular image did not come from my hard drive or any of my backups. This image came off a Flickr photostream. Not MY Flickr photostream, but A Flickr photostream. This photo had been part of a multi-DVD backup that I simply threw in the trash several years ago when I switched to external hard drives. I have no earthly idea how, why, or where these discs were found, or what possessed the finder to check what was on them. Apparently he/she could not have just been a run-of-the-mill, garbage-picking identity thief like everyone else. No. This culprit was content to post eight of my photos to their Flickr page.

bridge-to-nowhere-guyer-photography2

We are practically hard-wired to protect our personal and financial information by shredding or otherwise destroying it before it goes in the trash. Sometimes I even throw pieces of stuff away in different trash cans. Do you really want your images showing up on a photo sharing site without your knowledge? How about a stock agency? Obviously, the answer is a resounding NO. So, what do you do?  Simple. Destroy the backup before you dispose of it.  Some shredders are powerful enough for discs. If you don’t have a shredder, a hammer, screwdriver, knife, letter opener, or any sharp object can inflict enough damage to the disc surface to prevent anyone from misappropriating your images. External hard drives and jump drives can either be physically destroyed, or be wiped and rendered unrecoverable with programs like KillDisk.

As technology continues its upward march, concerns over the best way to dispose of digital media will hopefully become less and less of an issue. With bigger and bigger file sizes– particularly from cameras with full frame sensors– backup storage options are becoming more and more sophisticated, hopefully making concerns over proper disposal eventually a moot point. In the meantime, however, they’re your photos. Protect them.

Post originally from: Digital Photography Tips.

Check out our more Photography Tips at Photography Tips for Beginners, Portrait Photography Tips and Wedding Photography Tips.

Proper Disposal of Outdated Media: A Cautionary Tale


Digital Photography School

 
Comments Off on Proper Disposal of Outdated Media: A Cautionary Tale

Posted in Photography


Histograms: Your Guide To Proper Exposure

30 Apr
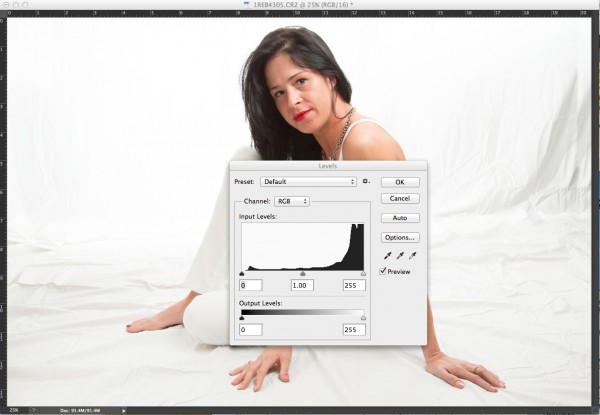
The finished image was a nice, high key portrait. See below for details on the histogram.

The finished image was a nice, high key portrait. See below for details on the histogram.

To many newbie photographers, getting the proper exposure in camera is the biggest challenge they face. While letting the camera do the work for them turns out fine most of the time, there are many times where the camera can require some help.  Knowing just how to give your camera that help is key to getting an image you’ll want to keep.  The best way to judge an exposure (or a potential exposure, when using Live View) is to use your camera’s histogram.

In this high key portrait, the histogram shows a majority of pixels on the right side, representing brighter pixels. This is to be expected due to the white background and outfit worn.

In this high key portrait, the histogram shows a majority of pixels on the right side, representing brighter pixels. This is to be expected due to the white background and outfit worn. The pixels in the middle of the histogram represent the subject’s skin tones, while the small dark peak on the left represents her hair. Notice also, that this histogram does show some highlight clipping. In some images, this may be a problem, but since this is a high key portrait and the background is the bright white area, and the skin tones are good, this is not a problem for this image.

A histogram, in it’s simplest terms, is simply a graph showing the brightness levels of pixels in the image. The right side of the graph represents bright pixels, while darker pixels are shown on the left side.  Pixels representing midtones are in the middle, of course. A histogram runs, from left to right, showing values from 0- black, to 255- white.  The height of the histogram represents how many pixels are recorded at a given brightness level. The primary aspects of the histogram that one should be concerned with are the left and right edges.  Any pixels that recorded as bright white (255) or as pure black (0), would be pushed up against the edge of the graph.

Since a histogram is simply a representation of the tonal range of a given image, there really is no right or wrong histogram. The histogram will change based on the tones in an image. A high-key portrait, for example, would show pixels mainly to the right side of the histogram. A low-key image would show pixels mainly to the left side of the histogram. An image with a wide tonal range would show pixels across the entire histogram.

As I mentioned, when judging exposure, the primary areas of the histogram to be concerned with are the right and left edges. Pixels in these areas are rendering as bright white, or dark black.  Generally speaking, unless an image is intended to show bright white or pure black areas, pixels pushed up to the very edge of the histogram could indicate an exposure problem.  This is also known as “clipping”. For instance, when a large number of pixels are pushed against the right side of the histogram, in essence, being cut off by the edge of the histogram, it is said that the highlights are clipped.

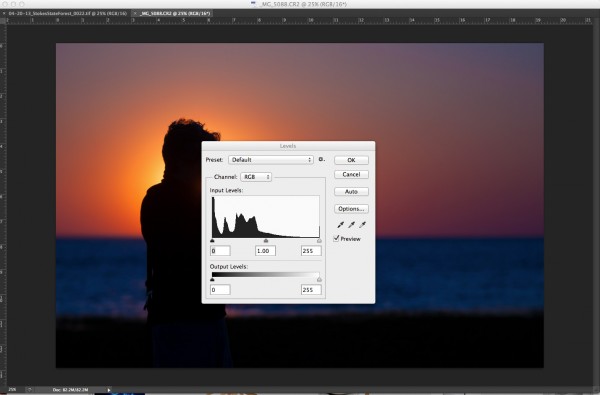
In this image, since the subject is in silhouette, and there are lots of dark tones, we expect to see most pixels on the left side of the histogram.

In this image, since the subject is in silhouette, and there are lots of dark tones, we expect to see most pixels on the left side of the histogram.

When judging the histogram, one must take into account the subject matter of the image. If the image should show bright white areas, yet the histogram shows the pixels as rendering more middle grey, due to the way the camera’s meter sets the exposure, you can then use exposure compensation or adjust your exposure manually to increase exposure and achieve the desired result.  The same is true for darker images that the camera overexposes because the meter is trying to achieve middle grey.  By reducing exposure, either manually by changing your shutter speed, aperture, or ISO, or by using exposure compensation, you can darken the image to achieve the desired image. The histogram of this new image will reflect the change to exposure.

Now, here’s the big secret. If you use Live View on your camera, you can view a live histogram, that will update and reflect changes in exposure when your exposure changes. This means you can judge what your current exposure is, and watch in real time how changes to that exposure will affect your image. It’s a great way to get a feel for how even a slight adjustment in shutter speed, aperture, or ISO can affect your exposure.

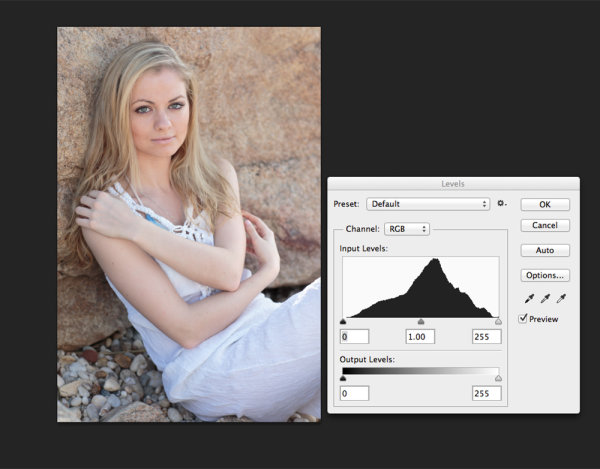
This portrait shows more midtones than anything else, so we see more of a classic peak near the center of the histogram, with the pixels falling off as they get to the edges of the histogram. You can see that neither the highlights or shadows are clipped .

This portrait shows more midtones than anything else, so we see more of a classic peak near the center of the histogram, with the pixels falling off as they get to the edges of the histogram. You can see that neither the highlights or shadows are clipped .

Post originally from: Digital Photography Tips.

Check out our more Photography Tips at Photography Tips for Beginners, Portrait Photography Tips and Wedding Photography Tips.

Histograms: Your Guide To Proper Exposure


Digital Photography School

 
Comments Off on Histograms: Your Guide To Proper Exposure

Posted in Photography


How To Make 3D Videos In Sony Vegas Pro 10&11 Proper Way

30 Oct

How To Make 3D Videos In Sony Vegas Pro 10&11 Proper Way my other video didnt really turn out as good as this one
Video Rating: 4 / 5

Next-generation gaming has arrived. Sparkle SXX5801536D5NM GeForce GTX 580 gives your games an adrenaline shot with the world’s fastest performance and futuristic, visually-stunning graphics. The Sparkle SXX5801536D5NM GeForce GTX 580 brings games to life through incredible DirectX 11 tessellation performance and advanced cinematic effects like motion blur and depth of field. Experience 3D worlds littered with debris and consumed in fire and smoke with NVIDIA PhysX effects running at twice the performance of prior generation GPUs. Completely immerse yourself in the game with NVIDIA 3D Vision Surround technology powering three HD displays in jaw-dropping stereoscopic 3D. And when you finish, sit back and interact with ray traced 3D renderings so realistic you won’t believe your eyes. Arm yourself for the future of gaming. Sparkle SXX5801536D5NM GeForce GTX 580. To Order this Product Visit tinyurl.com
Video Rating: 4 / 5

 
Comments Off on How To Make 3D Videos In Sony Vegas Pro 10&11 Proper Way

Posted in 3D Videos


Proper Sensor Cleaning Tutorial

25 Oct

Questions? Go here: www.youtube.com Tutorial on how to clean the camera sensor for dust-free images. See below for cameras with built-in Mirror Lock Up option available. Download the list of required supplies here (PDF): tinyurl.com D1-Series: EH-5 AC Adapter Required D2-Series: Mirror…

 
Comments Off on Proper Sensor Cleaning Tutorial

Posted in Nikon Videos


Crysis 2 Multiplayer “PC vs Xbox360” Graphics comparison ((PROPER))

02 Jan

((PLZZ POSTS COMMENTS)) FIRST TIME ON YOUTUBE REALTIME COMPARISON SUBSCRIBE ME SUBSCRIBE ME SUBSCRIBE ME Please keep in mind: The details following details are referring to the CryEngine 3 (CE3) in general and can’t necessarily be linked with Crysis 2! At the gamescom 2010, Crytek’s field applications engineer Sean Tracy showed to PC Games Hardware a live demonstration of the CryEngine 3 in stereoscopic 3D. Of course in real time (“What You See Is What You Play”) within the poweful editor Sandbox 3. Instead of rendering each picture twice (half the framerate!) and projecting it on a dedicated 120 Hz LCD monitor, Crytek simply uses the back buffer and the depth information in the graphics card: The renderred frame is practically being cloned and the fractum shift procedure makes two out of it. Thus, on the one hand there is nearly no performance drop and on the other hand stereoscopic 3D might be possible on any display – no matter if it’s on PC or consoles. Crytek calls this technology “Screen Space Re-Projection Stereo”. Crysis 2: Technological fireworks On an XBOX 360 or a PS3, Crysis 2 runs at 1.280 x 720 (720p) without anti aliasing with 30 fps (vertically synchronised; wether double or triple buffering was enabled Sean couldn’t tell us). The CryEngine-3-maxim corresponds with what John Carmack said about the id-tech-5-engine (rage): Due to the consoles the engineers had to massively optimize the engine. Deferred lighting for example demands lots of input performance
Video Rating: 4 / 5

yt3d:enable=true Highlight of the stereoscopic 3D related companies at The Gadget Show Live 2010 event filmed in 3D using a side by side rig of two Canon 550d’s. It was an amazing show. I got a chance to speak to lots of industry insiders and 3D pros, as well as experiencing almost all of the soon available 3D TV’s, projectors and monitors. All in all, I can’t wait till Gadget Show Live 2011. For the option of choosing your preferred 3D viewing method go to the channel view page to find it just below the video ( this is a bug that Youtube has in its new look, but according to their forums, they are working on a fix for it), otherwise you can only see it in side by side cross-eyed view. Also change the resolution box to 1080p,and then immerse yourself into the 3D experience of being at the show. Rate,comment,subscribe!
Video Rating: 5 / 5