RSS
 

Posts Tagged ‘Problems’

Due to Coronavirus, Canon Faces Production Problems on EOS R5, R6

17 Mar

The post Due to Coronavirus, Canon Faces Production Problems on EOS R5, R6 appeared first on Digital Photography School. It was authored by Jaymes Dempsey.

Due to Coronavirus, Canon Faces Production Problems on EOS R5, R6 featured image

The camera industry is feeling the effects of the coronavirus now more than ever.

According to Canon Rumors, Canon’s is facing significant shortages in the production of its two new mirrorless cameras, the EOS R5 and EOS R6.

These two mirrorless models are currently under development and were slated to launch this summer, but the appearance of coronavirus has seen the disruption of Canon’s supply chains and has brought production capacity on the cameras down to just 25%.

Canon is considering two ways of addressing these issues:

First, the company may decide to halt the release of the EOS R5 and EOS R6 until the fall, when production should be back at full capacity. This would allow for strong, albeit late, product launches.

Second, Canon may go ahead with the launch of both cameras. But Canon would be moving forward without the production numbers necessary to satisfy all customers, and so we would likely see shortages until the coronavirus pandemic has passed.

Obviously, neither of these measures is ideal. Both the EOS R5 and R6 have generated great excitement among Canon fans, and among the camera industry at large. Any delays or shortages will be met with frustration on all sides, especially by those who have been holding out for a true professional mirrorless model from Canon.

Note that the EOS R5 offers a number of features that were missing from Canon’s first two distinct full-frame mirrorless bodies, the EOS R and RP. These include dual card slots (essential for wedding photographers, photojournalists, and sports photographers, all who require redundancy in their work), as well as in-body image stabilization, which will debut in both the EOS R5 and EOS R6. The EOS R5 will also address concerns that videographers had with the EOS R; the R5 will reportedly offer true 8K video that utilizes the full width of the sensor.

And while Canon has not confirmed a megapixel count for the R5, it has been consistently rumored to feature a 45 MP sensor, which could position the R5 as a high-powered alternative to megapixel monsters such as the Nikon Z7 and the Panasonic S1R.

Canon has remained virtually silent regarding the EOS R6. But rumors suggest that the camera will feature a 20 MP sensor, in-body image stabilization, 4K/60p video, and 12/20 frames-per-second shooting with mechanical and electronic shutters, respectively. It may cater to hobbyists looking for a first full-frame mirrorless body, but who want true mirrorless-type features such as IBIS.

Here’s the bottom line:

The release of these two full-frame mirrorless cameras may well be a turning point for Canon. Whether it comes sooner or later is immaterial, though it will certainly be frustrating for anyone looking to purchase these cameras.

So keep an eye out for more information regarding both of these mirrorless bodies.

Are you looking to buy either the EOS R5 or the R6? Which camera excites you more? Share your thoughts in the comments!

The post Due to Coronavirus, Canon Faces Production Problems on EOS R5, R6 appeared first on Digital Photography School. It was authored by Jaymes Dempsey.


Digital Photography School

 
Comments Off on Due to Coronavirus, Canon Faces Production Problems on EOS R5, R6

Posted in Photography


8 Tips to Minimize Memory Card Problems

27 Nov

The post 8 Tips to Minimize Memory Card Problems appeared first on Digital Photography School. It was authored by Megan Kennedy.

minimize-memory-card-problems-tips

Memory cards are a crucial component of digital photography. Here are 8 tips to help minimize memory card problems.

glitch

The unfortunate result of a memory card issue

What is a memory card?

minimize-memory-card-problems-tips-CF-card

A memory card is a storage accessory that records the image data you make while taking photographs with a digital camera.

Square or rectangular in shape, a memory card slots into your camera and reads/writes each image file you create.

At the end of a shoot, the memory card can be removed from the camera and connected to a computer where images are then transferred for viewing, editing and storage.

There are many different memory cards built to suit different needs, camera models and budgets.

To have an in-depth look at memory card specifications, check out our article here.

Memory cards are no doubt an amazing piece of technology, but they do require care. Fortunately, a bit of research can help minimize memory card problems.

1. Use a good card reader

As I mentioned before, there are various types of memory cards, each with different specifications and levels of quality. There are also card readers of different qualities to match.

Card readers are the devices that transfer data from the memory card to your computer.

While card readers seem like a pretty straight-forward piece of equipment, you don’t want to run the risk of corrupting files as you upload them to the computer.

Investing in a good memory card reader can save a lot of stress down the road.

2. Purchase quality cards

example-of-cheap-equipment

Uh, oh…the result of using a cheap memory card. Unfortunately, this image couldn’t be saved.

Purchasing a good memory card is key to safeguarding your images. While quality cards may be more expensive, a cheap memory card can compromise your photography.

Brands like SanDisk and Lexar are a go-to for professional photographers. Steer away from deals that look ‘too good to be true’ or obscure brands with poor reviews.

3. Eject your memory card from the computer safely

8 Tips to Minimize Memory Card Problems

While it might seem harmless to remove your memory card from the computer without ejecting, you could be putting your next shoot at risk.

Not ejecting your card may result in corrupted data or card failure. To minimize memory card problems, always eject your card through the computer before removing it.

4. Turn your camera off before removing your memory card

Another simple way to minimize memory card problems is to turn your camera off before removing your card. Removing your memory card while the camera is still on can interrupt the writing process and potentially corrupt your image files.

In addition, avoid shooting while your camera battery is low. If your camera runs out of power while reading/writing it can be detrimental to all the data on your memory card.

5. Don’t completely fill your card with images

It sounds counter-intuitive, if you have the space, why not fill the card…right?

The fact is, just like a maxed-out hard drive, a card nearing capacity under-performs, and this can compromise your images.

To avoid this issue, invest in a large memory card, keep an eye on your image-count, don’t fill your card over 85-90% capacity, and always have a spare card at the ready.

6. Don’t switch devices without formatting

minimize-memory-card-problems-tips

Switching a memory card into different camera devices risks compatibility issues that can corrupt the data of the whole card.

If you need to change equipment, formatting a card before use or using a new memory card is the safest way to go.

7. Don’t delete files in-camera

If you take a photograph you aren’t too keen on, it’s tempting to erase the image then and there. However, deleting photographs individually in-camera can result in corrupted images.

Going through and deleting images can also soak up valuable shooting time. Wait till you have uploaded your files to the computer before you start deleting content.

8. Format your memory card before using it

8 Tips to Minimize Memory Card Problems

At the start of a new shoot, you want a memory card that is ready to read/write plenty of new data.

To do this properly, it’s a good idea to format your card in-camera first.

Selecting the format option in your camera menu will clear the card, readying it for new image files.

Formatting before a shoot also minimizes the likelihood of scrambling new images with lingering data left on the card from previous shoots.

Conclusion

Memory cards are amazing little pieces of technology. With a few simple steps, you can minimize memory card problems, allowing you to focus your attention on image-making instead!


Do you have any other tips for minimizing memory card problems? Or have you had corrupted cards and lost files? Share with us your tips and stories in the comments.

The post 8 Tips to Minimize Memory Card Problems appeared first on Digital Photography School. It was authored by Megan Kennedy.


Digital Photography School

 
Comments Off on 8 Tips to Minimize Memory Card Problems

Posted in Photography


Nikon issues battery recall: Overheating batteries from 2012 still causing problems

10 Jul

If you purchased a Nikon D800, D800E, D7000 or Nikon 1 V1 and are still shooting with the original EN-EL15 battery, or if you’ve ever purchased a spare EN-EL15 off the shelf, listen up. There’s a small chance you’re using a defective battery that could pose a danger to yourself and your camera body.

In an update to a recall first announced all the way back in 2012, Nikon is asking owners of certain EN-EL15 batteries to get in touch with the company about getting a complimentary replacement.

“The [affected] battery pack can experience a short circuit causing it to overheat and possibly causing the outside casing to become deformed, posing a potential hazard to consumers,” writes Nikon. “There have only been seven (7) confirmed reports of incidents of the problem worldwide, and while no injuries have taken place, Nikon Inc. has initiated this recall of the affected lot numbers as a reflection of its commitment to safety and product quality.”

Affected batteries can be identified by the serial number. If the 9th number of the serial on the back is either an “E” or an “F” your battery is affected, and you should reach out to Nikon Inc. through this form to get a replacement. Do not dispose of the battery in the trash. You’ll need to give the defective battery to the UPS guy who brings you the new battery in exchange.

You can read the full recall text below:

EN-EL15 Rechargeable Li-ion Battery Pack Recall

UPDATED EN-EL15 SERVICE ADVISORY AS OF JUNE 20, 2017. Technical Service Advisory for users of the EN-EL15 rechargeable lithium-ion battery pack.

Nikon Inc. is asking your cooperation in connection with a voluntary recall of certain lot numbers of its Nikon Model EN-EL15 rechargeable lithium-ion battery pack. The battery pack can experience a short circuit causing it to overheat and possibly causing the outside casing to become deformed, posing a potential hazard to consumers. There have only been seven (7) confirmed reports of incidents of the problem worldwide, and while no injuries have taken place, Nikon Inc. has initiated this recall of the affected lot numbers as a reflection of its commitment to safety and product quality. We are asking that owners of the affected battery pack contact Nikon Inc. to initiate a free product exchange.

The Nikon EN-EL15 battery pack is provided as a supplied accessory with the purchase of Nikon’s digital SLR D800, D800E, D810A, D810, D610, D600, D7200, D7100, D7000, D500 cameras and the Nikon 1 V1 advanced camera with interchangeable lens. However, EN-EL15 batteries supplied with D810A, D810, D610, D600, D500, D7200, D7100 are not included in this voluntary recall. It is also sold separately at retail under Nikon’s model number 27011. The EN-EL15 battery pack involved in this recall was first distributed by Nikon in March 2012 and is still being sold at retail.

No other Nikon battery packs are involved in this recall.

Nikon’s digital SLR D800, D800E, D810A, D810, D610, D600, D7200, D7100, D7000, D500 cameras and the Nikon 1 V1 advanced camera with interchangeable lens as well as any other Nikon cameras are also not subject to this recall.

What you should do:

1.) Determine if your EN-EL15 battery pack is affected
This voluntary recall is limited to EN-EL15 battery packs in lots E and F. First, please confirm that “EN-EL15” is printed on the label of your battery pack. Then, please locate the 14-digit lot number beside the recycle symbol, as shown on the photo below.

  • If the 9th character of the lot number is E or F, your battery is among those being recalled.
  • If the 9th character of the lot number is any other letter, your battery is not affected by this recall.

Click here to use our lot number lookup tool.

2.) If your EN-EL15 battery pack is affected

  • Immediately remove the battery from your camera or camera bag, but please do not dispose of it.
  • Complete the Nikon’s online EN-EL15 battery exchange form by clicking this link.
  • Once your request is processed Nikon will send a confirmation email.
  • On the day of your battery exchange, UPS will contact you by phone and email notifying you of the delivery.
  • A UPS courier will then deliver your new battery pack(s) AND collect the recalled battery pack(s).
  • Someone needs to be present for this exchange. If you need to make special arrangements, please contact UPS.

3.) If your EN-EL15 battery pack is not affected

No further action is needed. Please continue using your EN-EL15 battery pack as usual.

Nikon is committed to safety and to providing to its customers only the highest quality products. We regret any inconvenience this matter may cause you and appreciate your continued support of Nikon and its products.

If you have any additional questions or concerns, please contact Nikon at 1-800-645-6687.

Articles: Digital Photography Review (dpreview.com)

 
Comments Off on Nikon issues battery recall: Overheating batteries from 2012 still causing problems

Posted in Uncategorized


10 Tips to Help Photographers Avoid Back Problems

21 Jan

Studies state that one time or another, about 80% of the world population experiences some kind of back problems or pain. This is either due to nerve and muscular problems, degenerative disc disease, arthritis or some kind of trauma. Age, poor physical fitness and being overweight may explain some causes of back pain, but the main reason responsible is for sure bad posture.

A lot of jobs require physical efforts like lifting, pushing, or pulling while twisting your spine, but sitting at a desk all day may be just as bad, as a static posture increases stress in the back.

Nick Haskins

By Nick Haskins

Photographers are for sure high-risk candidates to back pain, either for carrying heavy cameras or bags on their necks or shoulders or by spending a long time at their computers editing images. Every photographer I know always complains about how bad their back hurts after a long shooting session or many hours editing images.

For many years I was one of those photographers with constant back pain. I was always trying to relieve it with pain medication or visits to a chiropractor until the day I woke up with my left arm completely numb. The doctor told me I had two really bad herniated discs in my cervical and that I needed surgery to fix it.

It was not an easy surgery let me tell you; the recovery was long and painful and it all made me realize that I could have avoided reaching this point if I had paid more attention to my posture. So here are some tips I have learned along the way that can help you take better care of your back while doing your photography work, so you can avoid what I went through.

#1 – Trade your shoulder bag for a backpack

10 Tips to Help Photographers Avoid Back Problems

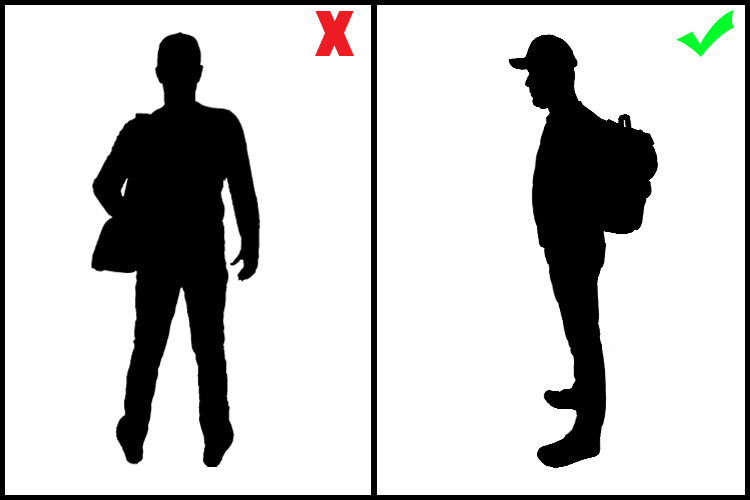
A shoulder bag is a signature style for most photojournalists, and it is indeed practical when you need to have easy access to your equipment while on the move. But it is also a big enemy of your posture, as it puts all the weight in one of your shoulders making your spine curved and unbalanced.

Backpacks distribute the weight equally on both shoulders, making it a much better solution for carrying your equipment. Rolling trolleys are an even better option, but they are not as practical if you need to move fast and don’t have smooth terrain.

#2 – Trade the neck strap on your camera for a sling strap

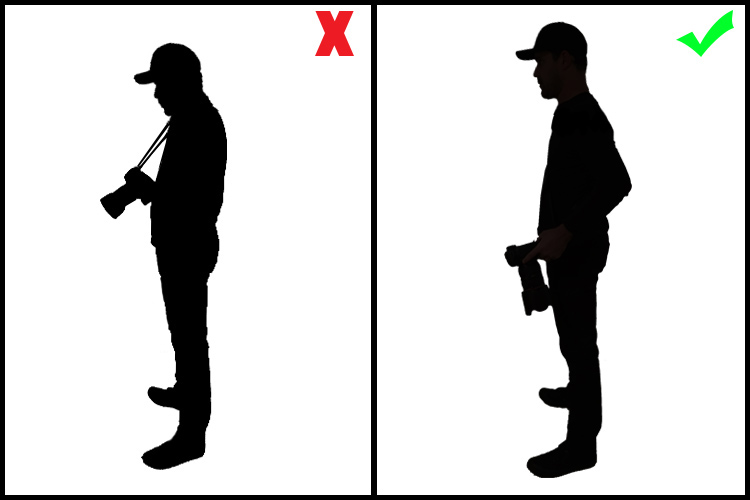
Having a heavy camera and lens hanging from your neck by a strap is obviously a really bad idea. It causes a lot of stress on your neck, leading to issues with either the spinal discs or in the joints of the cervical spine. Sling straps minimize the impact of the camera’s weight, hanging it from the shoulder and across the torso. This makes it easier for you to move around and reach the camera, reducing the impact on your neck.

10 Tips to Help Photographers Avoid Back Problems

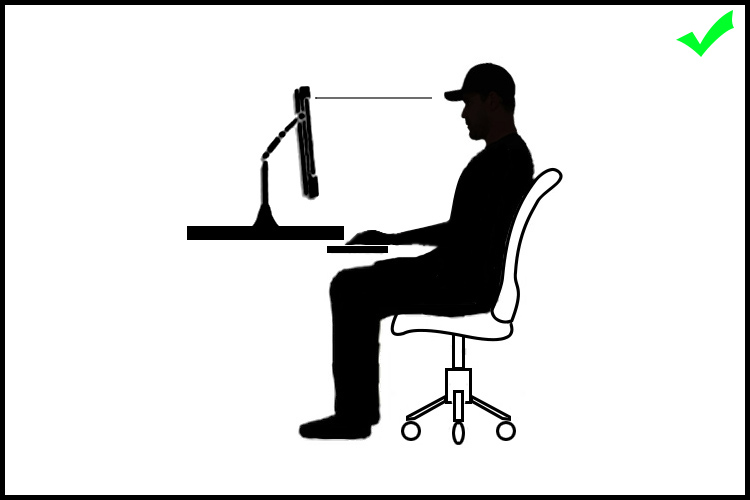
#3 – Get a good office chair

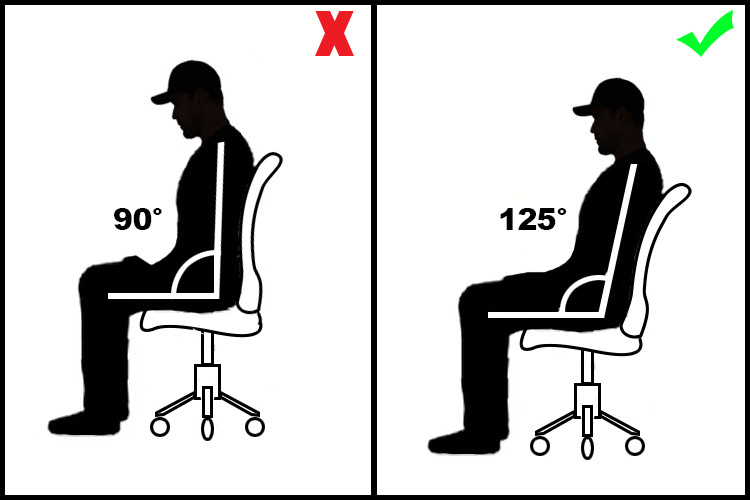
If you spend a long time working on your computer, then a good office chair is something you must invest in. It is really important that your chair is adjustable, and can be regulated to your size, and the position you adopt in relation to the table and the computer you are working on.

The optimal angle position between your legs and back is around 125 degrees.

10 Tips to Help Photographers Avoid Back Problems

Also avoid chairs with wheels that cannot be blocked, as they tend to move back and forward leading you to bad posture while seated. Also, avoid arm rests as they might cause pressure on the elbow tendons leading to tendinitis and ulnar nerve compression.

#4 – Adapt the computer position to your body

Almost everyone uses their computer in the worst possible position as they are most of the time located very low, especially if it is a laptop.

Hunching over and looking down for a long time causes really bad stress on the cervical spine and neck muscles, This can lead to a stiff neck, headaches, and in a long run degenerative spinal problems. The correct thing to do is to place your computer monitor in a position that you can look straight ahead without having to curve your neck.

10 Tips to Help Photographers Avoid Back Problems

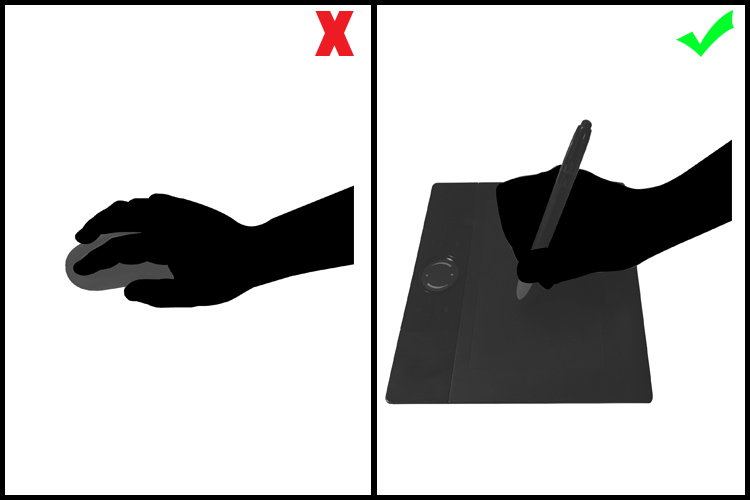
#5 – Use a pen and tablet instead of a mouse

A mouse is a fundamental piece of hardware for most people’s computer work, but at the same time, it is a bad ergonomic tool. It forces your hand to stay in an unnatural position, leading in the long run, to hand, wrist, shoulder and arm problems like tendinitis and arthritis.

The use of a pen and tablet, besides giving you much better control of design functions in image editing software, allows a much more natural hand position, avoiding health problems.

10 Tips to Help Photographers Avoid Back Problems

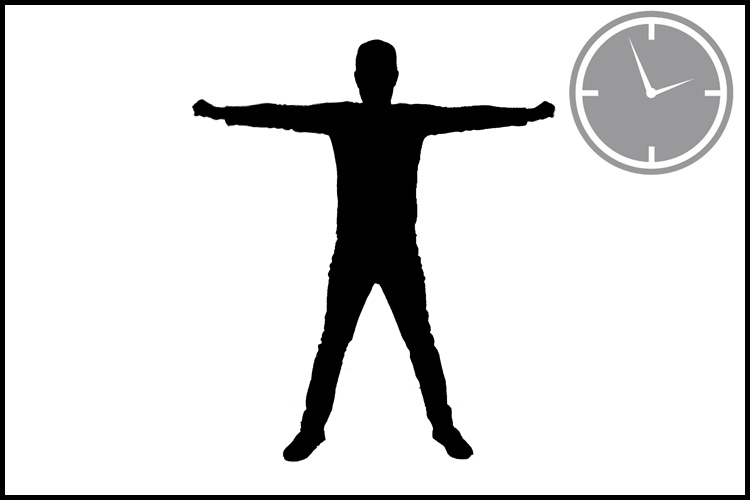
#6 – Take regular breaks and stretch your body

A common mistake we all make is to stand in the same position for long periods of time whether it is photographing, driving, standing at a desk, or simply just relaxing on the couch.

It is fundamental to take small breaks in your daily activities and simply just stretch, allowing the fibers in your muscles to move and avoid cramps and contracting.

10 Tips to Help Photographers Avoid Back Problems

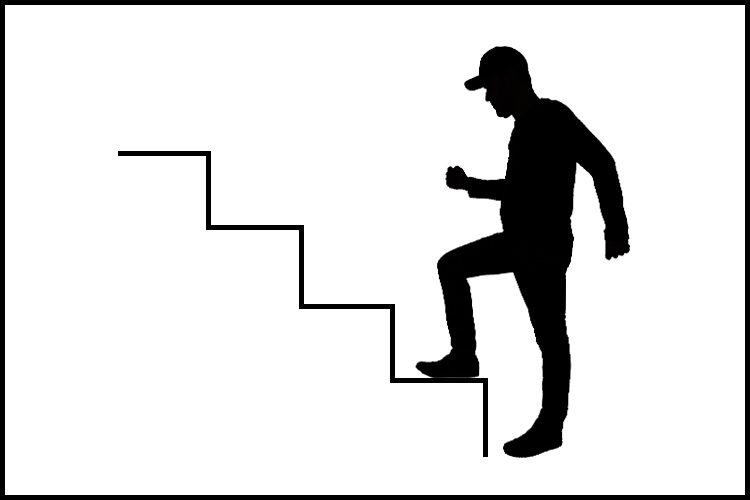
#7 – Get your blood flowing

Poor circulation is the starting point to a lot of really serious health problems. Of course, we would all like to have a healthier life, eat better, and exercise more, but the truth is that it takes a lot of time and discipline.

A great way to overcome this is to turn your regular activities into small exercises.

Simple things like taking the stairs instead of the elevator, or turn a walk down the street to the coffee shop into a power walk, just by adding more movement to your arms while you walk, can make a big difference in your overall physical condition.

10 Tips to Help Photographers Avoid Back Problems

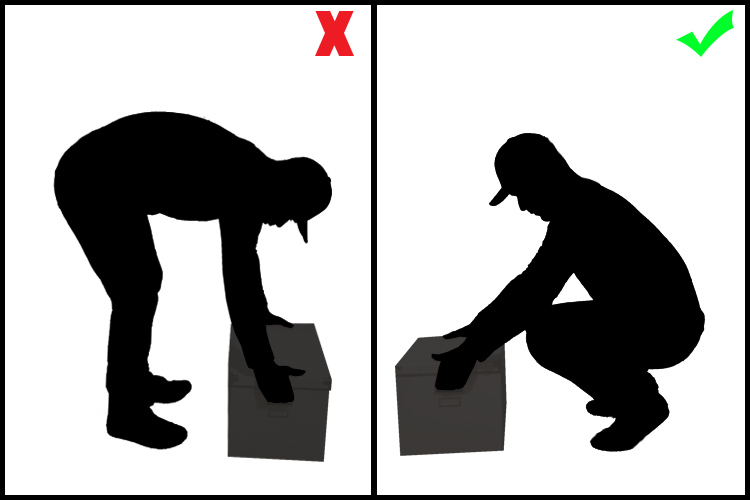
#8 – Always lift with your knees, not your back

Most severe back injuries come from trauma or heavy weight lifting. Trying to pick up something heavy from ground level, using just your back, is a true recipe for a disaster like a herniated disk.

The trick here is to always keep you back straight and use your knees as a lever to lift up the weight. Your legs muscles are much stronger than your back, trust me.

10 Tips to Help Photographers Avoid Back Problems

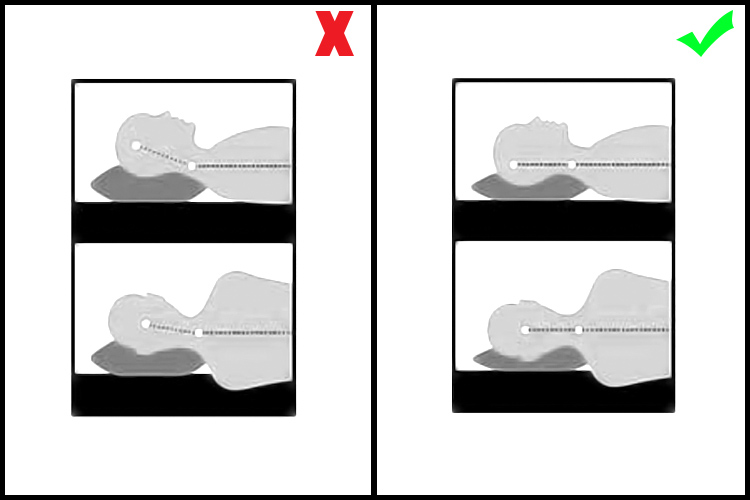
#9 – Adjust your sleeping position

We spend roughly one-third of our lives sleeping, so if we worry about our posture during the day, we should also worry about our posture while we sleep.

Most hard working people I know are so tired when they get to bed, that they just lay down, close their eyes and get to sleep right away. Most of the time that’s in really awkward positions and they spend most of the night wrestling with their pillow or sinking in really bad mattresses.

The best sleeping position is a really controversial discussion as it is a personal thing due to your body shape, weight, breathing difficulties, etc.

We move a lot in our sleep, but whether you sleep most of the time on your back, side or stomach, always try to have a mattress and pillow that keep your spine as straight as possible. You will rest a lot better and wake up a lot more fresh.

10 Tips to Help Photographers Avoid Back Problems

#10 – Hydrate yourself properly

Our body is 90% water, but yet we tend to forget how much we need to drink water just to be alive.

If you are a busy person, it’s not easy to reach the 2 liters per day of optimal water intake. But if you just make an effort and carry a water bottle around with you and drink regularly during the day you will see that your internal organs will function a lot better, your skin will look younger and your joints and bones will not get old so fast.

10 Tips to Help Photographers Avoid Back Problems

Conclusion – over to you

So there it is, a small list of simple tips that might make a significant change in your life.

They may seem obvious for most people, but the fact is that we are all so busy with our daily life and work routines, that we seem just to forget to take care of ourselves and only realize when it is just too late.

What about you, do you have some tips we could add to this list to help other photographers avoid back problems?

googletag.cmd.push(function() {
tablet_slots.push( googletag.defineSlot( “/1005424/_dPSv4_tab-all-article-bottom_(300×250)”, [300, 250], “pb-ad-78623” ).addService( googletag.pubads() ) ); } );

googletag.cmd.push(function() {
mobile_slots.push( googletag.defineSlot( “/1005424/_dPSv4_mob-all-article-bottom_(300×250)”, [300, 250], “pb-ad-78158” ).addService( googletag.pubads() ) ); } );

The post 10 Tips to Help Photographers Avoid Back Problems by Ivo Guimaraes appeared first on Digital Photography School.


Digital Photography School

 
Comments Off on 10 Tips to Help Photographers Avoid Back Problems

Posted in Photography


Pencil + Sharpener: Redesign Solves 3 Classic Drawing Tool Problems

27 Jun

[ By WebUrbanist in Design & Products & Packaging. ]

pencil plus sharpener

Pencils require sharpening, run out of eraser and turn into unusable stubs as they near the end of their lifespan, but this clever gadget aims to change all of that, solving all three issues at once.

demo

Even in today’s digital world, artists, designers, writers and musicians still fall back on this traditional tool. The Pencil+ helps on multiple fronts, but functions first as a pencil holder, enabling the user to tuck various lengths of pencil into a central void.

eraserhead

What keeps the pencil from slipping too far in? An adjustable eraser serves as a backstop, letting you move the pencil portion backward to fit and forward as the pencil gets shorter. Meanwhile, the back of the holder (normally where one would find an eraser) doubles as a sharpener, keeping it always on hand for reworking broken or worn tips.

remove and sharpen

“Worry no more because with pencil+,” say its creators, “you can now have a sharpener, extender, eraser holder and transporter for your favorite tool” which is available in Teak, Ebony, Wild Olive, African Padauk and Indonesian Redwood”

pencil sharpener combo

A few potential critiques come to mind: first, someone employing this device will have to deal with an additional step to access an eraser. Second, the holder is necessarily wider than a pencil, so it will require some getting used to in terms of grip and function. Third, the eraser length is a function of pencil length, so storing a lot of extra eraser could be an issue (though easily longer than a normal one). Still, one can be sure, at least, never to lose track of one’s sharpener, and also that a single pencil will last a lot longer.

Share on Facebook


[ By WebUrbanist in Design & Products & Packaging. ]

[ WebUrbanist | Archives | Galleries | Privacy | TOS ]


WebUrbanist

 
Comments Off on Pencil + Sharpener: Redesign Solves 3 Classic Drawing Tool Problems

Posted in Creativity


How to Identify Three Common Image Problems and Fix Them in Lightroom

06 Dec

I hear it over and over, “I have a nice camera but my pictures just don’t come out as good as I expect.”

What ensues is an interrogation first about equipment selection, settings, and general technique. More often than not when we finally get down to the nitty gritty, the fact is that many people not only have a difficult time identifying what’s wrong with their photos, let alone determining how to prevent it, or fix it in post-processing.

jumping through hoops

Common problems that plague your images might be able to be fixed, but you might have to jump through some hoops to do it.

Although there are two sides to this topic (one side being nailing the shot in-camera), we are going to take a look at some common image problems that might be plaguing your photos, and ways to fix them in post-processing. This may be helpful if you want to revisit images you have in your library that may be salvageable.

I’ll be referring to Lightroom (LR) as the post-processing software, although the general adjustments can be adapted for use in other software.

#1 Washed Out

The term washed out refers to a photo which seems to have been shot through a translucent fabric. There is a uniform haze which reduces color saturation, sharpness, clarity, and contrast. There are several factors that can contribute to your pictures being washed out. It could be anything from poor quality lenses, to ghosting from shooting directly into a light source (lens flare).

The good news is that with the features and power that we have in LR, this problem can often be overcome.

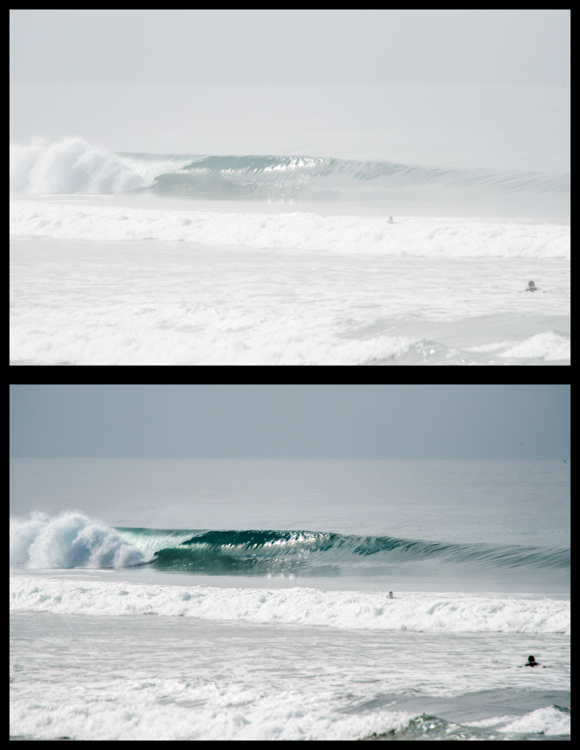
Let’s look at this photo of a beautiful wave, shot early in the morning. It was shot at 200mm with a 2x teleconverter (an effective focal length of 400mm). Teleconverters increase focal length, but are notorious for eating light, and reducing contrast and sharpness.

washed out image

Although teleconverters can wreak havoc on your images, all is not lost.

As you can see, the original shot is not very appealing. In an attempt to bring it back from the brink of unacceptability, I have made the following adjustments:

Basics panel

  • Contrast increased (+)
  • Highlights decreased (-)
  • Shadows decreased (-)
  • Whites increased (+)
  • Blacks decreased (-)
  • Clarity increased (+)
  • Vibrance increased (+)
  • Saturation increased slightly *+)

Tone Curve panel

  • Lights decreased
  • Darks decreased
  • Shadows increased

The trick here is to go back and forth between the different sliders that control darks and lights. For example, I will adjust the Highlights and Whites sliders, go to the Tone Curve panel and adjust the Highlights and Lights, then return to the Highlights and Whites again to fine tune how I want that end of the spectrum to look.

#2 Color or Tint

In my opinion, this is one of the strongest arguments for shooting in RAW format. Shooting in RAW allows you way more control correcting White Balance in post-processing, opposed to other file formats – and incorrect White Balance is the primary cause of off-colored images, or ones with a color tint.

If you haven’t developed an eye for identifying this problem, you might miss it. I see many really nice photos that have a slight tint, which is unintentional. The key is to look at areas of the image which are a neutral color, or white – this is where it is easiest to notice the off-color tint. Note that editing on a monitor which is not color calibrated may limit your ability to achieve correct White Balance.

incorrect white balance and tint

Sometimes noticing if an image has incorrect White Balance, or a color tint, can be tricky. I used LR’s White Balance eye dropper tool where the red square is (top image) – it got pretty close, but still a bit too magenta.

The first line of defence is to give LR’s Auto White Balance tool a shot. I find it to be somewhat inaccurate, but a good starting point nonetheless. Once activating the eye dropper tool, a pop-up window will show a magnified view to allow you to select pixels as close to a neutral color as possible.

From this point, you can use the White Balance and Tint sliders to fine tune the image. If there are people in the photo, your goal should be making the skin tones look as natural, and pleasing as possible.

#3 Too Much Variation in Contrast

Being confronted with a drastic contrast range is one of the most common problems you are likely to face in your shooting. After all, this is why many photographers are equipped with a polarizing filter, and why new camera models strive for an expanded dynamic range.

Luckily, you are not stuck with the image that you download onto your computer. If you are shooting in RAW there is a lot of information about details, color, etc., which you can exploit in post-processing.

Let’s take a look at this photo I snapped from inside a bookstore. It was pretty dark inside with the midday sun shining outside the window. Sure, I could have shot bracketed photos to merge into an HDR (high dynamic range) image, used a flash to balance the dark interior with the lighter exterior, or used a polarizer to darken the window portion of the scene. But I only had my camera with one lens, just grabbing some snapshots while out and about for the afternoon, so I didn’t have the means.

high contrast image

The camera struggled with this high contrast scene, but a little work in LR breathed new life into it.

So to what extent can this image be salvaged?

As you can see, the camera actually captured a lot of information, and it was just a matter of telling LR what to do with it. Here is a list of changes made to this image to give you an idea of how to do this yourself:

Basics panel

  • Contrast decreased slightly (-)
  • Highlights decreased (-)
  • Shadows increased (+)
  • Whites decreased (-)
  • Blacks decreased (-)
  • Clarity increased (+)
  • Vibrance increased slightly (+)
  • Saturation increased slightly (+)

Tone Curve panel

  • Highlights decreased
  • Lights decreased
  • Darks increased
  • Shadows decreased

Lastly, I used the Adjustment Brush to mask off the window portion and made these adjustments:

  • Exposure decreased (-)
  • Contrast increased (+)
  • Highlights increased (+)
  • Shadows decreased (-)
  • Clarity increased (+)

Conclusion

Of course, there are a host of other problems you can run into while out shooting, but these are a few of the most common you’re most likely to encounter. Don’t overlook the fact that you should try and get the best image possible while out in the field. Although editing software is very powerful, you will get best results when you don’t have to push the limitations of your editing software.

Hopefully this article has given you some guidance on how to salvage images that you may once have considered lost. Show us some examples of photos that you have saved in the comments below.

googletag.cmd.push(function() {
tablet_slots.push( googletag.defineSlot( “/1005424/_dPSv4_tab-all-article-bottom_(300×250)”, [300, 250], “pb-ad-78623” ).addService( googletag.pubads() ) ); } );

googletag.cmd.push(function() {
mobile_slots.push( googletag.defineSlot( “/1005424/_dPSv4_mob-all-article-bottom_(300×250)”, [300, 250], “pb-ad-78158” ).addService( googletag.pubads() ) ); } );

The post How to Identify Three Common Image Problems and Fix Them in Lightroom by Jeremie Schatz appeared first on Digital Photography School.


Digital Photography School

 
Comments Off on How to Identify Three Common Image Problems and Fix Them in Lightroom

Posted in Photography


5 Ways to Avoid Problems and Conquer Summer Photography

20 Aug

I’m a big fan of summer. In fact, I dislike winter greatly, and my favorite season is spring. But summer is probably number two on my favorite season list. Summer is great because it’s not cold. But it can also be so hot that you may walk a couple steps during a hot and humid day and return drenched in sweat.

Not cool, sun – not cool.

15_June_05_NxNW2015__DSC5091.dng

But in all seriousness, summer can be fantastic for photography because you can literally go out anytime with shorts and a t-shirt. In a way that’s liberating. In the winter you’re wearing layers upon layers; in the spring you may be wearing rain gear more often than not.

With this all said, I want to share some things to avoid during summer, and ways to conquer those avoidances. With these tips, you can improve your summer photographs.

1. Carry Less

Quite often photographers carry so much gear when they’re out making photographs. But how much of that is really necessary?

Look at your Lightroom catalog by using the Metadata Library Filter. Filter by the past year or two, and see what lenses you use the most. You can also dig in deeper by using the Lightroom Dashboard website to determine your most common focal lengths.

Lightroom Metadata

The Lightroom Library Filter for Metadata

Once you know which lenses you use the most, stick with those.

For example, as I’m writing this I have my bag packed for a huge photowalk tomorrow in New York City. I’m only bringing my 35mm lens for most of the walk and the 28-300mm lens for distance. I could bring others, but why? I know from experience that I don’t need others for this type of event (photowalk).

Carrying less means a lighter camera bag, which means less struggle in the heat.

2. Wear Less

I mentioned in the intro that in the summer you can wear less. On hot summer days I am outside photographing in shorts and a t-shirt. I might keep a Scottevest jacket with me (rolled in a ball in my bag) just in case it rains.

I won’t be wearing flip-flop,s because those are horrible for standing or walking on for extended periods of time. But I will be wearing low-top sneakers made for walking. But before my sneakers are on, I will also have socks designed for hot temperatures, and walking. Arch support is extremely important, and in the summer if you don’t have proper sizing or support then your feet will feel it.

Don’t forget a hat as well. The hot summer sun can easily cause sunburn. Usually I wear a simple hat, but if I’m traveling I keep my Tilley hat with me, which covers my ears and neck at the same time as my head.

Tilley Hat

Me in my Tilley hat. Photo by Joseph Hoetzl

The hat’s brim is also very soft and flexible, so it doesn’t get in the way when you hold your camera up to your eye.

3. Squint Less

With the sun comes harsh light, strong light, and blinding light. The last thing you want is for photographs of people squinting. My suggestion for this problem is to avoid photographing in the direct sunlight, and instead, find a shaded area as there you still get a lot of light, but it’s diffused.

portrait-direct-sunlight

The other option is to still photograph in direct sunlight, but to add your own diffusion. Lastolite and many other companies make products perfect for that job.

portrait-shade

On your side of things (the photographer), wear sunglasses, and remove them as needed when looking through your camera’s viewfinder or at the LCD.

4. Go Sunless

The summer is an amazing season to photograph during sunrise or sunset. Don’t plan a photo session during the strongest sunlight, like noon. Instead wait until sunset like 7:00 or 8:00 P.M. The sunset can make a great backdrop, and can produce really fun golden light.

If you are photographing portraits, then bring a reflector or flash to add some fill-light on your subjects.

5. Let Less Light Into Your Camera

The last tip is to let less light into your camera using neutral density filters. Sometimes the sun is just so harsh that your can’t get your camera’s settings where you want. By using a neutral density filter you can extend the shutter speed for landscape photos or moving objects, even in harsh sunlight.

For portraits neutral density filters enable apertures like f/2.8 even in direct sunlight, because the filter is blocking light.

Neutral Density - Long Exposure Mid Day

A long exposure made just around noon on a hot day, made possible by using neutral density filters.

I have now shared five ways for improving your summer photographs. Remember that if you are comfortable, then your photographs will improve. If you are overheated, then that worry, stress and discomfort will come through in your work.

So get comfy and enjoy the rest of the summer weather.

googletag.cmd.push(function() {
tablet_slots.push( googletag.defineSlot( “/1005424/_dPSv4_tab-all-article-bottom_(300×250)”, [300, 250], “pb-ad-78623” ).addService( googletag.pubads() ) ); } );

googletag.cmd.push(function() {
mobile_slots.push( googletag.defineSlot( “/1005424/_dPSv4_mob-all-article-bottom_(300×250)”, [300, 250], “pb-ad-78158” ).addService( googletag.pubads() ) ); } );

The post 5 Ways to Avoid Problems and Conquer Summer Photography by Scott Wyden Kivowitz appeared first on Digital Photography School.


Digital Photography School

 
Comments Off on 5 Ways to Avoid Problems and Conquer Summer Photography

Posted in Photography


Your Light Problems, Illuminated at Last

18 May

We’ve gathered up your most pressing light issues and found the perfect solutions for them. Dare we say we shed light on the situation? Oh yeah, we totally dare.

Check out all the products you’ll ever need for light perfection and our best tutorials for shooting in tricksy light. You’ve got the ‘light’ stuff now baby!

Choose the “Light”!
(…)
Read the rest of Your Light Problems, Illuminated at Last (291 words)


© Erin for Photojojo, 2015. |
Permalink |
No comment |
Add to
del.icio.us

Post tags:


Photojojo

 
Comments Off on Your Light Problems, Illuminated at Last

Posted in Equipment


Using Off-camera Flash to Fix Lighting Problems for Outdoor Portraits

23 Jun

Model holding flash better

When you’re taking pictures of family and friends outdoors, you are often not in control of the light, and that can lead to poor portraits.

A few of the possible problems include:

  • Raccoon eyes – deep shadows in the eye sockets (and other the nose) caused by bright overhead sunlight or light overcast skies
  • Bright background obscuring the subject’s face – although some cameras automatically compensate for it, if you’re shooting in the shade and there’s a really bright background, that can mislead your camera into underexposing the image, leaving your subject’s face too dark.
  • No control over direction of the light – the sun is here, and you are there. You can move around the person you’re photographing to get better light, but then you may lose the desired background.

With a wireless flash, these problems can be overcome, and it’s surprisingly easy. Canon’s Rebel line, D-series DSLRs and advanced G-series compact cameras let you control off-camera flash wirelessly, which opens up many possibilities when it comes to changing the quality and quantity of light that you use to photograph someone outdoors.

Raccoon eyes – below (left) is a typical portrait shot under direct midday sunlight with our model, Leanne. The sun, almost directly overhead, casts deep shadows over eye sockets, below the nose and chin, and wherever hair blocks the light. Gear: Canon EOS 70D, 85mm f/1.8 USM Canon lens. Exposure: 1/320 second at f/4.5, ISO 100.

Raccoon eyes before 600 Raccoon eyes after 600

Raccoon eyes fixed – (above right) the flash was mounted on the camera’s hot shoe and provided enough fill light to blow away the shadows, but the light is flat. Gear: same as above plus Canon 430 EX II Speedlight. Exposure: 1/250 second at f/10, ISO 100.

Raccoon eyes, cloudy skies (below left) the clouds move in and soften the light. Better, right? Well, sort of. Leanne’s eyes are still in the shadows. Gear: Canon EOS 70D, 85mm f/1.8 USM Canon lens. Exposure: 1/250th at f/3.5, ISO 100.

Raccoon lightcloud before 600 Raccoon lightcloud after 600

A lighter touch with light – (above right) in this case, less light was required to lighten the shadows, so I used the on-screen flash intensity control (on the Canon 70D, press Q and then touch the flash power icon to access this feature) and reduced the flash output. Determining the right amount of flash output is often a matter of trial and error. In this case, the default setting was too dark, +2 was too bright, but +1 was perfect. Gear: same as above plus Canon 430 EX II Speedlight. Exposure: 1/250th at f/7.1, ISO 100.

Balancing light when shooting in the shade

The ideal way to take a portrait in the shade without flash is to shoot with the bright area behind you (behind the camera). This will give you a wide light source and with nice, flattering light. However, you may not have this option, or you want to include interesting background elements that are, alas, drenched in sunlight.

While an on-camera flash will add enough light, you can add more dimensionality and features to your subject’s face by taking the flash off the camera and moving it around. By combining ambient (existing) light with your off-camera flash, you introduce infinite creative portrait-taking possibilities.

(Not sure how to use wireless? Scroll down to read our primer)

It’s best to have what flash guru Joe McNally calls a “voice-activated light holder” (also known as a human being, a friend, relative or cooperative stranger) to move around and hold the flash wherever you need it. If it’s just you and your model, however, an inexpensive light stand and shoe-mount flash adapter, such as the Flashpoint Heavy Duty Lightstand and Adorama Universal Swivel Holder, will do the job. Total cost? Less than $ 50!

Fixing harsh backlighting without flash

Exposed for the background – in the photo below (left), the background is perfectly exposed but Leanne, standing in the shade of a large Maple tree, is in deep shadow. Gear: Canon 70D, 85mm f/1.8 Canon Lens mounted on a Velbon GEO E535D Carbon Fibre Tripod. Exposure: 1/320 second at f/4, ISO 100.

Exposed for background Exposed for openshade

Add one stop of exposure – (above right image) better, but Leanne’s face is still too dark. Gear: same as above. Exposure: 1/200th at f/3.2, ISO 100.

Spot meter on the subject – by taking a spot meter reading you can eliminate the misleading bright background from the exposure equation and get a pretty good exposure on the face (below left). But the eyes are still too dark, and the background is getting blown out. Gear: same as above. Exposure: 1/160th at f/2.8, ISO 100.

Exposedforface Exposed for shadows

Exposed for the eyes – now you can see Leanne’s eyes clearly (above right), but overall the image is too bright, especially the background. So let’s introduce a flash and balance things out. Gear: same as above. Exposure: 1/125th at f/2.5, ISO 100.

Adding flash to balance with the ambient light

Balanced light, image below left. Now the exposure is spot on! If you hold a flash up a foot or so above your camera while shooting, you should get this kind of light. The slight angle gives Leanne’s face a bit of dimensionality. Gear: Canon 70D, 85mm f/1.8 Canon Lens, Canon 430 EX II Speedlight flash mounted on Flashpoint Heavy Duty Lightstand via an Adorama Universal Swivel Holder. Exposure: 1/200th at f/5.6, ISO 100.

Balanced flash background Balanced flash 45degrees Left

Flash at a 45 degree angle (image above right). By moving the flash (now mounted on a light stand) further to the left of the camera and about a foot above eye-level you get this classic Loop pattern portrait lighting. Note how Leanne is turned slightly towards the light, and how the light falls off her left cheek, creating a more flattering, dimensional look. Same gear and exposure as above.

Flash at 90 degree angle (image below left). Now the flash is directly to camera left, and her face is divided into light and dark halves (also known as Split Lighting). This is a more dramatic look. Same gear and exposure as above.

Balanced flash 90degrees Left Backlit flash with refl

Backlighting (above right) – even though the sun was to the right of the camera, after placing the flash above and behind and slightly to camera left, it looks like she is backlit by the sun. These are the kinds of effects you can get by moving the light around. Same gear and exposure as above.

Add a reflector

If one additional light source isn’t enough, you can easily, and inexpensively, add a second by using a reflector. The Glow 5-in-1 32-inch Reflector Kit, for $ 26, is a versatile option. This dramatically increases the possibilities for controlling and shaping the light, and bringing out the contours in your subject’s face.

One problem – running out of hands. The solution? Have your subject hold the reflector and compose a nice tight headshot.

Balanced flash 45 degree refl2

The reflector adds a new dimension. Here Leanne is holding a silver reflector to her left, which is bringing light back to her face in an approximately 2:1 lighting ratio (the reflected light is half that of the direct light from the flash). Notice how the more angular cross-light brings out her facial features. Same gear as above plus Glow 5-in-1 32-inch Reflector Kit. Exposure: 1/160th at f/7.1, ISO 100.

What if you take away the reflector and put a flash in the model’s hands?

Model holding flash better

Flashie? In another setup, Leanne is holding the flash to her side as the sole light source. This is kind of like a “selfie” but with a flash.

Model holding flash vertical

She’s holding the light. In this tight headshot, Leanne is still holding the flash in the same position as above, but with a reflector to camera left adding light on the other side of her face.

Adding an umbrella

While a stand-alone flash (or one used in tandem with a reflector) is great for close shots, light falls off quickly and may not illuminate the person in a longer shot. To solve this, consider adding an umbrella to your arsenal. This will enlarge the light source and will result in more even illumination when shooting a full body or ¾ length portrait. Using an umbrella is worth an article of its own.

Umbrella sidelight modelfull

While a stand-alone flash (or one used in tandem with a reflector) placed near a subject can be great for close shots, it won’t evenly illuminate your portrait subject in a wider shot such as this one. Normally, the solution is to move the flash farther away, but in this scene, an outdoor porch, there was a wall immediately to the left of the camera. In this situation, bounce the flash off an umbrella. This will enlarge the light source to create more even illumination. Be sure to increase flash power approximately one stop to compensate for the light loss that results from bouncing the flash into the umbrella. (Using an umbrella is worth an article of its own!)

Step-by-step instructions on how to trigger Canon off-camera flash wirelessly

Here are the step-by-step directions for triggering a Canon 430 EX II wireless Canon flash from the Canon 70D. If you’re using another camera, check your manual for wireless flash instructions. Among other Canon systems, the directions will be similar.
flashsettings

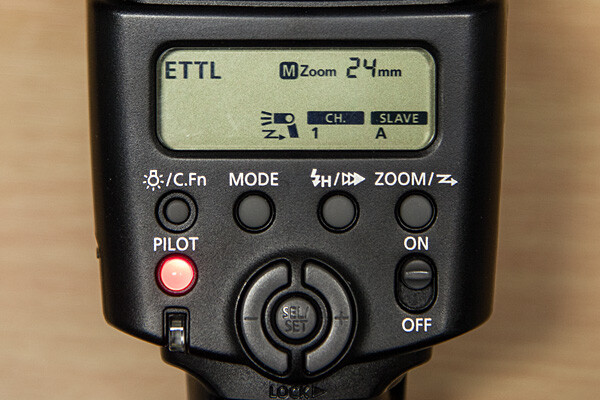
  1. Turn the flash on, then press and hold the Zoom button for a second or two. You’ll see a new flash icon and Ch 1 Slave A appear in the LCD screen (see photo above).
  2. Turn the camera on and pop up the flash
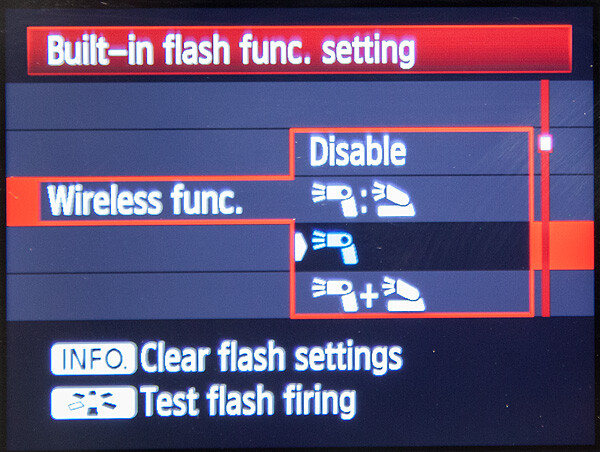
  3. Go to Menu; in the first tab (camera operation), choose Flash Control, then scroll down to Built-in flash function setting, select “Wireless Func.” and choose the middle setting of the single flash (see below) Note: Although the on-camera flash is flipped up, it will not fire during the exposure. Rather, it will flash a split-second before the exposure, which triggers the off-camera flash to fire during exposure, so your only source of flash illumination during exposure will be the off-camera flash.
canon-built-in-flash-function-setting

Hopefully you can take these off-camera flash tips and apply them in your photography to help you make better portraits outdoors. If you have any additional questions or tips please share in the comments below.

The post Using Off-camera Flash to Fix Lighting Problems for Outdoor Portraits by Mason Resnick appeared first on Digital Photography School.


Digital Photography School

 
Comments Off on Using Off-camera Flash to Fix Lighting Problems for Outdoor Portraits

Posted in Photography


Nikon D4s and Lexar 400x or 1000x memory card problems

19 Mar

D4s_58_1.4_front34l.png

According to a Nikon support advisory there are a small number of Lexar 400x or 1000x compact flash memory cards that may have issues communicating with the new D4s camera. Nikon USA’s service and support site has outlined how to identify the faulty cards and instructions for replacement. Learn more

News: Digital Photography Review (dpreview.com)

 
Comments Off on Nikon D4s and Lexar 400x or 1000x memory card problems

Posted in Uncategorized