RSS
 

Posts Tagged ‘Printed’

Fujifilm Instax Mini LiPlay can play sound that’s printed onto its instant images

13 Jun

Fujifilm’s next Instax mini model has a 5MP sensor, saves images to a memory card and allows users to record a ten-second audio clip that can be played when the printed picture is viewed. The Instax mini LiPlay, Fujifilm’s smallest and lightest Instax to date, produces the usual credit card sized prints but can print a QR code in the corner that links to the audio that was recorded to go along with the picture.

The idea is that users can record a message to a friend with whom they will share the picture taken with the camera. The friend scans the QR code using Fujifilm’s Instax mini LiPlay app and the audio clip plays through the phone. The audio could be a spoken message or the sounds from the place the picture was taken – Fujifilm suggests the sound of the sea to accompany pictures from the beach.

The camera uses a 5MP sensor and allows users to review images before deciding to print them or not. Images can also be saved to internal memory or to a removable MicroSD card, and images taken with other devices can be printed on the camera via a smartphone with a Bluetooth connection. The camera’s lens has an angle of view to match a 28mm lens on a full frame system and has a maximum aperture of F2. The lens has an AF system and shutter speeds run from ¼ – 1/8000sec, while the auto ISO feature moves between ISO 100 and 1600.

The Instax mini LiPlay will come in three colors and textures, and will begin shipping immediately depending on your region. It will cost $ 159.99/£149.99. For more information see the Fujifilm website.

Press release:

Hybrid instant camera “Instax mini LiPlay”

  • New-generation instax with sound-recording capability!
  • Capture memories in an instax print with audio message
  • Mini-format film “CONFETTI” and square-format film “Star-illumination” with metallic frame also available to add a touch of flamboyance to your pictures

FUJIFILM Corporation (President: Kenji Sukeno) has announced that it will release a hybrid instant camera “instax mini LiPlay” (hereinafter “LiPlay”), which supports credit-card-size film, on or after June 14, 2019 on a market-by-market basis. The model is a new addition to the lineup of “instax” instant cameras, which allows you to enjoy photo prints on the spot. The camera’s main unit is the smallest and most lightweight in the history of the instax series for outstanding portability. Yet, at the same time, the camera is packed with new features such as the “Sound” function* to convey a voice message or other audio data in the form of a QR code** included in a photo print, and the “Direct Print” function*1 to print images in your smartphone on instax film — broadening the scope of situations the camera can be enjoyed.

Fujifilm has also announced new metallic instax mini film “CONFETTI” and instax square film “Star-illumination,” available in two designs, adding a touch of creativity to your photos.

Overview of the instax series

The “instax” series of instant cameras, launched in 1998, is affectionately called “Cheki” in Japan, where it has enjoyed wide popularity for over 20 years. Today, it is sold in over 100 countries around the world, including Europe, Americas and Asia Pacific, with the cumulative number of shipments topping 45 million worldwide. It has been particularly loved by the digital-native generation in their teens and young adults who have embraced it as a communication tool, saying “It is fun to share those precious moments in life in the form of photo prints. When I hand photo prints to my friends, it gives me a real sense of connection with them.”

Overview of the new product, “instax mini LiPlay”

The new “LiPlay,” is a hybrid instant camera that allows you to review photos captured on the device via the LCD monitor on the back of the camera and choose images you want to print. The camera’s “Sound” function is capable of recording up to ten seconds of audio. The function converts the audio data into a QR code and adds it to a photo to be printed out together. The audio can be replayed*** by scanning the printed QR code with a smartphone*4. This allows you to give a photo together with your description about the pictured scene. The camera also features the “Direct Print” function, which transfers a photo taken with your smartphone to the LiPlay for printing. You can print your favorite picture in your smartphone easily on instax film and share it with your friends. To make it easy to take a group photo, the camera also offers the “Remote Shooting” function so that you can use a smartphone operation to release the shutter while standing away from the camera itself.

The camera body boasts a streamlined and stylish design. Its compact and lightweight form factor makes it easy to carry. Buttons and dials for basic operations such as shutter release and “Sound” function are laid out for advanced operability. Extra attention has been paid to perfect the camera’s texture. The camera comes in three colors, each of which has different surface processing, such as embossed or smooth finish.

Fujifilm will continue to broaden the world of the “instax” instant photo system for on-the-spot photo printing.

* * The free “instax mini LiPlay” app must be downloaded and installed on your smartphone to use the Sound and Direct Print functions.
* ** QR Code is a registered trademark of Denso Wave Inc.
* *** Recorded audio data is stored for one year from the time it is uploaded to the server together with its linked photo image via a special smartphone app.
* *4 Smartphones with the QR Code scanning capability are required to read the QR code.

1. Product Name

(1) Hybrid instant camera “instax mini LiPlay”

(2) Mini-format film “CONFETTI”

(3) Square-format film “Star-illumination”

2. Release Date

On or after June 14, 2019, on a market-by-market basis

3. Price

Open price

4. Main features

(1) “instax mini LiPlay”
1. Smallest and most lightweight hybrid instant camera in the history of the instax series
The LiPlay is a highly-portable hybrid instant camera that incorporates digital technology. Featuring a 2.7-inch LCD monitor at the rear, the camera allows you to shoot photos while checking the monitor and choose pictures to print. The camera also offers brightness adjustment capability based on exposure compensation as well as six filters for processing photos, e.g. in sepia tone or in monochrome, to create a different impression.

2. New “Sound” function
The camera’s audio-recording capability means you can record up to 10 seconds of sound. The function converts sound data into a QR code and prints it on your photo. Scan the QR code with a smartphonoe’s QR Code reader and replay the audio message. Printing a photo with a recorded message allows you to convey your sentiments to the person receiving the photo, making the scene more memorable. Alternatively, photograph a beach and attach the sound of waves, for example, to create a print that reminds you of the photographed situation, so that your memory of the precious moment stays vivid.

3. “Direct Print” function to use the camera as a smartphone printer
Images stored in a smartphone can be transferred to the camera via Bluetooth*5 for printing. You can enlarge or rotate images before transferring them.
4. “Remote Shooting” function for taking pictures while standing away from the camera
This function allows you to release the shutter with a smartphone operation while standing away from the camera. Remotely-taken images can be also printed on the spot. This function is particularly useful for a group photo or when you want to achieve a dynamic effect by taking photos from high or low angles.
5. Wide variety of design frames on offer
The camera comes pre-installed with ten design frames, which can be selected during or after taking a picture so that they are incorporated into the image for printing. Download the “instax mini LiPlay” smartphone app (free) to enjoy 20 additional design frames, bringing the total number of design frames available to 30.

6. Stylish camera body design
The streamlined shape of the camera body is complemented with a different surface finish for each of the three color variations in a design approach that even pays close attention to your tactile sense. The Stone White version has a rough, stone-like surface achieved with a special spray coating. The Elegant Black version features an eye-catching embossed finish on the camera surface, while the Blush Gold version dazzles with a smooth lustrous finish. Metallic parts are used for the lens ring, etc. for a premium look.

(2) New instax film
1. Mini-format film “CONFETTI”

  • Compatible with all “instax mini” series models that support the mini format
  • Colorful metallic frame that adds a touch of flamboyance to your photo
  • 10 prints per pack

2. Square-format film “Star-illumination”

  • Compatible with all “instax SQUARE” series models that support the square format
  • Elegant design of the night sky scattered with colorful stars to make your photo look stylish
  • 10 prints per pack

* *5 Bluetooth® work mark and logo are registered trademarks of Bluetooth SIG, Inc. FUJIFILM Corporation uses these marks based on a license agreement.

Articles: Digital Photography Review (dpreview.com)
 
Comments Off on Fujifilm Instax Mini LiPlay can play sound that’s printed onto its instant images

Posted in Uncategorized


Why It’s a Great Idea to Get Your Photo Printed on Large-Scale Canvas

28 Jun

Let’s face it, one of the true joys of a professional photographer is to see the fruits of their labor displayed in a physical format, preferably as a large-scale photo print. It just feels like the proper way these photos should be exhibited, the form in which they reach their true potential. With this in mind, I’m here to talk Continue Reading

The post Why It’s a Great Idea to Get Your Photo Printed on Large-Scale Canvas appeared first on Photodoto.


Photodoto

 
Comments Off on Why It’s a Great Idea to Get Your Photo Printed on Large-Scale Canvas

Posted in Photography


Blooms: Hypnotizing 3D Printed Sculptures Come Alive Under Strobe Lights

28 Sep

[ By SA Rogers in Art & Sculpture & Craft. ]

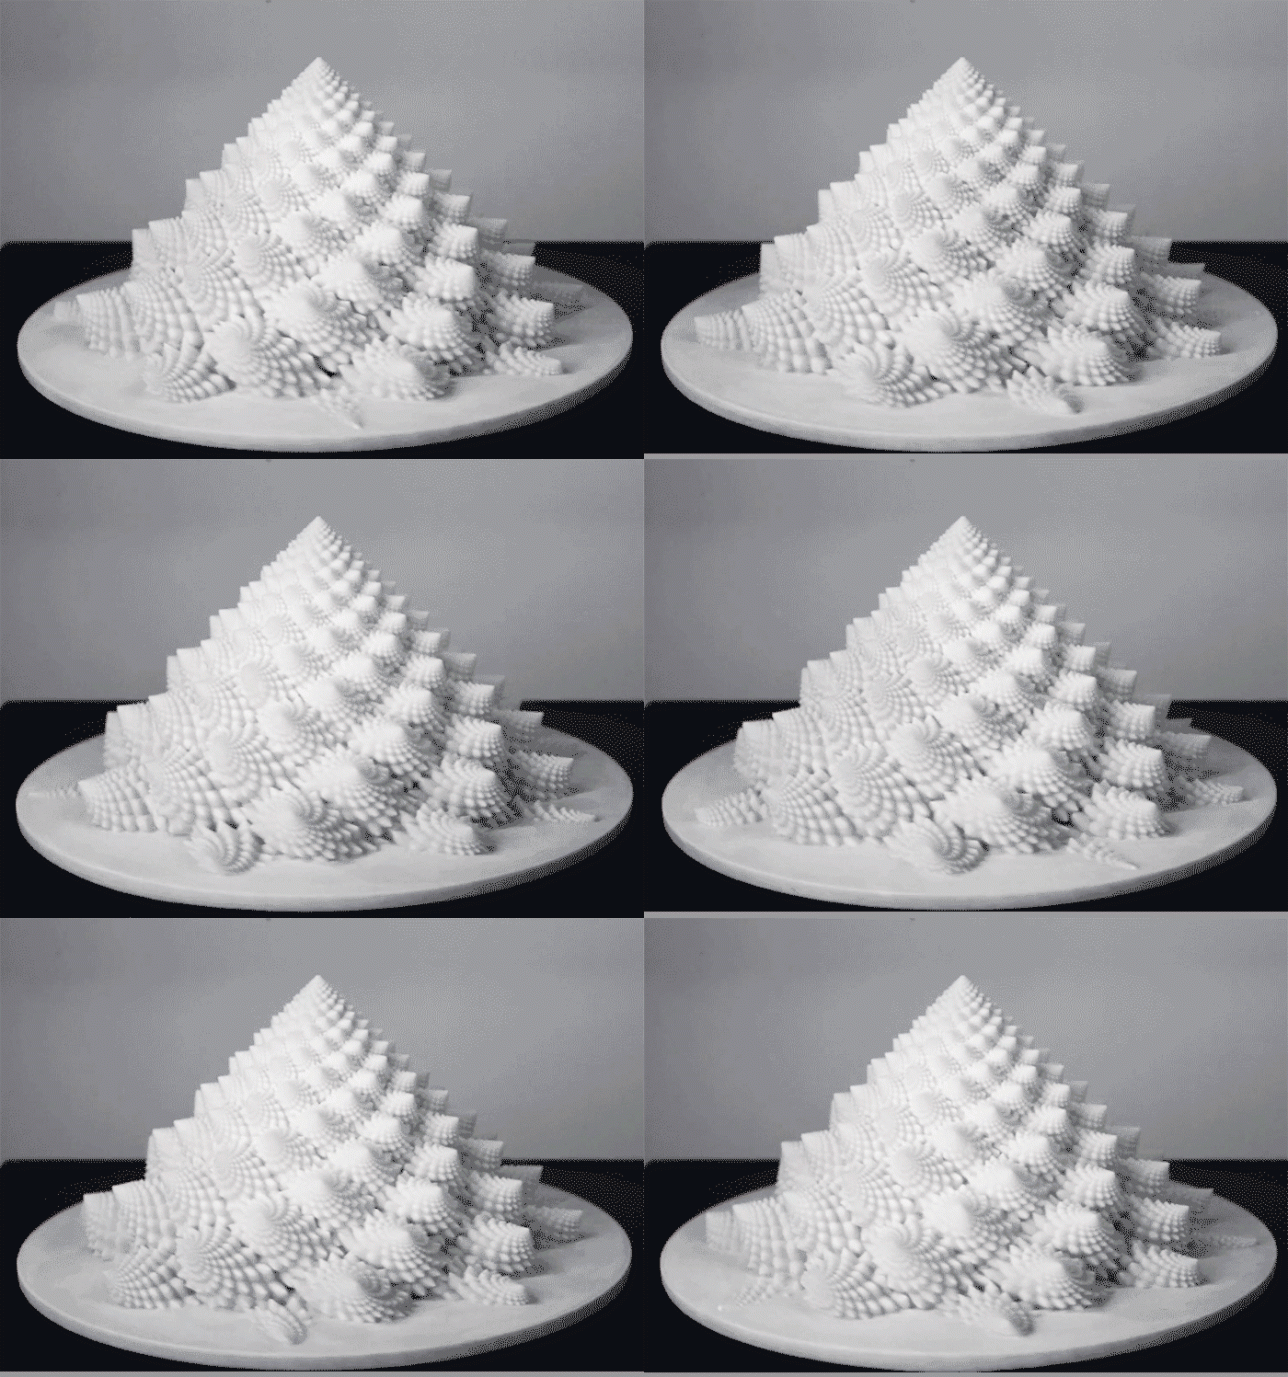
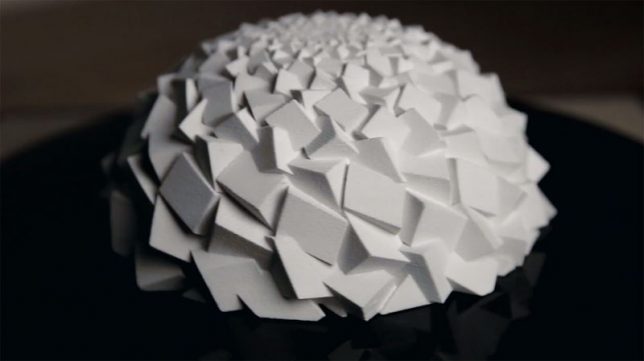
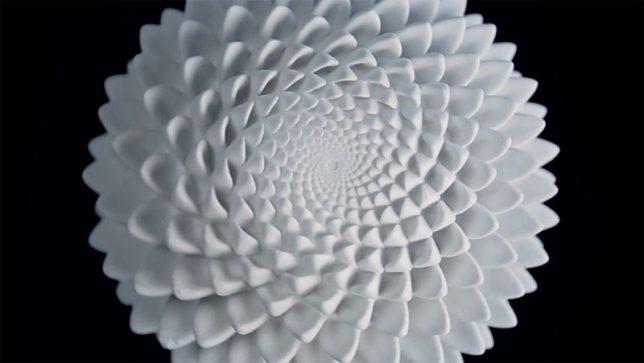
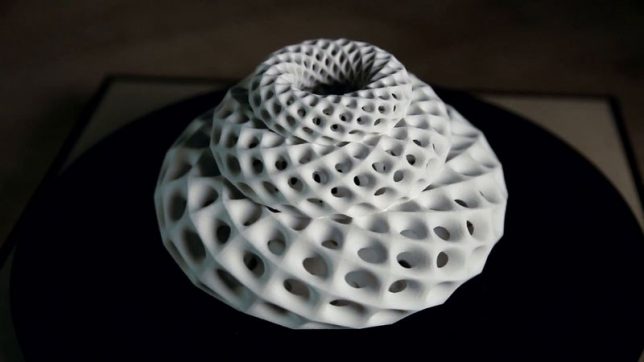
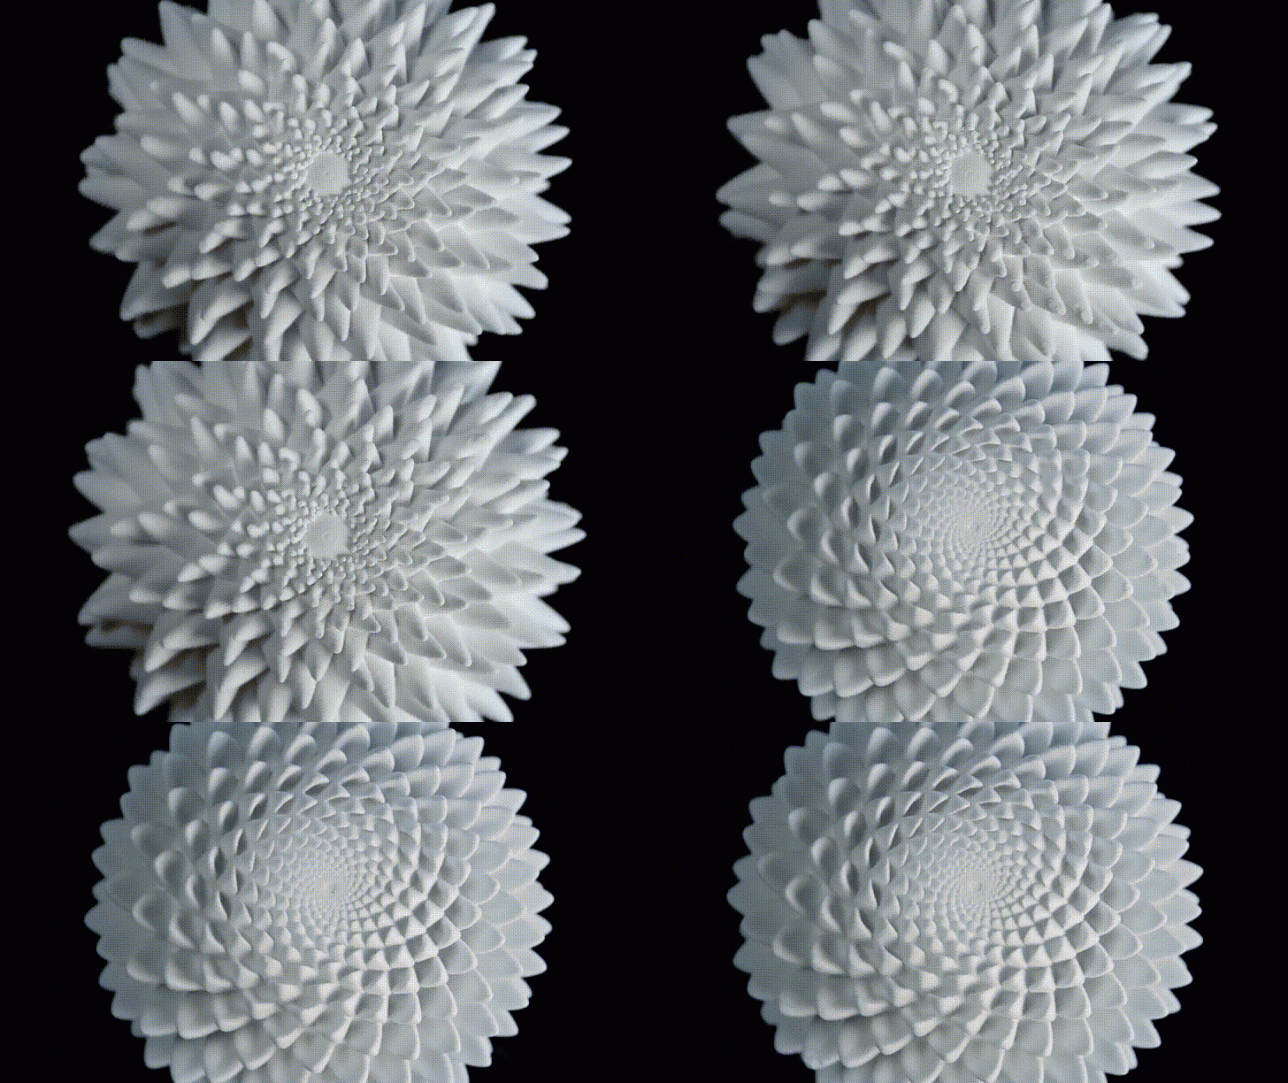
It’s really easy to lose a chunk of your day getting lost in the hypnotizing effects of these trippy 3D-printed sculpture animations by artist John Edmark. Drawing from spiral patterns and numerical sequences often found in natural objects like pine cones, cacti, sunflowers and seashells, the objects seem to shift and change before your eyes when spun under a strobe light. Watching the videos of the sculptures in motion, it’s hard to believe these aren’t digital animations.

“Unlike a 3D zoetrope, which animates a sequence of small changes to objects, a bloom animates as a single self-contained sculpture,” says Edmark. “The bloom’s animation effect is achieved by progressive rotations of the golden ratio, phi, the same ratio that nature employed to generate the spiral patterns we see in pinecones and sunflowers. The rotational speed and strobe rate of the bloom are synchronized so that one flash occurs every time the bloom turns 137.5 degrees (the angular version of phi.) Each bloom’s particular form and behavior is determined by a unique parametric seed I call a phi-nome.”

The artist explains that much of his work celebrates the patterns underlying space and growth, explored through kinetic sculptures and transformable objects. Highly precise mathematics come into play in both the design and fabrication of each object, more to ask questions about spatial relationships that can only be answered with geometrically exacting constructions than to put that precision on display or “exalt the latest technology.”

It’s a cool way to utilize 3D-printed objects, though, and if you want to play with the effect yourself, you can even purchase the individual shapes from Edmark via Shapeways. He offers a tutorial to repeat the results at Instructables.

Share on Facebook


[ By SA Rogers in Art & Sculpture & Craft. ]

[ WebUrbanist | Archives | Galleries | Privacy | TOS ]


WebUrbanist

 
Comments Off on Blooms: Hypnotizing 3D Printed Sculptures Come Alive Under Strobe Lights

Posted in Creativity


How one photographer 3D printed this beautiful medium format camera

27 May
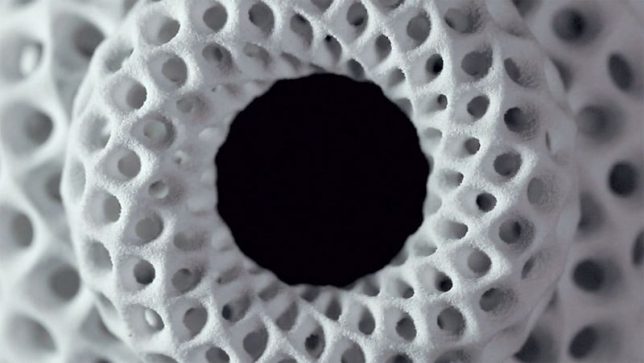
It’s named PK-6142016, aka the ‘Cycloptic Mustard Monster,’ and is a 3D printed medium format camera with a Kreuznach 90mm f/8 Super Angulon lens attached.

Photographer Paul Kohlhausen has created what he calls a ‘really precisely engineered box,’ the PK-6142016 ‘Cycloptic Mustard Monster’ medium format analog camera. Kohlhaussen designed the camera himself using Autodesk Fusion 360 and produced it via a 3D printer and SLS polyamide material. The Cycloptic Mustard Monster utilizes 120mm film and produces 6×14 cm negatives.

Kohlhausen detailed the camera on his website, where he explains that he used a Schneider Kreuznach 90mm f/8 Super Angulon lens designed for 4×5 cameras, with focusing being possible via fixed spacer brackets. Camera features include a viewfinder and a removable top plate for inserting film. In an interview with The Phoblographer, Kohlhaussen stated that he is considering launching the product on Kickstarter, but difficulties sourcing the aforementioned lens may be a hindrance.

Via: The Phoblographer

Articles: Digital Photography Review (dpreview.com)
 
Comments Off on How one photographer 3D printed this beautiful medium format camera

Posted in Uncategorized


Times Lapse: Minute-Long Video Shows Every NYT Cover Printed Since 1852

24 Mar

[ By WebUrbanist in Design & Graphics & Branding. ]

new york time lapse

The times are always changing, but few things bring it home quite so elegantly (and quickly) as an extended look at the front pages of a classic publication, compressing over 150 years of history (and 60,000 pages) into a single minute.

Data artist Josh Begley takes viewers on a whirlwind tour of New York Times cover images. His time(s)-lapse video spans from early days when they were entirely text to the advent of black-and-white then color images.

times

times two

While so much has changed, detailed maps and wood engravings appearing to liven up the pages as the years pass in seconds, much remains the same.

times over itme

time after time

The effects captured reflect both continuity and evolution, encapsulating not only a publication-specific shift but also the broader history of modern print publishing.

Meanwhile, for fans of history, typography and the Times (via Colossal): “Typesetter Carl Schlesinger and filmmaker David Loeb Weiss documented the last day of hot metal typesetting” in the film above. “This amazing behind-the-scenes view not only captures the laborious effort to create a single page of printed type, but also the the emotions and thoughts of several New York Times employees as they candidly discuss their feelings about transitioning to a new technology. One man decides he’s not ready for the digital age and plans to retire on the spot after 49 years, while others seem to transition smoothly into the new methods of production.”

Share on Facebook


[ By WebUrbanist in Design & Graphics & Branding. ]

[ WebUrbanist | Archives | Galleries | Privacy | TOS ]


WebUrbanist

 
Comments Off on Times Lapse: Minute-Long Video Shows Every NYT Cover Printed Since 1852

Posted in Creativity


5 Steps to Creating a Printed Photo Collection as Wall Art

28 Apr

In this digital age, where we wander about with thousands of digital images held captive in our smart phones, there is something special about printed photographs. They represent something tangible and reverent – something that was worth transforming into an enduring piece of artwork, to remind us of what is important in our lives.

One of the most rewarding aspects of my job is seeing the photographs I create for my clients hanging on their walls. To me, it is the icing on the cake, the cherry on top, the grand finale that tells me I have fulfilled my promise to the people who put their trust in me as a professional.

collection-dps-01

This image set by Darlene Hildebrandt

Like many portrait photographers, I began my career selling digital files on a USB stick. I found it disheartening and unfulfilling. Wall art collections were a revelation to me. As a photographer, they gave me a structure and framework to shoot within. My session times became shorter, because I was shooting with purpose. I now had something meaningful and lasting to offer my clients; collections that tell their story in all its detail, and represent something deep that they have revealed to me.

Photo collections can be about anything. In my case, they are invariably portraits, but if your thing is landscapes, travel, macro, nature etc., you can create collections that add life and personality to you home or office, and serve as visual reminders of what is important to you.

Step #1: Consider the space you want to fill

Think about the photographs you are capturing. What is the subject matter? What do these photos mean to you? Do you want to remember a favourite holiday destination, or how confident your son looks when he plays the violin? Do you want to capture the beauty of a rare flower you grew, or your young adult daughter who is about to leave home for college?

With this in mind, think about where in your home or office you would like to see these photographs every day. Consider how appropriate the subject matter is for where you want to display it, and take into account the style of the decor and other furnishings in the room. Often photographs are displayed above a piece of furniture – above your bed or the sofa, at the end of a breakfast nook, on the wall of a study, or cascading down a flight of stairs.

image showing photo collections

A collection to fit a long, narrow space.

Once you have decided where you want to display your photos, you should have a clear idea of what the layout should look like. Big spaces demand big photos, narrow spaces require long and thin, and a stairwell may need a staggered combination of large and small photos.

image showing photo collections

A different configuration using images from the same session. This would suit a larger space.

Step #2: Decide the layout before you pick up the camera

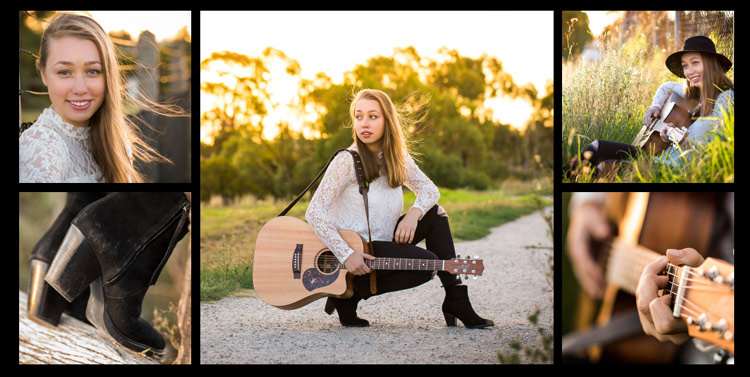
Think carefully about the configuration of your collection before you start photographing. For example, if you have a wide space to fill and you envisage a panoramic with two or three smaller prints underneath, your main photo will need lots of space to crop it into a panoramic shape, without compromising the composition or the quality of the image. You will be hard pressed to get a panoramic crop if you’re shooting in a vertical (portrait) orientation. When I’m shooting for a collection, I allow more space around my subjects than usual. This gives me some versatility when it comes to cropping.

Likewise with the smaller prints. Think about how you would like each photo to be oriented, and ensure you shoot from an angle that will enable this. I like to orient my detail shots inward, toward the main photo.

Image showing photo collections

It helps if you know how you are going to display each photo before you capture it.

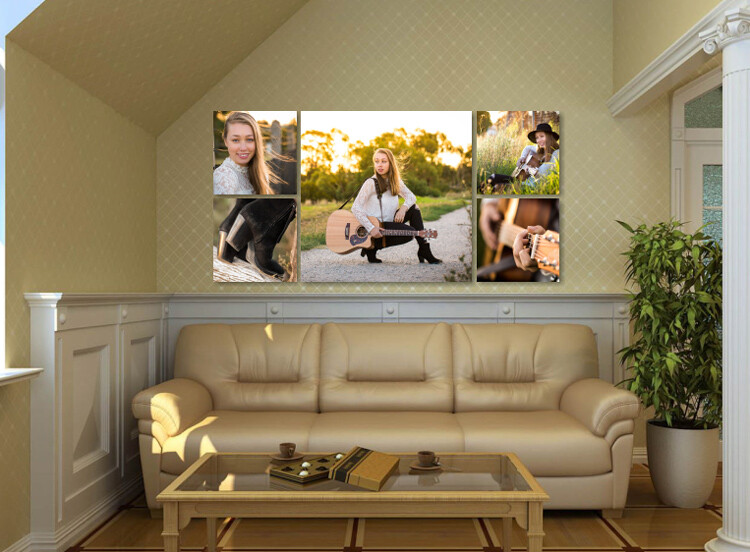
Image showing photo collections

This shows how the collection would appear on a wall.

Step #3: Keep the lighting consistent

A collection looks most cohesive when the lighting is consistent throughout. If three out of four photos in the collection are high key images with lots of white, a dark photo, or one with lots of colour, will look out of place. So, if you photographed your dog on the beach at sunset, that photo you took of him earlier in the bright midday sun will look mismatched, regardless of how adorable his expression is.

In the photo collections below, the silhouetted sunset image stands out as a mismatch. In the second version, it is replaced with an image that better matches the lighting.

Image showing photo collections

The silhouetted sunset shot in the middle looks out of place.

Image showing photo collections

In this collection, the images are unified by similar lighting.

Step #4: Stick to one subject per collection

Avoid the temptation to create a hodge podge by cramming every member of a family, or every flower in the garden, into one collection. Allow your subject to shine by devoting a whole collection to him, her (or it, in the case of an inanimate object). As a portrait photographer, my collections usually consist of one full body photo, and several detail shots which help tell a story.

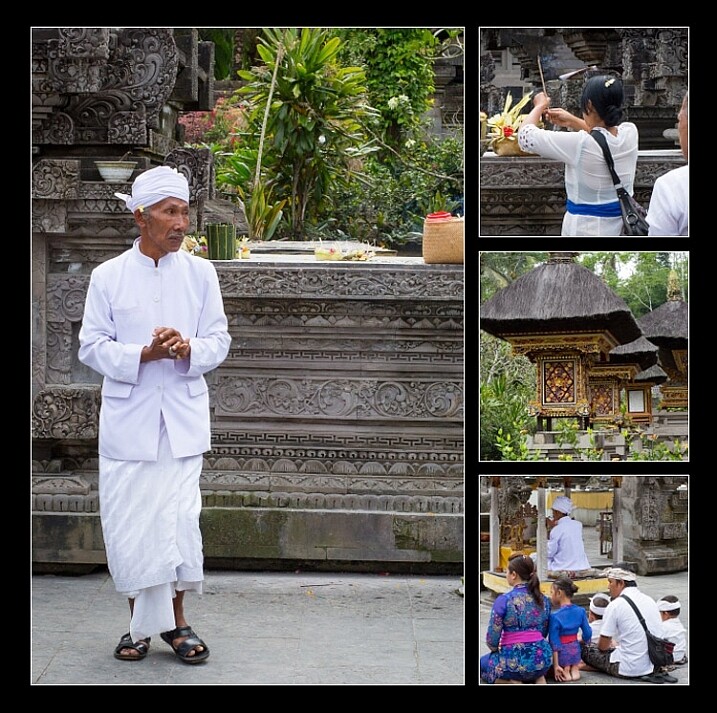
The photo collection below, taken at a water temple in Bali, depicts a sacred ritual. I took so many other photos I loved at the water temple, but to put them all together would detract from the story. I will save the other photos for a different collection.

image showing photo collections

Although it is tempting to cram every photo you love into a collection, the result is much more pleasing when you stick to one subject.

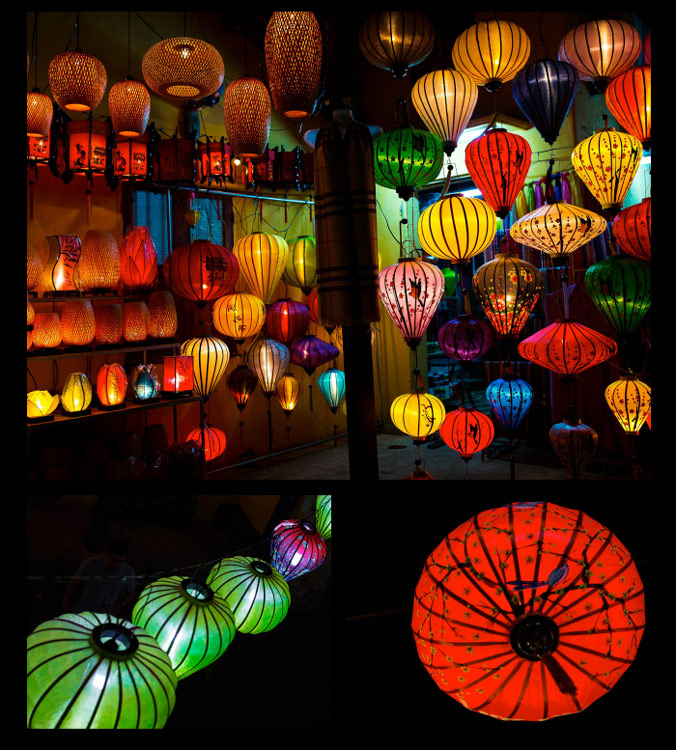
image showing photo collections

My main photograph in this collection is full of colour and a variety of shapes. To complete the collection, I have chosen closer-up detail shots of just two of the many lanterns.

Step #5: Collage or collection?

A photo collection can be made up of separate pieces displayed together, or you can create a collage to print as a single piece. Your decision will be influenced by the space you want to fill, the material you want to print on, and your budget.

A collection of separate pieces tends to look more luxurious than a collage. With some configurations such as stairs, it may be your only option. Another benefit of printing each piece separately is that you can change the layout later if you want to. Also, if one piece is not working quite the way you imagined, you can swap it out for a new one.

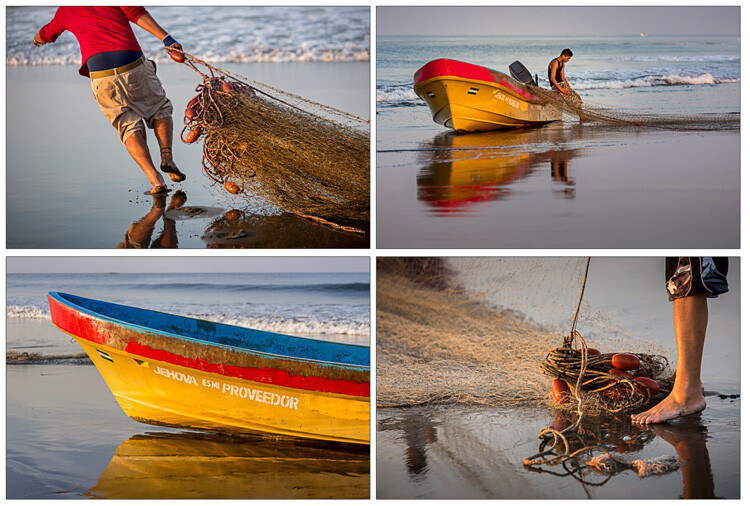
The photos below, taken at dawn on a beach in Vietnam, will be printed as separate pieces and hung together as shown.

image showing photo collections

Displayed together, the four photos tell a story.

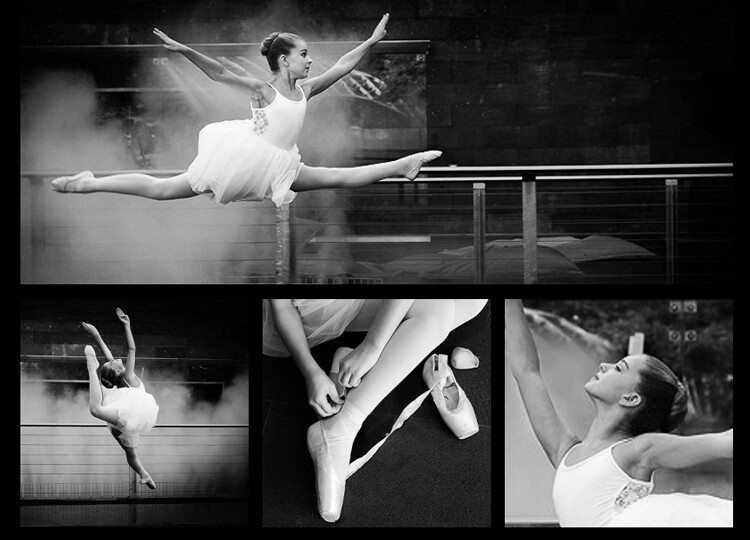
On the flip side, printing multiple pieces can be expensive, and it can be tricky to hang a multi-piece collection with the accuracy it deserves. Some configurations, such as the black and whites below, can look itsy-bitsy when printed separately, and look better printed as a single piece.

You can create hi-res collages like this in Photoshop, Lightroom, or the professional version of Proselect. Alternatively, you can buy ready-to-hang frames with cut-out mats designed for collections, or you can ask a framer to create a customized mat for your frame.

This collage was designed to be hung above a dining table, so the long narrow shape worked well. Background and borders are white to match the colour scheme of my clients’ home, and it is printed on metal to suit their contemporary decor.

image showing photo collections

This was designed to be printed as a single piece.

Collections and collages are a fun and interesting way to display your favourite images. With a little care and thought, they can make breathtaking displays that will last for a great many years. I hope this article inspires you to go and rescue those beautiful images of yours that are trapped in the digital world, and bring them to life!

Share in the comments section below your favourite photo collections or collages, or any hints or tips you have learned along the way.

googletag.cmd.push(function() {
tablet_slots.push( googletag.defineSlot( “/1005424/_dPSv4_tab-all-article-bottom_(300×250)”, [300, 250], “pb-ad-78623” ).addService( googletag.pubads() ) ); } );

googletag.cmd.push(function() {
mobile_slots.push( googletag.defineSlot( “/1005424/_dPSv4_mob-all-article-bottom_(300×250)”, [300, 250], “pb-ad-78158” ).addService( googletag.pubads() ) ); } );

The post 5 Steps to Creating a Printed Photo Collection as Wall Art by Karen Quist appeared first on Digital Photography School.


Digital Photography School

 
Comments Off on 5 Steps to Creating a Printed Photo Collection as Wall Art

Posted in Photography


Architectural Camouflage: Garments Printed with Tile & Marble

28 May

[ By Steph in Design & Products & Packaging. ]

architectural camouflage 1

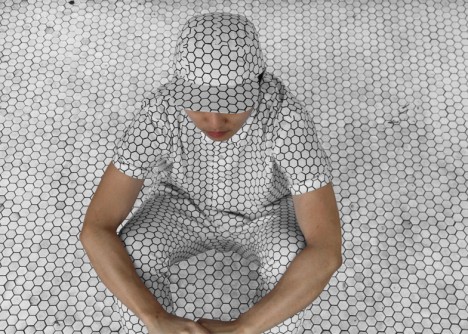
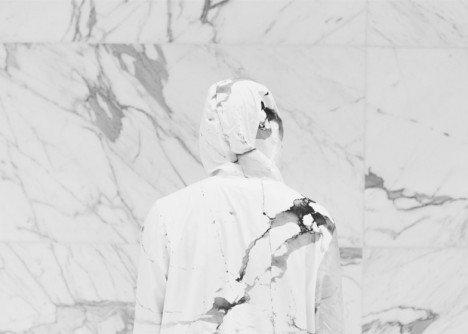
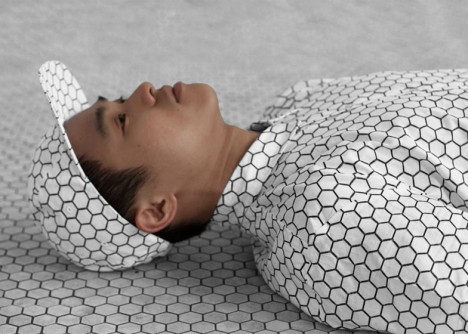
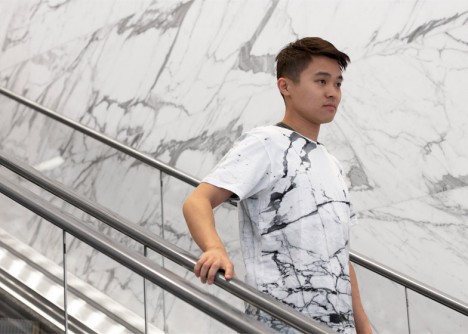
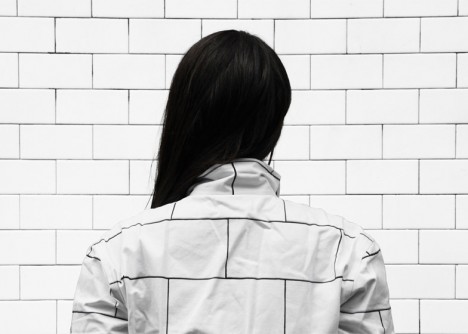
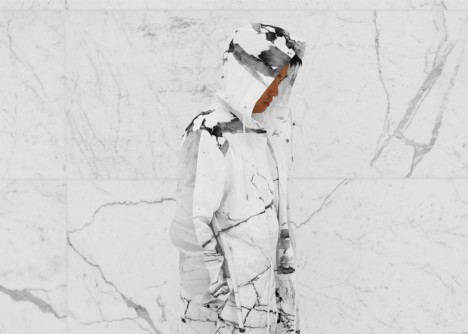
Blend right into urban surfaces, from the walls of subway stations to the marble in museums and courthouses, with this line of architectural camouflage shirts, pants and accessories. A collaboration between design firm Snarkitecture and custom print company Print All Over Me, the line takes architectural patterns from public places all over New York City and translates them into fashion.

architectural camouflage 5

architectural camouflage 2

The prints not only honor iconic minimalist patterns that have been an integral part of the city’s visual identity for decades, it enables the wearer to blend into urban environments. The effect can be pretty impressive, as seen in the collection’s promotional images.

architectural camouflage 3

“The starting point was this idea of creating moments of architectural confusion, where you become visually lost within different material surfaces,” says Snarkitecture, a Brooklyn-based collaborative practice known for its unexpected installations, like all-white airball machines at Miami’s coolest modern parking garage.

architectural camouflage 7

The Architectural Camouflage collection is available now at Print All Over Me, ranging from $ 38-$ 145, including a backpack, a baseball hat, a jumpsuit and a rain coat. Got an idea of your own? Anyone can upload images to create custom garments, home accessories and other items at PAOM.

architectural camouflage 6

Check out more urban camouflage, from body painting and bizarre costumes to disappearing cars.

Share on Facebook


[ By Steph in Design & Products & Packaging. ]

[ WebUrbanist | Archives | Galleries | Privacy | TOS ]


WebUrbanist

 
Comments Off on Architectural Camouflage: Garments Printed with Tile & Marble

Posted in Creativity


Nailed It: 3D Printed Manicures Are Frighteningly Awesome

18 Mar

[ By Steph in Design & Products & Packaging. ]

3D Printed Nail Art 3

We knew that 3D printing would make the creation of all sorts of amazing and unpredictable things possible, but we honestly didn’t see this one coming: frighteningly intricate, claw-like artificial nails. Cutting-edge robotic technologies now allow anyone with access to ‘print’ everything from medical prosthetics and lingerie to cars and entire houses. Add 3D-printed nails with names like ‘Armored Castle’ to the list.

3D Printed Nail Art 2

Manicures have gotten increasingly complicated with the option of adding all sorts of artistic elements, but a Shapeways shop called The Laser Girls truly takes them to the next level (and some.) Their 3D-printed creations come in a range of styles, sizes, materials and colors, and all of them look like they could do some serious damage if you’re not careful with your fingers.

3D Printed Nail Art 4

3D Printed Nail Art 5

The pyramidal ‘Kingdom Nails’ come in bronze-infused stainless steel, altering the meaning of the cliched saying ‘tough as nails.’ Other designs are made of strong and flexible nylon plastic with a smoother finish.

3D Printed Nail Art 1

These extreme artificial nails aren’t made for extended use; they’re applied using either nail glue or thin mounting tape like the sort used for scrapbooking. Explore lots more crazy (and purchasable!) 3D printed objects at Shapeways.


Share on Facebook


[ By Steph in Design & Products & Packaging. ]

[ WebUrbanist | Archives | Galleries | Privacy | TOS ]


WebUrbanist

 
Comments Off on Nailed It: 3D Printed Manicures Are Frighteningly Awesome

Posted in Creativity


Digital Grotesque: Intricate Full-Scale 3D Printed Room

19 Sep

[ By Steph in Gadgets & Geekery & Technology. ]

Digital Grotesque 3D Printed Room 1

Stacked sections of intricate 3D-printed columns of the most baroque nature imaginable make up a cube-shaped, full-scale room. Designers Michael Hansmeyer and Benjamin Dillenburger made ‘Digital Grotesque‘ out of eleven tons of sandstone, its outside smooth and flat, with an impossibly ornamented interior. It measures 16 square meters, and has 260 million surfaces.

Digital Grotesque 3D Printed Room 2

These complex, interwoven details and the ways in which the various layers of them join together wouldn’t be possible to craft by hand. Many elements look fractal in nature, repeating endlessly. One side is mirrored by the other in perfect symmetry. The architectural scale, for the designer, has been reduced from bricks to grains of sand.

Digital Grotesque 3D Printed ROom 4

This scale and detail is made possible by a new sand-printing technology that overcomes some of the limitations of 3D printing, enabling large-scale elements that can be layered into a whole. “The design process thus strikes a delicate balance between the expected and the unexpected, between control and relinquishment,” write the design team. “The algorithms are deterministic as they do not incorporate randomness, but the results are not necessarily entirely foreseeable. Instead, they have the power to surprise.”

Digital Grotesque 3D Printed Room 3

“Digital Grotesque is between chaos and order, both natural and the artificial, neither foreign nor familiar. Any references to nature or existing styles are not integrated into the design process, but are evoked only as associations in the eye of the beholder.”

Share on Facebook


[ By Steph in Gadgets & Geekery & Technology. ]

[ WebUrbanist | Archives | Galleries | Privacy | TOS ]


WebUrbanist

 
Comments Off on Digital Grotesque: Intricate Full-Scale 3D Printed Room

Posted in Creativity


3D Printed Car is Strong, Light and Close to Production

08 Mar

[ By Steph in Technology & Vehicles & Mods. ]

Urbee 2 3D Printed Car

The Urbee 2 is strong as steel, half the weight of a conventional vehicle, and can be manufactured in a warehouse full of plastic-spraying 3D printers. The teardrop-shaped 3D-printed car is an ecologically sound hybrid, and it looks cool, too. Aerodynamic and futuristic, this car could be a total game-changer for the automobile industry, leading to a rise of small-batch automakers.

Urbee 2 3D Printed Car 3

The three-wheel, two-passenger prototype vehicle with a generously sized, curved transparent roof (also made of plastic) was constructed by Kor Ecologic at RedEye, an on-demand 3D-printing facility with a Fused Deposition Modeling printer that sprays molten polymer one microscopic layer at a time to create the desired shape. The whole car takes about 2,500 hours to manufacture, but the process is fully automated.

The Urbee 2 3D-printed car’s light weight makes it so fuel-efficient, creator Jim Kor aims to make it from San Francisco to New York City on ten gallons of gas. Kor Ecologic’s design ideals for the project include causing as little pollution as possible during manufacturing, operation and recycling of the car, using local or regional and/or recyclable materials whenever possible, and making it affordable.

Urbee 2 3D Printed Car 2

You might wonder just how safe a plastic car can really be, but Kor is aiming high in that department, too. The bumpers will be just as strong as their sheet-metal equivalents. The final goal for the Urbee is not just to exceed all current automotive safety standards, but be able to pass the tech inspection required for race cars.

Share on Facebook


[ By Steph in Technology & Vehicles & Mods. ]

[ WebUrbanist | Archives | Galleries | Privacy | TOS ]


WebUrbanist

 
Comments Off on 3D Printed Car is Strong, Light and Close to Production

Posted in Creativity