RSS
 

Posts Tagged ‘Preparation’

A Beginners Guide to Taking Portraits of Elderly Clients: Part 1 – Preparation and Rapport

17 Mar

The post A Beginners Guide to Taking Portraits of Elderly Clients: Part 1 – Preparation and Rapport appeared first on Digital Photography School. It was authored by Clinton Moore.

1 - Taking Portraits of Elderly Clients

You often hear it said that outstanding photography is about storytelling. An image may not have perfect lighting ratios or razor sharpness, but if it connects with you that can be all that matters.

Working with elderly clients can be the ultimate storytelling journey as these folks have experience in spades!

In this first of a two-part series on working with elderly clients, we’ll explore the practical and rapport building aspects of creating a story through the click of a shutter. Part two focuses on lighting and posing techniques.

How old is old?

2 - Taking Portraits of Elderly Clients

Remember that there is a spectrum of seniors. Most do not think of themselves as frail or grizzled. Get to know your stereotypes and your subject.

One place where your point of view can get in the way of a great image is generalizations around age. You’ve fallen into this trap the minute you conceptualize your client as “old” or “elderly.”

They tend to hate these terms. Can you blame them?

It’s important to step back and remember that there is a spectrum of the elderly. A 65-year-old is probably going to be at a different place in their life, both physically and mentally, to a 90-year-old. This includes everything from their health and mobility to their attitude about what they desire in a portrait.

Just try getting a 90-year-old to go for a brisk walk down the beach at dusk as you do in your standard family portraits.

Step back and remember that you need to get to know where your client is at before you even pick up your camera. After all, age is a state of mind.

Rapport building

Older clients tend to take a bit more time to photograph. They’ve been around the block a few times, and they want to get to know you a bit first. Also, they’re generally not trained models looking for a glamour shot for their Instagram feed.

For them, a photograph is an event, not an addiction.

3 - Taking Portraits of Elderly Clients

Older generations may only have had one formal photograph in their lives. Don’t assume they will be comfortable around the camera just because they’re there.

Communicate their way

You may be used to connecting through a world of emails and social media, but this isn’t always the case for older clients. For many older clients, their first instinct will be to pick up the phone (and we’re not even talking about a cell/mobile half the time!).

So be sure to place your phone number prominently on your website and any other form of marketing. This creates a sense of trust that you’re not going to just run off with their money.

Of course, many older clients do have email but may likely hold you to a higher standard of communication than you are used to on social media. Make sure you address them formally (i.e. “Dear John”), don’t use modern abbreviations or slang, and please check your spelling and grammar!

Creating comfort

When shooting a portrait, comfort should be your number one priority regardless of your client’s age. However, for older clients, you may have to do a little more than just making bad jokes from behind the lens.

Take the time to meet with your client before the shooting date. Sit down with them and be willing to share a bit of your personal story. This means more than just your shooting style. Tell them about where you come from, your family, or your interests.

This old school type of business approach might seem a little strange if you’re used to more modern online interactions. However, for older clients, it builds trust.

Try to keep in mind that older generations didn’t grow up with cameras being thrust in their face every second of the day. So your first job is really to make them feel safe. It’s entirely possible that the photo shoot was the idea of their children, and the client themselves may not be entirely on board.

So be sure to make them feel comfortable. Communicate your process and timeline clearly, and then stick to it!

4 - Taking Portraits of Elderly Clients

Sitting down with your client can be the most interesting part of the whole process. Take the time to do it right.

Understand their goal

Who paid for the shoot? One of the tough parts about working with older people is that they may not actually be the client!

If their children are footing the bill, understand what they want from the session in addition to the older persons desired outcomes. Often this is going to be a case of compromise. This highlights the importance of communication and preparation.

Now assuming the older person is your client, the first step is to determine how they want to be portrayed. While this should be standard practice regardless of age, there are a few areas here that can trip you up.

If they’re quite old, this portrait could be the photo destined for the tombstone. No one will say it out loud, but people may be thinking it. As such, family members might have differing, but strong opinions about how things should look.

Keep in mind that some clients might want to be photoshopped back into their 20s, whereas others may proudly want their wrinkles on display. As always communication is vital!

Be careful about imposing your ideas of old age photography onto the session. Try to avoid the cliché shots of the serious or delirious old person. Instead, let their personality shine.

5 - Taking Portraits of Elderly Clients

Avoid the clichéd shots and post-processing that portray older subjects as worn or child-like. Let their personality lead your images.

Get out of their face

Want to make an 80+-year-old client feel immediately uncomfortable? Get right up in their face with a lens. Aside from the fact that it’s probably not going to give a very flattering look, it can feel intimidating.

They may also not be over the moon about being surrounded by multiple light stands, softboxes, flags, and reflectors.

During your initial consultation, find out what level of gear will allow them to feel comfortable. If that means just the natural light through a window, then work with that.

Posed versus candid photographs

One of the most important initial questions pre-shoot is whether the client wants posed or candid shots.

While the client’s wishes should mostly steer this decision, you need to take a few factors into account.

Client’s who are experiencing dementia, particularly frontal dementia, may struggle with a posed photo shoot. Frontal dementia affects a person’s ability to plan and organize. So your usually simple instructions such as “open your eyes and smile on the count of three,” may quickly descend into chaos.

That said, if you’re doing a family shoot, a little bit of this chaos (provided no one gets too embarrassed) can be a great natural ice-breaker.

When in doubt ask yourself what style of shoot will best allow the client’s personality to shine through. A shot of grandpa tinkering away in his workshop might be infinitely more valuable than a stale headshot for the family.

6 - Taking Portraits of Elderly Clients

Sometimes the best photograph won’t be the perfectly lit, composed and exposed image. A family snapshot can be infinitely more iconic if it captures your subject’s personality.

Length of sessions

When shooting significantly older clients, keep sessions as short as possible.

The process of having to concentrate on a range of different instructions can be quite fatiguing. There’s also a good chance that their preparation for the shoot started well before you arrived.

As mentioned before, clients suffering with dementia can also experience a phenomenon called “sundowning” which is a tendency to become more confused towards the end of the day.

See again the importance of making sure you know your client before you organize anything?

7 - Taking Portraits of Elderly Clients

Jot down everything you can during your pre-consultation to create a fleshed-out idea of your client and their needs.

Mobility and location of sessions

Although a 60-year-old client can probably go anywhere you can think of; a 90-year-old client can’t. Something as small as a flight of stairs can pose a massive hurdle to a significantly older client.

Plan where you are going beforehand and give your client plenty of time to get there.

Asking them to cross a park to get to a beautiful spot you usually take your clients could end up taking more time than you had intended for the entire shoot.

As you can see, the minute you leave the client’s home, things get a bit more complicated. However, don’t let that discourage you from venturing outdoors. Just do the groundwork beforehand and make sure everyone involved is on the same page.

8 - Taking Portraits of Elderly Clients

Be realistic about the areas an older person can access. A few steps may as well be a mountain for some. It never hurts to send your assistant to check it out first.

Conclusion

Working with older clients is a delightful experience. Their sincerity is hard to miss. To ensure you have the best chance at a successful shoot, take the time to prepare more than just your lighting diagrams. Focus on understanding the client’s goals and personality. Collaborate with the family where necessary, and make their comfort your number one priority.

Next time we’ll be looking at some ideas around lighting and posing older clients.

Do you have any other tips you’d like to share? If so, please do so in the comments section.

The post A Beginners Guide to Taking Portraits of Elderly Clients: Part 1 – Preparation and Rapport appeared first on Digital Photography School. It was authored by Clinton Moore.
Digital Photography School

 
Comments Off on A Beginners Guide to Taking Portraits of Elderly Clients: Part 1 – Preparation and Rapport

Posted in Photography


A Guide to Newborn Photography – Preparation, Posing and Post-Processing

09 Oct

Newborn photography is, in my opinion, one of the most rewarding (and difficult) branches that a photographer can get into. I’ve shot numerous hectic weddings where I was physically exhausted afterwards, and had lifestyle sessions where nothing went right, but nothing has even come close to the process involved when taking photos of a precious newborn baby!

Over the years, I’ve learned some insightful tips from interacting with parents, to posing newborns safely, and also my philosophy when it comes to editing. I want to give all of these tips to you, to hopefully fast-forward your newborn photography aspirations and take you to the next level.

DPSimage 1

Before I dive right in, I want to give you some insight on my background and techniques, so that you can evaluate your style compared to mine, and make adjustments to my tips to suit your photography.

LIGHTING AND SHOOTING PACE

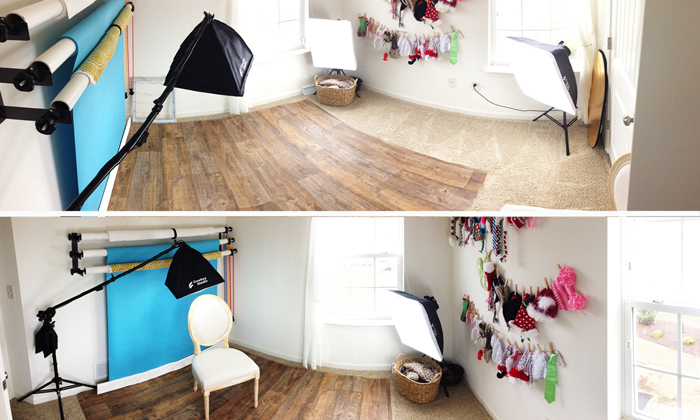
First, I’m a natural light newborn photographer. I will use a continuous lighting system in my studio on the darkest of days, but 99% of the time the only light in my photos is coming from that big fiery ball in the sky. Speaking of studio, I exclusively shoot newborn sessions at my in-home studio space. I’ve converted one of the bedrooms in my home to my shoot-space. You don’t need a huge studio for newborn photography – my small 10×10′ (3×3 meters)room with two windows gives me enough natural light and room to do everything I need to do.

DPSimage 2

SAFETY

Safety is my absolute number one priority for taking photos of newborns, which I’ll talk more about later in the article. It scares me how many pros and amateurs alike don’t make this step important. While on my soapbox, if you don’t make safety an absolute priority, then you have NO business photographing newborns. Whew – I feel better now.

PREPARATION

Whether you’re a photographer inviting newborns and their parents in, or you’re a parent yourself trying to capture beautiful images of your baby, the steps for preparation are virtually the same.

Here are some great tips to keep in mind when you prepare for the session:

  • Warm it up! I close the door to my studio and use a space heater in the corner to warm the room up to about 80-85 degrees F (26-29c). This is usually a great temperature to keep the baby happy, especially if they aren’t swaddled. Be sure to give any clients a heads up about the warmth, and suggest they bring light clothes for themsleves.
  • Wash your hands. Take every precaution not to spread germs, especially for a newborn with a weak and developing immune system.
  • Do NOT wear jewelry. I always take off my rings, bracelets, earrings, and necklaces. While the likelihood of your jewelry falling off is low, it’s not a zero chance. Keep it simple to keep the baby safe.
  • Avoid fragrances. While a newborn’s vision and hearing senses are not too keen, their sense of smell is very sensitive. Don’t wear perfume/cologne, fragrant lotions, or strong hand sanitizers. This can upset the baby quickly.
  • Try to create some white noise. Having some white noise can dull any thuds, shuffles, or the sound of the shutter on the camera that may otherwise wake a baby. My space heater serves to not only provide heat, but also gives me plenty of white noise. You may want to consider an app on your phone if the space heater is too far away, or too quiet.
  • Get all your props, backdrops, blankets, etc., ready before you take any photos. The less you have to move the baby to set up a new shot, the better.


DPSimage-3b

Another aspect of preparation for photographers working with clients, that isn’t talked about as much, is preparing for newborn parents. As a photographer myself, I have met hundreds of parents who are swelling with pride for bringing life into the world, but who are also completely exhausted. I offer my clients coffee when they arrive to let them know that this is a haven for comfort, and to trust me because I know what they are going through.

You’ll also run into two types of parents while photographing newborns: “hover” parents and “passive” parents. Hover parents may clutch and grab for their baby at the slightest sign of a whimper (which is natural human instinct, by the way), and it can impede your ability to take great photos for them. Passive parents are typically those that are the opposite of hover parents, and I’ve found are usually associated with parents who’ve had multiple children and are pretty laid back about the whole process.

The best solution for interacting with all parents is to make sure they’re properly informed before the session begins. Reassure them that their baby’s safety is your number one priority, go over your process with them, and make sure you openly communicate about their baby during the session. This will help ease any concerns a nervous new parent may have.

POSING

I LOVE natural newborn poses, and I try my best to capture the precious little miracle, and show how they are naturally. I do own a newborn posing beanbag (which I highly recommend purchasing) that has curves, allowing me prop the baby up, or lay them down. There are literally hundreds of guides on the internet about how to pose a newborn, so I won’t go into the different specific poses and setups here. However, I will go over the basics, and get into some more in-depth and technical aspects. If you have no idea how to start posing a baby, start with those guides before you ever (read: ever, ever, ever) actually take photos of a newborn!

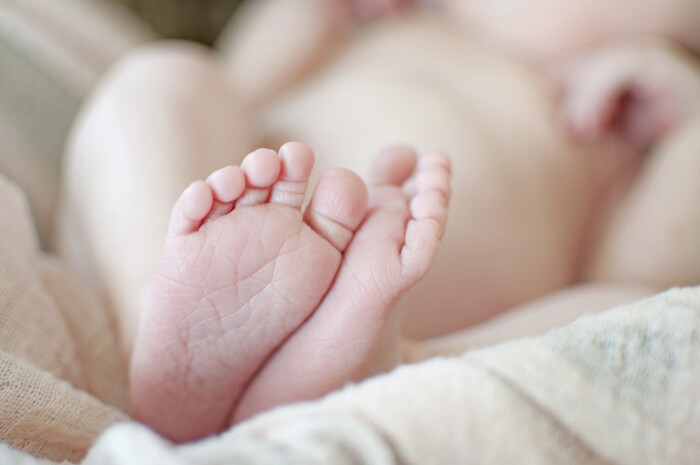
Like I’ve stated numerous times already, MAKE SAFETY FIRST! Natural poses are also safe because there’s very little risk involved if the baby twitches or moves spontaneously. While the baby is posed naturally, I’ll also snag some macro feature shots of the baby’s unique features like their cute little noses, tiny feet and toes, and the adorable little lips they have. Posing the baby naked, or swaddled with blankets, is something that you’ll decide, hopefully after a conversation with the baby’s parents to see what they prefer, and what photo theme they want.

DPSimage 4

You WILL eventually run into a fussy baby at times while posing during the session. It’s pretty rare to have a newborn that gives you no issues at all. That being said, you can prep the baby beforehand to increase your chances of successful posing. I always ask the parents to plan a feeding right before the session begins. Full belly = a happy baby most of the time. However, this isn’t the be-all-end-all solution for some newborns. I’ve been affectionately called the “baby whisperer” by many of my clients because I can typically sense what the baby wants, but I do so by using cues that the baby provides.

A hungry newborn will cry and root, sometimes shaking their heads back and forth and opening their mouths (kind of like a fish) as they look for a food source, i.e. Mommy. Another symptom of being fussy can stem from being cold. Look for tiny goosebumps on their skin to see if they’re too cold. The newborn baby may also be gassy, which can be tough to detect many times, but usually happens in a delay after a feeding. Sometimes it feels impossible to detect what may be causing the baby to be upset. I’ve found that often this is due to the newborn being just slightly uncomfortable or restless. You can calm a a fussy little one by doing some very soft rubs on their forehead or back, or some very light taps on their bottoms. Every baby is different in what they like so it may take some trial and error.

DPSimage-5b

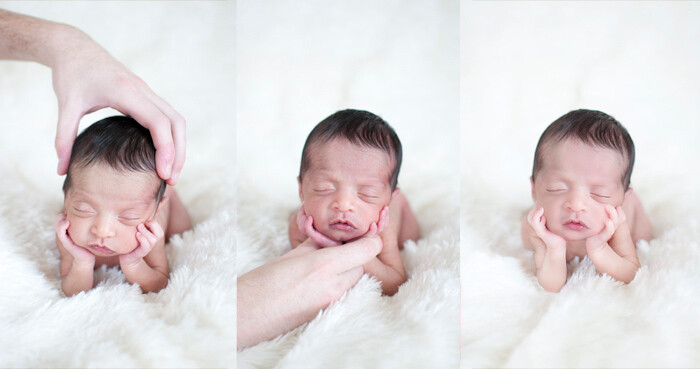
Photo one (left) holding the baby’s head for safety. Photo two (middle) holding the baby’s head from below for safety. Photo three (right) the two combined to make it appear that the baby’s head is resting on its hands.

While I prefer to naturally pose the baby, I will also do a few “risky” shots for variety, and that artistic touch. I put risky in quotes because these photos would be completely unsafe normally, but with composite editing in Photoshop, you can merge safe images together to create the artistic illusion you may be going for. Classic examples of this would be the head propped on hands photo (see above picture), hammock photos, or anything where the baby is perched on some object. By the way, you should never do these photos in one take – use the composite route! Just do a quick Google search for “composite newborn images” for step-by-step instructions on how to pull this off.

POST-PROCESSING

As a natural light photographer, I don’t typically manipulate the light in too many of my photos in Photoshop. I’ll make some tweaks here and there, but my biggest adjustments are typically associated with skin smoothing (although I also do some touching-up in post-processing). Slightly overexposing images helps with smoothing the baby’s skin, and shooting in RAW can help you correct any exposure or color issues along the way.

DPSimage 6

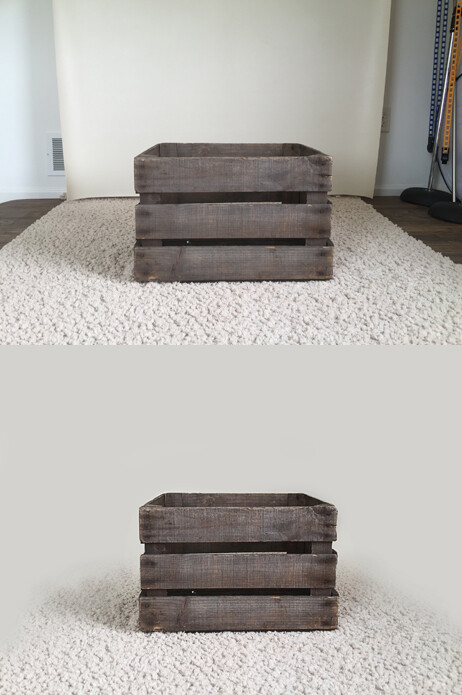
Here’s a tip – you don’t need a massive studio with a huge backdrop to create gorgeous images from far away. Take the example before/after photo above (sans newborn baby) – some minor editing and blending can create fabulous images you’ll be proud of. Just search for some floor/backdrop fading tutorials online for details and step-by-step instructions on how to do it.

Using the clone tool, the blend tool, and creating/manipulating layer masks in Photoshop, you can create exactly what you are after in a “look”. Digital Photography School has some basic Photoshop tips that are fabulous!


DPSimage-7b

In the end, you’ll need to decide what your style is, and what you want your photos to look like. My style includes editing out the skin imperfections on the newborns, but leaving certain features on macro shots (like skin flakes, birth marks, some baby acne, etc.), but there are others in my area that leave the images as they are, with very little touching up. It’s up to you. If someone has hired you, it’s because that person loves your images and the way you edit your photos – stick with it, or try to appeal to a different base.

googletag.cmd.push(function() {
tablet_slots.push( googletag.defineSlot( “/1005424/_dPSv4_tab-all-article-bottom_(300×250)”, [300, 250], “pb-ad-78623” ).addService( googletag.pubads() ) ); } );

googletag.cmd.push(function() {
mobile_slots.push( googletag.defineSlot( “/1005424/_dPSv4_mob-all-article-bottom_(300×250)”, [300, 250], “pb-ad-78158” ).addService( googletag.pubads() ) ); } );

The post A Guide to Newborn Photography – Preparation, Posing and Post-Processing by Elizabeth Moore appeared first on Digital Photography School.


Digital Photography School

 
Comments Off on A Guide to Newborn Photography – Preparation, Posing and Post-Processing

Posted in Photography


So You’re Going to Shoot A Wedding: Part 1 of 3 [Preparation]

06 Jul

About 5 seconds after I purchased my first professional camera, long before I hung a shingle or had any idea of what I was doing, the requests to shoot weddings came flooding in. Because let’s face it; someone’s always getting married. And your cousin’s dentist’s cleaning lady’s daughter would love a deal. And you are maybe just the photographer to give her one.

There are thousands of opinions regarding if non-wedding photographers should ever even consider taking a stab at shooting a wedding– free, favor, or otherwise. For the purpose of this article (and my sanity) we aren’t going to touch the politics of that with a 10 foot pole. Instead, we are going to assume that for whatever reason, you are shooting your first or near first wedding, like, tomorrow and you need a little reassurance that going ahead and shooting it as planned is a better idea than attempting to break your leg on purpose so you can be hospitalized and therefore legitimately unable to work. (The recovery time for this is longer than you would think. I’ve looked into it.) Here are 5 tips for the preparation of said wedding/non-purpose-leg-breaking.

PHOTO ONE 1

Value Yourself

Never, ever, ever shoot a wedding for free. I know it’s tempting. Maybe you’ve never shot one before and you feel awkward about charging. Or maybe it’s your brother/sister/neighbor/dry-cleaner’s wedding. Still, absolutely no.

Here’s why: these pictures, even if they aren’t of the caliber of work you hope to produce in the future, have worth. Great, amazing worth. A worth that is only increased when they aren’t just handed over for nothing in exchange. Now, in the right situation, I do a TON of work for cheap or trade and always have. But there has to be an energy exchange of some kind.

Work for trade, work for the slightest possible fee to cover your time and equipment rental or wear, but don’t work for free. Never, ever.

You don’t want to work with people who would expect you to and they don’t want to work with someone who doesn’t value their abilities. No matter how new you are to photography, you are right now reading an article on a website all about photography. That says that you have enough interest to research it, and I’m willing to bet, enough skill to pull it off.

PHOTO TWO 1

Prepare Yourself

I’m pretty high energy. I inhale coffee like it’s air and have to constantly remember to slow down when I talk. And walk. And drive. (Though that one probably doesn’t have much to do with caffeine.) Even so nothing lays me out like shooting a wedding. I don’t care if I have two assistants and the kindest, easiest, and most photogenic couple on the planet; it’s still exhausting.

Plan nothing the day before, and nothing the day after. The night before, sleep like it’s your job. Ice your eyeballs. If you’re into that kind of thing. You will likely be carrying twice as much equipment as normal, working five times as long, and running around like a toddler that mistook Red Bull for apple juice. No matter if you accepted actual compensation for this job or not—you owe yourself and the resulting images the best possible set-up. Day of, that set-up is comfortable shoes, a shirt that gives you renewed faith in human kind, and your lucky underwear. Or whatever. 

PHOTO THREE 1

Have a plan…..and Faith

Most brides have been told by wedding planners, magazines, and overzealous soon-to-be mother-in-laws that they need to provide their photographer with a “shot list”. If you can avoid this upfront, do. Instead tell them that you plan on taking all the typical and expected shots you can and if they want to provide you with a short list of requested special shots that you may not think of on your own, they are welcome to. You may not know that it’s very important to the bride that all of her uncles fifth removed on her father’s side get a picture together.

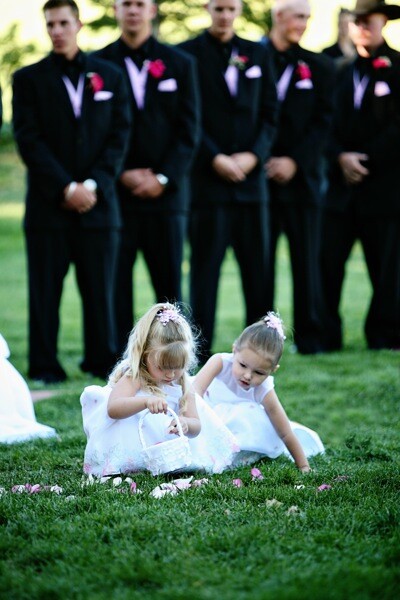
But you darn well know that she wants a shot of the kiss, a shot of the wedding party, a shot of cute flower girls doing cute flower girl things, and all the other standard shots that these lists tell brides they need to ask for. If they have a few simple unusual requests, this list goes in your pocket and is all you need. Everything else will happen as it’s supposed to, when it’s supposed to, and if you worry about it, you’ll just miss the cute flower girls doing cute flower girl things.

PHOTO FOUR

Bring the Right Equipment (and it’s Not what you Think)

Pack a lunch, water, and easy to eat snacks. I’m not even kidding. I know what you are thinking right now—but they will have food there! Yes, they will. But the logistics of you and said food meeting up for a little break time rendezvous are extremely complicated. Trust me.

Also, you’ll want gum, Advil, and safety pins.

Correction: someone will want these things. It may be you. It may not be. But everyone will assume you are packing minty freshness, pain relief, and an emergency dress fix, so you may as well pleasantly surprise them.

Finally, and this may seem a bit excessive to some but I am nothing if not a bit excessive; I bring an entire change of clothes. A lesson learned after a waitress carrying a tray of full wine glasses and I collided at the very beginning of a reception. I got to spend the rest of the evening smelling like a winery and everyone else got to wonder why the photographer had already hit the free bar when they hadn’t even gotten to the front of the buffet line yet.

PHOTO FIVE 1

Do you have an Exit Buddy?

Whether you have an assistant or not, you need a friend. A go-to. A pal. A person on the inside.  A free Girl Friday, if you will. I don’t know who that person is. Right now, you don’t know who that person is. But it will be obvious who it’s supposed to be and you will find them early on. And you will latch on to them in a way that will have you trading BFF necklace halves by the end of the night.

This person is going to explain who is who to you. Help you out when cousin Johnny is begging for your number and you still have 3 hours of dodging him while trying to remain professional.

This person knows who is giving the toast, every bridesmaid’s name, and will happily fetch you bouquets when you have everything set-up for the perfect shot but everyone forgot their bouquets in the bathroom. It’s a bridesmaid, an aunt, an unofficial wedding planner, a step-sister, or maybe just a knowledgeable family member that is only there for the free food.

And to help you, it turns out.

Post originally from: Digital Photography Tips.

Check out our more Photography Tips at Photography Tips for Beginners, Portrait Photography Tips and Wedding Photography Tips.

So You’re Going to Shoot A Wedding: Part 1 of 3 [Preparation]


Digital Photography School

 
Comments Off on So You’re Going to Shoot A Wedding: Part 1 of 3 [Preparation]

Posted in Photography


SNYP’s MW2 Trick Shot Guide! Part 2 – Preparation, Techniques and Tactics

17 Oct

PART 2 IS FINALLY HERE! Thankyou all so much for the overwhelming response on Trickshot Guide part 1. We hope this fully interactive beast of a guide was worth the long wait! Please leave a like and favourite if you enjoyed it, we spent absolutely ages on this guide! 🙂 Lots of love, ~ SNYP

 
Comments Off on SNYP’s MW2 Trick Shot Guide! Part 2 – Preparation, Techniques and Tactics

Posted in 3D Videos


[MODIFIED] Digital Fireworks Photography – Equipment Preparation Before the Shoot

01 Aug

Make sure your digital camera and accessories are ready to take plenty of great fireworks photos.

Preparation is the key to any successful digital photo shoot. Before you go out to a celebration to shoot photos of fireworks, whether it is the US Fourth of July, Boomsday on Labor Day, New Year’s Day, or other special occasion, make sure your equipment is ready:

* Obviously if it is legal and feasible (due to large crowds) to bring one along to where you are shooting photos, a tripod is crucial to getting the best, clearest photos. Otherwise you will need to hand-hold your digital camera very steady and do tricks such as increasing the ISO level to take quicker photos due to the low amount of available light. If you are using a dSLR, bring and attach any image stabilization lenses you may own to help offset the inevitable camera shake….

Read more at MalekTips.
New Computer and Technology Help and Tips – MalekTips.Com

 
Comments Off on [MODIFIED] Digital Fireworks Photography – Equipment Preparation Before the Shoot

Posted in Technology