RSS
 

Posts Tagged ‘Postcard’

You’ve got mail: Five photo postcard apps tested

04 Jul

In this age of sharing images via email, social media and text messages, one form of photo communication has sadly been left behind. It is something we all used to look forward to getting from anyone who was traveling. I’m speaking of the humble postcard.

Be it a trip as mundane as a work conference in Kansas City or as exotic as a trek through the Amazon rainforest, getting a postcard in the mail was something that we all looked forward to from friends and family. Even today, if I want to make my grandmother happy, sending even the cheesiest of postcards will bring a smile and a thank you. Perhaps more surprisingly, my kids go completely nuts when someone sends them a postcard. At 6 and 8, they both already have email addresses, but the postcards all go right up on the wall above their beds.

But what if we could merge the old-school and the new-school? What if, instead of relying on the spinning metal rack of cards at a roadside diner or airport giftshop, you could easily send a postcard of an image you took yourself? Through the magic of smartphone apps, doing so is far easier than you might expect.

Putting them to the test

I tried out five different postcard apps on an iPhone 5s: Touchnote, Postcard, Ink, Postagram and Snapshot Postcard. All of the apps are free and charge only for sending cards. I sent myself three postcards from each app using the same three images. One of the images was taken with a DSLR and another with a Micro Four Thirds camera, then transferred to my iPhone. The third image was a photo taken with the iPhone’s rear-facing camera. The data regarding pricing was reported by the app companies themselves. I did my best to make it clear what the costs would be for both US and International users. If the company reported specific non-US pricing, it is listed. But if they did not, pricing will be in whatever your local exchange rate is from USD.

Touchnote
www.touchnote.com

Cost: $ 2.99/£2.99/€2.99
Usable worldwide: Yes
Cardstock: 110 lb glossy
Android/iOS: Both
Additional products: Greeting cards

As with all of these apps, Touchnote has iOS and Android versions. What is unique is that it also has a web interface so you can order while at your desk. This is actually surprisingly handy if you intend to send non-phone images regularly. Full-bleed, white border, square or 1-6 multi image layouts are available. Images can be cropped, zoomed and rotated within the app. In addition to traditional messages on the back of the postcard, Touchnote allows you to add up to a 33 character caption on the front side as well. There is a confirmation email after you send a card and you can see (as well as copy for future use) all of your past sent cards in a nice timeline view.

Postcard by PrintMe
www.printmeapp.com/card

Cost: $ 2.99/£1.79/€2.49
Usable worldwide: Yes
Cardstock: 300 gr/qm (aprox 110 lb) luster
Android/iOS: Both
Additional products: Greeting cards, photo books, calendars

Postcard by PrintMe aims to be more of a ‘photo products’ app than the others in this article. That said, its postcard options are plenty strong on their own. Full-bleed, white border, and multi-image layouts are available, as well as many ‘occasion/holiday’ designs. The image can be zoomed and cropped, but not rotated.

Rare in these apps is Postcard’s ability to change the font for your message on the back. Sadly, there is no drop-down list, you just have to keep pressing the ‘font’ button over and over. Still, it is one of the only apps that give you any font option at all. Much cooler is the ‘signature’ box option which allows you to sign your name on-screen and have it print on the card. Finally, though I did not test it, Postcard offers the option to pick up folded greeting cards, but not postcards, next-day at Walgreens locations.

Postagram
www.sincerely.com/postagram

Cost: $ 0.99 domestic $ 1.99 international
Usable worldwide: Yes
Cardstock: 12 pt (approx 92 lb) with thick glossy laminate
Android/iOS: Both
Additional products: None

Looking to differentiate itself from the other apps out there, Postagram is unique both because it is designed around a, presumably, Instagram-inspired square image layout, and also because that square image comes pre-perforated and ready to pop out in a sort of trading-card style. Your message is printed on both the back of the image ‘card’ and on the front side as well. In a nice touch, you can choose a secondary 0.75 inch x 0.75 inch ‘avatar’ style secondary image to appear in the corner. Which is neat for including an image of yourself along with your landscape image from a trip somewhere, for example. Currently the non-image area of the Postagram cards are black. However, an upcoming app update will offer more colorful options.

Both Ink (described below) and Postagram are from the same company, so if you have set up an account on one, it will work on the other. They apps are also virtually identical in design and features, with the few small differences owing mostly to the differing focus of each product. There are some basic Instagram-style image filters available as well as the ability to zoom and crop. Rotating your image does not seem to be an option. To make sending multiple cards faster, you can copy a past card and update the address/message. There is a clever payment option that allows you to take a photo of your credit card instead of entering in the numbers manually. Both apps are very good with order-received/card-sent confirmations. I will say that unless you turn them off, they are both a little heavy on the marketing notifications (‘It’s a week until Mother’s Day!’ etc).

Ink
www.sincerely.com/ink

Cost: $ 1.99 within the USA, $ 2.99 International, $ 2.99 extra for “Premium” option
Usable worldwide: Yes
Cardstock: 12 pt (approx 92 lb) with thick glossy laminate, Premium cards are 120lb with eggshell finish
Android/iOS: Both
Additional products: None

Ink is designed as more of a greeting-card style postcard app, with many pre-formatted designs for various holidays and occasions that you can add your image to. But they also offer standard postcard options as well as full-bleed, white border or multi-image layouts. Ink postcards are the largest of any tested here, at 5×7 (vs roughly 4×6 for the others). They also offer an upgraded “Premium” card that is printed on heavier matte cardstock and comes in an embossed envelope with a real stamp.

SnapShot Postcard
www.snapshotpostcard.com

Cost: $ 1.99 domestic $ 2.99 international (first card is free from anywhere)
Usable worldwide:  Yes
Cardstock: 110 lb glossy
Android/iOS: Both
Additional products: None (though they do have a greeting card app, SnapShot Greeting Card, as well)

SnapShot Postcard is the only one of the apps that offers a quick ‘getting started’ video as part of its signup flow. While none of these apps are what I would call confusing for anyone who is used to mobile apps, a quick video walkthrough is pretty handy for those who aren’t as tech savvy. Another area where SnapShot Postcard is ahead of the others is that you can send your first card free. Trying a product before you buy is always a nice thing. While user interface is not particularly fancy, all the basics are there in the app. You can set a return address, place a caption on the front, and crop/zoom/rotate (with a handy ‘shake to reset’ function). You can choose borders or full bleed for your images. The borders are fairly cheesy and there isn’t any ‘white’ border option, so full-bleed is going to be your best bet. You are asked if you would like to send the same card again to a different address, handy for vacation or family photos where you might send the same card to many people. There is a nice order history, but you cannot copy old cards. 

Articles: Digital Photography Review (dpreview.com)
 
Comments Off on You’ve got mail: Five photo postcard apps tested

Posted in Uncategorized


Beyond the Postcard – 14 Tips for Creating Unique Photographs in Iconic Locations

28 Aug

Photography has been around since the early 1820’s. Of course, back then the technology of “picture taking” was not accessible to the common person. But have things ever changed! With the availability of digital cameras ever present, even in our cell phones, take a moment to consider these facts. Every two minutes today there are as many photos taken as were taken in the entire 19th century (1800s), and ten percent of all the photos ever taken were snapped within the last twelve months!

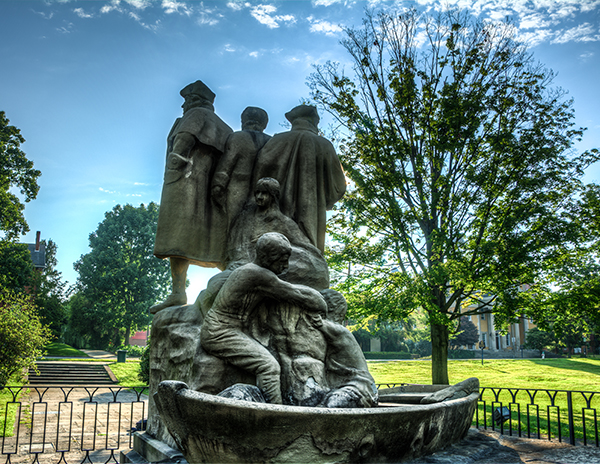
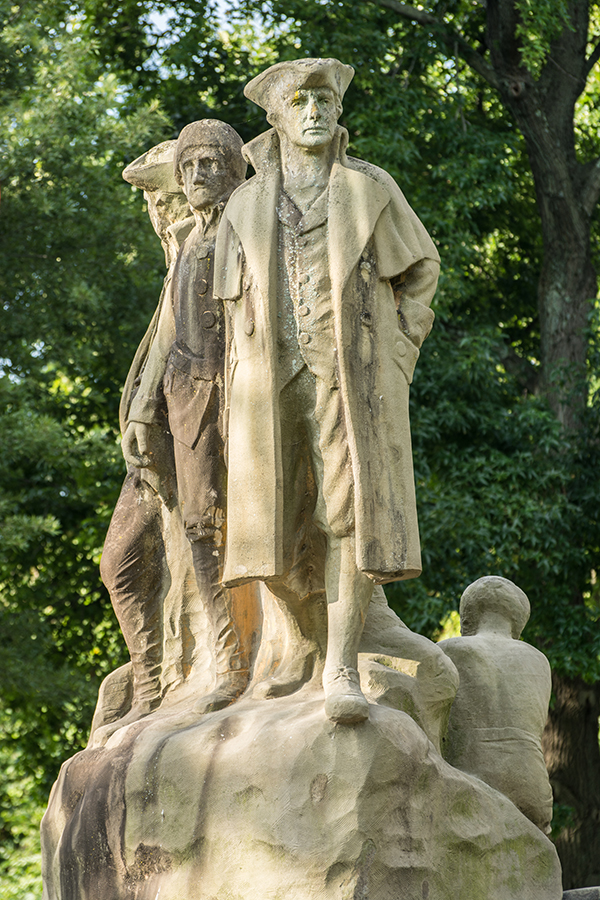
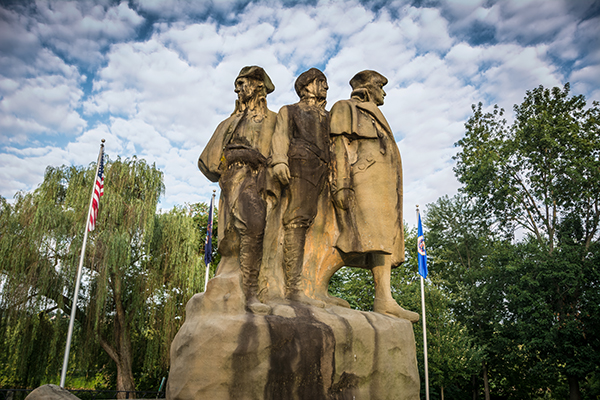
The Postcard: The Start Westward Monument in Marietta, Ohio.  (18mm 1/80th of a second at f/5, ISO 100)

The Postcard: The Start Westward Monument in Marietta, Ohio. (18mm 1/80th of a second at f/5, ISO 100)

So, with nearly 200 years worth of photographs in our collective albums and portfolios, it has become challenging to find an iconic view or subject that hasn’t been overdone by millions of photographers, especially when it comes to state and national outdoor landmarks. In order to look beyond the “postcard shot”, you need to research unique perspectives and techniques to capture that popular subject in a way that creates an original image. But first, go ahead and take that “postcard shot”. (You know you want to!) Then consider the following 14 different suggestions for creating unique photographs of the most popular spots.

#1 Check the internet

This is a resource past generations would have loved to have! By searching Google, Flickr, 500px and other photo sharing sites you can see how other photographers have captured most popular scenes. Besides seeing the images that have already been done, this will give you an idea of the layout of the location before you arrive. You may also find ideas that other photographers have tried and notice something that you might do differently to make the same image better.

#2 Get to know your location

Research the area by downloading maps and brochures from the internet. If your destination is only open certain days and hours, be sure you’ve garnered that information before you head out on your shoot. Stop at the visitor centers and ask questions.

#3 Talk to the locals

Talking to a “local” can often lead you to all kinds of special photo opportunities that may have never been visited before, such as discovering a special lighting effect that only happens at a certain time of the day or year, or maybe a waterfall that is hidden from view.

#4 Shoot at popular sites during the week

Avoid the weekends when the crowds can make it almost impossible to get an image, especially if you are looking for a shot free of human presence.

#5 Look for new angles

While looking for different angles, don't forget to explore all sides of your subject.

While looking for different angles, don’t forget to explore all sides of your subject.

Try to avoid the obvious straight-on shot that presents itself right in front of you,(the typical postcard shot), but look around for other angles instead – high, low or from the right or left. If you must shoot straight in front, try to include a foreground object.

Caution: If you are in a state or national park, be sure to abide by all park rules! Photographers sometimes tend to think that rules do not apply to them, but you will find that most park rangers will not agree with this point of view. These rules are put in place for your safety or to preserve the beauty of the area you are photographing.

#6 Photograph in different seasons

Photograph the scene or subject in all four seasons. Mother Nature provides amazing changes to scenery, from the different angles of the sun to the different colors of the leaves on the trees.

#7 Look for special events in nature

Some natural happenings can make your image unique, such as a full moon which may be included in the image if you are into nighttime photography. Special weather conditions can be conducive to producing a once-in-a-lifetime image. For example, some photographers may reject shooting on rainy days, but if you have the protective gear for your equipment, the rain can add special visual effects such as reflections or rainbows. Ice and snow coatings are often quite striking additions to outdoor objects both in nature or manmade.

#8 Look for special lighting

Of course the best light of every day will come during the golden hours, following the early morning sunrise and just before evening sunset. If you must shoot in the harsher lighting of midday, consider black and white images which can often produce some visually appealing contrast. If you are out on a heavily overcast day, you may be able to shoot all day, but in most of these cases avoid including the sky in your image. If you have the option, research natural lighting sources by using computer software, such as The Photographer’s Ephemeris, that show the position of the sun and moon to help you determine when the lighting will be best, and what time to arrive to capture your shot. These kinds of software can allow you to anticipate exactly when and where the best lighting may fall, on just the right spot, to create that once in a lifetime image.

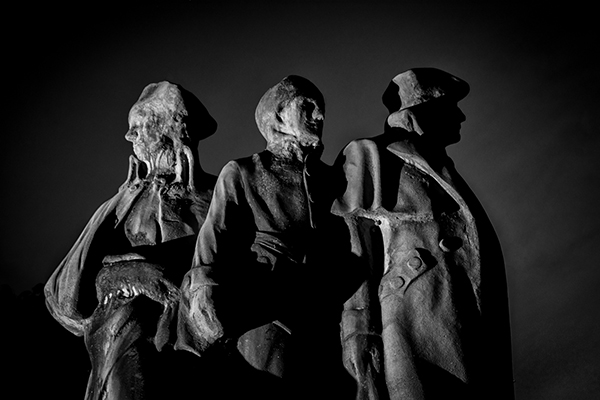
Black and white image shot after dark was lit with an off camera flash from the left side of the image.

Black and white image shot after dark was lit with an off camera flash from the left side of the image.

#9 Add the human element

Including a person in the scene not only will add a sense of scale, but can also add excitement and fun to your photo, which will make your image much more interesting to your viewer.

Special events present an opportunity to include a human element, which add extra excitement to your image.

Special events present opportunities to include human elements, which add extra excitement to your images.

#10 Focus on details

Narrowing your focus to capture details can be an especially effective way to create a unique photo. Whether zeroing in on the part of the vista that makes that site unique, or the feature of the statue that expresses its purpose, an original visual story may be captured in your image.

#11 Include a foreground element

Incorporating a foreground object to frame the subject can add depth to your scene and also enhance the image. A foreground object can also be used to lead the viewer’s eye to the subject of your photo.

#12 Use special effects

Two filters that could help make that standout image are the polarizing and neutral density filters. Use of a polarizing filter will enhance the blue of the sky and add color saturation. Use of a neutral density filter will cut down the light entering your camera, which allows you to slow down shutter speeds to capture interesting motion effects with the sky or water. Experimenting with your white balance can also create some interesting results.

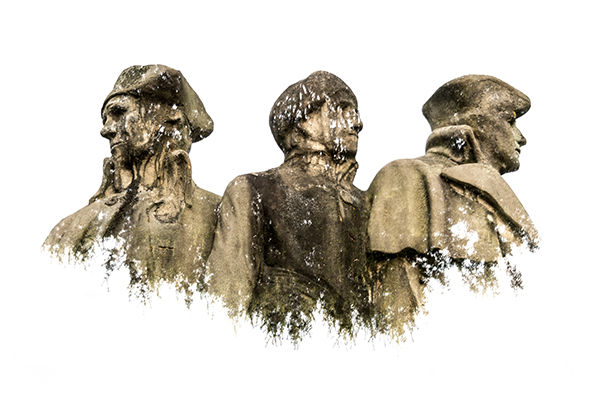
This image was created by using multiple exposures. the first image was of the monument against the sky, in the second the camera was turned upside down and captured the top of some nearby tree tops. In each image the sky was overexposed creating the white background.

This image was created by using multiple exposures. The first exposure was of the monument against the sky.  In the second exposure, the camera was turned upside down, capturing the top of some nearby trees. The sky was overexposed in each image, creating the white background.

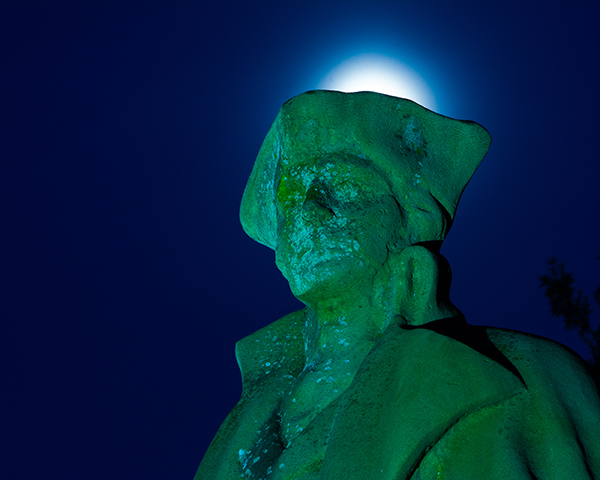
In this image shot at night the white balance was changed to Tungsten, which causes the monument to have a teal color. The glow above the head was created by the moon glow.

This image was shot at night the white balance was changed to Tungsten, which caused the monument to have a teal color. The glow above the head was created by the moon’s glow.

#13 Vary your focal length

Try different lenses to get varied results, for instance a telephoto lens will not only bring the scene closer to you, but will also compress the scene. On the other hand, a wide-angle lens allow you get more of your subject in the view, make background objects appear farther away, which adds depth to the scene.

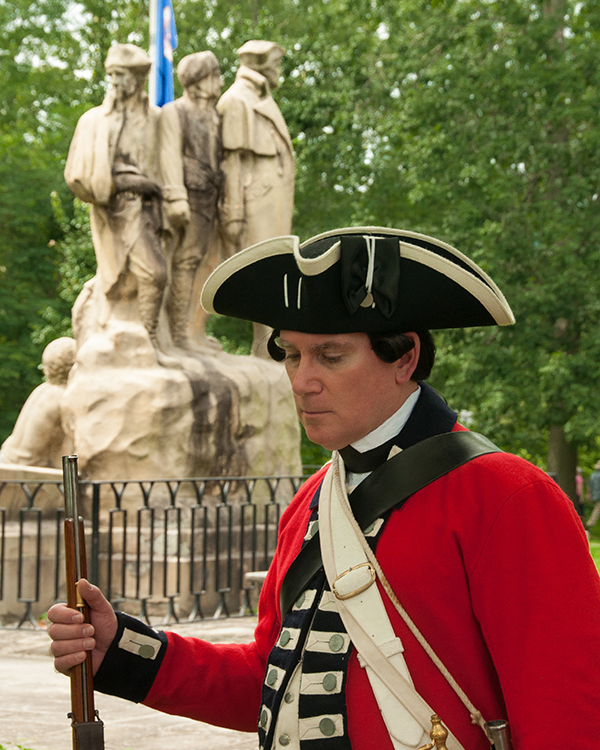
In this image the monument is captured just after sunrise giving the monument a nice glow. Also by using a telephoto lens at 150 mm @ f4.8 we compress the photo and the background is out of focus to make the monument stand out

In this image the monument is captured just after sunrise giving it a nice glow. Also by using a 150mm telephoto lens at f/4.8 we compress the photo and the background is out of focus to make the monument stand out.

#14 Experiment with DOF

To narrow your depth of field, open your aperture to a lower number, such as f/ 2.8, and make your subject stand out from the background. A distant landscape requires more depth of field to keep objects in focus, so you may want to close your aperture to something like f/16 to sharpen your image.

Researching your options and incorporating some of these tips will enhance the creative bent so many photographers already possess! Just don’t settle for the easiest, most common photographic result if you can take the time to shoot a more memorable image. Think and imagine your own photographic creations “beyond the postcard”. You’ll be glad you did!

Have any unique photographs from iconic locations or landmarks? Please share in the comments.

The post Beyond the Postcard – 14 Tips for Creating Unique Photographs in Iconic Locations by Bruce Wunderlich appeared first on Digital Photography School.


Digital Photography School

 
Comments Off on Beyond the Postcard – 14 Tips for Creating Unique Photographs in Iconic Locations

Posted in Photography


Travel Photography ~ Think Outside The Postcard When Photographing Famous Landmarks

21 Apr

How many of you have found yourselves in front of an iconic landmark and felt discouraged because every possible shot had already been made by thousands of tourists before you? You are on the trip of a lifetime. Your goal is certainly not to bring back pictures that look like the postcards at the souvenir shop.

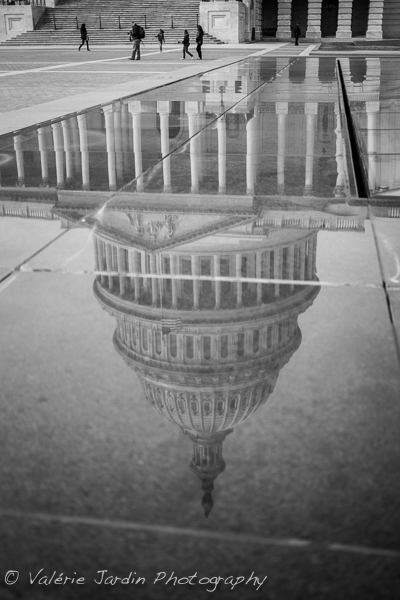
Photographing a reflection of a famous landmark such as the US Capitol in DC was a good way to avoid the cliché shot that every other tourist snaps daily. Adding the human element adds a sense of scale.

Photographing a reflection of a famous landmark such as the US Capitol in DC was a good way to avoid the cliché shot that every other tourist snaps daily. Adding the human element adds a sense of scale.

Here are a few tips to ‘think outside the postcard’ when you photograph a famous landmark:

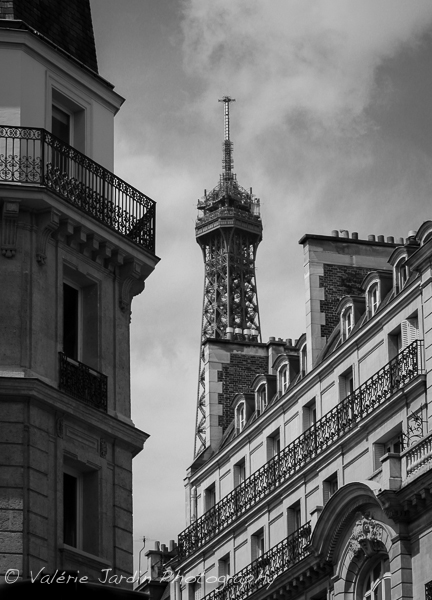
Get the cliché shot out of the way. You won’t feel right unless you do. So go ahead and photograph the Eiffel Tower the way you see it in your head when you close your eyes. Got the shot? Okay, now think of different ways you could photograph it and create your OWN iconic images of the same subject. Frame it with trees, look for its reflection in a window or a puddle, include it with the local architecture, shoot it as a silhouette, etc. The sky is the limit, you just have to train yourself to look for those unconventional frames.

Afraid that you are going to miss other opportunities while you are looking for different ways to see? Practice at home! Every town has its own iconic landmark, even yours. It may not be a grandiose building, but it doesn’t matter. Whether it is the local historic grain elevator, or the statue of a famous local politician, go out with your camera and see it for the first time again. Work your scene and find a creative way to frame it.

Don’t forget to include people in your frame. They add interest, life and movement to your images. They also add a sense of scale which works well when photographing massive buildings.

This simple exercise will change the way you see photographically. The more you practice, the quicker you will spot those interesting shots when you visit a new place. Your pictures will never be boring again!

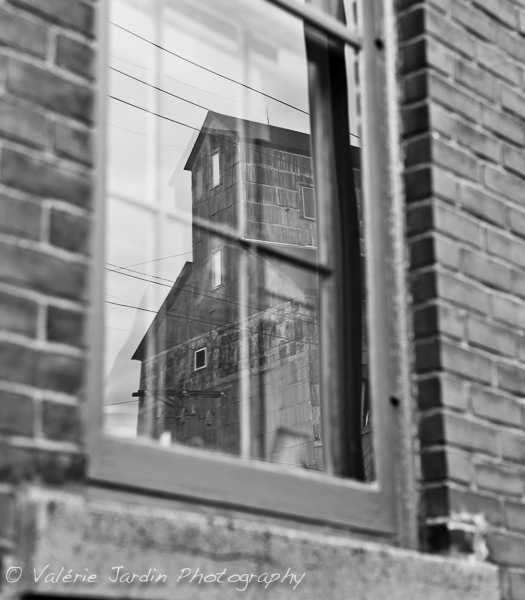
Practice at home!  This historic grain elevator may not be grand but it is one of the landmarks in a small river town near my home.

Practice at home! This historic grain elevator may not be grand but it is one of the landmarks in a small river town near my home.

Think of a different way to photograph a famous landmark by including local architecture in the foreground for example.

Think of a different way to photograph a famous landmark by including local architecture in the foreground for example.

Post originally from: Digital Photography Tips.

Check out our more Photography Tips at Photography Tips for Beginners, Portrait Photography Tips and Wedding Photography Tips.

Travel Photography ~ Think Outside The Postcard When Photographing Famous Landmarks


Digital Photography School

 
Comments Off on Travel Photography ~ Think Outside The Postcard When Photographing Famous Landmarks

Posted in Photography