RSS
 

Posts Tagged ‘Pose’

How to Pose and Angle the Body for Better Portraits

24 Jan

The post How to Pose and Angle the Body for Better Portraits appeared first on Digital Photography School. It was authored by Alexis Arnold.

how to pose and angle the body for better portraits

One of the best ways to make a living with photography is to photograph people. People need photographs of themselves for their businesses, conferences, publications, acting, and more.

Now, when a person comes to you to have their photo taken, they trust you to make them look good. That is really one of the biggest parts of your job as a photographer:

Make your subject look great.

When someone hires you to take their portraits or headshots, it’s important you understand how to pose them and how to angle their body toward the camera. With the right techniques, you will also be able to work more efficiently, which will benefit both you and your client.

After all, most people don’t like to have their photo taken, so you want the process to move along swiftly.

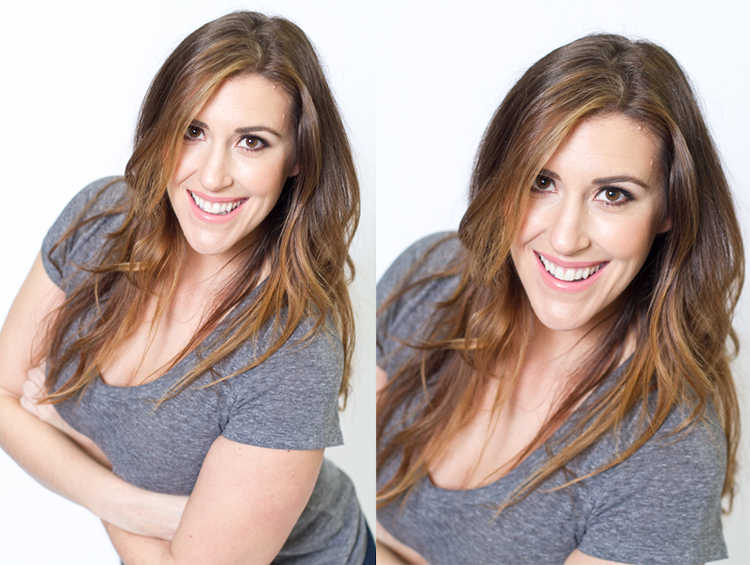
I have compiled clear examples of the slight changes you can make to create a more pleasing portrait. These photos are straight out of the camera; no post-processing or touch-ups have been done. The model in the photographs had professional makeup done before we shot.

(I recommend that you refer your female clients to a makeup artist so they can have their makeup done prior to the shoot. This will make a big difference in the final look.)

Okay, let’s get started.

how to pose subjects for portraits (the edited photo)
This is the final (edited) image given to the client.

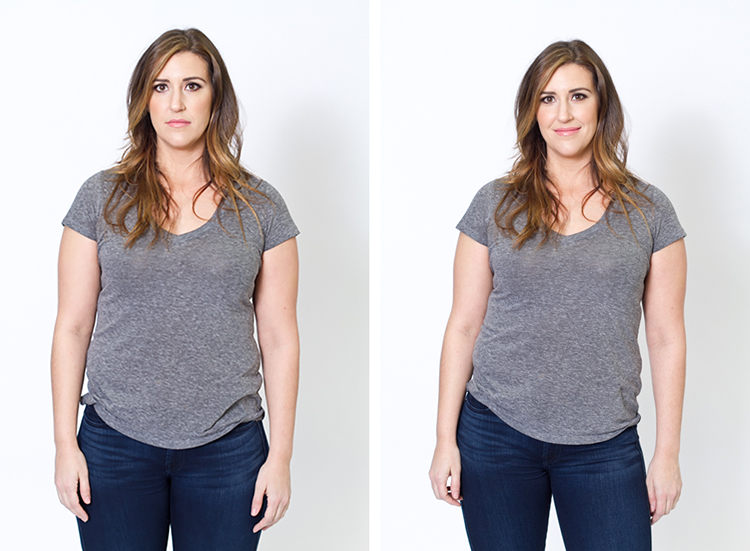
Shift their weight

With the first set of images (below), the model on the left is standing straight on (i.e., square to the camera). Her body weight is on both of her feet equally.

But as you can see with the image on the right, a subtle shift in her weight makes a big difference. All the model did was put the majority of her weight on her right leg – and this immediately created a subtle s-curve with her body.

The model is still facing the camera straight on, but already looks slimmer.

subject shifting her weight

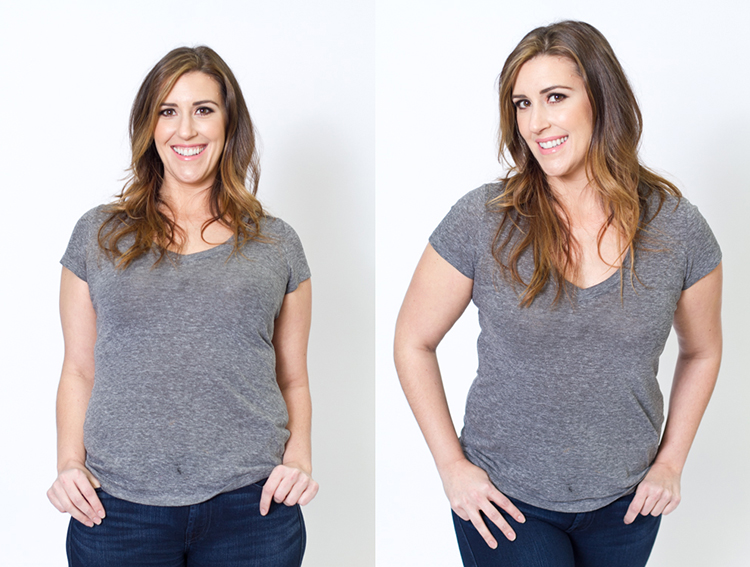
Lean forward from the waist

The model is still facing you straight on, but you can now have her lean forward from the waist.

With the photo on the left, the model is leaning away from the camera or backward, and it’s very unflattering. This angle creates a double chin and makes her look heavier. Anytime a client does this, you should correct them right away.

To make the photo better, just have your subject lean slightly forward from their waist (toward you).

As you can see from the photo on the right, when the model leaned forward, she automatically angled her head and shifted her weight. The pose is much more flattering!

subject leaning forward from the waist

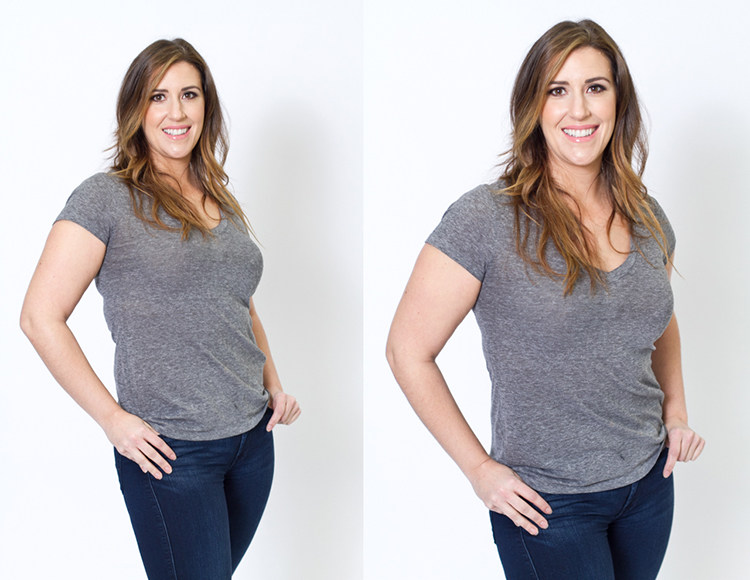
Weight on the back leg

Now have the model shift her weight to her back leg.

In the examples below, the model shifts her weight to her left leg and brings her right leg forward. With the image on the left, you can see how, when she leans backward or away from the camera, the pose looks awkward and unnatural.

So when your subject shifts their weight back, have them either stand up straighter or have them add a bit of lean toward you (as seen in the photo on the right).

subject putting weight on back leg when posing for portraits

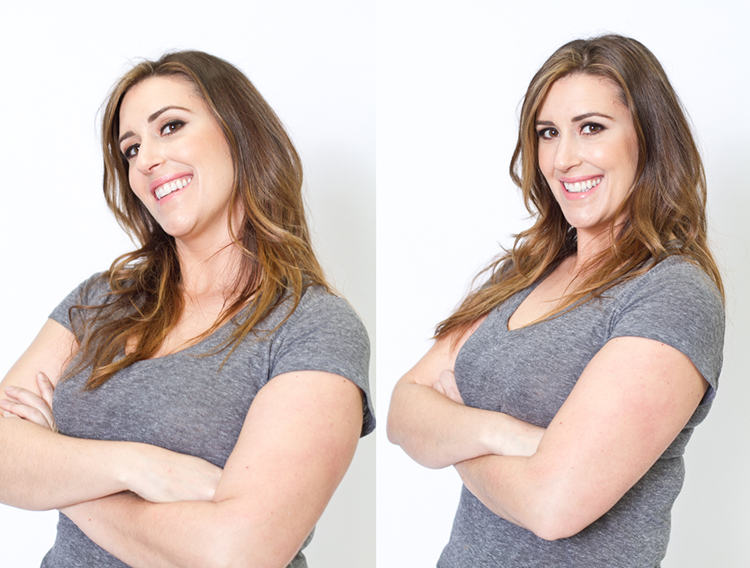
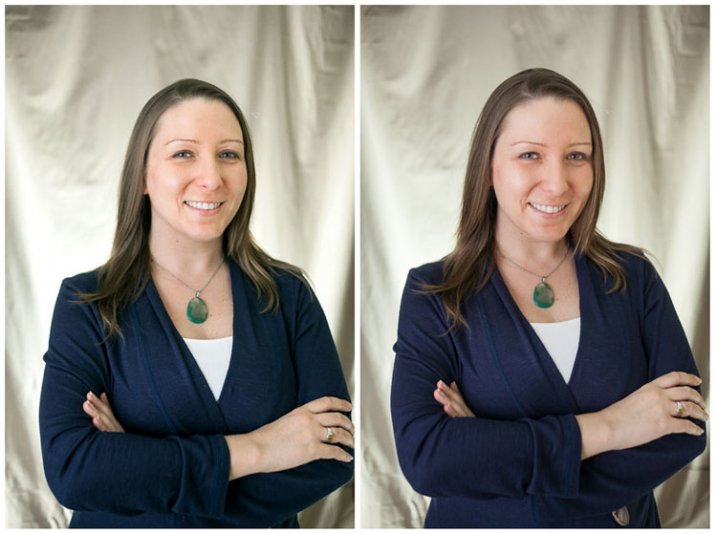
Cross arms

A very popular pose for business headshots is to have your model cross their arms (shown below). This projects a feeling of confidence and strength.

It can go wrong, however.

In the image on the left, the model angled her head backward. This mistake is more common in women, since they often tilt their head in photos.

Instead, communicate clearly with your subject to bring their chin forward and down slightly. This easy adjustment makes a big difference and is the shot your client will want.

two examples of a subject with the arms crossed

Lean forward again

You can get a very nice close-up headshot with the crossed-arms pose.

The image on the left was shot wider to show you how and where the model has angled her body.

Ask your subject to lean forward from the waist. Most people will think this feels weird, so just let them know that it’ll look great in the final image.

Remember that most people are insecure about how they look, so always take time to reassure them that they look amazing!

Then either zoom in tight with your lens or step in closer to get a beautiful portrait.

subject leaning forward toward the camera

Photograph on both sides of your model’s face

The example below shows the model’s “good side.” We all have one side that is better than the other. However, it is not usually visible to the naked eye, so please be sure to always photograph your model from the left and the right sides.

This is clearly shown with the model below. Her good side is when she angles her face to the right so her left side is more visible (below right). You can see more of her face, her neck looks better, both eyes are visible, the hair falls naturally, and her nose has a more flattering angle.

model posing with a left side and a right side

When repositioning your model, remember to shoot every pose from each side. Until you get good at recognizing your client’s good side just from looking at the image preview on your camera, always shoot from the left and the right.

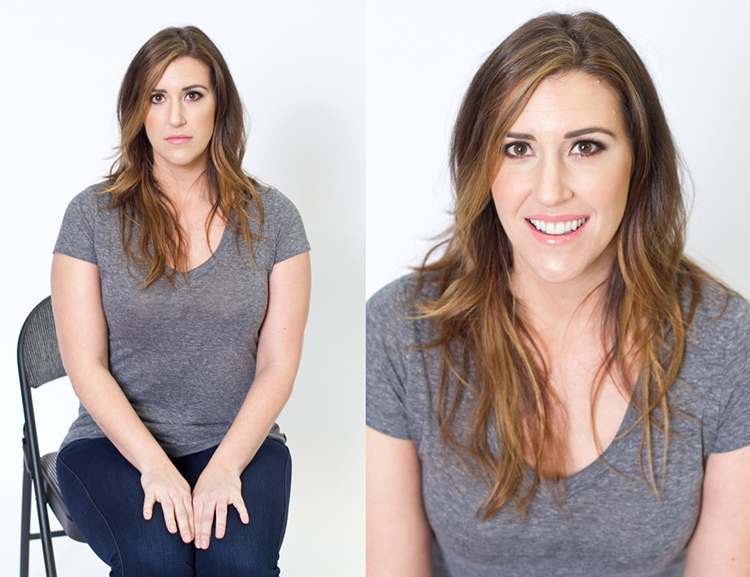
Sitting poses

Let’s move on to portraits where your client is sitting down. Having your subject in this sitting position places you above them – so you will be shooting at a downward angle, which is very flattering for most people.

Pose your subject on the seat edge

First, have your subject sit on the edge of the chair. You do not want them sitting comfortably where they lean all the way back.

In the left image below, the model is sitting on the edge of the seat, feet on the floor and shoulders square at the camera. Even though the angle isn’t the best, if you crop in tight, you can still create a nice portrait with the focus on the eyes, as seen in the image on the right.

subject posing on a chair

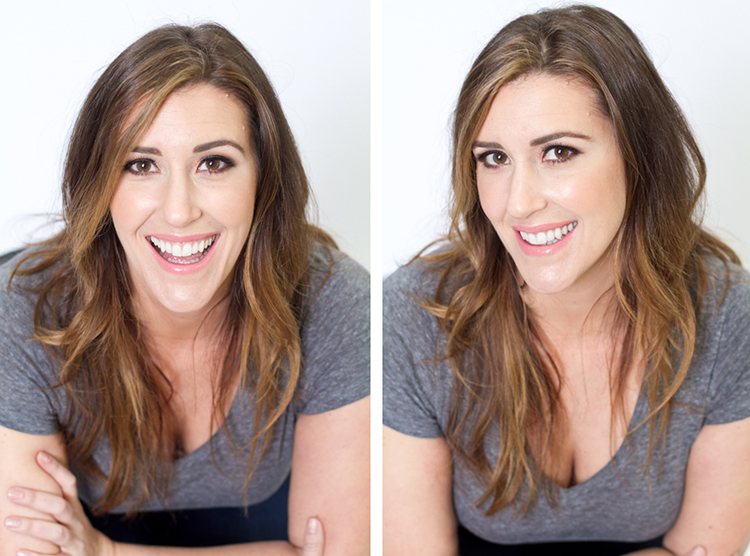
Consider crossing the arms and angling the face

With your subject still sitting in the chair, have them place their elbows on their knees.

Arms can be crossed or not; I suggest you play around with both options. This forces the subject to look up at you, taking away any issues with their neck.

Make the image better by having your subject angle their face slightly to the left or the right, as shown in the right image (below). Remember that these are tight crops, focusing on the eyes and the smile.

subject sitting and leaning forward how to pose subjects for portraits

How to pose and angle the body for better portraits: Conclusion

It’s easy to see how a simple posing adjustment can result in better portraits.

A good rule of thumb to remember:

Have your subject angle one shoulder toward you, and have them place their weight on the back leg. This will immediately make them look slimmer.

Of course, now that you know how to pose for great results, the best way to improve is to get out and practice, practice, practice!

And have fun shooting!

(All images were shot in a studio with a 50mm lens, on a white paper backdrop, with one strobe light.)

Now it’s your turn:

How do you come up with poses when doing portrait photography? Do you have any additional posing advice? Share your thoughts in the comments below!

The post How to Pose and Angle the Body for Better Portraits appeared first on Digital Photography School. It was authored by Alexis Arnold.


Digital Photography School

 
Comments Off on How to Pose and Angle the Body for Better Portraits

Posted in Photography


How to Pose Grooms and Groomsmen Effectively

21 May

The post How to Pose Grooms and Groomsmen Effectively appeared first on Digital Photography School. It was authored by Jackie Lamas.

Wedding days aren’t just about the bride, even though it might seem that way. As photographers we must also take photos of the groom by himself and with his groomsman buddies – whether they like it or not.

Posing the groom alone

When posing the groom alone you often see stiffness and shifting eyes because most men don’t feel  comfortable having their photo taken. So it’s worth starting a conversation that has nothing to do with the wedding to relax them and settle their nerves.

Find a nice background where you can photograph the groom at three different crops: full-body, half-body, and close-up. These three crops will add variety to your portraits, and give you more options when choosing the best portrait to deliver to your clients.

For example, window lighting can add dimension and depth while the groom is adjusting his tie or watch, or buttoning his shirt. Have the groom look out the window, or at his watch or tie. This keeps his hands busy, and because he’s not looking at the camera he won’t feel as vulnerable.

When you’re outside you can have the groom lean on a wall, or simply stand in the middle of a walkway. To help him pose naturally, tell him to stand as if he was by himself and not getting his photo taken.

Also, remind him to breathe. The stiffness is often caused by the groom holding his breath. It will also help him relax his shoulders and overall stance.

Photographing the groom at three different crops is a great way to add variety to the final images.

If the groom usually puts his hand in a pocket, have him put the one furthest from the camera into his pocket. This can help make the portrait feel more natural. Having the groom look at various points beyond the camera (to the side, behind you, or even at his shoes) can reduce the nerves and stiffness, and make him feel more comfortable.

As you’re taking the groom’s portraits, feel free to joke around, talk about things they like, or simply compliment them. This can make them feel more comfortable and bring about natural smiling and laughing, as well as fill in the silence.

Sitting is another great way to pose the groom. Have him sit on steps, a short wall or a chair. It will make the groom feel less stiff, and allow you to focus on various details of his outfit such as his shoes or socks if he chose something special.

Portraits of the groom while with the bride

But the groom doesn’t have to be completely alone in his portraits. A beautiful portrait of the groom with his bride can isolate him while placing him in the overall story of the wedding day.

Pose the couple facing each other, and ask the bride to place her head on his chest or arm to bring her face out a little. Then have her close her eyes while you direct the groom to look at the camera.

Another great portrait is having the groom at a 45-degree angle, with the bride behind him. Ask her to put her head on his back/shoulders, and have him look either directly at you or off into the distance.

He doesn’t have to smile. He can even look a little more serious. But the big picture will still look romantic and show that the couple is sharing a special moment.

You can move the groom and bride from there and create variations where the groom is:

  • in focus
  • in the forefront
  • looking directly at the camera
  • the main focal point in the photo.

These will all make great portraits of the groom and help him pose with his bride.

Groomsmen

Groomsmen are really fun to photograph. Most of the time they’re buddies and will joke around a bit, which can make for great candid photos. But it can also mean they won’t take the photo shoot seriously.

One way to get them to listen and cooperate is to let them know the faster they get through the photo shoot, the sooner they can start having fun. But don’t use this trick until you’ve captured some candids showing how they all interact, as it will be nice for the groom to have those as well.

Keep at least three different groomsmen setups in mind before photographing the wedding. You can find inspiration online and save those inspirational photos on your phone to recreate or build on them. This can save you lots of time if you’re new to wedding photography.

Try and keep the conversation light and easygoing. It will help the groomsmen relax, and you’ll get much more authentic expressions from them.

Group huddles and hugs are great icebreakers, and can lighten the mood if you feel the photos are getting a little stiff or the groomsmen are losing steam. A slow walking photo is also nice to have and having them looking at each other and talking is a great way to get them all smiling.

A staggered photo, either on a staircase or in a big area, can provide you with more varied poses for your final photos. If you have enough time, get a photo of each groomsman with the groom. Keep the photos moving by keeping the groom in the same place and having the groomsmen take turns standing beside him.

Keep everyone’s height variations in mind when taking photos of the groom with his groomsmen. Taller groomsmen may need to stand further back. If there are big height differences between the groom and his groomsmen, place those who are about the same height next to the groom, or bring the groom closer to the camera. This can help isolate the groom and make him the focal point of the photo, which is exactly what you want.

Keep everyone moving and try to get the photos done quickly. Groomsmen are usually ready for the next event pretty quickly and get sick of the camera much faster than the bride and bridesmaids.

If the groomsmen have ideas for poses, go along with them. It may be an inside joke or something that brings them closer together as buddies. And they’re usually the photos they love to remember.

Also, always ask if the groomsmen are wearing something special or have a gift from the couple – watches, socks, matching shoes, flasks, etc. These items have far more meaning when they’re photographed in the hands of those who received or are wearing them.

For example, these groomsmen all received personalized flasks from the groom, so a toasting photo was fun to create for them, along with a close-up of one of the flasks.

In conclusion

Grooms and groomsmen are fun to photograph during a wedding. But it’s best to have a few poses in mind so you can work quickly, as they often don’t like having their photos taken and may tire quickly. Keeping the mood light and fun gives them a great experience, and they’ll look back at the photos with fond memories.

dps-How-to-Pose-Grooms-and-Groomsmen-Effectively

The post How to Pose Grooms and Groomsmen Effectively appeared first on Digital Photography School. It was authored by Jackie Lamas.


Digital Photography School

 
Comments Off on How to Pose Grooms and Groomsmen Effectively

Posted in Photography


How to Pose Women Who Aren’t Models [video]

12 Apr

The post How to Pose Women Who Aren’t Models appeared first on Digital Photography School. It was authored by Caz Nowaczyk.

In this video by Anita Sadowska, you’ll learn how to pose people who are not models so they look more relaxed and natural in photos with a little help from photographer-turned-model for the video, Irene Rudnyk.

?

General tips

  • Always give the model encouragement.
  • Talk to them throughout the shoot to help them relax. If you like a pose they are making, tell them so.
  • Try to get your subject to laugh and smile to make them more comfortable in front of the camera. Tell jokes.

Standing poses

  • Get your model to stand on tip toes and move one leg forward, and shift hip forward.
  • When someone is shorter, shoot from lower to the ground, shooting upwards so the model looks taller.
  • Get the model to separate their arms to open up the body.
  • Don’t squash arms up against the body.

Sitting poses

  • Place one leg lower than the other. Bring one leg upward and turned inwards towards the body. Elongate the longer leg.
  • Keep the model using tip toes when seated too as it elongates the feet and legs.
  • Place arm outwards to lean on.
  • Sit more sideways to push the hip out a little more.
  • Also, place the chin up to elongate the body.
  • No crossed arms.
  • Lean backwards on the back arm, resting the front arm loosely on the front leg.

Facial positions

  • Push out the chin and then pull it down to create more definition.
  • Move their face around on different angles, tilting works well.
  • Try chin up and chin down. If using chin down, it is important to have strong eye contact.

Posture

  • Always ensure the model has good posture.
  • Move shoulders down, stand tall and suck in the tummy for a strong core.
  • Lean against something to feel more relaxed.

Accessories

  • Accessorize. Using an accessory can give the model something to play with/hold.
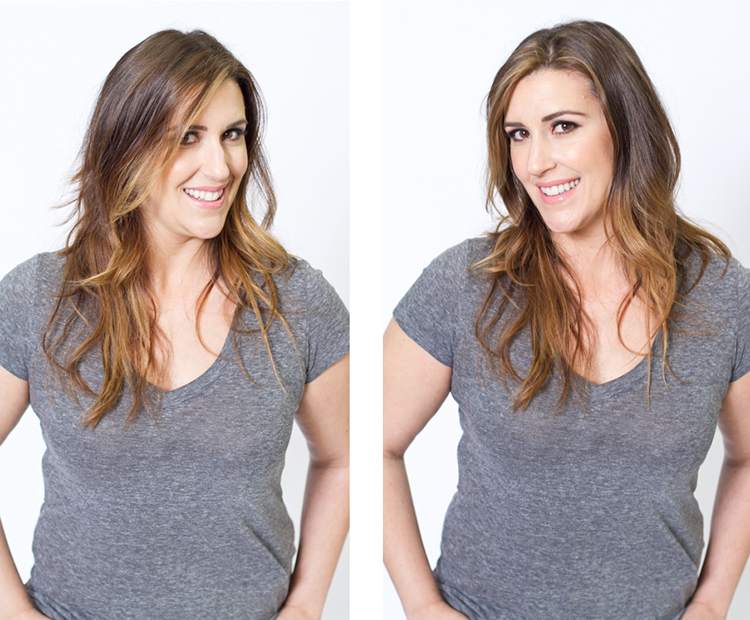
  • If you don’t have accessories, you can get your model to play with their hair and have fun with it.


You may also find the following articles helpful:

  • 67 Portrait Poses (printable)
  • 5 Ways to Use a Piece of Glass for Unique Portraits
  • Portraits: Striking The Pose
  • 10 Ways to Take Stunning Portraits
  • Clothing for Portraits – How to Tell your Subjects What to Wear
  • 14 Amazing Portrait Recipes
  • How to Create Awesome Portrait Lighting with a Paper Bag an Elastic Band and a Chocolate Donut

The post How to Pose Women Who Aren’t Models appeared first on Digital Photography School. It was authored by Caz Nowaczyk.


Digital Photography School

 
Comments Off on How to Pose Women Who Aren’t Models [video]

Posted in Photography


Lizard Strikes a Pose for a Perfect Contrast

27 Sep

Warning: preg_replace(): The /e modifier is no longer supported, use preg_replace_callback instead in /home/forge/content.photojojo.com/content.photojojo.com/wordpress/wp-content/plugins/ozh-better-feed/inc/feed.php on line 134


Photojojo

 
Comments Off on Lizard Strikes a Pose for a Perfect Contrast

Posted in Equipment


Video: How to pose male models (and friends) for better photos

09 Aug

There are tons of posing tutorials out there for portrait photographers, but almost all of them are directed at how to pose women. So if you’ve been looking for a few solid tips on how to pose male models—or male friends helping you out with a photo shoot—check out this video by Daniel and Rachel of Mango Street.

The duo released a popular posing tutorial a few months back, but that one used a female non-model and, ever since, their audience has been asking for a similar tutorial for posing men.

As with all of Mango Street’s videos, this one is short, to-the-point and useful, particularly if you’re a beginner or work with male friends for your photography and not professional models. The three tips below will definitely help add some drama to bland portrait poses.

  1. Define the Jawline: Use a harsher light source and/or ask your subject to tilt their head so that their jawline is nice and sharp.
  2. Do Something with those Hands: Give your subject something to do with his hands—whether he’s scratching the back of his neck or stroking a killer hipster beard, it’ll keep things looking more natural and less awkward.
  3. Pay Attention to Posture: Have your subject aim for either a relaxed posture, or create sharp angles with his limbs and (if possible) a harsher light source.

Check out the video to see all three tips demonstrated. And if you found this short video useful, you’ll probably like the rest of what Mango Street has to offer on YouTube.

Articles: Digital Photography Review (dpreview.com)

 
Comments Off on Video: How to pose male models (and friends) for better photos

Posted in Uncategorized


How to Pose People for Group Portraits

03 Jan

As someone who does a lot of family and child photos, one of the most rewarding but also the most challenging scenarios I encounter, is that of classic group portraits. You know, the one where you’ve got the whole family together and the kids all dressed up and it’s the first time in three years that the everyone was able to get in one place for a picture. Someone is fussing over an un-tucked shirt, another is texting his buddy, the kids are crying, and grandma and grandpa are patiently smiling away because they’ve been down this road many times before.

It’s a tricky situation to be sure. While every family is unique and there is no one single method that will work for every situation, there are a few tips and tricks you can use to pose the whole gang. Get everyone to chill out long enough so you can get the type of frame-worthy shot that may end up as a giant print on the wall or above a fireplace mantle.

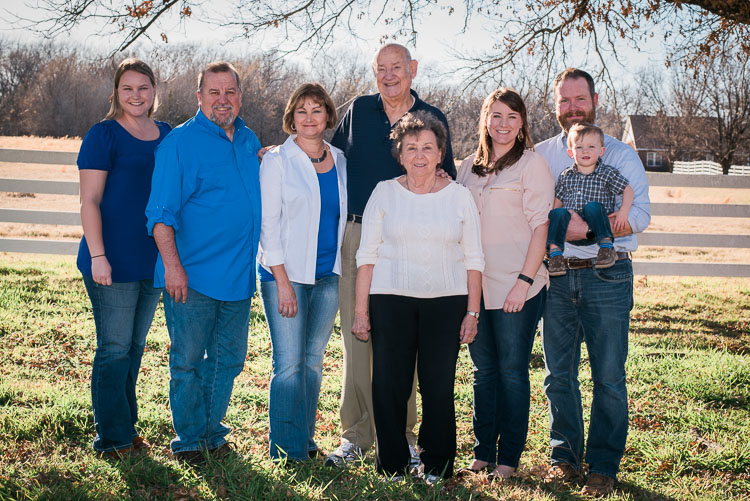
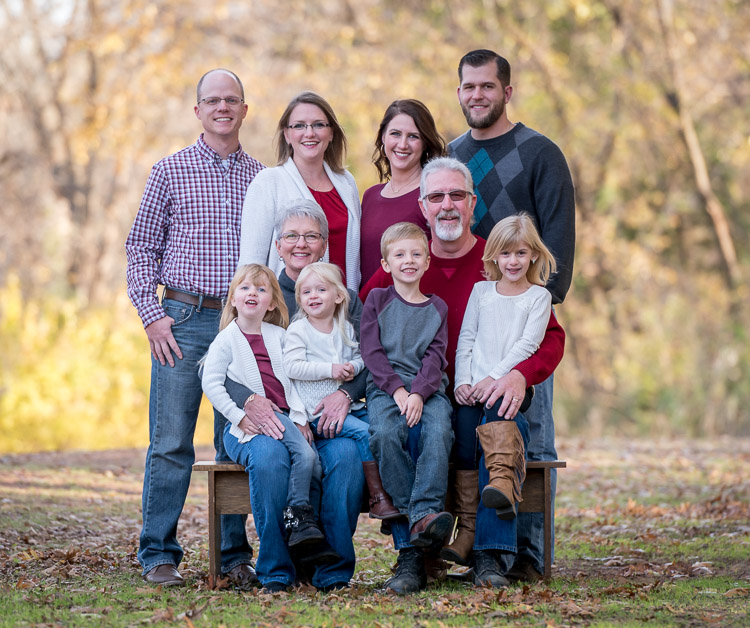
pose group portraits mom and dad and kids

Put the crowd at ease

As a photographer, it can be tempting to get right down to business at the beginning of a photo shoot. You want to show everyone how serious you are about your work, and start barking orders to all parties involved. “Okay Grandma, you sit down over there. Now uncle Jimmy, you go here. And you…what’s your name? Claudia? Can you do me a big favor and get your hands out of your pockets?”

The feeling of authority and power that can creep in when wielding your expensive gear and big lenses can be as intoxicating as it is nerve-wracking. But unfortunately, it’s not the best way to get the shots you want.

pose group portraits family

It’s easy to get so caught up in the idea of getting the perfect picture that you forget about the people whose photos you are taking. You don’t know what happened before they arrived at the session. They are probably a little trepidatious regarding what is about to take place with this photographer and all the fancy cameras and lenses.

The adults are likely on pins and needles because they have invested time, energy, and possibly a lot of money into the ensuing photo session and they just want things to go right. The last thing they need is more stress from a photographer (who can’t even remember their names) telling them where to sit, stand, and look.

pose group portraits bridge family

Take it slow – talk to them first

To solve this problem, I like to spend five or 10 minutes at the beginning of a family or group portrait session not shouting orders or even getting my camera out, but talking with everyone and getting to know them a bit. And for goodness sakes, learn their names!

Learn some other things too. Where do they work? What do they enjoy doing in their spare time? What movies do the kids like? Sure it will add some time to your shoot, and yes I realize the sun is going down soon and you need to get moving. But if you really want to up your game when it comes to family and group portraits try taking some time to get to know the family or group.

They will feel more at ease and want to work with you. Then when you need Claudia to get her hands out of her pockets you can call her by her correct name (Olivia, to be exact) and give her the Vulcan Salute with a wry grin because you just found out that she, like you, is really into Star Trek.

Focus on the kids

While not all group photos involve children, many of them do and in those situations, it’s vitally important to make sure you prioritize the little ones over the grownups. Not that you don’t care about the adults, but they are much more compliant when it comes to following directions and working with you. Kids are another matter entirely, which is why it’s so important to get them on your side early on and then pay extra attention to them during the photo shoot.

I usually make this clear to the grown-ups too, and blatantly tell them that I expect them to smile, hold a pose, etc., because all my attention is going to be aimed at the little ones. I often start by showing my camera to the children and letting them hold some of my gear. This can be especially useful if you are using longer lenses like a 70-200mm that might feel kind of intimidating to them. The process helps acclimatize them to you as a photographer, dispel some of the nervousness that often results during a session, and usually makes the kids more open to following instructions.

pose group portraits family

I also like to joke around with the kids, ask them about their favorite movies, toys, video games, and TV shows even if I have no idea what they’re talking about. (If someone can explain the difference between Peppa the Pig and Spongebob Squarepants I’d sure like to know. Cartoons these days make no sense at all to me.) This makes the kids let their guard down and smile while also putting the parents at ease, and believe me, if the kids are stressed the parents sure will be also. But if little Timmy and Alice are having fun, you can bet mom and dad are too.

Tips for posing

Astute readers will note that by this point I have said almost nothing that relates to the title of this article, which is ostensibly about posing people for group portraits. That’s because posing isn’t really the point here. If you show up with your Canon 5dMark III and 85mm f/1.2 lens and expect to take frame-worthy shots simply by going through a checklist of poses, you’re going to have a hard time.

Portrait photography is built on the foundation of a good professional relationship between you and your subjects. Taking the time to develop this at the outset is critical to getting good images when you start clicking away with your camera. However, when it is time to actually take pictures here are some tips to keep in mind.

pose group portraits large family

Do the must-have shots first

Get the must-have shots done first. These are the ones where you need the whole group in the picture, including the kids, and you need everyone to be at their best and brightest. If it’s a generational picture, put the eldest members (i.e. Grandma and Grandpa) in the middle, sitting down if possible. Surround them with kids. Put the little ones on their laps with any tweens and teens standing next to them. On the sides of the picture place the middle generation, or the children of the grandparents.

As you start taking pictures talk with the people, crack jokes, ask them to say odd things to get them laughing (e.g. “On the count of three everybody say Pepperoni and Pickles!”). In the process, you will not only get the little ones to produce genuine smiles, but the adults usually will too.

Keep it comfortable

Throughout the session, whether there are kids or not, you want your subjects to be comfortable with you and with each other so don’t make them do things that feel awkward or unusual. If you’re working with adults, have them stand up with their hands around their loved ones. (Position hands on backs, not wrapped around waists, or else you end up with floating fingers that look unflattering and unusual).

Use the scenery for seating or to stagger the heights of your subjects in order to get more interesting pictures. If women are on the edge of the frame (outer edge of the group) have them put one hand on their hip with the elbow out.

pose family group portraits

Another tip is to put the tallest person in the center and go down in height from there, but pay attention to relationships too. You’ll notice in the group photo above that the two men are on the edge instead of the middle, which creates a somewhat concave shape to the portrait.

That was an intentional choice on my part since the two young women are daughters of the couple sitting on the bench. I deliberately chose to break a posing rule because I wanted to emphasize the relationships present in the picture, which is something you need to keep in mind when posing for group photos.

pose-groups-for-photos-large-family-living-room

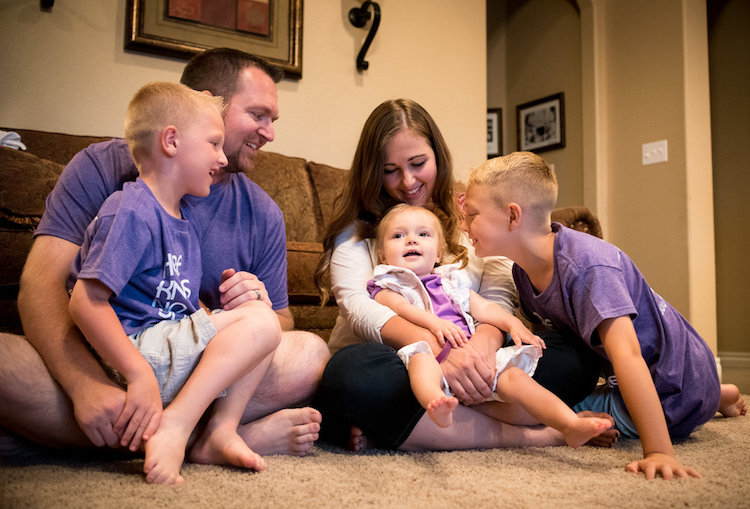
For this picture, I was more concerned with capturing a sense of emotion and family bonding than pixel-perfect posing.

Technical stuff

In terms of raw technical details, know that you need a decently fast shutter speed to freeze motion. So even if your group is standing relatively still I recommend using a shutter speed of 1/125th of a second to minimize blur that often happens due to moving hands or blowing breezes.

As a general rule, I like to shoot at f/4 or smaller (remember that larger f-numbers mean smaller apertures) to get a wider depth of field. Shooting at f/2.8 might give you a nice blurry background, but it could also mean someone in the group will be out of focus due to a shallow depth of field. Finally, off-camera speedlights can be a great way to compensate for harsh or dim lighting and help eliminate shadows on faces.

Finally

One final tip that comes in handy when doing group sessions is to have a shot list prepared with their actual names if possible instead of just placeholder pronouns like Mom, Grandpa, Little Sister, etc. You don’t want to get back to your computer and realize you forgot a crucial shot because you were too focused on getting the hand placements correct.

I hope some of these tips are useful for you, and I’m eager to know what techniques you have found to be helpful in your own shooting too. Leave your thoughts in the comment section below, and may you live long and prosper.

googletag.cmd.push(function() {
tablet_slots.push( googletag.defineSlot( “/1005424/_dPSv4_tab-all-article-bottom_(300×250)”, [300, 250], “pb-ad-78623” ).addService( googletag.pubads() ) ); } );

googletag.cmd.push(function() {
mobile_slots.push( googletag.defineSlot( “/1005424/_dPSv4_mob-all-article-bottom_(300×250)”, [300, 250], “pb-ad-78158” ).addService( googletag.pubads() ) ); } );

The post How to Pose People for Group Portraits by Simon Ringsmuth appeared first on Digital Photography School.


Digital Photography School

 
Comments Off on How to Pose People for Group Portraits

Posted in Photography


How to Pose and Angle the Body for Better Portraits

07 Mar
anglesfinalimageSM

This is the final, edited image given to the client.

One of the best ways to make a living with photography is to photograph people. People need photographs of themselves for their business, conferences, publications, acting, and more. When they come to you to have their photo taken, they trust you to make them look good. That is really one of the biggest parts of your job as a photographer, to make your subject look great.

When someone hires you to take portraits or head shots of them, it’s important you understand how to pose them, and angle the body toward the camera. By understanding this, you will also be able to work more efficiently, which will benefit both you and the client. You have to remember that most people don’t like to have their photo taken, so you want the process to move along swiftly.

I have compiled a series of photos, to give you a visual of the slight changes that can be made to create a more pleasing portrait. These are straight out of the camera, no post-processing or touch ups have been done. The model in the photographs had professional make-up done before we shot. I recommend if you are photographing a female client, that you refer them to a make-up artist you like to work with, to have their make-up done prior to the shoot. This will make a big difference in the final look.

Okay, let’s get started.

Shift their weight

With the first set of images the model on the left is standing straight on, or square to the camera. Her body weight is on both of her feet equally. As you can see with the image on the right, a subtle shift in her weight makes a difference. All she did was put the majority of her weight on her right leg. This immediately creates a subtle s-curve with her body. The model is still facing the camera straight on, but already looks slimmer.

1 hippush

Lean forward from the waist

The model is still facing you straight on or square but we will now have her lean from the waist. With the photo on the left she is leaning away from the camera or backwards, and it’s very unflattering. This angle creates a double chin, and makes her look heavy. Anytime a client does this, correct them right away.

To make this photo better, just have them lean slightly forward from their waist, toward you. You can see when she did this, in the image on the right side, that she automatically angled her head and shifted her weight on her legs. You now have a much more flattering pose.

2 leanback

Weight on the back leg

Now adjust the model once more. Have her shift her weight to her back leg. In the examples below the model shifts her weight to her left leg bringing the right one in front. With the image on the left you again see how when she leans backwards or away from the camera it looks awkward and unnatural. Have the model make the simple adjustment of either standing up straighter or have them add a bit of lean toward you as seen in the photo on the right.

3 leanbackforward

Cross arms

A very popular pose for business head shots, is having your model cross their arms. This creates a feeling of confidence and strength for the viewer. It can go wrong though. With the image on the left side below, the model angles her head backwards. This mistake is more common in women since they seem to like to tilt their head for photos. Communicate clearly with your client/model to bring their chin down slightly and forward. This easy adjustment makes a big difference and is the shot your client will want.

4 armscrossed

Lean forward again

From the crossed arm pose you can get a very nice close up headshot. The image on the left was shot wider to show you how, and where ,the model is angling her body. Ask them to lean forward from the waist. Most people will think this feels weird, just let them know that it looks great in the final image. Remember most people are insecure with how they look, so always take time to reassure them they look amazing! Then either zoom-in tight with your lens, or step in closer to get a beautiful portrait.

5 leanforward

Sitting poses

Let’s move on to portraits while your model/client is sitting down. Having your model/client in this sitting position places you at the angle above them. That means you will be shooting at a downward angle, which is very flattering for most people.

The first step you have to take, is to have your model sit on the edge of the chair. You do not want them to be sitting comfortably, where they lean all the way back. With the image on the left (below), the model is sitting on the edge of the seat, feet on the floor and shoulders square at the camera. Even though it is not the best angle, if you crop in tight, you can still create a nice portrait with the focus being on the eyes, as seen with the image on the right.

6 chairpose

With your model still sitting in the chair, have him or her place their elbows on their knees. Arms can be crossed or not, play around with both. This forces the model to have to look up at you, taking away any issues with the neck. Make the image better by having your model angle their face slighting to the left or right as shown with the right side image. Remember these are tight crops, focusing on the eyes and smile.

7 sitandleanforward

The last example shows the model’s “good side”. We all have one side that is better than the other. It is not usually visible with the naked eye, so please be sure to always photograph your model from the left, and the right sides. This is clearly shown with the model below. Her good side is when she angles her face to the right, and her left side is more visible (the image on the right). You can see more of her face, her neck looks better, both eyes are visible, the hair falls naturally, and her nose has a more flattering angle.

8 goodside

When repositioning your model, remember to shoot that pose from each side. Until you get good at recognizing which is your client’s good side just by looking at image preview on the camera, always shoot from the left and the right.

It’s easy to see how a simple adjustment of angling the body can result in better portraits. An good rule of thumb to remember, is to have the model angle one shoulder toward you, and have them place their weight on the back leg. This will immediately make them look slimmer. Of course, the best way to get better is to get out and practice, practice, practice!

Have fun shooting! All images were shot in a studio with a 50mm lens, on a white paper backdrop, with one strobe light.

googletag.cmd.push(function() {
tablet_slots.push( googletag.defineSlot( “/1005424/_dPSv4_tab-all-article-bottom_(300×250)”, [300, 250], “pb-ad-78623” ).addService( googletag.pubads() ) ); } );

googletag.cmd.push(function() {
mobile_slots.push( googletag.defineSlot( “/1005424/_dPSv4_mob-all-article-bottom_(300×250)”, [300, 250], “pb-ad-78158” ).addService( googletag.pubads() ) ); } );

The post How to Pose and Angle the Body for Better Portraits by Alexis Arnold appeared first on Digital Photography School.


Digital Photography School

 
Comments Off on How to Pose and Angle the Body for Better Portraits

Posted in Photography


How to Pose Groups for Portrait Photography

16 Jun

Group Main

For many years the gold standard for posing groups looked just like my first grade school photo. Everybody would be lined up and asked to stand as awkwardly as possible, feet together and for the lucky ones in the front, hands clasped together in their laps.

The photographer would shoot two frames (one for safety) and count every one in with a “1..2..3…say cheese” my grade one teacher Mrs. Witchell was way too cool to do cheese. She busted out her own version of Blue Steel instead. Respect.

Sadly this style of posing large groups is still pretty much the norm. But with some careful planning, and a little imagination, portraits of large groups can look far more dynamic than my grade one school photo.

Group 1

The classic school or sports style group photo is rigid and posed awkwardly. Introducing some variation in height, pose and shape of the group with give your portraits more life and energy making them far more interesting and dynamic.

There are four main styles I like use to shoot my groups:

1. The 90210

I learned this style of posing groups by studying the publicity shots of the American teen drama from the 90s, 90210 (I had a huge crush on Dilan). I have now developed, and modified, this technique and it has become my go to pose for many of the cast shoots I do.

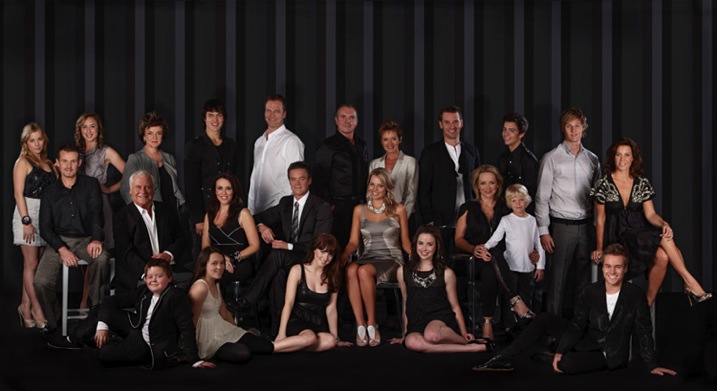
I like to create interest in these group shots by staggering the levels of all my models. I will have the back row standing. Middle row seated at various heights including high stools, chairs, lower ottomans or boxes. I then have a third level either on the floor or seated on very low stools or boxes. Lastly I pose each person individually and bring them onto the set one at a time, so I can see how the overall shot is looking.

90210 2 3 90210 2 4
90210 2 90210 2 6

Checklist

  • Shoot at 50mm or longer, as wider lenses will distort the group and make people in the front appear larger than those at the back. I usually shoot at around 100-150mm.
  • Ensure everyone is clearly visible.
  • Try and space everyone out so the image does not feel too constricted.
  • Shoot at least 10-15 frames. This is harder than it sounds because large groups can be intimidating and many people in the group tend to lose interest after two or three frames. The way around this is to warn everyone that you will be shooting at least 10 frames.
  • Keep the dialogue going. Be complimentary. Never single anyone out for doing the wrong thing.
  • If you need to, stop the shoot and give more direction.
  • Don’t be afraid to make people wait. I used to rush through my group shots (particularly with corporate males and athletes) because they intimidated me. I now realize that when I rush I don’t get great shots. Be confident and explain that you want to get this right, and if everyone does their bit it should all be over in five minutes.
  • Keep the dialogue going. Silence is a cue that you are unhappy with the shot or are finished shooting.
  • Lower your tone and speak calmly. This is a great trick I learned from my teacher training. Whenever I’m speaking to a large group I lower my voice rather than raise it. This way everyone becomes silent to hear you. I also find that women’s voices tend to go up and sound shrill when they try and raise it. This doesn’t sound very assertive or authoritative.

90210 3

The 90210 style also works for larger groups like this shot of the entire cast of the Australian Soap Opera, Neighbours ( above) or the cast and crew shot of the musical Moonshadow (below). I use the exact same approach and set up my shot in groups of three and five, staggering the head heights to keep the shot from looking too square.

Big Groups

2. The Reservoir Dog

This shot was inspired by the opening sequence of a Quentin Tarantino movie, Reservoir Dogs.

Resdog

This is a great option to photograph groups if you are pressed for time, need something more dynamic, or have a group of people that have trouble posing or taking direction.

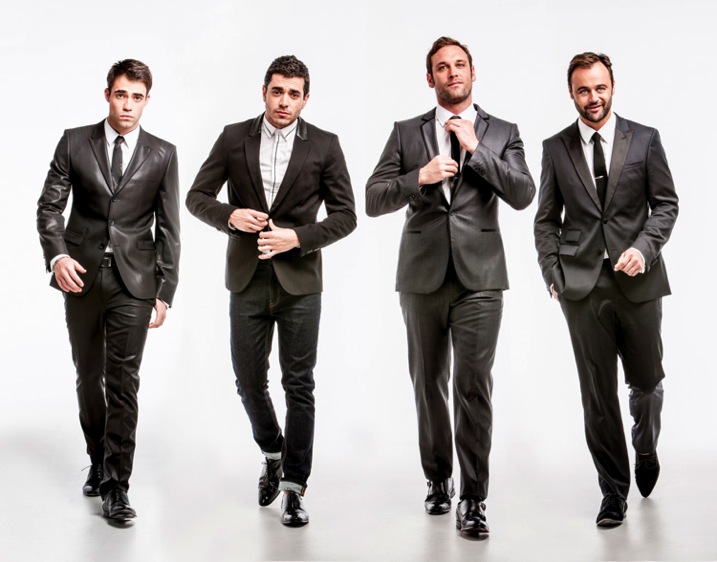
I like to shoot very low to the ground (sitting or laying) and ask the group to walk towards me. It works best when I give each person individual direction before we start. Eg., Person 1 put one hand in your pocket;,Person 2 walk and fix your tie as you go, Person 3 button your jacket up as you walk, Person 4 walk with a strut and attitude.

Reservoir Dog 2

If this shot is left to chance you may get lucky, but a little direction will really take it to another level.

When shooting set your camera to autofocus (AI servo for Canon or continuous for Nikon) and shoot with a long lens 150-200mm (to remove background distraction). I recommend aperture of f/5.6, a shutter speed of 1/250th of a second or higher, and focus on the face.

3. The Cartier-Bresson

This style is named after Henri Cartier-Bresson, a French photographer who took snapshots of everyday life and made them look extraordinary. He was a true master of candid photography.

I love photographing groups in is this fly on the wall style, which is posed to look like a candid snap-shot of life. I often get my inspiration for these poses from popular culture.

Cartier Bresson

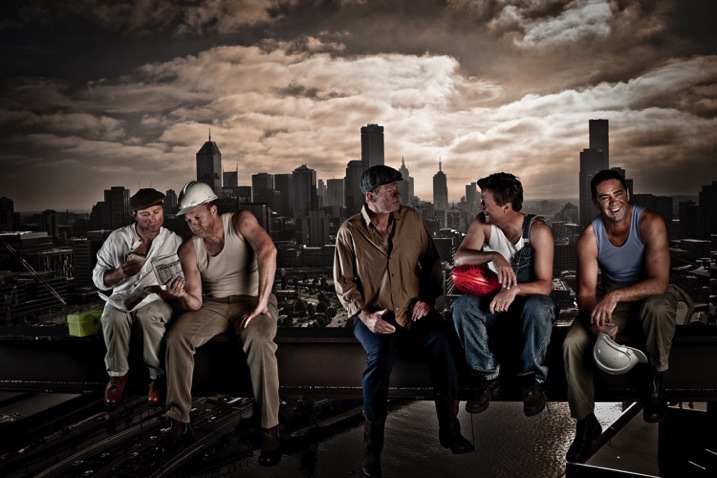
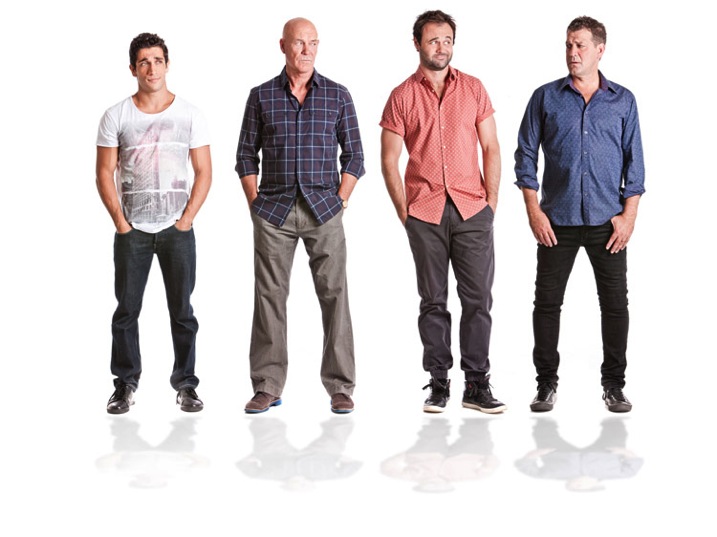
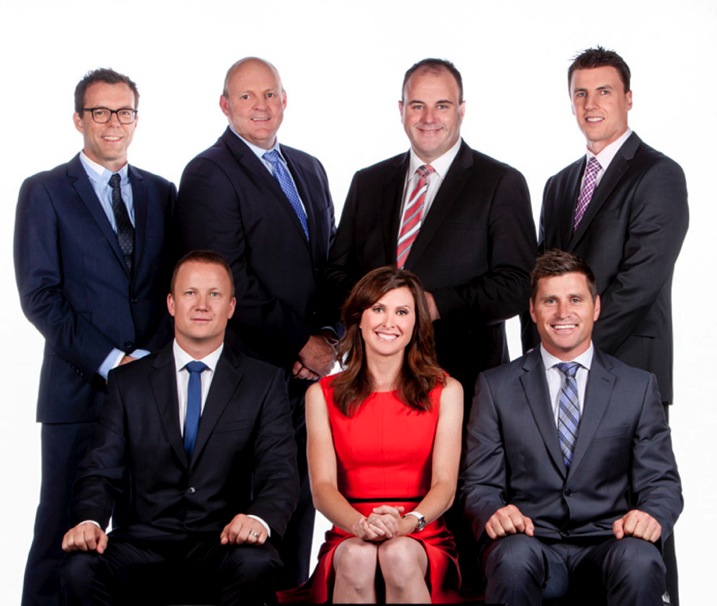
This photo of the cast of The Footy Show is homage to the famous 1932 image Lunch atop a Skyscraper.

When I’m directing a shoot like this I give everyone a role and ask him or her to repeat it over and over again. Poses are varied only minutely. For example: Billy and Shane (far left) were directed to look at the newspaper and eat the sandwich. Sam and JB (center) were asked to have an animated conversation and Garry (far right) was asked to laugh off camera. Expression was varied slightly but the pose was kept the same.

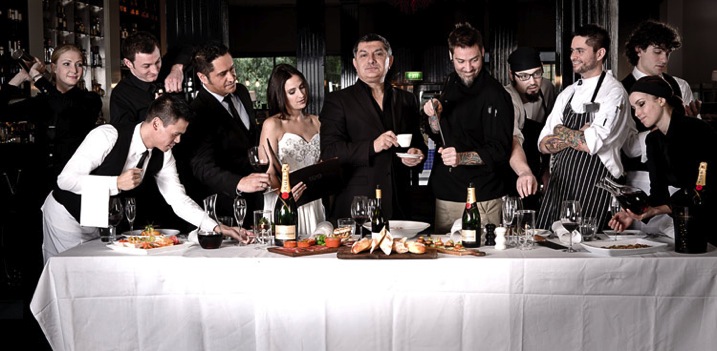
Lastsupper

This image was inspired by DaVinci’s Last Supper, and was photographed using a very similar technique to the Footy Show image.

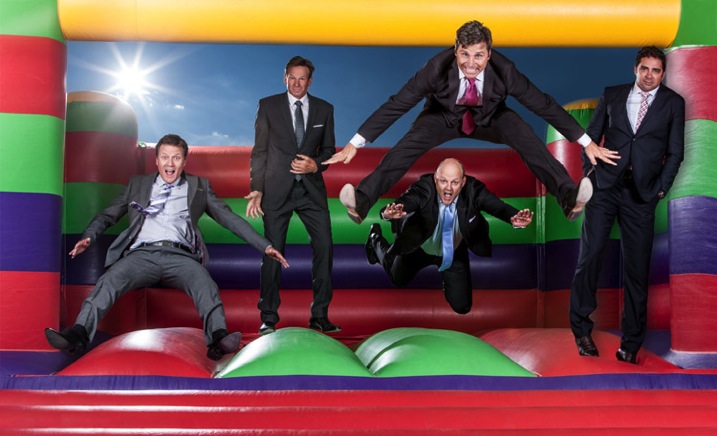
4. The lineup and “v” posed group shot

Small Time Gangster

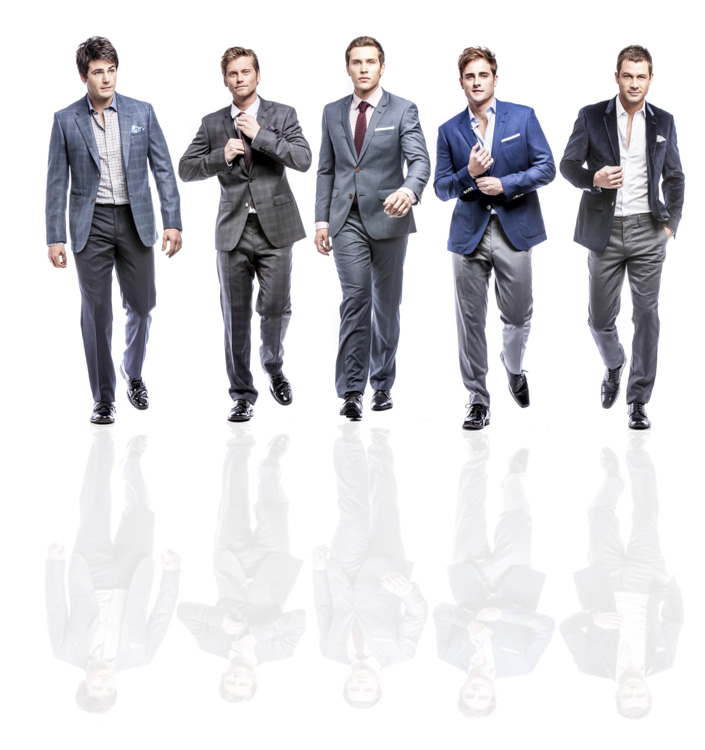
I photographed the cast of Small Time Gangster individually for this movie poster and then the shots were Photoshopped to create a “V” shape that is really popular in advertising and the entertainment industry.

Husbands A

The Cast of House Husbands was shot individually for this group shot, then the best expressions and poses were selected to create this image.

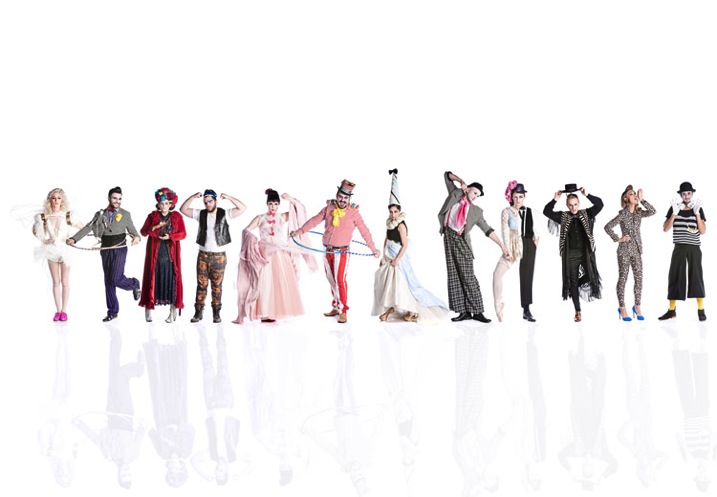
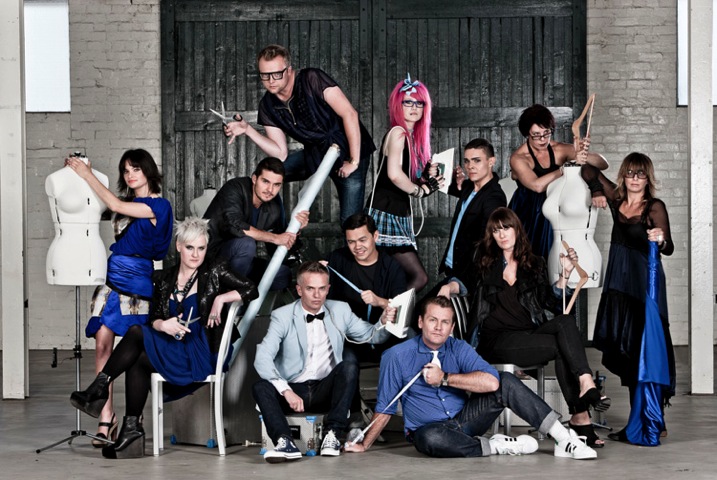
Project Runway S4

This style of photography works really well for large families and corporate groups, and really lets the individual personalities come through. I thought this was the ideal way to capture the cast of Project Runway Season 4.

This style of shooting was born out of necessity. Many of the TV shows I shoot cast shots for can’t schedule all their talent to be on set at once so I shoot them individually, and combine the shots in post-production. This is a great technique to capture everyone’s personality and it always looks dynamic.

Finally, don’t forget to have fun when shooting group portraits and let their personality (and yours) shine!

Lifestyle

These images were all posed to look like they had been taken candidly. The problem with candid photography is that you are relying on too many variables to be just right before you can get your shot. You need good light, location and expression. Miss out on one of these and your shot may turn to caca. If you set up the shot and give everyone great direction, you are guaranteed a great shot.

What are your favourite ways to pose and direct groups? Is there anything I may have missed or do you have a group portrait you are really proud of? I’d love to hear from you.

All images copyright Gina Milicia 2015

googletag.cmd.push(function() {
tablet_slots.push( googletag.defineSlot( “/1005424/_dPSv4_tab-all-article-bottom_(300×250)”, [300, 250], “pb-ad-78623” ).addService( googletag.pubads() ) ); } );

googletag.cmd.push(function() {
mobile_slots.push( googletag.defineSlot( “/1005424/_dPSv4_mob-all-article-bottom_(300×250)”, [300, 250], “pb-ad-78158” ).addService( googletag.pubads() ) ); } );

The post How to Pose Groups for Portrait Photography by Gina Milicia appeared first on Digital Photography School.


Digital Photography School

 
Comments Off on How to Pose Groups for Portrait Photography

Posted in Photography


How to Pose People for Headshots

14 Jun

Editor’s note: this week we will be featuring a series of articles on posing for portraits. Look for a new one each day. If you miss any make sure you subscribe to our newsletter and you’ll get a reminder of all our articles once a week.

HeadshotPose8

Headshots today are not what they used to be. Gone are the days of marbled backdrops in an indoor studio! Saturated markets filling up with fresh entrepreneurs, means that headshots are more important than ever these days. While location and wardrobe play a major role, knowing how to pose your subject is also vital in creating a successful headshot image that will stand out from the crowd. Let’s take a look at several examples of poses to keep in mind for your next shoot.

Basics

Before we go through some photos, let’s go over the basics of any pose. The fact that it’s for business use means that your subject should always be aware of their posture in a headshot. I simply tell people to put their shoulders back and their chest out. Once they adjust their posture, you can suggest gentle shifts if needed.

Another key point to mention to your subject is that they should lead with the forehead. This one can be a subtle, but powerful, shift in their pose. To lead with the forehead simply means that, depending on the overall pose/activity, they should always aim to have their forehead lean ever-so-slightly toward the lens, while pushing their face slightly forward. Below are two photos to compare – the left photo is with the model looking more or less straight ahead, while the photo on the right is when she followed my instructions about leaning the forehead slightly toward the lens. Note that I almost always have to slightly adjust the subject, because most people will tend to either lean in too far or lower their chin too much, so have them make slight adjustments until you find that ideal angle for them!

HeadTilt

Left photo shows subject looking straight at camera. Right photo shows subject leading with the forehead.

Now let’s get into several options for poses:

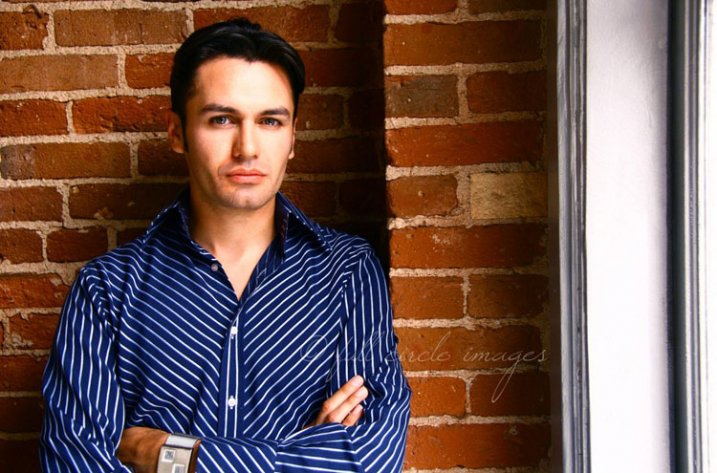
Crossed arms

First, let’s talk about one that harks back to traditional headshots – the crossed arms pose. While this general pose is nothing new, by simply changing location, having the subject add a slight lean, and loosening up the tightness of the crossed arms, this pose can feel modern. In the example below, the subject is slightly leaning in to the brick wall, while crossing his arms and maintaining an upright posture. When having women do this pose, encourage them to very loosely cross their arms; otherwise it will feel quite severe and cold. Men do have a bit more room to keep the arms tight, but be mindful of how tight they are to avoid that same severity.

HeadshotPose17

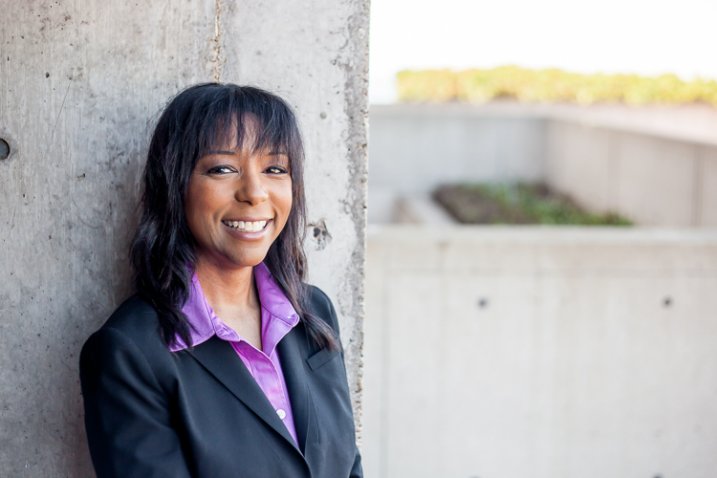
Here we see another example of a headshot with crossed arms, only this one relies on location to add warmth. Since the subject is a woman, she is also adding a slight tilt to her hip and dropped her shoulder closest to the camera. This all helps to soften up a traditionally harsh-feeling pose.

HeadshotPose14

Lean

Adding a slight lean can make a big difference in headshot posing. Many people are looking for a lifestyle feel to their headshots, which typically will call for an outdoor location. So if you go on location, why not use it to add personality?

I’ve already mentioned adding a lean to the crossed arms pose, but a simple lean against a wall or railing can also provide a more natural feel to your pose. In the example below, the subject is leaning against a clean wall. The detail is in the texture of the wall, and the lean provides a softening to the pose. The wardrobe helps maintain some formality (this subject in particular is a lawyer), while the slight lean and setting add a touch of modern casualness.

Note that even though the subject is leaning, it is still important for them to maintain good posture. You can let them know to lean with their bottom half, but not let their entire back slouch into the wall. Or, they can gently lean with one shoulder to maintain balance, while keeping posture upright. If the subject starts to look a bit stiff, have them “shake it out”, take a deep breath, and settle back into the pose. Sometimes all they need a break from the stiffness!

HeadshotPosing18

Here is another example of a lean working to the subject’s advantage. In this case, below, the subject is portraying a casual brand, but still needs to look polished and professional. Using the railing of the foot bridge that is the setting, the subject raises one arm to lean on the railing. This helps to give the subject something to do, rather than having their arms dropped to the side. In this case, the crossed arms would have portrayed an image that was too formal for the client’s needs, so this alternative was ideal.

HeadshotPose7

Sitting pose

There are a few variations of sitting poses that work well for headshots. One option is to have your subject sit and join their hands over their knees. Ideally, this would happen if they are sitting at a location where the knees end up being slightly higher than their hips, which can easily happen if they sit on stairs. In the example below, the subject is sitting on steps, loosely laying her hands over her knees, and still keeping her posture upright (very important!). This gives the subject something to do with their hands, and it adds a bit of formality to a pose than can very easily feel far too casual.

HeadshotPose6

This next example is a bit more formal overall in terms of location and expression, but the pose is meant to soften it a bit. Here we have two subjects, each sitting on different stairs. Note that the subjects are quite different in height, so the different steps offer an opportunity to balance out the heights a bit. In this photo, the subject on the top step is sitting and leaning slightly on the railing. His arm is casually laying over his leg. The lean towards the railing helps to show a bit more of his torso since there is another subject in front of him. The front subject is slightly leaning back and to his left, helping to unify him with the other subject. Since these two men are business partners, it was important to maintain a sense of partnership in their poses.

HeadshotPose1

Walking

This is one of my favorite classic moves for headshots, and it does several things including:

  • It loosens up their body if they are a bit stiff in front of the lens.
  • It encourages a more natural expression because I get the opportunity to banter with them as they walk.
  • It creates a sense of movement that translates into a deeper connection with the lens.

Below are several examples of headshot subjects walking towards the camera. As always, be sure to let your subject know to maintain good posture while walking.

HeadshotPosing14 HeadshotPosing16

Action

Here is where modern headshots get fun. Especially with entrepreneurs, you have the opportunity to express something about what they do, and what their personality is like. If they make a product, you can have them show you their product, If they do some sort of training, you can have them perform a bit of what they do. With these, giving detailed direction about posing is not as important as letting them do their thing. In the photos below, the subjects were given free reign to do what they want to express themselves. In these cases, be prepared to snap quite a few frames! The final images will need to not only capture the movement and activity, but also have flattering facial expressions.

HeadshotPose3 HeadshotPose18
HeadshotPose16 HeadshotPosing12

Regardless of the poses used, be sure that they are a good fit for the branding of the client. Getting to know the client’s needs is absolutely the best way to know how to pose them.

Do you have any favorite poses that you like to use for headshot clients? Please leave a comment below to let us know.

Check out more in this week’s posing series here:

  • Portrait Posing Tips- How to Help People to Relax and Take Better Photos
  • 5 Unposing Tips for Kids for More Natural Photos

googletag.cmd.push(function() {
tablet_slots.push( googletag.defineSlot( “/1005424/_dPSv4_tab-all-article-bottom_(300×250)”, [300, 250], “pb-ad-78623” ).addService( googletag.pubads() ) ); } );

googletag.cmd.push(function() {
mobile_slots.push( googletag.defineSlot( “/1005424/_dPSv4_mob-all-article-bottom_(300×250)”, [300, 250], “pb-ad-78158” ).addService( googletag.pubads() ) ); } );

The post How to Pose People for Headshots by Natalia Robert appeared first on Digital Photography School.


Digital Photography School

 
Comments Off on How to Pose People for Headshots

Posted in Photography


Posing Guide: How to Pose Groups without Losing Your Mind

09 Mar

The other day I had mom bring her daughter in for fine art dance pictures. “Oh, just snap away while she’s doing her competition routine… she doesn’t like to be interrupted,“ the mom said as the daughter grand jeted halfway off my roll paper half in the storage room, facing completely away from me. Shooting that would be crazy, right? Continue Reading

The post Posing Guide: How to Pose Groups without Losing Your Mind appeared first on Photodoto.


Photodoto

 
Comments Off on Posing Guide: How to Pose Groups without Losing Your Mind

Posted in Photography