RSS
 

Posts Tagged ‘Plugins’

ON1 announces ON1 Professional Plugin Series, including new versions of 4 plugins

21 Nov

ON1 has announced its all-new ON1 Professional Plugin Series. The suite includes new versions of ON1 HDR, ON1 Effects, ON1 Resize and ON1 Portrait AI. ON1 states, ‘The ON1 Professional Plugin Series is a new product line focusing on bringing ON1’s editing technologies into existing professional photo workflows with a more integrated experience.’

The ON1 plugins work with an expanded set of host applications, including Adobe Lightroom Classic, Adobe Photoshop, Affinity Photo, Corel Paintshop Pro, Apple Photos and Capture One (coming soon). ON1 says, ‘We were founded on creating plugins for Adobe Photoshop and later the Lightroom workflow. Back then, it was all about saving photographers time by making things easier to do in our plugins, which would make their workflows much faster. Today, it’s about how ON1 software can tightly integrate our newest technologies from ON1 Photo Raw into more workflows to produce better results.’

ON1 HDR 2021 includes improved performance and control over your images. Image credit: ON1

ON1 HDR 2021 promises ‘natural HDR photos’ that combine highlight and shadow details from bracketed exposures. It includes de-ghosting controls for reducing movement in a scene, such as clouds in the sky or moving water, and promises fast previews. ON1 says the software is up to 7x faster than ‘leading HDR apps.’ You can also adjust tone and color while working with layers and applying special effects. ON1 HDR includes noise reduction and lens corrections as well.

ON1 Effects 2021 features filters and presets crafted by ON1’s team of experts. New features in the 2021 version include a replace color filter, non-destructive Spot Healing Brush and Color-Sensitive Gradient Masks. ON1 states that the new custom brush shapes ‘give customers a quantum-leap in new ways to add creative edits.’ Further, the latest version includes a new full-screen preview option.

ON1 Effects 2021 features filters and presets designed by ON1’s team of experts. The plugin includes a non-destructive spot healing brush, among other features. Image credit: ON1

When you need to enlarge your images, ON1 Resize 2021 delivers ‘industry-leading Genuine Fractals technology’ to make it simpler and quicker to enlarge image files without sacrificing sharpness and detail.

Finally, ON1 Portrait AI 2021 relies upon machine learning to automatically find and retouch each face in an image. The plugin analyzes the image, locates the faces and adds ‘just the right amount’ of retouching to each person’s skin, eyes and mouth. The plugin includes a spot healing brush, custom brush shapes and full-screen preview as well.

ON1 Portrait AI 2021 uses machine learning to automatically retouch each face in a portrait. Image credit: ON1

ON1 is looking forward as well, promising that the company is working hard to introduce better integration with each host application. Future updates will also include better options for non-destructive workflows between plugins and host applications, such that your photos will remain re-editable.

Dan Harlacher, VP of Product, says, ‘One of the biggest challenges plugins face today is the walled gardens created by host applications. It makes it very difficult to re-edit your adjustments. We have a powerful solution for this common complaint that will maintain flexibility and your creativity on both sides, and we can’t wait to unveil this in the coming months.’

‘We have a powerful solution for this common complaint that will maintain flexibility and your creativity on both sides, and we can’t wait to unveil this in the coming months.’ -ON1’s Dan Harlacher

ON1 is also working ‘to improve on working with multiple photos between plugin and host application and quick access to features and functionality from ON1 within the host application itself.’ As part of the ongoing development, ON1 is investing in new AI technologies and solutions, with the goal of removing repetitive manual tasks. Improved AI-based solutions will result in faster culling of images, improved noise reduction and better batch image processing.

ON1 has also announced a partnership with photo and software educator, Matt Kloskowski. Matt K’s Corner is a new resource center for photographers using ON1 alongside Adobe products. Kloskowski will provide tutorial videos and articles each month and recommend workflows for users.

Click to enlarge

You can try each of the new plugins with a free 14-day trial. Each plugin is available for $ 59.99 USD each (regularly $ 69.99), or you can purchase the bundle of ON1 HDR 2021, ON1 Effects 2021, ON1 Resize 2021 and ON1 Portrait AI 2021 for $ 89.99 (regularly $ 99.99). For additional information and to download trials, visit On1’s website.

Articles: Digital Photography Review (dpreview.com)

 
Comments Off on ON1 announces ON1 Professional Plugin Series, including new versions of 4 plugins

Posted in Uncategorized


A Non-Techie User Guide to Installing GIMP Plugins

23 Aug

The post A Non-Techie User Guide to Installing GIMP Plugins appeared first on Digital Photography School. It was authored by Ana Mireles.

Have you heard all about how GIMP is free and open-source, but you’ve struggled to embrace the program? Well, I was like that at first; that’s why I decided to make this guide on installing GIMP plugins from one non-techie to another.

GIMP supports third party plugins

My first few attempts to use GIMP were quite off-putting, and when I tried to install a plugin I ended up completely frustrated. But now I actually prefer GIMP to Photoshop for certain edits. Hopefully, this article can save you some time and turn you into an avid GIMP user, as well.

What is open-source software?

When a developer builds software, they write lines of text in a specific programming language. This forms the software’s source code.

In commercial software, this code is protected by copyright. You have to pay a license to use such a program, and you can’t change it in any way.

Instead, an open-source program can be used, modified, and distributed by anyone. Also, most of the time it is free. Sounds great, right?

GIMP is open source

Well, it is. That’s why everybody keeps telling you GIMP is amazing because it’s “open source.” On the other hand, GIMP is not as user-friendly as other programs. So you might need some time to get used to it. Here’s an introductory guide to get you started.

What are plugins?

A plugin is an add-on that gives more functions to a program. It can be a filter, a tool, or a library that isn’t included in the original source code. As a result, the software gets more powerful and gains more capabilities.

installing GIMP plugins GIMP features

Commercial software has plugins, too (Photoshop, for example).

Since we are already talking about expanding the capabilities of software, scripts are another essential add-on to be aware of. You’ve probably heard of Photoshop actions and Lightroom presets, both of which are scripts.

Well, GIMP has scripts to automate processes and save you time and effort. So while you might find GIMP to be somewhat basic at first, once you start adding plugins and scripts you’ll see that it really has a lot to offer.

Where can you find GIMP plugins?

This is where it starts to get more tricky. Because neither GIMP nor the plugins are made by one developer, there isn’t a website that you can go to find a list with links.

GIMP's plugins are no longer in registry installing GIMP plugins

There used to be one registry that held all the plugins, scripts, images, and files, but it’s not active anymore. Fortunately, in this day and age, you can find anything just by Googling.

As you know, search engines like Google will show you a lot of results; some of it can be outdated, other results can even be a virus, so be careful with what you download.
Here are some tips to make your search more efficient:

Look for tutorials

Start by searching for guides or tutorials on what you want to do, for example: “How to do Content Aware Resizing in GIMP?”

These results will give you suggestions for different plugins that have this functionality, and often they’ll even share the link so you can download it. Since you know that the recommendation comes from a plugin user, you know it’s safe and you can also see if it’s what you’re looking for.

Always look at the date the recommendation was published and click on the most recent suggestions. If you find an article that’s too old, you might not find the plugin anymore, or the plugin may not be compatible with your GIMP version.

Look for reviews on blogs

There are tons of websites that make lists and reviews about these kinds of things. You can search for “The best plugins of this year for GIMP.”

This way, you’ll also find safe downloads and you don’t have to worry about the plugins being useful. If they weren’t, they wouldn’t be on such a list, right?

Installing GIMP plugins

Download your file

Once you find the plugin you want, download it to your computer. I’ll use the Resynthesizer plugin as an example, which you can download here. Please keep in mind that you need to find the right file for your operating system. Everything you see here is done on a Mac.

Downloading and installing GIMP plugins

Resynthesizer downloads in a zip file, so double-click on it to extract the files. Leave this Finder window open. You’ll need it again in a moment.

Find GIMP’s plugin folder

Now open GIMP. Click on the GIMP menu and choose Preferences. This will open a pop-up window.

In the left column, find the Folders menu and click on it. This will display all the folders that hold GIMP’s information, so just look in there for the one called Plugins.

Find the folder with the plugin resources. It should be called something like this: GIMP-2.10.app/Contents/Resources/lib/gimp/2.0/plug-ins.

Of course, the GIMP version may be different for you; mine is 2.10.

Find the folder for installing GIMP plugins

Now click on the square button in the top right of the window. If you hover on top of the button, it should say Show file location in the file manager. This will open the folder that contains the plugin files.

Copy the plugin to GIMP

Now you should have the two folders open:

On one side, the Finder window with the folder of the plugin you downloaded.

On the other side, the window you just opened from GIMP with the folder that contains the plugins.

Select the files from the new plugin and drag them into GIMP’s plugin folder.

Copy-Paste files for installing GIMP plugins

Restart GIMP

That’s it. Now you only have to restart GIMP to find the new tools ready for use.

In the case of the Resynthesizer plugin, it adds the filters Enlarge & Sharpen, Heal Selection, Heal Transparency, Sharpen by Synthesis, and Uncrop.

GIMP's resynthesizer plugin installed

Conclusion

That’s it. As you can see, installing GIMP plugins is basically a copy-paste operation, so it’s really not as complicated as you might think.

The only hassle is finding the right files and locations. With the tricks I showed you in this article, it will hopefully get easier.

In the end, it’s worth the effort.

Now over to you:

Share in the comments your experiences with GIMP plugins, as well as any plugins or scripts you recommend.

The post A Non-Techie User Guide to Installing GIMP Plugins appeared first on Digital Photography School. It was authored by Ana Mireles.


Digital Photography School

 
Comments Off on A Non-Techie User Guide to Installing GIMP Plugins

Posted in Photography


Create Light Beams in GIMP that Glow Without Any Plug-ins

01 Apr

The post Create Light Beams in GIMP that Glow Without Any Plug-ins appeared first on Digital Photography School. It was authored by Ana Mireles.

Create Light Beams in GIMP that Glow Without Any Plug-ins

Do you want to create light beams with GIMP? While previous versions of GIMP used a process called Alpha to Logo, it’s not available in the latest version. Not to worry, you don’t have to download any plug-in or script-fu, as I’ll show you a step-by-step example to do them manually.

Create Light Beams

GIMP’s open-source nature can be the most attractive thing for some people and the most off-putting for others. Create light beams used to be a one-click operation, but the script-fu was removed since version 2.10.4. There’s a way to get it back and install it separately, but you can also create them using GIMP’s basic functions.

How to Create Light Beams in GIMP

1. Design the shape

Open the image or canvas where you want to create light beams.

Now create a new layer, I strongly recommend you to name them as you go because you will need a few of them.

Do this in the designated space on the top. Then choose Fill With Transparency and click OK.

Add transparency layers

In this new layer, draw the shape of your light beam using the Path Tool. Make sure the Edit Mode is set to Design and start drawing.

If you want to create curves, just hold the mouse button and drag the anchor point.

Design light beams

Once you have the shape you want, choose the color by clicking in the patches you find on the left panel.

Then right-click in any anchor point of your shape and choose Edit > Stroke Path from the menu.

Stroke the designed path

This will open a pop-up window.

Select Paintbrush and Emulate Paintbrush.

This will apply the effect using the settings you have in your Paintbrush tool as if you had painted the shape.

2. Create the beam

Now, the stroke needs to start looking like a light beam. For this, you need to draw a lighter outline to it. The easiest way is to right-click on the layer and choose Alpha to Selection.

Alpha to selection

Go back to the color swatches and choose a lighter hue, or even white.

Create another transparency layer, then go to Edit > Stroke Selection. In the pop-up window choose Stroke Line and set the value that will determine how thick you want it.

Create light beams outlines
Here I disabled the visibility of the first stroke. You don’t have to do this, it was only to show you how the second stroke does an outline.

Deselect everything and click on the Layer Mask button.

Set it to black (full transparency). This will cover the entire outline you created before, but that’s OK, you’ll make it visible in the next step.

Pick the Paint Brush tool and set the color to white.

Then lower the opacity of the brush and paint over your light beam to slowly make the outline visible. After that, with full opacity, paint over some parts to create highlights.

add some highlights
I used full opacity only in the curves because that’s where I want the highlights to be.

3. Make it glow

Duplicate this layer and delete the mask. Lower its opacity and then go to Filters > Blur > Gaussian Blur. The value is up to you, I started with 22. Repeat this process a second time, this time changing the values in the Opacity and the Blur filter.

create light beams that glow

This is how you can create light beams that appear to glow. If you feel like adding a neon effect, keep on reading to learn how.

4. Add some color for a neon effect

With the top layer selected, add a new transparency layer.

Then set the color you want in the swatches.

Since you’re going for a neon effect, I recommend you choose something ‘electric’.

Use the Paint Brush tool to add some colored splats on your design.

create neon light beams

Change this layer to Soft Light blending mode at the top of the Layers panel.

Then create another one and do the same with another color. Change this one to HSL Color.

create light beams using GIMP

That’s it! Your neon glowing light beam is ready.

Feel free to skip any step or add some more to make it your own.

Remember, the good thing about doing them manually is that you have full control over the outcome.

Extra tip:

If you want it to swirl around something, like mine, just erase or cover with a layer mask the parts that should go behind the subject.

Incorporate light beams in your photography

Conclusion

Scripts and plug-ins can save some time, but they aren’t necessarily available or easy to install. Granted, you don’t always know the individual commands that were automated and that makes it difficult.

This process, however, is meant as a starting point to make it less daunting and allow you to get creative. I hope you liked this technique to create light beams in GIMP without any plug-ins.

Want to learn more GIMP Tutorials? You may like:

  • A Brief introduction to GIMP Software
  • Creative Uses for the GIMP Jigsaw Pattern
  • How to Use Gimp for Basic Photo Re-Touching
  • Make your Photos Sparkle with GIMP
  • 5 Top Tips for Working with Gimp

The post Create Light Beams in GIMP that Glow Without Any Plug-ins appeared first on Digital Photography School. It was authored by Ana Mireles.


Digital Photography School

 
Comments Off on Create Light Beams in GIMP that Glow Without Any Plug-ins

Posted in Photography


5 Adobe Lightroom Plugins That Will Make Your Life Easier

19 Oct

5 Lightroom plugins that will make your life easier

We all love Lightroom.

There’s a reason it became an essential part of a photographer’s workflow. It’s powerful, easy to use, and helps make your photos come alive.

But what if I said you could make it even easier to use while adding a new dynamic to your editing process?

Well, plugins can do just that.

Being able to extend Lightroom’s capabilities with third-party plugins is one of the things I love most about it. And it’s something most people overlook.

In this article, I’ll introduce you to five Lightroom plugins I use and couldn’t live without.

But first…


How to install Lightroom plugins

Installing Lightroom plugins is pretty straightforward. They all use the same six-step installation process.

  1. Unzip the ZIP file for the plugin, and move the unzipped file to a folder on your computer. Note: The unzipped files can’t be moved or deleted after installation, or the plugin will stop working.
  2. From Lightroom’s File menu, select ‘Plug-in Manager’.

How to install Lightroom plugins

  1. Click the ‘Add’ button near the bottom of the dialog box.

How to install Lightroom plugins - Plugin Manager

  1. Navigate to folder you chose in step 1.

How to install Lightroom plugins - Folder selection

  1. Open the folder and highlight the file with the ‘.lrplugin’ extension, then click ‘Add Plug-in’.

How to install Lightroom plugins - selecting the plugin

  1. Restart Lightroom to complete the installation of your new plugin.

Note: with the 7.5 release of Adobe Lightroom, some newer plugins now have the extension of .xmp rather than .lrtemplate or .lrplugin. This is so they can be used in both Lightroom and Photoshop.

In this case, go to Lightroom->Preferences and select ‘Show Lightroom Develop Presets’. This will open the Presets window. Select the ‘Settings’ folder, and simply drag and drop your unzipped file into the Settings Folder and restart Lightroom.

If you don’t have the ‘Show Lightroom Develop Presets’ link select the ‘Show Lightroom Presets Folder’. This will open the Presets window. Select the ‘Lightroom’ then ‘Develop Presets’ folder, and simply drag and drop your unzipped file into the folder and restart Lightroom.

Now that you know how to install Lightroom plugins, let me show you five that will save you time and effort during your next mammoth editing session.


The Fader

The Fader is probably the plugin I use the most. Its main advantage becomes clear when you’re using presets.

It works as a master slider that controls all the different tools within Lightroom. Moving the slider will adjust all the edits a particular preset makes at the same time and in equal measures.

If you’re working on an edit and haven’t applied a preset, but you still want to use The Fader, simply create a new preset using the image you’re working on as a template and adjust it from there.

To create a new preset, click either a filter tool (graduated or radial) or the brush tool, and from the drop-down menu select ‘Save Current Settings as New Preset’.

Lightroom plugins - The Fader

Whether you create your own presets or download other people’s, chances are you’ve experienced this situation: You apply a preset to one photo and it looks great, but when you apply it to another, it’s completely over the top and looks terrible.

Normally you’d have to reduce each tool individually. But with The Fader you can reduce them all at once using the slider. Just open The Fader (File -> Plug-in Extras -> The Fader), select the preset you want to apply, and then use the opacity slider to increase or decrease the preset’s overall strength.

Lightroom plugins - The Fader 2


LR Backup

LR Backup does exactly what it says it does – back up your Lightroom catalog. But it gives you a few extra features the standard backup tool doesn’t provide.

Why is it important to back up your catalog? Because it contains a record of every edit you’ve made to your images. You might have backups of your RAW files, but without a backup of your Lightroom catalog they’ll be just that: RAW images with no editing applied.

LR Backup lets you make manual backups of the Lightroom catalog without having to exit the program, which you need to do when using the built-in backup tool. But what makes this plugin really useful is its ability to schedule backups.

Lightroom plugins - LR Backup

It also compresses the backup to almost 10% of its original size, which is particularly useful when you have a large database of edited images.

While a free version of LR Backup is available, you need to make a donation to the creator to unlock its full functionality. But the donation can be as small or as large as you like. It’s totally up to you.


LRTimelapse

If you create time-lapse videos using your camera’s intervalometer, you’ll need an easy way to batch edit the images so you don’t have to do them one by one.

LRTimelapse makes time-lapse videos easy. It comes in both free and paid-for versions as either a standalone product or a Lightroom plugin. And what I really love about it is how the plugin integrates with Lightroom.

Lightroom plugins - LR Timelapse

By integrating LRTimelapse with Lightroom, you can create a few keyframes that you’ll edit in Lightroom and then export back into LRTimelapse. It then uses these edited keyframes to automatically and seamlessly edit the other time-lapse photos into a video that transitions smoothly and gradually from the first frame to the last.

It’s a great way to incorporate the power of editing in Lightroom into your next time-lapse video.


Focus Mask

The Focus Mask plugin by Capture Monkey (the same people who make The Fader) is a simple plugin. It does only one thing, but it does it very well.

The plugin works the same way focus masking or focus peaking does in your camera. It highlights the parts of the image that are in focus.

Lightroom plugins - Focus Mask

This helps you to choose the best shot between two or more similar images at a glance.

We’ve all taken a handful of photos of the same subject because we weren’t sure we nailed the focus. This plugin will help you quickly pick a winner.

Photolemur

The last plugin on the list might not be for everyone. In fact, some people might be totally against it.

Photolemur automatically edits your photos with one click. It uses artificial intelligence to create the best edit possible so you can focus your time on other aspects of photography.

Now, some of you might think letting a bunch of computer code edit your photos takes away part of the artistic process. And you’d be right.

I wouldn’t use it on every image, especially client images. But if I want to quickly upload something to Instagram without having to process the image first, I’ll use Photolemur.

Photolemur is a standalone product, but can also be set up as a Lightroom plugin. Unfortunately, there isn’t a free version you can try before you buy. It’s only available as a paid product.


Which Lightroom plugin will you try?

I’ve used all the plugins I just mentioned. But if I had to pick one, I’d choose The Fader because I love using my own presets. It makes my editing style consistent across all of my work.

But they’re all great plugins. Which one are you going to try?

Image Credit: Joseph Pearson

The post 5 Adobe Lightroom Plugins That Will Make Your Life Easier appeared first on Digital Photography School.


Digital Photography School

 
Comments Off on 5 Adobe Lightroom Plugins That Will Make Your Life Easier

Posted in Photography


10 Lightroom Plugins You Should Use

24 May

Lightroom is one of Adobes most useful tools in its photography bag. It’s the companion to Photoshop, and it’s built more for image processing and visual editing, rather than the manipulation abilities that makes Photoshop so popular. Lightroom is one of the key tools any photographer should have in their tool belt. What’s a Plugin? Plugins are often referred to Continue Reading

The post 10 Lightroom Plugins You Should Use appeared first on Photodoto.


Photodoto

 
Comments Off on 10 Lightroom Plugins You Should Use

Posted in Photography


10 Lightroom Plugins You Should Use

19 Apr

Lightroom is one of Adobes most useful tools in its photography bag. It’s the companion to Photoshop, and it’s built more for image processing and visual editing, rather than the manipulation abilities that makes Photoshop so popular. Lightroom is one of the key tools any photographer should have in their tool belt. What’s a Plugin? Plugins are often referred to Continue Reading

The post 10 Lightroom Plugins You Should Use appeared first on Photodoto.


Photodoto

 
Comments Off on 10 Lightroom Plugins You Should Use

Posted in Photography


Preserving Architectural Gems: 8 Beijing Hutong Plug-Ins Update Historic Shells

19 Oct

[ By SA Rogers in Architecture & Houses & Residential. ]

Passing through historic Beijing neighborhoods, seeing only the preserved street-facing facade, you’d never know that surprisingly modern structures contrast with aging surfaces within the courtyards just out of sight. Instead of just demolishing the ‘hutong’ courtyard houses found only in this Chinese city, architects are adapting them to modern life, slotting houses, hostels, museums, tea houses, cinemas and more under the existing roofs.

Tea House by Archstudio

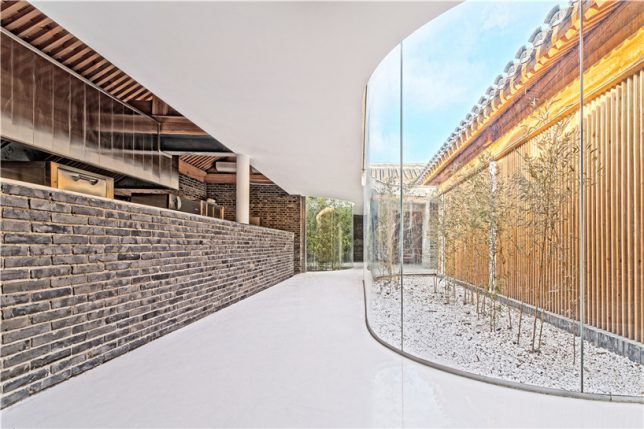
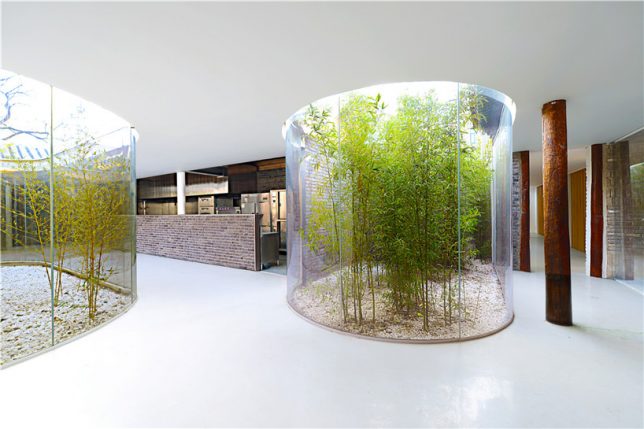
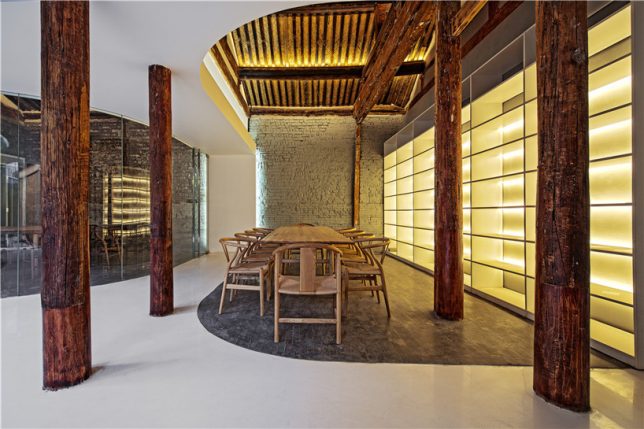
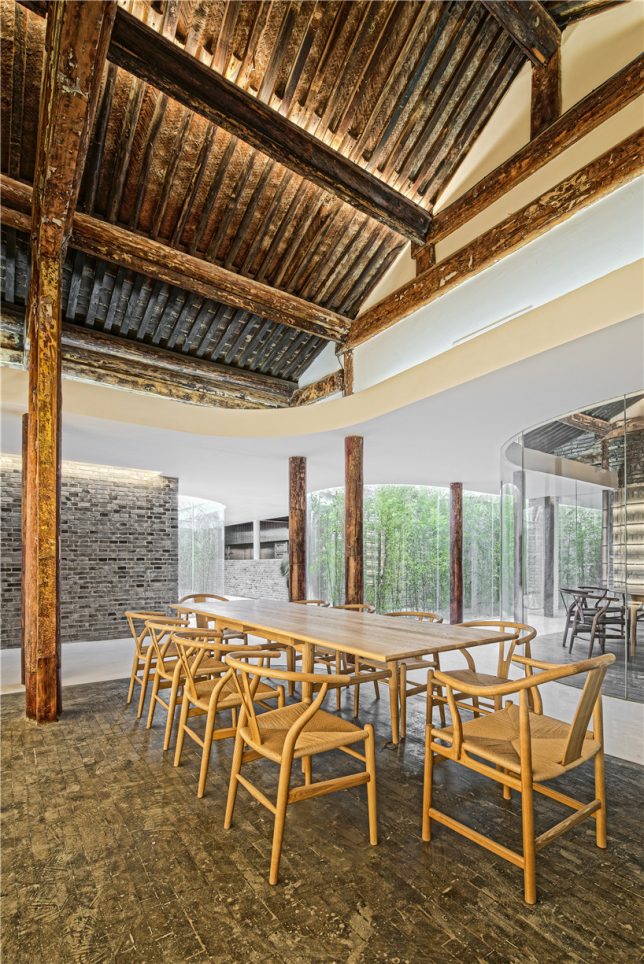
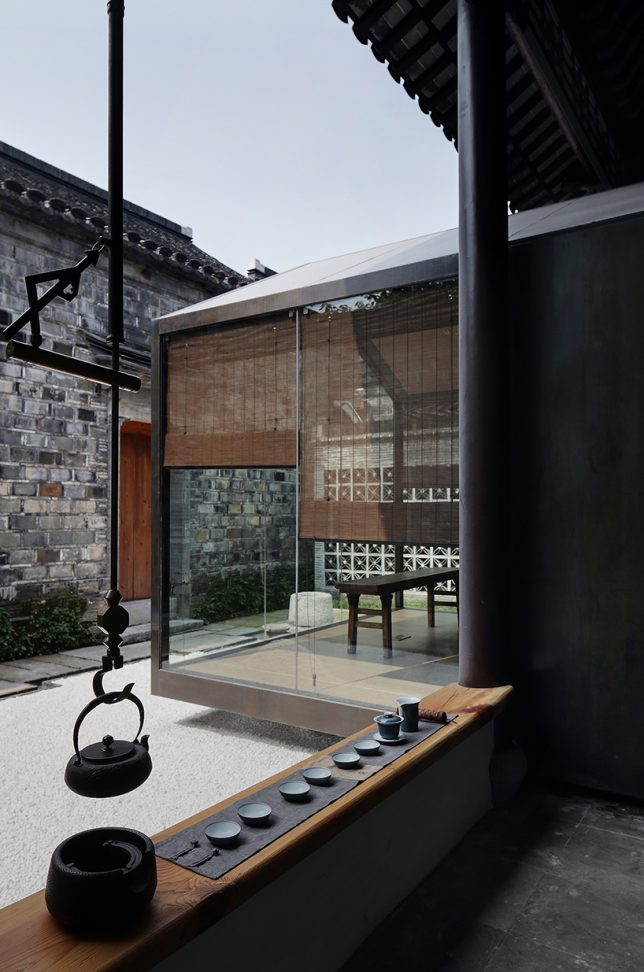
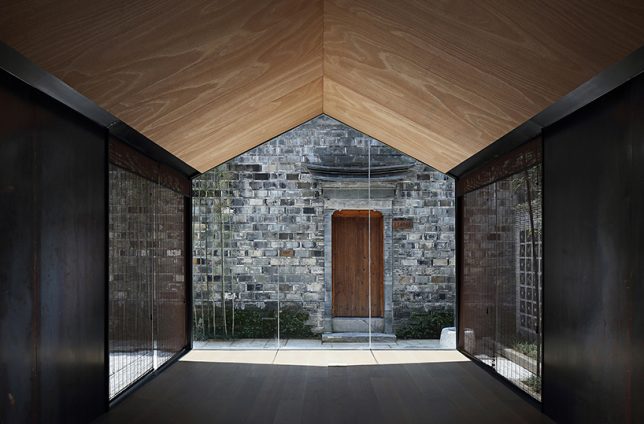
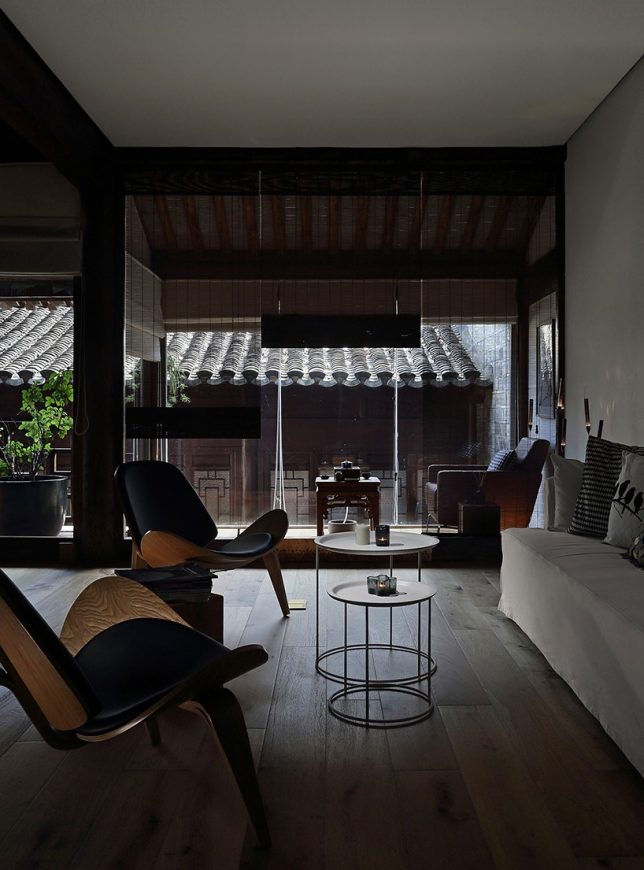
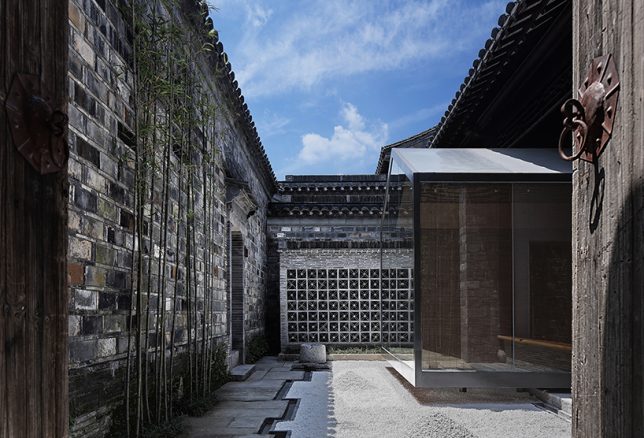
In a truly stunning adaptation, Archstudio has completed a tea house and cafe within an existing hutong house, enclosing it from above with new roofs while leaving atriums open for bamboo and other greenery. The intervention connects the site’s five existing structures with a glazed corridor following the path of the original courtyard, forming three tea houses with their own unique views.

Twisting Courtyard by Archstudio

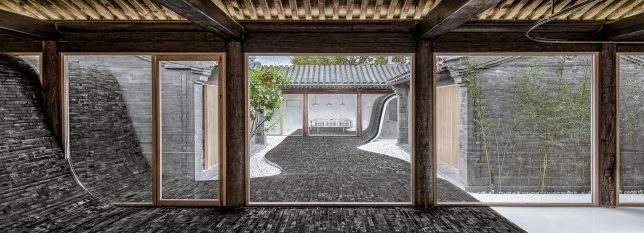
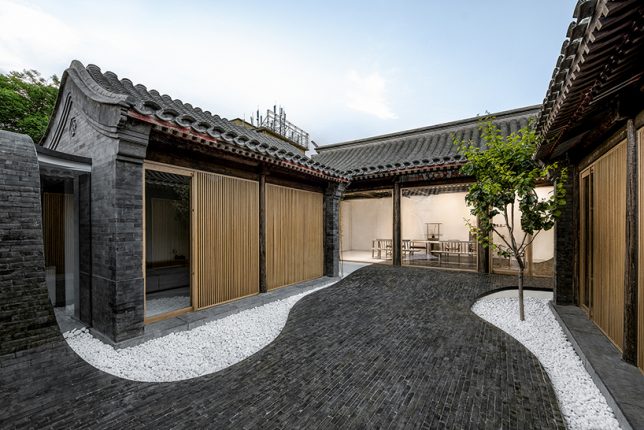
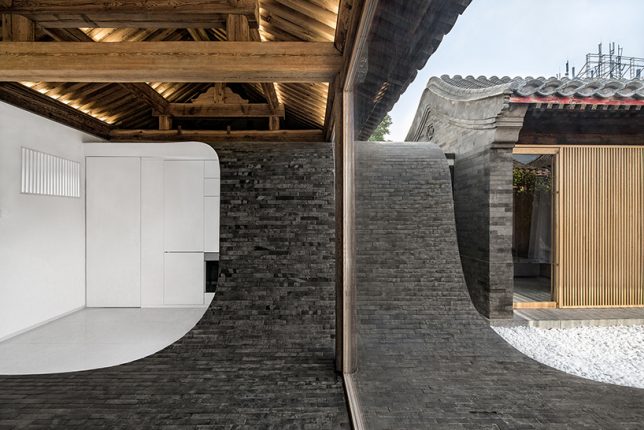
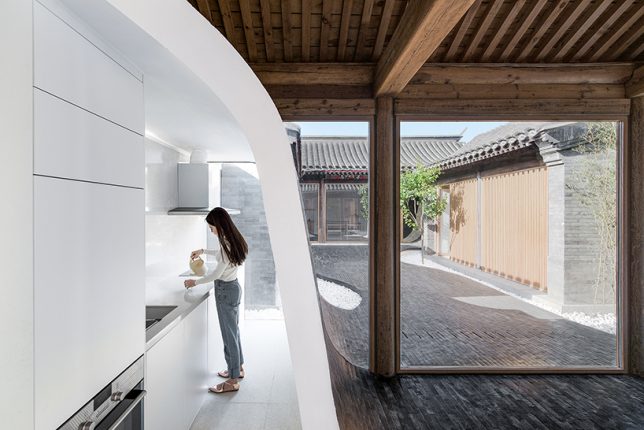
A river of glossy grey bricks streams through the courtyard of a Siheyuan house in the Paizihutong area of Beijing, upgrading the historic architecture with spaces that meet modern requirements of living. Archstudio‘s stunning pathway arches over the new volumes and even continues right into the dining room as part of the floor.

Mini Hostel Inside Hutong by ZAO / standardarchitecture

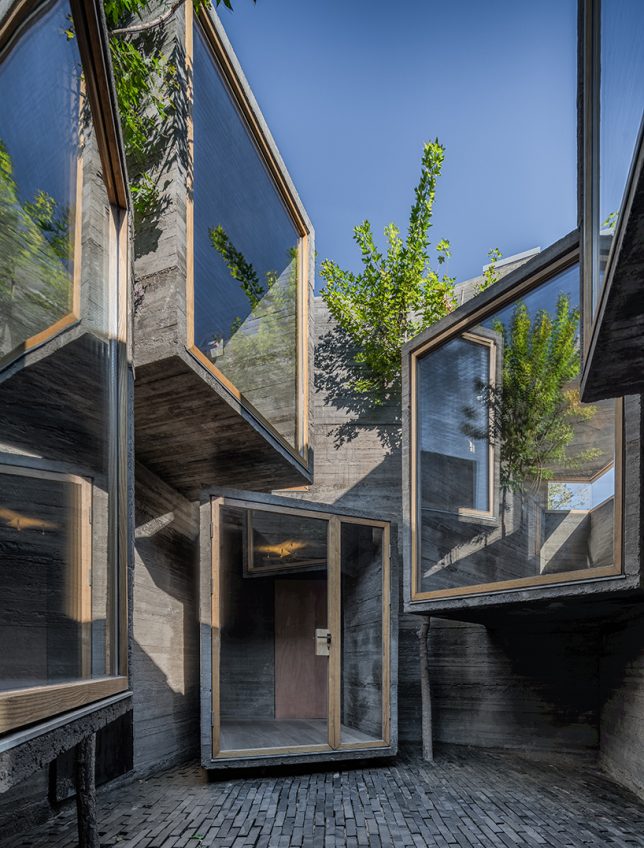
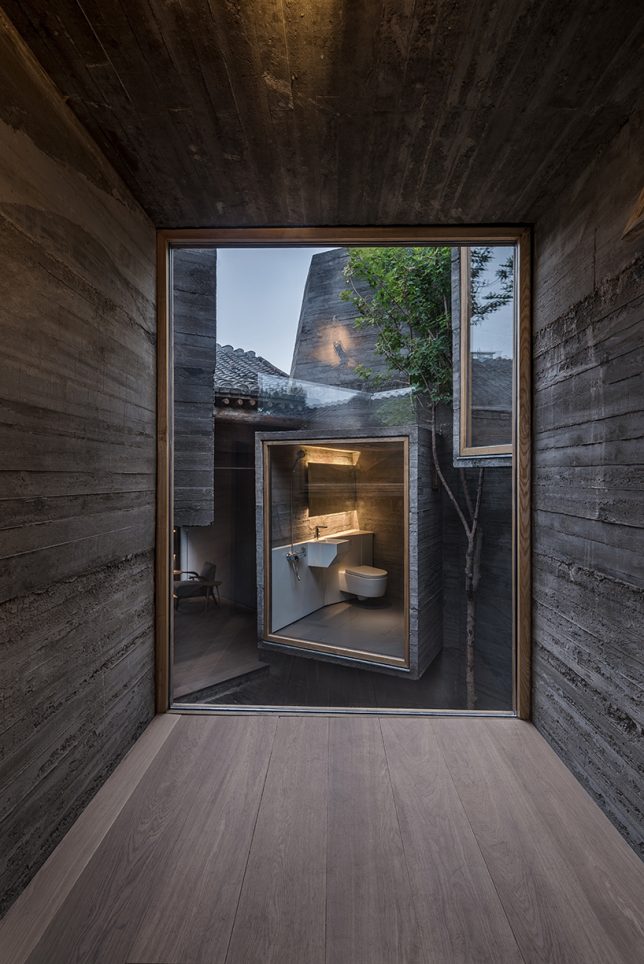
The firm ZAO / standard architecture inserted a small hostel inside a renovated Beijing hutong, exploring the potential of small-scale accommodations that slot right into the city’s existing architecture instead of displacing it. The glazed facades of volumes made of board-formed concrete project into the courtyard, facing each other (in some cases, with views of toilets, much to the horror of many Westerners looking at these images.) “The result is an architectural operation that brings back the courtyard as generator of the program, as it activates the building by creating a direct relationship with its urban context.”

Lai Yard House by Minggu Design

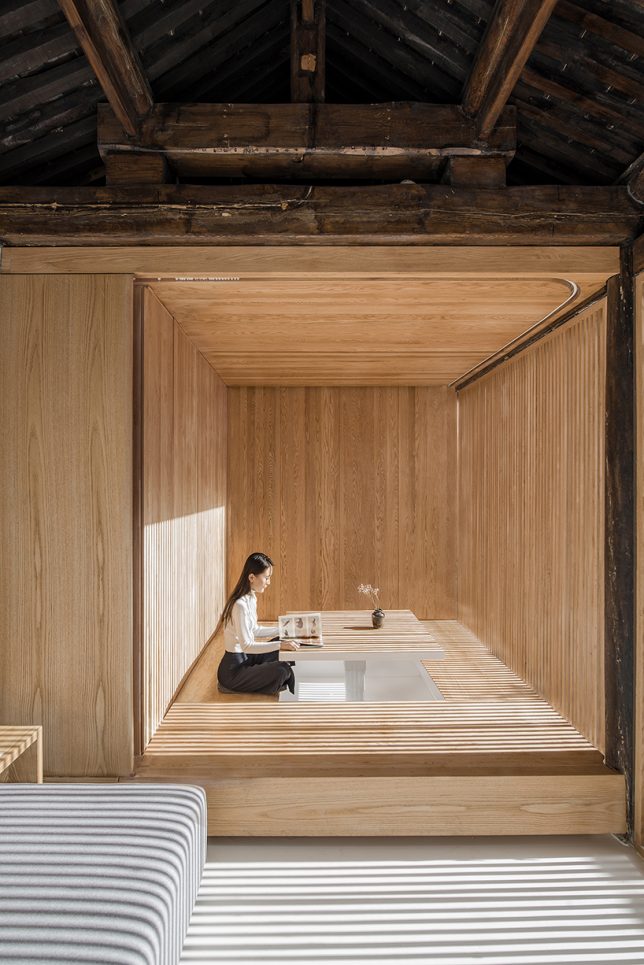
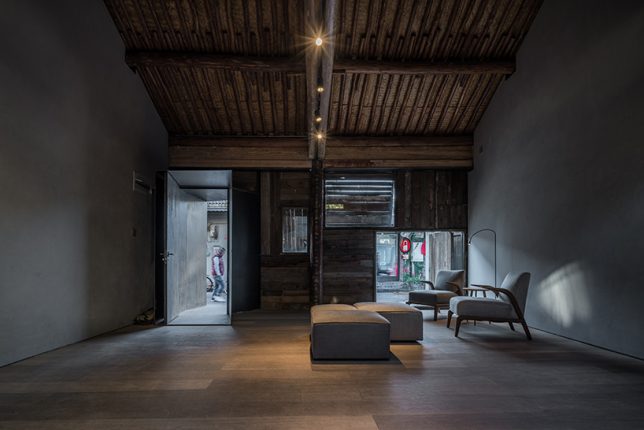
Tucked away behind weathered brick facades near the ancient city wall of Beijing, this courtyard home was crumbling. Minggu Design protects and preserves the original Chinese architecture while enhancing and adapting it for the 21st century, inserting volumes made of wood and glass to complement the surroundings without overpowering them. They used the new volumes to intentionally block and filter light to the original interior, creating a tranquil cave-like feel.

Next Page – Click Below to Read More:
Preserving Architectural Gems 8 Beijing Hutong Plug Ins Update Historic Shells

Share on Facebook


[ By SA Rogers in Architecture & Houses & Residential. ]

[ WebUrbanist | Archives | Galleries | Privacy | TOS ]


WebUrbanist

 
Comments Off on Preserving Architectural Gems: 8 Beijing Hutong Plug-Ins Update Historic Shells

Posted in Creativity


Adobe acquires Mettle SkyBox suite of VR plug-ins

26 Jun
Adobe has acquired Mettle, the makers of the popular SkyBox suite of 360-degree-video and VR editing tools for Adobe Premiere Pro and After Effects. Mettle founder Chris Bobotis takes on the role of director, professional video at Adobe.
The SkyBox suite will no longer be available for separate purchase but existing SkyBox customers will continue to have the same contact and support process through Mettle. The suite will be integrated into Adobe Creative Cloud by the end of the year. Until then Adobe CC subscribers will be able to access the SkyBox tools by sending an email to dvaplugin@adobe.com. You should inlude your Adobe ID and first and last name as it appears on your account. Adobe then will get back to you within a week.

Adobe says that many of its users have been relying on the SkyBox Suite of plug-ins from Mettle for VR transitions, titles, and effects and it therefore made sense to make the plug-ins available to all subscribers through Creative Cloud.

“We believe that making virtual-reality content should be as easy as possible for creators. The acquisition of SkyBox plugins and Mettle technology allows us to deliver a more highly integrated VR editing and effects experience to the film and video community by the end of the year,” said Bill Roberts, Adobe senior director of professional video product management. You can read the full announcement on the Adobe Blog.

Articles: Digital Photography Review (dpreview.com)

 
Comments Off on Adobe acquires Mettle SkyBox suite of VR plug-ins

Posted in Uncategorized


Mozilla Firefox – Plugins and Extensions – Grab a Word Count and Readability Score of Selected Text

21 Apr

Need a quick count of the number of words or characters on a webpage or section of text?

Typing a comment on a webpage and curious if you’re getting a little long-winded? Writing a blog post for an assignment and need to satisfy a word count minimum? Or writing an article and want to get an estimated readability score to help ensure your text can be understood by as many people as possible?

The “Word Count Tool” extension for Mozilla Firefox lets you select a block of text on a webpage and see the word and character counts in the Add-On bar. Pressing Ctrl + Alt + C (or navigating the right-click menu) shows an enhanced details screen displaying the number of sentences, paragraphs, average word length, estimated readability score, and more….

Read more at MalekTips.
New Computer and Technology Help and Tips – MalekTips.Com

 
Comments Off on Mozilla Firefox – Plugins and Extensions – Grab a Word Count and Readability Score of Selected Text

Posted in Technology


Useful Lightroom Plug-ins

30 Mar

Lightroom Export to PicasaWeb plug-in

In previous articles you learned: how to create a photo website using the Koken plug-in for Lightroom, how to use The Fader plug-in to add an opacity slider to Develop Presets, and how to upload photos to 500px using their own plug-in (scroll down to read that section).

Today I’d like to look at some other Lightroom plug-ins you may find useful. To clarify, I’m referring to plug-ins that add extra functionality to Lightroom by enabling you to do things with finished photos. Not programs such as those made by Nik or OnOne Software that are also plug-ins, but are used for editing photos.

Jeffrey Friedl plug-ins

Jeffrey Friedl has written lots of plug-ins for Lightroom (there’s a full list here). I’m going to highlight a few interesting ones here, but feel free to go and check the full list at the link above because there’s a lot of useful stuff there.

Jeffrey’s plug-ins work on a donation-ware basis. They are free to download and install, but will stop working properly after six weeks unless you register the plug-in. To register, you need to make a payment using Paypal. The amount you pay is up to you, the minimum is just one cent, making the plug-ins virtually free. You can pay more if you’d like to make a donation to support Jeffrey’s work.

Lightroom Publish Service

Export to Facebook

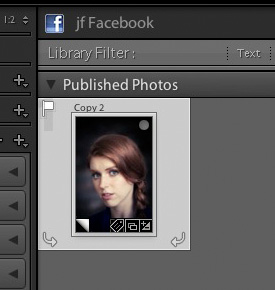
Lightroom’s Publish Services has built-in support for exporting images to Facebook. However, the photos are published to your personal Facebook page, not a business page. Jeffrey’s Export to Facebook plug-in lets you publish to Facebook pages as well.

For those of you unfamiliar with Lightroom’s Publish Services, these are found in the Library module and let you export photos directly to a location on your hard drive or a photo sharing website such as Flickr without leaving Lightroom. You get from this (photo right) > to this (below), with just the click of a mouse button.

Portrait published on Facebook page

Export to PicasaWeb

Lightroom’s Publish Services don’t support Google+, but you can get around that using the Export to PicasaWeb plug-in. PicasaWeb albums are used by Google+ to store your photos. Once your photo is uploaded to a PicasaWeb album, go to the photo albums in your Google+ account, select the photo and click Share to share it with your circles:

Lightroom Export to PicasaWeb plug-in

Export to Tumblr

The Export to Tumblr plug-in allows you to export images to a Tumblr account. It works a little differently from the previous two in that in doesn’t set up a Publish Service. Instead, go to File > Export and select jf Tumblr from the Export To menu at the top. You will need to authenticate your Tumblr account to get started:

Export to Tumblr plug-in

Adobe Plug-in Exchange

Plug-in exchange

If you click the Plug-in Exchange button in the Lightroom Plug-in Manager the Lightroom Exchange Classic website opens in your browser. This is the official Adobe marketplace for Lightroom Plug-ins and Develop presets. You’ll find a wide range of both, and plug-ins to do all sorts of things including exporting photos to SmugMug, Zenfolio and Dropbox.

Photographer’s Toolbox

The Photographer’s Toolbox website sells plug-ins written by Timothy Arnes, John Beardsworth and Matt Dawson. They are not free, but you can test them out by downloading them and using them (within the trial limitations). Some of them, such as LR/Mogrify 2, a plug-in that exports your images with borders, watermarks or text annotations, are donation-ware, letting you decide how much you would like to pay for the plug-in.

LR/Blog is another useful plug-in that lets you export photos directly to a WordPress, Blogger or TypePad blog, or a NextGEN gallery for WordPress.

Website Creation

I’ve already mentioned Koken, a free CMS (content management system) that lets you build a photo website, but there are a couple more websites that sell more sophisticated plug-ins for creating photo websites. One of those is The Turning Gate, and another is Sean McCormack’s Lightroom-Blog. Take a look at both of these if you want to create your own website from within Lightroom.
Installing Lightroom Plug-ins

The easiest way to install a Lightroom Plug-In is to start by saving the uncompressed file in a folder on your computer’s hard drive. If you use the same folder for all your plug-ins, you will know exactly where to go each time.

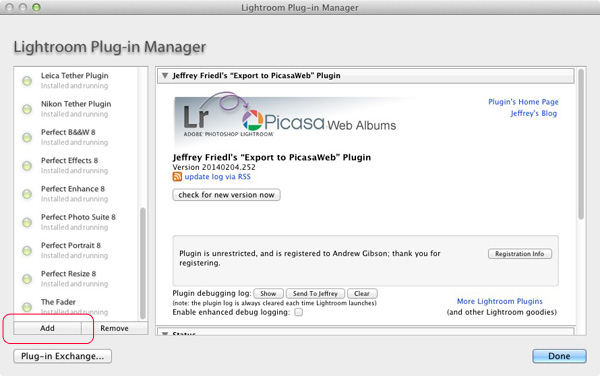
In Lightroom, open the Plug-in Manager (File > Plug-in Manager) and click the Add button in the bottom left-hand corner. Go to the folder where the plug-in is saved, select it and click the Add Plug-in button. If you get a message asking you to update your Catalog, then click the Update button. From this point on the process may vary, so check the installation instructions that come with the plug-in you have added to finish the installation and set-up.
Lightroom plug-in manager

More plug-ins

Here are links to the Lightroom plug-ins covered in earlier articles:

Koken Lightroom plug-in
500px Lightroom plug-in
The Fader Lightroom plug-in

Over to you

I’ve touched on a few of the more popular or useful Lightroom plug-ins in this article, but I can’t possibly cover them all. So now it’s your turn. What Lightroom plug-ins have you used? What do you recommend for other readers? Let us know in the comments.


mastering-lightroom-bundle-1

Mastering Lightroom: Book One and Two

My Mastering Lightroom ebooks are a complete guide to using Lightroom’s Library and Develop modules. Written for Lightroom 4 & 5 they take you through every panel in both modules and show you how to import and organise your images, use Collections and creatively edit your photos.

The post Useful Lightroom Plug-ins by Andrew S. Gibson appeared first on Digital Photography School.


Digital Photography School

 
Comments Off on Useful Lightroom Plug-ins

Posted in Photography