RSS
 

Posts Tagged ‘plugin’

Lightroom plug-in for Pentax 645Z tethered shooting now available

10 Dec

Ricoh has announced a software plug-in for Adobe Lightroom supporting tethered shooting with the Pentax 645Z medium-format camera. Creative Cloud Lightroom subscribers can also take advantage of integration with Lightroom Mobile, making it possible to comment on and adjust photos remotely via the cloud. The Pentax Tethered Capture Plug-In is available now from Ricoh.


Press release:

Ricoh Imaging Delivers Tethered Capture to its Acclaimed PENTAX 645Z Camera

Highly requested software plug-in to enhance the PENTAX 645Z’s in-studio photo-shooting with Adobe® Lightroom® capabilities available today

DENVER, December 9, 2015 – Ricoh Imaging Americas Corporation today announced the immediate availability of the highly anticipated PENTAX Tethered Capture Plug-In for use with Adobe® Lightroom®. The software plug-in enhances the tethered capture capabilities of the PENTAX 645Z medium-format camera by enabling files to easily be uploaded into Adobe Lightroom during a studio session, where they can readily be viewed, shared and edited.

Adobe Lightroom is the digital photo processing and editing software favored by many professional and advanced amateur photographers, making the use of the new PENTAX Tethered Capture software both cost effective and efficient as there is no additional software package to purchase and learn. In addition, with the new capabilities of Lightroom Mobile, uploaded images may be viewed and adjusted by a photographer’s colleagues or clients from any remote location, anywhere in the world.

“Since Lightroom is already the de-facto standard for many photographers to edit and develop their images, this new plug-in is especially welcome. It makes studio use of the PENTAX 645Z camera easier, more efficient and, ultimately, faster than ever,” said Chris Knight, a New York-based portrait photographer. “Using Lightroom, I am able to quickly share photos with my clients, who are even able to view and comment from remote locations.”

Since its launch in June 2014, the PENTAX 645Z camera has been embraced by a wide range of photographers. The PENTAX Tethered Capture Plug-In is being offered to further enhance the user experience, and is a free option that can be downloaded starting today at: http://www.ricohimaging.co.jp/english/support/download_digital.html

Main Features

  • The PENTAX 645Z camera supports industry-standard Adobe DNG (Digital Negative) RAW files, which ensures optimal image quality. The in-camera DNG file format effectively eliminates any RAW file incompatibility issues, thus allowing the photographer to confidently import DNG RAW files during a tethered session.
  • Adobe Lightroom Creative Cloud users can use Lightroom Mobile to connect to tethered sessions via cloud services to comment and adjust photographs and return those edits to the photographer from anywhere in the world.
  • Adobe Lightroom offers an exceptional cataloging system that allows photographers to capture and catalog tethered sessions with confidence.
  • The PENTAX Tethered Capture Plug-in for Adobe Lightroom is an easy-to-install, powerful and streamlined tethering solution that allows any photographer to manage their own workflow from capture to output.
  • Adobe Lightroom users can download and apply presets to any tethered capture session thus eliminating the need to process every raw file individually.

Articles: Digital Photography Review (dpreview.com)

 
Comments Off on Lightroom plug-in for Pentax 645Z tethered shooting now available

Posted in Uncategorized


How to Choose a Black and White Plug-In

02 Sep
Best black and white plug-ins

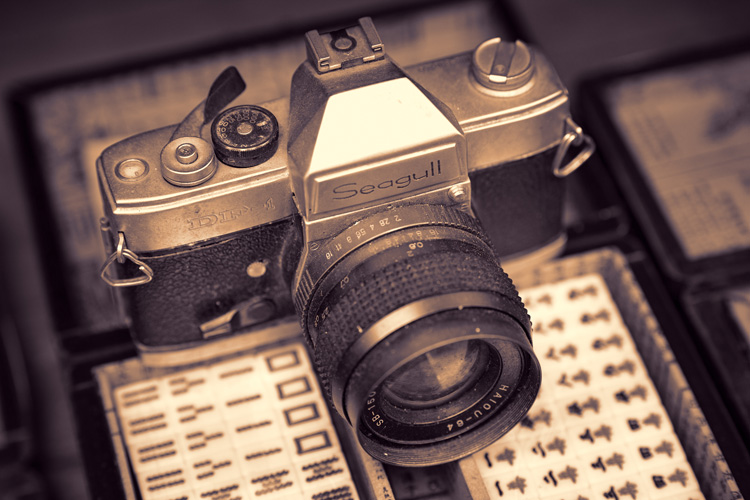
Photo converted to black and white in Topaz B&W Effects 2.

While Lightroom and Photoshop are sophisticated, advanced Raw converters and image editing programs, there are still many things that they don’t do as well as third party applications. One of these is converting photos to black and white. But, there are so many plug-ins available that it can be difficult to know which one to buy. This guide will help you decide.

Why buy plug-ins?

A common theme with black and white plug-ins is that they contain many more ways to emphasize texture than Lightroom and Photoshop. This is important with black and white, as texture is an important part of the composition. In Lightroom and ACR (Adobe Camera Raw) you can use the Clarity slider to emphasize texture, but it’s a blunt instrument compared to the options available in these plug-ins.

Another feature of most of these plug-ins is that they come with an extensive set of presets that you can use as a starting point for your black and white conversion. Just browsing through the presets and seeing what you can do to your photos will inspire you.

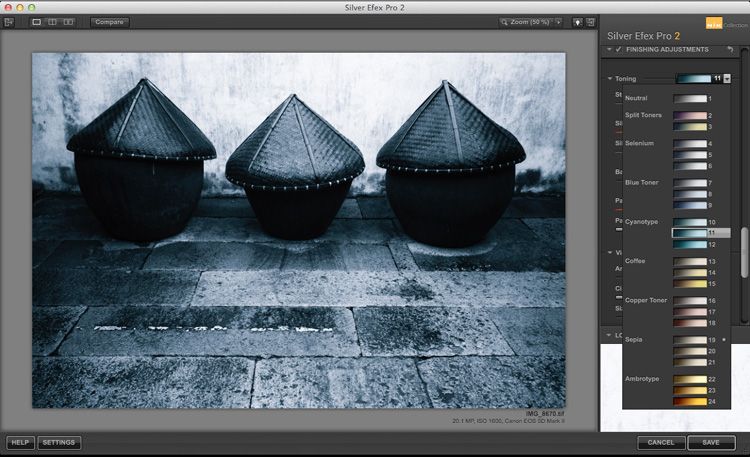
Some presets imitate old printing processes such as cyanotypes and wet plate photography. Others emulate black and white films, some of which are no longer available.

Silver Efex Pro 2

Best black and white plug-ins

Split toning in Silver Efex Pro 2.

Silver Efex Pro 2 is made by Nik software and regarded by many photographers as the ultimate black and white conversion plug-in. You can buy Silver Efex Pro 2 along with the other applications in the Nik Software range in a bundle for $ 149. While you can’t buy Silver Efex Pro 2 as a stand-alone application, it also means that you get the rest of Nik software range included with it.

Who is Silver Efex Pro 2 for?

Silver Efex Pro 2 is for the professional, or advanced hobbyist photographer, who wants to take black and white processing to the ultimate level. If you are serious about black and white photography, you will love this plug-in.

Reasons for buying Silver Efex Pro 2:

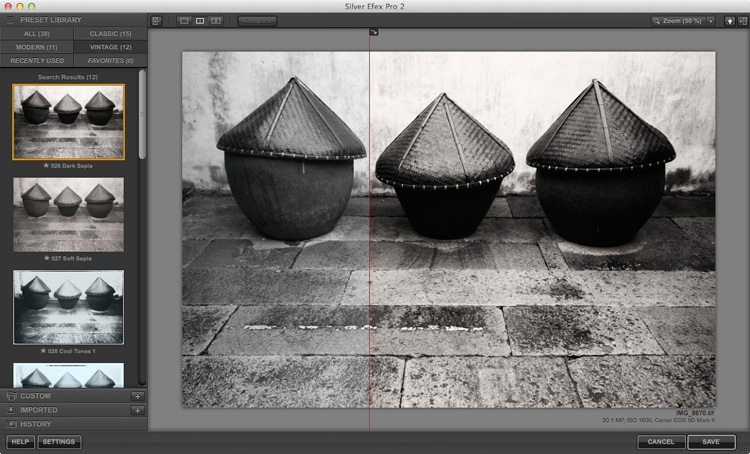
  • It has more options than Lightroom or Photoshop. There are more ways of adjusting tonal values, toning images, and adding borders. The Structure, Fine Structure, Dynamic Brightness and Soft Contrast sliders in Silver Efex Pro 2 provide a lot of ways to enhance texture, an important element of many black and white images.
  • It has a good workflow. The History in Silver Efex Pro 2 makes it easy to see where you’ve been and where you are going with your black and white conversion.
  • It comes with a number of good presets that help you obtain good black and white conversions right away.
  • It mimics black and white film grain. If you are interested in creating images that look like they were taken with film, Silver Efex Pro 2 lets you imitate the grain structure of 18 commonly used black and white films.
  • It has the standard Before and After view. It also has a Split View that I rather like. You can move the red dividing line to see more of one version or the other (see below). You can also zoom-in to view the differences in fine detail.

Best black and white plug-ins

Exposure

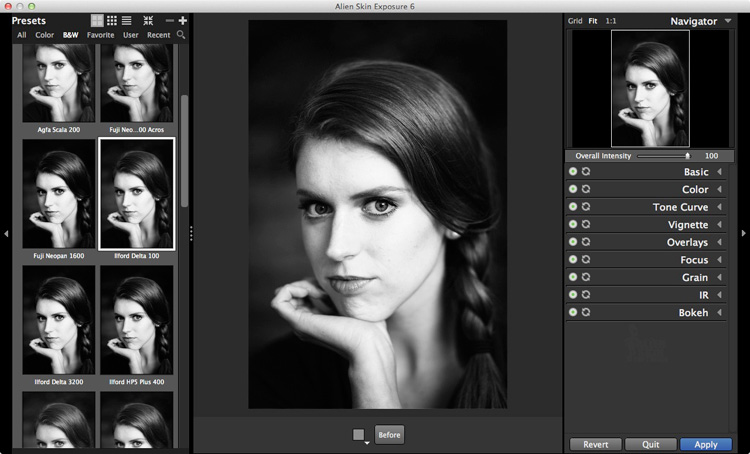
Exposure by Alien Skin Software is a plug-in designed to give your digital photos an analog look. It comes with hundreds of black and white and colour presets that imitate the look of film and antique processes. Alien Skin Software are not merely imitating though – a lot of research has gone into replicating the grain structures of all the film types featured in their software. Where the film wasn’t available, they used photo archives.

Best black and white plug-ins

Just like Silver Efex Pro 2, the presets are a starting point, and tools are provided to make adjustments, including an Intensity slider that lets you fade the effects created by the plug-in. You can create and save your own presets for future use.

Who is Exposure for?

Exposure is for photographers who want to mix the look of analog photography, with the speed and convenience of digital. If you yearn to make your photos look like they were shot with film rather than a digital camera, then this is a good plug-in to use.

Exposure is used by a lot of photographers to create effects that you can’t create in Lightroom, or would take a long time in Photoshop. While it seems mainly pitched at portrait, fashion and wedding photographers, you can apply the filters to virtually any type of photo. It’s a lot of fun to use.

Reasons for buying Exposure:

  • It lets you emulate the look of black and white film. There are over 20 film presets (plus variations) that let you apply an analog look to your digital photos.
  • Exposure is for colour as well as black and white. While this isn’t a concern if you are only interested in the plug-in for black and white conversions, there are some beautiful colour presets and film emulations to use.
  • It lets you add creative borders, light leak effects and scratches to your photos.
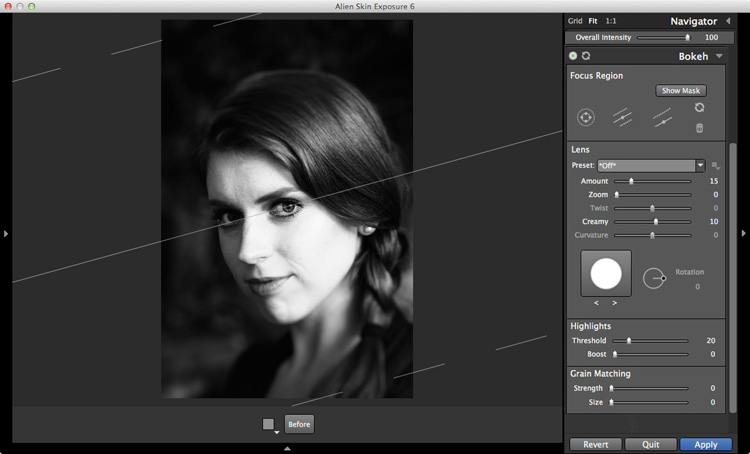
  • Exposure lets you add sophisticated lens blur effects to your images, emulating the look created by using specialist lenses such as tilt-shifts and Lensbaby optics (see bel0w).
  • It has an easy to use batch processing tool that makes processing multiple images very quick and easy.

Best black and white plug-ins

Perfect Black & White

Perfect Black & White comes as part of OnOne Software’s Perfect Photo Suite. There are six modules within the suite, giving you the use of the additional ones if you buy it.

Another benefit of Perfect Photo Suite is that it comes with built-in layers. When you convert a photo to black and white it is placed on a layer with an Opacity slider that lets you merge it with the original colour image. While this feature is of limited use for black and white conversions, it may come in handy with the other programs included in the suite.

Best black and white plug-ins

Who is Perfect Black & White for?

This software is ideal for the photographer who wants to experiment with black and white photography and take advantage of the other programs that come with the suite. You will only appreciate the power and potential of this software by using it and experimenting with all the tools.

Reasons for buying Perfect Black & White:

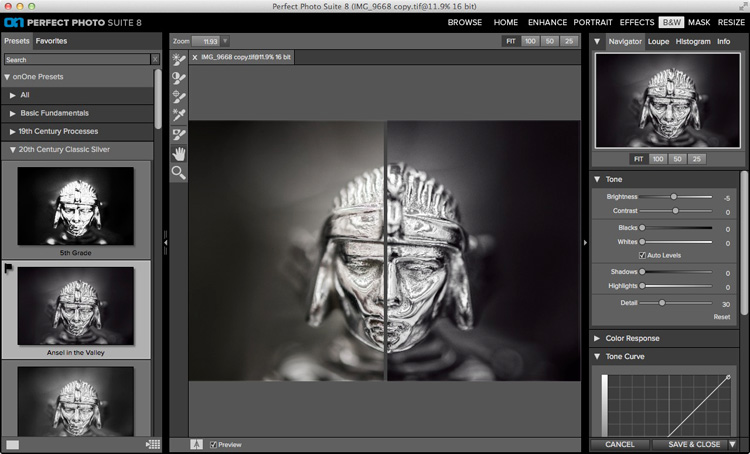
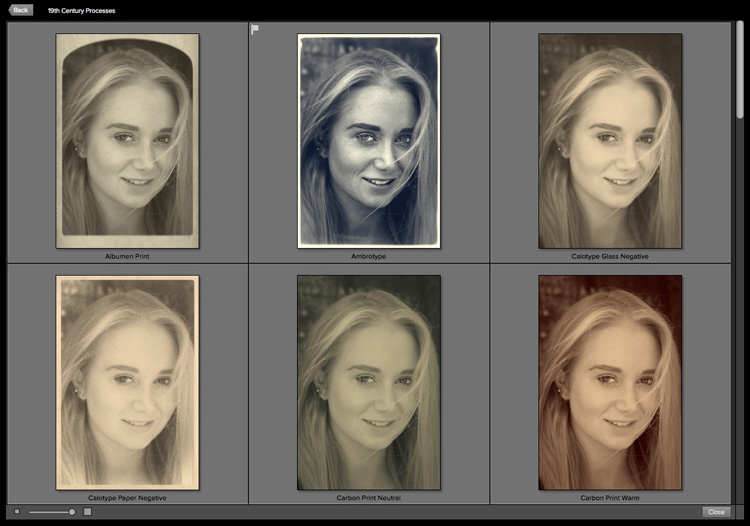
  • It has presets that emulate old photographic processes such as 19th century processes such as the Albumen Print and Ambrotype (see below).
  • There is a good selection of creative borders that you can add to your images.
  • The Sharpening options in it are more advanced than those in Lightroom and Photoshop. There are three types of sharpening to choose from: High Pass, Progressive and Unsharp Mask. High Pass is the most aggressive, while the others let you apply Sharpening in a more subtle fashion.
  • It works in conjunction with the other modules in Perfect Photo Suite. For example, you can use Perfect Portrait to retouch portraits before (or after) converting them to black and white. Or Perfect Resize to enlarge your photo files to a suitable size for making large prints. Or add textures to your photos using layers.
Best black and white plug-ins

Some of the antique process presets available in Perfect Black & White.

B&W Effects 2

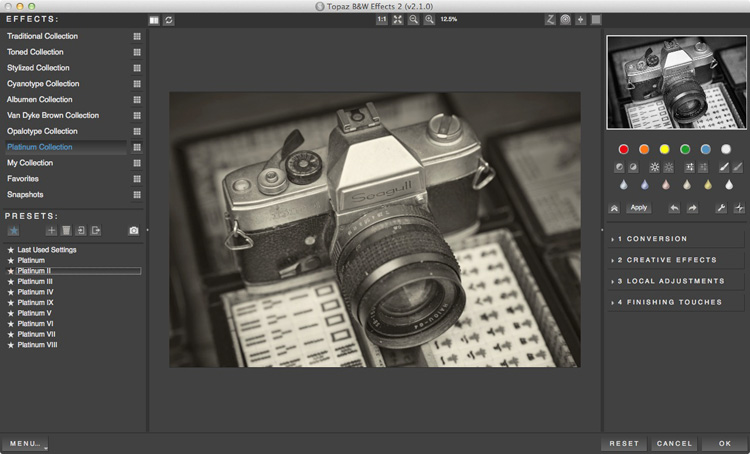
B&W Effects 2 is a Lightroom plug-in made by Topaz Labs. The main strength of this plug-in is its strong collection of presets, many of which imitate old processes. There are over 200 to choose from, and many of them have an interesting look which you don’t get from the presets in the other plug-ins mentioned here.

Best black and white plug-ins

Who is B&W Effects 2 for?

B&W Effects 2 is for photographers who want to take advantage of its extensive preset range as a basis for creative black and white conversions. The Snapshots feature gives you a history function that most of the other plug-ins lack, albeit one that you have to activate yourself by taking Snapshots at important points in the processing stage. B&W Effects 2 is also good at increasing detail in mid-tone areas and bringing out texture, an important part of a good black and white conversion.

Reasons for buying B&W Effects 2:

  • Lots of presets for emulating old printing processes. Have you ever wanted to try out cyanotype, albumen, van dyke brown, opalotype or platinum printing? The cost and impracticality associated with these processes puts them out of reach of all but dedicated enthusiasts. But B&W Effects 2 has all these and more.
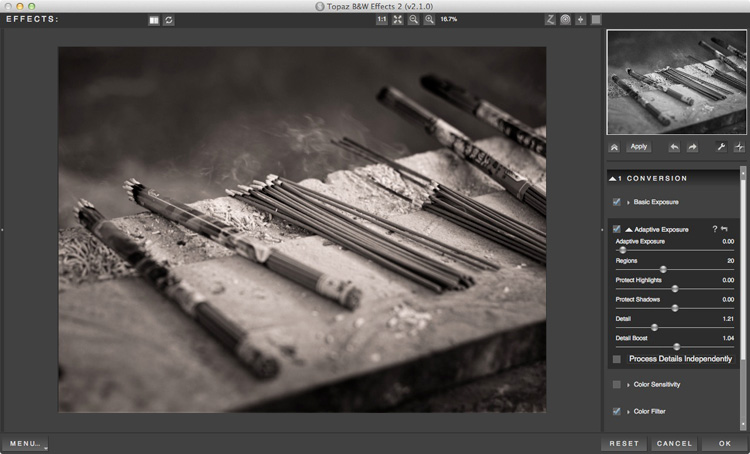
  • It uses Adaptive Exposure technology to add mid-tone contrast in a way that can’t be replicated in Lightroom or Photoshop. It works by analyzing the image, breaking it into regions and applying the adjustment to each region individually. The best way to appreciate what this tool can do is to try it out for yourself.
  • The Detail and Detail Boost sliders bring out details and texture, completing the work done by the Adaptive Exposure sliders. You’ll be amazed by how much detail and texture you can bring out with these sliders.

Best black and white plug-ins

DxO FilmPack

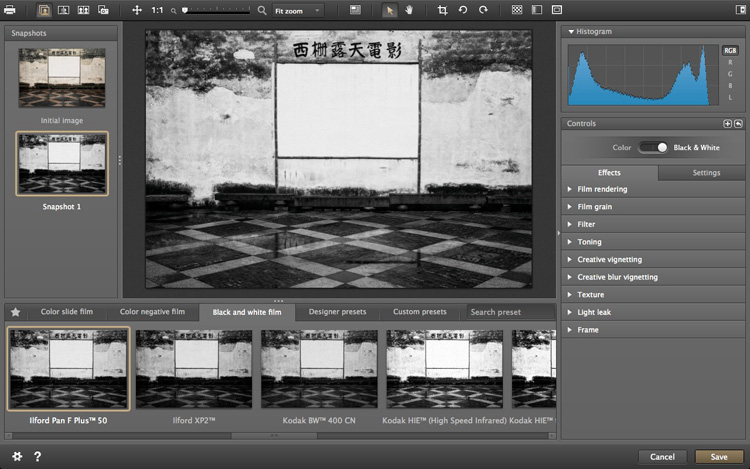
All the plug-ins we’ve looked at so far include some sort of film simulation, but DxO have taken it a step further with their FilmPack plug-in. According to their website, DxO FilmPack lets you, “Perfectly reproduce the quality, style, colours, and grain of the most famous analog films.”

Like Exposure, DxO FilmPack works in both colour and black and white.

Best black and white plug-ins

Who is DxO FilmPack for?

DxO FilmPack is for photographers who want to process their digital images so that they look as if they were taken on film. But it goes further than that, and offers a variety of creative effects that you will find useful in creating emotive monochrome images.

Reasons for buying DxO FilmPack:

  • Lots of film emulation presets, based on an analysis of the films themselves.
  • Features shared by most of the plug-ins listed here – the ability to add borders and textures, toning, light leaks effects and creative blur.

Tonality Pro

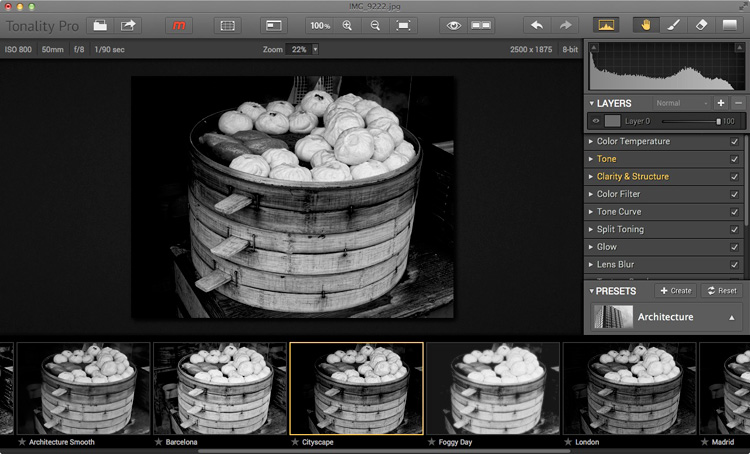
MacPhun is a company that makes plug-ins for Apple Mac computers (sorry Windows users!). Tonality Pro is a relatively recent addition to its stable of software and even though it will only be of interest to some of our readers I’ve included it here because it is a very good piece of software.

MacPhun’s aim with Tonality Pro was to create the best black and white plug-in available. I’ll leave it up to others to decided whether they have achieved that, but there’s no doubt it’s a powerful application with lots of useful tools for converting your photos to monochrome.

best-black-white-plugins-10

Reasons for buying Tonality Pro:

  • Tonality Pro has over 150 presets. There is also an Opacity slider that lets you control the strength of the preset, so you can make the effect as strong or subtle as you wish.
  • Tonality Pro has layers. None of the other presets mentioned here do, except for Perfect Black & White (and then not within the plug-in itself). Layers mean that you can apply an effect to your photo, then use brush mode to create a mask so the effect is applied selectively. Layers add a level of creative potential that allows you to use the plug-in’s tools with nearly unlimited freedom.
  • The clarity and structure tools help you emphasize texture and bring out detail in a way which simply isn’t possible in Lightroom or Photoshop.

Your turn

For me, one of the best things about plug-ins is that they give you a chance to play. They open up new ways of processing that you may not have considered before. Above all they are fun, give you chance to get creative, and find new ways of expressing yourself.

So, here’s a challenge. Download the trial version of one of these plug-ins. Then have a play with some of your favourite images and see what you can do with them. Does the new software give you some creative options that you had never considered before? Let us know how you get on in the comments.


Mastering Lightroom: Book Three – Black & White

Masterlng Lightroom: Book Three – Black & White by Andrew S GibsonMy ebook Mastering Lightroom: Book Three – Black & White goes into the topic of black and white in depth. It explains everything you need to know to make dramatic and beautiful monochrome conversions in Lightroom, including how to use the most popular black and white plug-ins. Click the link to visit my website and learn more.

googletag.cmd.push(function() {
tablet_slots.push( googletag.defineSlot( “/1005424/_dPSv4_tab-all-article-bottom_(300×250)”, [300, 250], “pb-ad-78623” ).addService( googletag.pubads() ) ); } );

googletag.cmd.push(function() {
mobile_slots.push( googletag.defineSlot( “/1005424/_dPSv4_mob-all-article-bottom_(300×250)”, [300, 250], “pb-ad-78158” ).addService( googletag.pubads() ) ); } );

The post How to Choose a Black and White Plug-In by Andrew S. Gibson appeared first on Digital Photography School.


Digital Photography School

 
Comments Off on How to Choose a Black and White Plug-In

Posted in Photography


Corel releases ParticleShop brush plugin for Photoshop

13 Aug

Corel has released a new brush plugin for PhotoShop called ParticleShop. It uses Corel’s Painter Particle brush technology to create photo-realistic effects like smoke, dust, fabric, fire, hair, lighting and fur. These effects are added to photos using brush strokes. Read more

Articles: Digital Photography Review (dpreview.com)

 
Comments Off on Corel releases ParticleShop brush plugin for Photoshop

Posted in Uncategorized


Alien Skin Software announces Exposure 6 plugin

29 Apr

Cliff_Mautner_Exposure_6_2__Medium_.jpg

Alien Skin Software has released the latest version of its flagship photography effects software. Exposure 6 now includes a ‘Bokeh’ focus and lens-simulation feature, an updated image processing engine for instant previews, enhanced user interface for quick workflow, and unlimited creative texture control. The analog film emulation and creative effects software integrates with Photoshop, Photoshop Elements, Lightroom, and Aperture or can be launched as a stand-alone program. Learn more

News: Digital Photography Review (dpreview.com)

 
Comments Off on Alien Skin Software announces Exposure 6 plugin

Posted in Uncategorized


How to Add an Opacity Slider to Lightroom Develop Presets with The Fader Plug-In

13 Jan

The Fader Lightroom plugin

For me, one of the biggest advantages of Lightroom over Photoshop is the ability to use Develop Presets on your images. Here are some of the benefits:

  • You can create several virtual copies of an image and use different Develop Presets to see how they come out. Doing so uses virtually no extra hard drive space as the changes are stored in the Lightroom Catalog in the form of text commands.
  • Develop Presets fit in neatly with your Lightroom workflow – there’s no need to export your images to Photoshop or other software.
  • It’s easy to see how Develop Presets work. If you download someone else’s Develop Presets it is easy to go to the Develop module and see which settings have been altered. You can tweak them to suit your photo, and (best of all) you get to see how the photographer achieved the effect. It’s a great way to learn how to use Lightroom.

Lightroom comes with some built-in presets, and there are plenty of websites that either give Develop Presets away for free or sell them. One of my favourites are the Signature Collections from OnOne Software. They are free (click the link for details) and give you a range of creative effects you can add to your images.

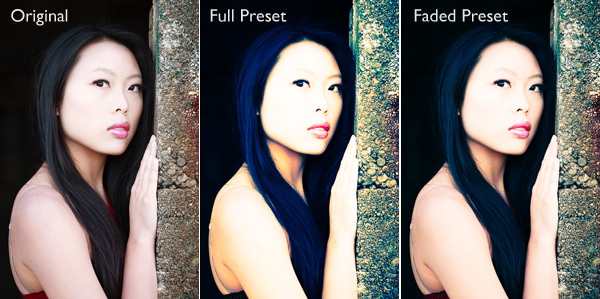
The only thing with downloaded Develop Presets is that most of them are not subtle. Here’s an example:

The Fader Lightroom plugin

If only there was a way of fading the effect – a kind of opacity slider in Lightroom. Maybe it will come in a future version. But at the moment there isn’t, so we have to find a way around that.

One method is to export two versions of your image, one with the preset applied and the other without. You place one on top of the other in Photoshop and use the Opacity slider to fade the effect. Easy enough – but it does take you out of Lightroom, something that’s good to avoid where possible. Those exported files take up valuable hard drive space. Plus, you may want to do something else to the image afterwards back in Lightroom.

As a smart Lightroom user you probably want to save time as well as hard drive space. That’s where a Lightroom plug-in called The Fader comes in.

The Fader does exactly what its name suggests. Once installed, you can activate it, select the Develop preset you want to apply from the drop down menu, and use an Opacity slider to fade the effect. This clever plug-in calculates the changes the Develop preset made to the image, and fades them all at the same time.

It’s simple, and it works wonderfully well. It isn’t free, but it’s relatively inexpensive at $ 10 (plus 24% VAT if you live in the European Union). You can download it, and test it out, with Lightroom’s built-in Develop presets at no cost. Paying the registration fee lets you use it with all your Develop presets.

You can download The Fader plug-in from the Capture Monkey website.

Installing The Fader plug-in

1. Go to this page on the Capture Monkey website and download The Fader plug-in. Select a folder to store it in (creating a folder called “Lightroom Plug-ins” in your Documents folder seems logical). Double-click the zipped folder to extract the files.

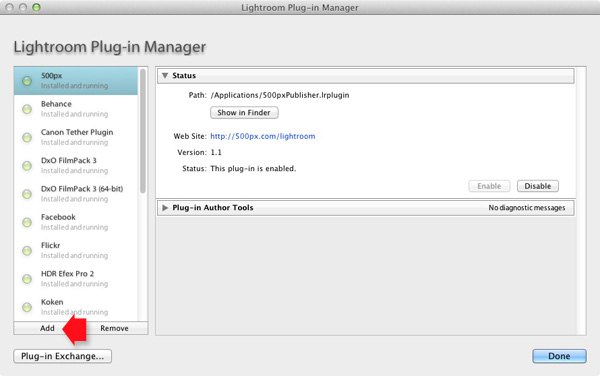
2. Open Lightroom and go to the Plug-In Manager (File > Plug-in Manager). Click the Add button in the bottom left-hand corner and navigate to the folder where you saved The Fader folder. Open the folder and double-click on the file called TheFader.lrplugin to complete the installation:

The Fader Lightroom plugin

Using The Fader

1. Open the photo you want to process in the Develop module. If you are using Develop Presets like the ones in OnOne Software’s Signature Collection, then you should process your file first in Lightroom and then apply the Develop Preset afterwards. Don’t expect the preset to do all the developing for you, it doesn’t work that way:

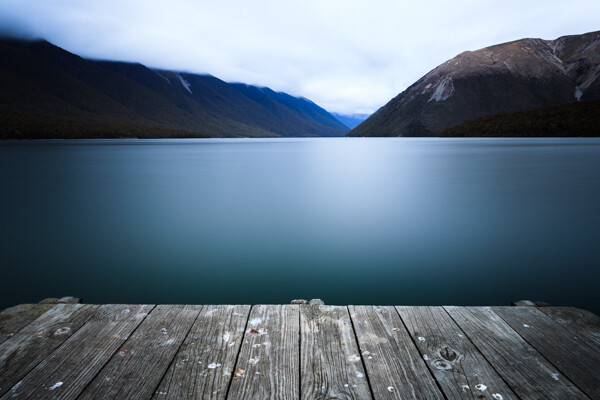
Original images before preset

Original images before preset

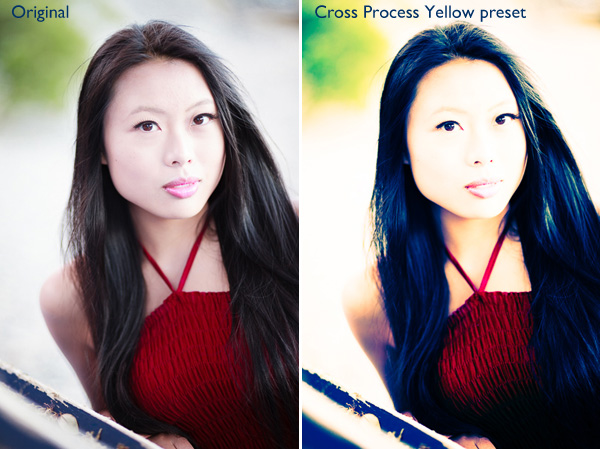
Then go to File > Plug-in Extras > The Fader and select the Develop Preset you want to apply. In this case I’ve chosen the Cross Process Yellow preset from OnOne Software. The effect is dramatic:

Preset applied

Preset applied

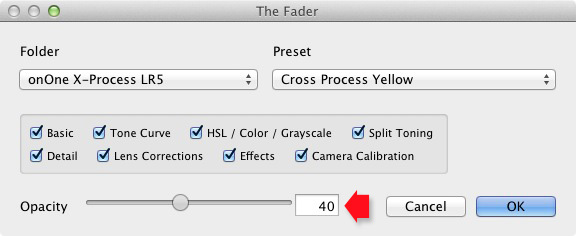
2. Now use the Opacity slider to reduce the intensity of the Develop Preset:

Fader applied

Fader applied at 40%

Here, I set Opacity to 40% for a more subtle effect:

The Fader Lightroom plugin

The Opacity slider has a range of -50 to 150. Values above 100 increase the intensity of the Develop Preset. The effect of minus values varies according to the preset used, but it is unlikely you will ever use them.

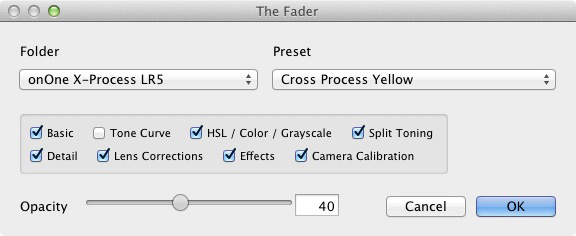
3. Finally, you can fine-tune the fade even further by selecting which parameters to apply to your photo. For example, if the Develop Preset you selected applies a Tone Curve to the photo, you can disable that part of the preset by unticking the Tone Curve box. Then you can use the Opacity slider to fade out the rest of the Develop Preset.

The Fader Lightroom plugin


Mastering Lightroom Book One: The Library Module

key-11My latest ebook Mastering Lightroom Book One: The Library Module is a complete guide to using Lightroom’s Library module to import, organize and search your photo files. You’ll learn how to tame your growing photo collection using Collections and Collection Sets, and how to save time so you can spend more time in the Develop module processing your photos.

The post How to Add an Opacity Slider to Lightroom Develop Presets with The Fader Plug-In by Andrew Gibson appeared first on Digital Photography School.


Digital Photography School

 
Comments Off on How to Add an Opacity Slider to Lightroom Develop Presets with The Fader Plug-In

Posted in Photography


Five Minutes to Realistic HDR using Lightroom and a 32-Bit Plugin

19 Dec

Easy Peazy HDR in Adobe Lightroom to make realistic HDR images!

HDR photography used to be time consuming, difficult to learn, and required expensive software. Recent new technology now allows anybody, even beginners, to make perfect HDR in less than 5 minutes – while eating a bowl of ice cream. It’s that easy!
Cuddeback_DSC5809_10_1132-bit-HDR-2

Using Adobe Lightroom for HDR

Just wait until you see how awesome this is!

The Perfect HDR Workflow takes place completely within Adobe Lightroom 4 or 5, a very robust, yet inexpensive, state of the art software. There is also an inexpensive plugin you will need. It’s made exclusively for Lightroom by the smart Photomatix people and is the secret sauce which makes this workflow possible and so elegant. It’s called “Merge to 32-bit HDR plugin” and is available for $ 29. They also have a trial version available so you can test it out first. These are the same people who make the world’s leading HDR tone mapping software, Photomatix Pro. So, take comfort, there’s no smoke & mirrors in this HDR workflow and you’ll be working with the best software available today. At the same time, your photography will now blow away 95% of the HDR images which are still being made using the old, harder to learn, HDR tone mapping process.

Notice, you don’t need to own Photoshop or endure the pain & suffering of learning how to use Photoshop to do this method! This, in itself, is huge and a welcome departure from the way HDR photography is typically done.

Advantages of 32-bit HDR Processing

The process I’m going to show you is technically called 32-bit HDR processing. The Perfect HDR Workflow is just my name for the particular workflow I designed with the beginning photographer in mind. My criteria was that total cost be under $ 150 US, which immediately rules out Photoshop in the workflow. Another requirement was that it be so easy that even a beginner can learn to make extraordinary HDR photos in minutes.

The advantages of the 32-bit process are:

  • It’s fast
  • It’s inexpensive
  • It yields realistic looking images
  • It’s very easy to learn

HDR doesn’t have to be complicated anymore. In fact, the Perfect HDR Workflow obliterates the complex technical barriers of making outstanding HDR which used to exist. Now, anybody with a digital camera and the desire can play a much bigger game when it comes to HDR photography, can do this!

Are you ready to see how it’s done?

Five Minutes to Perfect HDR

Here we go. Start with the three bracketed RAW images right out of the camera (you can download these for free if you want to follow along):
Easy realistic HDR in Lightroom

-2 shot at: ISO 200, F8, 1/1500

Easy realistic HDR in Lightroom

0 exposure shot at: ISO 200, F8, 1/350

Easy realistic HDR in Lightroom

+2 exposure shot at: ISO 200, F8, 1/90

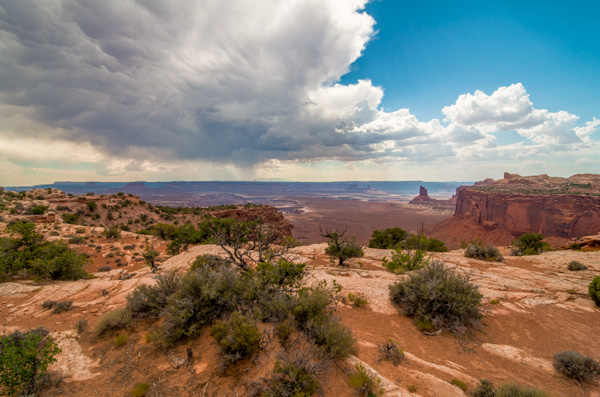
In less than 5 minutes you’ll end up with an HDR photo looking like this:

Cuddeback_DSC5809_10_1132-bit-HDR-2

Start your stopwatch:

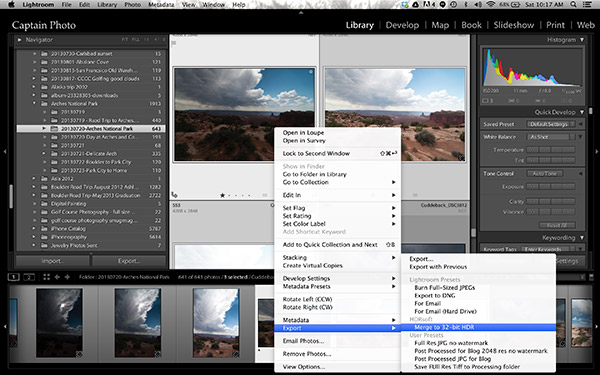
The first thing you want to do is create the 32-bit image. With the three RAW files selected in Lightroom, right click and in the dialog box which appears, select “Export>Merge to 32-bit HDR” as shown below.
Screen Shot 2013 11 23 at 10 17 57 AM

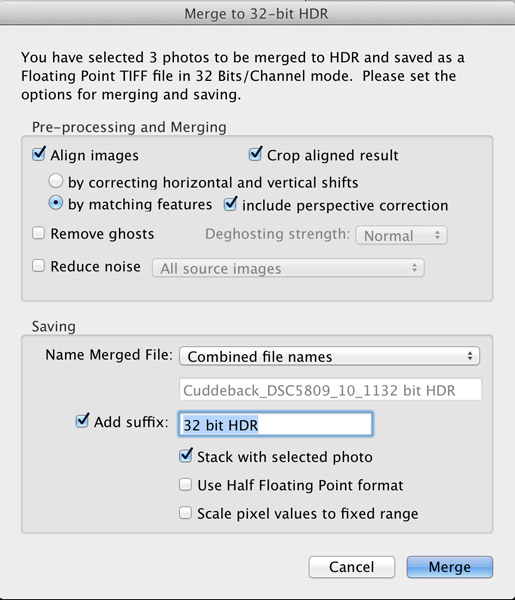
A new dialog box opens up where you choose your options for merging the RAW files (see image below). Always choose to “Align Images” and then one of the alignment options. If your three photos were taken handheld, select the alignment option “by matching features”. When you shoot on a tripod, you would chose the other option, “by correcting horizontal and vertical shifts”.

If there are moving objects in your scene such as: cars, people, clouds, trees, or anything else – select “Remove ghosts” and the software will usually do a great job of producing a non-blurry merged image, with no ghosts. For this landscape photo, nothing was moving so this option was not selected.

Noise reduction is usually necessary in HDR photography, however, I recommend not using the “Reduce noise” option which the plugin offers up. Instead, you are better off using the noise reduction built into Lightroom. So, leave that unchecked, as well.

Moving down to where you choose how the resulting 32-bit file is saved. I recommend simply combining the file names and adding a suffix like “32-bit HDR” so that, at a glance, you know that is the 32-bit file you want to work with in Lightroom.

The final dialog box selection you want to make is; “Stack with selected photo.” It’s so easy and elegant how this plugin makes your HDR workflow when this is selected. After the 32-bit file is created, the plugin automatically imports it right back into Lightroom and places it neatly next to the original RAW files. This keeps my OCD mind happy. Leave the final two options unselected then click the “Merge” button.

Here’s what the dialog box should look like
Screen Shot 2013 11 23 at 10 18 08 AM

In a few seconds, your newly created 32-bit file appears in Lightroom and looks something like this:
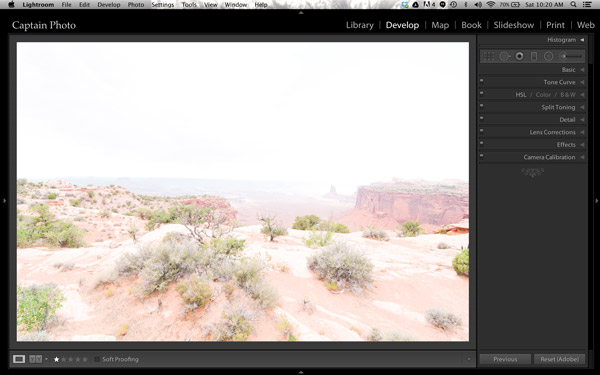
Screen Shot 2013 11 23 at 10 20 14 AM

Okay, well that’s not too pretty! That’s because this is a 32-bit file which your computer monitor can’t correctly display. But Lightroom 4 or 5 can process it, so let’s do that.

We’ll be working mostly in the Basic panel of the Develop module in Lightroom. The first step is to simply click the “Auto” button which gives you Lightroom’s best guess at the right setting for the image:
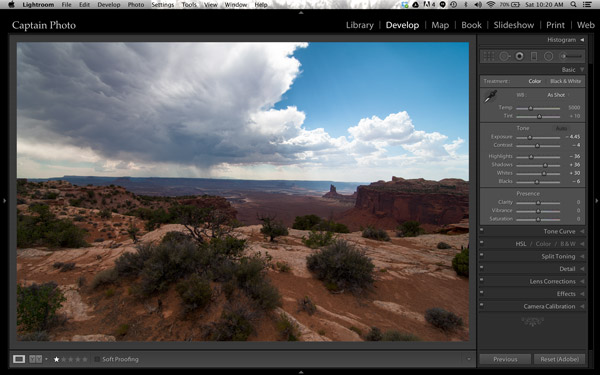
Screen Shot 2013 11 23 at 10 20 25 AM

It’s already looking much better. But let’s take it a step further!

Adding Your Artistic Touch

Now it’s time to add your personal artistic mark on your photo! At this point, you take over the processing manually to create an HDR image that is most pleasing to you. There are no right or wrong settings. However, my 5 minute process to Perfect HDR does follow some general guidelines so let me show you how this image evolved for me.

Working in the Basic panel, you first will reduce the “Highlights” (slide it left) and increase the “Shadows” (push it to the right) sliders until the image looks best to you. Then you might adjust the “Clarity” to a slight positive value, which adds local contrast between pixels. It makes the HDR photo “pop.” Please be careful not to push clarity too far right. My advice is to keep it below 30, for now anyway. Now let’s jump out of the Basic panel.

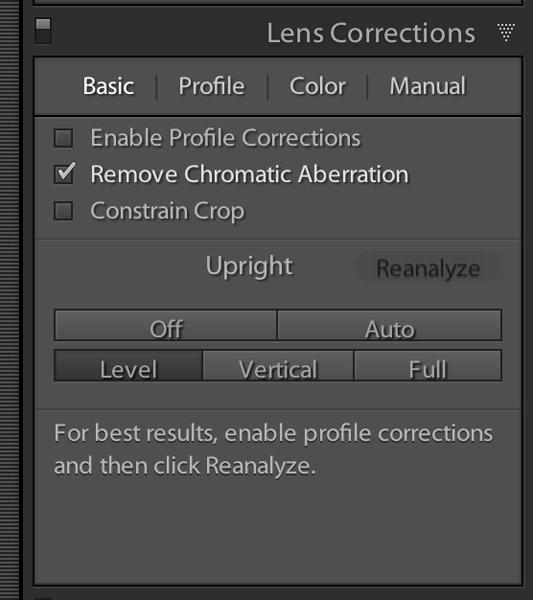
For just a couple of quick automatic adjustments, open up the “Lens Correction” panel. I recommend that you always check the box to “Remove chromatic aberration.” Also, you may want to straighten your horizon and/or vertical lines using the “Upright” adjustment tool. Here is what the “Lens correction” panel looks like when you make these simple adjustments:
Screen Shot 2013 11 23 at 10 24 24 AM

Now, go back to the Basic panel to finish. Set the white and black points as shown in the video below. The other sliders in the Basic panel can then be fine tuned to your taste and that’s it! Woooo Hooooo, done in less than 5 minutes! You’ve just made your first Perfect HDR photo! Send it to Mom and your friends and be ready to receive their adoration!

Watch The Full Perfect HDR Workflow Video

In the video below, I show the complete processing of this image including how to set the white and black points correctly. It’s easier to show some of the steps in a video, rather than try to describe it all in written form.

Try the Perfect HDR Workflow

If you want to give the Perfect HDR Workflow a try yourself right now, you can download my RAW files of this image for free. Get the free trial download of the merge to 32-bit plugin from the Photomatix website. The plugin you want is the last item on the page. Install the plugin with your copy of Lightroom 4 or 5. Then follow along to get the hang of the Perfect HDR Workflow and find out for yourself how easy this really is! If questions come up, I hang out on Google+ every day and you are welcome to circle & chat with me there or on my blog.

Become an HDR Wizard

Next time, in Easy Peazy HDR in Lightroom Part II, we’ll take this image further using the other panels of the Develop module in Lightroom. I think you’ll be amazed at the power and control you have using Lightroom to process your HDR photos. It’ll be like you’ve evolved into this unstoppable HDR Wizard!

The post Five Minutes to Realistic HDR using Lightroom and a 32-Bit Plugin by Keith Cuddeback appeared first on Digital Photography School.


Digital Photography School

 
Comments Off on Five Minutes to Realistic HDR using Lightroom and a 32-Bit Plugin

Posted in Photography


MetaRaw plugin offers Photoshop and Elements users broader Raw support

18 Jun

metaraw.png

The Plugin Site has created the MetaRaw plugin for Photoshop and Photoshop Elements that allows the conversion of Raw files not supported by the associated version of Adobe Camera Raw. The MetaRaw plugin offers access to three Raw conversion methods – ACR, DNG Converter or its own, dcraw-based converter. It also allows Elements 10 and 11 users to access ACR’s lens correction and chromatic aberration tools.

News: Digital Photography Review (dpreview.com)

 
Comments Off on MetaRaw plugin offers Photoshop and Elements users broader Raw support

Posted in Uncategorized


Solar Socket: Portable Plug-In Creates Free Energy to Go

22 May

[ By WebUrbanist in Gadgets & Geekery & Technology. ]

window socket

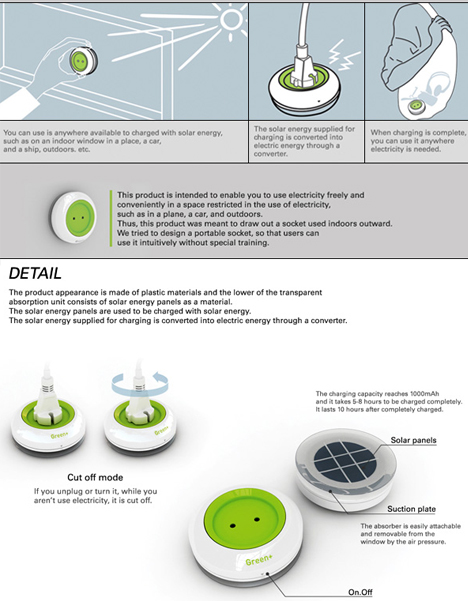
With batteries running low, your eye roams the room for a place to plug in, but then you remember: you brought your own power supply. Portable, easy and green, this solar socket design is a stroke of genius, able to both generate and hold a charge.

window portable power generator

A suction cup lets you stick the converter to any flat glazed surface, putting photovoltaic panels on the outside and a customary energy outlet on the other. And if you are worried about what happens at night or in overcast conditions: the device itself can store energy for in-place or mobile use.

window mounted solar cells

Kyuho Song & Boa Oh have added a few other functional quirks to the design: rotate your charger plug and you kill the power, spinning a circular cut-off switch built into the face plate. There is a second manual on/off switch on the bottom as well.

Share on Facebook


[ By WebUrbanist in Gadgets & Geekery & Technology. ]

[ WebUrbanist | Archives | Galleries | Privacy | TOS ]


WebUrbanist

 
Comments Off on Solar Socket: Portable Plug-In Creates Free Energy to Go

Posted in Creativity


? NEW 2012 Volvo V60 Plug-In HYBRID Diesel – GENEVA 2011

13 Feb

Volvo Cars present the world’s first diesel plug-in hybrid, the new V60 Plug-in Hybrid. This car combines the best properties from three different car types into one by simply pressing a button. The car becomes an electric car with a range of up to 50 kilometres (Pure mode) or a high-efficiency hybrid with carbon dioxide emissions averaging just 49 g/km (Hybrid mode) or a muscular fun-to-drive car with a combined output of 215 + 70 horsepower, 440 + 200 Nm of torque and acceleration from 0 to 100 km/h of just 6.9 seconds (Power mode). The majority of all European car drivers cover less than 50 km a day, for instance to and from work. On longer trips, the diesel engine is activated automatically, giving the car the same properties and range as a conventional hybrid. The Volvo V60 Plug-in Hybrid will reach the showrooms 2012.

Comment, Rate, Subscribe & Watch in HD!!! Beechcraft Duke B-60 N1873K KDAB-KJAX Diverted Back To KDAB Due To Severe Weather At KJAX Real Weather Used
Video Rating: 4 / 5


Burnt Retina : Photoshop Plugin

28 Oct

lumafilters.com Burnt Retina is a Photoshop Plugin that performs a Non-Linear Multipass Sharpen of your images. Burnt Retina works with Paint Shop Pro, Photoshop and Photobrush.
Video Rating: 0 / 5

 
Comments Off on Burnt Retina : Photoshop Plugin

Posted in Retouching in Photoshop