RSS
 

Posts Tagged ‘Planet’

NASA Ingenuity helicopter prepares for the first powered, controlled flight on another planet

25 Mar

NASA has announced that it is preparing to launch its Ingenuity Mars Helicopter no earlier than April 8. Ingenuity’s maiden flight will mark the first attempt at a powered, controlled flight of an aircraft on another planet. Before Ingenuity can lift off, the team must meet numerous challenging milestones.

The Mars Perseverance Rover landed on Mars on February 18. Since then, the rover has been sending important images and data back to Earth while the team goes through different instrument checks and testing procedures. Since then, the Ingenuity Mars Helicopter has remained attached to the belly of Perseverance.

However, the operation has experienced progress. On March 21, Perseverance deployed the ‘guitar-case shaped graphite composite debris shield’ that protected Ingenuity when Perseverance landed last month. Perseverance is now in transit to the ‘airfield’ where Ingenuity will attempt to fly. After Ingenuity is deployed, the helicopter will have 30 Martian days, known as sols, to perform its test flight campaign. This is equal to 31 Earth days.

‘When NASA’s Sojourner rover landed on Mars in 1997, it proved that roving the Red Planet was possible and completely redefined our approach to how we explore Mars. Similarly, we want to learn about the potential Ingenuity has for the future of science research,’ said Lori Glaze, director of the Planetary Science Division at NASA Headquarters. ‘Aptly named, Ingenuity is a technology demonstration that aims to be the first powered flight on another world and, if successful, could further expand our horizons and broaden the scope of what is possible with Mars exploration.’

‘When NASA’s Ingenuity Mars Helicopter attempts its first test flight on the Red Planet, the agency’s Mars 2020 Perseverance rover will be close by, as seen in this artist’s concept.’ Caption and image credit: NASA/JPL-Caltech

It’s difficult enough to get a helicopter to Mars, and that accomplishment is the result of years of work by many talented people and considerable financial resources. When designing Ingenuity, the team had to ensure it was small and light enough to be an acceptable payload for Perseverance. The helicopter is solar-powered, and it must be efficient enough to have the required energy to operate on Mars and survive cold Martian nights.

There are significant challenges to flying on Mars. The Red Planet has about one-third of Earth’s gravity, for starters, and the atmosphere is also only 1% as dense as Earth’s at the surface. The weather poses unique challenges, with nighttime temperatures dropping to -130° F (-90° C), which can wreak havoc on electrical components.

‘Members of the NASA Mars Helicopter team inspect the flight model (the actual vehicle going to the Red Planet), inside the Space Simulator, a 25-foot-wide (7.62-meter-wide) vacuum chamber at NASA’s Jet Propulsion Laboratory in Pasadena, California, on February 1, 2019.’ Caption and image credit: NASA/JPL-Caltech

‘Every step we have taken since this journey began six years ago has been uncharted territory in the history of aircraft,’ said Bob Balaram, Mars Helicopter chief engineer at NASA’s Jet Propulsion Laboratory in Southern California. ‘And while getting deployed to the surface will be a big challenge, surviving that first night on Mars alone, without the rover protecting it and keeping it powered, will be an even bigger one.’

Once Ingenuity is in place, squarely in the center of its 33′ x 33′ (10m x 10m) airfield, the complicated deployment process can begin. ‘As with everything with the helicopter, this type of deployment has never been done before,’ said Farah Alibay, Mars Helicopter integration lead for the Perseverance rover. ‘Once we start the deployment there is no turning back. All activities are closely coordinated, irreversible, and dependent on each other…’

‘NASA’s Mars Perseverance rover’s descent stage was recently stacked atop the rover at Kennedy Space Center, and the two were placed in the back shell that will help protect them on their journey to Mars. In this image, taken on April 29, 2020, the underside of the rover is visible, along with the Ingenuity helicopter attached (lower center of the image). The outer ring is the base of the back shell, while the bell-shaped objects covered in red material are covers for engine nozzles on the descent stage. The wheels are covered in a protective material that will be removed before launch.’ Image and caption credit: NASA/JPL-Caltech

If all goes according to plan, the deployment process will take six sols. On the sixth scheduled sol of the deployment phase, NASA states that ‘the team will need to confirm three things: that Ingenuity’s four legs are firmly on the surface of Jezero Crater, that the rover did, indeed, drive about 16 feet (about 5 meters) away, and that both helicopter and rover are communicating via their onboard radios. This milestone also initiates the 30-sol clock during which time all preflight checks and flight tests must take place.’

Artist’s rendition of the Perseverance rover and Ingenuity helicopter. Image credit: NASA/JPL-Caltech

Ingenuity is not carrying special instruments, and unlike the rest of the mission, its goals are not scientific. Ingenuity is solely an experimental engineering test flight. The team wants to see if it can fly on Mars. When Ingenuity is ready to fly, JPL mission controllers will send and receive flight instructions through Perseverance. Hopefully, early next month, Ingenuity will successfully launch from Mars’ surface. When it does, it will mark a monumental achievement for NASA, JPL and countless others.

Articles: Digital Photography Review (dpreview.com)

 
Comments Off on NASA Ingenuity helicopter prepares for the first powered, controlled flight on another planet

Posted in Uncategorized


Review: Live Planet VR live-streaming system

05 Oct

Live Planet VR camera and live-streaming platform
$ 3,495 | liveplanet.net

Live Planet VR bills itself as “the only end-to-end VR system,” and technically, since it includes a camera system as well as a cloud publishing suite that’s capable of delivering to just about every major VR headset and outlet currently available (including live-streaming high-resolution stereoscopic 360 video over mobile networks) they may be right.

Live Planet has a lot of things going for it, especially when it comes to the algorithm and software solutions side of things. Their live-streaming and real-time stitching execution is impressive, and I can also see many cases where their cloud publishing platform could be a godsend, which we’ll get to below.

In fact, whether or not Live Planet VR is right for you is highly dependent on how you plan to use it, as Live Planet is targeting a very specific user – mostly those looking to live-stream.

But we’ll start with the key features and the design.

Key Features

  • 16-lens stereoscopic VR 6K camera
  • DCI 4K/30p (4096×2160) resolution for live streaming
  • 6K/24p (6144×3328) for post-production stitching
  • In-camera real-time stitching
  • Live-streaming capability
  • Records to a single microSD card
  • VR headset live preview
  • Robust cloud publishing solution to all major VR platforms
  • Delivers high quality VR over LTE networks

Design

The camera itself is quite nice. It’s a hefty, well-crafted chunk of heavy polymer and machined metal about the size of an extra large coffee mug. It has sixteen Sunex DSL218 F2.0 lenses and 1/2.8” Sony IMX 326 sensors, and is flanked on top and bottom by generous ventilation grills.

The bottom of the unit has inputs for USB stereo, audio-in, ethernet, 12V DC 5A power, microSD slot, TOSLINK (optical audio), and HDMI out, as well as a standard 1/4”-20 thread for mounting to any standard tripod plate or system.

The LivePlanet camera may look like something out of a science fiction movie, but it’s a robust camera with sixteen F2.0 lenses.

The camera records to a single microSD card in a compressed .mp4 format. It also offers an HDMI out for YUV 4:2:0 capture so you can transmit the signal in both stereo or mono to a switcher or for a traditional broadcasting workflow. For standard recording, it captures at 50 Mbps, and for live-streaming it can capture at 15, 30, 45, or 60Mbps.

This all weighs in at around 700g (1.5 lb) and comes packaged in a Pelican case with custom foam cutouts.

I had no qualms about the aesthetic and physical design of the camera, but there are a few key points to take into account as you consider whether this system is right for you, which brings me to…

In use

As with most VR cameras, much of the magic happens on the software side. In the case of the Live Planet system, most of that magic is related to live streaming. If you’re looking for a rig to showcase and/or live-stream produced events, such as sports, concerts or conferences, and expect to do little to no post-processing, the Live Planet VR system is certainly one to take a look at, for this is where Live Planet VR truly shines.

Live Planet is targeting a very specific user, mostly those looking to live-stream.

However, if you’re looking for a fairly portable system that you can quickly grab and go to capture high-resolution, high-quality 360 footage, you should probably be aware of a few things:

There are no internal microphones. You need to connect a third party microphone, such as the Zoom H2N or Zoom H3-VR, if you plan to capture audio, as well as a second tripod or clamp to attach it to the tripod and keep it out of view below the camera. Live Planet does support direct-to-soundboard input so audio is attached to your video files.

There’s no internal battery pack. In order to use this unit away from a power source, you need a third party battery pack. The review unit came equipped with a Watson Pro VM-95-ME 97Wh external Lithium-Ion battery pack and Core SWX GPSCPM V-Mount plate and monopod clamp, also to be attached to the tripod. These are not included when purchasing the Live Planet VR camera.

The camera’s ethernet plug provides a reliable connection for live streaming content.

You can’t preview recorded clips in the field. In order to preview what you’ve recorded the app provides screenshots, but you can’t see recorded video files until you offload footage onto your laptop or computer. Live Planet says that this is a feature on their roadmap.

The camera only records in compressed .mp4 format. While most cameras at this price point offer several recording options, those interested in color grading and refining stitches may want to look elsewhere as the Live Planet VR camera does not currently record Log or Raw footage, nor does it allow you access to full resolution un-stitched camera files for fine-tuning using tools like Mistika VR or Nuke. Live Planet tells me they have features in beta for Raw capture and a Premiere Pro plugin, however it doesn’t seem that access to individual camera files is yet on the roadmap.

The Live Planet VR camera requires some accessories, like an off camera battery and audio recorder, so it’s not the best camera for quick projects. But for live-streaming events it’s a very powerful solution.

There’s no internal gyroscope or stabilization solution. While this wouldn’t be as much of an issue if individual camera files could be accessed to post-process using third party software, moving shots are virtually impossible with the Live Planet VR system without a gimbal or rover with stabilization.

These may seem like some serious limitations, and for certain uses they are. However, when you consider that the system is optimized to live-stream VR content, features like previewing recorded clips or the specific recording format used are probably less critical.

Software and apps

First, the basics.

The mobile app, as well as the web app from your computer or laptop, are very simple to use. For image control it offers the essentials: exposure (including auto-exposure), shadows, saturation, temperature (including auto-white balance), tint, and curves.

Additionally, you can choose between monoscopic and stereoscopic, quality of live-stream, choice of audio stream (with optional microphone attached), and field of view (currently 360 or 180, with plans on future updates to choose anywhere between 0 and 360 degrees). Finally, you get the option of recording or live-streaming, as well as a button to turn on and off the camera unit.

The Live Planet mobile app is easy to use and offers a lot of control.

Now, the magic.

First, by taking full advantage of an NVIDIA Jetson TX2 Module (with AI computing), the unit live-stitches 4K footage in real-time, and the algorithm does a fantastic job doing so. I was as close as a half meter (1.5 ft.) away, and stitch-lines are hardly noticeable as you can see in the video below

There is an impressively noticeable lack of optical flow Jello-effect, often seen with other software stitching systems at such close distances. It really wasn’t until I was about 30cm (1 ft.) away that I even noticed any stitch lines. To get these kind of results from a package that fits in the palm of your hand, when just a few years ago you needed an ultra powerful desktop-sized stitchbox sitting underneath the camera, is a more than impressive feat.

Editors note: for best results, we recommend watching this sample video on a mobile or head-mounted device.

The Live Planet system is able to live-stitch 4K footage in real-time, a very impressive feat considering how well it works. Stitch lines are hardly noticeable until something gets within about a half meter of the camera. (Please excuse the lack of audio – I failed to consider the lack of internal microphones until I offloaded later in the day).

Second, the ability to monitor and preview live using a Samsung Gear VR headset is priceless. It’s very easy to setup and use, and is a wonderful way for a producer, director or client to experience, on set, the 360 sphere the way the end user will experience it. It’s also capable of simultaneously streaming an equirectangular preview to a laptop or computer, from where you can also control the camera and settings.

Third, and this is perhaps the main selling point for the Live Planet system, is that it gives the user the opportunity to simultaneously live-stream in 4K stereoscopic video, at as low as 2Mbps, to various platforms, including Oculus Go, Samsung Gear VR, and Google Daydream headsets as well as YouTube and any platform that supports Real Time Messaging Protocol (RMTP).

To get these kind of results from a package that fits in the palm of your hand, when just a few years ago you needed a powerful desktop-sized stitchbox sitting underneath the camera, is a more than impressive feat.

This makes it an elegant solution for publishers of live events to easily distribute to multiple channels. All you need to do is connect the camera to a router via Ethernet cable, plug it in, and hit the Livestream button on the mobile app or computer. You then share a simple event code generated by the Live Planet Cloud to whomever you like and users can login to experience both live, as well as pre-recorded, video. Facebook and Vimeo support are on the way.

Now here’s the kicker – users of most major 360 cameras such as Insta360 Pro, Vuze+, Samsung Gear VR and Rylo can now take advantage of Live Planet VR Studio, Live Planet’s cloud publishing platform. Since the software is where Live Planet does some serious algorithmic voodoo, this is an incredibly welcomed feature. Using the Live Planet publishing platform can give you a consistent easy way to push your 360 content out to the world, no matter what platform a user chooses to experience it on. I cannot think of an easier turnkey way to simultaneously publish to all major VR and social media outlets.

Finally, and this will be one of the least talked about and least understood, but perhaps one of the most exciting parts of the technical design, it all runs on a blockchain-enabled infrastructure called VideoCoin.

I cannot think of an easier turnkey way to simultaneously publish to all major VR and social media outlets.

Those that know me know that anything blockchain and distributed ledger technology gets my full attention. While this isn’t the place to get into the nitty-gritty of blockchain tech, essentially the basis of most cryptocurrency, what’s important in the Live Planet VR system’s case is that it provides a peer-to-peer, decentralized, encrypted platform for data distribution – never has there been a safer way to safeguard, control, and distribute your own data, in this case video.

Live Planet also employs a proprietary algorithm in what they call ViewCast technology, which predicts head movements in order to maximize resolution in the direction the eye is facing, enabling high-resolution viewing in headsets even on mobile networks.

The Live Planet system arrives in a very sturdy Pelican case with custom foam cutouts.

The Live Planet team also indicated that they “plan to release an update every 3 weeks.” Some of the things they specifically pointed out to us include still photo capture, HDR capture, flexible field of view capture (0 to 360º), support for streaming from multiple cameras, RAW capture, an Adobe Premiere Pro plugin to aid in post-production color grading, and spatial audio support on the Live Planet publishing platform.

Be aware that space and publishing through the cloud system will cost you, based on how much streaming time and space you need. There are packages from $ 50/month for 90 minutes of streaming and 50GB storage, up to $ 270/month for 10 hours of streaming and 250GB storage. To take advantage of the ViewCast technology, it’ll cost you $ 9.99 per streamed hour.

Image quality

Image quality is certainly adequate and acceptable, especially for the turn-key live event use cases as described above. While a recent update allows for 6K capture (6144×3328) at 24fps, that is currently reserved for post-production stitching. Maximum resolution for live streaming is 4096 x 2160 at 30fps. The camera does a very good job of rendering details close-by, however, at further distances, in high-contrast situations, say under a tree canopy or between several buildings in daylight, there tends to be some noticeable edge-fringing.

Conclusions

When I first started using the Live Planet I ran into some of the same frustrations that I did when I started shooting 360 several years back, piecing together 3rd party accessories and solutions. With no internal battery, on-board audio recording, any sort of controls on the camera unit itself, it’s not the best camera for travel or on-location shooting. It has a lot of moving pieces, all of which have to work perfectly together with no issues.

Bottom line, this is a perfect turn-key solution for the quickly growing market of live-streaming events in 360 video.

However, when I began to truly consider what the Live Planet system was designed to do – effortlessly stream live events – my perspective changed. Live Planet’s software engineering and solutions are top notch. For live-streaming, especially over wireless networks, 4K is more than enough resolution for that bandwidth to handle. Furthermore, since Live Planet has begun to open up its software solutions to users of other cameras, it’s absolutely worth keeping an eye on Live Planet’s evolution as I’ve yet to see anything that rivals Live Planet VR Studio on the software and distribution front.

Bottom line, this is a perfect turn-key solution for the quickly growing market of live-streaming events in 360 video, and it gets my enthusiastic recommendation as a system to use for live streaming purposes. Additionally, Live Planet VR Studio certainly gets my nod as a publishing platform for users of any camera.

What we like

  • Build quality
  • Instantaneous stitching
  • Live Planet live-streaming publishing platform
  • Good image quality
  • End-to-end system
  • Only requires 1 MicroSD card

What we’d like to see improved

  • Price
  • No internal or swappable battery
  • No audio recording
  • No still photo capture (coming soon)
  • No raw recording (coming soon)
  • No access to individual camera files
  • No stabilization
(Rating based primarily on use as a live-streaming system)

Articles: Digital Photography Review (dpreview.com)

 
Comments Off on Review: Live Planet VR live-streaming system

Posted in Uncategorized


The Live Planet VR System is an end-to-end solution for creating, streaming 4K 360º content

23 Jan

Live Planet has announced the Live Planet VR System, an end-to-end solution to capturing, editing and delivering immersive 360-degree content to viewers.

The idea behind the Live Planet VR System is to launch an all-in-one product that makes it easy to get a full VR production up and running without the need to hassle with multiple products and programs. In Live Planet’s own words:

VR video has yet to take off as a medium because no one has focused on solving the full range of production and distribution challenges. As a result, it has been very difficult to easily, quickly, reliably, and affordably produce VR video experiences at scale, in particular for live distribution.

At the core of the Live Planet VR System is its 16-camera 360-degree video array. The camera system uses an Nvidia Jetson Tx2 module to instantaneously stitch the video from all 16 cameras to create 4K30p footage on-camera — no need to offload the footage to stitch it all together.

In addition to taking the video off of the device for post-production, the resulting video can also be streamed directly to viewers using Live Planet’s accompanying VR apps or platforms that support VR streaming including: Samsung Gear VR, Oculus, Google Daydream, YouTube and more. Live Planet also offers a cloud-based storage via its Live Planet VR Cloud platform.

The Live Planet VR System is available for $ 9.950 USD and includes the stereoscopic VR camera, $ 1,000 credit toward VR Cloud storage and delivery services, a premium monopod, app licenses, ‘platinum support’ and a custom camera case.

Live Planet’s Industry Changing VR System Now Shipping, Empowering Anyone to Expand The Boundaries of VR With Integrated Capture and Delivery of Immersive VR Video

Stereoscopic Camera Stitches Perfect VR in Real Time Paired with a Powerful Cloud and Apps for Picture-Perfect Optimized Delivery That Revolutionizes VR, Allowing Anyone to Capture, Manage, and Deliver Live and Recorded VR Video to All VR Headsets and 360° Platforms

LOS ANGELES and SAN JOSE —? January 22, 2019? —? ?Live Planet, Inc.?, creator of next-generation media technologies, today announced the full-system release of its game-changing, end-to-end virtual reality (VR) video solution, the Live Planet VR System. In development over the last three years, the system is a powerful, fully-integrated solution for creating immersive video experiences, enabling anyone to easily and quickly capture and distribute dramatically better stereoscopic VR video easier than any other method. This complete system includes the full integration of best-of-breed VR camera, cloud and applications, delivering VR video live or recorded to all VR headsets and 360° platforms (e.g., Samsung Gear VR, Oculus, Google Daydream, YouTube, etc.).

Live Planet’s VR System enables anyone to easily and quickly unleash their vision for immersive video experiences and define new categories of VR application, expanding the visual mediums within and beyond television and film. The system makes it simple, practical, and affordable to create and deliver stereoscopic VR and 360° video. Creators can:

  • CAPTURE? picture-perfect, real-time automatically-stitched stereoscopic footage optimized for comfortable viewing for livestream or later use with the Live Planet VR Camera.

  • STORE? and manage their uploaded VR video easily and affordably from anywhere with the Live Planet VR Cloud.

  • DELIVER ?on-demand VR video and live VRcasts to audiences publicly or privately, even over mobile networks, to both Live Planet VR apps and social platforms.

“The vision of “Live Planet VR” is as the name suggests: to allow instantaneous immersion in the experiences that catalogue being human,” said Halsey Minor, founder and CEO of Live Planet. “VR video is more than just a new medium and those who have tried VR instinctively know something extraordinary is afoot — the capacity to share our lives, the arts, sports, celebrations and tragedies in profound new ways that are not mediated by others but directly experienced. Where the power of television leaves off, VR begins. Until now, creating VR video has been hindered by poor quality and insane complexity. Live Planet has put the industry’s best VR experience in the hands of mere mortals, enabling the innovation and growth the industry has so far lacked. Just as pundits have written off VR for its experiential issues and complexity, along comes the Live Planet VR System to change the game.”

While VR point solutions — including various headsets and cameras — have been around for the last few years, VR video has yet to take off as a medium because no one has focused on solving the full range of production and distribution challenges. As a result, it has been very difficult to easily, quickly, reliably, and affordably produce VR video experiences at scale, in particular for live distribution. Technical hurdles the Live Planet VR System has now overcome include:

  1. Capturing footage at the highest possible visual quality, stereoscopically, and in a manner consistent with the natural characteristics of human vision, providing a comfortable experience with no dizziness or nausea so viewers may dwell in content experiences for long periods of time.

  2. Generating automatic, perfectly-stitched footage in real time on the capture device, critical for live applications.

  3. Delivering all footage, whether live or recorded, reliably and of the highest quality over dynamic network conditions — including mobile networks — to the myriad VR and 360° platforms, each of which has its own specifications.

Live Planet has invested in addressing these technological hurdles, creating innovations that handle them “under the hood”, enabling the VR video industry to move forward with push-button simple solutions.

Live Planet uses the ?NVIDIA Jetson TX2? supercomputer on a module to stitch together 16 different image sensors to output 4K video at 30 frames per second — all inside the camera,saving creators days and dollars? in post production time and expense. With its camera and cloud in beta with VR enthusiasts over the last year, the VR System now enables creators and application developers to “share their world,” from transporting audiences to the stage with their favorite band, witnessing a Hail Mary from the 50 yard line, or attending Tim Cook’s next Apple WWDC keynote — the creative potential of the VR video medium is now available to anyone.

“VR provides a unique opportunity to tell immersive stories, but creating and editing high-quality scenes comes with its own set of challenges,” said David Weinstein, Director of VR at NVIDIA. “With the NVIDIA Jetson TX2, Live Planet simplifies the process with a system that provides stunning immersive environments, delivering a VR experience like no other.”

The Live Planet VR System is available for purchase at ?www.liveplanet.net? for $ 9,950 USD. The purchase price includes the stereoscopic VR camera, $ 1,000 credit toward VR Cloud storage and delivery services (additional services are priced a la carte), a premium monopod, app licenses, platinum support, and a custom camera case.

About Live Planet, Inc.

Live Planet, Inc. develops infrastructural technologies to transform the world of video toward a more compelling, controllable future for consumer and business applications everywhere. The company was founded in 2016 by serial entrepreneur Halsey Minor, a technology visionary behind notable successes including CNET, Uphold, Salesforce, Google Voice, OpenDNS and Vignette. Live Planet’s initiatives include:

  • ? The Live Planet VR System:? the end-to-end solution for easily creating and delivering live and recorded picture-perfect stereoscopic VR video programming and applications. For more information on the Live Planet VR System, please visithttps://www.liveplanet.net?. Creative professionals and innovators seeking to shape the future of immersive media may join our partners program by contactinginfo@liveplanet.net?.

  • ? The VideoCoin Network:? video infrastructure for the blockchain-enabled internet delivering decentralized video encoding, storage, and content distribution. For more information, visit ?https://videocoin.io?.

Articles: Digital Photography Review (dpreview.com)

 
Comments Off on The Live Planet VR System is an end-to-end solution for creating, streaming 4K 360º content

Posted in Uncategorized


How to Make a Little Planet Quickly and Easily in Photoshop

12 Oct

Do you find your panoramas a bit flat? Would you like to create a whole little planet out of a single street or square? Do you want to make fun, eye-catching images in just a few minutes without any new equipment or apps? Then this article is for you!

What is a Little Planet

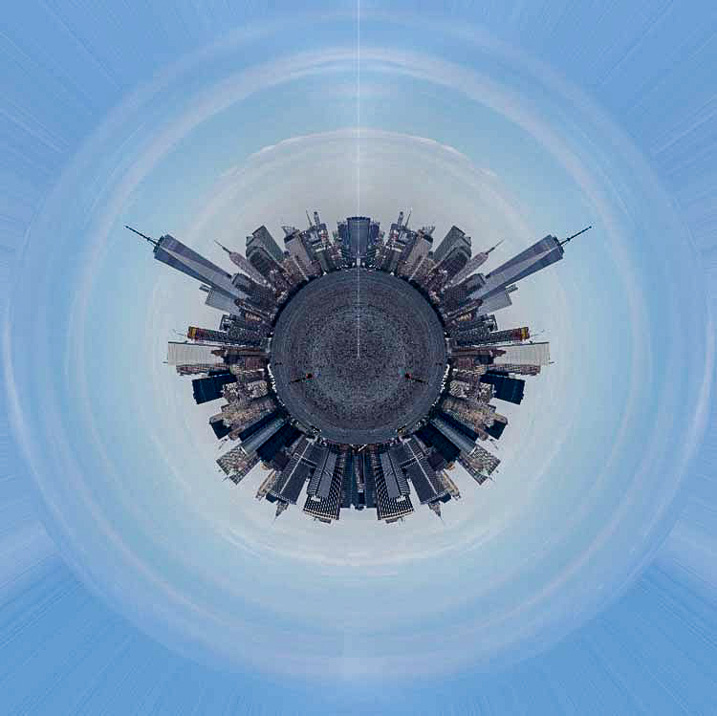
Maybe you’ve heard about the “tiny planet” or “little planet” effect but don’t know exactly what that is. Maybe you have seen them but don’t know how to do them. Well, let’s start by explaining that a tiny planet is a spherical panorama and is technically called a stereographic projection.

The result of this effect is that your traditional landscape will now be circular and thus look like a planet floating in space, water, or sky depending on the background of the panorama you’re using.

PlanetReggio - How to Make a Little Planet Quick and Easy in Photoshop

Little planets are very trendy since it became possible to capture 360 x 180 degree panoramic shots. However, in this tutorial I’m going to show you how to do them from any straightforward bi-dimensional rectangular photo. I’m using Photoshop for this, but you can do it in most post-processing programs, even the free ones like GIMP.

Subjects for a Little Planet

A landscape or a panorama are the best choices, however you can get interesting results applying this effect to other kind of scenes. For example, I used it in this photo from the interior of a library, see how the spiral lines add depth to the space?

Library How to Make a Little Planet Quick and Easy in Photoshop

Also, if you apply it to a portrait the result is like looking through a peephole.

Clown How to Make a Little Planet Quick and Easy in Photoshop

How to Make a Little Planet

Okay, back to the instructions. First you need to open your image in Photoshop and alter the proportions of your photo so that it becomes a square. To do this go to Menu > Image > Image Size. Once the Image Size pop-up window opens, make sure you deactivate the “constrain proportions” option or else the entire image will resize proportionally. Once you do that, make sure the width and the height values are the same.

Size How to Make a Little Planet Quick and Easy in Photoshop

Now you will see your image distorted, like stretched out. Don’t worry about it, that’s what we were looking for here.

Rotate the Image

Distortion How to Make a Little Planet Quick and Easy in Photoshop

Now that you have your square you need to rotate it. To do it you go to Menu > Image > Image Rotation > 180 degrees.

Rotation

Now you will see the image upside down.

Upsidedown

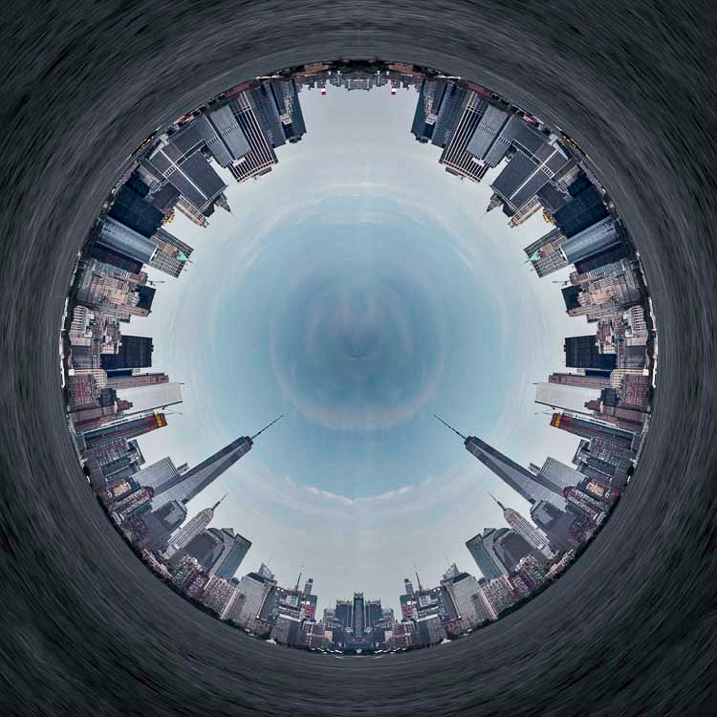
*Note: if you want your planet to be inside out you skip this step! At the end, I’ll show you the results with and without this rotation.

Apply the Effect

The final stage is to apply the effect. Go to Menu > Filter > Distort > Polar Coordinates. In the pop-up window you will see a preview of your little planet; make sure that the Rectangular to Polar option is marked and click OK.

PolarCoordinates

Voila a Little Planet

There you go, your own little planet! You can rotate the image (like you did in step 2) until you find the orientation that works best for your image. You can also use the clone tool if you need to blend the merging of the borders or iron out any final details. And of course, you can fix contrast and exposure, as you would do with any photo.

Final How to Make a Little Planet Quick and Easy in Photoshop

And here is the one inside out if you skipped the second step and didn’t rotate the image:

Insideout How to Make a Little Planet Quick and Easy in Photoshop

So you see, it was only a matter of three steps. However, to get better results, especially if it’s your first few planets let me give you some tips and tricks:

Tips and Tricks

Use a photo with a wider ratio, like 2:1 and more. If you don’t have that, a landscape (horizontal) photo will still do better than portrait (vertical) one.

StartLandscape How to Make a Little Planet Quick and Easy in Photoshop

Compose your photo with the rule of thirds leaving the top and bottom sections with minimal information and the details in the middle area. In this example, I have the sky on the top, trees in the middle, and ground on the bottom.

Make sure the horizon line is completely straight. If it wasn’t like that in the original shot, it’s very easy to fix. First, pick the ruler tool from the toolbox (if you don’t see it just press and hold the eyedropper and you’ll find it). Then click and drag a straight line from one side to the other. Finally, click on the Straighten Layer button on top.

Ruler How to Make a Little Planet Quick and Easy in Photoshop

The edges will merge better in the planet if the left and right edges of your panorama are similar. When possible, like it would be in the case of a forest, for example, you can copy the left side, flip it and paste it on the right side. That way they will match perfectly.

Edges How to Make a Little Planet Quick and Easy in Photoshop

Your Turn

Now you can create a whole universe of little planets from nature to urban landscapes, the possibilities are endless.

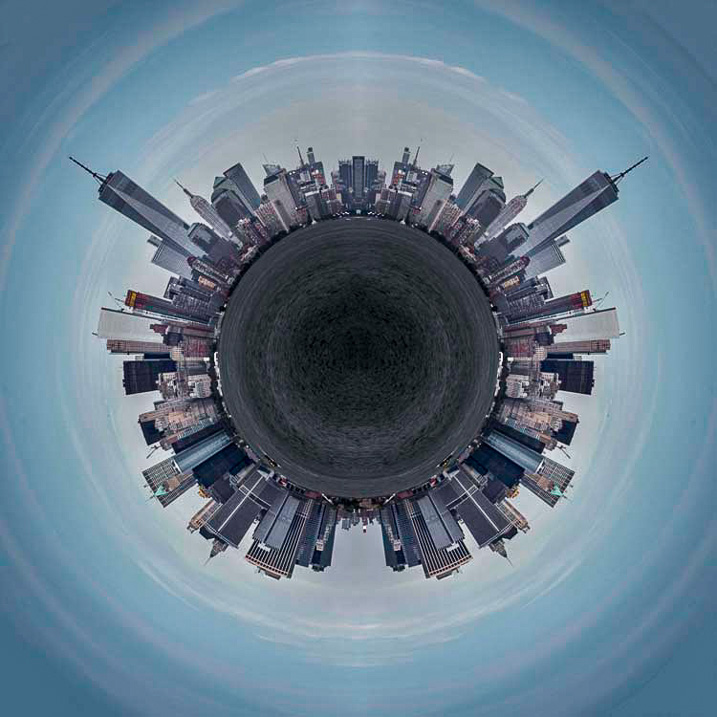
UrbanPlanet

I invite you to share your planets here in the comments section below.

The post How to Make a Little Planet Quickly and Easily in Photoshop by Ana Mireles appeared first on Digital Photography School.


Digital Photography School

 
Comments Off on How to Make a Little Planet Quickly and Easily in Photoshop

Posted in Photography


Lonely Planet unveils Instagram-like Trips app for sharing travel photos and tips

11 Aug

Lonely Planet, the world’s largest travel guide book publisher, has just launched an Instagram-like mobile app called Trips that allows anyone to share their travel photos and create their own travel guides. The app, which is only available for iOS at the moment, serves as a platform for users to catalog trips they’ve taken and publish guides for the places they’ve visited. The guides include text, photos and captions, though the app’s main focus is ultimately on sharing photos.

Lonely Planet describes its new app as “a beautiful, simple and intuitive way to share travel experiences.” Each user has their own timeline, and their content can be shared with both other travelers using the app as well as family and friends.

Speaking to Engadget, Lonely Planet CEO Daniel Houghton explained, “We don’t expect people to abandon other photo-sharing apps.” Underscoring that there is an option in Trips for users to link to their Instagram account and show off the photos they have shared on that platform.

For travelers, though, Trips offers a way to share content that is more trip-focused than what’s possible on photo sharing services like Instagram. In addition to being able to arrange photos chronologically in trip reports, users can also add a map to their report, better enabling viewers to see exactly where the adventure took place. Plus, Trips can be used in conjunction with Lonely Planet’s popular Guides app, which offers travel guides from experts for regions around the world.

Trips is currently only available on iOS. An Android version of the app will arrive later this fall.

Articles: Digital Photography Review (dpreview.com)

 
Comments Off on Lonely Planet unveils Instagram-like Trips app for sharing travel photos and tips

Posted in Uncategorized


Real 3D images of Mars make up this video of a simulated flight over the red planet

21 Mar

It took photographer and self-proclaimed space enthusiast Jan Fröjdman three months to produce a video turning NASA anaglyph images of Mars into a simulated flight over the planet. NASA’s high-resolution imagery offers depth information and comes from HiRISE, a camera on board the Mars Reconnaissance Orbiter. 

Fröjdman converted the still images into panning video clips using reference points – 33,000 of them – and color-graded the images. He describes it as an effort to visualize the planet in his own way, rather than as a strictly scientific endeavor. It’s certainly a mesmerizing way to spend 4 minutes.

Articles: Digital Photography Review (dpreview.com)

 
Comments Off on Real 3D images of Mars make up this video of a simulated flight over the red planet

Posted in Uncategorized


Urban Planet: How the Whole World Would Fit into a Single City or Structure

08 Mar

[ By WebUrbanist in Architecture & Cities & Urbanism. ]

life in one city

Cities often feel like dense and crowded places, and it is hard to imagine everyone on Earth living in urban environments let alone a single city or even (yes, it’s possible) one gigantic megastructure. In a series of videos, filmmaker Joseph Pisenti asks: what if everyone lived in one city? Then he takes it further with: what if everyone lived in just one building?

It sounds like an absurd proposition, but our planet’s population of billions could, in fact, but contained in a relatively small amount of space if needed (perhaps in case of a worldwide evacuation to space?). Images of single cities in the videos show places that already have populations in a single frame larger than countries like, say, Australia have spread across an entire continent.

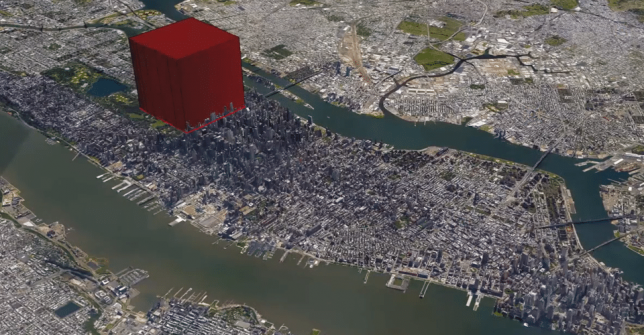
A few billion cubic meters in a structure set on, say, Manhattan, could uncomfortably house the human race. It would be twice the height on the world’s largest building, but we would fit if we had to.

As the video series unfolds, its creator gets increasingly realistic with respect to actual needs for people beyond simply space to exist, imagining a world where we all could actually live on a small part of South America. Hopefully, of course, it will never come to this, but as sea levels rise it’s good to know we have options (and fun to engage in these thought experiments, regardless). By the time you finish watching this series, however, you may find you would rather simply escape it all:

Share on Facebook


[ By WebUrbanist in Architecture & Cities & Urbanism. ]

[ WebUrbanist | Archives | Galleries | Privacy | TOS ]


WebUrbanist

 
Comments Off on Urban Planet: How the Whole World Would Fit into a Single City or Structure

Posted in Creativity


4K from Space: ISS astronauts shoot 3D movie of planet Earth

07 May

Astronauts based on the International Space Station have been working as movie makers to help create a 3D film featuring the planet Earth as viewed from space. A Beautiful Planet was shot in 4K using Canon’s cinema camera system, and will be shown in IMAX theaters from the end of the month. The film includes dramatic views of the planet lit up at night as well as overhead perspectives on weather systems and the Northern Lights.

A Beautiful Planet IMAX® Trailer

Footage for the film was collected by six space station astronauts over the course of three missions from November 2014, after Canon EOS C500 and EOS-1D C cameras were delivered to the ISS via an unmanned supply ship with a collection of lenses. Made in association with NASA, the film aims to educate viewers about Earth, but also to highlight the effects humanity has on the planet.

For more information on the film and where you can see it visit the IMAX website.

Press release

IMAX® Film ‘A Beautiful Planet’ Features “Out Of This World” Canon 4K Imagery

Using Canon Cameras and Lenses, Teams Shooting from the International Space Station Capture Breathtaking Images of Our Planet from a Vantage Point Few Get to See

MELVILLE, N.Y., April 14, 2016 – The future of 4K filmmaking is looking up — in fact, all the way to space. A Beautiful Planet, the latest 3D space documentary from acclaimed filmmaker Toni Myers and IMAX Entertainment, made in cooperation with NASA, will premiere in IMAX in New York on April 16 and was shot primarily in space using Canon cameras and lenses.  The film will be shown to the public exclusively in IMAX® and IMAX® 3D theaters beginning April 29.

The Canon EOS C500 4K Digital Cinema Camera and EOS-1D C 4K cameras were transported from Earth to the International Space Station (ISS) in November 2014 via an unmanned supply ship, and were received by NASA astronaut Terry Virts, astronaut Samantha Cristoforetti from the European Space Agency and Cosmonaut Anton Shkaplerov. This was the first time that 4K cameras were brought aboard the space station for a commercial film project. During a six-month mission at the ISS, Virts, Cristoforetti and Shkaplerov worked closely with NASA astronauts Kjell Lindgren, Butch Wilmore, Scott Kelly, and Kimiya Yui of the Japan Aerospace Exploration Agency (JAXA) to take turns using Canon’s advanced digital cameras and lenses to film footage of lightning storms, the continents, volcanoes, coral reefs and bright city lights on Earth for the film. One of the film’s greatest and most dramatic highlights, the striking imagery of the Northern Lights–or the aurora borealis– was captured by NASA astronaut Kjell Lindgren. These awe-inspiring images were previously unattainable in such stunning resolution.

The Canon EOS C500 4K (4096 x 2160-pixel) Digital Cinema Camera is capable of originating uncompressed RAW output for external recording to meet the demands of premium cinematic productions and other top-quality production markets. It features a Super 35mm, 8.85-megapixel CMOS image sensor, DIGIC DV III Image Processor and an expansive range of recording and output options specifically for 4K and 2K image acquisition. The compact, lightweight Canon EOS-1D C Digital SLR camera delivers outstanding video performance and provides video recording at 4K (4096 x 2160-pixel) or Full HD (1920 x 1080-pixel) resolution to support high-end motion picture, television production and other advanced imaging applications.

‘A Beautiful Planet’ joins Canon at NAB
A gallery of still images taken on the ISS with the Canon EOS-1D C camera and Canon lenses during the shooting of the film will be shown at the Canon booth # C4325 at the National Association of Broadcasters (NAB) trade show, April 18-21, 2016 in Las Vegas, NV. During NAB, the film’s Director of Photography, James Neihouse, ASC, will speak at Canon’s stage on the challenges and benefits of shooting in space. Joining him will be Marsha Ivins, a consultant on the film, former NASA astronaut, and a veteran of five space shuttle missions. Neihouse has worked on more than 30 IMAX films including Space Station 3D and Hubble 3D and trained more than 25 shuttle and space-station crews on the intricacies of large-format filmmaking.

The documentary, A Beautiful Planet was produced, written, and directed by Toni Myers, and is narrated by Academy Award®-winning actress Jennifer Lawrence.

About A Beautiful Planet
A Beautiful Planet is a breathtaking portrait of Earth from space, providing a unique perspective and increased understanding of our planet and galaxy as never seen before. Made in cooperation with the National Aeronautics and Space Administration (NASA), the film features stunning footage of our magnificent blue planet — and the effects humanity has had on it over time — captured by the astronauts aboard the International Space Station (ISS). From space, Earth blazes at night with the electric intensity of human expansion — a direct visualization of our changing world. But it is within our power to protect the planet. As we continue to explore and gain knowledge of our galaxy, we also develop a deeper connection to the place we all call home. From IMAX Entertainment and Toni Myers — the acclaimed filmmaker behind celebrated IMAX® documentaries Hubble 3D, and Space Station 3D — A Beautiful Planet presents an awe-inspiring glimpse of Earth and a hopeful look into the future of humanity.

Articles: Digital Photography Review (dpreview.com)

 
Comments Off on 4K from Space: ISS astronauts shoot 3D movie of planet Earth

Posted in Uncategorized


From another planet: Venus LAOWA 15mm F4 Wide Angle Macro quick review

13 Mar

Venus LAOWA 15mm F4 Wide Angle Macro lens
£325 / $ 499 | www.venuslens.net

Chinese company Venus Optics (Anhui ChangGeng Optical Technology Company Ltd.) is a new lens and camera accessory manufacturer started by a group of macro photography enthusiasts who design and create their own macro photography lenses. They began with the Venus 60mm 2:1 macro (which enables twice life-size reproduction), and have followed this up with the LAOWA 15mm 1:1 wide macro of this review. In addition to these lenses, they also offer a twin head macro flash unit, which we think looks quite a bit like an alien on top of a camera.

Features and specifications

The LAOWA 15mm lens is one of the widest full-frame lenses to offer a full 1:1 magnification ratio (meaning that the object in focus is projected at actual-size onto the film or sensor). Admittedly, this magnification only occurs when the object is 0.2 inches (4.7mm) from the rather large front element of this lens, but that’s the trade off between a wide angle of view and the desire for ‘true’ macro abilities.

In addition to the headline feature, this entirely manual lens (manual focus; manual aperture; no communication to the camera body) also includes a shift mechanism to physically move the optics up or down along the lens mount. This shift provides perspective correction for converging lines, as well as a way to create seamless panoramas (though the shift direction is fixed to the frame’s vertical axis).

Focal length  15mm
Max. aperture  F4
Min. aperture  F32
Angle of view 110° (135 frame) / 85° (APS-C)
Shift distances + / – 6mm
Aperture blades 14
Min. focus (1:1) 4.7mm
Filter thread 77mm
Dimensions 83.8 x 64.7mm / 3.3 x 2.5in
Weight 410g / 14.5oz
Available mounts

Nikon F / Canon EF / Pentax K /
Sony A, E, FE / Fuji X / m43

The lens is designed around 12 elements in 9 groups, with three High Refractive elements, and one Extra-low Dispersion lens.

Multi-layer coatings minimize flare and ghosting, while the overall optical design strikes a balance between close focus abilities and wide angles.

Of note is the 77mm filter thread around the non-protruding front element. This allows for easy filter use without requiring the more expensive square filter systems (although for ND grads, those are recommended). Given the wide angle of view, slim filters are still required.

The body surrounding the glass elements is made from aluminum and brass, with engraved aperture and distance scales that are necessary for the all-manual operation.

The aperture ring is ‘clickless’ and located toward the front of the lens, while the focus ring near the back has a relatively short throw for a macro lens (90° of rotation).

The lens comes with a shifting lens mount, allowing for perspective correction by adjusting the center of the image circle on the film or sensor. The range of adjustment is 6mm from the center, either up or down.

The small lever to engage the shift mechanism is just behind the focus ring, at the rear of the lens. There are no scales or gears to finely control the amount of shift.

Shooting experience

1:1 macro at F11. The flare comes from the combination of back-lighting and inability to use the hood at such close working distances.

The LAOWA 15mm is an entirely manual lens, but still easy enough to adjust and work with. This was aided somewhat by testing a K-mount lens on a Pentax APS-C camera body and a Sony a7 II (w/ Novoflex adapter), both of which provide image stabilization (from a manually entered focal length), stop-down metering, and focus confirmation/peaking, despite the low-tech, ‘slab of brass’ lens mount.

When ordering this lens in Micro Four Thirds, Sony E, or Fuji X mount, the folks at Venus bundle an appropriate adapter with either a Nikon F or Canon EF mount lens. (For single-system Sony shooters, there is the option of a native FE mount, without adapter.) However, as our friends at Lensrentals point out, testing a wide-angle lens with an adapter (regardless of manufacturer) can introduce issues, so much of the more technical analysis in this article is based on experience of using this lens on a native Pentax (APS-C) body. 

Ergonomics

The absence of autofocus is not much of a detriment when using this lens for wide-angle macro photography, since adjusting the subject distance while looking at the LCD or viewfinder is typically a much faster way to focus at these minute working distances. Stop-down metering and looking through a dim viewfinder or noisy LCD at smaller apertures (due to the lack of automatic aperture control), on the other hand, is a bit harder to adapt to.

The focus throw is somewhat short for a macro lens, requiring only a bit more than 90 degrees of rotation to go from the closest focal distance (and 1:1 macro) to infinity. Further, the helical is biased toward the macro and close-focus end, so there is only a tiny amount of travel between 2 meters and infinity. This took some getting used to, and initially resulted in enough mis-focused shots to warrant bracketing.

The biggest ergonomic difficulty was getting used to using an aperture ring positioned in front of the focus ring. Adding to the confusion is the fact that both rings are ‘clickless’ and identically sized. Of course, the lack of hard stops on the aperture ring, along with the wide angle and availability in many different lens mounts, combine to make this an interesting option for video work, but that’s beyond the scope of this article.

Macro

The image quality of this unique lens is excellent at closer focus distances, and shows the commitment of the macro photographers at Venus Optics for getting very close and very wide. There is a high degree of sharpness in the center of the frame, even at wider apertures, and the inevitable distortion and falloff along the edges doesn’t interfere at closer focus distances. Being very well corrected for aberrations is another plus as a macro lens.

However, this lens is differentiated by its 1:1 macro focusing, which, unfortunately, comes with some inconveniences. To keep the price of the lens reasonable, the LAOWA relies on manual focus and a manual aperture without linkage (resulting in the dim viewfinder when stopped down, as mentioned above), while the wide angle optical design means a minuscule 4.7mm working distance (for true 1:1) coupled with a rather large front filter ring and hood.

The petal-shaped hood prevents many subjects from reaching the tiny minimum focus distance for 1:1 macros, and furthermore blocks out light that becomes necessary for macros with acceptable depth-of-focus (narrow aperture). After a few experiments with macro flash rigs, resulting in images that looked like ‘flash party photos’ due to the lack of beam spread across the very wide angle of view, natural light (and a tripod for static subjects) was the order of the day. Thomas Shahan, of course, could probably overcome this with aplomb.

Shift ability

Unshifted Shifted +6mm

The addition of a shifting lens mount is a great bonus for a wide angle lens like the LAOWA 15mm, however the optical characteristics of the lens tend to make this function most useful on APS-C or smaller format sensors. In images shot with a full frame body (the Sony a7 II w/ Novoflex adapter), the vignetting and distortion at the edge of the image circle eclipsed the value of shifting the lens (although it is unknown how much of this is due to it being an adapted lens).

One troublesome aspect of the lens shift is that it lacks the gearing and markings for fine control of the shift found on most other perspective control lenses. Press the shift release button and almost immediately the lens slides up (or down) to the maximum shift amount. There is a detent in the middle to reset the lens to an unshifted position, but getting a small or precise amount of shift requires patience and a steady hand.

15mm wide angle

Toronto skyline, as seen from the islands offshore. On the full-frame Sony, the 15mm shows significant degradation at the edges, as evident in the lights on the right side.

When using this lens as a ‘normal’ ultra-wide angle, the results are something of a mixed bag. At close focus distances, the center is quite sharp (where most macro subjects tend to be) at all apertures, while at infinity the corner details appear smeared until the lens is stopped down significantly. Some night shots on the full-frame Sony, and attempts at astrophotography with the Pentax O-GPS Astrotracer, both show significant degradation of the lights at the edges. These examples are perhaps not quite as comprehensive as LensRentals’ OLAF system, but still illustrative. Check out the full resolution images in the gallery below.

Many macro lenses are designed to have a ‘flat field’ for the in-focus region. The LAOWA 15mm is not one of those lenses. Similar to other wide angle lenses, the field of focus curves radically, yet does not flatten out as focus is shifted toward infinity. Add in some edge distortion, and the resultant lack of corner sharpness at infinity is perhaps the biggest issue with the image quality from this lens on full-frame cameras. It requires some acceptance of the ‘dual nature’ of the lens (macro and ultra-wide) to work within this limit. Oddly enough, shifting the lens provides some relief for at least two of the corners, due to the curved field being off-center.

Distortion

Very few ultra wide angle lenses are free from distortion, and this 15mm is no exception. In most shots with the APS-C Pentax, curved lines were minimal (see the shift photos above) and could be corrected in processing if desired.

However, on the full-frame Sony, the barrel distortion along the edges reached a point where it was almost un-correctable. The image to the left shows doors that have very straight edges, but look organically curved in the (uncorrected) photo.

Chromatic aberrations

One area where the LAOWA 15mm is quite competitive is in the control of chromatic aberrations. While there definitely is some lateral CA, particularly visible at high contrast edges in the corners, it is fairly well controlled when stopped down, and quite consistent. A few clicks in most modern Raw processing software removes these distractions very easily. In addition, longitudinal CA (color fringing in the out of focus areas) is almost non-existent, which is excellent for a macro lens, even though many other wide angle lenses tend to be similarly devoid of this aberration.

(Note: none of the images in this article, or the samples, have had software lens corrections applied; whether for distortion, vignetting, chromatic aberrations, or fringing.)

Bokeh

Close focus at F4 Close focus at F16

It’s a bit unusual to discuss the bokeh of an ultra-wide lens: considering the typical design for this kind of lens provides such wide depth-of-field, there is frequently little out of focus anyhow. However, the close focus and macro abilities of the LAOWA 15mm give quite a lot of room for shifting the focal plane, so bokeh is not only visible, it can be an integral part of the image.

With a 16-bladed aperture, the blur discs produced by this lens appear round at all stops, with a slight ‘onion-ring’ artifact when examined closely. More importantly, the falloff in the blur is smooth and gradual, as one would expect from a macro lens. This combines to make the exaggerated field curvature less bothersome at closer focal distances and wider apertures, and becomes another one of the strengths of this lens.

Summing up

The Venus LAOWA 15mm F4 Macro is an unusual lens, both in its pedigree (or lack thereof) and its unique features. With a relatively reasonable price and availability in many different lens mounts, there is now an ultra-wide option for anyone who likes to get really close to their subjects. The lack of autofocus and auto-aperture prevents this from being a ‘snapshot’ lens, and may make it frustrating to use on camera systems that do not support low-tech lenses very well.

There are some compromises in the optical design of this multipurpose lens, including wide field distortion, and some edge softness at infinity. However, wide-angle macro enthusiasts will definitely enjoy this lens, while anyone with patience and a desire to explore the options it provides will similarly find the Venus LAOWA 15mm to be a fun and rewarding addition to their system.

Things we like:

  • Very close focus (1:1 macro)
  • Sharp in the center, even wide open
  • Well built and smooth focusing
  • Shift option is useful for APS-C
  • Nice bokeh for a wide angle

Things we don’t like:

  • Extremely short macro working distance
  • No mechanical aperture linkage (K and F mounts)
  • Significant distortion on full-frame
  • Edges smeared at infinity with wider apertures

Real-world samples

$ (document).ready(function() { SampleGalleryGridV2({“galleryId”:”8066630650″}) })

Venus LAOWA 15mm F4 Wide Angle Macro samples

47 images • Posted on Oct 27, 2015 • View album
Sample photoSample photoSample photoSample photoSample photoSample photoSample photoSample photoSample photoSample photoSample photoSample photoSample photoSample photoSample photoSample photoSample photoSample photoSample photoSample photoSample photoSample photoSample photoSample photoSample photoSample photoSample photoSample photoSample photoSample photoSample photoSample photoSample photoSample photoSample photoSample photoSample photoSample photoSample photoSample photoSample photoSample photoSample photoSample photoSample photoSample photoSample photo

Articles: Digital Photography Review (dpreview.com)

 
Comments Off on From another planet: Venus LAOWA 15mm F4 Wide Angle Macro quick review

Posted in Uncategorized


How to Make a Little Planet Using Photoshop

06 Jan

Photography doesn’t always have to be serious, sometimes it is nice to do something just for fun. Making a landscape look like it is a little planet is one of those things. There aren’t any uses for it, and you wouldn’t spend your photography career doing this. It is, however, one of those photography tricks that a lot of people like to try.

LeanneCole-landscape-sphere-done-0033-dps717px

A Landscape turned into a sphere or little planet.

Landscape images work best. The photo should have a foreground, a horizon, and a sky. If you have trees or buidings in the image that go out the top of the image it may not work as well. It is all experimental, so you should try images like that, but it does seem to work best with images that look like the one below.

LeanneCole-landscape-sphere-done-0035-dps717px

This image was chosen because it has all of those elements; the river is in the foreground, there are buildings along the horizon, and there is a sky. There is also nothing going out the top of the image. As the photo is going to connect from one end to another, it has to be an image that has similar ends.

How to create a Little Planet

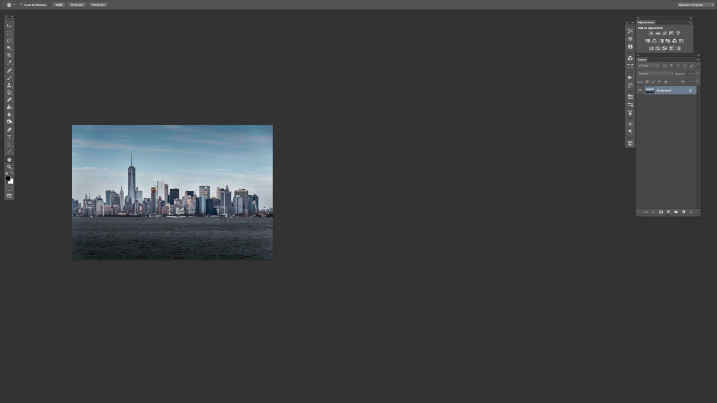
Open the photo you want to use in Photoshop.

1-leannecole-tutoria-photo-sphere

Open photo in Photoshop.

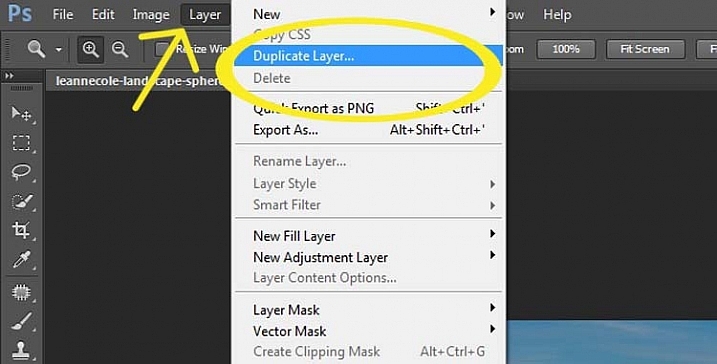
The first thing to do is to duplicate the layer by pressing Ctrl+J (CMD+J on Mac). It can also be done by going up the main menu, clicking Layers > Duplicate Layer.

16-leannecole-tutoria-photo-sphere

Duplicate Layer

You may need to make the image smaller on the screen using the magnifying tool. Make it small enough to only fill part of your current view, like so:

Screen Shot 2015-12-21 at 1.18.59 PM (2)

Turn on your rulers (Cmd+R on Mac, or Control+R on PC). Once they appear, right click on one and select percent to display on the rulers.

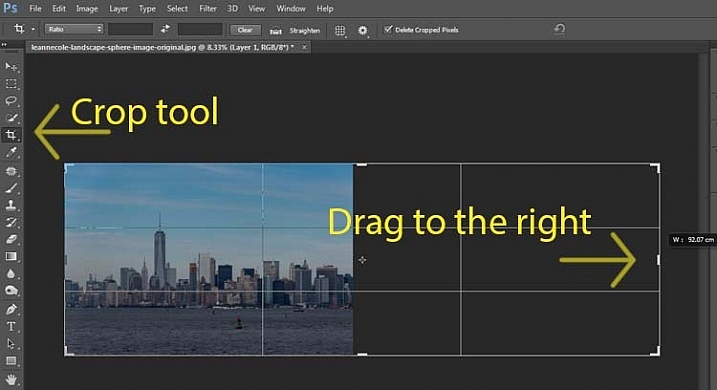
Make sure you are on the Background Layer, and select the crop tool (keyboard shortcut is C). Click on the image to bring up the cropping frame. Grab the right edge marker, and drag it it to the right to enlarge the frame to twice the size of the image (watch the number as you drag, go until you get to 200%). Look at the following image.

17-leannecole-tutoria-photo-sphere

Extending the Image

Next, highlight the duplicated layer in the Layers panel, by clicking on that layer.

4-leannecole-tutoria-photo-sphere

Select the duplicate layer

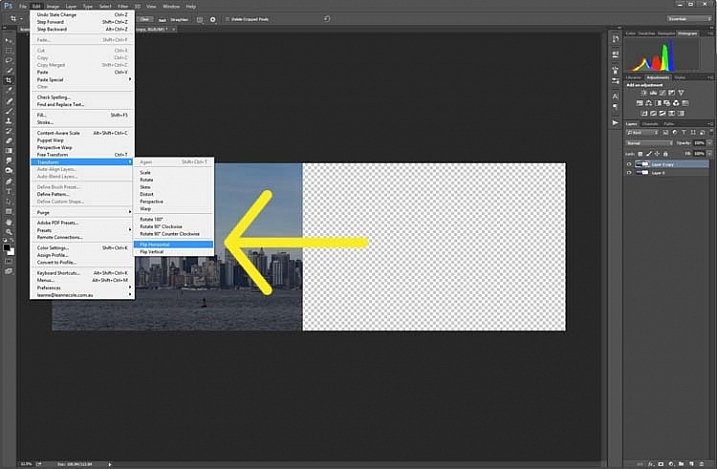
This duplicated layer needs to be flipped horizontally. Go to: Edit > Transform > Flip Horizontal.

5-leannecole-tutoria-photo-sphere

Use Transform to flip the duplicate layer.

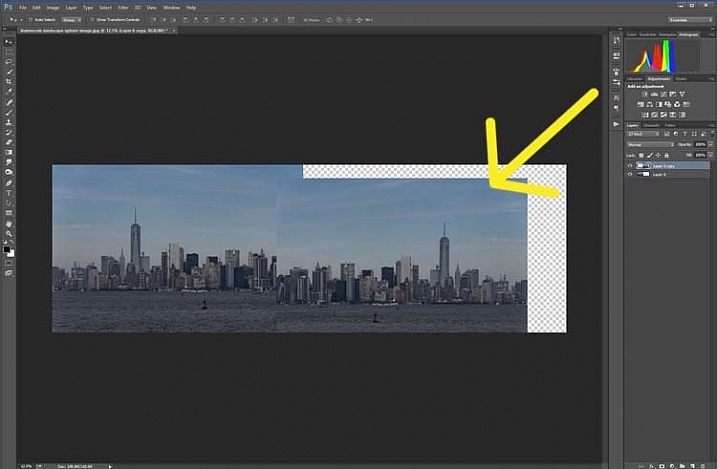
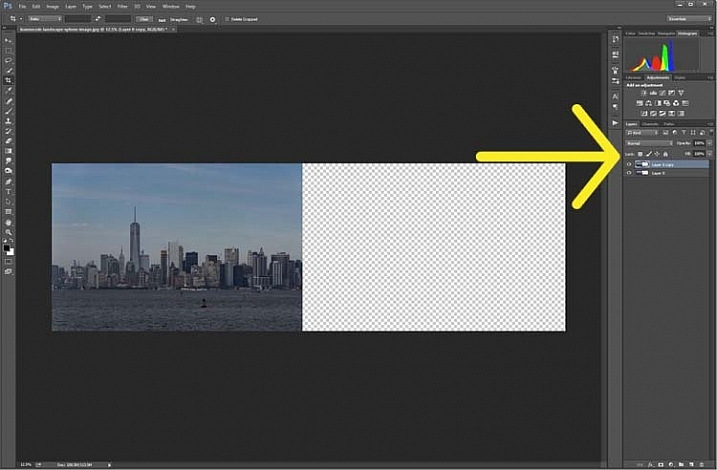
Select the move tool (keyboard shortcut is: V) and move the duplicated image over to the right side until you have the two images touching in the middle.
6-leannecole-tutoria-photo-sphere

Use the move tool to put the duplicated, flipped image, into place.

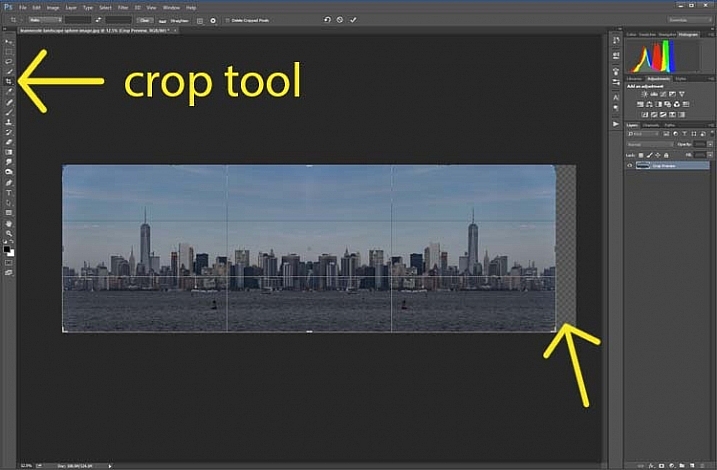
Figure out where you want the images to meet in the middle. Sometimes overlapping them can make it look a little better. You will need to crop the image to remove some of the extra area that you created earlier.

7-leannecole-tutoria-photo-sphere

Crop the image to the edges of the image.

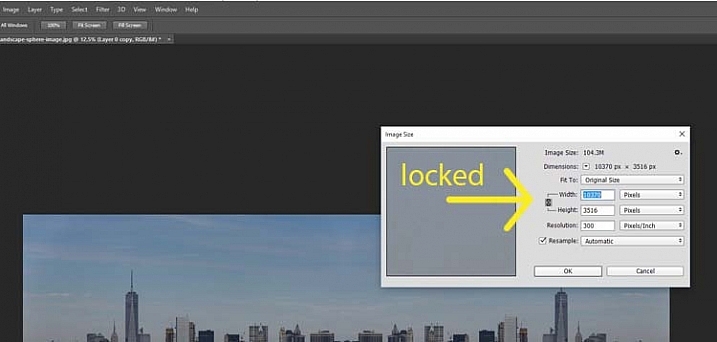
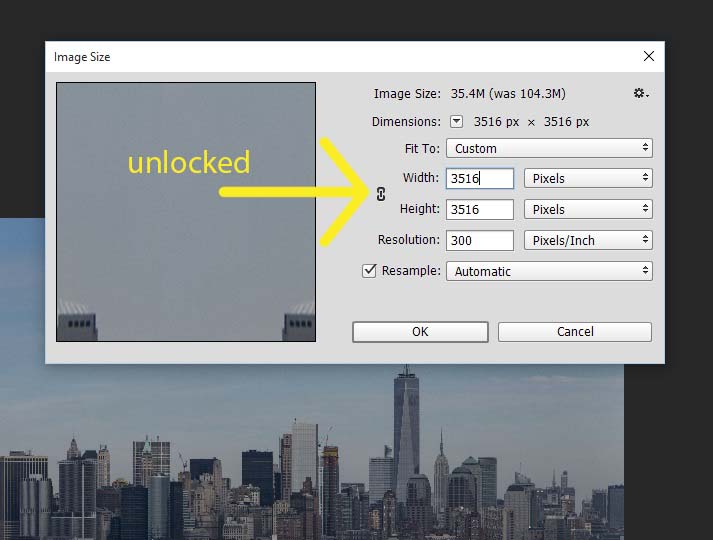
To make the sphere, the image needs to be square, so go to the top menu and click Image > Image Size. When the window pops up, you need to unlock the part that automatically changes the height when you change the width (maintains the proportions). Click the lock (chain) icon to unlock it. Make the width the same as the height, and press okay.

8-leannecole-tutoria-photo-sphere

In the Image Size window the height and width are locked.

9-leannecole-tutoria-photo-sphere

Click on the lock to unlock image to make width the same as height.

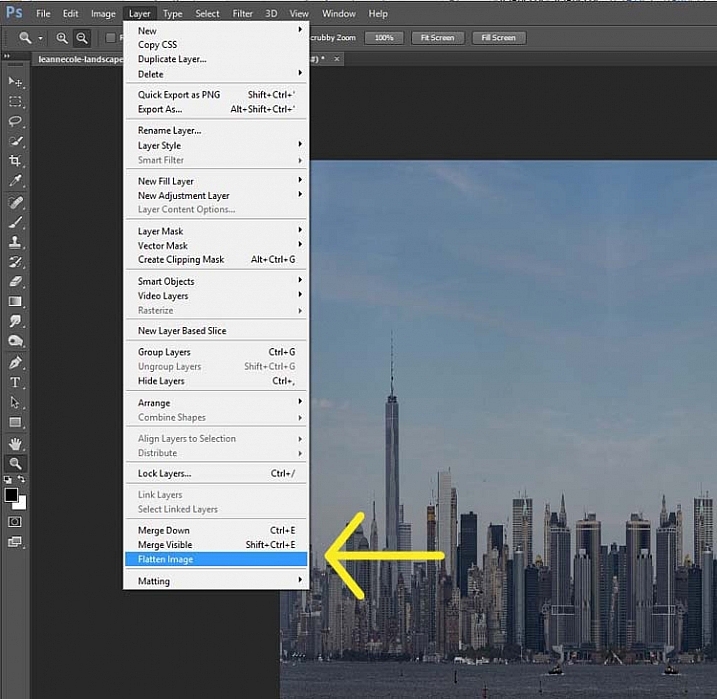
Before you can make the sphere you should combine the layers. Go up to: Layers > Flatten Image. An easier way is to press Shift+Ctrl+E (Shift+Cmd+E on Mac), this will make them one layer (it merges all visible layers).

10-leannecole-tutoria-photo-sphere

Combine the layers.

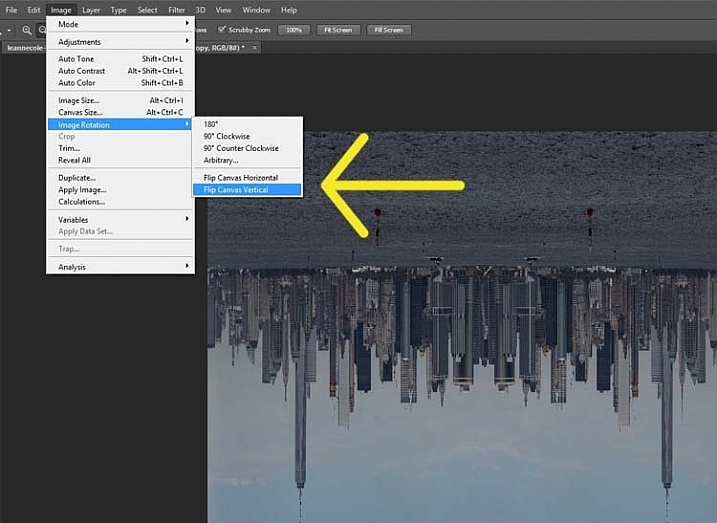
You will also need to flip the image vertically. Go back to the main menu, select Image > Image Rotation > Flip Canvas Vertical.

12-leannecole-tutoria-photo-sphere

Flip image vertically.

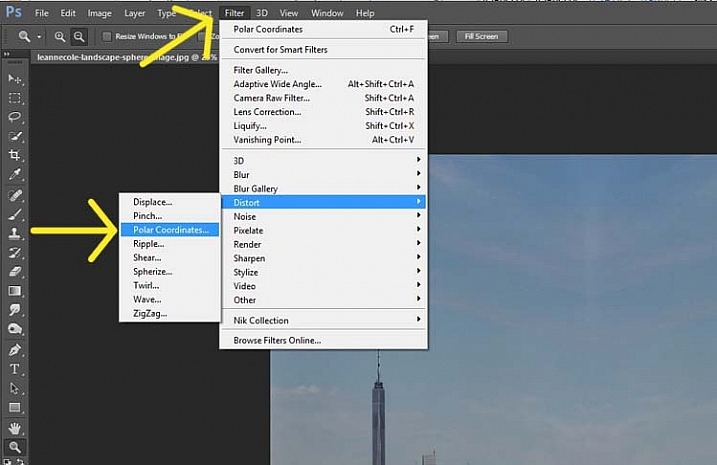
Next, go to Filter >Distort > Polar Coordinates….

11-leannecole-tutoria-photo-sphere

Select Polar Coordinates in the Filter, Distort menu.

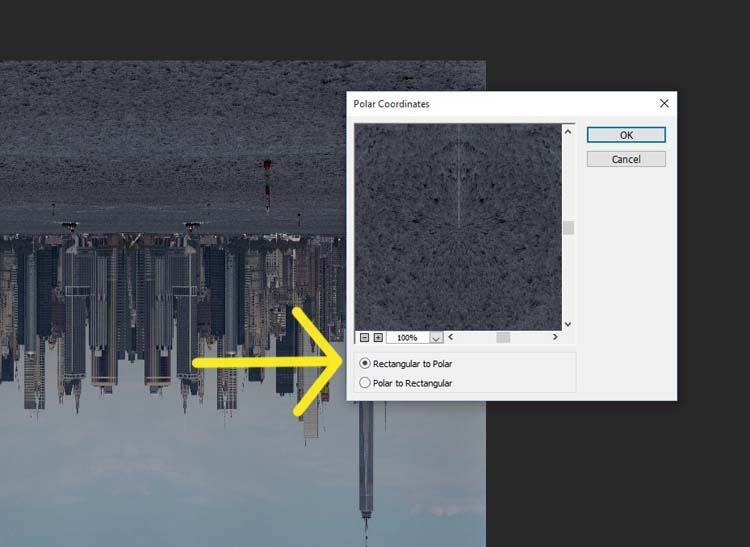
When the popup window appears, select the option: Rectangular to Polar. Press OK.

13-leannecole-tutoria-photo-sphere

Choose rectangular to polar.

Voila, your landscape sphere, which now looks like a little planet.

14-leannecole-tutoria-photo-sphere-dps717px

The world turned around.

But, there is a gap where the images meet. This can easily be fixed with the Spot Healing Brush Tool. It is in the toolbox on the left side of the windows panel. Run the tool along where the images don’t quite connect.

LeanneCole-landscape-sphere-done-0033-dps717px

Landscape turned into a sphere or little planet.

There you have your landscape sphere, or little planet image.

You may want to crop it a little to make the planet bigger in the image, and to remove any things that have happened in the corners. You may also want to rotate it to get the view you want.

You can do this with other types of images as well. You could try it with a panorama, then you don’t have to do the part where you copy the layer. However, you need to be aware that it may not come out as you expect, it can come out distorted.

If you don’t flip the image vertically before applying the filter it will do the image in reverse. The image that I used for this article would then have the river on the outside, and the sky in the center (see image below).

LeanneCole-landscape-sphere-done-0034-dps717px

Result done the other way.

As you can see there are no real uses for this except as a fun project. Try it and see what you can come up with, and please share your images in the comments below.

googletag.cmd.push(function() {
tablet_slots.push( googletag.defineSlot( “/1005424/_dPSv4_tab-all-article-bottom_(300×250)”, [300, 250], “pb-ad-78623” ).addService( googletag.pubads() ) ); } );

googletag.cmd.push(function() {
mobile_slots.push( googletag.defineSlot( “/1005424/_dPSv4_mob-all-article-bottom_(300×250)”, [300, 250], “pb-ad-78158” ).addService( googletag.pubads() ) ); } );

The post How to Make a Little Planet Using Photoshop by Leanne Cole appeared first on Digital Photography School.


Digital Photography School

 
Comments Off on How to Make a Little Planet Using Photoshop

Posted in Photography