RSS
 

Posts Tagged ‘places’

6 Places to Use ND Filters for Long Exposure Photography

05 Apr

The post 6 Places to Use ND Filters for Long Exposure Photography appeared first on Digital Photography School. It was authored by Matt Murray.

6 places to use ND filters for long exposure photography

A neutral density (ND) filter is one of the most versatile accessories you can have in your camera bag. They may be small, but ND filters open up a range of creative options for photographers.

If you need some inspiration on where to use your neutral density filter, keep reading. In this article, I’ll share with you some of my favorite places to use ND filters for long exposure photography.

What is an ND filter, and why would I want to use one?

A neutral density or ND filter is a piece of glass that sits in front of your lens and reduces the amount of light that reaches the sensor.

If you’ve never used an ND filter before, you might be wondering why you’d want to do this; let me explain.

Many long exposure photography beginners shoot at night. Here, a shutter speed of a few seconds or more is necessary for an accurate exposure of the scene, and any movement captured in the image is magically transformed into a thing of beauty. If your camera is steady on a tripod, buildings remain in sharp focus, but the movement of car headlights or rushing water is captured as interesting streaks in the image:

harbor with bridge and city
A neutral density filter can be a photographer’s best friend.

Capturing this kind of effect can only be done after dark, right?

Wrong.

With an ND filter, you can take stunning long exposures during the day.

You see, if you don’t use an ND filter, a long exposure in bright daylight conditions would result in an overexposed image. But with an ND filter reducing the amount of light that reaches the sensor, you need to use a much slower shutter speed to photograph the scene. This allows you to capture movement.

There are so many amazing places where you can use an ND filter to take stunning long exposure photos. I’ve listed some of my favorites below, starting with:

1. Waterfalls

Waterfalls are the place many photographers try out their ND filters for the first time.

They’re certainly a fantastic location for you to start; flowing water is transformed into a silky-soft cascade, which gives images a real wow factor.

Just watch out for mist and water spray and make sure it doesn’t cover your filter and lens!

waterfall long exposure
Waterfalls are a popular place to try out an ND filter.
Captured with my Fujifilm 16mm f/1.4 lens at Springbrook National Park in Queensland.

The intensity of a waterfall can depend on recent rainfall. But the good news is that, no matter how large or small the waterfall is, it’ll look amazing when shot with an ND filter.

2. Rivers and harbors

Rivers and harbors are fantastic places to capture movement and lights along with the flow of water.

During daylight hours, it’s possible to capture the movement of boats along the water. And as the sun goes down and the city lights come on, ferries and boats create colorful light trails that can bring an image to life.

I love this image of a ferry on Sydney Harbour:

harbor long exposure
Rivers and harbors provide an array of long exposure opportunities.

Thanks to my ND filter, I was able to use a shutter speed of around 1s, giving the ferry a nice, colorful blur (while buildings behind it remain in sharp focus).

3. Ocean pools

Saltwater ocean pools dot the Australian coastline, with most of them found in the state of New South Wales. The pools are very popular with locals and tourists alike and can get very busy each morning. But the good thing about these iconic locations is that you have another body of water to photograph alongside the sea.

This image was taken early one morning in Yamba, New South Wales:

ND filters for long exposure photography ocean pool

I framed the pool in the foreground with the sea and the cliffs in the background. As I was taking a series of long exposures with a 10-stop ND filter, a swimmer jumped out of the pool right in front of me, creating a ghostly figure in the foreground of the frame.

The image below was taken at 6 AM (when it was already very bright). I was attracted to the scene by the reflections in the flooded area next to the pool, which contrasted nicely with the pool’s ethereal-looking water and the waves of the ocean on the far left.

ocean pool ND filters for long exposure photography
I love the three different bodies of water in this ocean pool shot.

4. Traffic

Traffic trails are typically one of the first things photographers shoot when they start taking long exposure images. Well after the sun has sunk below the horizon, a shutter speed of between 5 and 15 seconds is often needed to create a properly exposed shot, resulting in a colorful blur of traffic trails.

But if you have an ND filter, there’s no need to wait until after dark.

This is a composite of images I took with my ND2 filter at a subway station in Taipei, Taiwan:

city long exposure
A composite image of dusk in Taipei, Taiwan.

I knew I needed an exposure of a few seconds to make the most of the traffic and the subway train in the image. But it was too bright, and my exposure times were barely a second. Adding an ND filter allowed me to capture this scene as I had envisioned, and the final file is a composite of some of those long-exposure images.

5. Funfairs

Funfairs and carnivals are fantastic places for photography. There are so many opportunities: people, rides, food, and animals, to name just a few.

And when the sun goes down, don’t head home – set up your tripod for some long exposure images.

That’s exactly what I did for this image of a sideshow alley at Brisbane’s Royal Queensland show four years ago. The photo has been shared on Instagram every year since – sometimes with my permission, sometimes without. With an ND2 filter, I was able to take exposures that were twice as long as usual.

fair in Brisbane long exposure
My images of this funfair in Brisbane have been very popular on Instagram.

6. Unique natural attractions

Okay, so I’m cheating a little with this last image by combining two places I’ve already mentioned: a waterfall and the sea.

This stunning location (below) is the village of Gásadalur in the Faroe Islands. Unfortunately, there are not many places in the world where you can see such an incredible sight, though there are probably many unique natural locations near where you live.

waterfall heading into ocean ND filters for long exposure photography
Perhaps the most unique waterfall in the world, Gásadalur, Faroe Islands.

Gásadalur was number one on my list of places to photograph when I visited the Faroe Islands in 2017. Blessed with sunny weather on my first day, I headed to the coast just outside the village to take this shot. I wasn’t disappointed.

6 places to use ND filters: final thoughts

Neutral density filters are quite possibly the handiest accessory photographers can keep in their camera bags. They have many uses, but the most common is to take photos with a slow shutter speed.

This makes ND filters a must-have for long exposure photography during daylight hours; you can use them to blur subjects that would otherwise be frozen.

It’s always fun to get out your tripod and ND filter and experiment!

Now over to you:

What are your favorite places to use ND filters for long exposure photography? Share your thoughts (and long exposure images) in the comments below!

The post 6 Places to Use ND Filters for Long Exposure Photography appeared first on Digital Photography School. It was authored by Matt Murray.


Digital Photography School

 
Comments Off on 6 Places to Use ND Filters for Long Exposure Photography

Posted in Photography


Finding Photography Inspiration in Ordinary Places

30 Mar

The post Finding Photography Inspiration in Ordinary Places appeared first on Digital Photography School. It was authored by Simon Ringsmuth.

Finding Photography Inspiration in Ordinary Places Featured image

Photography is filled with highs and lows. One week you might find yourself overflowing with ideas and see photographic opportunities all around you. The next week, you’re stuck in a vast wasteland where nothing seems to be worthy of your camera. Finding photography inspiration isn’t something that requires exotic travel destinations or even fancy camera gear. Often you can uncover extraordinary picture opportunities in the most ordinary of places.

finding photography inspiration
Nikon D7100, 50mm, f/1.8, 1/2000 second, ISO 400. This mockingbird was sitting in a bush near my office.

Inspiration is a tricky thing. While it can come when you least expect it, I have found that you often have to work for it.

If you’re expecting a brilliant photo opportunity to show up on your doorstep, it probably won’t happen. But if you purposely go out in search of photo opportunities, inspiration is usually close behind.

A quote widely attributed to Thomas Edison says that “Genius is 1 percent inspiration and 99 percent perspiration.

The same applies to photography.

Go on a photo walk. Slowly.

This might sound a bit cliché, but the hustle and hurry of everyday life can be a hindrance to photography. If you’re so busy going to and from work, school, the store, and back, it probably seems like you have no time to take pictures.

When a spare fifteen minutes does come your way, the idea of getting out your camera to take pictures can seem more exhausting than inspiring.

finding photography inspiration
Nikon D750, 50mm, f/8, 1/125 second, ISO 900. Saw this snail on the sidewalk while going from my car to my office. I used a +4 close-up filter which I got online in a four-pack for $ 30.

A local photo walk can be just the ticket to newfound photography ideas and inspiration. It doesn’t have to be expensive, fancy, or exotic. Instead of spending lots of time and money on a bipedal picture-taking excursion, try just going out your front door and walking down the block. But here’s the trick: go slowly.

The pace of my photo walks has changed over time from a steady gait to almost a crawl. Not literally of course, but you have to tell yourself that your goal isn’t to cover a lot of ground or get your steps in for the day. It’s to look for picture opportunities, often where you never thought you would find them.

Everyday locations like the mailbox, the gas station, the park down the road, or even your own kitchen become fertile ground for inspiration to take root if you keep your eyes open and go slowly.

finding photography inspiration
Nikon D7100, f/2.8, 200mm, 1/1500 second, ISO 100. This was literally in my own back yard.

Your daily locations might not seem exotic to you because you see these things every day. A visitor would see familiar objects with fresh eyes, and the trick to taking this approach is to try to emulate that perspective. Just because you see everyday objects as ordinary and unworthy of photographs, doesn’t mean they can’t lead to flashes of inspiration.

The next time you feel stuck in a photographic rut, take a short, slow walk around a familiar setting and try to see it with a fresh set of eyes. You might be surprised at how things can transform from familiar to phenomenal.

And, even everyday objects can be used for finding photography inspiration.

finding photography inspiration
Fuji X100f, 23mm, f/3.6, 1/30 second, ISO 400. This is just a washing machine still spinning after I opened the lid. I was inspired when I saw it whirling, and I really like the photo I was able to get.

Photograph like you just don’t care

One thing that prevents a lot of people from taking more photos is the thought that they might look silly doing it. I’m as guilty of this as anyone, and most times when I am out with my camera, I feel completely awkward and self-conscious. I feel like the whole world is staring at me, pointing and laughing at the weirdo with a camera taking pictures of sticks and leaves and flowers!

In truth, that is almost certainly not the case.

In all likelihood, most people don’t really care about someone minding his or her own business who just happens to be carrying a camera.

When was the last time you stopped and stared indignantly at a passer-by harmlessly taking pictures? If those types of people don’t bother you, then you probably aren’t bothering anyone when you’re the photographer.

finding photography inspiration
Fuji X100f, 23mm, f/16, 1/30 second, ISO 200. This cyclist probably didn’t even notice I was sitting next to the sidewalk.

This kind of advice is easier said than done, but if finding photography inspiration is your goal, then you have to stop worrying about what people think.

Some of my favorite pictures I’ve ever taken were in ordinary places like parks or downtown areas filled with people. And, not once has anyone ever told me I was bothering them.

Make sure you’re not being rude, obnoxious, or intrusive when taking pictures. If you’re just being a nice person and not bothering anyone, you can be almost entirely certain that no one will think twice about your presence. If they do, they probably think you’re some kind of fancy artist who clearly knows a lot about photography!

finding photography inspiration
Nikon D200, 50mm, f/1.8, 1/50 second, ISO 400. I felt incredibly awkward and self-conscious taking pictures in a library. I wasn’t harming anyone, and I ended up with a few photos I really liked. It turned into a fun and inspirational experience!

Don’t try to take good photos

This took me a long time to learn, but it’s a lesson that has repeatedly made a big difference for me.

Years ago when I started getting more involved with photography, I thought only great photos were worth taking. I constantly passed up photo opportunities because I didn’t think the results would be worth the effort, and wouldn’t lead to any sort of photography inspiration.

What I learned was that inspiration takes the exact opposite approach! The images I thought were boring, mundane, or just flat-out bad taught me how to improve my photography by leaps and bounds. By examining my bad photos, I was able to understand why they were bad. They helped me learn how to take good photos as a result.

finding photography inspiration
Nikon D200, 50mm, f/2.8, 1/1000 second, ISO 200. This is one of the most boring photos I can recall taking. It’s just not very good. But it taught me a lot about what does make a photo good.

There’s an old saying, Don’t let a perfect plan be the enemy of a good plan. It applies in a variety of situations, particularly photography.

If you’re waiting for inspiration to strike because you are seeking the perfect image, you might be waiting a very very long time. Try the opposite approach instead: take lots of pictures that aren’t great, and see what they can teach you along the way.

Another thing to consider is the sheer enjoyment of the art.

Stop thinking of your images in terms of objective quantification. Learn to value process over product! It’s the repeated practice of process that leads to superior products.

Take pictures because you enjoy it, not because you think the end result is good or bad. Enjoy the journey, take pictures just because you like it, and let that be your source of inspiration.

finding photography inspiration
Nikon D200, 50mm, f/1.8, 1/125 second, ISO 200. I shot this photo years ago just for fun, and I still think about it when I go up and down stairs in tall buildings.

Take a social media hiatus

While social media sites like Instagram can be a boon to photographers, they can also be a curse.

Finding photography inspiration online can seem like a no-brainer: just follow some accounts with brilliant photos and you’ll surely get ideas for your own!

In reality, what often ends up happening is we compare our own photos to others and conclude that we just don’t measure up. All the other pictures look so amazing, so detailed, so colorful, and so full of life! Yours, by contrast, seem dull and lifeless. Worse, your pictures (even ones that you thought were awesome) only got a handful of likes, hearts, or thumbs-up. Meanwhile, someone else’s shot of breakfast cereal got a thousand. It’s just not fair!

finding photography inspiration
Fuji X100f, 23mm, f/16, 30 seconds, ISO 200. I worked hard to get this shot, and it only got 21 likes on Instagram. If I measured my value as a photographer by social media standards, no way would I ever keep going.

Social media can be inspiring, but just as often it can be downright demoralizing.

The solution?

Get rid of social media!

Don’t delete all your accounts, but turn off notifications for photo-sharing sites and move those apps to the neglected depths of your phone screen. Log off social media sites on your computer, and stop measuring your worth by likes and upvotes.

This has consistently been one of the most effective ways of finding photography inspiration for me. Temporarily shutting out social media, removes any temptation to take photos for online accolades and attention. I start to take pictures that are interesting, challenging, or fun. Then I soon find inspiration flooding back.

finding photography inspiration
Nikon D200, 50mm, f/1.8, 1/2500 second, ISO 200. I shot this long before I was sharing photos on social media. It’s nice to return to those halcyon days sometimes.

Conclusion

Finding photography inspiration isn’t always easy, but it can be simpler than you think. It doesn’t have to involve a lot of time, money, travel, or fancy camera gear either.

Inspiration can come in ordinary ways from ordinary places, and lead to some outstanding results.

What about you? What are your favorite ways to get inspired as a photographer? Share your thoughts in the comments below.

The post Finding Photography Inspiration in Ordinary Places appeared first on Digital Photography School. It was authored by Simon Ringsmuth.


Digital Photography School

 
Comments Off on Finding Photography Inspiration in Ordinary Places

Posted in Photography


Shooting Greenland in Winter Part 3: Familiar Places

23 Jun

In the previous articles in this series, I wrote about reaching Uummannaq in problematic conditions and about the better days that followed. For this final article, I’d like to tell you about my experience shooting Ilulissat and Disko Bay in winter.

I’m no stranger to Disko Bay. I’ve been traveling and guiding there for several years now, so I wasn’t as excited about shooting there compared to Uummannaq. My visit was quite productive however, and sometimes surprising. Weather was problematic some of the time, with very heavy snow making it hard to shoot anything more than a few meters away. On the few days I could shoot, I had a very good time and produced some images I’m happy with.

Winter is a very good time to shoot travel scenes in Ilulissat. I’m a nature photographer but had commitments to sponsors, and thus had to try my skill at shooting non-nature scenes that they had asked for. This included shots of town and shots of dog sledding.

Ilulissat harbor in winter. The boats are resting on sea ice.

The dog sledding was done on a snowy day, which added a lot to the experience and also allowed me to easily isolate my subjects. To shoot the musher and dogs from above while moving I had to kneel as high as I could and shoot blindly, but it wasn’t so hard after a few tries. I did almost fall a few times.

$ (document).ready(function() { SampleGalleryV2({“containerId”:”embeddedSampleGallery_8493828700″,”galleryId”:”8493828700″,”isEmbeddedWidget”:true,”selectedImageIndex”:0,”isMobile”:false}) });

When it stopped snowing, my guide Jakob and I took a fast snowmobile and headed to Kangia Fjord. The drive was going great, and I was enjoying the complete white cover created by the heavy snow the previous day. And then… we got stuck in the snow. It appeared that it had snowed so heavily, the powder was over a meter deep and had no time to harden. After 2 hours trying to dig us out, we had to call for help. The upside was that we got stuck right at a frozen side-fjord which was packed full of beautiful icebergs embedded in sea ice.

I took advantage of the situation and of the white conditions to take some surreal images of the icebergs surrounded by turquoise sea-slush, which had been exposed when the currents had slightly moved the icebergs.

The thing I was most looking forward to was an iceberg sail. I had done it many times in summer, but in winter the bay is covered by a layer of slush, which might have prevented the sail from happening, but otherwise creates opportunity for very interesting photography.

I attended two sails. The first was a normal tourist sail, which I took together with many other visitors. The sail was good, but the boat stayed near the fjord. This is problematic since the really interesting and intricately-shaped icebergs are ones which had time to melt into those shapes, which means they are also ones that are farther in the bay (usually to the north). The tourist sail missed those entirely.

Finally, right before finishing the visit, I managed to get a boat for a few hours just for myself. I tried my best to use it wisely, since costs were high and time was short. I sailed north of Ilulissat, and managed to find some beautiful icebergs surrounded by frozen sea ice, which added a lot to the images. The sea ice also gave the open water a calm and reflective appearance, a relative rarity in Disko Bay.

I hope you’ve enjoyed this series and that it encouraged you to think of visiting Greenland in winter, and trying what it has to offer.


Erez Marom is a professional nature photographer, photography guide and traveler based in Israel. You can follow Erez’s work on Instagram and Facebook, and subscribe to his mailing list for updates.

If you’d like to experience and shoot some of the most fascinating landscapes on earth with Erez as your guide, take a look at his unique photography workshops in Southern Iceland, Northern Iceland, The Lofoten Islands, Patagonia, Greenland in summer, Greenland in winter, Namibia the Faroe Islands and Ethiopia.

Erez offers video tutorials discussing his images and explaining how he achieved them.

More in this Series:

  • Part 1: Uummannaq Whiteout
  • Part 2: The Better Part of Winter

Selected Articles by Erez Marom:

  • Parallelism in Landscape Photography
  • Winds of Change: Shooting changing landscapes
  • Behind the Shot: Dark Matter
  • On the Importance of Naming Images
  • On Causality in Landscape Photography
  • Behind the Shot: Lost in Space
  • The Art of the Unforeground
  • Whatever it Doesn’t Take

Articles: Digital Photography Review (dpreview.com)

 
Comments Off on Shooting Greenland in Winter Part 3: Familiar Places

Posted in Uncategorized


7 Travel Photography Hacks to Get You Going Places

17 May

One of the joys of travel is capturing all the new and exciting destination sites from your own perspective. Sometimes you make conscious decisions of what to leave behind and other times you realize you forgot to bring something, only after you got there. Whatever the case, a few travel photography hacks can help you save the day!

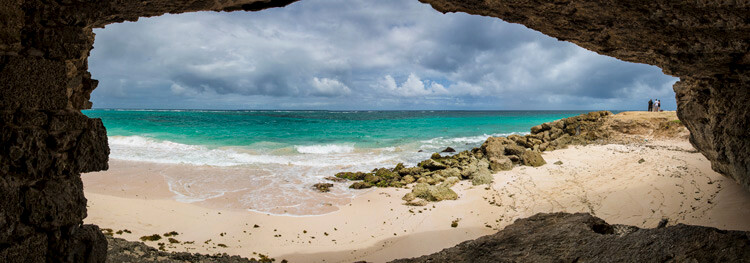
view from a cave of the ocean - travel photography hacks

1. Pack Light

Many times, the biggest challenge in travel photography is whether or not you will be able to capture the essence of the place with the gear you packed. If you are going on vacation, you certainly do not want to take every lens you own. Other than adding weight, there is a chance that much of it will not be used.

 travel photography hacks - lagoon with trees and a boat

This is a good reason to research your destination is to help determine what images you want to capture. Are you going to shoot more landscape scenery or trying to capture the people living there? Your decision will affect what gear you take with you.

blue sky and beach -  travel photography hacks

Additionally, a great way to determine what to take is by reviewing your last trip. Look at what you captured then and decide if it is similar to what you hope to capture now. Many times you will find that most of your photos were taken with the same lens. You can use Lightroom’s filtering system to gather that intel.

For example, if you took both a wide and long zoom lens, but took most shots with the wide lens, then you can safely leave your long zoom behind.

2. Pack Smart

When you decide which lenses you need for your trip, pack well to protect them. It helps to remember that lenses are made mostly of glass, even when built with highly durable exterior bodies. An easy packing hack to avoid damaging your lenses is putting them inside thick socks. This cushions your lens during travel, whether inside your luggage (carry-on only, never check your valuable camera gear) or camera bag.

photo from an airplane window -  travel photography hacks

Optional: further secure your lenses by putting them (sock-wrapped) into shoes/boots.

3. Make a Shot List

You do not have to be a professional photographer to make a shot list. As you research your destination, there are no doubt certain things that you want to see and experience there. As you plan your itinerary, you can make a note of what you want to capture in that location.

b/w architecture image -  travel photography hacks

Take a note of your different points of interest and how you plan to shoot them. Sometimes this simple action can keep you from being overwhelmed when you get there. This will also help you determine what gear to pack (mentioned above).

4. No Neutral Density Filter, No Problem

If you did not pack neutral density filters for your trip, there is no need to kick yourself if an opportunity for a long exposure presents itself. It does take a little familiarity and processing in Photoshop, though. Compose your image and take between 15-20 shots with that composition.

beach shot -  travel photography hacks

15 shots taken of the same scene in short intervals.

You need to shoot in burst mode or ensure that the intervals between your shots are as small as possible. Download your images and load them into Photoshop as layers.

Photoshop layers -  travel photography hacks

15 shots loaded into Photoshop Layers.

Select Auto-Align Layers from the Edit Menu and Auto. Click OK when done. Next, convert your layers into Smart Objects. You do this by selecting the Layer menu, Smart Object and Convert to Smart Object. This step may take a few minutes to process.

When that is finished, go back to your Layer menu and Smart Objects. In Stack Mode, choose Mean (or Median also works well). This process also takes a few minutes to run.

15 images stacked in Photoshop - travel photography hacks

The result, silky smooth water as if it had been shot with a neutral density filter and really long exposure.

Bonus Tip: This method can also help you remove people from your photos.

5. Tripod or Not?

A tripod is that piece of gear that you benefit tremendously from, but when traveling you may be willing to concede. Again it comes down to when and what you are shooting. If you plan on capturing nightscapes or moving subjects, a tripod is a necessity. A good compromise is a tripod that converts to a monopod.

shot of leading lines of a theatre seating area -  travel photography hacks
Conversely you can leave the tripod at home. Depending on where you are going, a tripod can become a nuisance to lug around or may not even be allowed. This is when you have to get creative and make a supporting object your tripod. Tables, walls, rocks or anything stationary which supports your camera will stand-in for a tripod.

b/w statue -  travel photography hacks

6. Batch It!

Chances are that you will shoot a number of images in one location with the same lighting and conditions. A quick way to edit a large number of photos with your style is to batch process them. Batch processing is applying the same edit across multiple images. In addition to Photoshop and Lightroom, there is other photo editing software available that can help you achieve this.

7. Let’s Reflect

There is no need to walk with a bulky or expensive reflector on your trip. Buy a piece of foam board to bounce light into your shadows. This cheap trick can save you from packing more and you only need apply it to some situations.

city at night - travel photography hacks

Conclusion

With travel photography, most times you want to walk around with less gear (for both your comfort and safety). Once you have done your research and know what you want to achieve, there is no need to go with equipment that you will not use. Sometimes a few travel photography hacks can save you in a pinch.

Please share some of your favorites with us in the comments area below.

The post 7 Travel Photography Hacks to Get You Going Places appeared first on Digital Photography School.


Digital Photography School

 
Comments Off on 7 Travel Photography Hacks to Get You Going Places

Posted in Photography


The Broccoli Tree and the dangers of sharing photos of the places you love online

13 Mar

Landscape, wildlife, and adventure photographers (among others) will often keep their most treasured locations and subjects secret. And while this might seem rude or selfish or mean, the tale of The Broccoli Tree in Sweden—told beautifully in a recent vlogbrothers video by best-selling author John Green—explains exactly why this practice might also be necessary.

The Broccoli Tree, for those who aren’t familiar, is (or was) a tree in Huskvarna, Sweden that somehow became social media famous.

Photographing this tree became a passion project of photographer Patrik Svedberg, and over the course of 4+ years, the tree gained quite a following on Instagram. In fact, it kind of became Insta-famous so-to-speak, accruing over 31,000 followers to date.

But Insta-fame comes with consequences in this day and age. No matter how beautiful or inspiring, no matter how much joy something brings to the general populace, there will always be those people who get some deluded self-satisfaction out of destroying it.

This is what happened to The Broccoli Tree.

One day in September of 2017, Svedberg went to photograph his favorite tree, only to find that someone had sawed one of the tree’s branches almost all the way through. It wasn’t long before the whole tree had to be cut down.

Ever since the tree got viral a couple of years ago the number one joke has been ”what if someone cuts it down..?” Or ”What´s next, maybe you should cut it down and take photos haha.” I´ve never had good answer to that question, or joke. It´s not like we´re planted together, we live different lives the tree and I. This question was so common so I guess it was just a matter of time before some guys mentally retarded enough would crawl up from under a stone and make it happen as a part of a bet or something. Clearly it´s a obsession in lots of minds out there for some inscrutable reason. One of the trees branches has now (a couple of days ago..?) been sawn in almost all the way through and it´s just a matter of time before it´ll fall off. I won´t be around to document it, others will for sure so I guess you lunatics who did it can enjoy every moment. You can win a bet. Get cheered at. Even get a bit infamous. Congrats. What an accomplishment. I guess you were excited like little children while you did it, must have taken quite a while. For sure you are excited now, aspecially when the word is out. Now is your moment. High fives, maybe some back slapping. Suck it in. Time will erode those memories, excitement will turn into second thoughts. But the saddest thing of all, however You absolutely cannot un-saw a tree. —– I leave the judgement to others and have to move on to work, you can talk to each other about this below of course, but I feel for now this is what I have to say in this matter. Cheer up, there will be a tomorrow after this. // Patrik

A post shared by A tree on Instagram (@thebroccolitree) on

You can hear the entire story in the video at the top of this post, although you might be surprised to find that Green’s takeaway isn’t that people should keep these locations a secret, or not share photos of them at all. In fact, he comes to a totally different, if somewhat melancholy, conclusion:

The truth is, if we hoard and hide what we love, we can still lose it. Only then, we’re alone in the loss. You can’t un-saw a tree, but you can’t un-see one either. The Broccoli Tree is gone… but its beauty survives.

Articles: Digital Photography Review (dpreview.com)

 
Comments Off on The Broccoli Tree and the dangers of sharing photos of the places you love online

Posted in Uncategorized


How to Take Interesting Photos in Uninteresting Places

07 Nov

Having spent the past several months traveling extensively to some pretty exciting places, coming back home to small-town suburbia was a rude awakening for me to say the least. I was so used to having interesting subjects – be it people, landscapes, flora and fauna – at my doorstep everyday. I didn’t have to think much about what I wanted to photograph, I could just step outside and find something new and interesting every time.

But once I got home and settled into my routine, I started to experience PW (photographer withdrawal). There really was nothing for me to photograph, right? How many times can I photograph the same bush, the same tree, the same pond and the same ducks?

You see being smack-dab in the middle of American suburbia, this is the extent of my daily views. But then I realized that there are some simple ways to make an uninteresting location a bit more interesting! Here are six tips to help you do that.

#1 Change the way you look at things

Sometimes it’s just about changing perspective. Literally. Let’s say you have pine trees in your neighborhood. Nothing fancy – simple pine trees that are quite abundant in most areas.

Have you ever tried to look at one through a macro lens? Maybe you can capture individual blades of pine needles. How does the tree look when it snows? Can you isolate the snow on the pine needles? How do pine cones look under a macro lens? All of these things provide a potential for interesting photographs. Just change your perspective a complete 360 from what you normally do!

Get in close

Try looking at the same boring thing with a new or different lens. A macro lens or even a close-up filter is a nice way to get up close and personal to an otherwise boring subject.

Pine Tree in ice rain winter - How to Take Interesting Photos in Uninteresting Places

The image on the left is the neighborhood pond in winter. Nothing exciting ever happens there. But this past winter we had an ice storm and the pine tree was covered in ice. It made for some interesting compositions and also very cool macro shots!

Try wide-angle

The opposite of close is to try something that encompasses the whole scene. Using a wide-angle or ultra-wide angle lens to change your perspective of the scene in front of you.

Pine Tree in ice - How to Take Interesting Photos in Uninteresting Places

Here I used a wider angle to try and encompass the whole extent of ice on the tree. I quite like how the ice is hanging off the branches. I almost got frostbite from being outside in this cold but quite worth the shot, don’t you think?

Get the details/textures

Textures are a wonderful way to look at the details in and around an object. The play of color, age and grain make for great abstract imagery.

How to Take Interesting Photos in Uninteresting Places

#2 Experiment with different light

Light is one of the most important elements in photography. Sometimes boring doesn’t have anything to do with the location, but with the quality of the light at the time that you are shooting. If you feel that what you have around you is really uninteresting, try photographing the scene or subject in lighting that is different from what you usually do.

Get your tripod out and try photographing at night with a flash or a long exposure (slow shutter speed) combined with some light painting. Try early morning or golden hour light when the light is softer and the shadows are longer. Or go completely against the norm and try photographing in the harsh midday sun and embrace the play of light and shadows.

How to Take Interesting Photos in Uninteresting Places

Sometimes when the light is just right, I don’t have a model handy, so my dog is the one who poses for me. I just loved the way he was sitting in the light basking in the warmth of the setting sun.

Portraits in shadows - How to Take Interesting Photos in Uninteresting Places

This was a little bit more staged but she just happened to be sitting there when the setting sun entered the house from the left. I positioned her a bit so she was half in the light and half in the shade. No props needed at all – just a willing model and looking for the right or different kind of light.

photos of the setting sun - How to Take Interesting Photos in Uninteresting Places

Sunsets and sunrises are perfect to spruce up your boring location. You just need get outside and photograph that great light!

#3 Simple special effects

This ties into the point above. Using simple tools like a tripod, off-camera flash, gels, etc., can add an element of interest and change to your otherwise boring images.

Some other ideas to try are motion-blur with a really low shutter speed and a fast-moving subject, intentionally missing focus to create an artistic image, panning while tracking a moving object, double exposures, free-lensing, etc.

double exposure photography - How to Take Interesting Photos in Uninteresting Places

I absolutely love double exposures. When all else fails and there is nothing of interest to photograph, I try to combine nature and portraits to create some cool double exposure effect. More often than not, my pet is the only willing and able model!!

How to Take Interesting Photos in Uninteresting Places

#4 Break photography composition rules

We all know the basic rules of compositions such as; the rule of thirds, filling the frame, cropping effectively without cutting body parts, using leading lines and shapes, symmetry and patterns, pay attention to the background, etc. But sometimes when you are not quite feeling motivated and inspired or when you are dealing with an uninteresting background, try breaking some or all these rules to add some interest and drama to your images.

Dramatic Light Food Photos - How to Take Interesting Photos in Uninteresting Places

Most food photographs are always in perfect light on perfect white backdrops. I decided to break some rules and photograph my morning smoothie in the hard afternoon light that was streaming through my kitchen window to get some shadows in the frame and also give a more imperfect look to the blackberries.

How to Take Interesting Photos in Uninteresting Places

I loved the way my neighbor’s tree burst into flowers over the spring. So after much coercion and bribing, my daughter agreed to pose – but she refused to look at the camera. So I covered her eyes, cropped off her arms and create a different kind of portrait with the florals that I loved.

#5 Try some street photography

Street photography is an interesting genre of photography because it involves people and people watching is always fun and entertaining, no matter where you are.

#6 Experiment in post-processing

If none of these ideas inspire you, try to create something fun and interesting in post-processing. My post-processing software of choice is Lightroom. Perhaps you want to try HDR processing for your images, or a black and white theme. You can also use selective blur, gradient filters, and other tools to try sprucing up your images to create something interesting and fun.

How to Take Interesting Photos in Uninteresting Places

If you have been following my work for a while, you know that my style is very light, bright and airy. My images are clean and give a sense of freshness even in my processing. The image on the left is more of my normal style. But for this article and also to show that experimenting with post-processing is another way to overcome boredom, I edited all the images in a more dark and moody style throughout.

How to Take Interesting Photos in Uninteresting Places

Left is how I would normally process this image, and the image on the right is just experimenting with darker, moodier tones. I quite like them both and spend hours playing around with editing styles for this article.

Your turn

I hope these ideas get your creative juices flowing in terms of things to try and experiment with in your photography when you feel your location is uninteresting and boring. Remember, memorable images don’t always happen in cool, popular places – they happen when something simple or mundane tells an interesting story.

The post How to Take Interesting Photos in Uninteresting Places by Karthika Gupta appeared first on Digital Photography School.


Digital Photography School

 
Comments Off on How to Take Interesting Photos in Uninteresting Places

Posted in Photography


5 Tips for Taking and Caring for Your Camera Equipment in Far Away Places

06 Oct

If the thought of being away from all your camera equipment stresses you out, this article is exactly what you need! I can safely say that being on the road for over two and a half months teaches you a thing or two about need and necessity versus wants.

Road trip

For the longest time, one of my dreams has been to live away from home and travel with my family for an extended period of time. I used to dream about all the places I could travel to, and how much fun I would have living a nomadic life. Of course, then I would wake up and the realities of my responsibilities would take over.

However, earlier this year after suffering a big life setback with the loss of my mom to cancer, I decided that my life was too short to not make my dreams come true. After several months of discussion and planning, my husband and I decided that our little family would spend our summer in India – traveling and visiting family. Somewhere along the way a trip to Ladakh, London, Zurich and Rome got added to my roster and pretty soon I was in charge of planning and packing for a life on the road for two and a half months living out of just four suitcases – one for each one of us. Being a photographer, I knew that somewhere in there I had to pack my camera equipment along with my essentials.

Taking and Caring for Your Camera Equipment in Far Away Places

Sunsets along Lake Zurich were magical – one of my favorite cities that I have ever visited!

Here are a few things that really helped me make the most of my time away from home. It is very likely that I have missed some key photographic opportunities but overall I am very happy with my time away, the opportunities that my family has experienced, and the images that I have created. And as an added bonus, all the camera equipment I did take made it back without any major mishaps along the way.

#1 – Gear Choices

Let’s face the reality of life as a photographer – we all love and want all the gear that we think we need wherever we go. When I was packing I realized that as a photographer I had so many things I wanted to bring, but as a mom, the need for gear was quickly overruled by the need for practical things like clothes, shoes, books, toys, etc. I had to make some very hard choices on the camera equipment that I could take, versus the gear I wanted to take. I narrowed down my list based on where my travels would take me and what gear I could realistically carry and transport safely without any damage.

So, in the end, I settled for this kit:

  • A wide zoom lens – Canon EF 24-70mm f/2.8.
  • A simple point and shoot camera (yes, this was my backup as weight was a concern when flying to and from Asia with layovers on the way there and back).
  • One telephoto lens – Canon 70-200mm f/2.8L.
  • One camera body – Canon 5D MK III.
  • Four camera batteries.
  • One battery charger.
  • A small travel tripod – just a generic brand – mine fits in my carry-on bag.
  • A remote trigger.
  • Five camera CF cards ranging from 8GB to 32GB.
  • Two 2TB External Hard drives ( primary photo storage and a backup photo storage).
  • Two generic lens and camera cleaner kits.

All of these things comfortably fit into my REI brand hiking backpack. I use this bag for everything and store my gear in individual soft-cover bags inside the pack. This is what I have done since day one and something that has worked well for me.

The one thing I wish I had taken with me was a rain cover for my camera. My backpack had its own rain cover which I used numerous times during the trip because we got caught in sudden downpours in the mountains. But without a separate rain over my camera, I was not able to use my gear in the rain.

#2 – Be Prepared and Organized

For me, being prepared and organized included having a rough idea of where I was going and the kind of environment I was going to expose myself and my gear to. Before I left, I jotted down all the serial numbers, make, and brand for my camera equipment and stored them in a document on my cloud-based Dropbox account. All my external hard drives were stored off-site at a friend’s place as well as the remainder of my gear.

Now, obviously, this is a friend I trust. But another option would be to lock it in off-site storage facility. As part of your research, another good thing to keep in your back pocket is the name, address, and contact information of authorized service dealers for your gear in the country you are visiting. Sometimes things just go wrong no matter how prepared you are. Being prepared with this information about services centers and authorized dealers for your gear is a time saver especially when you are traveling in areas where the internet connection is not very reliable.

Taking and Caring for Your Camera Equipment in Far Away Places

An hour’s hike from our campsite in the Himalayas got us to this beautiful alpine lake. But by the time I could get the camera and tripod out, the fog set it…and it was magical!

During my travels, my gear choices on the road would depend on the activities that were planned for the day and the fact that this was a family travel trip, not just a photography expedition. In Rome and Zurich we traveled everywhere either on foot or used public transportation. So I just carried my camera body and the 24-70mm lens among other daily necessities in my backpack. The rest of my camera equipment was either packed away in the hotel room safe or locked away in my suitcase.

When we hiked and camped in the Himalayas, my camera along with both my lenses were always on my person, and the tripod was handed off to the porters that were carrying our camping gear. For my camping trip, I just carried all my CF cards and ditched the charger and external hard drive at the house where we were staying because it was highly unlikely I’d find a charging port on that journey.

All these choices were possible because of the research I had done ahead of time.

Taking and Caring for Your Camera Equipment in Far Away Places

Much of Ladakh is dry and barren and upwards of 10,000 feet above sea level. Altitude sickness is very real and sometimes your gear also acts up. Of course, these dramatic views almost make up for any hardships.

Additionally, a good mindset to have when you travel to far-off exotic locations is one of acceptance of physical and mental limitations – both for yourself and your camera gear. I experienced some altitude sickness in Ladakh as we were traveling on roads at almost 17,000 feet above sea level. I also found my gear did not function as efficiently at that altitude. My batteries did not last as long and the camera also did not shoot as fast. The first few times it happened I freaked out. But then I just accepted it as something beyond my control and gave myself some extra time to be patient in getting the shot that I wanted.

#3 – Know Your Gear

This one is too basic to include here but it is amazing how many of us don’t follow this simple tip. We are so enamored with the latest and greatest gear available, but yet don’t quite know how to use the stuff that we do own.

The best way to get over this is to really limit yourself to a few key pieces of camera equipment for an extended period of time. One of my goals for this trip was to try and capture star trails and The Milky Way when I traveled to Ladakh. After all, I was going to be in a remote part of the country at an altitude of almost 15,000-17,000 feet above sea level. Barring any bad weather, I should be able to get relatively clear shots of The Milky Way and star trails.

Now astrophotography is not my thing. I always limited myself from trying it out because I don’t usually travel with a tripod, nor do I own an intervalometer. So this time I actually downloaded the camera manual on my phone and studied it before I left. With that information, I was able to comfortably and confidently use the B (a.k.a Bulb mode) on my camera to capture star trails in Ladahk. It was quite a thrilling experience for my maiden attempt.

Taking and Caring for Your Camera Equipment in Far Away Places

A 26-minute exposure while sleeping in the car near Jisp along the drive to Leh was one of the highlights of my trip. This is one of my first star trails shot and now I find myself looking out for stars every night! This would have been impossible without a tripod and proper remote trigger.

Another good thing to practice before you head out is gear maintenance. I had to routinely clean my lens and camera throughout this trip. I made the decision to carry two camera cleaning kits just because I knew my gear would get a lot of use. Before every major outing, I spent the time to clean out the dirt and dust from the camera and the lens. The dust pen was kept in my camera bag just in case I needed it while I was out and about photographing.

#4 – Be Local and Think Like a Local

I have to include this one in any travel photography related article because it does relate indirectly to taking care of yourself and your gear. Often times I find photographers I meet along my journeys have a fake sense of entitlement. When you are a guest in someone’s house, are you not on your best behavior? Why is it that when you are a guest in another country, common sense and basic manners seem to fly out the window.

Locals are still people who deserve the same amount of respect and courtesy as anyone. Put yourself in their shoes and try to imagine what they experience when someone shoves a camera in their face without so much as a hello or a smile.

While in Ladhak, we visited a lot of beautiful monasteries. Most of them are still in use and we saw many temples where the monks were in prayer. Even if there is no sign discouraging photography, please use common sense to not invade their private space especially when they are chanting. I cannot tell you how many times I came across tourists that almost jumped over each other or hanging out of moving cars just to take pictures of them chanting and praying. Seeing this rude behavior almost made me embarrassed to take my camera out.

Taking and Caring for Your Camera Equipment in Far Away Places

The infamous cable cars in Lucern, Switzerland…the clouds adds a certain mystery and aura to these engineering marvels!

Additionally flashing your fancy gear around is almost begging for the wrong kind of attention. I remember this one evening in Rome, I was out with my kids taking photos around some of the beautiful horse-drawn carriages. We lost track of time and soon found ourselves in a fairly deserted alley. I quickly put my gear away in my backpack, stuffed it with our jackets, grabbed my kids, and sprinted towards a more crowded piazza.

#5 – Make Friends with Local Photographers

The internet is an amazing tool for almost anything. It is such a great resource to find and connect with other photographers, especially if you are traveling to areas that are new and foreign to you. I was able to connect with some photographers in India as well as in Rome this summer. We chatted on the phone, met for dinner and just became friends.

They even gave me advice on some of the local, non-touristy spots to photograph as well as offered to lend me gear if I needed it. We tried to plan a shoot in India but the timing was not right, I know that the next time around we are going to create some magic, though.

Taking and Caring for Your Camera Equipment in Far Away Places

I met up with another photographer and we attempted to do night photography in Mumbai. But the moisture in the air because of the monsoons was causing some weird light trails against all the lights. So we went for ice cream instead! But it was a cool experience none the less.

Conclusion

I hope these tips are helpful as you plan your next vacation in a far-off destination. If you have other tips and tricks that worked for you, please share them with the community so we may all learn new ways to have an exciting and creatively satisfying vacation.

The post 5 Tips for Taking and Caring for Your Camera Equipment in Far Away Places by Karthika Gupta appeared first on Digital Photography School.


Digital Photography School

 
Comments Off on 5 Tips for Taking and Caring for Your Camera Equipment in Far Away Places

Posted in Photography


Apple is releasing its Live Photos API, which means more moving photos in more places

21 Apr

Apple has revealed the API for its Live Photos feature, meaning more app and web developers will be able to support the company’s short 1.5 second video ‘moving photo’ video clips. Apps like Facebook are already able to display Live Photos for users running iOS 9, but making the API available will allow any developer who wants to put a Live Photos viewer on their website or in their iOS app to do so.

Live Photos debuted in 2015 with the iPhone 6S. Owners of recent iPhones including the 7 and 7 Plus can capture the moving images in the stock camera app, and anyone running iOS 9 or later can play the video clip by pressing and holding the image.

Articles: Digital Photography Review (dpreview.com)

 
Comments Off on Apple is releasing its Live Photos API, which means more moving photos in more places

Posted in Uncategorized


Extreme Architecture: 15 Structures Built to Withstand the World’s Coldest Places

05 Jan

[ By SA Rogers in Architecture & Public & Institutional. ]

extreme-cold-architecture-main

You might say that the kinds of built structures you find in either Antarctic research stations or the coldest permanently inhabited place on Earth (located in Russia) are polar opposites: some are high-tech, capable of elevating themselves above the accumulating snow or departing to warmer climes via helicopter, while others are as humble as it gets. But people have learned how to survive in these harsh places, whether by keeping coal fires burning around the clock or burrowing into the earth for warmth, and even polar bears have some secrets to share with architects on surviving amidst all that ice.

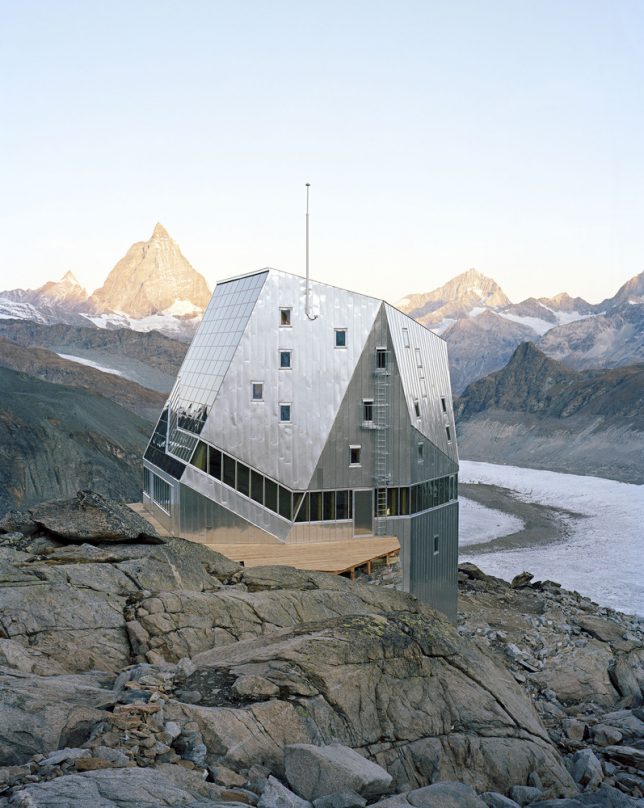
Monte Rosa Hut, Switzerland

extreme-cold-architecture-monte-rosa-hut-1

extreme-cold-architecture-monte-rosa-hut-2

extreme-cold-architecture-monte-rosa-hut-3

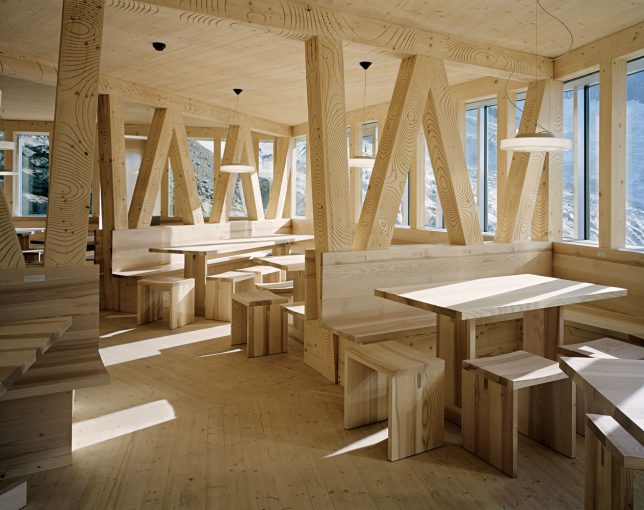
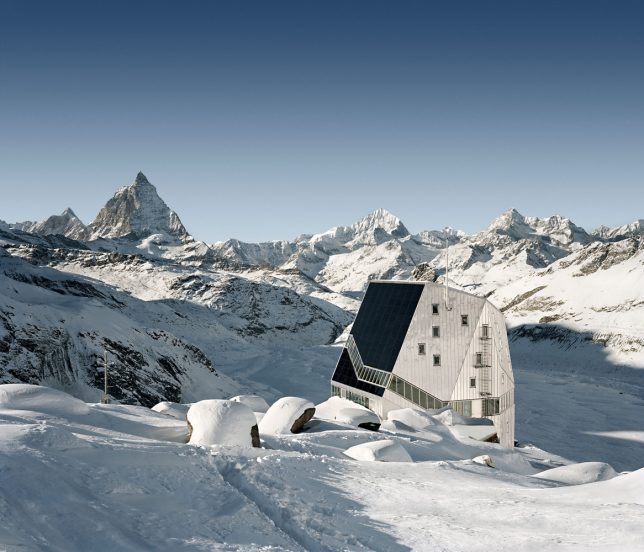
This five-story wooden structure on Switzerland’s Corner Glacier by Bearth & Deplazes Architekten has an exterior look befitting its environment, making it seem morel like a research facility than an ‘alpine hut’ for adventurers.

Memu Meadows Experimental House, Hokkaido, Japan

extreme-cold-architecture-meme-meadows-1

extreme-cold-architecture-meme-meadows-2

extreme-cold-architecture-meme-meadows-3

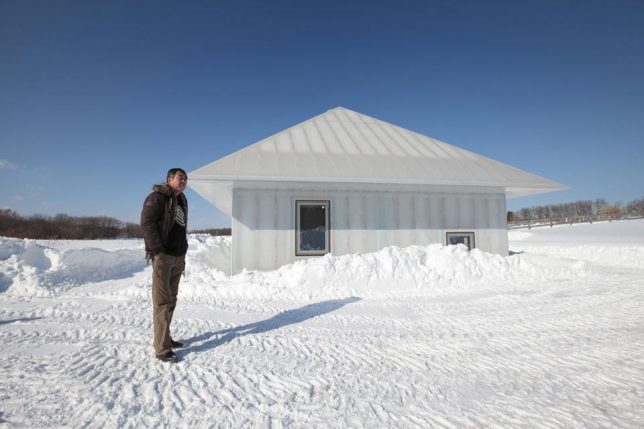
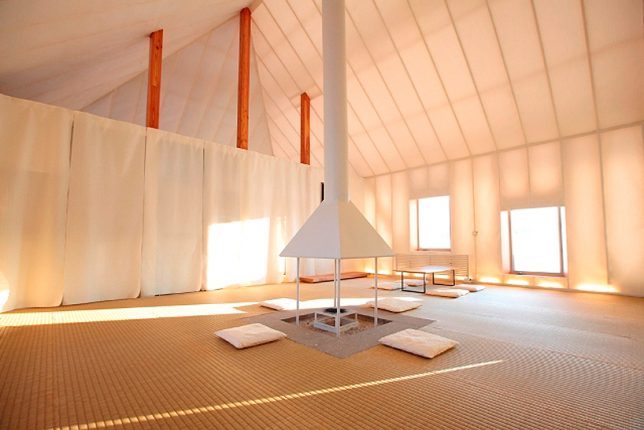
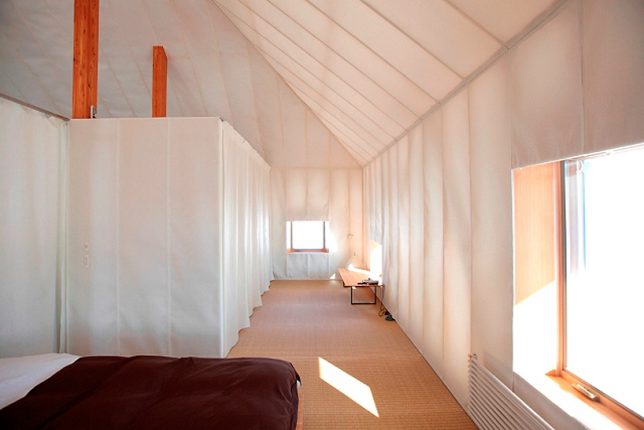
An experiment by architect Kengo Kuma, the translucent ‘Memu Meadows’ house was designed to test the limits of domestic architecture in extreme cold conditions. It’s a modern spin on the traditional homes of the indigenous Ainu, whose buildings used bamboo grass exteriors to hold in the heat of a central fireplace that remains burning all the time. Kuma’s version replaces grass with insulation and polycarbonate cladding but remains cheap and accessible, and allows the house to glow like a lantern after dark.

Halley VI, World’s First Mobile Research Station, Antarctica

extreme-cold-architecture-halley-vi-1

Ocean Waves Crashing on Seawall

extreme-cold-architecture-halley-vi-4

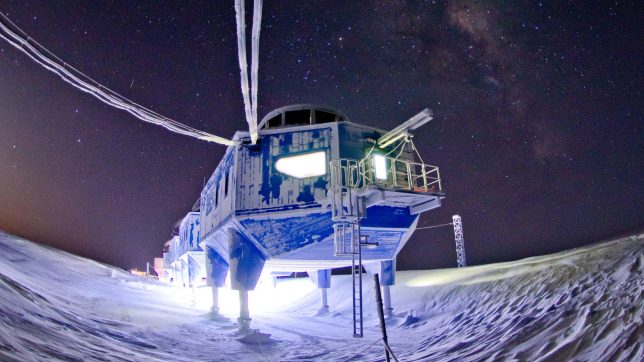
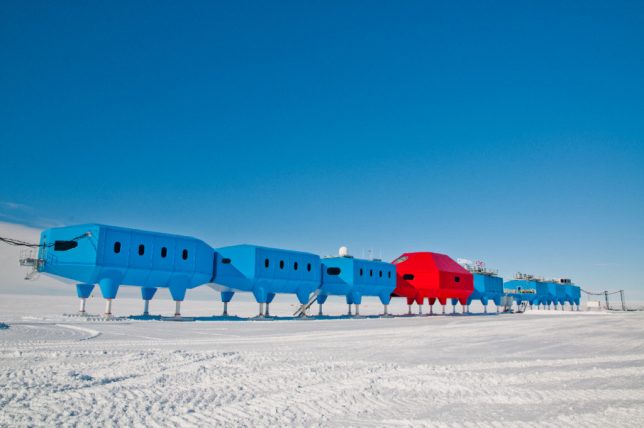
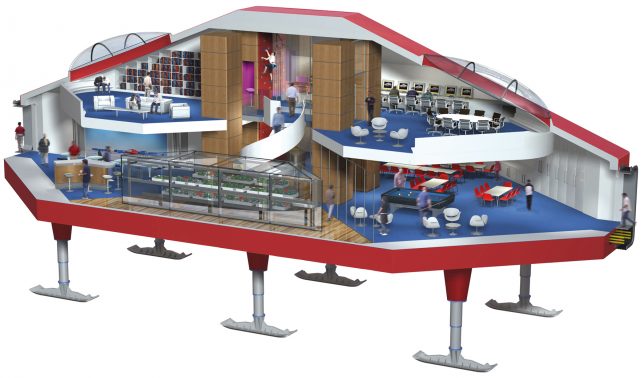
Halley VI by Hugh Broughton Architects stands up to some of the most extreme conditions on earth, serving as a mobile home base for Antarctic expeditions. It’s located on the floating Brunt Ice Shelf and can be transported on its ski-like feet, while hydraluic rams allow it to be raised above the snow as it accumulates. Seven interlinking blue modules offer offices, bedrooms, labs and energy plants while the central two-story red module contains social space for 16-32 crew members.

Arctic Adaptations: Concepts Reflecting Indigenous Canadian Traditions

extreme-cold-architecture-arctic-adaptations

extreme-cold-architecture-arctic-adaptations-2

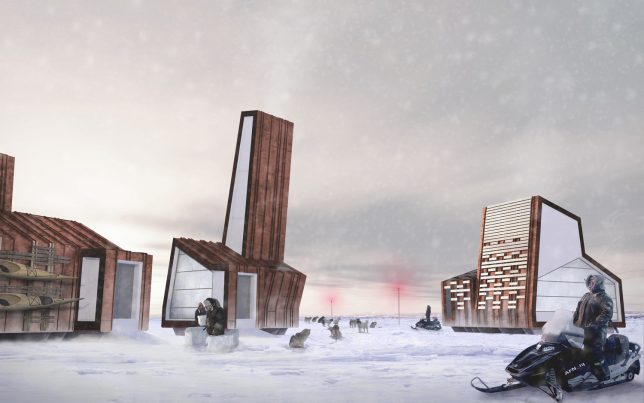
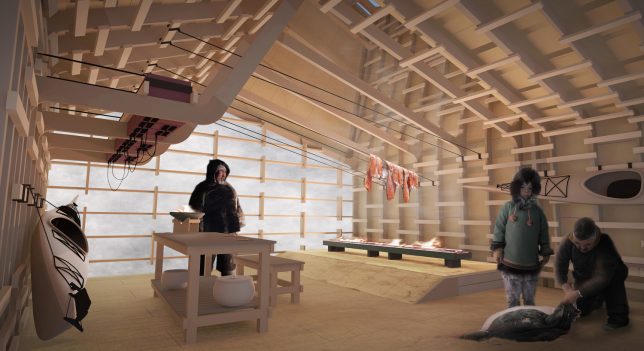
Canada commissioned Lateral Office to curate its Nunavut-inspired exhibition at the 2014 Venice Biennale, entitled ‘Arctic Adaptations: Nunavut at 15.’ The project proposes how architecture could improve the development of cohesive communities even as the environment and the world around them rapidly changes.

Trollstigen Tourist Route, Norway

extreme-cold-architecture-trollstigen-1

extreme-cold-architecture-trollstigen-2

extreme-cold-architecture-trollstigen-3

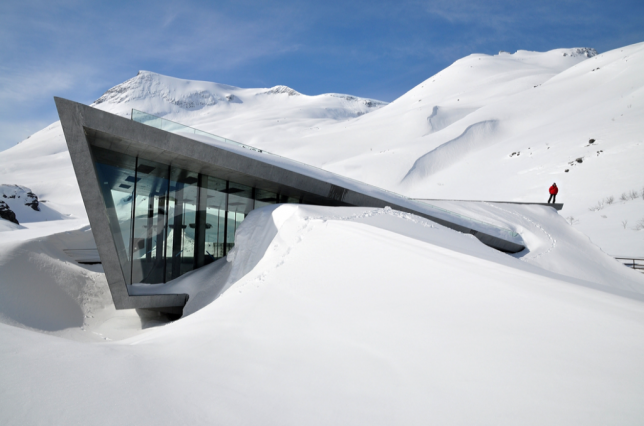
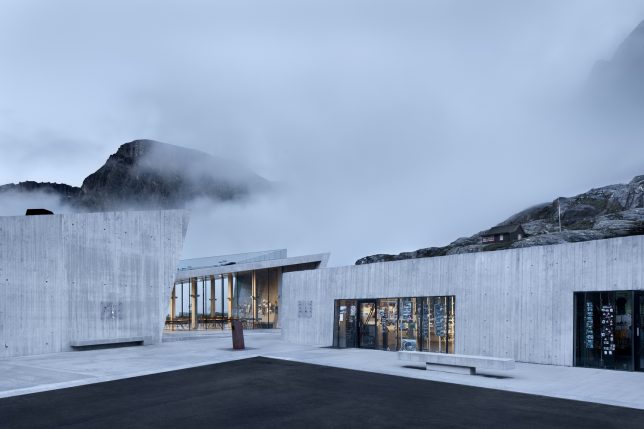
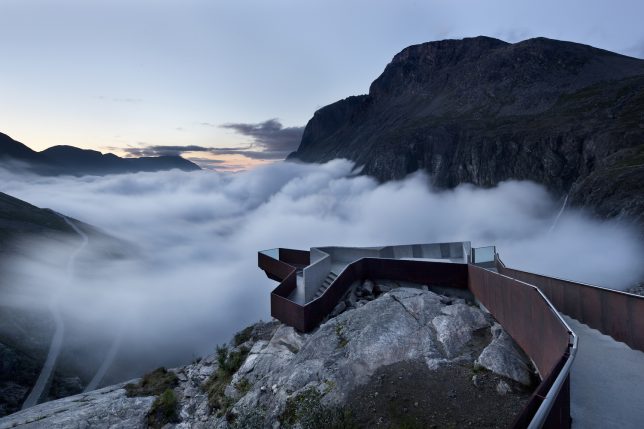
Set along the Trollstigen national tourist route in Norway, this visitor center and overlook by Reiulf Ramstad Architects gazes out onto a mountain pass that’s lush and green in the summer and formidably snowy in the winter. The overlook is particularly dramatic when the snow starts to accumulate.

Next Page – Click Below to Read More:
Extreme Architecture 15 Structures Built To Withstand The Worlds Coldest Places

Share on Facebook


[ By SA Rogers in Architecture & Public & Institutional. ]

[ WebUrbanist | Archives | Galleries | Privacy | TOS ]


WebUrbanist

 
Comments Off on Extreme Architecture: 15 Structures Built to Withstand the World’s Coldest Places

Posted in Creativity


2016 DPReview Readers’ Best Shots: Places

30 Dec

2016 DPReview Readers’ Best Shots: Places

Photo by Fred Gunnerson

Every Spring people come from all over to view and photograph the orchards in bloom. It only lasts a few weeks so you have to be ready when the rain stops. The bottom half of the photo is Oregon and the top half is Washington. That’s Mt. Adams in the background.

Hood River, Oregon, USA

Picking your favorite image is never an easy task. Nevertheless, our readers were up to the challenge when we asked them to submit their best shots of 2016. We received a huge number of submissions, and it was no small job picking favorites. We didn’t need the reminder, but it underscored just how talented our readership is. Photos were divided into three categories and we settled on a small selection to feature in each.

The category featured here is ‘Places’. We tried to include a variety of our favorite landscapes and cityscapes to feature. A huge thanks to everyone that participated and gave us a chance to see your work! You can find all of the submitted images here, here and here.

2016 DPReview Readers’ Best Shots: Places

Photo by Michele Palazzo

New York City’s iconic Flatiron building emerges from the blizzard like the bow of a giant ship plowing through the wind and the snow. Taken during the historic coastal storm “Jonas” on January 23rd, 2016. Shot January 23rd, 2016 in New York City with a Ricoh GR.

New York City, NY, USA

2016 DPReview Readers’ Best Shots: Places

Photo by Hans Kruse

Morning sun at the Quiraing on Isle of Skye shot during a photo workshop I was leading on Isle of Skye, Scotland in September 2016.

Isle of Skye, Scotland

2016 DPReview Readers’ Best Shots: Places

Photo by George Fowler

This picture was taken a few weeks ago in Shiobara, an area about two and a half hours north of Tokyo in the countryside. The fall colors were at their peak and the footbridge across the small river was absent of any people.

Shiobara, Japan

2016 DPReview Readers’ Best Shots: Places

Photo by Mike Sandman

Designed by the architect Frank Gehry, inspired perhaps by an Escher woodcut. Magnetically attractive to the eye, but the roof leaks.

Stata Center, MIT, Cambridge, Mass. USA 

2016 DPReview Readers’ Best Shots: Places

Photo by Derek Dammann

An early spring dawn breaks at the Dark Hedges in County Antrim, Northern Ireland.

County Antrim, Northern Ireland

2016 DPReview Readers’ Best Shots: Places

Photo by Morten Smedsrud

Sunrise over the Troll Wall from Store Trolltind, the highest peak in the Trolltindene mountain ridge, Romsdal Norway.

Romsdal, Norway

2016 DPReview Readers’ Best Shots: Places

Photo by Peter Alessandria

Photo of Harvest Full Moon (Oct 2016) rising behind the Statue of Liberty in New York Harbor. This shot was planned weeks in advance to align the trajectory of the moon with Lady Liberty.

Statue of Liberty, New York, NY, USA

2016 DPReview Readers’ Best Shots: Places

Photo by Maurice J Byatt

Crater Lake National Park, OR, USA

2016 DPReview Reader’s Best Shots: Places

Photo by Damjan Sirca

Taken on 28/10/16 in Yosemite valley – a bad weather forecast is not always bad news.

Yosemite Valley, CA, USA

Articles: Digital Photography Review (dpreview.com)

 
Comments Off on 2016 DPReview Readers’ Best Shots: Places

Posted in Uncategorized