RSS
 

Posts Tagged ‘Pixels’

Samsung’s new ISOCELL GN1 sensor features Tetracell tech, phase detection on all active pixels

20 May

Samsung Electronics has launched a new image sensor that is designed for use in the primary camera of high-end smartphones. Like other sensors from the the ISOCELL family, the ISOCELL GN1 comes with the company’s pixel isolation technology that creates a barrier around each pixel in order to reduce color cross-talk.

At 50MP the sensor´s native resolution is fairly moderate when compared to the 108MP juggernaut used in Samsung’s latest flagship smartphone, the Galaxy S20 Ultra, but has other tricks up its sleeve: it’s Samsung’s first image sensor to combine Dual-Pixel autofocus with the company’s Tetracell technology, allowing for increased light sensitivity in low light as well as precise and fast autofocus performance in all light conditions.

The GN1 comes with 100 million phase detection autofocus (PDAF) sites, meaning all of the sensor’s active pixels double as focus pixels, allowing for fast focusing in all light conditions and at all angles. Dual Pixel technology places two photodiodes side-by-side within a single pixel. When an image is captured the outputs from the two photodiodes are merged into a single pixel. Samsung also offers a software feature that can analyze light information from both photodiodes to compute image output that is comparable to a 100MP file.

Tetracell uses pixel-merging methods to increase light sensitivity in low light conditions. Four adjacent pixels are merged into one doubling the effective pixel size from 1.2?m to 2.4?m and quadrupling the light sensitivity at a 12.5MP output size. In bright light the sensor can operate as a standard Bayer sensor and capture full-sized 50MP images.

In addition the GN1 sensor offers a Smart-ISO function that ‘intelligently sets the optimal ISO value, and a real-time HDR mode. Electronic image stabilization uses data from the device’s built-in gyro to avoid shaky video and blurry images and video shooters can make use of an 8K video mode that can record at 30 frames per second.

Overall the GN1 looks like a very versatile image sensor that can adapt to a multitude of shooting situations. In bright light the 50MP resolution should allow for excellent detail. In dimmer conditions the Tetracell tech can deliver images with low noise and a wide dynamic range. At the same time the all-sensor Dual-Pixel autofocus system is making sure subjects are in focus, even in difficult scenes.

Samsung says mass production of the ISOCELL GN1 sensor has started this month. We’ll find out how it performs in real-life conditions once the first GN1-equipped devices make an appearance in the marketplace.

Articles: Digital Photography Review (dpreview.com)

 
Comments Off on Samsung’s new ISOCELL GN1 sensor features Tetracell tech, phase detection on all active pixels

Posted in Uncategorized


OmniVision launches the OV64B, a 64MP smartphone sensor with 0.7 micron pixels

28 Apr

Mobile sensor manufacturer OmniVision has announced the OV64B, a 1/2” sensor it claims is the ‘world’s first 0.7-micron 64-megapixel image sensor’ that’s destined for ultra-thin flagship smartphones.

The 1/2” sensor is built on OmniVision’s PureCel Plus-S stacked die technology and a four-cell color filter array (CFA) with on-chip hardware for re-mosaic. In addition to 64MP (9248 x 6944 pixel) stills, the sensor can also output 16MP images with what OmniVision claims is 4x the sensitivity thanks to near-pixel binning that yields images with a sensitivity equivalent to sensors with 1.4-micron pixels. Omnivision also notes 2X digital crop zoom modes are also supported at 16MP.

In terms of video, the OV64B is capable of recording 8K video at up to 30 frames per second (fps) 4K video at up to 60 fps and 4K video with electronic image stabilization (EIS) at up to 30 fps. It can achieve slow-mo capture at up to 240 fps at 1080p and 480 fps at 720p as well, with other output options including 64MP still capture at up to 15 fps and 16MP still capture at up to 30 fps with four-cell pixel binning.

The last notable feature is the sensor’s 2×2 microlens phase detection autofocus (ML-PDAF) that OmniVision claims improves autofocus accuracy, particularly in low-light situations.

No specific information is given in regards to what smartphone manufacturers may use this sensor in their devices, but OmniVision says the first smaple units should ship out to prospective clients in May 2020. It’s also no coincidence that the OV64B has specifications that align almost perfectly with the capabilities of Qualcomm’s Snapdragon 865 chipset, which is being used in flagship Android devices around the world.

You can find out more information on the OV64B on OmniVision’s website.

Articles: Digital Photography Review (dpreview.com)

 
Comments Off on OmniVision launches the OV64B, a 64MP smartphone sensor with 0.7 micron pixels

Posted in Uncategorized


Samsung announces 43.7MP ISOCELL Slim GH1 mobile sensor with 0.7?m pixels

24 Sep

Samsung has announced its tiniest camera sensor to date, the ISOCELL Slim GH1.

Designed specifically for ‘slim full-display devices,’ the pixels measure just 0.7 micrometers (?m) each for a total 43.7-megapixels (7,968 x 5,480 pixels) of resolution. As its name suggests, the ISOCELL Slim GH1 uses Samsung’s ISOCELL Plus technology, which uses pixel isolation to minimize color cross-talk, an issue that becomes more problematic the smaller pixels get.

Samsung also notes the ISOCELL Slim GH1 offers its Tetracell technology, which uses pixel-merging methods to give the sensor ‘light sensitivity equivalent to that of a 1.4?m-pixel image sensor.’

The ISOCELL Slim GH1 is capable of recording 4K video at up to 60 frames per second by using Samsung’s Tetracell technology to downsample the footage down to 3,840 x 2,160 pixels, a resolution that covers the standard resolution of 4K video (3,840 x 2,160 pixels). It also features phase detection autofocus, real-time HDR capabilities and gyro-based electronic image stabilization (EIS).

Samsung says it will start production of the ISOCELL Slim GH1 by the end of the year, meaning we probably won’t see it inside any devices until 2020. Based on the ‘Slim’ nomanclature and the mention of ‘selfie’ in the press release, it’s likely this particular sensor will be used as a front-facing camera, although it’s certainly not limited to such implementations.

Press release:

Samsung Introduces Industry’s First 0.7?m-pixel Mobile Image Sensor

Samsung ISOCELL Slim GH1 offers 43.7 megapixels in an extremely compact package, ideal for slim full-display smartphones

Samsung Electronics, a world leader in advanced semiconductor technology, today introduced the industry’s first 0.7-micrometer (?m)-pixel image sensor, the 43.7-megapixel (Mp) Samsung ISOCELL Slim GH1. Thanks to advanced ISOELL Plus technology, the new ultra-high-resolution GH1 image sensor embraces 43.7-million 0.7?m-sized pixels in a super-small package, providing the optimum solution for slim full-display devices.

“Samsung has been stepping up in pixel technology innovation from the industry’s first 1.0?m-pixel image sensor, to most recently, 0.8?m ultra-high-resolution sensors at 64Mp and 108Mp,” said Yongin Park, executive vice president of the sensor business at Samsung Electronics. “We are pleased to deliver yet another breakthrough with the industry’s first 0.7?m pixel image sensor, the ISOCELL Slim GH1 that will enable sleeker and more streamlined designs as well as excellent imaging experiences in tomorrow’s smartphones.”

The ISOCELL Slim GH1 is the industry’s first mobile image sensor to adopt the smallest pixel size in the industry at 0.7?m. By utilizing ISOCELL Plus, Samsung’s latest pixel isolation technology that minimizes color cross-talk and optical loss, the tiny 0.7?m pixels are able to absorb sufficient light information to produce bright and vivid photographs. In low-light environments, the GH1 makes use of pixel-merging Tetracell technology that enables higher light sensitivity equivalent to that of a 1.4?m-pixel image sensor.

For video recording at 4K (3,840×2,160) resolutions, the ISOCELL Slim GH1, with a high resolution of 7,968×5,480, is able to take 4K videos with minimum loss in field of view (FoV), while most high-resolution image sensors crop or scale down full image resolutions that result in a reduced FoV. Using Tetracell technology, the GH1 is converted down to 3,984×2,740, a resolution that snugly covers the 4K (3,840×2,160) resolution, allowing users to capture more detailed backgrounds when recording high-resolution videos or selfies at 60T frames per second (fps).

For sharper photographs and video, the GH1 supports a gyro-based electronic image stabilization (EIS) and a high-performing phase detection auto-focus technology, Super PD, allowing fast and accurate autofocus. In addition, the real-time high dynamic range (HDR) feature delivers more balanced exposure and richer color even in mixed-light environments.

The Samsung ISOCELL Slim GH1 is expected to be in mass production by the end of this year.

Articles: Digital Photography Review (dpreview.com)

 
Comments Off on Samsung announces 43.7MP ISOCELL Slim GH1 mobile sensor with 0.7?m pixels

Posted in Uncategorized


iPhone XS Max teardown reveals new sensor with more focus pixels

28 Sep

When Apple announced the new iPhone models XS and XS Max the company told us that the camera’s wide-angle module featured a larger sensor with 1.4 µm pixels compared to 1.22 µm on last year’s iPhone X.

Now a teardown performed by TechInsights has confirmed the new sensor, but has also revealed some additional detail about the wide-angle camera. The sensor is a stacked model provided by Sony and measures 7.01 mm x 5.79 mm (40.6 mm2). This is 7.8 mm2 more than the wide-angle camera sensor on the iPhones X and 8 Plus.

TechInsights engineers noticed an increased density of Focus Pixels

In addition, the TechInsights engineers noticed an increased density of Focus Pixels. This means more regions of the sensor are available as autofocus points and should, at least in theory, improve autofocus performance in most light conditions and shooting situations. Focus Pixels is an Apple term for masked PDAF pixels which were first introduced in 2014 with the iPhone 6.

TechInsight’s teardown is still in progress, so we hope the team can provide some more information and also have a closer look at the camera’s 2x tele-module, which on paper looks unchanged from last year, over the coming days.

Articles: Digital Photography Review (dpreview.com)

 
Comments Off on iPhone XS Max teardown reveals new sensor with more focus pixels

Posted in Uncategorized


Sony fixes a7 lll ‘blinking pixels’ video issue with firmware 1.01 update

19 Apr

Sony has released the first firmware update for the Sony a7 III—version 1.01—and it was specifically released to solve a “blinking pixel” issue that showed up when recording video footage while using certain settings.

The flickering pixels would appear along the base of footage “during XAVC S 4K (PAL 25p) recording (depending on the combination of camera settings).” Additionally, the update resolves a problem that could occasionally make the rear touch screen stop working, and Sony says the camera’s system should run more smoothly with the new firmware as well.

For more information and to download V1.01 for yourself, visit this support page on the Sony website.

Release Notes

ILCE-7M3 System Software (Firmware) Update Ver.1.01 (Windows)

Resolves a “blinking pixels” phenomenon at the bottom edge of the image during XAVC S 4K (PAL 25p) recording (depending on the combination of camera settings)

Applicable Models

This information is for the following models: ILCE-7M3

About this download

Benefits and improvements

  • Resolves a “blinking pixels” phenomenon at the bottom edge of the image during XAVC S 4K (PAL 25p) recording (depending on the combination of camera settings)

  • Resolves an issue where the touch panel could occasionally become unresponsive

  • Improves the overall stability of the camera

File Info

File Name: ILCE-7M3 System Software (Firmware) Update Ver.1.01 (Windows)

File Version: 1.01

File Size: 282 MB (296,352,960 bytes)

Release Date: 18/04/2018

Articles: Digital Photography Review (dpreview.com)

 
Comments Off on Sony fixes a7 lll ‘blinking pixels’ video issue with firmware 1.01 update

Posted in Uncategorized


How to Understand Pixels, Resolution, and Resize Your in Photoshop Correctly

19 Nov

Size, resolution, and formats… What do pixels have to do with it?

Do you buy your camera based on its number of megapixels? Are you having problems sharing your photos online? Does your print look low quality even if it looks great on the screen? There seems to be a lot of confusion between pixels and bytes (image size and file size), quality and quantity, size, and resolution.

So let’s review some basics to make your life easier, your workflow more efficient, and your images the correct size for the intended usage.

How to Understand Pixels, Resolution, and Resize Your in Photoshop Correctly

This image is sized to 750×500 pixels at 72 dpi, saved as a compressed JPG which is 174kb. Let’s look at what all that means.

Is resolution the same as size?

One of the biggest misunderstandings comes from the concept of resolution. If this is your case, believe me you’re not alone.

The problem is that resolution can refer to many things, two of them relate to the problem at hand. Further on I’ll explain these two resolution concepts, however, they have one thing in common that I need to clarify first. They both have to do with pixels.

You’ve probably heard a lot about pixels, at least when you bought your camera. This is one of the most available and “valued” specs on the market so I’ll start there.

What is a pixel?

A digital photo is not one non-dividable thing. If you zoom in far enough you’ll see that your image is like a mosaic formed by small tiles, which in photography are called pixels.

Pixel grid - How to Understand Pixels, Resolution, and Resize Your in Photoshop Correctly

The amount of these pixels and the way they are distributed are the two factors that you need to consider to understand resolution.

Pixel count

The first kind of resolution refers to the pixel count which is the number of pixels that form your photo. In order to calculate this resolution you just use the same formula you would use for the area of any rectangle; multiply the length by the height. For example, if you have a photo that has 4,500 pixels on the horizontal side, and 3,000 on the vertical size it gives you a total of 13,500,000. Because this number is very unpractical to use, you can just divide it by a million to convert it into megapixels. So 13,500,000 / 1,000000 = 13.5 Megapixels.

Pixel density

The other kind of resolution is about how you distribute the total amount of pixels that you have, which is commonly referred as pixel density.

Now, the resolution is expressed in dpi (or ppi), which is the acronym for dots (or pixels) per inch. So, if you see 72 dpi it means that the image will have 72 pixels per inch; if you see 300 dpi means 300 pixels per inch, and so on.

The final size of your image depends on the resolution that you choose. If an image is 4500 x 3000 pixels it means that it will print at 15 x 10 inches if you set the resolution to 300 dpi, but it will be 62.5 x 41.6 inches at 72 dpi. While the size of your print does change, you are not resizing your photo (image file), you are just reorganizing the existing pixels.

Imagine a rubber band, you can stretch it or shrink it but you’re not changing the composition of the band, you’re not adding or cutting any of the rubber.

Pixel Density 72dpi - How to Understand Pixels, Resolution, and Resize Your in Photoshop Correctly

Pixel Density 300dpi - How to Understand Pixels, Resolution, and Resize Your in Photoshop Correctly

In summary, no resolution is not the same as size, but they are related.

So quantity equals quality?

Because of the aforementioned correlation between size and resolution, a lot of people think that megapixels equal quality. And in a sense it does because the more pixels you have to spread out, the higher the pixel density will be.

However, on top of the quantity you should also consider the depth of the pixels, this is what determines the amount of tonal values that your image will have. In other words it is the number of colors per pixel. For example, a 2-bit depth can store only black, white and two shades of grey, but the more common value is 8-bit. The values grows exponentially so for example with an 8-bit photo (2 to the power of 8 = 256) you’ll have 256 tones of green, 256 tones of blue, and 256 tones of red, which means about 16 million colors.

This is already more that the eye can distinguish which means that 16-bit or 32-bit will look relatively similar to us. Of course, this means that your image will be heavier even of the size is the same, because there is more information contained in each pixel. This is also why quality and quantity are not necessarily the same.

Therefore quantity helps, but also the size and depth of each pixel determine the quality. This is why you should look all the specs of the camera and its sensor and not just the amount of Megapixels. After all, there’s a limit to the size you can print or view your image, more than that it will only result in extra file size (megabytes) and no impact in the image size (megapixels) or the quality.

How to choose and control image size and file size?

First of all, you need to choose the outlet for your photo, there is a maximum density that you need. If you are going to post your image online you can do great with only 72 dpi, but that is too little for printing a photo. If you are going to print it you need between 300 and 350 dpi.

Of course, we are talking about generalizations because each monitor and each printer will have slightly different resolutions as well. For example, if you want to print your photo to 8×10 inches you need your image to have 300dpi x 8″ = 2400 pixels by 300dpi x 10″ = 3000 pixels (so 2400×3000 to print an 8×10 at 300dpi). Anything bigger than that will only be taking up space on your hard drive.

How to resize in Photoshop

Open the menu for the image size and in the popup window, you need to tick the Resample Image box. If you don’t activate “resample” you will only be redistributing the pixels like I explained at the beginning of the article.

You can also choose to tick the Constrain Proportion if you want the measure to adjust according to the changes you make. So the width adjusts when you change the height and vice versa.

How to Understand Pixels, Resolution, and Resize Your in Photoshop Correctly

8×10 inches at 300 ppi, this is the size needed for printing an 8×10. Notice the pixel size is 3000 x 2400.

750×500 pixels at 72 ppi. This is web resolution and is the exact size of all the images in this article. The size in inches is irrelevant when posting online – only the pixel size matters.

On the top of the window, you’ll also see how the file size changes. This is an uncompressed version of your image, it’s the direct relationship I explained in the first part of the article: fewer pixels means less information.

How to Understand Pixels, Resolution, and Resize Your in Photoshop Correctly

Now, if you still want to change the file size without resizing anymore, you have to do it when you save the image. Before saving your photo you can choose the format you want:

Formats - How to Understand Pixels, Resolution, and Resize Your in Photoshop Correctly

If you don’t want to loose any information you need to save an uncompressed format. The most common, and therefore easier to share is TIFF.

Tiff - How to Understand Pixels, Resolution, and Resize Your in Photoshop Correctly

If you don’t mind losing a little information as long as you have a lighter file, then go for a JPEG and choose how small you want it. Obviously the smaller you set it, the more information you will lose. Fortunately, it has a preview button so you can see the impact of your compression.

JPG high quality.

JPG low quality. Notice how it’s pixelated and breaking down? If you crunch it too much or go too low quality you risk degrading the image too far.

Conclusion

So there you have it. So quality, quantity, size and resolution explained and they all have to do with pixels, as they are the basic units that constitute your image. Now that you know you can make the best choices to print, share and save your photos.

The post How to Understand Pixels, Resolution, and Resize Your in Photoshop Correctly by Ana Mireles appeared first on Digital Photography School.


Digital Photography School

 
Comments Off on How to Understand Pixels, Resolution, and Resize Your in Photoshop Correctly

Posted in Photography


Android 7.1.2 update fixes Google Pixel’s pink camera streaks issue

05 Apr

Google has released Android 7.1.2 for the Pixel and Nexus smartphones, and with it comes a fix for the pink streaking issue affecting some Pixel cameras. Owners affected by the issue report a pink banding and vertical lines that appear on photos taken using the Pixel’s camera app. Google had encouraged affected handset owners to factory reset their phone as a temporary solution for the problem, and now it has released a permanent fix with the latest version of Android.

In addition to fixing the Pixel’s pink banding problem, Android 7.1.2 for Pixel and Nexus phones brings improvements to Bluetooth connectivity and fingerprint swipe performance, and also adds battery usage alerts. Google says audio popping and early shutdown issues have also been fixed.

The update is available now via both OTA update images and factory images. Handset owners who don’t want to manually flash their device with an image can wait for the update to be delivered to their phone over-the-air, the rollout of which is happening now.

Via: Android Police

Articles: Digital Photography Review (dpreview.com)

 
Comments Off on Android 7.1.2 update fixes Google Pixel’s pink camera streaks issue

Posted in Uncategorized


This photo of some strawberries with no red pixels is the new ‘the dress’

02 Mar

UCLA neuroscientist Matt Lieberman posted the ‘no red pixels’ image on the left. It’s developed from an original by Experimental Psychologist Akiyoshi Kitaoka (right) that, despite appearances, does have some very slightly red-tinged pixels in it.

Remember internet kerfuffle that was ‘the dress’ ? Well, there’s another optical illusion that’s puzzling the internet right now. Behold: the red strawberries that aren’t really red. Or more specifically, the image of the strawberries contains no ‘red pixels.’

The important distinction to make here is that there is red information in the image but, despite what your eyes might be telling you, red is not the highest value for any individual pixel in the image. Hence, no ‘red pixel’ in the image.

As was the case with ‘the dress,’ it all relates to a concept called color constancy, which relates to the human brain’s ability to perceive objects as the same color under different lighting. Which should immediately bring to mind a familiar photographic concept: white balance. Although there’s a significant cyan cast to the whole image, your brain is able to correct for it without you having to consciously identify a neutral part of the image (as you’d need to in processing software).

This got us thinking: without any understanding of what strawberries look like, how well would a camera’s auto white balance cope with the significant color cast in this image?

Here’s what a Nikon D7200’s auto white balance algorithms made of the image (defocused slightly, to avoid moiré from the monitor’s pixels)

The answer? Pretty well, actually. We don’t know whether it’s been able to detect the overall cyan cast or has assumed that the brightest point in the image is probably neutral, but it’s done a good job.

We have Experimental Psychologist Akiyoshi Kitaoka to thank for turning this puzzle loose on the world, and neuroscientist Matt Lieberman for turning it viral. Curiously, the first image contains a few red-dominated pixels (which Lieberman’s edited version doesn’t), yet appears more grey than Lieberman’s version.

Articles: Digital Photography Review (dpreview.com)

 
Comments Off on This photo of some strawberries with no red pixels is the new ‘the dress’

Posted in Uncategorized


A look at Google Pixel’s sensor reveals potential HDR video tech

14 Oct
Example of a sensor pattern with spatially varying exposure, in which pixels of the same color receive differing amounts of light. (From the Computer Vision Laboratory at Columbia University.)

Steven Zimmerman over at XDA Developers has just published an article with some insights into the Sony IMX378 sensor used in Google’s recently announced Pixel smartphones. Although he covers a number of technologies likely familiar to DPReview readers, such as stacked BSI-CMOS technology and on-sensor phase detect autofocus, there’s an interesting section on Spatially Multiplexed Exposure (SME-HDR) which has the potential to provide improved HDR video capture. It’s an interesting read, and one worth taking a look at if you’re interested in sensor technology.

Articles: Digital Photography Review (dpreview.com)

 
Comments Off on A look at Google Pixel’s sensor reveals potential HDR video tech

Posted in Uncategorized


5 Tips for Going from Pixels to Print Quality

18 May

Whatever level of photographer, you are sure to have gathered a stockpile of pixels.

It’s just the way it is nowadays. Whether you are the kind of person that clogs up their hard drive, gradually slowing your Mac or PC down until you are forced to do something about it. Or perhaps you are already super organized having kept negatives, CDs, DVDs, hard drives, a raid system or even the cloud?

Indeed whatever storage method you choose you need to catalogue the files by name, event, and year, so you may retrieve without having a complete breakdown while searching for your favorite file. After all photography should be fun, not pain.

Many photographers use Lightroom, which is a great program, not only for editing but also for organizing your ever-increasing pile of pixels. But then what? What do you do with them then? I think you would agree we all spend too much time in front of screens? So why would you keep your masterpieces locked away in digital format?

To create that killer slideshow you will amaze your friends with is a lot of fun, especially if you have a large TV or digital projector. However, be careful of the content of your slideshow. Nothing worse than visiting a friend, only to be subjected to look through every snap taken on their holiday. Slideshows really should not be much more than ten minutes long or people generally loose interest. Keep them simple also, not too many whizzy effects, that just makes your viewer feel queasy!
PIC 10 simonjohn co uk

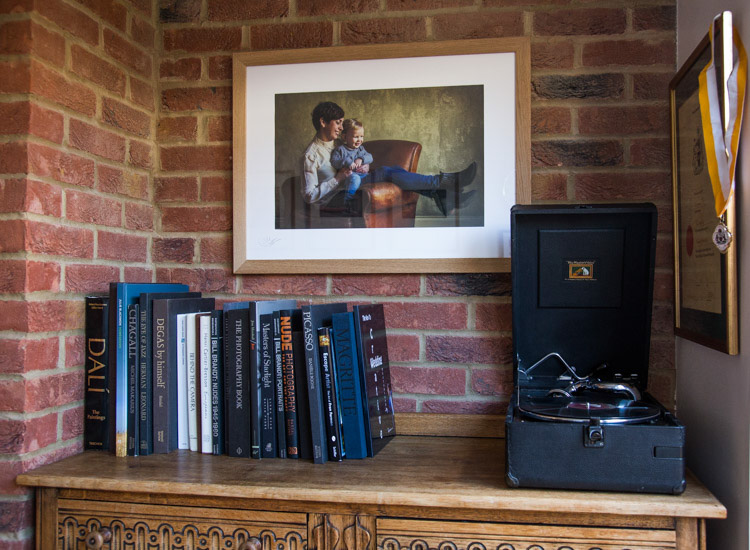
So you have this catalogue full of great images, what next? I would say enjoy them. Have your favorites printed and framed. Photography is personal, just like any other art form. By printing your special images, and hanging them in your home, you are not only enjoying the fruits of your labour, but also creating personalized wall art. This shows friends your talents, without the need for a longwinded slideshow.

You may find as time goes by, the framed photographs mean more or less to you. This is quite natural as we grow, and our taste and habits change also. Not to worry, you can always replace them with fresh images. It’s not like the old days when the portrait your parents had remained in the given spot forevermore. In fact, it is refreshing to change your images from time to time. Just like wallpaper or any other interior design things, move on. Only when you can look back at a photograph you made perhaps 10, 20, or 30 years ago, and still love it, will you know it’s a keeper!

My background is a portrait and wedding specialist. Lets take a look at an image from my portfolio. I will describe the process from capture through editing, and finally the framed piece for the wall (above).

#1 – Get it right in-camera

Pic 1 simonjohn co uk

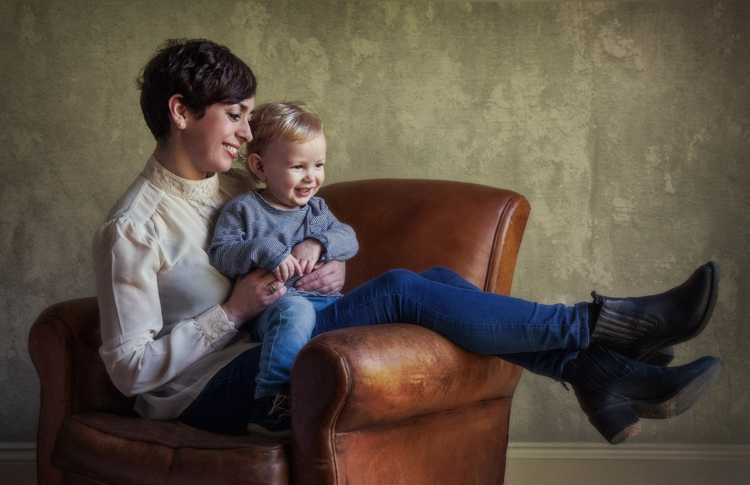
As you can see the old chair, and soft natural light, was perfect for the basis of this portrait. I positioned the mother in the first third of the image, placing her legs over the arm of the chair for a more relaxed contemporary look. My directions to her were simply to get close, and look at your beautiful boy. All I had to do then was to get the toddler to look in the right direction, with the expression to fit. A squeaky toy often saves the day!

The mother is in profile, while the toddler is in three quarter face, adding interest and different angles to the image. The lighting was a large window (not with hard sunlight) off to the right. I also placed a reflector just below the mum’s boots, to bring light back into the eyes and softly wrap around into the shadows. The exposure was 1/250th (freezing the toddler) with an aperture of f/5.6, using a 70mm focal length, as my back was pressed against the far wall of the room.

So to summarize; I feel the expressions are captured well. The lighting is fitting, being soft and directional. The image has style, and is well balanced compositionally. But it just needs something more. The capture stage is so important to get right. Photoshop should not be regarded as a fixer. The great Ansel Adams talked about “printing virtuosity” and just because we now craft our images on a screen, as opposed to in the darkroom, quality and finishing are still paramount.
So take a look at the edited image below.
Pic 2 simonjohn co uk

#2 Basic adjustments in Photoshop or Lightroom

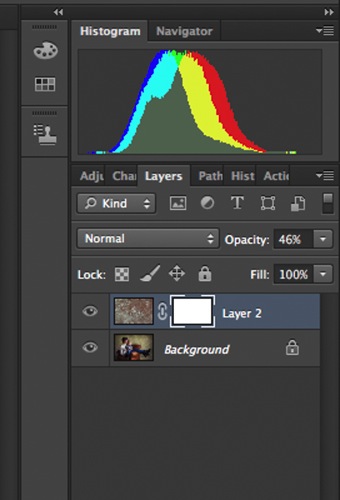
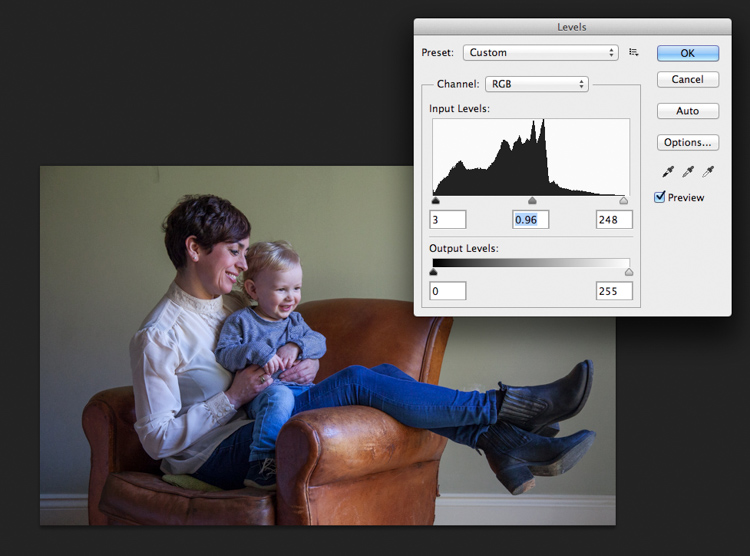
Firstly, you will need to level the image in Photoshop, bringing the sliders in to just clip the histogram at both ends. This ensures depth in the blacks and good clean whites. The mid-tone is really your X factor, but just be aware that you have detail throughout all tones if that is the look you are after. Be careful if you make it too light, the image could appear milky. While if you make the mid-tones too dark the image could appear muddy.
Screen Shot 2016-04-27 at 21.12.41-untitled

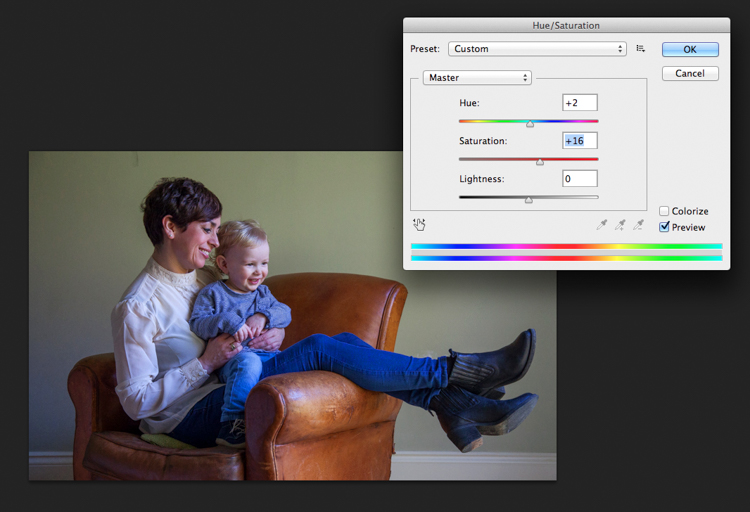
Secondly, I have adjusted the Saturation and the hue of the image to achieve the color pallet I require. Often you can go between the levels and saturation, and make small tweaks as the image takes shape.
Screen Shot 2016-04-27 at 21.13.20-untitled

#3 – Add a texture overlay (optional)

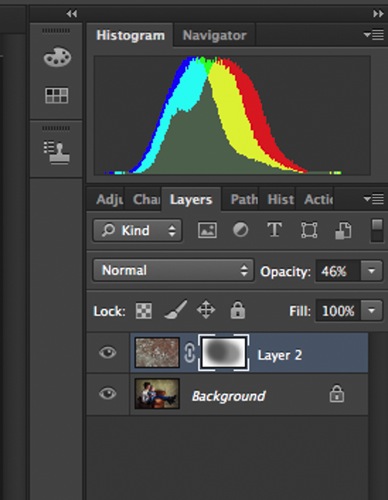
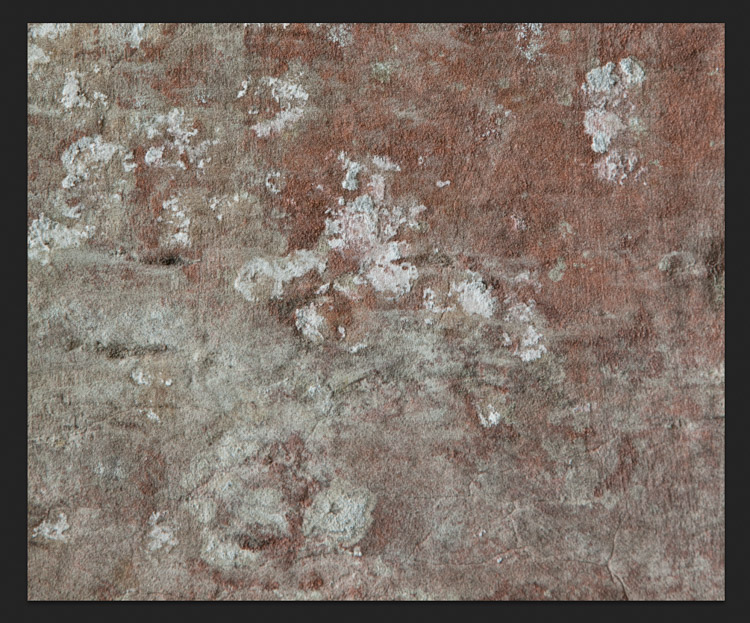
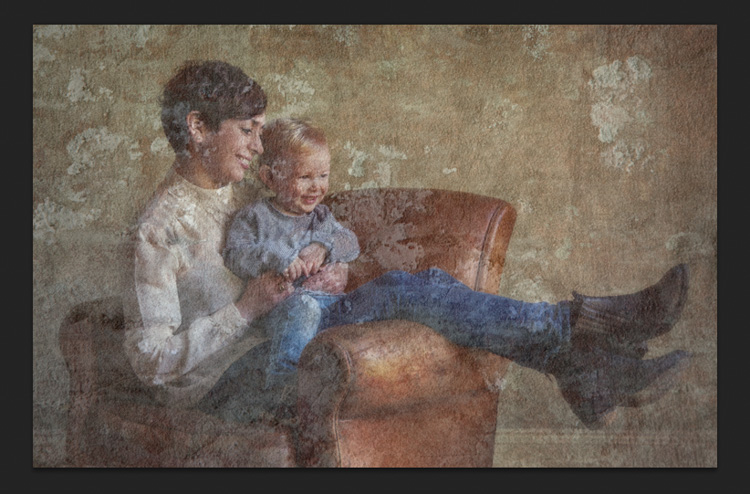
Next you could do as I have here, added a texture overlay. I felt it complimented the chair in its shabby chic style. I photographed a piece of wall, then blended the two images using opacity in the layers pallet. I added a layer mask, then rubbed through with a soft brush to create the subtle look you see here. I then added a soft Gaussian blur from the PS filters, blending the two layers together.
PIC 5 simonjohn co uk

PIC 6 simonjohn co uk

Pic 2-simonjohn.co.uk-untitled

PIC 8 simonjohn co uk PIC 9 simonjohn co uk

#4 – Local tone control

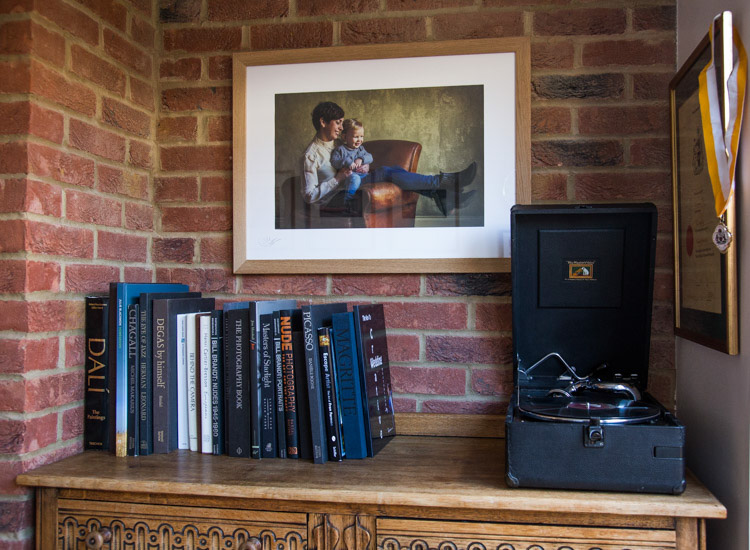
Finally to complete my image I needed to Dodge and Burn. As you can see this really is a subtle finishing skill, and should not be left to a Photoshop filter. In a future article I will explain exactly how to dodge and burn your images like a professional, directing the eye of your viewer to the important parts of the image. But for now, let’s see the final piece as it was hung on my gallery wall.
PIC 10 simonjohn co uk

#5 – Print it

I have printed the image on Fuji fine art 300mgs rough texture paper, which I love. The paper is not only excellent for color rendition but has a wonderful tooth to it, adding texture and depth. I have framed the portrait in a simple natural oak and white acid free mount. I have chosen clear glass. Although there is much talk about non-reflective glass, this simply flattens and dulls the image; I would not recommend it. The finished portrait compliments its surroundings, and fits well into the décor and given space.

As I said at the start of the article, it’s important to display your favorite images rather than hide them away on a computer. I am happy to share with you, that I have done just that here. This is my girlfriend Yvonne and my son Miles.

Some photographers prefer to print their own images. This can be a very good way of speeding up workflow and achieving exactly the right colors you require. In recent years printers have became smaller, and inks and paper more archival. I will perhaps invest this year simply for ease of use, and meeting clients deadlines. Perhaps one issue, according to friends who print their own, is you tend to have a fair amount of wastage profiling papers and inks. If you are not particularly a high volume, large output photographer, ink wells can get clogged up causing spattering of pigment. However I think both these problems are now almost eradicated as technology improves year after year.

If you choose, as many professional photographers do, to use a pro lab you have to close the color loop from the start. I use a Spyder 4, as seen in the screenshots below, and my lab use the Epson 9900 and 4900 for printing the Giclee fine art papers I require.


2

4
It is attached via USB to your monitor, and simple to follow with onscreen instructions. Basically it brings the colors back in line within the colors space you use. Until recently most labs suggested sRGB, as the colors seen on your screen were pretty much what could be printed. The other often used space is Adobe 98, but not all printing machines can produce such subtleties in color. Progress moves on and there are machines that can print Adobe 98, but my advice for now would be stick with sRGB (ask your lab if you want to know which they use).

Because you are working in a given color space the lab can set its own monitors accordingly, and with a skilled technician the loop should be closed. Sometimes you may find a print is slightly too dark or light. This may be due to the ambient light in yours or your printer’s room being marginally different. A good working relationship is what is needed when using a lab. When asked to reprint an image they should work with you, and offer tips and help if needed; its in everyone’s interest. I rarely have a print that is off, but if I do my lab simply reprints without charge.

So how should you prepare your files? Follow this checklist below for ease of use:

  • Always shoot in raw. Much more detail recorded through highlight to shadow.
  • Save the raw file but create a working tiff.
  • Once you are happy with the finished tiff export as a jpg if sending to a lab.
  • Export or print always at 300dpi for best quality.
  • Check your prints against your monitor and if adjustments are needed, make sure you talk to your lab first.
  • Never compromise composition for print size, i.e. if your image looks better 10×5.5 rather than 10×8, make it that way and drop it on the nearest paper size available. Simply have a mat made to fit your masterpiece.

Do not hang your finished prints in direct sunlight. Like anything that has natural fibers and dyes they will fade. Hung correctly, ink jet prints are now considered very stable, and a alternative to traditional lab chemistry for environmental reasons, but also better quality colors and increased tonal range.

Please share photos of prints you make and hang up on your walls in the comments below. Ask any questions you may have about the process as well and I will try and help you out.

googletag.cmd.push(function() {
tablet_slots.push( googletag.defineSlot( “/1005424/_dPSv4_tab-all-article-bottom_(300×250)”, [300, 250], “pb-ad-78623” ).addService( googletag.pubads() ) ); } );

googletag.cmd.push(function() {
mobile_slots.push( googletag.defineSlot( “/1005424/_dPSv4_mob-all-article-bottom_(300×250)”, [300, 250], “pb-ad-78158” ).addService( googletag.pubads() ) ); } );

The post 5 Tips for Going from Pixels to Print Quality by Simon John appeared first on Digital Photography School.


Digital Photography School

 
Comments Off on 5 Tips for Going from Pixels to Print Quality

Posted in Photography