RSS
 

Posts Tagged ‘Photoshoot’

Photographer’s Dress Code: What to Wear to a Photoshoot

22 Aug

The post Photographer’s Dress Code: What to Wear to a Photoshoot appeared first on Digital Photography School. It was authored by Suzi Pratt.

what to wear to a photoshoot

As a budding photographer, one of the biggest questions that will eventually come to mind is, “What should I wear to a photoshoot? Is there a photographer’s dress code?”

In truth, the answer varies widely – depending on the type of photoshoot you’re conducting, the specific client you’re working with, your overall style and brand as a photographer, and the culture of the region where you’re shooting.

A portrait photographer, for example, may have more flexibility in how they dress compared to a corporate event photographer. Similarly, a photographer shooting on the West Coast of America will likely be able to dress more casually than an East Coast photographer.

That said, here are some general photographer dress code guidelines you can use to get started.

photographer with camera

1. Invest in a solid, comfortable pair of shoes

Regardless of what kind of photoshoot you’ll be conducting, start with shoes. Consider that you’ll likely be standing for hours on end, so comfort and ergonomics are key.

Also, think about the terrain you might encounter during your shoot, and think about the seasonal weather. Will there be grassy fields, sandy shores, or other outdoor elements you might walk into? If so, shoes that can take a light beating and still look good will be of utmost importance.

As a female photographer who shoots mainly for corporate clients, I generally opt for black leather flats during the warm season, black leather boots for colder weather, and dressy black leather sneakers for extra long shoots with outdoor elements. In any case, try to stay away from sandals, high heels, and flip flops.

shoes on the ground

2. Cover up

As a photographer in constant search of creative angles, consider your possible physical maneuvers, such as bending, stooping, and squatting, then dress accordingly.

Make sure to wear an outfit that will allow you to be physically flexible without giving your clients an eyeful, or worse yet, causing a wardrobe malfunction.

Ladies, this means avoiding low-cut tops, ultra-short skirts and dresses, and skimpy outfits. At the very least, bring a blazer or sweater to cover up. Gentlemen, don’t forget a belt and a longer shirt that can be tucked in.

3. Dress in all black

This is a contestable point, as it can also be argued that dressing according to your brand is a better strategy. However, it’s a general rule of thumb that wearing all black is best for a photoshoot.

Why? Black ensures you won’t stand out and take attention away from the main subject. Not to mention that dressing in all black makes you look more official – like a staff member – which can be helpful in navigating around a venue.

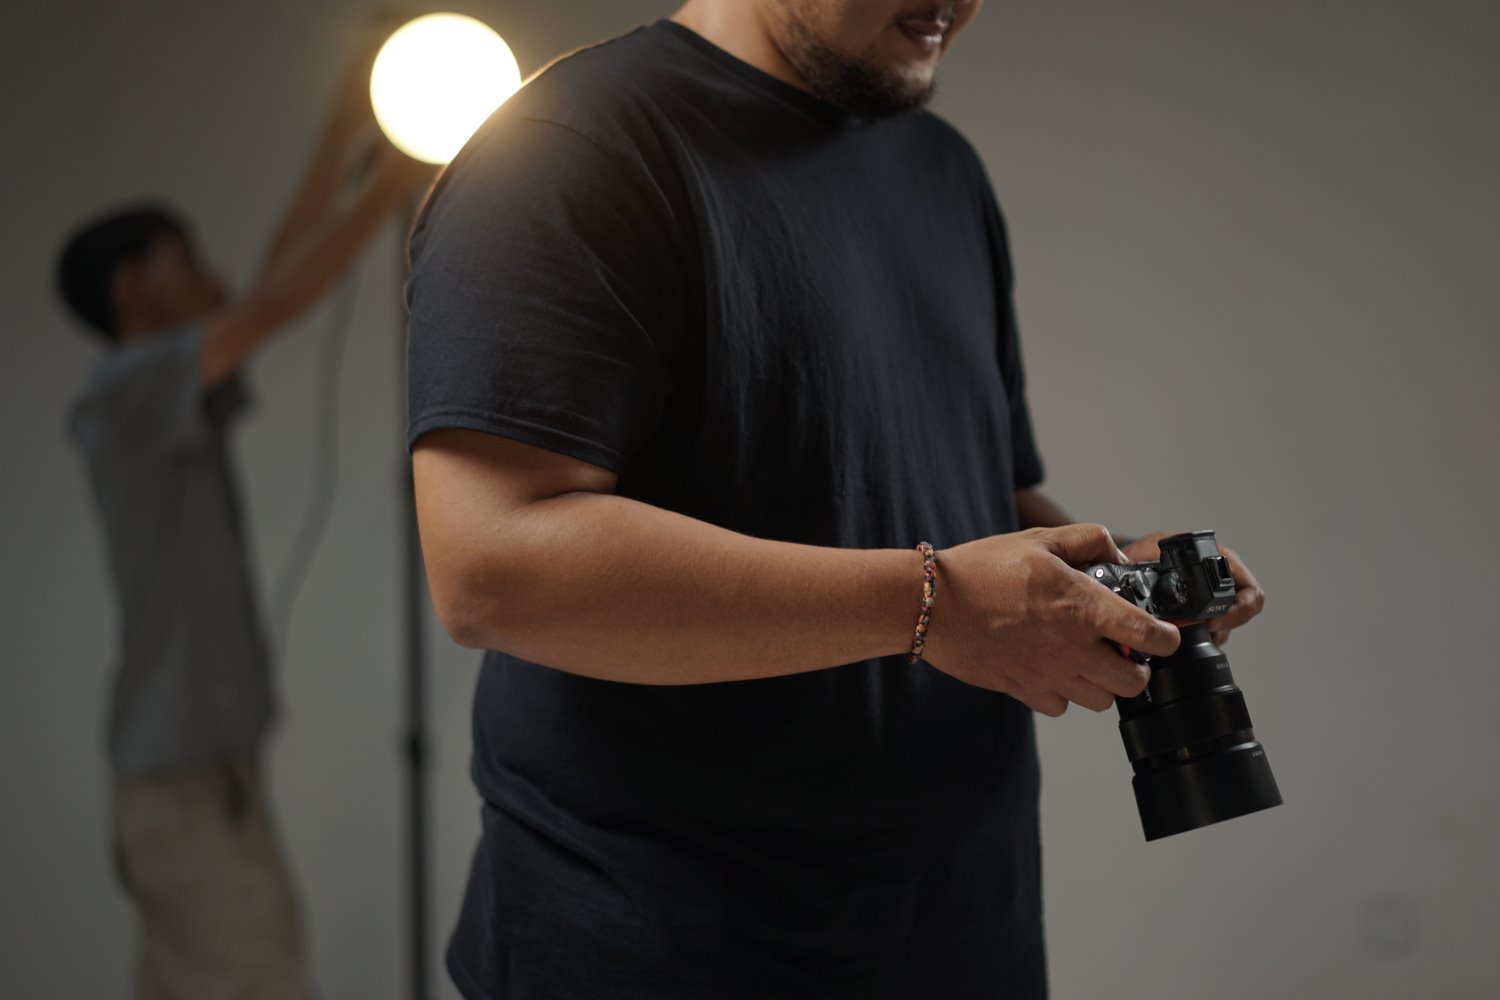
Personally, I opt for the all-black rule for my photoshoots, simply because a pre-assembled uniform gives me one less thing to worry about. My uniform consists of mixing and matching from the following selection: one pair of black skinny jeans, one pair of black slacks, a black leather belt, several button-down black blouses, several black polo shirts, and a black blazer. Whenever possible, I try to buy my black clothing in lightweight, moisture-resistant fabrics rather than cotton to avoid sweat absorption.
what to wear to a photoshoot photographer dressed in black

4. Add a personal touch

Some photographers might contest the above point of dressing in all black with the argument that it’s important to dress according to your brand. This is something I definitely believe in as well, but you can infuse brand elements into your style of dress while wearing all black.

For example, I always make sure to wear a few pieces of statement jewelry to accent my outfit and serve as a conversation starter. I have a couple pairs of unique earrings, necklaces, and watches that almost always attract comments or questions, but they are small enough that they don’t stand out too much.

Another idea is to custom-order black clothing that has your logo on it, such as a polo shirt with a subtle branding element. A photography colleague of mine has done this with huge success; it further reinforces his brand while also making him look and appear more official at photoshoots.

photographer sitting by water

5. When in doubt, ask

If you’re truly stumped on what to wear to a photoshoot, ask your client if they have any preferences. This is likely less important if you’re doing an intimate portrait session, but for event photographers in particular, it never hurts to ask the client.

I once had a corporate photography client who forgot to send over their two-page document detailing their dress code for photographers. Had I not asked, I would never have received proper instruction.

At the very least, it’s important to find out if the dress code for your shoot is formal, semi-formal, or casual, and what exactly those terms mean to the client.

photographer's dress code shooter in coat

What to wear to a photoshoot: conclusion

To some photographers, what you wear to a photoshoot may not seem like a big deal. But I firmly believe that how you dress is a reflection of your brand, so considering every element of your outfit is crucial.

Now over to you:

What do you wear when you’re conducting photoshoots? Do you have any photography dress code tips? Let me know in the comments below!

The post Photographer’s Dress Code: What to Wear to a Photoshoot appeared first on Digital Photography School. It was authored by Suzi Pratt.


Digital Photography School

 
Comments Off on Photographer’s Dress Code: What to Wear to a Photoshoot

Posted in Photography


5 Secrets for Finding Great Indoor Photoshoot Locations

26 Jun

The post 5 Secrets for Finding Great Indoor Photoshoot Locations appeared first on Digital Photography School. It was authored by Melinda Smith.

secrets for finding indoor photoshoot locations

Not all photographers have a dedicated indoor studio, yet sometimes you need to shoot a session indoors. Maybe it’s freezing outside, and you don’t want to be out in that weather. Maybe you just want something fresh and a little quirky. Maybe a building has a special meaning to you or the person you are photographing.

Whatever your reasons, if you want to take indoor portraits, you’ll need to find that perfect indoor photoshoot location. And that’s what I’m going to share in this article: all my secrets for finding stunning locations (plus how to get permission to use them).

With any luck, they’ll help you find the perfect spot for your next session!

bride on a couch

1. Always be on the lookout

Wherever you go, keep your “photography eyes” open. You may be surprised by how many places transform into a great location once you really start looking.

Some unique and exciting indoor photoshoot locations might include:

  • family photos in the library
  • model portfolio shots in a city building
  • engagement session in the laundromat
  • dance group session in a hotel lobby
  • mom and toddler portraits in a grocery store
  • bridal session in a grand old house, a museum, a quaint bed and breakfast, a roller-skating rink, a university building, a furniture store, a toy store, or a candy store (the list is endless!)

Look for great lighting, open spaces, interesting backgrounds, and fun things to interact with. Consider whether there are lots of people you might end up disturbing, or whether it’s a relatively calm place where you can photograph in peace.

Use your imagination and creativity to turn the ordinary into something extraordinary.

kissing couple in a library photoshoot location

2. Always ask permission

Once you’ve found a place you’d like to use for a photoshoot, make sure you ask permission before you bring a client there.

I find that asking in person is usually best; the staff/owner can see who they’re talking to, and they’ll be much less resistant if they can see your smiling, friendly face. If you do need to ask over the phone, be professional and friendly. Remember, they need to feel comfortable with you coming in, camera setup and model/client in tow.

If you like a location but aren’t sure who owns it, check city or county records, or ask a neighboring building if they know the owner. It might take time and effort, but you should always find out who owns the property before shooting. It gives all photographers a bad name if you trespass.

In fact, I’ve had many photoshoots where I call to ask permission, and the owner thanks me profusely for bothering to ask. They usually express their frustration with other photographers who just start shooting without asking. (They allow me to photograph on their property, so obviously they don’t mind people being there, but they always appreciate being asked first.)

Also, note that some locations, like museums or theme parks, are fine with you taking photographs inside, but you’ll have to pay the entrance fee.

woman posing on stairs

Other places charge a fee for photography and some don’t allow photographers at all. If you whip your camera out in either of those types of places without asking permission first, you could be fined huge amounts. It’s not worth it. Ask, and if you get declined, just move on and find another place.

Remember: It never hurts to ask. Most of the time you’ll be granted permission – and owners are often pleased that you think their building is worthy of being an indoor photoshoot location.

child with valentine's day gift

3. Find an owner who will also benefit

I needed a place to have adorable kids come for Valentine’s Day photos, but I didn’t know who would want multiple kids and families traipsing in and out of their establishment. Then I came across an adorable little candy shop; it was was decorated perfectly, plus it was full of delicious sweets and treats.

In the end, my photography clients came in and out all day for their sessions, and they ended up buying lots of candy in the process. Many who came had never noticed the little hometown shop with homemade caramel apples and every kind of candy you can think of. They were happy to have discovered it. I ended up with a great place for my Valentine’s Day photos, and the owner got a lot of new business.

child looking in candy baskets

Look for places that might benefit from your photoshoot, and chances are the owner will be more than happy to let you use their location (free of charge).

Also, many small, locally-owned places need a couple of photos of their establishment for websites and advertising purposes, or maybe even a quick headshot, and would be thrilled to let you photograph there in exchange for a photo or two.

family looking at a dinosaur

4. Explore your connections

Do you have a friend who owns a quaint little bed and breakfast? Do they work at a museum? If you get hired to photograph that friend, you may be able to get your foot in the door and photograph at that location.

Then, if the photoshoot goes well, your friend/client may be okay with you bringing other people back to the property!

You can also think about your broader friend network. You might not be planning to photograph your best friend, but they may still have a connection to a property that you could use for your shoots.

That said, be careful not to ask for too much, and be careful not to put anyone in an uncomfortable position. If you sense that a friend is hesitant about letting you use a location, don’t push it. A little respect goes a long way, and you don’t want to be the photographer who people avoid at all costs. Relationships are more important than having a cool place to photograph, so be extra sensitive when following this advice.

family posing near a dinosaur

5. Be the best guest

Once you’ve gotten permission to use a place, never, never, ever let anything get destroyed or damaged. The whole location should be left exactly how you found it.

If you need to move something out of the way, ask if it’s okay first. Then, when you’re done, put it back.

Be mindful of what is going on around you, especially if you are photographing kids. You are responsible for what happens during your session, and you never want to pay a big repair bill or lose a friendship because you were careless.

Remember: When you use public or private property for photos, you are not only representing yourself but also all photographers. If you make it a horrible experience for the owners, you’ll destroy the opportunity for future sessions for yourself and for all other photographers who might think to ask permission.

Please don’t be a careless photographer who ruins it for everyone. Instead, leave such a great impression that all photographers are welcomed with open arms.

family sitting together indoor photoshoot locations

Secrets for finding indoor photoshoot locations: final words

Well, there you have it:

Five ways to find the perfect indoor photoshoot location. If you follow the tips I’ve given above, you’re bound to discover some gorgeous locations – and you’ll be able to use them for years to come.

Now over to you:

Do you have any other tips for finding great indoor portrait locations? Have you found any gems? Please share your comments and images of your favorite spots below!

bride posing indoors

The post 5 Secrets for Finding Great Indoor Photoshoot Locations appeared first on Digital Photography School. It was authored by Melinda Smith.


Digital Photography School

 
Comments Off on 5 Secrets for Finding Great Indoor Photoshoot Locations

Posted in Photography


Outfits for Family Photoshoot: How to Choose and Coordinate?

22 Dec

If your home is anything like mine there are photos of you and your family dotted all over it. There’s something heartwarming about looking at the different moments in time and reliving them. Remembering how you felt, the smells, tastes and sounds of the day. It’s no wonder that year after year families just like yours and mine enlist the Continue Reading

The post Outfits for Family Photoshoot: How to Choose and Coordinate? appeared first on Photodoto.


Photodoto

 
Comments Off on Outfits for Family Photoshoot: How to Choose and Coordinate?

Posted in Photography


Quick and Easy Poses for any Couple During a Photoshoot

11 Jul

The post Quick and Easy Poses for any Couple During a Photoshoot appeared first on Digital Photography School. It was authored by Jackie Lamas.

Engagement sessions can feel intimidating and you might feel like your poses or photos are starting to look all the same. Or perhaps you’re having trouble getting a start at sessions? If that is the case, these poses will help you at your next engagement session and they work for all couples!

Easy-Poses-for-any-Couple-During-a-Photoshoot-1

The following poses work for all couples. Give them a try and add variety to your photo session.

T-Bone Pose

This pose works for any couple as it is in the shape of a “T.”  Place one person (the taller person) 45-degrees from the camera. Then place the other person’s shoulder into the armpit area of the taller person.

From here, the couple can hold hands, snuggle into the pose, look at each other, and even hug. Also, you can have the taller person, or the person standing at 45-degrees, kiss the person who is leaning into them on the forehead or cheek.

Easy-Poses-for-any-Couple-During-a-Photoshoot-2

See the shape of the “T” as the woman leans into the man’s chest in this photo and they snuggle close.

You can use this same pose with a little distance between the two and have them hold hands. Doing the pose this way can make it feel more powerful and strong.

Standing with arms interlocked

Start by having both people stand facing the camera. Ask one person to wrap their arms around the other person’s with the hands around the tricep/bicep area. Once they are in that pose, you can have the person who is wrapped around also lean their head on the shoulder.

Here you can add variety by getting up close and photographing the rings. Have the leaning person look down at their hands and get detail photos of their face. Alternatively, get one from farther back and have the couple look at each other in this pose.

Easy-Poses-for-any-Couple-During-a-Photoshoot-3

This particular pose also works if you photograph the couple from behind and ask them to touch noses, foreheads, or to kiss lightly.

One person in front and one person behind

This pose can offer many different photos since you can photograph it from different angles. Have one person standing slightly in front but off to the side of the other person.

Here they can stand holding hands, or you can even have one person facing backward and angled so that their back is to the camera but facing the other person. From here, you can ask them to look at each other. Have one person look at the camera, or have them get closer little by little while you capture their reactions.

Easy-Poses-for-any-Couple-During-a-Photoshoot-4

Have them face the camera and ask them to walk a bit with one person trailing behind. Do this a couple of times with them looking down, looking at each other, laughing or talking, or strolling. All of which will bring about authentic expressions while you’re photographing the pose.

Sitting down

Sitting down is another great pose for any couple. It can offer lots of different variations all within the same spot. You get different photos and won’t have to move your couple very much.

Easy-Poses-for-any-Couple-During-a-Photoshoot-5

A combination pose sitting down using the t-bone set up along with the arm wrapped around and the head leaning on the shoulder.

This pose works best if you have a staircase, ledge, or stool of some kind to offer different height options. However, don’t worry, it also works if they sit on a curb or the grass.

The key here is to have the couple sit comfortably as if they were sitting on their own during a date. From there, you can make adjustments to hand positions and where they are facing.

Have the couple sit next to each other at an angle. Or have one person leaning into the other in a sitting t-bone shape. You can even have one person sitting and the other standing.

Photograph them in this position from behind, side, and front. This will give you a lot of variety within the same pose. Have them snuggle, hold hands, caress or fix each other’s hair, kiss, close their eyes and go forehead to forehead, or touch noses. All of these are great variations of the same sitting down pose.

Using different focal lengths and apertures will give you a lot of different types of photos of the same moment.

Natural posing

When in doubt, natural posing may just be the best pose for all couples. It can be extremely useful at times during the session when it can seem like the poses are getting stale or repetitive.

Easy-Poses-for-any-Couple-During-a-Photoshoot-6

Natural posing is when you ask the couple to simply walk and enjoy the moment, or just sit and tell each other something they love about one another. You can also tell them to enjoy their surroundings or that you’ll be photographing them hanging out together as if you weren’t there.

This can bring about a lot of natural expressions, gestures, and relaxed poses from the couple that is much more authentic than any other pose you can put them in.

Usually, this works if you give them something to do like enjoying the moment or walking and exploring the location where they are. You can also tell them that you’re getting the settings right and just catch them being natural and relaxed.

This type of posing is really helpful at the beginning of sessions since most couples are nervous about having their photos taken. Getting them to relax while not having the pressure of looking at the camera or knowing how to pose can help them look natural.

Easy-Poses-for-any-Couple-During-a-Photoshoot-7

Also, use this when you feel like your poses are getting repetitive, or you feel like you’re out of ideas. Natural posing can also lead to natural cuddles that you can ask your couples to repeat and hold so that you can get the shot.

Natural posing can break up the session and make it more fun, especially if you’re at a location like a coffee shop, carnival, or doing an activity with the couple.

In conclusion

Using poses that work for all couples can a great solid foundation when you’re getting started in couple shoots.

Also, these poses work for all couples and therefore, can be helpful when you have run out of ideas or need something new to use at your next couples shoot.

Which pose will you try at your next couples session?


easy-poses-for-couples

The post Quick and Easy Poses for any Couple During a Photoshoot appeared first on Digital Photography School. It was authored by Jackie Lamas.


Digital Photography School

 
Comments Off on Quick and Easy Poses for any Couple During a Photoshoot

Posted in Photography


Photoshoot with 30-Year-Old HELIOS 44M-4 58mm f/2 Lens

24 Jun

The post Photoshoot with 30-Year-Old HELIOS 44M-4 58mm f/2 Lens appeared first on Digital Photography School. It was authored by Kunal Malhotra.

Helios 44M-4 58mm f/2 lens is probably one of the most mass-produced camera lenses in the world. I was lucky enough to find the M42 screw-mount version of this Helios lens in a nearby camera store. Using an ‘M42 to EF’ adapter I was able to use this 58mm f/2 lens on my Canon APS-C camera body.

After using this manual lens for more than 3 months now, I envy its build quality. The Helios 58mm f/2 lens is built like a tank and you can literally smash an onion with it. But that is not the reason I bought this lens. Its swirly bokeh effect is the only reason I have been scouting this lens for the past few months.

This lens has always been famous for the swirly bokeh effect that it produces as you move towards the edges of the image. So if you position your subject at the center, the lens produces what is also known as a ‘Cat Eye’ Bokeh effect. I hope the photos shown will help you understand this better.

Optical Performance

This is not one of those sharp lenses you would get nowadays, but it is not that bad either. Being an f/2 manual lens and at 58mm on an APS-C sensor, means that you will have to be patient while focusing. The depth of field is narrow, but once you have the subject in focus, you get magical photos. The swirly bokeh if used properly, can completely transform the look of your images.

The highlights are a bit on a higher side, but again it has its own charm if it suits your taste of photography. I had to boost the contrast and saturation during the editing process to suit my style of photos.

However, if you are buying this lens, it has to be for its swirly bokeh superpower and not to achieve the sharpest or punchy images. Thanks to Photoshop and Lightroom, we can later adjust the sliders as per the need.

Thanks to mirrorless camera technology, using the ‘focus assist’ feature, I can easily focus on a manual focus lens. Trust me – it saves a lot of time. And if you are short tempered, then you must make use of this feature if possible. The photos that you see in this article are all clicked using a Canon M50 mirrorless camera. Thank god, someone invented this technology.

Aperture Ring

As you must be aware that the aperture value of the manual focus lenses is adjusted using the physical ring on the lens. One of the few issues I had with this lens was the ring being too smooth. The slightest touch on the ring can make it rotate to a different aperture value. During this shoot, I was unaware of the fact that my aperture value had moved from f/2 to f/4, and I shot around 20 images until I realized.

Conclusion

As a digital photographer, being able to capture such dreamy images with a $ 30 lens is in itself unbelievable. The Helios 58mm f/2 lens was ideally mass produced for Zenit cameras, but the fact that you can still use it on a modern digital camera is amazing. I am very impressed with the results and the bokeh effect this lens allowed me to capture at f/2. Though this lens is not easily available online, you can check a few websites to find one in used mint condition.

Photoshoot with 30-Year-old HELIOS 44M-4 58mm f/2 Lens

The post Photoshoot with 30-Year-Old HELIOS 44M-4 58mm f/2 Lens appeared first on Digital Photography School. It was authored by Kunal Malhotra.


Digital Photography School

 
Comments Off on Photoshoot with 30-Year-Old HELIOS 44M-4 58mm f/2 Lens

Posted in Photography


4 Essential Things to Consider When Styling a Photoshoot

09 Mar

The post 4 Essential Things to Consider When Styling a Photoshoot appeared first on Digital Photography School. It was authored by Lily Sawyer.

A successful photoshoot doesn’t just happen by itself. Perhaps there are times when everything lines up and an impromptu photoshoot happens. But that is often the exception. From my experience, much planning goes into a successful photoshoot. Whether you are doing a family, newborn, or portrait shoot, formal, informal, indoor or outdoors, styled or casual shoots, there are common factors that are crucial to its success. Here are some essential things to consider when styling a photoshoot.

4-things-consider-styling-photoshoot-dps-tips-lily-sawyer-photo

1. Location

Location dictates equipment

Deciding on your location beforehand is necessary as that dictates the equipment you’ll need. If shooting in a studio, you need to think of the lenses you would use for the amount of space available in your studio. If you have a small studio, you may only be able to use a 35mm or a 50mm lens for portraits. A 24-70mm would be ideal for a small space, but you need to consider any distortions if you’re shooting portraits at close range using a short focal length.

4-things-consider-styling-photoshoot-dps-tips-lily-sawyer-photo

If you are relying on natural light indoors, then you would need to think of the time of day you are shooting and the available ambient and natural light at those time to give you ample light that you need for your shoot. It would also be a good idea to have a reflector handy for both shoot, but most especially for indoor shoots. Their are various types of reflectors, that create different effects.

4-things-consider-styling-photoshoot-dps-tips-lily-sawyer-photo

Backdrops

Another thing to consider when shooting indoors is your background or backdrop. If it’s in a client’s home, you may need to ask them for photos of an idea of walls, windows, possible backdrops you can use if you haven’t been there before. If shooting in your own home or studio, then you have more control and can prepare the space beforehand. You can go for a light or dark backdrop, fabric or walls, wallpaper or painting, or just the available surfaces in the home. You may need to declutter a bit so unnecessary objects are in the shot.

4-things-consider-styling-photoshoot-dps-tips-lily-sawyer-photo

Weather – Plan B

If shooting outdoors, you need a plan B in case the weather doesn’t cooperate on the day. A plan B could be a cafe nearby or a sheltered area such as a gazebo. Generally, when shooting outdoors during the day, the opposite problem occurs. There is often too much light. The first thing to decide on is the time of day to shoot. Will it be golden hour? Middle of the day? Early morning? Dusk? Evening? Understand the needs for these different times of the day.

Best times of day to shoot

Early and late and golden hour are great times to shoot because the light comes from an angle. Golden hour gives a nice warm glow to your images but light during early morning shoots are often quite cold. Midday light, when the sun is high up in the sky, gives harsh light. You need to mitigate this by using reflectors, so you don’t get dark shadows under the eyes. They can be a natural reflector like concrete paths, white walls, floors or the usual photography reflectors available.

4-things-consider-styling-photoshoot-dps-tips-lily-sawyer-photo

Urban or country? Each has a very different vibe. If shooting in a busy city location where you have to walk around and have nowhere to park, you may need to pare down your equipment. If going to the country, then you can fill your car with equipment and props to your heart’s content and make a shoot logistically easier.

If shooting with artificial light either indoors or outdoors, you have more control over the amount of light available for your shoot and natural lighting is not so much a factor. However, this would require more equipment such as light stands, softboxes, electronic flashes, triggers and receivers, batteries, and diffusers.

You can read more about equipment you would need for a home or portable studio here.

4-things-consider-styling-photoshoot-dps-tips-lily-sawyer-photo

2. Overall colour scheme

Details matter when it comes to the outcome. For an image to be pleasing and successful, it involves more than just lighting. It involves tones and color schemes. When planning your shoot, it may help to think of a theme like vintage, bold, contemporary, simple, maximal or busy. Also think of a seasonal feeling; summer, spring, autumnal, or winter. Considering these things helps you eliminate ideas that won’t be fitting and narrows them down to a few essentials.

You can then decide on the colors. Winter would call for cool white, grey and blue tones and you may decide on a pop of color. Spring may have a combination of pastel colors with dominant greens. Summer may be bursting with saturation and light, blue skies, and warmth. Autumn can have burnt orange, red, purples and verdant greens.

Feeling your shoot while mentally preparing for it helps in streamlining everything to achieve the desired outcome. You could go for a rainbow shoot where you want the colors to pop against a plain white or dark backdrop.

4-things-consider-styling-photoshoot-dps-tips-lily-sawyer-photo

3. Props

Props are optional, but they are useful. My preference is minimal props, but I would suggest having them as tools during the shoot rather than items to be necessary in the shoot. Let me explain.

If I am photographing young children, I would often ask the parents to bring a bag of favorite toys without the knowledge of their children. During the shoot, I may need to use them to entertain, comfort, use during breaks and even to make them look at the camera. However, only one of those may make it into the shot, usually a soft comfort toy.

For engagement shoots, I’d ask the couple to choose one or two props they want to be in the shot but that these props must mean something to them. We’ve had picnic baskets, bikes, guitars, books and flowers amongst others. Sometimes, couples can’t think of props or don’t want any, and that is fine too. Often I’d say pick up a bunch of flowers just in case. Many couples, especially those who haven’t had a photoshoot yet may feel awkward and holding something like flowers helps.

A piece of outfit or accessory can be used as a prop too. A hat, bag or a special pair of shoes can work. This leads us nicely to the next factor…

4-things-consider-styling-photoshoot-dps-tips-lily-sawyer-photo

4. Outfits

Even when you have your lighting and location all planned perfectly, sometimes your photoshoot can still get ruined. Okay, ruined may be a bit too harsh but there is still one thing that can make or break your shoot – It’s the outfit.

I give my clients a guide on what to wear before their photoshoot in the hope that they plan their outfits beforehand and, even better, share them with me so we can discuss them. Often they send me options to choose from, and together we agree on one or two final outfits.

I once had a couple whose location was in the most beautiful country setting – it was a totally dreamy scene. Unfortunately, their outfits were not in keeping with the location. Although they were happy with the images and the shots were beautiful, their shoot could potentially have been published in many places but were let down by the outfits.

4-things-consider-styling-photoshoot-dps-tips-lily-sawyer-photo

Encourage your clients to treat the photoshoot as a special event that they plan and prepare for. If they can afford it, even buy new clothes for the shoot. With regards to matching outfits, like all white shorts and jeans, that’s down to personal preference. Mine is more towards classic complementary colors and patterns than matching or uniform outfits. Discussing this with your client is important. The one big no-no I always tell my clients is to avoid big logos, cartoon characters, numbers or letters, or anything that is trend-based that dates quickly.

I hope the above has helped with styling a photoshoot and what you can prepare in advance to ensure its success. If you have any more ideas, do share them here in the comments below.

The post 4 Essential Things to Consider When Styling a Photoshoot appeared first on Digital Photography School. It was authored by Lily Sawyer.


Digital Photography School

 
Comments Off on 4 Essential Things to Consider When Styling a Photoshoot

Posted in Photography


Benjamin Von Wong’s Shark Shepherd photoshoot captures an underwater fantasy

20 Jan

Photo by Benjamin Von Wong

Photographer Benjamin Von Wong has released photos and a video from his new Shark Shepherd photo shoot, which features a model in a white dress in the sea as sharks swim nearby. The shoot took place in Fiji and aims to expose a less-often seen side of sharks as peaceful creatures. ‘I wanted to create a series of images that would help break those stereotypes and show that it is possible for us to co-exist together in perfect harmony,’ said Von Wong in a post on his blog.

In his PIX 2015 talk, Benjamin Von Wong discusses his journey from taking what he describes as ‘ordinary’ photos to creating ‘extraordinary’ imagery. Throughout his career, he’s made a name for his surreal images that blend practical elements, fantastic locations and post-processing. For Shark Shepherd, nothing has been added in post-processing – the photo shoot features model Amber Bourke, a champion free diver, with assistance provided by divers Steve Hathaway and Kris McBride. According to Von Wong, the shoot took place over three days with more than six hours of waiting for curious white tipped reef sharks to swim up close. The sharks were described as being like ‘squirrels at a park,’ getting close out of curiosity but darting away quickly when someone moved.

Articles: Digital Photography Review (dpreview.com)

 
Comments Off on Benjamin Von Wong’s Shark Shepherd photoshoot captures an underwater fantasy

Posted in Uncategorized


Planning Your Photoshoot – Review of the App: LightTrac

18 Oct

Getting to know when is the best time of the day, or the best lighting conditions in specific locations, is key for the outdoor photographer. Whether you are shooting landscapes or portraits outside, it is always good to know in advance what to expect in terms of lighting at your desired location. Of course, as the old saying goes, there’s an app for that.

LightTrap-App-Review-3

While there is no shortage of similar applications, I find LightTrac easy to use and understand. It basically helps to plan outdoor photo sessions in advance, by finding the right lighting conditions and time, depending on the specific location you want to photograph.

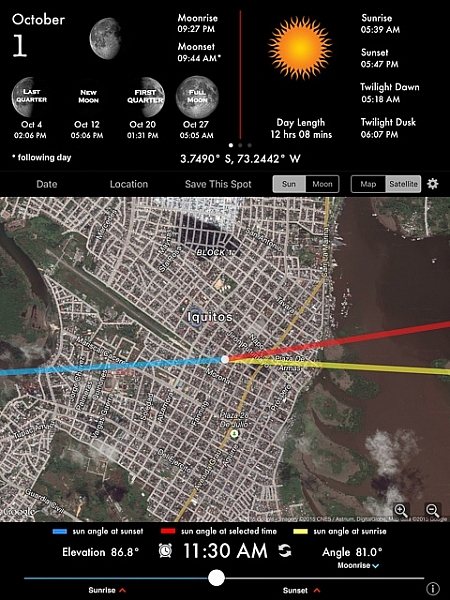
The application calculates the angle of the sun, the moon, and plots the results on top of a map for any location in the world. While using LightTrac you can pick any date and time, at any place, then visualize the position and elevation of the sun and moon. It’s quite handy to be able to know not only what time sunset or sunrise will be, but more importantly, the relative position of the sun.

Here is the list of features for the iPad and iPhone version:

  • Find angle and elevation of sun for any location and time
  • Find angle and elevation of moon for any location and time
  • Find sunrise, sunset and twilight times for any day
  • Find moonrise, moonset and moon phase for any day
  • View when full moon, new moon, first and last quarters occur
  • View elevation chart and azimuth chart for sun and moon
  • Integrated compass view on the iPad
  • Search locations by address, city or zip code
  • Save multiple locations and switch between them easily
  • Use address book to pick locations from your contacts’ addresses
  • Share your saved locations easily with fellow photographers via email
  • Easily export your locations to KML file to view on other apps
  • Does automatic timezone detection
  • Available in English, German and French languages

There is also an Android version with a more limited list of features.

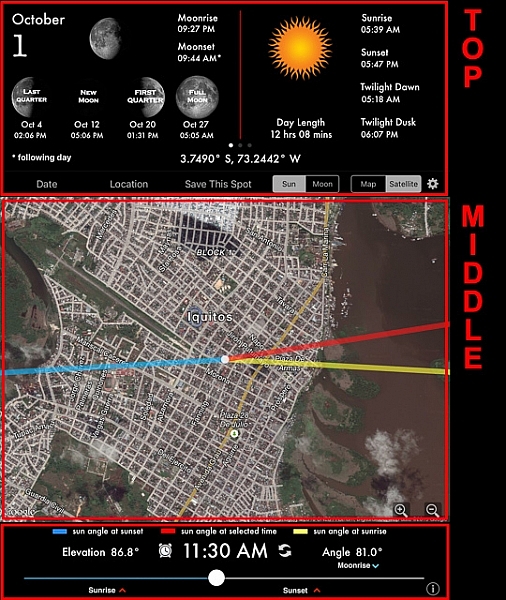
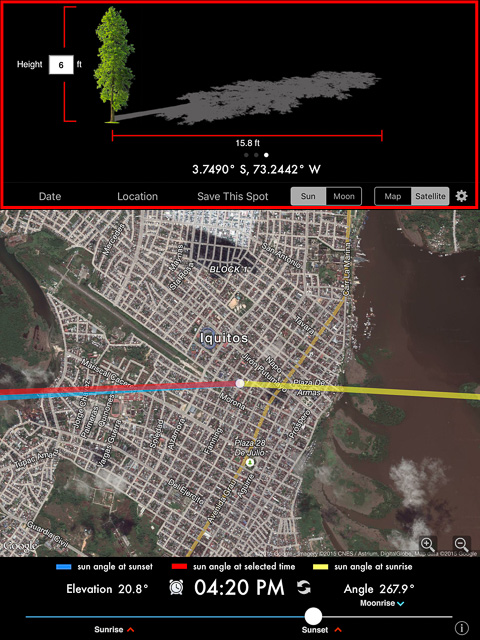
The application is very easy to read and understand. The screen is mainly divided into three sections: top, middle and bottom.

LightTrap-App-Review-2

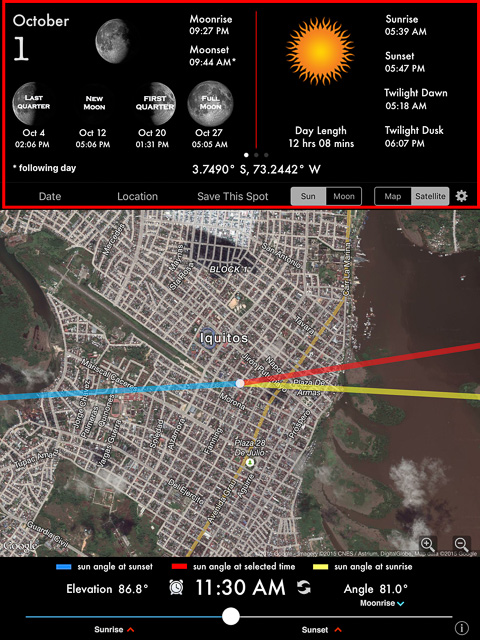
The upper section of the application’s screen shows the date and all information pertaining to moonrise and sunrise with times, including twilight for dawn and dusk. It also display the lunar phases for the month, and GPS coordinates. If you are looking to search information for a specific place, you can tap in “Location” and either enter your own GPS coordinates, or make a search by city name. The same can be done with “Date”; just tap to enter a date in the future.

LightTrap-App-Review-1

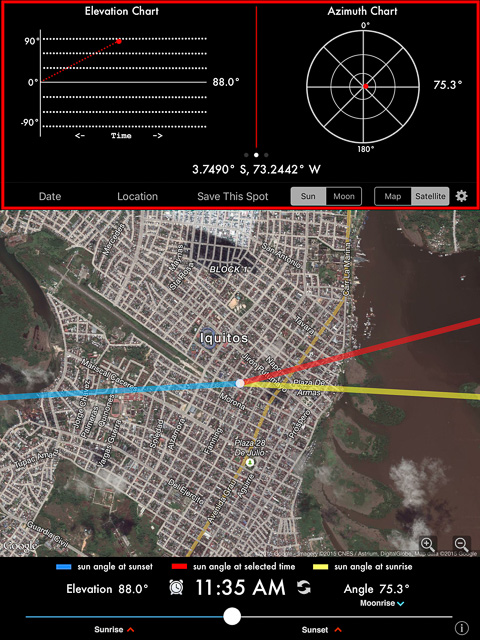
But the upper section provides much more information. Just by sweeping to the left, there are two more screens. The first one will show you an elevation chart and an azimuth chart; these sets of tools basically help you to determine the position of the sun in the sky related to your location at a certain time of the day.

LightTrap-App-Review-5
That’s practical information for sure, but it seems a bit geeky to me. I’d rather use the second screen. If you sweep one more time, the following illustration will show you the shadows projections from an object; it’s more practical and easier to understand than the previous screen.

LightTrap-App-Review-4

As you can see in the screen captures above, the middle section shows a map with super-imposed information of the sun’s angle. The sun’s angle at sunrise is marked in yellow, at sunset in blue, and the red line will show the sun’s angle at any time you select. The selection can be easily done by moving the slider of the bottom section, and as you do, the time changes and the red line that represents the sun angle moves accordingly, emulating the position and movement.

There is also a very useful tool in the bottom section. If you tap in the clock besides the time, a window will pop up offering you to set a reminder, an alarm, or even add to your calendar that specific event.

In conclusion, LightTrac is a simple but practical tool that is very useful for the outdoor photographer, because one the best ways to create beautiful photos is to properly plan the best time of the day to shoot. This application allows you to do that very precisely and in advance.

googletag.cmd.push(function() {
tablet_slots.push( googletag.defineSlot( “/1005424/_dPSv4_tab-all-article-bottom_(300×250)”, [300, 250], “pb-ad-78623” ).addService( googletag.pubads() ) ); } );

googletag.cmd.push(function() {
mobile_slots.push( googletag.defineSlot( “/1005424/_dPSv4_mob-all-article-bottom_(300×250)”, [300, 250], “pb-ad-78158” ).addService( googletag.pubads() ) ); } );

The post Planning Your Photoshoot – Review of the App: LightTrac by Daniel Korzeniewski appeared first on Digital Photography School.


Digital Photography School

 
Comments Off on Planning Your Photoshoot – Review of the App: LightTrac

Posted in Photography


Professional photographer turns to iPhone for post-wedding photoshoot

25 Jan

iphone-6.jpeg

Would you be brave enough to let a wedding photographer immortalise your celebration with only an iPhone? One couple in Gujarat, western India did just that. When Rishita and Kintan Brahmbhatt hired professional photographer Sephi Bergerson to shoot their wedding, he used a DSLR for the main ceremony, but turned to his iPhone for the post-wedding ‘couples shoot’. Click through to learn more about his experience and view some of the resulting images on connect.dpreview.com.

News: Digital Photography Review (dpreview.com)

 
Comments Off on Professional photographer turns to iPhone for post-wedding photoshoot

Posted in Uncategorized


Xj Photography S & J photoshoot

27 Dec

sony,dfw ,photos, photography dfw ,photography,a300, photo shoot, fabric, pet photography ,dog photography,backdrop, backdrops,hp,canon rebel,canon rebel xti,canon rebel xs,canon rebel xsi,canon , camera,a200,a350,a100,d40,d60,d80,d90,a700, photo equipment, epsion, cheap ticket, nfl , nba…
Video Rating: 0 / 5

DigitalCameraInfo.com previews the Nikon CoolPix P60, a new compact digital camera that offers manual controls as well as the conventional automatic ones.
Video Rating: 4 / 5