The post Photo Finishing – Challenge Yourself to Reveal the Personality in Every Image You Capture appeared first on Digital Photography School. It was authored by Herb Paynter.
Many folks think that photography takes place in the camera, but that’s not the whole truth. Photography is a two-part process that involves 1) capturing the light from a scene, and 2) shaping that captured light into a form that matches what your mind saw when you took the picture. The capture process does happen inside the camera, but the shaping part happens on your computer.

The Capture, or Photo Process
We give the camera credit for things that it doesn’t actually do. Don’t get me wrong, capturing all the light in a scene is a monumental undertaking. Keeping track of millions of points of light is a very critical and specialized responsibility. However, the camera is not so much an artistic tool as it is a capture device with a single purpose – to accurately record the light from the surfaces of objects in a scene. While that purpose can get complicated with lighting challenges, the camera is still just box with a round glass eye and a single function: to record light.
When the light of a scene enters the camera lens, it gets dispersed over the surface of the camera’s image sensor, a postage-size electrical circuit containing millions of individual light receptors. Each receptor measures the strength of the light striking it in a metric called “lumens.” Each receptor on this sensor records its light value as a color pixel.

The camera’s image processor reads the color and intensity of the light striking each photoreceptor and maps each image from those initial values, producing a reasonable facsimile of the original scene. When this bitmap of pixels gets viewed from a distance, the eye perceives the composite as a digital image.
The real magic happens after the storing of light on the memory card. The image that first appears when you open the file is the image processor’s initial attempt at interpreting the data recorded by the camera’s image processor. Most times, the initial (JPEG) image interpretation of this data is an acceptable record of the original scene, though not always.
Presets
Your camera provides several pre-set programs that adjust the three settings in the camera that affect exposure: aperture, shutter speed, and ISO.

Three main controls determine your exposure: the shutter speed, the aperture, and the ISO. The camera presets (A, S, and M) allow you to determine the depth of field and/or speed with which the camera captures the light.
The A (aperture priority) mode allows you to set the size of the lens opening (f-stop) while the camera automatically sets the shutter speed. The S (shutter priority) mode lets you set the duration of the lens opening (shutter speed) while the camera adjusts the size of the lens opening. The letter P (program mode) allows you to determine the best mix of aperture and shutter speed while your camera retains the correct balance of light for the exposure. The letter M (manual mode) gives you complete control over all settings but requires to balance the overall exposure.
Your camera’s variable ISO (International Standards Organization) setting adjusts the light sensitivity of the camera’s image sensor, allowing you to capture scenes in dim or bright light; the higher the number, the more sensitive the light receptors become, allowing you to capture images in lower levels of light.
The Histogram
Your camera provides a small graph that roughly indicates how well the camera is set to correctly capture the light in the current scene.

This graph displays the range of light coming through the lens and approximates the current light distribution that captured under the current settings. By adjusting the three settings mentioned above, you can shift and somewhat distribute this range of light to best record the full range of light.
Color balancing the light
Every scene’s color cast is influenced by the temperature of the light illuminating that scene. When the scene is captured outside, the Sun’s position in the sky and the influence of cloud cover alters the color of the light. Your camera offers at least two ways to compensate for the differences in color temperature (Auto White Balance and Pre-set Color Balance).
Auto White Balance
The Auto White Balance (AWB) sensor in your camera seeks any prominent white or neutral subject in the scene and shifts the entire color balance of the scene in an effort to neutralize that element. But there is an assumption with AWB that you desire the current lighting to be perfectly neutral in color.
Any clouds interfering with the sunlight will have a slight influence on the neutrality of 6500° (natural sunlight) lighting. AWB takes that slight shift out of the equation. Most of the time, this is a great idea. However, to record early morning or late afternoon (golden hour) lighting accurately, AWB will neutralize those warm colors and completely lose that “warm” mood.

Pre-Set White Balance Settings
Your camera offers several pre-sets to offset any known color casts caused by specific lighting situations. These settings appear in every digital camera “Settings” display and may appear in a slightly different order or wording. Daylight sets the camera to record scenes under typical mid-day outdoor lighting. Cloudy/Overcast shifts the colors toward orange to compensate for the bluish cast caused by light filtering through nominal cloud cover.
Shade offers a stronger orange shift to compensate for completely overcast (stormy) skies. Flash provides a very similar color temperature lighting as Daylight and is intended to prepare the image sensor for artificial daylight or “Speed light” type flash devices.
Tungsten/Incandescent shifts the colors toward the blue end of the color range to compensate for the warmer shift of incandescent lights. Fluorescent attempts to compensate for the greenish cast of gas-charged fluorescent lights.
Kelvin/Custom permits the user to set a custom color balance setting, essentially teaching the camera what “neutral” gray color looks like. All of these pre-sets attempt to correct non-neutral lighting conditions.
The Sculpting, or Finishing Process
While the camera does capture the full range of reflected light in a scene, it has no way of knowing the best tonal curve to apply to each image. Many times the five tonal ranges (highlight, quarter, middle, three-quarter, and shadow) need to be reshaped to best interpret the light captured at the scene. This tonal contouring process is the magic of sculpting the light into a meaningful visual image.

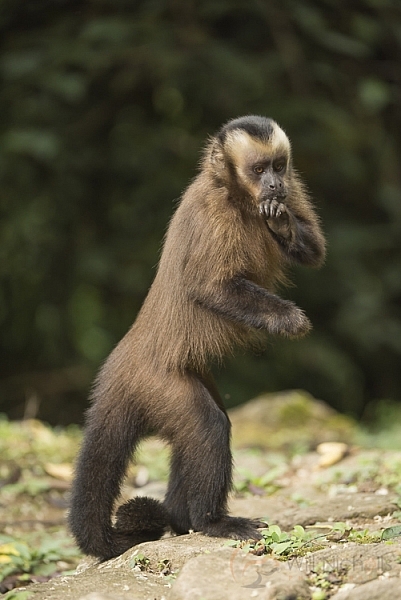
This little fella perched outside my front door and caught me off guard. I didn’t have time to fiddle with the controls to optimize the lighting situation. My first click got his attention and the second got this expression. Fortunately, I capture my images in both jpg and RAW formats simultaneously. Doing so allowed me to post-process the tones and display to you what I actually saw that morning.
I use the term “sculpting” when talking about image editing because it best describes the rearranging of tones in a digital image. Only ideal lighting balance looks great when rendered as a “stock” JPEG camera image.
This sculpting or finishing process amounts to the clarification of tones and colors in a digital image; making the image appear in final form the way the human mind perceived it in the original scene. While the color balancing aspect of this process is a bit more obvious, the tonal recovery is actually more critical to the final presentation.
The digital camera cannot capture all of the dynamics of the visible spectrum on a sunny day, nor can it determine the best balance of those tones. The camera’s image sensor simply captures all the light possible and presents the data to the camera’s image processor to sort out. Under perfectly balanced lighting, this works out just fine, but occasionally detail hides in the shadows and gets lost in the highlights, requiring help from the photographer/editor to balance out the tones.

This is where the individual tone-zones come into play, and the sliders available in RAW processing software (Camera Raw, Lightroom, On1 Camera Raw, Exposure X4) are invaluable. The internal contrast of every image (Whites, Highlights, Middle tones, Shadows, Blacks) can be pushed around and adjusted in a very non-linear manner (in no particular order) to reveal detail that otherwise remains hidden.
Conclusion
Photo finishing isn’t complete until both color and tones are correctly adjusted for maximum effect, matching the emotion of the original scene. Only then is your image ready for viewing. Challenge yourself to squeeze the detail and reveal the potential personality out of every image you capture. It’s well worth the extra effort.
The post Photo Finishing – Challenge Yourself to Reveal the Personality in Every Image You Capture appeared first on Digital Photography School. It was authored by Herb Paynter.
















You must be logged in to post a comment.