RSS
 

Posts Tagged ‘Person’

Treat yourself 2017: the ultimate holiday gift guide for that special person (you)

20 Nov

2017 Treat Yourself Buying Guide

The holidays are all about giving, so why not give back to the most important photographer in your life? That’s right, I’m talking about you.

At this time of year there are plenty of gift guides out there geared toward buying for others, but at the end of the day, your own photographic spirit needs nurturing. Also, camera gear can be pretty pricey and no matter how much they love you, your significant other/siblings/parents/friends might not be able to spring for that $ 1600 item on your wish list.

In this guide, we’ve rounded up a list of gear designed to pamper you and your creative spirit. From the ultimate pocket compacts, to nicer ways of carrying your camera, to the perfect rugged, portable hard drive – we’ve got you covered.

Peak Design Everyday backpack, 20L black

Peak Design Everyday backpack, 20L | $ 260 | PeakDesign.com

Treat yourself to one of the most technical and well-thought-out camera backpacks on the market: the Peak Design Everyday backpack. It comes in both a 20L and 30L capacity.

Weather-proof with plenty of ways to expand its carrying capacity including luggage straps, this bag is also real slick-looking. We’re big fans of the origami-style Flex-Fold dividers used to organize the bag’s interior, and we also appreciate the many interior pockets.

DJI Mavic Pro Fly More Combo

DJI Mavic Pro more combo | $ 1300| DJI.com

There are smaller, cheaper drones than the DJI Mavic Pro out there, (like the DJI Spark) but we recommend treating yourself to the Pro because it offers a great balance of portability, features and image/video quality. The Mavic Pro can shoot 12MP Raw files and 4K video and offers 27 minutes of flight time, 3-axis gimbal stabilization and can fly at up to 40 mph. It’s also pretty easy to pick up and start using, especially in beginner mode, though there is a slight learning curve.

In a sense, it’s the perfect drone for the first-time-flyer, long-time-photographer who wants to shoot more than HD video or JPEGs with their drone. We recommend you spend the extra cash on the controller – using your cellphone alone provides a very limit flight range and mediocre flight experience. But there are few things better for changing up your photographic perspective than owning a flying camera.

Affinity Photo for desktop

Affinity Photo for desktop | $ 50 | Affinity.Serif.com

Affinity Photo for desktop is a nifty piece of editing software that rivals Photoshop, all for a one time payment of $ 50.

In our review of Affinity Photo, we found the software more than capable at handling the majority of our re-touching tasks. Editing is mostly non-destructive and there are tools for batch processing, Raw processing, tone mapping, creating panoramas and focus stacking. Plus, if you’re coming from Photoshop, the learning curve is pretty shallow.

Affinity Photo for desktop is available for both Mac and PC.

Polaroid OneStep 2

Polaroid OneStep2 + i-Type film pack | $ 146 | PolaroidOriginals.com

The ultimate treat yourself: Take a step back from the technical nitty-gritty of this modern digital world and try shooting just for composition – it can do wonders for your creative spirit. To get into this mindset may we suggest one of the coolest instant cameras on the market, the Polaroid OneStep2?

The OneStep2 is a modern rebirth of the classic Polaroid OneStep. The controls on this camera are purposely limited: there’s a shutter button, a flash on button and a self-timer. It shoots Polaroid i-Type film which is similar to the original Polaroid 600 film and substantially larger than the Instax film offered by Fujifilm.

The camera itself is pretty affordable ($ 100), but it’s the film cost that’ll get you – at ~$ 2 a shot it’ll definitely have you shooting decisively. Nothing wrong with that!

Sandisk Extreme 500 portable SSD 500 GB

Sandisk Extreme 500 portable SSD 500 GB | $ 170 | ShopSandisk.com

This tiny portable SSD drive is both drop-proof and weather-proof and it weighs less than 80g. For the traveling photographer with limited space, it’s an invaluable piece of gear – one that won’t fail if dropped or knocked around. It also offers super fast transfer speeds and runs cool and quiet.

So treat yourself and your data to peace of mind and pick up what we consider to be the most sensible rugged hard drive currently on the market.

Ricoh Theta V

Ricoh Theta V | $ 430 | us.Rioch-Imaging.com

360-degree photos and videos are pretty darn cool and the technology required to make decent looking 360/VR content is finally coming down in price. Why not get in on the fun and treat yourself to one of the nicest stand-alone 360-cameras on the market in the form of the Ricoh Theta V?

We’ve found found the Theta V to be both easy-to-use and capable of impressive quality stills and video. It offers 4K video capture and shoots 14MP stills. Connectivity and audio capture have both been improved over the previous model, and the camera itself has a slick, Apple-like design.

Olympus Tough TG-5

Olympus Tough TG-5 | $ 450 | Get.Olympus.com

The budget compact may be dead but the rugged compact is still very much alive. And the Olympus Tough TG-5 is a DPReview favorite. We already recommended it as a great gift option for others, but if you’re into outdoor activities it’ll make a great compact option alongside your main camera. In fact, DPR’s Carey Rose deemed it the ‘best rugged compact you can buy right now,’ based on his shooting experience.

The camera offers a 25-100mm equiv zoom lens and the body is completely sealed, making it waterproof down to 50ft, drop proof from 7ft, crush proof up to 220lb and freezeproof to 14F. It also shoots Raw and is capable of surprisingly good image quality. Other features include 4K video capture and 20 fps burst shooting.

There’s something to be said for a go-everywhere-camera that you don’t have to worry about dropping, breaking or soaking. And there’s none we’d recommend over the Olympus Tough TG-5. Treat yourself!

Sony RX100 V

Sony Cyber-shot RX100 V | $ 950 | Sony.com

Speaking of compacts, the Sony Cyber-shot RX100 V is arguably the most advanced high-end pocket camera to ever exist, jam packed with a dizzying array of technology and features. The creme de la creme of small cameras, for many it is a want-to-have, not a need-to-have. To that we say… treat yourself!

It’s got a useful and sharp 24-70mm equiv. F1.8-2.8 zoom lens and can shoot at up to 24 fps with AF and auto exposure. Plus, it uses an impressive 315-point phase detect AF system. But that’s not all: it’s capable of outstanding 4K video and class-leading stills. The RX100 V also offers built-in Wi-Fi, a pop-up electronic viewfinder and a pop-up flash (read our full review).

The RX100 V has come down a tiny bit in price since launch, but if it’s still too expensive, you should consider some of the other also excellent, but more affordable RX100-series cameras.

Fujifilm X100F

Fujfilm X100F | $ 1300 | Fujifilm.com

We’ve enjoyed using every camera in the Fujifilm X100-series, and the X100F is the latest and greatest iteration. A beautifully-designed, retro-looking camera, the X100F offers a fixed 35mm F2 equiv. lens and tons of direct controls.

The X100F gains a higher-resolution 24MP sensor, an AF joystick and improved AF performance. We especially like the hybrid optical/electronic viewfinder. And unsurprisingly, we gave the X100F a gold award in our review.

In short, we think it’s among the nicest-designed compact cameras around and a great companion for travel, or documenting friends and family. So treat yourself to retro-elegance in this fixed-lens beauty.

Canon 85mm F1.4L IS USM

Canon 85mm F1.4L IS USM | Canon.USA.com | $ 1600

If you’re going to buy a portrait lens, you might as well buy one of the nicest primes released this year. We’re talking of course about Canon’s new 85mm F1.4L IS (see our sample gallery shot with it). Sharp, fast and stabilized, this lens is capably of seriously excellent image quality. It’s also dust and weather-sealed and features a 9-blade aperture.

At $ 1600, it’s priced pretty competitively, but Sigma’s stabilized 85mm F1.4 is also excellent, and somewhat cheaper at $ 1200.

Nikon D850

Nikon D850 | $ 3300 | NikonUSA.com

Perhaps you already shoot Nikon, but maybe you are invested in another DSLR system, or you shoot mirrorless. Regardless of the camera your are currently shooting with, we’d urge you to take a look at the best DSLR currently on the market: the Nikon D850. As we stated in its gold award winning review…

‘Offering an impressive 45.7MP of resolution, 7fps burst shooting, full-width 4K video and a focusing system derived from the flagship D5, it looks as though Nikon’s thrown just about everything they’ve got into the D850, and priced it well to boot. Competitors with similarly specced megapixel counts such as the Sony a7R II and Canon EOS 5Ds R may be cheaper at this point in their lifetimes, but they also fall short of the D850 in a number of ways that may make a difference in the way you shoot.’

If that doesn’t have you convinced the Nikon D850 is the ultimate treat yourself purchase, maybe our sample gallery will.


That’s all the self-gifting advice we have for you this year. We certainly don’t expect you to pick up everything on our list, but hopefully there is something here that’ll make you, or a special someone smile.

Articles: Digital Photography Review (dpreview.com)
 
Comments Off on Treat yourself 2017: the ultimate holiday gift guide for that special person (you)

Posted in Uncategorized


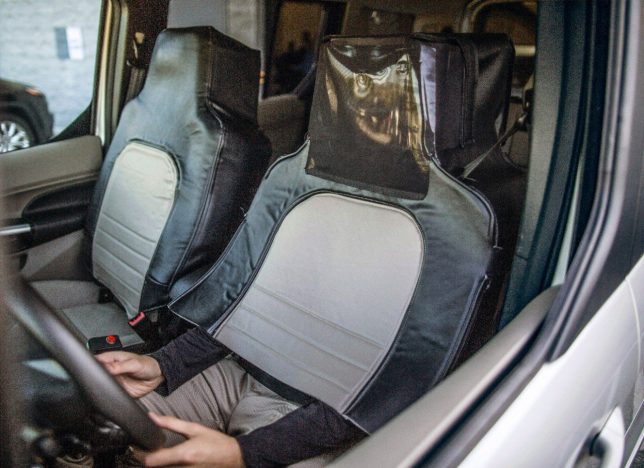
Ford Disguised a Person as a Seat to Test How We React to Driverless Cars

16 Sep

[ By SA Rogers in Technology & Vehicles & Mods. ]

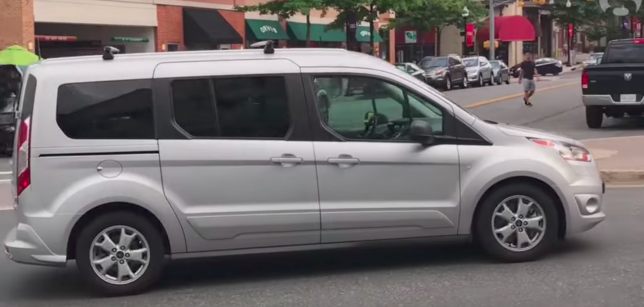
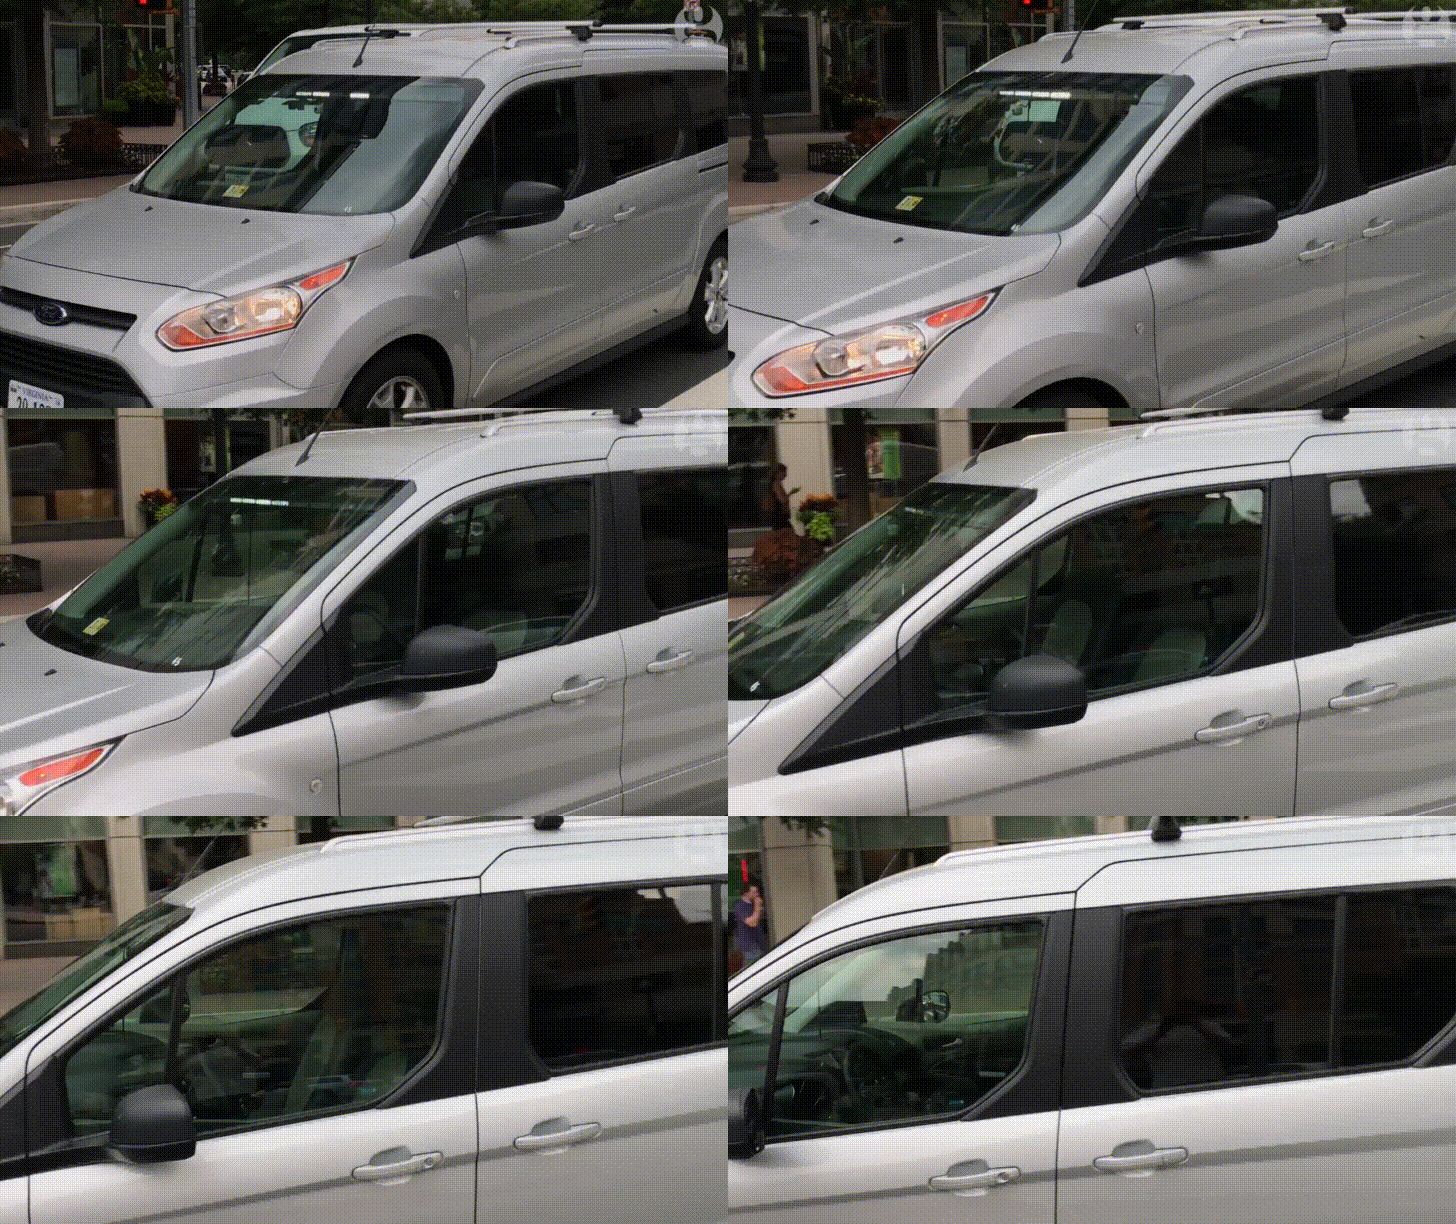
A Ford van zooming around the Washington D.C. area last month, seemingly without a human in the driver’s seat, wasn’t self-driving after all: it was a man in a ‘seat suit.’ A fake driverless car might seem like a weird experiment, especially considering the fact that there’s an entire fake town for testing self-driving vehicles at Ford’s disposal. But as it turns out, they have their reasons: observing how people react to seeing it. While Virginia Tech has already been testing autonomous vehicles in the area, they’re still using human overseers to take over the wheel in case something goes wrong.

In the video above, a few people muse aloud, “Is that a self-driving car?” Slow-motion shots show the vehicle passing by with a seemingly empty driver’s seat. But the fact that there’s a man camouflaged as a car seat is almost more interesting, anyway. After learning of the stunt, Adam Tuss of NBC Washington followed the car around until he could pull up next to it at a red light and get a shot of the interior, revealing the driver’s hands and legs. “Brother, who are you?” he asks in the video. “What are you doing? I’m with the news, dude.”

John Shutko, a Ford self-driving researcher, divulges some answers in a piece on Medium.

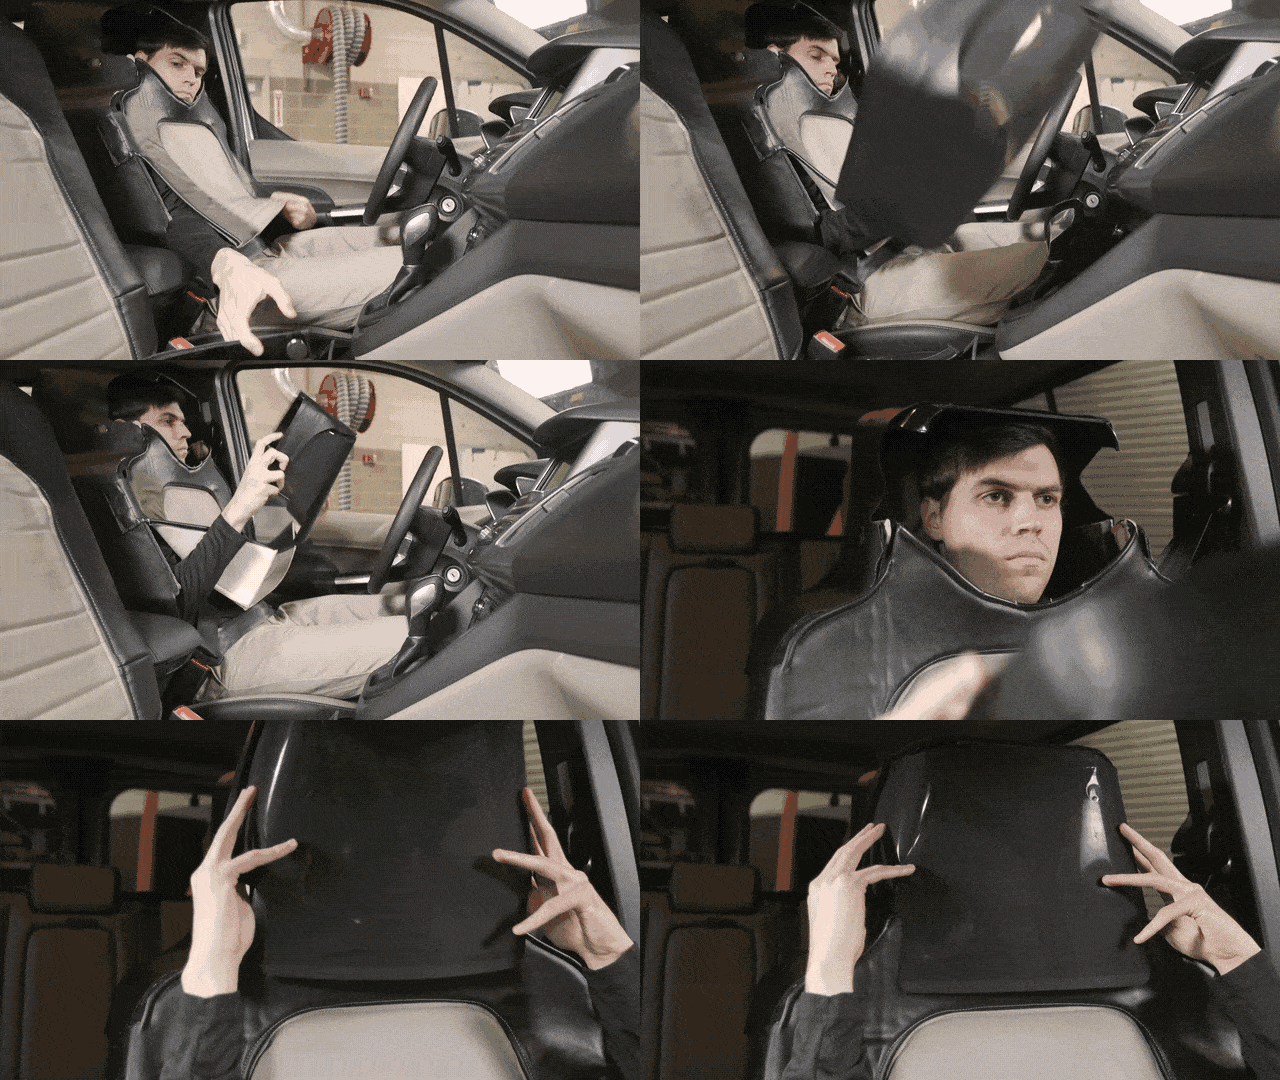
“We’re teamed up with [Virginia Tech] to test our communications method and to explore how pedestrians and bicyclists react to self-driving vehicles with no human in the driver’s seat. Of course, we do need someone in the seat right now, so we dressed a human up in a seat suit to make it appear as though there was nobody inside our simulated self-driving Ford Transit Connect. This seat suit allowed us to collect real-world reactions to an autonomous vehicle driving on miles of public roads in northern Virginia, without actually using an autonomous vehicle.”

Six different drivers wore the suit throughout August, reporting that they started out on a test track before moving onto the streets, and that the suit was definitely uncomfortable.

Share on Facebook


[ By SA Rogers in Technology & Vehicles & Mods. ]

[ WebUrbanist | Archives | Galleries | Privacy | TOS ]


WebUrbanist

 
Comments Off on Ford Disguised a Person as a Seat to Test How We React to Driverless Cars

Posted in Creativity


Video: first person view of a spacewalk, shot by an action cam

19 May
 
There’s literally nothing cooler than outer space. And getting to see a first-person view of a spacewalk, shot by an action camera, is both fascinating and exciting. The above video was taken on March 24th by ESA astronaut Thomas Pesquet. It also shows NASA astronaut Shane Kimbrough.

The two are shown preparing a dock and making repairs to components at the International Space Station. From the Youtube post:

“The primary task was to prepare the Pressurized Mating Adapter-3 (PMA-3) for installation of the second International Docking Adapter, which will accommodate commercial crew vehicle dockings. The PMA-3 provides the pressurized interface between the station modules and the docking adapter. The pair disconnected cables and electrical connections on PMA-3 to prepare for its robotic move, which took place on Sunday, March 26. PMA-3 was be moved from the port side of the Tranquility module to the space-facing side of the Harmony module, where it will become home for the docking adapter, which will be delivered on a future flight of a SpaceX Dragon cargo spacecraft. The spacewalkers also installed on the starboard zero truss a new computer relay box equipped with advanced software for the adapter.

The two spacewalkers lubricated the latching end effector on the Special Purpose Dexterous Manipulator “extension” for the Canadarm2 robotic arm, inspected a radiator valve suspected of a small ammonia leak and replaced cameras on the Japanese segment of the outpost. Radiators are used to shed excess heat that builds up through normal space station operation.”

Articles: Digital Photography Review (dpreview.com)
 
Comments Off on Video: first person view of a spacewalk, shot by an action cam

Posted in Uncategorized


How To Create Two of the Same Person in One Photograph Using Photoshop

12 Jul

This is a fun twist on portraiture that can often tell a bit more of a story about your subject, by allowing them to reveal two or more sides to their personality. It’s an old photography trick used in the days of the darkroom, and now with modern technology can be done in minutes with a few simple steps in Photoshop.

First you are going to need two or more photographs of your subject, so find yourself a victim to experiment on, or try a self portrait. The main trick to this technique is to get things set up well in the shooting stage so everything goes smoothly when you go to edit.

Getting Set Up to Shoot

You’ll need to put your camera on a tripod. Your tripod position, lighting setup, your camera and its settings, all need to remain the same throughout the shooting session. Once you’re set up don’t move or twiddle anything, otherwise things can get a bit wobbly when you go to blend your final images.

It is possible to do this with natural light, but you’ll have to work fast before the light changes too much. If you don’t have studio lighting you can try light painting or some of the other DIY lighting tips from my article Creating Effective Studio Lighting with Household Items

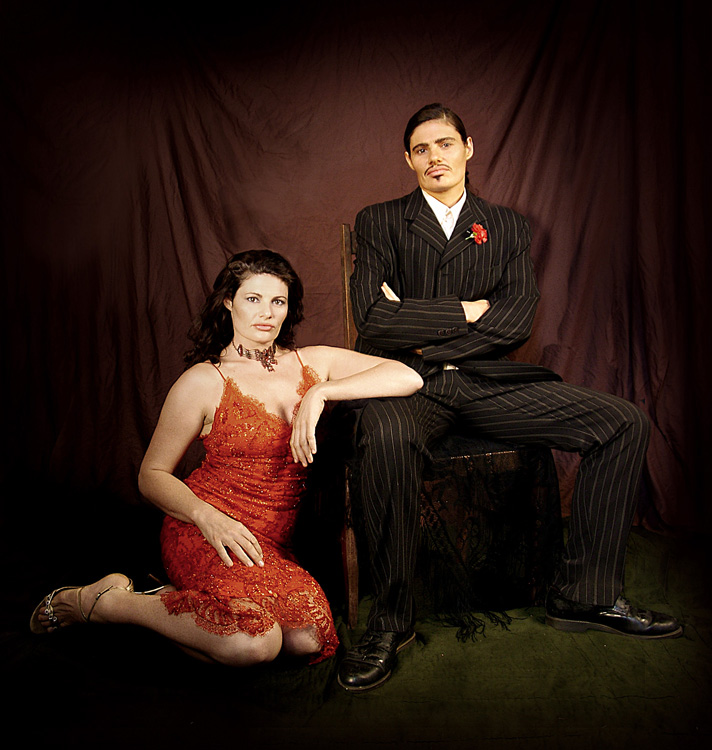
Start with a simple set such as two chairs. To make it a bit more interesting, add something like a small table in between with a prop or two; your subject could be sharing a cup of tea or a glass of wine with themselves.

portrait-photography-trick02

Positioning your subject

Once you have set your stage and are happy with how it looks through the viewfinder, bring in your subject to test out the lighting on them for both positions. Then you are ready to roll.

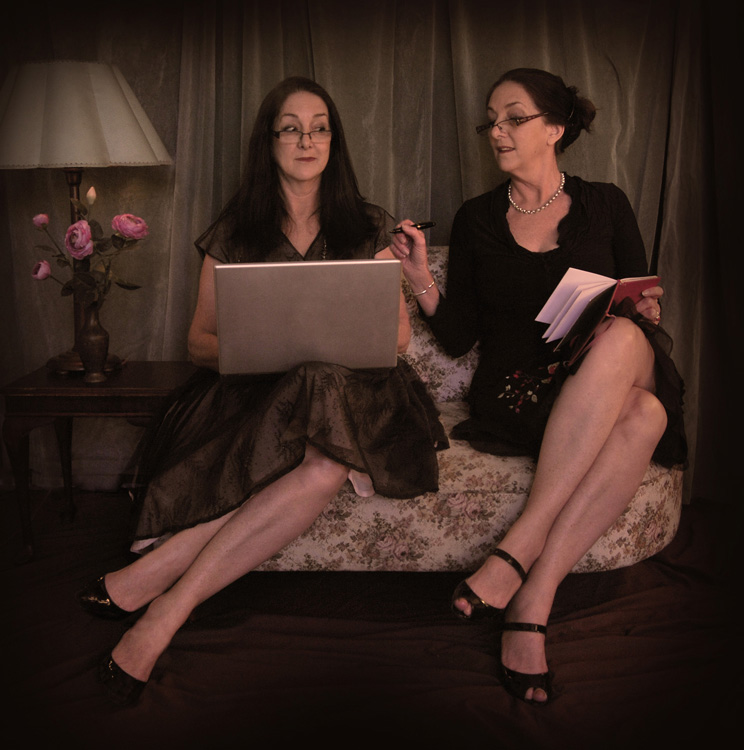
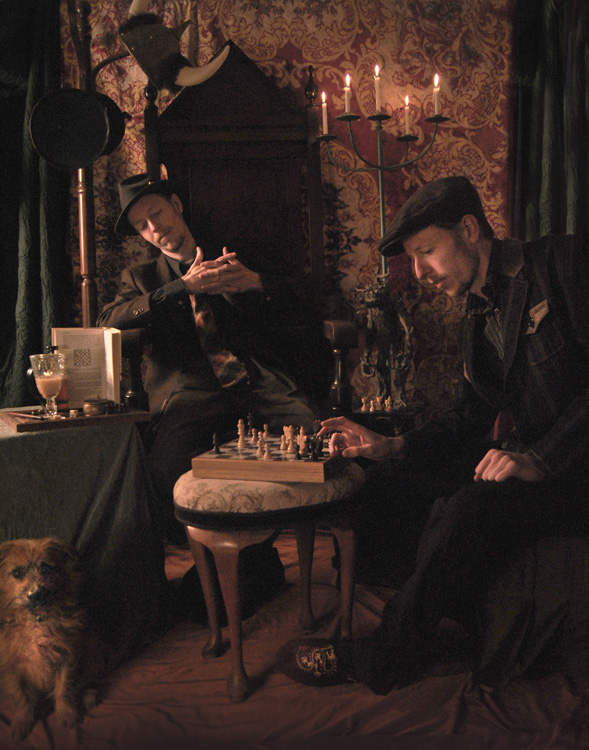
Think about how the different versions of your subject will interact with each other. Will they be in conversation, raising a glass congratulating themselves on a portrait sitting job well done perhaps? In such a case it’s important to get their line of site correct to achieve the illusion of the subject looking at themselves.

portrait-photography-trick03

It is a good idea, when first attempting this, to ensure there is no overlap of the two versions of your subject, such as a stray foot, to save you any extra fiddling about in the editing stage. You can help to keep both versions separate by placing a small marker, such as a tiny bit of tape on the floor in the middle of your setup, so your subject knows where that invisible overlap line is located.

For the shot below I had the female version lean on a rolled up towel to imitate the knee of the male version of herself. This gave a natural lean to her pose and helped create the illusion that she is actually leaning on the male version’s lap.

portrait-photography-trick04

Take as many shots as you and your portrait subject have the time and patience for. The more versions you have, the better chance of finding a perfect match in the editing stage. Try different facial expressions and poses for each version of your subject.

Easy editing

We are going to be working with layers here, but if that’s new to you don’t panic! It really is easier than you might think. Just follow the few steps below and you’ll be pulling a photographic rabbit out of a Photoshop hat in no time.

  • Open your favorite image of each version of your subject in Photoshop.
  • Make sure both images are the same size.
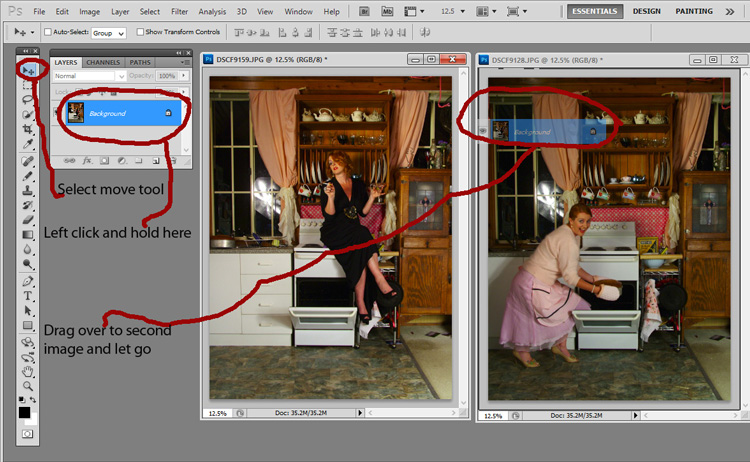
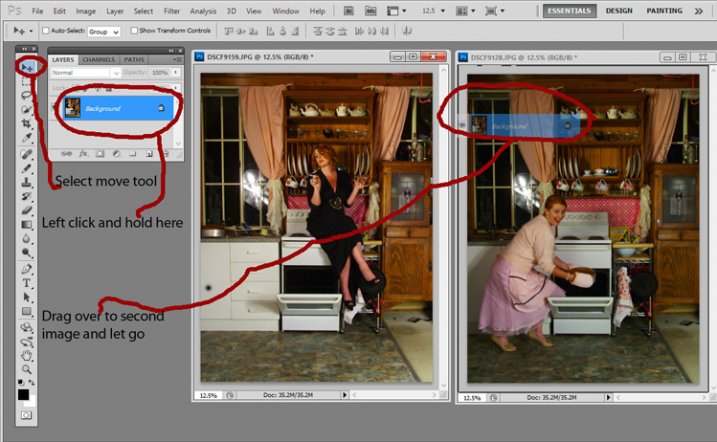
  • Using the Move Tool, click on the thumbnail of the first image in its Layers Palette, drag over the top of the second image and let go.
  • You now have both images on top of each other in the same file, seen as Background and Layer 1 in the Layers Palette (shown below).

portrait-photography-trick05

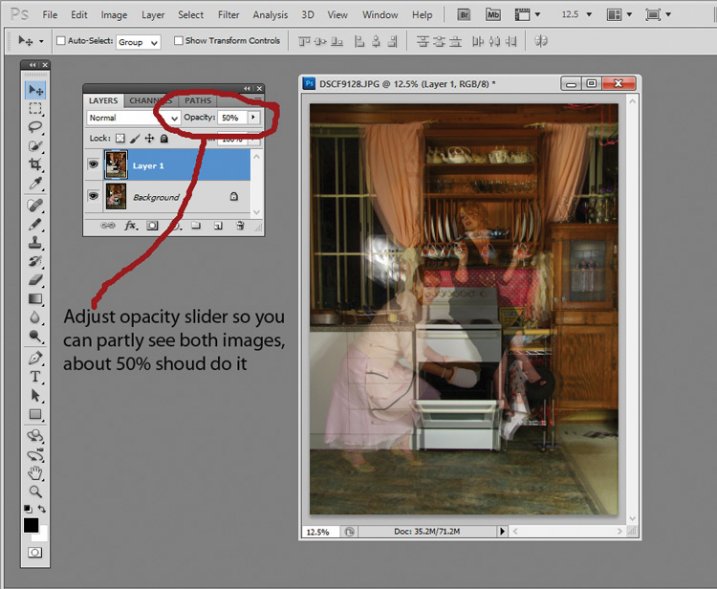
  • You’ll need to see both versions, so go to the Layers Palette and select the Layer 1 thumbnail.
  • Using the Opacity slider just above it, slide it around until you can see both images, about 50% usually works the best.

If you haven’t moved anything about during shooting the images should line up perfectly. In which case, you’ve done the hardest part already, it’s smooth sailing from here.

If your setup got bumped, you can probably still line things up well enough to work. Just use the Move Tool to slide around top image and try and get the best alignment. It helps to zoom in to check accuracy (you can also use Auto-Align Layers” in the edit menu but it may be fooled by the subject – but give it a try).

portrait-photography-trick06

Now the fun part

  • Select Layer 1 in the Layers Palette.
  • At the bottom of the Palette is a little square with a circle in it, commonly known as the Add Layer Mask button, or as I like to call it, the Where the Magic Happens button.
  • Click on it and a Layer Mask white box will appear next to the image thumbnail.

It’s not sounding very magic so far, but hang in there.

  • The Background and Foreground Colour squares at the bottom of your Tools Pallette will need to be black on the top (foreground color).
  • Select a brush, set to zero hardness and get ready to make magic happen.
  • Set both Layer and Brush Opacity sliders to 100%.
  • Make sure that white Layer Mask thumbnail is still selected.
  • Start brushing and watch as the second version of your model magically appears, tada!

portrait-photography-trick07

Don’t worry if you go too far, and erase something more than you intended, if you do, you can just switch those little black and white boxes in the Tools Pallette with the tiny arrows (or press X on your keyboard) so white is on top, then brush back in to reverse the mistake (black conceals, white reveals).

That’s it! All the tricky stuff done and dusted.

Now you simply flatten the image. File> Flatten Image, and all that is left is to edit as you would any other photograph. For this image it was a crop here, a filter and color adjustment there, and erasing the umbrella light reflection in the window.

portrait-photography-trick08

This technique is something you can really play with, from building sets and getting creative with props, or simply using it to get more of a story from your portrait subject. Either way, it is great fun to try. If you do, please share your results in the comments. Happy experimenting.

googletag.cmd.push(function() {
tablet_slots.push( googletag.defineSlot( “/1005424/_dPSv4_tab-all-article-bottom_(300×250)”, [300, 250], “pb-ad-78623” ).addService( googletag.pubads() ) ); } );

googletag.cmd.push(function() {
mobile_slots.push( googletag.defineSlot( “/1005424/_dPSv4_mob-all-article-bottom_(300×250)”, [300, 250], “pb-ad-78158” ).addService( googletag.pubads() ) ); } );

The post How To Create Two of the Same Person in One Photograph Using Photoshop by Lea Hawkins appeared first on Digital Photography School.


Digital Photography School

 
Comments Off on How To Create Two of the Same Person in One Photograph Using Photoshop

Posted in Photography


Photographer creates picture of 100-man orchestra… with the same person playing each instrument

06 Jun

An Oslo musician and photographer has created a photo stitched together using 400 images, showing an entire orchestra with every instrument played by the same person. Violinist Alexander Light created the 200MP picture by shooting percussionist Heming ValebjØrg in every seat on a stage while he played the appropriate instrument for that position. Read more

Articles: Digital Photography Review (dpreview.com)
 
Comments Off on Photographer creates picture of 100-man orchestra… with the same person playing each instrument

Posted in Uncategorized


How Does a Blind Person Use Instagram? This Blind Instagrammer Demos

03 Jan

What if your camera could talk to you? That’s exactly what Tommy Edison’s can do.

Tommy has been blind since birth, but he uses Instagram on the regular. In fact, he has over a thousand followers!

It’s all thanks to the Accessibility setting on his iPhone, a setting that dictates to him what’s on his screen. With it, he can shoot, pick filters, add a caption, and read comments.

You might be wondering why a blind person would use Instagram if they’re not able to see their photos. It’s pretty much the same reason those of us with vision do!

Through it, Tommy’s able to document and share his daily life with friends and fans. In a way, he even gets to “see” his photos through the feedback he gets.

Pretty amazing, right?

MORE: Check out our feature on Pete Eckert a blind art photographer and Amy Hildebrand a photographer born legally blind from albinism.

How Blind Photographers Use Instagram [Thanks, Darby!]

p.s. Our friends at New York Institute of Photography wanna help you become better photographers this year. You can take their classes on your time from just about anywhere!

No related posts.


© lisbeth for Photojojo, 2013. |
Permalink |
No comment |
Add to
del.icio.us

Post tags:


Photojojo

 
Comments Off on How Does a Blind Person Use Instagram? This Blind Instagrammer Demos

Posted in Equipment


Vixels — This Artist Will Turn You into a Pixel Person!

18 Oct

Normally, you don’t want your pixels to be seen.

You like the pristine, fine-grain look. But what if you went to the other extreme and really let your pixels show?

Vic Nguyen is taking commissions for turning your photos into awesome pixel portraits! His vixels, as they are called, are a little reminiscent of 8-bit Twitter avatars, but turned up a few degrees with way more detail.

Mustaches, beards, dimples, even your haircut are turned into exact pixel replicas.

So the next time someone tells you your pixels are showing, it’ll be a compliment!

Have Your Pixel Portrait Made from Photos [via Uppercase Magazine]

p.s. Hey, Hot Shot! has a photo competition with $ 15,000 in prizes and some pretty amazing exposure up for grabs. Deadline is 11/14, so get those hot shots in!

Related posts:

  1. Turn Your Webcam Into a Funhouse Mirror June’s Photojojo made possible by… ~Have a cool photo product…
  2. Embrace Your Inner Artist — How to Doodle on Your Photos and Bring Them To Life! Extra photos for bloggers: 1 2 3 Since the dawn…


Photojojo

 
Comments Off on Vixels — This Artist Will Turn You into a Pixel Person!

Posted in Equipment