RSS
 

Posts Tagged ‘Pass’

8 Tips for Editing Stock Photos so they Pass Inspection

17 Jun

The post 8 Tips for Editing Stock Photos so they Pass Inspection appeared first on Digital Photography School. It was authored by Kevin Landwer-Johan.

dps-tips-for-editing-stock-photos

Editing stock photos requires a little more attention to detail than you otherwise might give your photos. Stock photo agencies have standards to meet and rules to follow. If you want your photos accepted into their libraries, you must adhere to them.

You may have applied to a stock photo agency in the past and had your imaged rejected because they were not up to scratch. Each stock photo agency has its guidelines for what is acceptable and what is not. Learning what these are can save you a lot of wasted effort and time.

Asian lanterns at night for editing stock photos
© Kevin Landwer-Johan. Nikon D700, 105mm, 1/20 sec, f/4, ISO 200, Manual Mode, Pattern Metering..

It’s easier than ever to upload to stock photo agencies

Over the years micro-stock photography requirements for image editing have shifted somewhat.

Camera technology has improved, so there are fewer imperfections caused in images when you take them. With the increase in megapixels and image quality, there’s less need for as much post-processing now.

With more and more stock photography sites coming online over the years, standards are not so tough as they used to be. Newer, smaller agencies want to attract photographers. Not being so strict on image quality makes it easier to meet requirements. Image libraries are populated more quickly because there are fewer rejections.

As stock photo libraries contain millions of photos, the parameters for what style of photo is accepted has changed. Many photo sales sites will accept photos for editorial licensing, whereas in the past most did not.

From one agency to another, the quality and style of photos they accept differ. In this article, I’ll go over some of the most common things to look for in your photos that might hinder them from being accepted.

New Zealand landscape for editing stock photos
© Kevin Landwer-Johan. Nikon D200, 70mm, 1/125 sec, f/3.2, ISO 200, Manual Mode, Pattern Metering.

Common requirements for editing stock photos

When I started learning about stock photography, there were fewer agencies, and their quality standards were much higher. It was more challenging to have your photos accepted into the best agencies. And, when you had been welcomed as a contributor, you could not let your standards drop.

Each submitted photograph gets thoroughly checked. The team of inspectors works with a list of parameters and standards. Every photo must meet these before it’s included in the stock library. In some cases, inspectors will offer you feedback. There can be a provision made to resubmit rejected photos once they are fixed. But not all stock agencies do this. Sometimes if your photos are rejected, there is no opportunity to fix them and resubmit.

Learning to meet the standards will help you improve your image editing skills. The bar may not be so high anymore, but it’s always best to aim to present the highest quality possible.

Some of the most common things stock photography inspectors look for in photos that will get them rejected are:

  1. Incorrect exposure
  2. Excessive noise
  3. Chromatic aberration
  4. Artifacting
  5. Sensor spots, dust, and other blemishes
  6. Poor cropping and alignment
  7. Incorrect white balance
  8. Copyright infringement
beer bottle and opener for editing stock photos
© Kevin Landwer-Johan. Nikon D700, 55mm f/1.4, 1/30 sec, f/3.5, ISO 500, Manual Mode, Pattern Metering.

Editing stock photos so they pass inspection

Before you start editing, you can do a lot to ensure your photos will get accepted. For more of your photos to pass inspection, you need to think like a stock photographer as you are taking your photos.

1. Set your exposure well

Keep in mind the importance of attaining a good exposure. This is far more desirable than correcting your exposure during post-production. Start editing stock photos that are poorly exposed and you’ll run into other problems.

When your exposure is poor, correcting it during post-production can result in artifacts in your image. This is when the digital integrity of the image starts to break down. Stock agency photo inspectors usually reject photos with artifacts.

8 Tips for Editing Stock Photos so they Pass Inspection
© Kevin Landwer-Johan. Nikon D700, 55mm f/1.4, 1/15 sec, f/32, ISO 200, Manual Mode, Pattern Metering.

2. Clean the noise up

Modern cameras have an incredible capacity to take photos in low light. Raising your ISO too high can create an unacceptable amount of digital noise.

Cleaning up the noise is often not at all difficult. With the correct balance of noise reduction slider, you can eliminate it.

When you’ve used a high ISO setting, make sure you zoom into 100% and take a look at the level of digital noise. You may not see it clearly unless you enlarge your photo. Using the appropriate sliders, you will be able to reduce it significantly.

sky lanterns being released a festival in Thailand.
This image contained a lot of digital noise that I removed in Lightroom. © Kevin Landwer-Johan. Nikon D700, 35mm f/1.4, 1/100 sec, f/2.8, ISO 6400, Manual Mode, Pattern Metering.

3. Remove chromatic aberration

Chromatic aberration is sometimes called purple fringing. It’s a fault in digital images caused by contrast in a scene. When you’re editing stock photos, you must look carefully for this problem.

Check along the edges of objects in your photos where there’s a contrast with the background. When you notice a band of color along the edge you will need to correct this. The color is usually magenta or green. Sometimes it can be blue or yellow.

Most popular image processing software now has dedicated tools for eliminating this problem.

4. Clone out sensor spots and other blemishes

Sensor spots look ugly in photos. It’s best to keep your camera sensor clean, but this is not always possible. Other dust and blemishes also need to be removed so you can upload the cleanest photos possible.

Using clone tools is often the best way to clean these blemishes from your photos. Again, zoom into 100% so you can see these spots easily. Work methodically over the whole photo to make sure you don’t miss any.

Sensor spots are usually visible against a clear space in your photos. They are likely to show up in large areas of sky, snow, or other similar elements containing little or no detail.

white cross for editing stock photos
This type of image with lots of sky needs to be checked well for sensor spots. © Kevin Landwer-Johan. Nikon D700, 85mm f/1.4, 1/5000 sec, f/2.8, ISO 200, Manual Mode, Pattern Metering.

5. Straighten your photos

Buildings, lamp posts, horizons, and other elements must look properly aligned. If you’ve taken your photo with your camera on a bit of an angle, the vertical and horizontal lines will not appear natural.

Cropping your photos, so elements in them are aligned correctly, will help them pass inspection.

6. Correct your white balance

Most of the time, I have my camera set to auto white balance. This produces the correct color in my photos most of the time. When the color in your photos looks odd, it must be tweaked so it looks natural.

Having your camera set to save RAW files makes all aspects of post-processing easier, especially color correction. If you have photos where the color looks too cool or too warm, use the eyedropper tool or color correction sliders to help you achieve the natural color.

Lonely girl on the steps for editing stock photos.
© Kevin Landwer-Johan. Nikon D700, 50mm f/1.4, 1/200 sec, f/4, ISO 200, Manual Mode, Pattern Metering.

7. Remove all copyrighted elements when you are editing stock photos

This is the most frustrating aspect of stock photography for many people. So many things are copyrighted and branded. It’s best to avoid anything with a logo or branding when you are taking your photos. Sometimes you can’t, so you need to remove any instances of copyrighted material from your images.

If you are only uploading your images to sell under an editorial license, the requirements for copyright are different. You’ll need to check the terms and conditions for each stock photo agency as they differ from one to another.

Sometimes copyrighted material is in plain sight. Branding on a coffee cup. An outdoor advertising banner. Logos on shoes and clothing. All these are unacceptable when submitting photos to royalty-free microstock photo agencies.

Some of the more elusive things that contain copyrighted material are:

  • Zips with branding
  • Clips on bags with branding
  • Buttons with branding
  • Watches
  • Phones
  • Artworks

Text written in a language the inspector does not read will also often be rejected as they have no way of knowing if it’s copyrighted.

Cloning out any logos or branding can take a long time, so it’s best to avoid including these things in your photos when you can.

jet ski on the beach
I had to clone out a lot of branding from the jet ski. © Kevin Landwer-Johan. Nikon D700, 35mm f/1.4, 1/160 sec, f/6.3, ISO 200, Manual Mode, Pattern Metering.

8. Post-processing editorial stock photos

What’s allowed and what is not allowed is different for regular and for editorial licensing.

Images submitted for sale under a standard royalty-free license can be edited freely. Editorial stock images must meet higher standards. The most important thing to know is you cannot generally make use of the clone tool.

Any alteration to the content, other than sensor spots is not allowed. You must check the rules for each stock agency you submit editorial images to.

Conclusion

Become familiar with the requirements of each stock photo agency you want to upload to. Understand what is acceptable and what is not. This can take some time but ultimately will save you time and stress.

Take your time when you are editing stock photos. Look carefully at each one. Zoom into 100% to ensure your image quality meets the standards required.

I hope you find these tips useful. Do you have any other tips for editing stock photos you’d like to share? Please do so in the comments!

The post 8 Tips for Editing Stock Photos so they Pass Inspection appeared first on Digital Photography School. It was authored by Kevin Landwer-Johan.


Digital Photography School

 
Comments Off on 8 Tips for Editing Stock Photos so they Pass Inspection

Posted in Photography


Photoshop Sharpening for Beginners – Unsharp Mask, High Pass and Smart Sharpen Explained

02 Jan

The post Photoshop Sharpening for Beginners – Unsharp Mask, High Pass and Smart Sharpen Explained appeared first on Digital Photography School. It was authored by Nisha Ramroop.

photoshop-sharpening-for-beginners

With the constant improvement of technology, it is realistic to expect tack sharp images straight out of your camera. Many times, though, the image appears sharper on your camera than when uploaded to your computer. This is because images need to be sharpened for their specified output. In Photoshop sharpening for beginners, we look at why and how to sharpen your images. Also, you will review some of the sharpening filters and techniques that help make a huge difference to the overall quality of your final edit.

Image: F/5.6 1/200/ ISO800 @420mm

F/5.6 1/200/ ISO800 @420mm

Why sharpen?

Before we delve into the photoshop sharpening tools, it is important to know why and when you need to sharpen your images. The premise of sharpening is that it increases the contrasts around the edges in your image.

As previously mentioned, you need to sharpen images for their specific output types. This means you sharpen an image displayed on the internet differently than one meant for print.

Sharpening is also very useful when it comes to correcting smaller focus issues. For example, if you are shooting a portrait and the focus is on the ear instead of the eyes.

Sharpening the subject’s eyes brings the attention back where you intended. In other genres of photography, use sharpening in pretty much this same way. Sharpen the areas you want to draw the viewer’s eyes to and decrease the sharpness in areas you want to “fall away”.

Photoshop-Sharpening-for-Beginners

Sharpen for your respective output: web vs print. Details make a difference F/11 1/250 ISO200 @10mm

Keep in mind that while sharpening takes your image to the next level, there are times when it is not needed. While sharpening a person’s eyes and lips can take their portrait to the next level, you want to avoid sharpening their skin!

How to sharpen

As with other editing techniques, Photoshop sharpening filters are destructive (when applied directly to your image). Use layers and smart objects, to maximize the following sharpening tools and avoid permanently changing it.

Bonus Tip: When post-processing, save the application of your sharpening technique for last.

Unsharp Masks

While the name “unsharp” sounds like a tool that would make your images less sharp, this counter-intuitively named filter is, in fact, a sharpening tool. Interestingly enough, it was regarded as the best tool to sharpen images in earlier iterations of Photoshop.

While it is still useful, some of the other tools afford you a greater amount of control.

Photoshop-Sharpening-for-Beginners

Photoshop sharpening for beginners notes: When you sharpen an image too much, it starts to look a little noisy.

To use Unsharp Mask:

  • Duplicate your original/background layer
  • Right-click on your new layer and choose “Convert to Smart Object”
  • Go to Filter -> Sharpen -> Unsharp Mask. This brings up a dialog box with the options: Amount, Radius and Threshold


Remember, we said that sharpening basically increases the contrasts around the edges in your image? Well, building on that will make these sliders easier to understand.

Use the Amount slider to increase or decrease the amount of contrast in the edges of your image.

Radius manages the level of detail. So a smaller radius will manage the smaller details, while a large radius affects a bigger area.

The last slider, Threshold, affects the areas of higher contrast.

Photoshop Sharpening for Beginners – Unsharp Mask, High Pass and Smart Sharpen Explained

When using these sliders, a good starting place is to figure out your radius first. Do you want to sharpen the smaller details or the larger ones? If you are still unsure how to work with Photoshop sharpening for beginners, experiment!

In this example, push your radius up and then work back down until you affect the areas that you want. From here, you can start moving around the other two sliders until you get your desired results.

One of the downsides of using Unsharp Mask is that it is Layer specific. This is because it affects your entire image, so you need Layer Masking to discard areas that you don’t want sharpening.

Smart Sharpen

The Smart Sharpen tool is like a child of Unsharp Masks, as it gives you some more options. One of the cool things with Smart Sharpening is that it ignores skin detail and focuses on areas with higher contrasts e.g. eyes, eyebrows, lips.

Use the same workflow as above to access the Smart Sharpen filter. The dialog box gives you more advanced options than the previous Unsharp Mask. Amount and Radius work the same way as previously described.

Image: F/5.6 1/1600 ISO100 @420mm

F/5.6 1/1600 ISO100 @420mm

A drop-down menu allows you to remove different types of blurs such as Gaussian, Lens and Motion blur. Lens blur is the most common removal used in this menu.

Image: In Photoshop CC, your menu looks a little differently but has all the same options. Additiona...

In Photoshop CC, your menu looks a little differently but has all the same options. Additionally, it includes a useful option to reduce noise.

Smart Sharpen also allows you to create presets. This is helpful if you are sharpening a batch of images at similar focal lengths. Remember, when you apply your filters/filter preset to a Smart Object, you can further adjust/refine it.

High Pass Sharpening

Another photoshop sharpening for beginners is the High Pass Sharpening technique. While it is a little more advanced than the other tools, you can still easily apply it. It is not a filter found in the Sharpen Menu like the Unsharp Mask and Smart Sharpen filters. What it is, however, is a combination of steps that sharpens your image.

To process with High Pass Sharpening:

  • Duplicate your layer
  • Desaturate your new layer. It seems like a strange step, but since sharpening increases saturation around your edges, your image may start to look surreal.
  • Right-click on your desaturated layer and choose “Convert to Smart Object”
  • Go to Filter -> Other- > High Pass. Your entire image now turns to gray, and when you move the radius slider, you will see the targeted detail areas affected.
Photoshop-Sharpening-for-Beginners

Left: Using High-Pass in the default normal mode, see how your edges are defined. Right: Using High-Pass in Overlay Blend Mode allows you to see your changes in real-time

There is, of course, an alternate way to this gray image where you see your edit in real-time.

Prior to the last step above:

  • Select your desaturated layer and go to Blend Modes
  • Select Overlay
  • Then go to Filter -> Other -> High Pass and adjust


Photoshop-Sharpening-for-Beginners

At full size, you don’t always see that the eyes are not as sharp as they can be. Like Smart Sharpen, the eyes and lips are sharpened, but the skin is unaffected. F/7.1 1/125 ISO100 @70mm

Note: This sharpening technique is the only one that lets you apply sharpening with different blend modes.

Conclusion

Remember, sharpening should be the last step in your post-processing workflow. These filters and techniques in Photoshop Sharpening for Beginners will take your image to that next level. It helps to know when and why to sharpen an image and as with all processing, applying correctly makes a huge difference to your final image.

Do you have any other photoshop sharpening for beginners tips you’d like to share? Please do so in the comments!

The post Photoshop Sharpening for Beginners – Unsharp Mask, High Pass and Smart Sharpen Explained appeared first on Digital Photography School. It was authored by Nisha Ramroop.


Digital Photography School

 
Comments Off on Photoshop Sharpening for Beginners – Unsharp Mask, High Pass and Smart Sharpen Explained

Posted in Photography


Huawei caught trying to pass off DSLR images as smartphone photos…again

20 Aug

It appears Huawei hasn’t learned its lesson. Two years after the Chinese smartphone manufacturer was busted for trying to pass off a DSLR image as a photograph captured with its P9 smartphone, it’s under scrutiny yet again.

Huawei is now taking heat over a recent advertisement for its Nova 3 and 3i smartphones, wherein Huawei insinuates certain photos were captured with a smartphone when a behind-the-scenes photo proves that’s not the case.

The video, which is 30 seconds long, shows various scenes in which the subjects snap photos using various built-in camera features, including beauty, HDR and AI modes. Although the video never explicitly states the images were captured with a Huawei smartphone, it’s very much implied that’s the case.

A critical eye would instantly realize the images weren’t captured with the phone. But for the sake of empirical evidence, we’ll reference the above image uploaded to Instagram (and subsequently deleted) by Sarah Elshamy, the actress in the ad. In the behind-the-scenes still, pictured above, it’s clear the main actor was holding his hand out to make it appear as though he’s holding a phone, when in reality the scene was being shot with a Canon DSLR.

Again, Huawei never specifically mentions what the ad was shot with, leaving a bit of room for leniency. But it’s misleading at best, and downright false advertising at worst. We’ve reached out to Huawei for an official comment and will update this article accordingly if we hear back.

Articles: Digital Photography Review (dpreview.com)

 
Comments Off on Huawei caught trying to pass off DSLR images as smartphone photos…again

Posted in Uncategorized


Humor: Sports reporter tries to pass off iPhone calculator as ‘light meter’

30 Aug

You can’t make this stuff up… the website Deadspin stumbled across this on-field report from a cricket commentator, who tries to pass off his iPhone calculator as a “light meter.”

The question he’s trying to answer is whether or not it’s getting too dark to continue the test match between New Zealand and South Africa. According to his “light meter” there’s only 6.5 EV of light left to work with, which in his words is, “getting a little dodgy.”

Don’t worry though, the refs will take their own reading before they stop the match…

Articles: Digital Photography Review (dpreview.com)

 
Comments Off on Humor: Sports reporter tries to pass off iPhone calculator as ‘light meter’

Posted in Uncategorized


Photoshop Tip: Using the High Pass Filter to Sharpen Images

22 Nov

If you’ve used Photoshop, you are likely aware by now that there are many ways to accomplish the same tasks. One of the more important ones that should be done to almost every digital image is sharpening. This is necessary because most digital camera sensors make use of an anti-aliasing filter, which very slightly blurs the image, to reduce the chances of moire occurring in the image. This slight blurring, generally only one pixel in size, causes a slight loss of detail in an image. To correct for the slight blurring, tools such as Unsharp Mask are used. For a good tutorial on Unsharp Mask, check out How To Sharpen Photos: An Introduction.

High Pass Sharpening

This shot of sunflowers benefited from the High Pass filter by sharpening the fine detail in the center of the flower.

Another easy way to sharpen your images is with a filter that’s not even found in the Sharpen menu under Filters in Photoshop. It’s relegated to the Other category at the bottom of the Filters menu, and is called High Pass. The High Pass filter is a bit easier to use than Unsharp Mask, in that it only has one slider to worry about, and the technique for using it allows for some experimentation even after it’s applied, so you can get your image looking exactly as you want.

Note: I am using the latest version of Photoshop, version 2015.0.1 in Creative Cloud.

Step 1: Edit your image, then flatten it

Before you use the High Pass filter, you’ll first want to process the image to your liking. Generally speaking, sharpening should be the final step in image editing, because it is directly dependent on image size. You will sharpen an image sized to 5×7″ differently than one sized to 13×19″. Once your image is edited, flatten all layers by going to the Layer menu and selecting Flatten Image. Then adjust your image size as needed if you’re going to print or to display online.

Step 2: Duplicate Layer

Now that your image is flattened, duplicate that layer by pressing <CTRL + J> (in Windows) or <CMD + J> (on a Mac). You’ll then want to zoom in to view the image at 100% by pressing <CTRL + 1> (in Windows) or <CMD + 1> (on a Mac), or just double clicking the magnifying glass in the toolbox. You’ll want to be at 100% so you can see the detail of the image clearly.

Step 3: The High Pass Filter

High Pass Filter Selection

In the Filter menu, select Other, then High Pass.

Go to the Filter menu and select Other, and then High Pass. You will see the entire image turn a flat grey color. Not to worry, as this will allow you to see what the filter is doing.

Step 4: Adjust the amount of sharpening

high pass filter sharpening

Once the High Pass filter dialog box pops up, use the slider to adjust the radius.

Once you run the filter, you’ll see a dialog box open up, showing a preview along with a radius slider. In addition, the image behind the dialog box will have turned grey, with some edge lines showing.  This allows you to see exactly what is being sharpened. The High Pass filter only sharpens edges, so anything that’s not an edge becomes flat grey. The amount of sharpening you do will largely be image dependent, as well as size dependent.

For this image of the sunflowers, I was making a large print, using the full resolution of the image. When doing so, I’ve found my radius amount will usually fall somewhere between 0.5 and 5 pixels. You need to be careful here, as too much sharpening will introduce unwanted artifacts and noise into the image. I use the preview as my guide. I want to see thin black lines over the grey areas, with little to no white. Once you see any white, it means you’ve begun to get a halo, which you want to avoid. The final effect will be a subtle sharpening, not a drastic pop. For this image, I used a radius of 0.9. You can see above that there are only black lines around the edges of the flower, with very little halo. Click OK when ready.


Step 5: Adjust Layer Blending Mode

High Pass filter layer blending mode
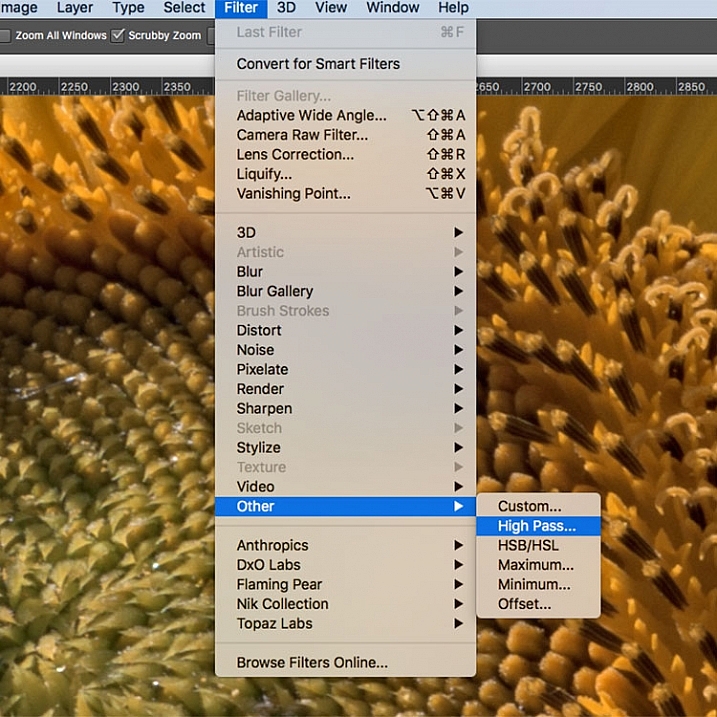
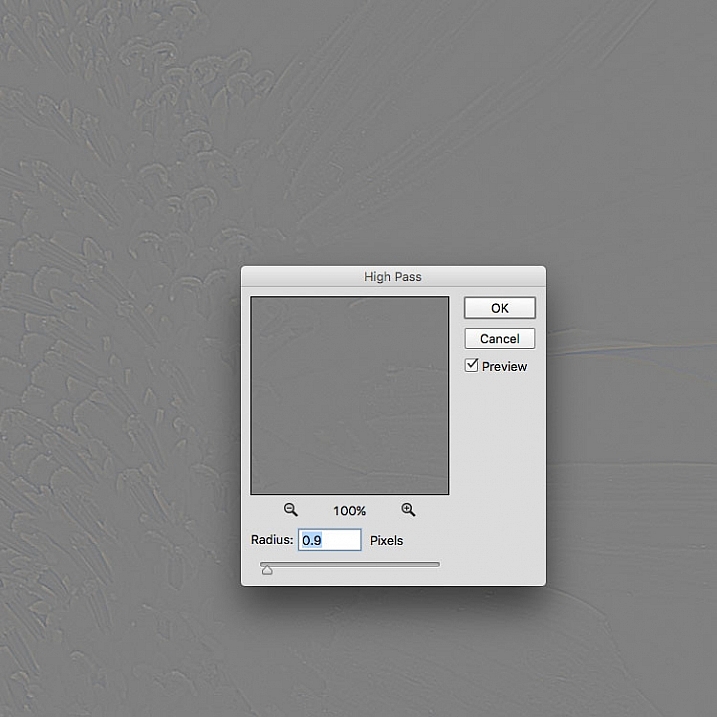
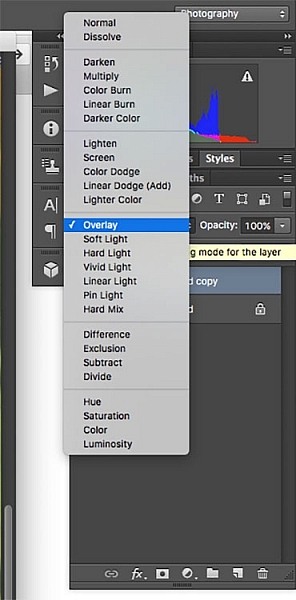
Once you’ve applied the High Pass filter, it’s time to get rid of that flat grey image and bring your photo back to life. Go to your Layers palette and select the Blending Mode drop-down menu and set it to Overlay. Your image will regain its color, and you can toggle the sharpened layer off and on, to compare the image with and without sharpening.
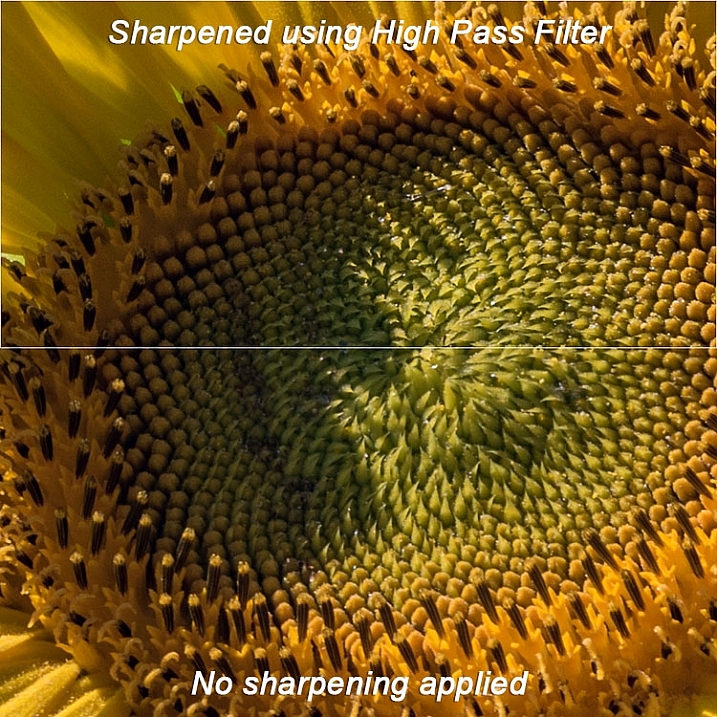
You can also experiment with different blend modes, including Soft Light, Hard Light, Vivid Light, Linear Light, and Pin Light. In addition, you can use the Layer Opacity setting to reduce the effect a bit, if you decide the sharpening is a bit too strong. The beauty of this technique is that it’s completely adjustable (non-destructive) after you’ve applied the filter, and because you’ve worked on a separate layer, you can easily undo the sharpening and start over again if needed. Also, again because you’re working on a separate layer, if there are certain areas in the image where you want the sharpening to be applied, you can use Layer Masks to hide or show it.

Final results

High pass filter comparison

In this comparison image, the top half has been sharpened using the High Pass filter, while the bottom half has not been sharpened.

The High Pass filters allows a lot of flexibility in sharpening photos and is simple to use. It’s a great way to give your images a sharper, crisper look before uploading or printing. Give it a try and let me know what you think!

googletag.cmd.push(function() {
tablet_slots.push( googletag.defineSlot( “/1005424/_dPSv4_tab-all-article-bottom_(300×250)”, [300, 250], “pb-ad-78623” ).addService( googletag.pubads() ) ); } );

googletag.cmd.push(function() {
mobile_slots.push( googletag.defineSlot( “/1005424/_dPSv4_mob-all-article-bottom_(300×250)”, [300, 250], “pb-ad-78158” ).addService( googletag.pubads() ) ); } );

The post Photoshop Tip: Using the High Pass Filter to Sharpen Images by Rick Berk appeared first on Digital Photography School.


Digital Photography School

 
Comments Off on Photoshop Tip: Using the High Pass Filter to Sharpen Images

Posted in Photography


How to Secure Your First Music Gig Photo Pass

02 Sep

The hardest part about gaining a photo pass for a large gig is in needing a strong portfolio of concert photos – getting a portfolio of works together when you can’t get access to shows makes things quite tricky. This article will explore how to build your first portfolio and in turn how to secure your first photo pass.

While she sleeps will barnes

While She Sleeps, shot for Brighton Noise

Get the gear

A lot of photographers will say it doesn’t matter which gear you have, and that it’s all about how you use what you’ve got. I completely disagree with this for music photography, you will need a fast lens – gigs are one of the darkest and dingiest places you will ever shoot, you will need something with at least an f/2.8 aperture. I highly recommend, for those on a budget, a 50mm f/1.8 – these can be picked up for around $ 100, and when shot with the aperture wide open will immediately put your work above those shooting with an f/3.5-5.6 kit lens.

As you shoot more shows, you’ll find the style you want, and as such will slowly upgrade your kit. I find my current set-up a dream, the Canon 6D mounted with the Tamron 24-70 f/2.8, a coupling that is perfect for low-light gig photography.

Howls will barnes

Howls, shot for Make a Scene Promotions

Know the rules

Before shooting any shows, it is important to know the rules. Unless you have explicit permission from the bands, managers or promoters, only shoot for the first three songs and don’t use a flash. These are rules you will have to stick to when shooting big shows so get used to them early. Learning to shoot in low light without a flash will push you as a photographer; while only having 10-15 minutes to cover a performance will make you think on your toes and focus on every opportunity.

Start local

Once you know the rules and have the right gear it’s time to start networking. A lot of photographers will just turn up to a gig and start shooting without knowing the bands, promoters or managers, or without asking. This can cause issues and I would not recommend it. Sometimes bands can be very protective about their image and might not actually want their photos taken, so always secure some sort of permission.

The dillinger escape plan will barnes

The Dillinger Escape Plan, shot for Brighton Source

The best way get in with the right people is to find a local venue and become a regular. Get to know the staff, the punters, the bands, and start networking. This isn’t to say push it in everyone’s face, but after you’ve watched a good band let them know you enjoyed it and mention that you’d love to shoot them live sometime, swap details, shake hands and continue drinking your beer while watching the next band.

Starting locally will offer you a chance to network with bands that are eager for good photos of themselves. They are all after strong imagery to promote themselves and will often be keen to have a photographer cover their shows. They will also be pretty poor, so don’t expect to get paid for anything when you first start. Shooting locally, in this way, will spread your name and will help you to start building a strong portfolio – thus give you the starting blocks for talking to the larger bands, promoters, venues and even magazines.

Once you’ve covered a good number of local gigs and have a variety of photos from different shows, it’s time to start looking for larger opportunities and looking at the bigger bands and venues.

Aim big

So now that you’ve got a portfolio of great photos from all the local shows you’ve covered, it’s time to market yourself. Chances are most of the people who have control of the photo passes have no idea who you are, so ensure you have an online presence. When talking shop you’ll need a simple way to show your work, so a website is best. You won’t need any big bands in the portfolio but simply proof that you’re an awesome band photographer. I’d also recommend getting a Facebook page, and a Flickr or 500px page that only shows your best work. You will be judged on the worst photo in your portfolio.

Coheed and cambria will barnes

Coheed & Cambria, shot for Brighton Source

So the tricky part is now in finding a publication to work with, to get you your first major photo pass. I started by checking out all the gigs at the local major venues and Googling them a few days after the show to find out who covered it. Try something as simple as “Coheed and Cambria Brighton”. This will give you a list of publications to contact, and then simply drop them an email saying that you are looking to cover a few upcoming shows for them, and that they can see your work at your website. Chances are they will say that they already have it covered. However, it’s putting yourself in front of them so that when a photographer drops out of a show they will have someone to call, you.

What if there aren’t any local publications covering shows in your area? Then it gets a bit trickier, but the methodology is the same, find shows you want to cover and find out who is running them. Email the promoters and the band managers, show them your work, and offer them high resolution copies of all the best photos for them to use to promote themselves. The promoters will likely want these to show how good their shows are – although it’s important to remember that these bigger bands probably already have an awesome collection of photos, so you have to really shine both in your conversation and your portfolio.

Andrew wk will barnes

Andrew WK, shot for RMP Magazine

Success

So it’s finally happened, the local publication got back to you saying they love your work and they want some coverage of the next big show in town, now it’s time to do your thing. Remember to prepare everything way before hand; charge your batteries, empty your memory cards, clean your lenses, prepare your photo pass (if this is simply an email print it out), arrive on time, be polite to everyone and abide by the first three songs, no flash rules.

Once the show is over it’s important to ensure you get the photos to the relevant contact as fast as possible. I will normally edit all the photos as soon as I get home and submit them straight away. This is important because shows are time sensitive, people will be looking for the reviews and the photos the next day, so you need the photos with the promoters, bands or publications literally ASAP.

At this point you will now have an even bigger and stronger portfolio, so now you can start to outreach with even bigger publications, bands and promoters. Before you know it you’ll be the centre-fold of your favourite magazine.

Bleed from within will barnes

Bleed from Within, shot for ALT.promotions

A few tips

You will likely get offered drinks at some point. Remember, don’t drink too much, you are representing either a promoter, a band or a publication, being a drunk photographer will not reflect well and will likely lose you access to the next show – drink Red Bull instead.

Also don’t forget how you managed to get to cover that Dillinger Escape Plan or Andrew WK show, it all started locally with small bands – always remember those guys and continue working locally where you have time. It will improve your techniques, give you an even bigger portfolio and will make you feel good for creating great photographs for local talent.

Are you ready to give it a go and get your first gig photo pass?

The post How to Secure Your First Music Gig Photo Pass by Will Barnes appeared first on Digital Photography School.


Digital Photography School

 
Comments Off on How to Secure Your First Music Gig Photo Pass

Posted in Photography


Photographing the World’s Most Secluded Tribes: Before they Pass Away

17 Nov

Got 12 minutes? Check out this TED talk by photographer Jimmy Nelson who tells the story behind his amazing project ‘Before they Pass Away‘. A project where Jimmy sets out to photograph 35 of the world’s most secluded tribes.

In this video Jimmy shares 3 lessons (through story) that he’s learned through meeting and photographing these tribes.

Learn more about Jimmy’s project and meet the tribes he photographed at his website and grab a copy of his book of the same name to see the amazing images he’s created.

Post originally from: Digital Photography Tips.

Check out our more Photography Tips at Photography Tips for Beginners, Portrait Photography Tips and Wedding Photography Tips.

Photographing the World’s Most Secluded Tribes: Before they Pass Away

The post Photographing the World’s Most Secluded Tribes: Before they Pass Away by Darren Rowse appeared first on Digital Photography School.


Digital Photography School

 
Comments Off on Photographing the World’s Most Secluded Tribes: Before they Pass Away

Posted in Photography


Ricoh announces Pentax K-3 24MP DSLR with selectable low pass filtering

08 Oct

K3_18135.png

Ricoh has announced the Pentax K-3 – a 24 megapixel enthusiast APS-C DSLR. In addition to the higher pixel count, the range-topping camera gains a 27-point autofocus system and a more advanced 86,000 pixel metering sensor, compared with the K-5 II. Rather than offering versions with an without an optical low-pass filter, the company has found a way to selectively use the image stabilization system to mimic its effect. It also offers twin SD card slots and USB 3.0 connection. Click through to find out more.

News: Digital Photography Review (dpreview.com)

 
Comments Off on Ricoh announces Pentax K-3 24MP DSLR with selectable low pass filtering

Posted in Uncategorized


Killer Tips for Photographing the Moon That You Can’t Pass Up

17 Jun

The moon has long been a source of deep fascination for mankind. As long as anyone can remember, human beings have stared up into its source of light in the pitch black of night and wondered about it. Some have even gone a bit batty thanks to the moon’s effects (at least, some would have you believe). But hardcore photographers Continue Reading

The post Killer Tips for Photographing the Moon That You Can’t Pass Up appeared first on Photodoto.


Photodoto

 
Comments Off on Killer Tips for Photographing the Moon That You Can’t Pass Up

Posted in Photography


50 Great Photography Blogs You Can’t Afford to Pass by

19 Mar

Have you ever seen excellent photography by Joseph Linaschke? Or do you know 22 things you can do today to change your photography forever? Or maybe you know what you may look like while taking pictures? All these intriguing posts were published on different photo blogs which you might have never seen before. I guess how many cool posts you’ve Continue Reading

The post 50 Great Photography Blogs You Can’t Afford to Pass by appeared first on Photodoto.


Photodoto

 
Comments Off on 50 Great Photography Blogs You Can’t Afford to Pass by

Posted in Photography