RSS
 

Posts Tagged ‘Packing’

Your Vacation Photography Packing List

26 Jun

The post Your Vacation Photography Packing List appeared first on Digital Photography School. It was authored by Simon Bond.

Andrew Neel

It’s summer, and for most people, that means a vacation somewhere nice and sunny! Now, of course, it’s nice to bring those holiday memories back home. That is why people bring nice cameras with them, and perhaps purchase new lenses to get the very best images. You’ve chosen an amazing exotic location, so this is a chance to photograph something that’s not from your regular day. The big question pre-trip is what to pack! Having read this article for your vacation photography, you’ll make the trip knowing you have the right equipment for your needs.

Going alone, or with family?

The group photo, how will you take yours?

Depending on your age and life circumstances, you will either be going alone or with a group. The equipment you bring for either of those situations will be different. If you’re with family, you won’t be able to spend the whole day out photographing somewhere, so the amount of equipment you’ll need is going to be less. This article is going to assume you are traveling with the family since if you’re traveling alone, that’s a different packing list more aimed at a travel photographer. That’s not to say you won’t get great travel photos on your trip. With the right equipment, you’ll hold your own against someone who perhaps has more time.

Landscape and portrait photos?

Landscapes and portraits are the two main areas that every photographer will focus on during a trip. There should be a balance of both of these photos. Then you’ll get a better sense of place from your album.

To get the best results, you’re going to need the following equipment.

This is a broad list which will be referenced when you think about your final packing list. The camera body and cleaning equipment are a given, so here you’ll see the other equipment needed.

  • Landscape – The items you’ll need here will vary depending on the landscape you’re going to photograph. It’s always a good idea to bring a tripod, remote shutter release (Cable or Infra-red), ND1000 filter, CPL filter, UV filter and Graduated ND filters. To capture the scale of the scene you’ll also want a good wide angle lens. The majority of these will be 16mm or 17mm wide on a full frame camera with an aperture of f2.8 or f4. Do you need a longer focal length? Some landscape photos require compression of the background to work, with main subjects too far into the distance. That means that, yes, you do need a longer focal length. A superzoom for travel photography is, therefore, a good option here.
  • Portrait – This isn’t photos of your fellow vacationers, we’ll come to that in a minute. This is about capturing the local life in the place you’re staying. The setup here is simpler. You’ll need a good prime lens. The 50mm f1.8 is a good choice here. Should you want the most striking photos, bringing strobes, radio triggers, and light modifiers will help. However, it’s unlikely you’ll need that for most vacation portraits.

Everyone enjoys seeing a good sunset on their trip abroad.

Vacation photography of friends and family

You’re going to spend the vast majority of your time on this trip with your family. They know you’re the photographer in the family, so the expectations are that you’ll take the family photos. The equipment you’ll need here is dependent on the photography type.

  • Group photo: If you wish to be in the photo yourself you have two options; find someone to take the photo for you, or use a tripod and self-timer. You’ll want a lens with a wide angle for this as well.
  • Posed photos: A good portrait lens like the 50mm will do the job here. They are nice for bokeh background and will work well into the evening when the light begins to fade.
  • Fun moments: The candid captures are best caught using a 50mm lens, or a telephoto lens so you can capture from a distance.
  • Eating together: Eating picnics on the beach, or evening meals at the restaurant? A 50mm lens or your wide angle will work here. Don’t forget to take some photos of the food as well! In the lower evening light, you’ll likely need the 50mm lens. Alternatively, pack a strobe, but be wary of disturbing other diners with your flash. If the situation allows using off-camera flash for food photography, you will really get better results.
  • Famous locations: One of the reasons you’ll have traveled to a place is the famous attractions. Whether it’s the Eiffel Tower, the Leaning Tower of Pisa or the Taj Mahal – you’ll want the photo. In terms of equipment, you’ll most likely want a wide-angle lens. That’s so you can position both your family and the famous landmark in the same photo. Look to get creative with your photos as well, go beyond the standard group of people standing in front of a famous building.

Candid photos of those you are on holiday with are always nice.

Special events

If you’re lucky, or better still you’ve planned it, a special event may coincide with your trip. This is a great chance to make your vacation photos stand out even more. This is likely to be something like a street carnival like Carnevale in Venice, or a street performance like the Chinese opera. To best capture these type of events during the day, you’ll want a super zoom lens, one that covers the focal range of 28-300mm. If the festival is at night, different lenses will be needed. At night look to bring a fast prime lens, so your 50mm f1.8 will work well.

Getting great portrait photos from your trips abroad will balance out your set of images.

Non-photography equipment

Much of the following are sensible items that you should travel with, whether you’re photographing or not. You may not even have to pack them. In some cases, you’ll be wearing these items.

So bring these items for your vacation photography. The list here could be very long, so items such as clothing, passports, and toiletries, I will assume are packed.

  • Footwear: A special mention for the correct footwear here. In hot countries, a strong pair of hiking sandals are a good investment for walking around towns. Anything more outdoors than this, and consider bringing hiking shoes.
  • Water: Getting good photos will mean a fair bit of walking (if you have the time away from your family that is). You can always schedule your time for the morning and meet your family later. If the country’s hot, bring water bottles and water bladders to keep hydrated while you photograph.
  • Smartphone: A smartphone is useful for many photographic reasons. It can act as a second camera, and there are numerous apps to download for your photography.
  • Weather protection Being prepared for the weather for your vacation photography is a good idea. It could rain, so bring a poncho and weather protection for your camera. You don’t want to burn, so pack the sunscreen, a hat and some sunglasses. If you happen to be going somewhere cold, you’ll need equipment for that as well. Specialized clothes for the cold include a hat, hot packs, and gloves.
  • Money belt: Keep your valuables somewhere it’s difficult for them to be stolen, so using a money belt is wise. Split up your money as well, so keep some on your belt, some in your pocket, and some in your camera bag.

At night you’ll need a fast prime lens, something like a 50mm f1.8.

The final packing list for vacation photography

As you’ll have noted, there is lots of potential for great photography on your vacation. You can’t pack absolutely everything, so here is a suggested packing list to make the best of your vacation photography.

  • Camera bag – This needs to fit all your camera gear into your hand luggage, assuming you’re going to fly somewhere. Never put expensive camera equipment into your checked luggage! The Manfrotto 3N1-35PL is a great bag for this. It’s a large bag so you can probably fit non-camera equipment in this as well.
  • Camera body – An entry-level Canon or Nikon dSLR is ideal. If you want to splurge and carry the extra weight look to a full frame dSLR or the Sony Alpha 3.
  • Lens – Take two lenses with you. A wide angle and a super zoom lens if you’re more into landscapes. Or a 50mm prime and a super zoom lens if you’re more into portraits and street photography. The super zoom should go from 28-300mm.
  • Tripod – This doesn’t need to be too heavy, but it needs to be sturdy. The Sirui T120-5X is all the tripod you’re going to need. Don’t fancy a full tripod? The gorilla pod is a good alternative.
  • Strobe – This is optional, but if you do bring one, look to pack a radio trigger as well so you can use the flash off camera.
  • Filters – Each lens should have a UV filter attached. Look to have a CPL filter, and ND1000 filter, and perhaps an ND4 filter to use with the 50mm prime lens in the midday sun.
  • Storage – Bring a laptop or tablet with you, depending on your way of storing images. A blue-tooth external hard drive is also a great idea.
  • Memory card – Enough for one day worth of photography. If you choose not to bring extra storage devices then enough memory cards for your entire trip.
  • Batteries – Two camera batteries and a charger.
  • Camera cleaning – A blower and cloth to clean your lens and camera when needed.

Try and get some photos of your family eating together.

Conclusion

You’re now all set to nail your vacation photography, with a camera bag that will suit your needs.

Do you agree with everything on this list? Is there anything you’d remove, or anything you’d add to this list?

What camera equipment do you take with you on a trip with your family?

At digital photography school, we’d love to see examples of the photos you’ve taken on your family trips. So please share any thoughts or photos in the comments section of this article.

your vacation photography packing list

The post Your Vacation Photography Packing List appeared first on Digital Photography School. It was authored by Simon Bond.


Digital Photography School

 
Comments Off on Your Vacation Photography Packing List

Posted in Photography


Review: Peak Design Travel Backpack 45L and ‘Packing Tools’ are pricey but versatile

01 Jan

Introduction

The Peak Design Travel Backpack 45L is the core item in the brand’s new travel line.

The Internet has been abuzz with excitement over Peak Design’s new travel-oriented bag line which revolves around a 45L carry-on-sized backpack and set of organizational ‘Packing Tools’. The system is for those who love Peak Design gear and want to travel with their camera gear and personal items packed into just one bag.

The system is for traveling with camera gear and personal items packed into just one bag

The Kickstarter for said line of bags launched in July and crossed the finish line with over 10 times its initial goal raised. In more direct numbers, that’s 5.2 million dollars raised, with an initial goal of $ 500,000. Wow.

The whole kit I tested: Travel Backpack 45L (right), Packing Cube (top-middle), Shoe Pouch (bottom-middle), Camera Cube (top-left), Tech Pouch (middle-left), Wash Pouch (bottom-left).

For the sake of this review I’ll be looking at the Travel Backpack 45L, on page one. On page two I’ll look at the rest of the system, including the Tech Pouch, Wash Pouch, Shoe Pouch, Rain Fly, Packing Cube (small), and Camera Cube (medium). Combined these items add up to $ 545.

It’s important to note this bag and its accessories should be viewed almost as a gear carrying ecosystem, not unlike owning a Macbook, iPhone, AirPods, etc. These products are designed to be used together, but I believe its important to remind both myself and anyone else interested in these bags you certainly can choose to use other brands alongside the different pieces of the Peak Design (PD) ecosystem. I’ll go in depth with the main bag, then share my notes on the each of the smaller items, and lastly return to how all of these things fit together.

Peak Design Travel Backpack 45L
$ 299.95| PeakDesign.com

The most important part of the Travel Line is the backpack itself. It’s big, sleek, and surprisingly boxy, though I’ll get to why that’s not such a bad thing later. As mentioned, this bag is oriented towards travelers, photographers, videographers and anyone in between. It blends some design principles of a traditional ‘backpacking’ bag with the sensibilities of a camera luggage bag, sans-wheels.

Specifications

  • Carrying Capacity: 30L – 45L
  • Height: 56 cm (22″)
  • Width: 33 cm (13″)
  • Depth: 23 – 29 cm (9″ -11″)
  • Weight: 2.05kg (4.52lb)
  • Back panel and dual side loading/access
  • 2 Expandable side pockets with drainage holes
  • Front access organization panel with 5 zippered compartments
  • Passport/travel document pocket in back panel
  • Laptop/Tablet sleeve in back panel interior, fits 15″ laptop
  • Storable hip and shoulder straps
  • 12 gear attachment loops across bag
  • 400D weatherproof, 100% recycled nylon canvas outer shell
  • 900D weatherproof bottom liner
  • Durable water repellent, polyurethane coated interior
  • Weatherproof zippers for back, front and side panels
  • Padded ultralight foam around entire bag

Compared to other bags

There aren’t a lot of direct competitors to the Travel Backpack, but two that comes to mind are Osprey’s Porter 46 Travel Pack and Mind Shift’s Firstlight 40L. These two bags represent the different focuses that Peak Design is trying to blend: a long distance travel backpack (Osprey) and a camera gear bag (Mind Shift).

The Porter is nearly identical in size, fits many of the same things and weighs only 1.5kg, or .5kg less than the Peak Design – it also costs $ 140, less than half of Peak Design’s $ 300 price tag. That being said, the Porter doesn’t have quite the gear readiness of Peak Design’s bag and is also missing the 900D bottom liner, though it does boast 420D weatherproof nylon, as opposed to PD’s 400D.

Peak Design’s Travel Backpack 45L packed with the Camera Cube (medium)

Meanwhile, the Firstlight has 5L less carrying capacity and an interior depth of 18.5cm compared to PD’s 23cm at the low end. The Firstlight also costs $ 330, $ 30 more than Peak Design but the key difference here is that the Firstlight comes readily equipped with padded dividers in the main compartment of the bag – not the case with the PD option. With the Firstlight you lose some of the flexibility and travel-focus of Peak Design’s bag, but you actually end up spending less in the long run if what you’re looking for is a gear-focused bag.

Design and construction

This bag really surprised me out of the gate. Design-wise, it boasts a simple facade that has all kinds of pockets, straps, and secret stash areas. The boxiness of the bag seems like a departure from Peak Design’s more angular, triangle-based design you see in the Messenger and Everyday Backpack. This bag doesn’t ask for attention in its appearance.

The Travel Backpack has a simple design with little flashiness.

In the Black version (tested here), everything blends together seamlessly. None of the straps, loops, or zippers call attention to themselves and everything has a James Bond-esque coolness to it. The Sage color also looks classy.

Nothing feels flimsy and all the zippers are smooth. Every strap feels like it belongs and helps the user carry the bag in whatever method is most convenient in the moment. I particularly appreciate the addition of the duffel-style strap in the center of the back panel. I’m a huge fan of Peak Design’s padded handles on both the tops and sides of their bags so to see another one in another place I didn’t realize I wanted it until I had it is a joy.

Back of the Travel Backpack 45L, note the duffel handle in the middle

I think the area that Peak Design seems to excel the most is producing bags that feel sturdy and warrant the trust we give them with our gear. Another stellar addition here is the 900D weatherproof bottom liner, something you rarely even see in more outdoor-oriented bags.

The only design flaw that really stands out to me is the hip straps’ locking mechanism feels particularly unfamiliar. I like that Peak Design chooses to use hard metal joiners, like for the sternum strap, but for me I would’ve been perfectly happy with a hard plastic buckle.

Hip Strap Sternum Strap

In Use

I actually found this bag to be much more comfortable on my shoulders than my backpacking bag from REI. The hip straps aren’t quite as load-bearing, though I still find they take some of the weight off my shoulders and I think part of this is to do with the fact that a) I’m skinny, and b) the metal hook used to secure the hip straps doesn’t have quite the same tension as a buckle.

That said, the magnetic latches that allow you to store the hip straps in the back panel are super helpful for keeping things streamlined without a bunch of straps flapping in the wind when you’re moving around. And yes, this bag weighs more than others, I didn’t find it to be excessively heavy but ultimately that’s going to depend on how you pack it.
Strap storage, brought to you by: magnets!

I first used this bag (along with the medium sized camera cube) like a gear suitcase traveling from Seattle to Portland to shoot a wedding and found it more than adequate for moving my equipment in a safe, comfortable manner.

I later used it without the camera cube as my main pack to travel around Europe for a few weeks and it was also pretty great. I opted to keep all my clothes and miscellaneous belongings in the main backpack and then carried Peak Design’s 10L Sling separately to keep my camera, extra lenses, journal, Kindle, etc. protected. Although it’s not really possible with the 10L Sling, Peak Design’s 5L sling can fit inside the Travel Backpack no problem, though you won’t have the same side panel access you could have with the camera cubes.

There are a lot of features packed into this bag and they take time to learn

The compression down to 30L is nice for those who want to use it, but I found the bag still felt too large for use as a ‘day pack’, even compressed down. The compression is achieved by folding two buttons on the top of the bag back onto their button counterparts, making the bag more angled down its face. There are a lot of features packed into this bag and honestly one of the biggest hindrances of enjoying them is they take time to learn. I’d highly recommend anyone interested in using using this pack for extended travel consider taking it out on a short weekend excursion first to learn some of the ins and outs. I didn’t initially realize that the front zipper panel with 4 zipper pockets could actually be rolled up and stowed for a more simple 1 compartment approach (see below).

My biggest usage gripe with the bag (which also extends to Peak Design’s Everyday Backpack) is that the side pockets really don’t expand much and can only fit some pretty small things. My 32oz Nalgene bottle for example, had to be attached on one of the gear loops because it didn’t fit in the side pockets. My guess is that this tightness is based around keeping things like tripods snug against the side of the bag. On the other hand one thing I like most about this bag is it stands upright on its own, unlike some of Peak Design’s other packs.

The pocketed divider can be stowed to create one big main pocket with immediate front access.

Conclusion: Peak Design Travel Backpack 45L

Overall, I really enjoy using this bag and think I’ll be relying on it more to come in the future. The build quality is stellar, it’s stylish but subdued and it offers a lot of possibilities in terms of approaching how you carry all your stuff with you.

On it’s own this backpack offers a really awesome option for traveling light. It can fit enough to live out of, but doesn’t make you feel like a turtle. The sturdy design of the bag gives buyers a chance to manipulate the space within it as effectively as possible, unlike other backpacking bags that require you to stuff things in from the top down.

What we like:

  • Stylish design
  • Lots of space and versatility
  • Comfortable fit
  • Packed with tons of features
  • Durable and naturally protective

What we don’t:

  • Too large for daypack use
  • Pricey
  • Features can be overwhelming at first
  • Small side pockets

Peak Design Travel Backpack 45L rating:


Head to page 2 for a breakdown of the rest of Peak Design’s Packing Tools and our overall conclusion.

Articles: Digital Photography Review (dpreview.com)

 
Comments Off on Review: Peak Design Travel Backpack 45L and ‘Packing Tools’ are pricey but versatile

Posted in Uncategorized


Peak Design announces 45L Travel Backpack and new system of ‘Packing Tools’

24 Jul

$ (document).ready(function() { SampleGalleryV2({“containerId”:”embeddedSampleGallery_6187580265″,”galleryId”:”6187580265″,”isEmbeddedWidget”:true,”selectedImageIndex”:0,”isMobile”:false}) });

Peak Design has announced a fresh travel-oriented product line that centers around a 45L carry on-sized Travel Backpack that can be yours for a reduced price through Kickstarter (starting today). Also in the line is a set of set of ‘Packing Tools’ to help keep your gear and personal items organized on the go.

The 45L Travel Backpack has all the bells and whistles of a high-end pack: a weatherproof nylon canvas shell, a rugged bottom liner, a luggage pass-through, full rear and side access, a laptop compartment, luggage handles and tons of organization pockets. It can also be expanded or contracted to fit 35L or 45L worth of stuff.

The 45L Travel Backpack officially hits stores this holiday season for $ 299.95 and will be available in either black or sage

The Packing Tools bring a nice level of versatility and modularity to the 45L Travel Backpack (though could easily be used in any pack). They come in a variety of forms including general packing ‘Cubes’ – useful for items like clothing (available in two sizes) – and ‘Camera Cubes’ for your precious gear (available in three sizes). There are also packing tools specifically for tech odds and ends, toiletries and shoes.

The 45L Travel Backpack is projected to officially hit stores this holiday season for $ 299.95 and will be available in either black or sage. The Packing Tools range in price from $ 24.95 – $ 89.95 and will also be available for the holidays.

Look for a full review of the 45L Travel Backpack on DPReview soon. In the meantime, read our review of the Peak Design Capture Clip V3.

Press Release

Peak Design’s Travel Line Reinvents One-Bag Travel

Travel Backpack 45L and Packing Tools Offer Infinite Customization

San Francisco, CA (July 23, 2018) – Peak Design, the leader in crowdfunding and best-in-class carry solutions, is proud to unveil the first products in their Travel Line: the Travel Backpack 45L and complete system of Packing Tools. With a focus on versatility, organization, and access, the Travel Line aims to satisfy a simple design directive: no two trips are the same, so the best luggage should adapt to them all.

Peak Design was founded during a trip and has grown into a team of prolific travelers who understand life on the road. The Travel Line combines Peak Design’s travel experience with their expertise, innovation, and design philosophies honed through their massively successful photography and everyday bag lines.

The hero of the Travel Line is the Travel Backpack 45L, a carry-on-sized backpack that boasts a collection of best-in- class travel functionality. In addition to full rear access for easy packing, the bag features dual side access, top access to laptop/tablet, and a dedicated front-access organization panel for smaller items. Beefy shoulder and waist straps stowe instantly beneath a magnetically sealed back pad. Expansion zips allow the bag to grow to 45L check-in size, while an innovative compression snap system shrinks the bag down to a 35L daypack. Thoughtful details include 360-degree grab handles, a duffle/luggage carry handle, theft-deterrent zips, hidden passport pockets, a soft- lined sunglasses pocket and tuck-away external carry compression straps. The Travel Backpack comes with a weatherproof 400D nylon canvas shell made from 100% recycled plastics and available in black or sage colorways.

Peak Design Founder and CEO, Peter Dering, rarely stays in any one place longer than two weeks: “From day one, travel has been a primary inspiration to us as photographers, designers, and adventurers. Living on the road is part of our DNA as a brand, and we couldn’t be more excited to have built a set of travel gear that truly adapts to the endless variety of trips we take.”

Accompanying the Travel Backpack is a feature-rich system of Packing Tools that provide endlessly customizable organization and protection of clothes, shoes, toiletries, tech items and photo/video gear. Designed to fit perfectly in Peak Design travel bags, each cube or pouch offers easy access, thoughtful organization, durable materials and a consistent aesthetic cleanliness.

Each Packing Tool was designed from the onset as a standalone product, intended to push their respective category forward with unique patterns, features and innovation. Art Viger, Lead Designer at Peak Design, commented on the system: “When you travel, the things you carry become your home on the road. Each and every one of the pouches and cubes are designed to work as a fluid ecosystem that can be easily re-configured for any type of trip.”

The new Travel Backpack (MSRP: $ 299.95) and Packing Cubes, will be available on Kickstarter (peakdesign.com/ks) for a pre-sale discount beginning July 23, 2018. The system will then be available for purchase online at peakdesign.com and through major retailers in time for the 2018 holiday season.

About Peak Design

Since 2010, Peak Design has been building innovative carry solutions with a simple overarching design directive: make the best things. The idea for our first product was born on a motorcycle trip through Southeast Asia and has since expanded to include a cross-functional ecosystem of bags, pouches, slings, straps, and clips. We’ve won applause along the way, but we’re most proud of the fact that we’re 100% crowdfunded and 100% employee-owned. We’ve raised $ 15.6 Million through 8 Kickstarter campaigns, allowing Peak Design to stay investor-free and focused on the things that matter most: designing great products, fostering happy employees, and taking care of our customers and the natural environment. Learn more at peakdesign.com.

45L Travel Backpack

MSRP: $ 299.95
Available on Kickstarter for a Limited Time: $ 235

Access

  • Full back panel-load access for packing
  • Dual zippered side hatches for instant camera access
  • Quick tablet & laptop access
  • Dedicated front organization panel
  • Soft-lined sunglasses pocket
  • Hidden passport/document pockets
  • Bag sits upright on floor when packed or empty

Expansion & Compression

  • Maximum international carry on size in normal 35L state
  • Expansion zip gives additional 10L of storage (45L max)
  • Compressible down to 30L day bag size
  • Expandable side pockets for water bottles, tripods
  • Tuck-away external carry compression straps

Organization

  • Rigidly supported sidewalls for easy packing
  • Zippered dividing panel separates bag into 2 compartments, or stows away for 1 large volume
  • Front organization panel contains 4 zippered mesh pockets for smaller items
  • Mount Camera Cubes (sold separately) internally for back or side access to photo, drone, or video gear
  • Protected luggage tag holder

Comfort & Portability

  • Magnetic strap storage system
  • 360-degree grab handles
  • Full-size padded hip belt with additional pockets and attachment points for Capture & Range Pouch (sold
    separately)
  • Axial strap attachments for shoulder & hip straps give constant comfort for all body types and carry loads
  • Proprietary sternum strap
  • Luggage pass-through and duffel grab handle
  • Back panel folds under for increased ventilation & comfort

Security

  • 400D weatherproof 100% recycled nylon canvas shell
  • DWR impregnated, PU-coated interior for water resistance
  • Oversized #8 (front, side) and #10 (back) main zips are weatherproof and lockable
  • Rugged 900D weatherproof bottom liner
  • Ultralight padded foam provides security, structure, and aesthetic cleanliness around entire bag

Packing Cubes (sold separately):

Packing Cubes (MSRP: Sm – $ 29.95, Md – $ 39.95) – Compressible, easy to access, and dividable, Peak Design Packing Cubes are available in 2 sizes. A tear-away main zip lets you access contents instantly, and an internal divider allows separation of clean and dirty clothes. An expansion/compression zip doubles available space or compresses clothes so you can fit more in your bag.

Wash Pouch (MSRP: $ 59.95) – Dedicated, easy-to-clean pockets for toothbrush and razor. Hangs or sits upright on sink for easy access in tight spaces. Unique folding pocket layout keeps toiletries neatly organized and easy to find.

Tech Pouch (MSRP: $ 59.95) – Designed to store small items like cables, cards, batteries, and travel essentials, Tech Pouch’s unique origami-style pockets create enormous spatial efficiency. Pack more into a smaller space, yet keep all items organized and easy to find.

Camera Cubes (MSRP: Sm – $ 49.95, Md – $ 69.95, Lg – $ 89.95) – Camera Cubes provide protection, organization, and instant access to camera, video, and drone gear. Securely mount Camera Cubes inside the Travel Backpack and access your gear via the rear or side zips. Tuck-away lids let you access camera gear from outside of the bag via a single zip, while a system of intelligently designed dividers allows for endless organization and customization.

Shoe Pouch (MSRP: $ 24.95) – An ultralight, durable, weatherproof pouch for shoes or additional clothing storage.

Rain Fly (MSRP: $ 29.95) – Provides complete waterproof protection to an already weatherproof bag. Rain Fly is made of durable, ultralight 200D rip-stop nylon, adjusts via cinch cord for snug form-fit, and stuffs into a convenient storage pocket.

Articles: Digital Photography Review (dpreview.com)

 
Comments Off on Peak Design announces 45L Travel Backpack and new system of ‘Packing Tools’

Posted in Uncategorized


Tips for Making Your Travel Photography Packing List for International Trips

19 Mar

Packing for any trip abroad can be a chore. Then add in the task of making sure you have all of the photography bits and pieces you need, and it’s enough to send your head spinning. Thankfully there is a cure for this craziness: The Travel Photography Packing List.

Tips for Making Your Travel Photography Packing List for International Trips

The Packing List is my go-to resource for ensuring I have all the gear I need in order to bring back the best photos. No one wants to deal with dead batteries or a lack of memory cards while they are exploring the world at large. That’s why I use the list below to sooth my packing-frazzled mind and to get on with creating amazing photos.

Camera

I know it seems obvious but the camera is the first thing on my packing list. Why? Because I take time to check it and give it a good cleaning, inside and out, before packing it away. I often carry a spare camera these days, which doesn’t get a lot of action until it is desperately needed.

Packing time is a good opportunity to make sure all cameras are in working order. You might also want to adjust the clock (set it to the time zone you’ll be traveling to) on your camera(s) so you can hit the ground running.

Tips for Making Your Travel Photography Packing List for International Trips - camera in a tripod

Lenses

Lens choice is a dilemma for most of us. Bring them all and suffer the back strain of having to lug them around, or bring just a few and worry about missing the shot? As individual as this choice can be, I suggest thinking about what you will shoot the most if you want to limit the number of lenses you take along. Also, ask other photographers who have traveled where you are going or your tour operator for suggestions.

On my own tours, where our focus is on people, nature, and wildlife photography, I suggest a 24-105mm lens for walking around and city photos. These lenses are great for a variety of situations from close to medium distance.

Then for the landscape shots, a wide-angle or wide zoom, like a 16-35mm lens or 10-22mm on a crop sensor camera, can work wonders.

Tips for Making Your Travel Photography Packing List for International Trips - guy taking a photo on a safari

All-in-one lenses

My go-to lens for travel is the venerable Canon 28-300mm L-series Lens. It covers a huge range and with some panorama stitching, I can get mildly wide-angle shots without switching lenses. It’s a heavy lens indeed, but I’ve grown used to it. I will then bring a 10-22mm wide-angle for the monumental landscape shots I love to capture.

Optionally, a long lens may be needed in certain situations, but they can be cumbersome. For instance, I would not have gone to Panama and Costa Rica, lands rich in birds and wildlife, without a Sigma 150-600mm Sport lens. Yet, that same lens will not follow me to the Himalayas, where weight is certainly a factor and the chance for birds is lessened.

A Flash or Speedlight

For all my travels in the past decade, I have rarely found myself wanting to have a strobe along for the ride, especially due to the added weight involved. Yet I still tend to bring just one flash and I have been happy every time I did.

Tips for Making Your Travel Photography Packing List for International Trips - people shooting the Taj Mahal

What I have found valuable when bringing a strobe is to make sure it is one that I can use off-camera. A flash that can be remotely triggered either with a tether or a smaller unit on the camera (either the built-in flash or a unit that attaches to the hotshoe). This has allowed me the greatest flexibility to add well-directed light to my travel photos.

Tripod

A good travel tripod is a thing of beauty. These units, built for packability and lightweight, have been following me on more and more trips abroad.

My main issue with packing a full-size tripod, even if it is carbon fiber, is the need to take larger luggage. The legs of a super sturdy tripod are often longer, even when broken down, than the luggage I wish to take.

Tips for Making Your Travel Photography Packing List for International Trips - canyon in Utah

It’s a balancing act and it matters what you intend to shoot. If you have space, bring the monster tripod, especially if you are accustomed to hauling it around with you near home. If you have limited space, but still want stability in your landscape or astrophotography shots, consider something along the lines of the MeFOTO Globetrotter. It packs small, can double as a monopod and has a fully functional ball head.

Power Strip

Power strips are great for travel and there are a variety of options. I prefer a brand where the cord is easy to store and the strip comes with two USB ports. The two outlets in the power strip are meant for a variety of international plugs so it’s easy to share when you find the outlet at the airport overloaded. I’ve done this more than once and was able to get a charge when I couldn’t have without a power strip.

Girl in flowers taking a photo - Tips for Making Your Travel Photography Packing List for International Trips

WARNING: See the next section about converters because it’s important to make sure the power strip is set up for universal power. I once had a strip with USB ports go, “Pop!” and puff smoke arose when I didn’t realize it was only set for US power and I was using it in India. Know before you go!

Chargers, Adapters, and Converters

Almost any charger from a major manufacturer these days will work on what’s known as “Universal Power”. They have an input range that straddles 110V-240V and 50Mhz-60Mhz. This fits almost any AC power around the world. If your charger is not set up for Universal Power (check the charger itself for those phrases above printed somewhere on its label), then you need a converter.

A converter will change the power coming out of the wall in your hotel to the power your charger needs. This stops things from literally catching fire.

Photographer and sunset - Tips for Making Your Travel Photography Packing List for International Trips

Different than a converter is an adapter. All it does is makes the plug on your charger fit the wall socket in your hotel. There is a handy guide on the Internet that lists the types of plugs in use around the world, by country, so you can see if your plug will fit.

If not, I’d suggest picking up either a small adapter specific to your host country or a universal adapter that will serve you for almost any country around the world for decades to come.

Memory cards

How many memory cards should you bring? Oh boy, that’s the big question. I’m sure if we ran a poll we’d have a huge range of answers. To help in planning, I take a per diem method and figure out what my average has been on previous trips, per day. I then multiply that by the number of days I’ll be gone to get a total number of photos I estimate that I’ll take over the duration of the trip.

Next, take the total (let’s say 4000 photos) and multiply it by the average size of a photo from your camera. Mine is about 24MB, so for 4000 images, I’d need 96,000MB or roughly 96GB. I then throw in an extra card, just in case. In this example, I will bring four 36GB cards and call it good. Especially if I am going to a country where I know it will be easy to buy more.

If you shoot a lot of videos, you should do the same calculations for video and add the two together.

Snowy mountains - Tips for Making Your Travel Photography Packing List for International Trips

Lens Cleaning Kit

You can’t get a clear shot with a dirty lens and a proper cleaning is vital. We cover the basics of a simple and portable kit in our article, How Should I Clean My DSLR’s Lens?, and I’d also include a sensor brush if you are comfortable with in-field sensor cleaning.

Filters

Most of us own and carry a circular polarizing filter and they certainly have earned a solid reputation. So throw one in your bag if you are familiar with them.

girl taking a photo of a lake - Tips for Making Your Travel Photography Packing List for International Trips

Next, include a graduated neutral density (GND) filter unless you are proficient at bracketing your shots and merging them artfully in your computer later. A GND helps in situations where there is a large difference between the lighting in a scene. They will slightly darken a sky so it won’t blow out when compared to a darker foreground.

Lastly, I’d suggest a quality neutral density filter, maybe a three or 6-stop.

Shot List

We’ve released shots lists on DPS before and they can be helpful to keep you on track when every single thing you see is new and photo-worthy. A shot list is by no means a dogmatic requirement, but I have found it helpful to bring back a nice variety of shots.

Otherwise, we all tend to slide back into what we like (landscape, food, astrophotography, etc.) and miss out on all the other subjects that make our trip so memorable.

Notebook

For me, a notebook is invaluable for remembering the little things that go with those photos. Maybe you have a mind like a steel trap, in which case you’re blessed, but for the rest of us, by the time day-three rolls around, we can’t really remember little things that happened on day one.

Tips for Making Your Travel Photography Packing List for International Trips - sunset

Sure, your photos will help you remember, but they don’t always capture the emotions and conversations you might have had. They are also great for sharing information with strangers, such as writing down the name of a restaurant or attraction you shouldn’t miss.

I fill a couple of pages before my trip with ideas of what I want to see or shoot. It’s then an easy reference later when I’m feeling rudderless and need some direction.

Your List

I hope this gives you a good start the next time you make a packing list for a trip. It’s not meant to be exhaustive so I would love to hear what else you have on your list. Leave a comment below so others can benefit from your experience with travel photography.

The post Tips for Making Your Travel Photography Packing List for International Trips by Peter West Carey appeared first on Digital Photography School.


Digital Photography School

 
Comments Off on Tips for Making Your Travel Photography Packing List for International Trips

Posted in Photography


Big Miss Steak: 10 Eerie Abandoned Meat Packing Plants

08 Sep

[ By Steve in Abandoned Places & Architecture. ]

abandoned Swifts meat packing plant Fort Worth Texas 1
As the disconnect between the meat we eat and the places it’s processed grows, so does the number of urban and suburban abandoned meat packing plants.

abandoned Swifts meat packing plant Fort Worth Texas 2

abandoned Swifts meat packing plant Fort Worth Texas 3

Take the former Swift and Company meat packing plant in Fort Worth, Texas. The plant first opened in March of 1904 but by the 1950s, the consequences of local droughts and the reduced importance of the historic Fort Worth Stockyards saw the Swifts plant enter a long period of decline – it finally closed in 1971.

abandoned Swifts meat packing plant Fort Worth Texas 4

Even closure and abandonment couldn’t reverse the Fort Worth Swifts meat packing plant‘s spiral into decay. In the 1970s, two major fires reduced most of the plant’s buildings to ruins leaving only the firm’s administrative offices still salvageable: in the 1980s the building housed an Old Spaghetti Warehouse restaurant. More recently, one of the plant’s buildings acted as a very believable prison in the TV series Prison Break. Kudos to Flickr user Noel Kerns for capturing the Swift plant’s eerie afterlife in 2008 and 2009.

Forst To Close

abandoned Old Forst meat packing plant Kingston NY 1

abandoned Old Forst meat packing plant Kingston NY 2

abandoned Old Forst meat packing plant Kingston NY 3

Flickr user richie 59 fired up the wayback machine to post these two images of the decrepit red brick Old Forst meat packing plant in Kingston, New York. The first two photos date from early 1982 while the third was snapped in 1985. As for Old Forst, it was demolished in 2006 when developers planned to build a 7-story hotel (which ended up not being built).

Hello, Neuhoff

abandoned Neuhoff meat packing plant Nashville TN 1

abandoned Neuhoff meat packing plant Nashville TN 2

abandoned Neuhoff meat packing plant Nashville TN 3

The former Neuhoff Meat Packing plant is located in northern Nashville, Tennessee, just six blocks from the State Capitol building… one imagines summer legislative sessions must have been unbearable when the wind rose. The plant closed in 1979 after decades of operation on a site that hosted a slaughterhouse for some time before the Neuhoffs even arrived. The abandoned meat packing plant is at long last being cleaned up, however, as the main buildings are being re-purposed as a mixed-use development focused on arts and ecology. A tip of the hat to Flickr user Eva Wood who snapped these striking scenes of neglect and decay in October of 2008.

Next Page – Click Below to Read More:
Big Miss Steak 10 Eerie Abandoned Meat Packing Plants

Share on Facebook


[ By Steve in Abandoned Places & Architecture. ]

[ WebUrbanist | Archives | Galleries | Privacy | TOS ]


WebUrbanist

 
Comments Off on Big Miss Steak: 10 Eerie Abandoned Meat Packing Plants

Posted in Creativity


Rapid Packing Container: Students Reinvent Cardboard Box

10 Feb

[ By WebUrbanist in Design & Products & Packaging. ]

rapid easy fast box

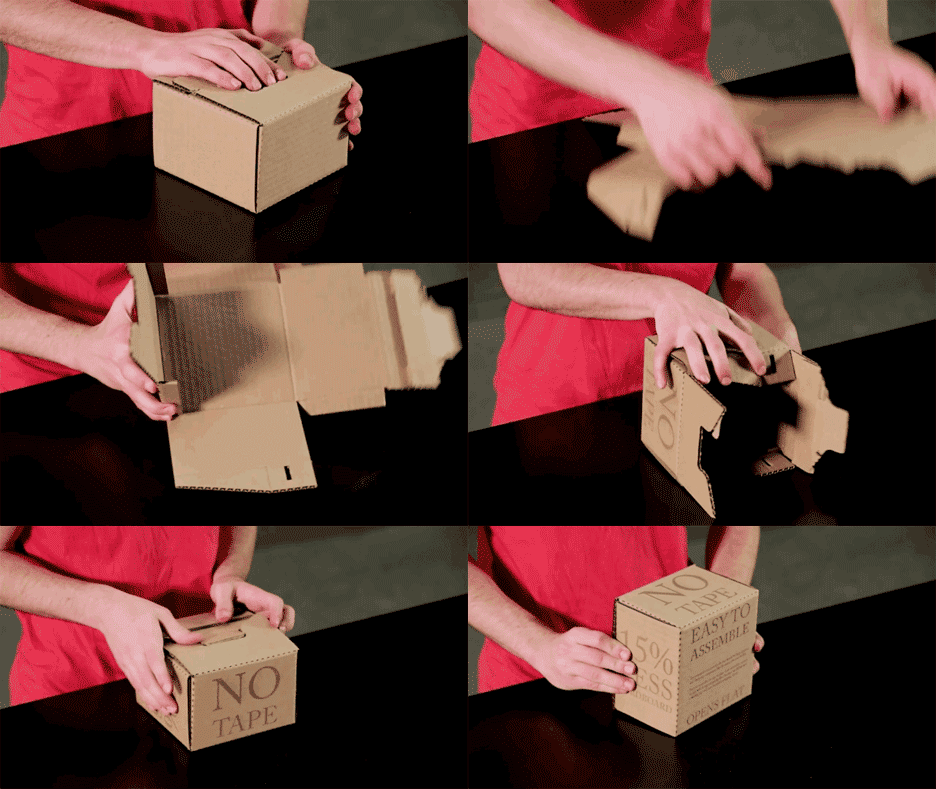
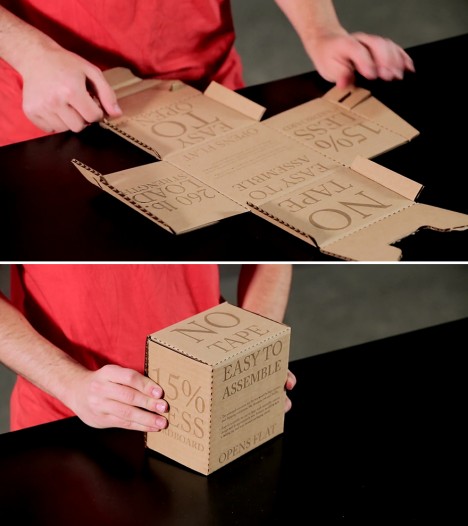
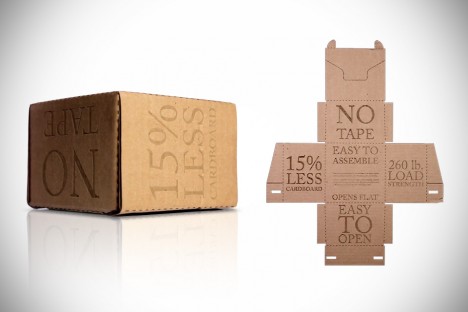
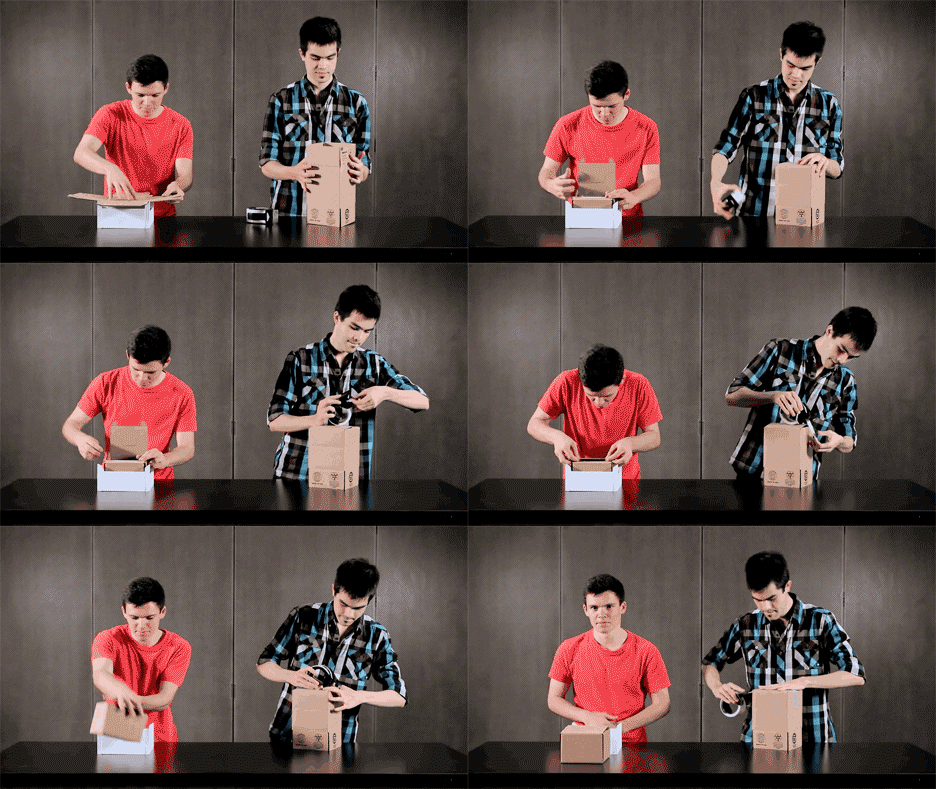
Faster, leaner and just plain better, this ingenious resign reduces wasted cardboard, eliminates excess tape and is also more convenient to build, open and store than traditional shipping boxes.

rapid-box-assembly

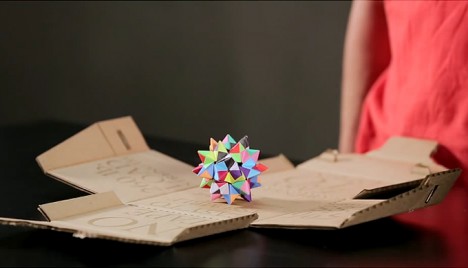
Fully reversible for easy reuse, this patent-pending creation is the product of two Cooper Union student collaborators, Henry Wang and Chris Curro, undergraduates in the Albert Nerken School of Engineering.

rapid-box-construction-desi

The Rapid Packing Container deftly address a long series of shortcomings, showing that even something so taken for granted as the cardboard box can benefit from serious improvement.

rapid easy folding box

Instead of pulling the unfolded box from a shelf then manually taping together various sides and flaps, shippers can simply press the flattened version of the RPC into a box that folds it for them. After removing a single strip of paper, a minimal amount of exposed adhesive does the rest. Instead of unnecessarily overlapping layers of cardboard, or using tape to support weight, the built-in corrugation and interlocking folds provide for essential structural needs all while using less material.

rapid assembly cardboard box

The end-user experience is also refreshingly clean and simple – instead of cutting through copious amounts of tape, recipients can push a tab to open the box and watch it unfold in front of them. If there is branding or shipping data on the exterior, that set of exposed sides can be flipped, folded and bent back into the hidden interior. Of course, only time and rigorous testing will tell whether this radical reinvention can disrupt entrenched industrial design standards.

Share on Facebook


[ By WebUrbanist in Design & Products & Packaging. ]

[ WebUrbanist | Archives | Galleries | Privacy | TOS ]


WebUrbanist

 
Comments Off on Rapid Packing Container: Students Reinvent Cardboard Box

Posted in Creativity


The Intrepid Landscape Photographer’s Guide to Bag Packing

16 Aug

Landscape photography is a lot like fishing: There are good days and there are bad days…sometimes the weather isn’t on your side…. Other times it is…. You can wait around for hours and come away with nothing, or sometimes you end up with too much to carry! One thing is definitely certain: The better prepared your kit is prior to Continue Reading

The post The Intrepid Landscape Photographer’s Guide to Bag Packing appeared first on Photodoto.


Photodoto

 
Comments Off on The Intrepid Landscape Photographer’s Guide to Bag Packing

Posted in Photography


Chase Jarvis TECH: Packing Photography Gear (Basic)

12 Feb

Award winning photographer Chase Jarvis shows us the ins and outs of how he packs his photo gear for shoots on locations around the world, as well as just down the street. Whether you’re an established pro or and aspiring amateur, you’ll pick up some great tips from Chase, including what gear he travels with, what bags/packs he uses, and how he navigates the airlines and freight companies with his photo equipment in tow.
Video Rating: 4 / 5