RSS
 

Posts Tagged ‘Orton’

How to Use the Orton Effect in Photoshop to Save Blurry Photos

04 Jun

The post How to Use the Orton Effect in Photoshop to Save Blurry Photos appeared first on Digital Photography School. It was authored by Ana Mireles.

orton effect in photoshop featured image

Is your photo a little bit blurry? Don’t throw it out just yet. In most cases, you wouldn’t want soft-focus in your image, but you can rehash-it with a different purpose. One thing you can do is apply an Orton effect in Photoshop to give it new life, especially if it’s a landscape.

Landscape Orthon Effect in Photoshop

Some times when you see your photographs in the camera without zooming in, they look sharp when they are not. Maybe your shutter speed was too slow, or you were using the wrong focus mode.

There are many reasons this can happen. Often you find out too late – when you’re already back home on your computer.

If it’s possible just go back and shoot again, you can find some useful tips in this article so that you can get the best results. If this is not an option, soft-focus and blurry images are completely acceptable if done in a creative way. This is where the Orton effect in Photoshop comes in.

Close-up Orthon Effect in Photoshop

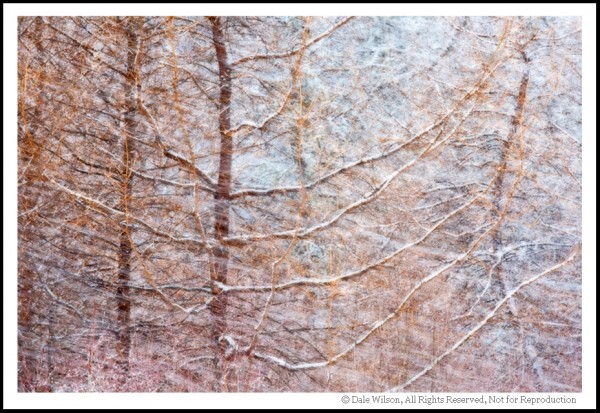
What is the Orton Effect?

The photographer Michael Orton invented this technique, hence the name. It was created in the 80s, which means that it was done with film photography. He overlapped different versions from the same scene with different exposures and a different focus. As a result, the image gained a surreal atmosphere.

Michael Orton Artist Statement

His images look like paintings thanks to the experimentation he does with light, color, and motion. On his website, he says that “The vast color combinations and unique variations of light found in the natural landscape, used with the wide variety of choices in compound camera motion provide an exciting challenge.”

You can go there to see his work and understand more of the technique before getting into it.

The Orton Effect in Photoshop

Because this technique was done by stacking images, it can be perfectly recreated in Photoshop because you can work with Layers. Since this is technically easy to do, many photographers have tried it.

Get yourself acquainted with what is out there so you can find your own style. Try using hashtags like #orton or #ortoneffects on Instagram and Pinterest.
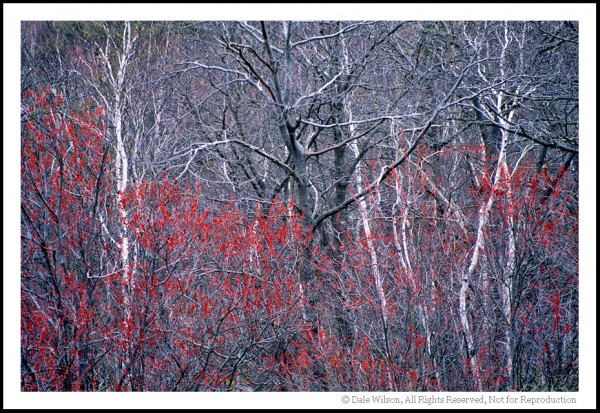
Orton effect on Instagram

Choose your image

Although technically speaking, you can apply this technique to any photo, it doesn’t necessarily look good on all of them. This is mostly done on landscapes because of the dream-like glow that will result from it.

Orthon effect in photoshop tutorial
This image is slightly blurry, it’s mostly a landscape and the man in the bear custom works well with a surreal atmosphere.

Another thing to consider is that it’s not a magical way to save an image that’s completely out of focus. Because it mixes areas with different amounts of detail in them, the soft-focus won’t be distracting. But you do need a certain degree of sharpness in it.

Step by step

In the same way that Michael Orton stacked slides, you’re going to be stacking layers. There are many ways to achieve this technique, it’s a matter of experimenting and finding your own. The basic principle is the same, though; blend different exposures and focus. Here’s my way of doing it to get you started.

Different exposures

When you open your image in Photoshop, it will be a Background layer that is locked. Click and drag it into the Duplicate Layer button at the bottom of the panel to create a copy of it.

Photoshop layers

Now, change the Blending Mode to Screen. You can do this by opening the menu that you’ll find at the top of the Layers Panel.

The Screen blending mode is one of the different options that allow you to lighten your image. When this layer blends with the one underneath, the pure blacks – if any – will be covered. The pure whites will stay the same and the greyscale will become brighter.

Screen blending mode in Photoshop

Next, duplicate the original background layer again and drag this copy to the top.

Then, change the blending mode to Multiply. This one does the exact opposite of the Screen blending mode. As the name indicates, it multiplies the base color by the blend color resulting in a darker one.

Multiply blending mode

Different focus

Now that you have different exposures, you need to add the different sharpness.

For this, you’ll need to add a filter.

Whenever you do this, it’s a good idea to make it a Smart Filter so that you can always come back to change it. The first thing to do is to right-click on the layer and choose Convert to Smart Object.

Smart objects in Photoshop

With this change, you’ll be working non-destructively. So, go to Menu>Filters>Blur>Gaussian Blur. In the pop-up window, you can adjust the right amount of blur for your image. Keep the preview option checked so that you can see what you’re doing.

Gaussian Blur

It’s easy to overdo it, so I recommend that you always come back to your work and check with fresh eyes. Because you made it a smart filter, you can just double-click on it and the Gaussian Blur window will pop-up again so you can make any adjustments you want.
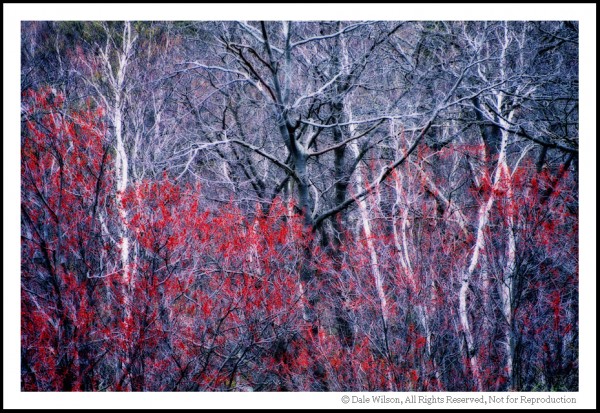
Finishing touches

Because the filter will be on a mask, you can paint black any area that you may want to keep without the blur. This can help to create a different effect or direct attention to a specific subject.

You can then crop or add any adjustment layers to finish it off.

Layer's mask in Photoshop

There you go, an easy and fun technique that can turn your not-so-great photo into an artistic project to save the day. Try it and share the results in the comment section.

Orton effect in Photoshop result

The post How to Use the Orton Effect in Photoshop to Save Blurry Photos appeared first on Digital Photography School. It was authored by Ana Mireles.


Digital Photography School

 
Comments Off on How to Use the Orton Effect in Photoshop to Save Blurry Photos

Posted in Photography


Go with the glow: How to effectively use Orton Layers in post processing

08 May

This image was taken in the summer of 2015 on the Skyline Trail near Panorama Point on the slopes of Mt. Rainier, WA.  The image is composed of 8 focus stacked frames and was shot at the following settings: 16mm, f/8, 1/25sec, ISO 400 using a Sony a7R and a Canon 16-35mm f/2.8L II lens.

Photo: Chris Williams Exploration Photography

Have you ever wondered how some of the top landscape photographers achieve that dreamy yet sharp look in their photos? It turns out that the answer is really quite simple. The Orton effect, as it has been dubbed in recent years, is achieved by selectively adding a Gaussian Blur layer in Photoshop. When applied correctly the technique can add depth, atmosphere and an almost surreal feeling to your images.  It can also help reverse some of the ‘crunchiness’ that sometimes results from web sharpening and compressing a large scene dynamic range into one, tone-mapped image. 

The technique itself was developed by photographer Michael Orton in the darkroom some years ago. This ‘Orton’ effect was achieved through the process of sandwiching two slightly over exposed images; one of which was slightly out of focus while the other remained tack sharp. The result of this process yielded a soft glowy image that retained much of its edge detail. 

Lucky for us this effect is now easily attained and even simplified in the digital age through the use of tools like Photoshop. In the following steps I will outline how to use and refine the technique that has been made popular by landscape photographers like Ryan Dyar over the past few years. 

Apply the Blur

The first step to this process is to take care of your focus stacking, exposure blending and touch up work before you apply the blur layer. Once that has been completed, sharpen your image as you would normally and merge the visible layers. Right click on your merged image layer and duplicate it.  

Now that you have the duplicated layer you can begin the process of applying the Orton effect. Select your duplicated layer (leave it at 100% opacity and normal blending mode) and apply the Gaussian filter to your layer. The radius at which you blur the pixels really depends upon your camera’s resolution and the desired outcome for your finished product. 

Selecting the Gaussian Blur layer is as simple as browsing through the filter options in Photoshop and selecting the appropriately named layer.

I typically blur the Raw files from my Sony a7R at a pixel radius of around 37. If you’re using a lower resolution file from something like a Sony a7S or even an APS-C camera I wouldn’t go further than a pixel radius blur of 25. The methodology behind this is that you don’t want to lose all of your edge detail and compromise the contrast in your blur layer, so choosing the correct blur radius is important. It’s a balance, and one that you should really play with to determine what blur radius works best for your needs and file types. Generally speaking, you want to stay within a pixel radius blur range of 15-40.  

A preview of the effect of your Gaussian blur settings can be seen prior to applying the setting to the layer; adjust the pixel blur radius here to determine what works best for your image.

Once you have selected the Gaussian blur settings that work best for your image click ‘okay’ to apply the filter to your layer. Leave the opacity of the layer at 100% for now.  

Bring Back the Contrast and Select the Opacity

One of the most important steps to this process is to apply a ‘levels’ adjustment to this layer. More often than not, when photographers first start to experiment with this type of technique in post processing, their images are left with haloing and a lack of contrast. Applying a levels adjustment selectively to your Orton layer can make a huge difference in your final result by bringing back the blacks and highlights that the Orton layer tends to bleed out. I normally bring the blacks in to between 10-25 and the highlights to around 245. Applying this step to your layer will ensure that you lose a minimal amount of contrast and will help to blend the layer in areas of harsh transition.   

Choose the ‘levels’ tool and adjust the blacks and lights to your taste.

Once you have completed this step it’s now time to adjust the opacity of your Orton layer. I typically aim for between 10-20% opacity. This really depends on your style and what the overall desired look and feel of your image is.  The example below illustrates what can happen if you increase your Orton layer to 35%, which can be a bit on the excessive side depending upon your image.   

10% Orton Layer 35% Orton Layer

The Devil is in the Details

Now that you’ve got this great atmosphere and glow going on in your image, you may ask yourself what happened to the detail? Loss of detail can happen when this layer is applied in your workflow, but there is a very easy solution to remedy this issue; the High-Pass filter. 

The first step is to duplicate your original background image layer (that has no Orton applied to it), select it, pull it to the top of your workflow and navigate to the filters tab.  Scroll down to find the ‘other’ category and select ‘High Pass’. A high-pass filter brings the detail out in the areas that tend to be most effected by the Gaussian layer: the edges of the elements in your composition. 

Choosing the high-pass filter follows many of the same steps as locating the Gaussian filter only this time the filter is located in the sub-menu titled ‘other’.

Once you have done this you will be given an option to select the pixel radius you wish to apply to your layer. I normally try to stay within a pixel radius of 4-5.5 (any larger and the image detail can get grainy). Pick your desired radius and click OK.  

Once you have selected the high-pass filter you can choose your pixel radius size; I normally choose between 4 and 5.5.

If you aren’t familiar with this type of application your first thought will probably be: ‘what did I just do to my image?’ as you stare at the grey layer on your screen. Fear not! There’s a very easy solution; you will need to select the layer and choose the ‘Soft Light’ blending mode.  

Make sure to apply the ‘soft light’ blending mode to your layer to blend the high-pass pixel detail seamlessly into your exposure.

This mode seamlessly blends the High-Pass pixel detail back into your image. You may want to adjust the opacity of this layer to your tastes after its application, but that’s all there is to it!  If you feel like you’ve got your settings down to a science you may want to even record this as an action. Be aware that every image will be a bit different from a processing stand point, however, so you may want to make subtle changes on a case by case basis.

Toggle the application of your layers off and on and make changes in opacity, detail and contrast as you see fit.

The Final Product

No Orton applied Orton applied

If you’ve completed all of these steps successfully, you now know how to effectively utilize an Orton layer in your workflow. This type of layer can be added to anything from landscapes, to wildlife, and even to portraits in some cases. The limits are only bound by your creativity. Have fun with it and happy shooting!    

Articles: Digital Photography Review (dpreview.com)

 
Comments Off on Go with the glow: How to effectively use Orton Layers in post processing

Posted in Uncategorized


Pulling Dreamscapes via Orton Effect

02 Nov

Not far from my home is the residence of one of the best teachers of photography in Canada, if not the planet. Freeman Patterson has that incredible ability to not only implant a contagious passion within his student he does so in a way that demands they push their limits. Thankfully for us he has penned no less than 12 books, including four of the absolute best instructional volumes available. His sense of design and use of space have influenced many, many photographers that stand behind a camera today, myself included.

On the opposite Canadian coast, in British Columbia, Michael Orton is one of a very few photographers who has created an effect that has endured both the film and digital ages. Some photographers have re-named the technique for their own purposes, but the fact remains it was Orton who mastered the technique.

In the early 1980’s Orton started experimenting with sandwiching two slides to create a final image. This in and of itself is not unique; many photographers had been doing this for years. What Orton did, however, through his experimentation was to purposefully over-expose the two slides – one by two f/stops and the other by one f/stop. To add his own personal touch he would throw the two f/stop over-exposed image out of focus and thus came the “Orton Effect.”

For the last 30 years this “Dreamscape” style of image has been appearing in camera club competitions, on greeting cards and calendars. We can call the technique what we will, but I am a firm believer in providing credit where due – Michael Orton.

Once digital capture became the norm and film was relegated to disposal at yard sales, many photographers were left trying to discover ways to replicate in Photoshop those techniques that had previously taken considerable practice to master. It took some time for me to develop the recipe that “worked” and closely mimicked what I was able to capture on film. I have tweaked this many times and have yet to acquire that same “feel” as film, but will attribute this to the fact that digital capture simply is different than film.

Please feel free to adjust and season to taste, but this technique should be included in every recipe book. I will not use shortcut keystrokes or use the command or control key function of Mac versus PC platforms. I will assume the reader can understand where, when and how to substitute these keystrokes.

  1. Open image
  2. Duplicate background layer and call this new layer “Base Layer”
  3. Create a duplicate layer of the Base Layer and call this new layer “Screen Layer”
  4. With the screen layer active, change blend mode to Screen
  5. With the screen layer active, select Merge Down
  6. Create a duplicate layer of the “Base Layer” and call this new layer “Blur Layer”
  7. With the “Blur Layer” active, go to Filter > Gaussian Blur. Adjust the blur to a point where there are no identifiable features; 20 is a good starting point.
  8. With the “Blur Layer” active, change the blend mode to Multiply, and adjust the opacity and / or fill slider bars to achieve the desired effect.
  9. Flatten the layers.

Depending on your own taste you might find the blacks have become blocked-up. To adjust for this there are several usual techniques, most often it is easiest to create a curves adjustment layer and simply open those shadows until you begin to see a hint of detail.

Like all cookbooks you adjust the recipe and season to taste.

While there are many photographers utilizing variations of this technique today, it is always refreshing to review the works of the original craftsmen. Study Patterson for his approach to design and how to utilize space, in so doing it his style of image that loans itself best to the Orton Effect; and, review Orton’s work to see how it is possible to move an image from the documentary “I was there” type of picture to a well crafted and intended piece of art that captures the flavour of the place.

Post originally from: Digital Photography Tips.

Check out our more Photography Tips at Photography Tips for Beginners, Portrait Photography Tips and Wedding Photography Tips.

Pulling Dreamscapes via Orton Effect


Digital Photography School

 
Comments Off on Pulling Dreamscapes via Orton Effect

Posted in Photography


Glamour Orton glow: Photoshop

11 Mar

Arty, soft glow effect that looks great for landscapes and portraits.