RSS
 

Posts Tagged ‘Organize’

How to Organize Your Photos by Location in Lightroom

09 Aug

You likely know Adobe Lightroom as a powerful piece of photo-editing software. It’s known as the industry standard for photography post-production, especially when paired with Photoshop. You may also know that its photo management features are pretty impressive. If you so choose, you can use this one piece of software to upload, rename, keyword, review, edit, export and organize your photos.

camper van on the grass - How to Organize Your Photos by Location in Lightroom

How you use Lightroom is entirely up to you, and it’s unlikely that two photographers will use it the same. The way you organize your catalog will depend on many factors, including which genre of photography you choose, who you’re shooting for, and how you have your computer hardware arranged. There is no right or wrong way to organize things, and it will likely change over time.

If you’re a portrait or wedding photographer, you might choose to organize your catalog around sessions or dates. As a landscape and travel photographer, it makes sense for me to organize my photos based on locations. Whether a location is a city, country, or even a continent, it helps me to keep things organized so I can always find what I’m looking for without wasting time searching through thousands of photos.

There are a few different ways to find photos based on location in Lightroom, but they only work if you take a few simple steps when you import them.

Import

Whenever you import photos into Lightroom, try to follow the same steps.

It’s a good idea to create some templates for the Develop and Metadata settings. This makes it easy to apply some standard settings and metadata to every one of your photos. You should at least apply your copyright information to your photos with a metadata preset.
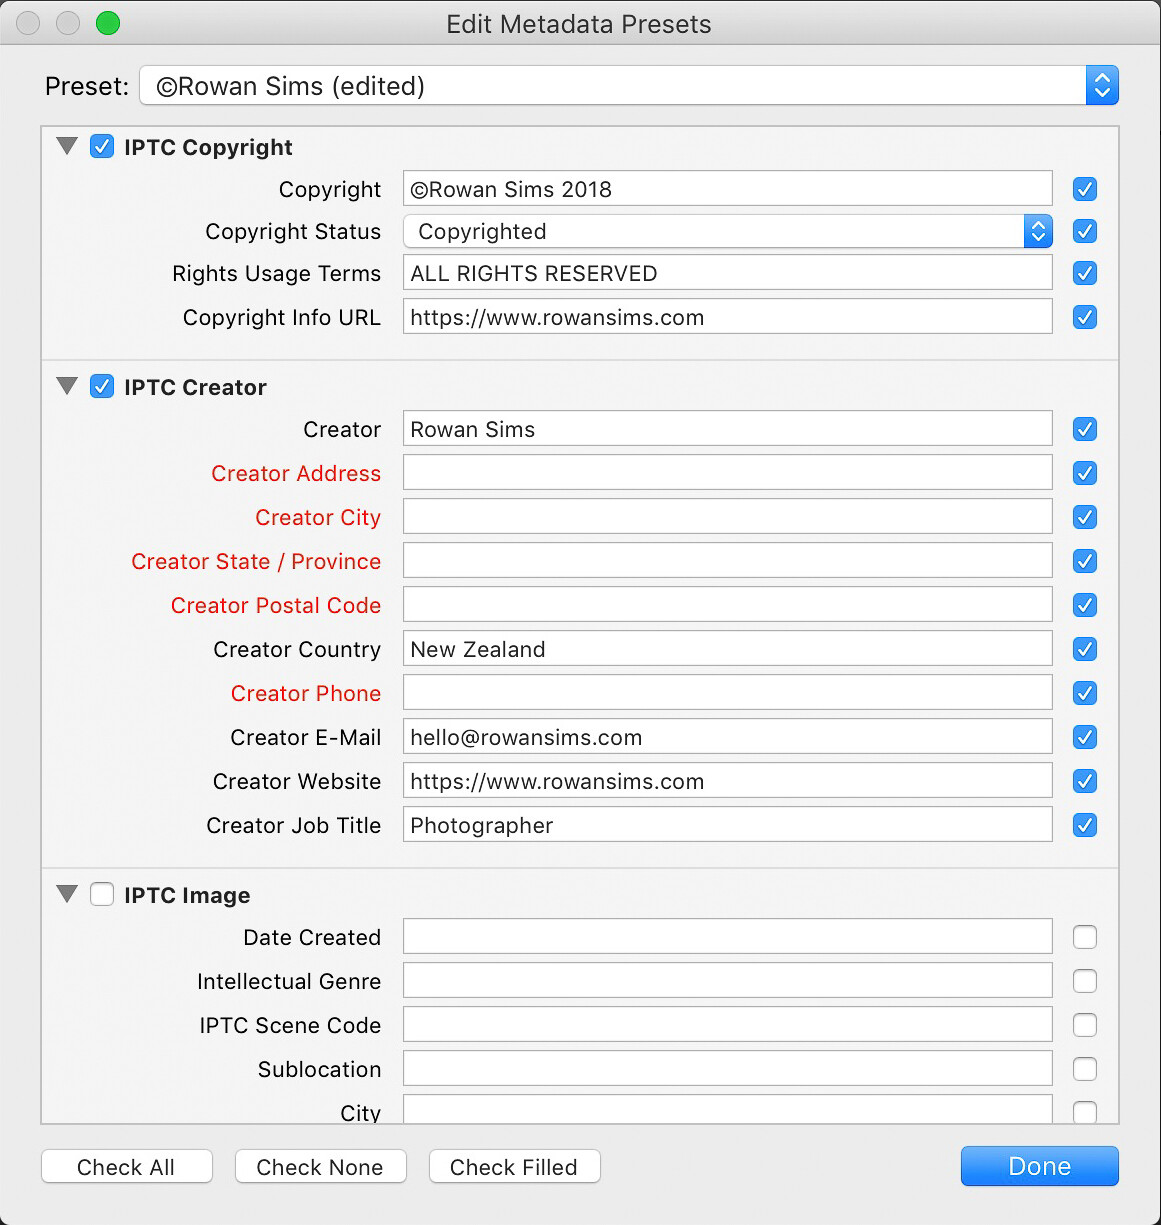
metadata organizing lightroom photos by location

Keywords

The single most important thing you can do to simplify the process of finding photos is keywording. You don’t need to add a long list of keywords, just a few relevant ones that will help you later on when you search.

When organizing by location, I always add the name of the country, region, and specific place name. I’ll also add any other relevant keywords that I may want to search for, such as aerial or long-exposure.

When renaming my images during import I always include the location in the name. Something like “noosa-beach-qld-australia” works well. The words in your filenames become searchable keywords themselves (make sure to use a dash between words). I don’t use dates in my file names, but it’s up to you whether you want to or not.

How to Organize Your Photos by Location in Lightroom

Folders

Using a good folder structure will make your life far easier, especially when you have tens of thousands of images.

To organize your folders by location, you can create a new folder for each specific location or one for each city or country. I have one folder for each country I visit and just keep adding to it. Even if I visit that country again years later, I’ll still keep using that same folder. It makes it far simpler and I know where I can find a photo from anywhere on earth.

It also makes it simpler to find image files on my computer as the folder structure I set up is identical both inside and outside Lightroom. Organizing folders by date or some other number-based system would never work for me.

Collections

Collections are another one of Lightroom’s great features that can help you keep everything organized by location. Where Folders contain every photo from a given location, Collections contain only the photos you choose. Again, I’ll create a new Collection for each country, but I only put the keepers in there.

How to Organize Your Photos by Location in Lightroom

In the past, I’ve done this manually, but I now create a Smart Collection for each location. I only need to add two rules to each Smart Collection: Flag and Keyword. Based on these settings, any photo that I flag that has that keyword is automatically added to the collection.

smart collections - How to Organize Your Photos by Location in Lightroom

Map

As a travel photographer, my favorite Lightroom tool for finding photos based on location is the Map module. One of the first things I’ll do after I’ve finished importing new photos into Lightroom is to add GPS coordinates. There are a couple of ways you can do this.

If you know the coordinates you can add them manually in the Metadata panel. The easiest way is to select all your images (Cmd/Ctrl+A) then go into the Map module, search for the location in the search bar above the map, then drag all your photos onto the right location on the map.

Depending on your camera, your photos may already have GPS coordinates embedded in the file. This is often the case with drone photos or any other GPS-connected camera or device. If not, you can record the GPS coordinates by taking a photo with your phone then grabbing them from that photo’s metadata.

map module - How to Organize Your Photos by Location in Lightroom

Searching for Photos

Now that you’ve imported your photos with location-based keywords and filenames, organized them into location-based Folders and Collections, and geotagged them with GPS coordinates, finding them later is simple.

I use a different approach depending on whether I’m looking for a specific image or a group of images from a specific location.

If it’s a specific image you want, and you know you flagged it, select the Collection associated with that location. If you’re not sure if it’s flagged, select the folder. Then search inside the collection or folder using the Library Filter.

Click on Text, select Any Searchable Field in the first drop-down menu, then Contains All in the next menu, then type your keywords in the search field. The more keywords you add, the more specific the search becomes.

library filter - How to Organize Your Photos by Location in Lightroom

If I’m looking for an image or group of images from a specific location, I like to use the Map module. Select All Photographs in the Catalog panel on the left then go to the Map module and type the location name into the search bar. Any geotagged images in that area will show up on the map.

You can zoom in or out on the map to make your search location more or less specific. Images in the specified location will appear along the filmstrip below the map.

Summary

A little forethought and organization when importing your images are worth the effort. It doesn’t take much time to apply these settings but can save you a lot down the road.

If you’re anything like me and have tens of thousands of photos in your catalog, you’ll be doing yourself a favor, and future you will thank you for your efforts.

The post How to Organize Your Photos by Location in Lightroom appeared first on Digital Photography School.


Digital Photography School

 
Comments Off on How to Organize Your Photos by Location in Lightroom

Posted in Photography


4 Tips to Organize Your Photos in Lightroom

01 May

Lightroom is one of the most widely-used programs for photographers today, with good reason. In addition to extensive editing options in the Develop module, Lightroom also contains a bevy of tools to help you organize your photos as well.

It can make the process of managing thousands (or tens of thousands) of pictures much more seamless and intuitive. Getting started with Lightroom’s organization functionality can be a bit intimidating, but there are four simple ways in which you can easily and quickly use the program to get a handle on your photos.

4 Tips to Organize Your Photos in Lightroom - sunset and flowers

Understanding the Lightroom Method

Before you begin using Lightroom’s organizational options it’s important to know one thing about how the program works. It never, and I mean never, does anything to the original images on your computer. All the organization tips covered here deal solely with how Lightroom sorts and displays images within its own internal Catalog, which is kind of like its own database for keeping track of your pictures.

Lightroom will never move your pictures to a different location on your computer, nor will it change the filename or any other property of your pictures. Basically, no matter what you do in Lightroom, your original pictures will always be safe and unchanged, so you never have to worry about making a mistake.

Feel free to try things, click on buttons, and play around with the features in Lightroom as much as you want because you’ll always have your original files safe and sound.

4 Tips to Organize Your Photos in Lightroom - thumbnail images

Lightroom contains a variety of tools to help you organize and manage your images.

1 – Smart Collections

If Lightroom didn’t have Smart Collections I’d probably fall out of my chair and start crying like a baby. Smart Collections are the bedrock upon which my entire Lightroom organizational methodology is built. They are simple enough that anyone can learn how to use them but powerful enough to meet the needs of the most demanding photographers.

Imagine taking a hamper full of laundry out of the dryer, dumping it on your floor, and as the clothes fall out they are immediately sorted and folded into individual piles: pants, shirts, lights, darks, and even socks. Pure bliss, right? That’s kind of how Smart Collections work, and they are so useful it’s almost magical.

4 Tips to Organize Your Photos in Lightroom - abstract image

Smart Collections can help you make sense of the chaos that is your photo library.

Smart Collections automatically sort your images into folders depending on criteria that you specify, and you can even have Smart Collections within other folders called Collection Sets. (Again, this all happens ONLY within the Lightroom Catalog database.

Lightroom will never move your photos around on your computer or change the folders they are actually stored in!). You can set up Smart Collections to automatically sort your photos into virtual folders such as…

  • All images that were taken in the month of January 2018  (see screenshot below).
  • Include all the images that were taken with either your Nikon or Canon camera.
  • Any images that have not yet been edited in the Develop module.
  • All images that were taken at a specific geographic location and have a five-star rating.

4 Tips to Organize Your Photos in Lightroom - smart collection criteria

One of the easiest ways to use Smart Collections is to just create one for each month of the year. I do this at the beginning of each year so my pictures are automatically sorted by month and I never have to think about it again until next January rolls around.

It’s a simple way to get started with Smart Collections and will help you see how useful they are for your entire photography workflow. You can create Smart Collections that fit almost any criteria you can think of, which can dramatically decrease the amount of time you spent managing your pictures.

2 – Flagging and Rejecting

This might sound simple to veteran photographers, but for someone who is just starting out or otherwise unfamiliar with Lightroom, the Flag/Reject technique can have a huge impact on how you organize your pictures.

On its face, the technique is simple. As you scroll through your photo library, press the P key to mark a photo as a Flagged (or Picked), press the X key to mark a photo as rejected, or press the U key to remove either of those demarkations from a given image.

This simple act can be incredibly useful as a way to organize your photos, especially when used in conjunction with Smart Collections. As you flip through your pictures it’s easy to press P, X, or U so later on you know which pictures are your favorites and which are not worth keeping.

You can then have the Flagged images automatically displayed in a Smart Collection without doing any extra work on your part. Additionally, you can click the filter icons at the bottom-right of both the Library and Develop modules to quickly show or hide the photos you have marked as Flagged, Rejected, Unflagged, or a combination of all three.

4 Tips to Organize Your Photos in Lightroom - flagging in LR

The white flag indicates that image is marked P or as a Pick. Notice there is also a white line around the thumbnail so you can easily find the flagged images.

3 – Keywords

One of the most useful features that Lightroom has to offer as it relates to photo organization is that of keywording, though it also requires some degree of effort on your part to make it truly worthwhile. In the Library module, you can activate the Keyword panel on the right-hand side of your screen and type in descriptive words that identify a given photograph, such as Soccer, Nature, or Macro.

To use multiple keywords for a given picture just use a comma to separate them, and you can assign as many keywords to a picture as you like.

Lightroom even has banks of keywords you can use to select common descriptors for categories like Outdoor Photography, Wedding Photography, and Portrait Photography. These make the process of adding keywords even easier because you can just click on the ones you want to use, and they are automatically assigned to the photo or a group of photos that you have selected.

4 Tips to Organize Your Photos in Lightroom - keywords

Lightroom makes it easy to assign keywords to photos in the Library module. You can also assign keywords to a group of photos during the import process as well.

To use keywording for photo organization you can create Smart Collections that specify certain keywords or, in contrast, do not contain specific keywords.

For example, you could have a Smart Collection of photos that include the keywords Wedding and Ceremony and another Smart Collection that requires the keywords Wedding and Reception. You can also use the Filter Bar (View > Show Filter Bar) to sort photos in real-time by adding specific keywords to your sorting criteria.

4 – Face Detection

Some people decried the inclusion of face detection when Adobe added it to Lightroom in 2015 because it’s generally not seen as a feature that true professionals use very often. While I can’t necessarily disagree with that sentiment, I do find facial recognition to be a fantastic way to organize your photos for beginners, casual shooters, and even sometimes for working pros.

Nestled at the bottom-left corner of the Library module is a small little Face icon which will activate Face Detection when you click on it. If you have never used this feature it will take Lightroom quite some time to analyze all the photos in your catalog for faces.

This also illustrates one of the biggest weaknesses with this feature: speed, or lack thereof. Face Detection is, and this is putting it mildly, as slow as molasses even on some of the latest computer hardware. But it still can be highly useful and, when properly trained, a great way to keep your images organized.

4 Tips to Organize Your Photos in Lightroom - facial detection

The initial facial analysis will take a long, long time. Better go get yourself a cup of coffee while you wait. Or two cups.

Click the question mark below each photo to add a name, and the more photos you name the better Lightroom’s analytical engine will be at figuring out which images contain which people. It will also group photos together that are nearly identical so when you give a name to one face it will add that name to all the faces in the group.

After you start the identification process you can click on a single face at the top of the screen under “Named People” to show all the pictures that include that person.

The most difficult part of the Face Detection process is detecting and naming faces. If you’ve got tens of thousands of images in your Catalog this can take a really long time. So I recommend starting with people who are most important to you and working out from there over time. Begin with your family, closest friends, or repeat clients, and then branch out to other people as you progress.

I find Face Detection to be in roughly the same category as the shop-vac out in my garage: I don’t use it every day, but when I do need it, it’s extraordinarily handy. Your mileage may vary, but you just might find that it’s worth your time to try out.

4 Tips to Organize Your Photos in Lightroom - face detection and naming

You can enter names for everyone in a single photo, and unnamed people will have a “?” above them.

Conclusion

These four tips are just some of the ways in which Lightroom can help you manage your ever-growing collection of photos. If you’re a Creative Cloud subscriber you will continue to see improvements over time, especially with regard to overall speed for things like Face Detection.

But even if you use a standalone version like I do, you may find that these features are often indispensable. Each also has their own set of nuances and additional settings that can help you tweak things even further.

What about you? What are some of your favorite ways to organize your photos in Lightroom? Please leave your thoughts in the comments below.

The post 4 Tips to Organize Your Photos in Lightroom appeared first on Digital Photography School.


Digital Photography School

 
Comments Off on 4 Tips to Organize Your Photos in Lightroom

Posted in Photography


Google ‘LIFE Tags’ uses AI to organize LIFE magazine’s 4 million-photo archive

08 Mar

Earlier today, Google revealed a few new projects that utilize its artificial intelligence technology at the intersection of education and culture, and one of those projects is called Google LIFE Tags. For the LIFE Tags project, Google used a computer vision algorithm to intelligently sort through, analyze, and tag 4,000,000 photos from LIFE Magazine’s publicly available archive.

LIFE Magazine initially ran from its launch in 1936 until 1972; it then resumed distribution in 1978, only to be suspended again in 2000. According to Google, the publication only used 5% of the millions of images that were taken for the magazine during its decades of operation—an archive that spans 1800m / 6000ft of space across three warehouse.

The archive’s enormous size makes it difficult to browse, and that’s where Google LIFE Tags comes in. The project, which is available now for anyone to use, organizes the archive based on objects found within the photos. Each object—such as “1937 Ford,” “Airbus,” “American bulldog,” and thousands more—are presented on the Google LIFE Tags website in the form of an interactive encyclopedia.

Visitors can browse images from LIFE Magazine’s photo archive that contain the particular objects or subjects they’re interested in by clicking the related tags on the project’s website.

Clicking the “camera” tag, for example, prompts the system to present more than 800 images containing cameras. Each category’s page includes a definition pulled from Wikipedia, as well as related tags that the visitor may be interested in, such as (in this case) things like “camera lens,” “filmmaking,” “photographer,” and “film camera.”

“Using thousands of automatically created labels,” Google explained in a blog post, “the tool turns this unparalleled record of recent history and culture into an interactive web of visuals everyone can explore.”

And honestly, we can’t imagine a better way to spend a few hours of time this evening than browsing through this incredible archive of imagery. Enjoy… and our apologies to your productivity.

Articles: Digital Photography Review (dpreview.com)

 
Comments Off on Google ‘LIFE Tags’ uses AI to organize LIFE magazine’s 4 million-photo archive

Posted in Uncategorized


Inner Space: 14 Modular All-in-One Living Cubes to Organize Interiors

09 Feb

[ By SA Rogers in Design & Fixtures & Interiors. ]

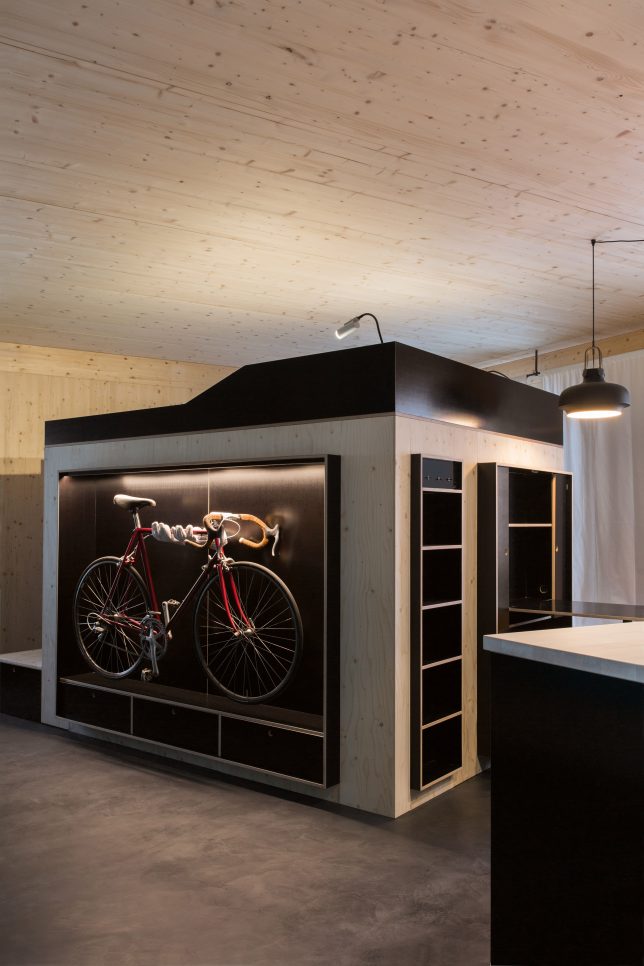
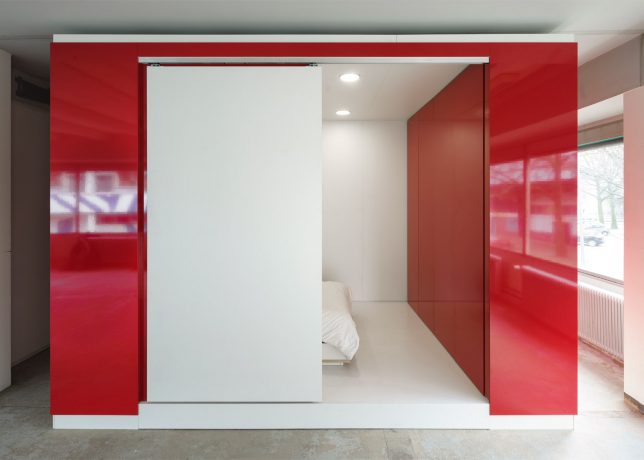
kammerspiel cube 1

No shelter is too small or too basic to accommodate a comfortable lifestyle when everything you need, from your bed and kitchen to walk-in closets and mini theaters, is contained in one compact, mobile, modular ‘living unit.’ Often fitted out for plumbing and boasting their own internet and sound systems, these rooms-within-rooms can instantly make warehouses and other typically uninhabitable spaces into cozy apartments or save an astounding amount of space when square footage is severely limited.

Kammerspiel Unit by Nils Holger Moormann

kammerspiel cube 2

kammerspiel cube 3

Designed for people living in micro apartments, Nils Holger Moormann’s ‘Kammerpsiel’ contains just about everything you need in an apartment, in one compact and highly efficient package. The bed is lofted above the walk-in closet, while important functions are located along the perimeter, like the couch, storage, desk, dining are and even a place to display and store your bike.

Cubitat by Urban Capital and Luca Nichetto

cubitat 2

cubitat 1

cubitat 3

Measuring 10 by 10 by 10, the Cubitat by Luca Nichetto and urban Capital is designed to be a ‘plug and play’ living space containing a built-in kitchen, living room, bed, bathroom and closets. The idea is that you could move into virtually any kind of building and instantly make it inhabitable without the need for further renovations.

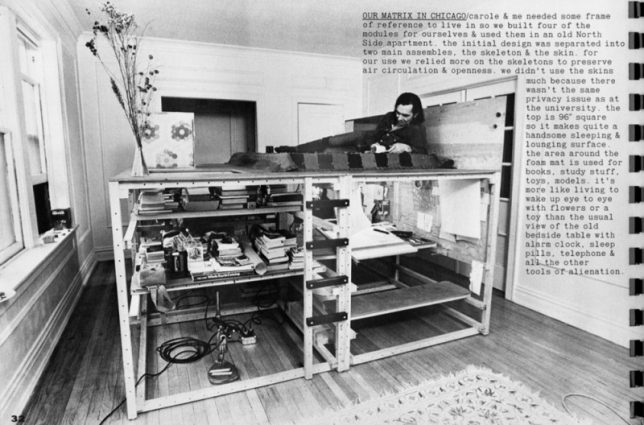
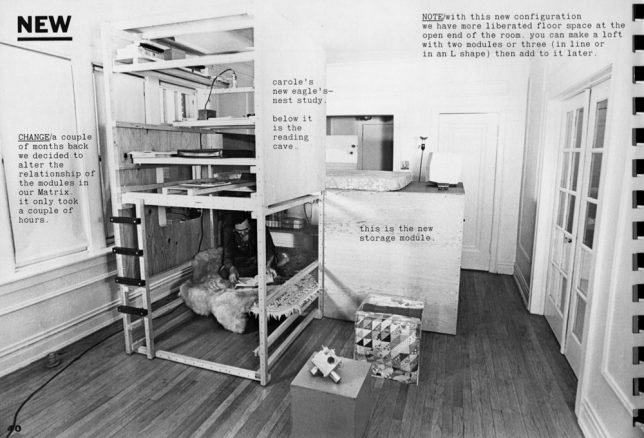
Living Cube by Ken Isaacs

ken isaacs living cubes

ken isaacs living cube 2

The first designer to come up with this concept seems to have been Ken Isaacs, whose 1974 book ‘How to Build Your Own Living Structures’ still serves as a roadmap to modular room systems today. Isaacs reportedly came up with the idea when he was a poor Chicago student needing a place to live and work. The whole book is downloadable here.

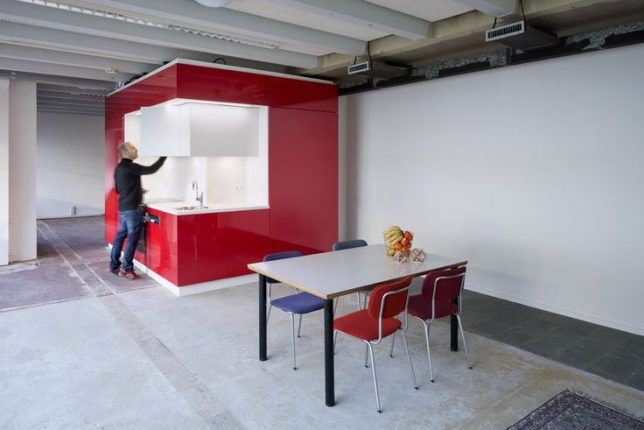
The Hub by Kraaijvanger Architects

the hub

the hub 2

the hub 3

Another all-in-one apartment system, the Hub by Rotterdam-based architects Kraaijvanger, contains everything you need to make a warehouse a comfortable place to live – even plumbing. It measures just a little more than 160 square feet, hooks up to existing water mains through an access point in the floor, and has its own internet, heating and sound system.

Wooden Mountain Hotel Suite, Volkshotel

photo: Arend Loerts

photo: Arend Loerts

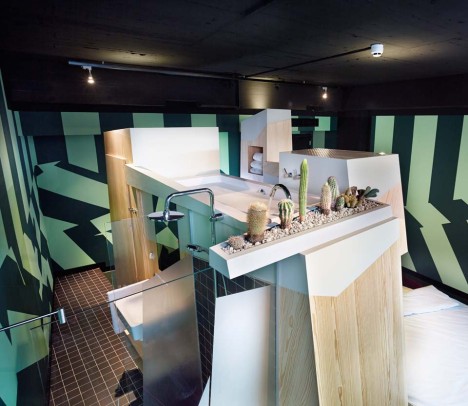
Not all modular living systems are cubes, though. The Wooden Mountain in the Volkshotel’s Edmund Suite packs just as much function into an amorphous wooden structure, including a wardrobe, double bed, shower, toilet, full-sized soaking tub and even a cactus garden. Photos by Arend Loerts.

Next Page – Click Below to Read More:
Inner Space 14 Modular All In One Living Cubes Organize Interiors

Share on Facebook


[ By SA Rogers in Design & Fixtures & Interiors. ]

[ WebUrbanist | Archives | Galleries | Privacy | TOS ]


WebUrbanist

 
Comments Off on Inner Space: 14 Modular All-in-One Living Cubes to Organize Interiors

Posted in Creativity


How to Organize Your Photos in Lightroom

30 Sep

The Lightroom Catalog is a database containing all the relevant information that Lightroom needs about your photos in order to process your images and sit at the centre of your workflow.

Lightroom is a digital asset management (DAM) tool – you can use it to organize and search your photos, as well as process them. This is the main difference between Lightroom and Photoshop, which is a powerful image editor, but has no database capabilities.

Even if you use Photoshop for all your processing you can still use Lightroom to view, organize, and search your photos. That’s why the two programs come together if you subscribe to Adobe’s Creative Photography Plan (and why Photoshop no longer comes with Adobe Bridge). This article will walk you through some of the tools inside Lightroom to help you organize your photos.

Using Collections

Lightroom uses Collections to organize your images. A Collection is a virtual folder that exists in the Lightroom Catalog. You can create as many Collections as you like within Lightroom and use them for whatever purpose you see fit. The more you use them, the more you will find better ways to use them.

There are several types of Collections in Lightroom:

Collections: Virtual folders to which you can add any photo that you have imported into Lightroom.

Collection Sets: Another type of virtual folder to which you can add Collections, but not photos. Collection Sets are used to keep your Collections organized.

How to organise photos in Lightroom

This screen shot shows the icons used to represent Collection Sets and Collections in Lightroom. Xi’an – Terracotta Warriors (red arrow) is a Collection Set. Full Selection (green arrow) is a Collection. The icon is indented because it is inside the Collection Set.

Smart Collections: Collections that are populated automatically according to the rules that you set. For example, you could create a Smart Collection containing all photos taken in 2015, tagged with the keyword phrase “New York” to find all photos that meet those criteria. A Smart Collection is really a way of searching for images, and retaining the result indefinitely.

Published Collections: Beyond the scope of this article, Published Collections are created in Lightroom’s Publish Services. You can learn more about Published Collections in my article How to Upload Photos to Flickr and 500px Using Lightroom 5 (the information applies to Lightroom 6 and Lightroom CC as well).

Book and Print Collections: These are created in the Book and Print modules. My articles How to Create a Simple Blurb Photo Book in Lightroom and How to Create a 2015 Calendar in the Lightroom Print Module go into more detail.

For the purposes of this article we are interested in Collections and Collection Sets.

Creating Collections and Collection Sets

If this is your first time using Lightroom you won’t have any Collections yet (apart from the Smart Collections that it already contains). So let’s get started! I’m assuming that you have already imported your first photos into the Lightroom Catalog.

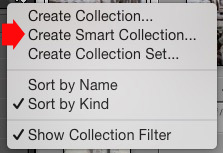
Go to the Collections panel and click on the plus icon you see in the top right corner. Select Create Collection Set.

How to organise photos in Lightroom

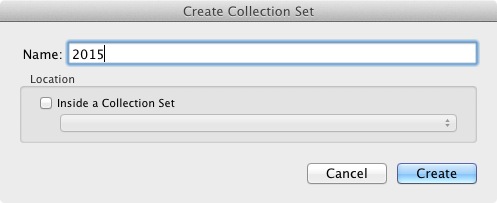
The Create Collection Set window appears, where you can give the Collection Set a name.

How to organise photos in Lightroom

I’ve named this one 2015. The idea is that it will house all the Collection Sets containing photos taken in the year 2015 (remember that Collection Sets can only contain Collections, not photos).

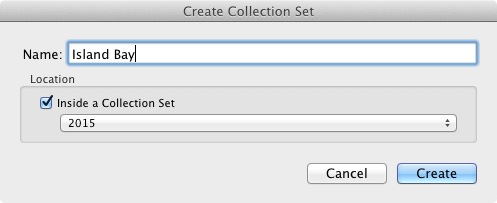
Now right-click on the Collection set you just created and choose Create Collection Set. Lightroom prompts you for a name. I’ve called this Island Bay because it’s the Wellington suburb where the photos in my last import were taken (and have saved it inside the 2015 Collection Set).

How to organise photos in Lightroom

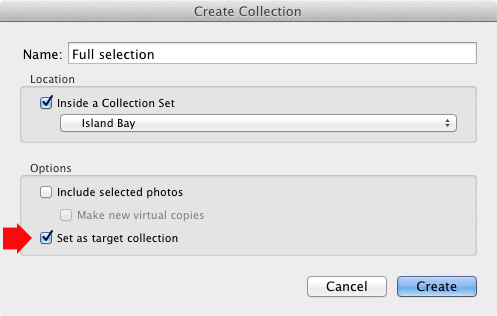
Right-click on this new Collection Set (Island Bay) and select Create Collection. The Create Collection window opens. This is slightly different and gives you more options. Name the Collection “Full selection” (I’ll explain why in a minute), tick the Set as Target Collection box and click Create.

How to organise photos in Lightroom

Now go to the Catalog panel and click on Previous Import. Lightroom displays the last set of imported images in the Content window. Go to Edit > Select All to select all the photos and press the B key. Lightroom adds all the selected photos to the Target Collection – the Collection called Full Selection that you just created. Congratulations, you have just created your first Collection!

How to organise photos in Lightroom

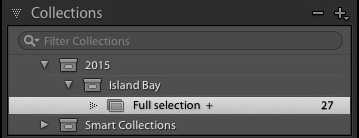
This is what the Collection Sets and Collection I created in the example above look like in the Collections panel in the Library module. The plus icon next to the Collection Full Selection indicate it is the Target Collection. The number 27 on the right tells you how many photos are in the Collection.

Collections and workflow

Of course, you are probably wondering why I asked you to create such a strange name as Full Selection. To find out why read my article Use Lightroom Collections to Improve Your Workflow. It shows you how to use Collections to help you decide which photos from a shoot you are going to process. All will become clear when you do so.

Flags, Ratings and Color Labels

The Lightroom database (called the Catalog) lets you assign Flags, Ratings, and Color Labels to your photos. There seem to be as many ways of using these as there are photographers, but if you have read my article about using Collections to improve your workflow you will understand that I favour a very simple system, which is this:

Use Flags to indicate which photos you are going to process.

I ignore Ratings and Color Labels and don’t use them. Of course, you may wish to use them and there is nothing wrong with that. Workflow is a personal thing, and ultimately you will figure out what works best for you through trial and error.

Let’s take a closer look at Flags, Ratings, and Color Labels. The easiest way to see them is in Grid View, which you can go to from any Lightroom module by pressing the G key on the keyboard. Read my article Making Sense of Lightroom’s Grid View to learn more.

Flags

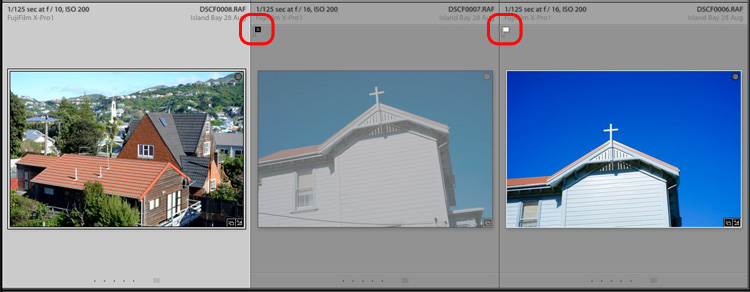
Every photo in your Lightroom Catalog is either unflagged (the default), flagged as a Pick (indicated by a white flag) or flagged as a Reject (marked by a black flag with a cross in it).

The quickest way to flag a photo as a Pick is to select and it and press the P key. You can remove the flag by pressing the U key or mark it as a Reject by pressing the X key. Flags are generally used to indicate which photos you would like to process (Picks) and which you would like to delete (Rejects).

How to organise photos in Lightroom

The middle photo has been flagged as a Reject. It is marked with a black flag (circled left) and the thumbnail is greyed out, making it easy to pick out in Grid View. The right photo has been flagged as a Pick and is marked by a white flag (circled right). The left photo is unflagged. There is no flag icon, but Lightroom displays a grey one when you mouse over the thumbnail.

Ratings

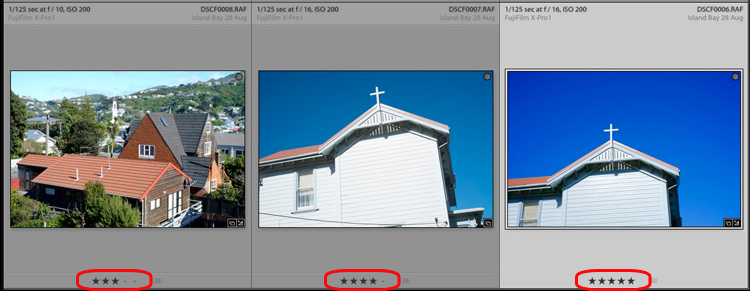
Every photo in your Lightroom Catalog is either unrated (the default) or has a one, two, three, four or five star rating. You can apply these ratings by selecting a photo and pressing the corresponding number key (1, 2, 3, 4 or 5).

Ratings are generally used as a way to indicate which photos are your favourites. Give your best images a rating of 5, and use the other numbers for the rest.

How to organise photos in Lightroom

Here, the three photos have been given a rating of three, four and five stars respectively. The star rating of each photo is displayed under the thumbnail in Grid View.

Color Labels

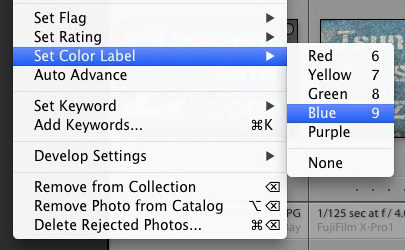
You can also assign a color label to your photo by selecting it, going to Photo > Set Color Label and choosing from Red, Yellow, Green, Blue, Purple or none. You can also use the 6, 7, 8 and 9 number keys as a shortcut to applying Red, Yellow, Green and Blue color labels.

How to organise photos in Lightroom

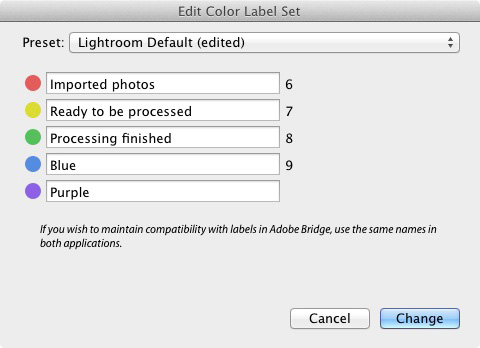
Colour labels are designed to be adaptable so you can use them for whatever you want. Go to Metadata > Color Label Set > Edit to assign a meaning to each color label. In this example I have entered a purpose for three of the color labels. It’s just an example to show you the possibilities – in reality I prefer to keep things simple and not use them.

How to organise photos in Lightroom

Hopefully this article has given you a good overview of the process of using Lightroom as a digital asset management tool. The next article in this series will show you how to get started in the Develop module. Meanwhile, if you have any questions about organizing your photos in the Library module then please let me know in the comments.


Mastering Lightroom Book One: The Library Module

Mastering Lightroom ebookMy latest ebook Mastering Lightroom Book One: The Library Module (second edition) is a complete guide to using Lightroom’s Library module to import, organise and search your photo files. You’ll learn how to tame your growing photo collection using Collections and Collection Sets, and how to save time so you can spend more time in the Develop module processing your photos.

googletag.cmd.push(function() {
tablet_slots.push( googletag.defineSlot( “/1005424/_dPSv4_tab-all-article-bottom_(300×250)”, [300, 250], “pb-ad-78623” ).addService( googletag.pubads() ) ); } );

googletag.cmd.push(function() {
mobile_slots.push( googletag.defineSlot( “/1005424/_dPSv4_mob-all-article-bottom_(300×250)”, [300, 250], “pb-ad-78158” ).addService( googletag.pubads() ) ); } );

The post How to Organize Your Photos in Lightroom by Andrew S. Gibson appeared first on Digital Photography School.


Digital Photography School

 
Comments Off on How to Organize Your Photos in Lightroom

Posted in Photography


How to Organize and Photograph Events Like a Pro

19 Mar

The Main Event: How to organize and shoot events like a pro.

EVENTS MAIN

The Footy Show and image courtesy of Nine Network Australia © Gina Milicia 2015

If you own a camera and are known in your circle of friends as an enthusiast or a pro, there’s a really good chance you’ve been asked to photograph an event.

An event is basically any time a group of three or more people gather together to celebrate a milestone. This could be your best friend’s wedding, Uncle Dave’s 50th birthday, your next-door neighbor’s bar mitzvah, your cousin Maria’s engagement, a product or corporate event, or an awards ceremony. They’re all defined as events.

Event Montage

© Gina Milicia 2015

I’ve been shooting events for the last 25 years. In that time, I’ve been the official event photographer for the Australian Grand Prix, the Melbourne Cup, the Dalai Lama, Bvlgari, WWE Wrestling, the Logies (Australia’s Emmys), press conferences with rock stars, product launches for big brands, Uncle Dave’s 50th (great party!) and my cousin’s engagement.

The protocol I use to photograph events is the same for Uncle Dave’s 50th as it is for an A-list function. I’m going to share all the pre-event and event protocols, tips and techniques I’ve developed over the last 25 years – so you can photograph events like a pro too.

The “no more tears” gear check list

Rechargeable Batteries

© Gina Milicia 2015

Always ensure you have fresh batteries for your event. If you are shooting a lot of events and working with flash on-camera you may want to consider investing in rechargeable AA and AAA batteries for your flashes and other devices. They are a bit of an investment at the start, but eventually pay for themselves and are far more environmentally friendly.

“To be prepared is half the victory.” – Miguel de Cervantes

I always organize my gear the day before I shoot a big event. This is an extensive list based on all the items I’ve managed to forget over the years – and yes, there have sometimes been tears and yes, they did cause me stress.

  • Test all flashes, sync cables and radio slaves. (I once broke someone’s wedding! If you haven’t heard this story, you can relive my heartbreak here.)
  • Pack fresh batteries and spares.
  • Charge all camera batteries.
Melb Cup

© Gina Milicia 2015

In one of my early Melbourne Cup shoots, I was sent to the finish line to cover the presentation of the Melbourne Cup for its sponsor, Emirates. It had been a long day and I was still a bit green to this event caper. I completely overestimated my flash and camera’s battery lives and had to endure a stressful 30 minutes waiting to photograph “the money shot” with my camera blinking, “I’m about to die! Now feed me!”

My spare battery and charger were safely tucked away in my camera bag about 20-minute walk away. (Doh!) I managed to squeeze out five frames by turning the camera on and off. I got the shot, but it wasn’t fun.

  • Clean your lenses. Always check for dust, mould, scratches and smears. There’s nothing worse than having to retouch 300 shots because of gunk in the corner of the frame, or worse still, a large gooby that completely ruins a shot.
  • Fully charge your laptop, phone, and booster for remote locations.
  • Ensure you have all your cables, accessories and chargers for laptops, etc.
  • Pack two card readers and spare cables.
  • Carry extra memory cards and spare cards.
Cables

© Gina Milicia 2015

I once shot a wedding at a very remote Australian location. It was at the end of a long, hard week and I realized when I arrived that I had forgotten the USB cable for my card reader. I knew it was going to be a big wedding — the magazine wanted full coverage, from start to finish — and I only had enough memory cards to cover about half of it.

I sent my assistant out to the tiny country town’s shopping district in search of a cable or a card reader while I continued the pre-wedding shots. She rang every camera store within 20km (12.5 miles), but no luck. I ended up having to shoot with the limited number of memory cards I had, and treat it as if I was shooting with film.

I got there in the end, but that little oversight could’ve been very costly. Now I carry two memory card readers and put spare cables in my glove box camera bag, handbag and laptop bag.

Events 003

Nutella comes in a handy travel size. © Gina Milicia 2015

  • Put together a survival kit (water, tissues, deodorant, mints, snacks, protein bars, nuts, umbrella, blankets, spare warm clothes, and comfy shoes for the drive home). Events can go on for hours and often run over meal times. There’s nothing worse than being cold, tired, hungry or stinky at an event. Always pack an emergency kit to keep you going between meals and showers.
  • Read the run sheet, look up all shoot locations and work out the best travel routes. I always work out the best way to get to my gig the night before. Events can be stressful enough without having to worry about getting lost on the way.
  • Wash your car and fill the tank. Again, it’s all about minimizing stress. Events are usually dressy affairs, so it’s nice to turn up in a clean car. It feels better, too.
  • Pre-pack and recheck all lighting, tripods, stands, and accessories.
  • Ensure your gear is portable, lightweight and quickly and easily accessible. Here’s my personal event location kit: Roller bag, laptop, monopod or tripod, two camera bodies, 24mm-105mm f/4 lens, 70mm-200mm f/2.8 lens, 85mm lens, two speedlights, rechargeable AA batteries.
  • Have a safe spot to store the memory cards you use at the event. Mark them clearly so you don’t accidentally overwrite them.
  • Bring a hard drive for backup. If you have time and a safe place to do it, download your memory cards onto your computer and back them up at the same time. I have an in/out system that I use. Check out: Photography Workflow Tips – From Memory Card to Computer and Beyond for more info.
  • Keep drunken guests away from your table. Food and drinks don’t mix with and laptops. One spilled drink and it’s all over.
  • Don’t forget a pen and notebook to jot down important information.

Dress code

Your next clients may be among the guests at the event you’re shooting. You only have one chance to make a good impression, so make sure it’s a good one.

Events 4

© Gina Milicia 2015

I’d love to wear my favorite torn jeans and boots to every shoot I do, but I know that wouldn’t make a very good impression. I don’t want to embarrass clients by turning up in inappropriate attire, so I always check the dress code first.

I believe a good photographer should blend in with the guests. Don’t get me wrong, I’m not suggesting you turn up dressed like Paris Hilton. Rock out your own style, but maybe tone down the diamond tiara, nine-inch gold-plated heels and leopard skin jumpsuit.

Here are a few suggestions you may want to take on board:

  • Buy a great pair of really comfortable dress shoes. There’s nothing worse than wearing uncomfortable shoes on a long shoot.
  • The best color to blend in at an event is black.
  • Always carry a lint roller, safety pins, shoe polish and a sewing kit in your bag for those just in case moments. I once tore my pants just before an event.

Etiquette

Events 5

© Gina Milicia 2015

  • Never be seen eating or drinking at the event.
  • Food and drink should always be consumed away from guests (eat before you go).
  • Ask for the best place to store your gear (I often call the venue in advance to ask to have a space set up for me).
  • Don’t annoy guests and corner them and bang on with boring stories.
  • Only give out your card if somebody specifically asks for it.
  • Keep notes on a pad or your Smartphone so you can remember the names of key people.
  • Always ask guests if they mind you taking their photo. If people are deep in conversation, try and wait for a break before cutting in. This is tricky, especially for new photographers. Try, “Hello. Sorry for interrupting. Do you mind if I take a photo?” Tone is really important. Never be pushy and always have a huge smile on your face. Compliment guests on their hat, bag, shoes, or eyes, but do it sincerely.
  • If you’re working with other photographers, try and help them set up shots and work together. This is a small industry; chances are you will work together again and it’s always great to develop friendships with other photographers. This can be a lonely industry sometimes.
  • Never stand around looking bored. If you’ve run out of guests, shoot the food, band or signage.
  • Email shots of the band, flowers and food to the suppliers. This is a great way to value add for your client, a nice thing to do for the suppliers, and a great way to meet potential new clients.

Day of the event

Try and arrive 30 minutes, to an hour before the event. This will give you plenty of time to unpack your gear and compose yourself before the event starts. There’s nothing worse than arriving late and having to set up under pressure.

Do a quick reconnaissance of the location, take note of the lighting and try to pre-plan good locations for group shots and portraits. Set up your gear. Test and retest everything to make sure it’s working. Check that your memory cards are in your camera, the ISO is set to the correct setting, and your flashes are firing properly.

Read the shot list and check and double check you’re getting all your key shots. Continually refer back to this on the day. Cover every detail possible on the day: signage, food, gift bags, drinks, flowers, and table settings. This is a great opportunity to introduce your skills to other businesses, so make sure you forward these images to caterers, florists and designers.

Try and keep group shots to a maximum of five people. I often shoot people in groups of two, three and five. Take three to five frames when shooting groups of people because someone will always blink or pull a funny face. Tell the group you’ll take a few shots so they don’t look, or walk away, after the first frame. Keep talking while you’re photographing the group so you command their attention. Otherwise they’ll look the wrong way, start talking or eating, and ruin your shot.

Events 8

Using a long lens makes it really easy to capture candid images at events. © Gina Milicia 2015

People shots

Don’t be afraid to tidy people up (fix their jackets, ask them to stand in a more flattering way). Not every shot needs to be posed. Try and get a mix of candid images of people talking, laughing and enjoying the day. I find these shots are best done using a long lens when people don’t know you’re taking them. It’s very difficult to look discreet when you’re five inches away using a 28mm lens.

Try and shoot speeches with a long lens, no flash. This means you can be in a discreet position and take several shots of the speaker without annoying them with your flashes. I like to wait until the speaker looks up from their notes or smiles to acknowledge applause.

Avoid taking shots of people eating. I’ve yet to see someone who looks glamorous with a mouth full of food.

After the event

Events 6

© Gina Milicia 2015

  • Carefully back up ALL your files (Then back them up again when you get back to your office/base).
  • Do a final double check for random gear you might have left behind (I’ve lost two monopods).
  • Rehydrate and eat something before you process your files.
  • Send off any extra shots to caterers, florists or guests who may have approached you during the event.

Do you have any pre-event rituals that you use to help your day run smoothly? Is there anything I may have missed? I’d love to hear your suggestions.

googletag.cmd.push(function() {
tablet_slots.push( googletag.defineSlot( “/1005424/_dPSv4_tab-all-article-bottom_(300×250)”, [300, 250], “pb-ad-78623” ).addService( googletag.pubads() ) ); googletag.pubads().enableSingleRequest();
googletag.pubads().disableInitialLoad();
googletag.pubads().collapseEmptyDivs( true );
googletag.enableServices();
} );

googletag.cmd.push( function() { googletag.display( ‘pb-ad-78623’ ); } );

googletag.cmd.push(function() {
mobile_slots.push( googletag.defineSlot( “/1005424/_dPSv4_mob-all-article-bottom_(300×250)”, [300, 250], “pb-ad-78158” ).addService( googletag.pubads() ) ); googletag.pubads().enableSingleRequest();
googletag.pubads().disableInitialLoad();
googletag.pubads().collapseEmptyDivs( true );
googletag.enableServices();
} );

googletag.cmd.push( function() { googletag.display( ‘pb-ad-78158’ ); } );

The post How to Organize and Photograph Events Like a Pro by Gina Milicia appeared first on Digital Photography School.


Digital Photography School

 
Comments Off on How to Organize and Photograph Events Like a Pro

Posted in Photography


[MODIFIED] Mozilla Firefox – Misc – Organize Downloads Better by Saving Them Where You Want

07 Apr

Force Mozilla Firefox to save downloaded files to a folder of your choosing.

Many people are fine with Mozilla Firefox downloading files to the standard Downloads folder. However, if you grab many different types of files it may make things easier to save files in different places. Store downloaded DRM-free music in one folder, game demos in another, backups of work documents from Google Docs in yet another location, etc. Making this Firefox configuration change is easy.

1. Access the Firefox Options dialog box. You can either click the Firefox logo button and choose “Options” – “Options”, but I prefer just pressing ALT + T, then the letter O….

Read more at MalekTips.
New Computer and Technology Help and Tips – MalekTips.Com

 
Comments Off on [MODIFIED] Mozilla Firefox – Misc – Organize Downloads Better by Saving Them Where You Want

Posted in Technology


8 Reasons You Should Organize Your Photo Collection

18 Mar

Editing and organizing our websites, print portfolios, business collateral and promotional material is something every professional photographer does at least once if not several times a year. It allows us to present the best possible vision of our work to our clients.

After a build-up of new work it was time for me to edit my portfolio as well. I’ve spent the last several weeks working on a vigorous edit in preparation for a large annual marketing and meeting push – and it occurred to me this would make a good post for dPS. While the purpose of my organizational edit is for business reasons, you don’t need to be a professional photographer to benefit from a good organization of your images. Every level of photographer will find something valuable in it.

Here are eight reasons why you should consider spending a bit of screen time and organize your photo collection.

Website Thumbnail Edit

1. Everything is easier to find

If you don’t have a good organizational system in place, there’s little that’s quite as droll as sifting through your images and key wording, tagging, starring, folder sorting, and/or color coding them. However you want to distinguish your files, it helps to find them in a pinch.

Without a good system how will you ever locate those photos of the Johnson family if they decide they actually want to buy some from you down the line? Or what about that shot you entered a year ago on a National Geographic forum… and now they want to publish it!

No matter what your system is, it’s important to develop one. Just know yours in and out, in case a cool or monetary opportunity arises in the future.

How could you find a file in this mess?

How could you find a file in this mess?

2. See how you’ve progressed

Sitting down and organizing your images from beginning to the present gives you a great overview of how you’ve progressed since first picking up a camera. You’ll notice not only the difference in content of what you’re photographing, but the quality of it as well. There’s nothing as bemusingly head-shake inducing as looking at some of the first images that came out of your camera. How could you possibly ever have been that bad?! Look back and see how far you’ve come and celebrate!

3. You’re forced to review the good with the bad

There are some valuable lessons to be learned in organizing your images, especially in recent ones. You’ll get a play-by-play look at the good images, along with the bad ones.

Sit down and really take some time to think about what it is that makes you admire certain images, but dislike others. What did you do right in those great ones? What did you do wrong in the poor ones? This critical review will help you develop your eye and create better images in the future.

4. It will teach you to avoid recurring mistakes

During any good review you’ll probably realize there are one, two or more mistakes you’re consistently making. You’ll find new ones every time you do this, and you’ll know what to avoid in the future.

During past reviews I found I used to slightly overexpose my images, or that I was lacking in night images with my travel shots. Taking the time to review allowed me to correct those mistakes and bolster the holes in my portfolio. I’m always finding something new to work on, and so will you. Learning from your mistakes is what makes you better.

5. Discover ideas you want to revisit

Perhaps a year or two or more ago you took a trip to the Grand Canyon or photographed a really fun concept, but realize now all the little things you missed or messed up on. Now that you’ve sat down to organize you remember that great idea you had – and with your new-found knowledge, it could be a great time to revisit the shoot and improve upon it.

There’s nothing wrong with revisiting a concept you’ve photographed before and working to improve it. Many professionals work on a project or series for years before they think it’s complete. Some scrub everything they’ve shot and re-start again on a concept they love, but want to tackle with a new execution. Consider it a challenge to re-invent something you’ve already done.

Color-Theme-MattDutile

6. Find themes and begin developing a vision

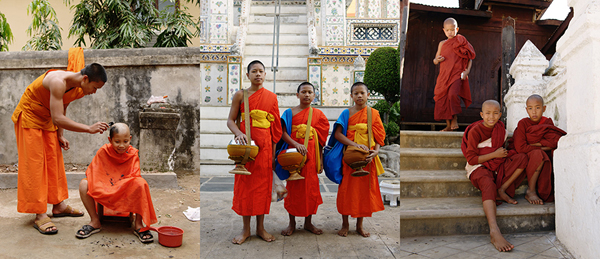
If you had your own website, or already do have one, how would you organize it? Would there be a portrait section? Or weddings and babies? Perhaps landscapes and still life? Or travel and lifestyle? Most professionals organize their images by subject, project or theme. Doing so in your own work can tell you a lot about what kind of photographer you think you are or want to become. What do you value and enjoy shooting?

Look for themes across your work other than simply subject. What you may notice appearing is your specific style or vision. After a great period of time every photographer begins developing a sense of style, but you may be able to notice the threads of it early. It’s a clue to what you value in your images and your unique perspective.

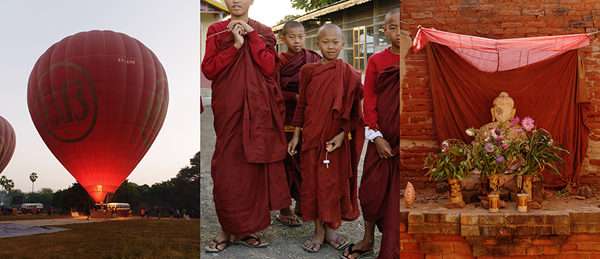
Monk-Theme-MattDutile

7. It’s easier for potential clients

If you have the desire to take your hobby professionally one day, organizing now and understanding how you would define your photography will make it easier for potential clients to identify what they like about your work ,or why they should hire you. The business of photography is defining what you bring to the market that’s different, and at what value. It’s answering the question, “Why should I work with you?”.

8. It just looks nice

The last reason is one of simple vanity. Organization, if done right, just looks pretty. I often enjoy in my spare time putting together different color arrangements, collages and themes. Some of them make their way into my marketing material if the idea turns out particularly good, others may entirely change the way I categorize my business, and still others go in the trash as a fun but failed experiment. Organization doesn’t just have to be a boring task though, it can fuel creative insight and help you develop your images.

The post 8 Reasons You Should Organize Your Photo Collection by Matt Dutile appeared first on Digital Photography School.


Digital Photography School

 
Comments Off on 8 Reasons You Should Organize Your Photo Collection

Posted in Photography