RSS
 

Posts Tagged ‘onscreen’

Image Size and Resolution Explained for Print and Onscreen

27 Oct

The post Image Size and Resolution Explained for Print and Onscreen appeared first on Digital Photography School. It was authored by Helen Bradley.

One of the most confusing things for a new photographer is understanding image size, resolution, and printing.

So in this article, I’ll explain what these terms mean.

And I’ll show you how to resize your images depending on what you want to do with them.

Let’s get started.

What is resolution in digital cameras?

When talking about digital cameras, resolution refers to the number of megapixels produced by an image sensor.

This, in turn, generally corresponds to the amount of detail a camera can capture.

So if your camera packs 20 megapixels (often written as 20 MP), it captures less detail than a camera with 30 megapixels, which in turn captures less detail than a camera with 40 megapixels.

But what is a megapixel, really? And how does it affect your ability to print and display photos?

Megapixels and photo size

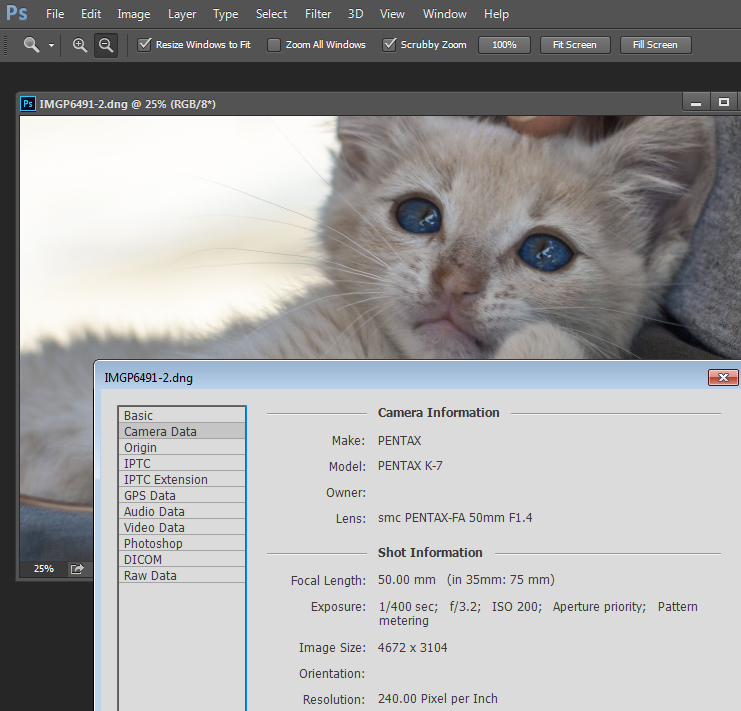
Find information about a photo (including resolution) using File > File Info

Technically, a megapixel is equal to 1,048,576 pixels; in reality, camera manufacturers round this number to 1,000,000 when stating how large of an image the camera will capture.

So my camera, for example, captures 14.6-megapixel images, which is around 14,600,000 pixels per image (14.6 x 1,000,000). This information tells you nothing about the actual pixel dimensions of the image – it only tells you the total number of pixels that make up the image.

My camera, like most DSLRs, captures images with an aspect ratio of 1.5. So the ratio comparing the number of pixels along the long edge of the image to the short edge of the image is 3:2.

Each of my full-sized RAW images is 4672 x 3104 pixels in dimension. So by multiplying the number of pixels along the image width by those along the image height, we get the actual number of pixels in the image (4672 x 3104 = 14,501,888). You and I might call this 14.5 MP, but camera manufacturers round this up and call it a 14.6 MP camera.

You can check the width and height of an image using your photo editing software. In Photoshop, you can open your image, then choose File > File Info > Camera Data. The image above shows the resulting information dialog box.

Now, a pixel itself is a single picture element – and for our purposes, it’s the smallest element that your photo can be divided up into. A pixel can only be one color, and a photograph is made up of a grid of thousands of pixels, each of the different colors that together make up your image.

You can see these pixels if you open a photo and zoom in until you see single blocks of color (as shown below). Each of these blocks is a pixel:
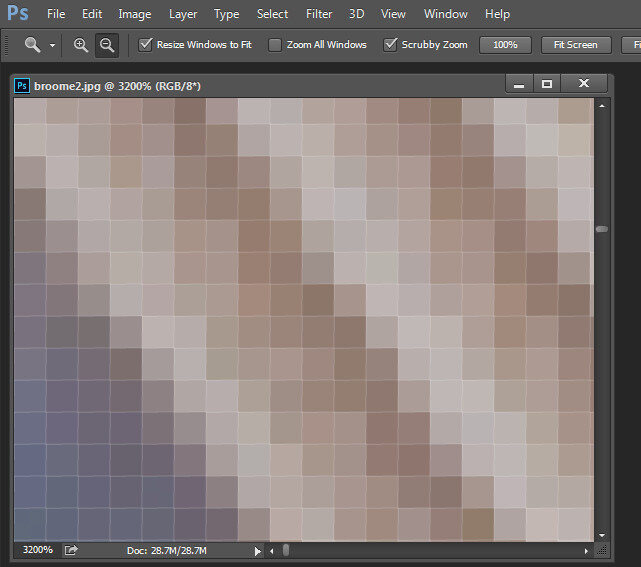
An image of pixels in a photo

Why size is important when printing

When you’re printing an image, you may encounter the term PPI or pixels per inch. This literally refers to the number of pixels in an inch-long line of an image.

Most printing services, and indeed your own printer, will require a certain density of pixels in the image (PPI) to be able to render a print that looks good (i.e., with smooth color transitions so you can’t see each individual pixel).

Typical printing PPI values range from 150 to 300 PPI, although some high-end magazines may require images that are 1200 PPI.

So for example, if you want to print a 4 x 6 inch image at 300 PPI, then you need a file that has at least 4 x 300 (1200) pixels along its short side and 6 x 300 (1800) pixels on the long side. In other words, it needs to be at least 1200 x 1800 pixels in size.

To print an 8 x 10 inch image at 300 PPI, use the same math:

Multiply the printed image’s width and height in inches by 300 pixels. The result is 2,400 x 3,000 pixels, which is the image resolution you need to print an 8 x 10 image at 300 PPI.

Therefore, when cropping and sizing an image for printing, you’ll need to know what PPI the image should be. Your printer manual or printing service should be able to tell you this.

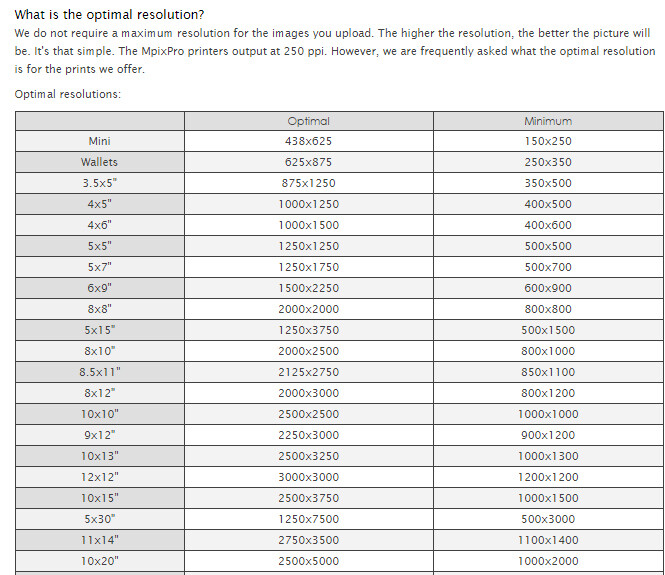
Below is a screenshot from the MpixPro.com website, showing their optimal and minimum image sizes for standard print sizes. Their printer outputs at 250 PPI (but can handle 100 PPI images), though other services may differ, so always check before preparing your images.

Print size required for MpixPro printing

Use the crop or resize feature in your software to size your image to the desired width and height and the desired PPI resolution.

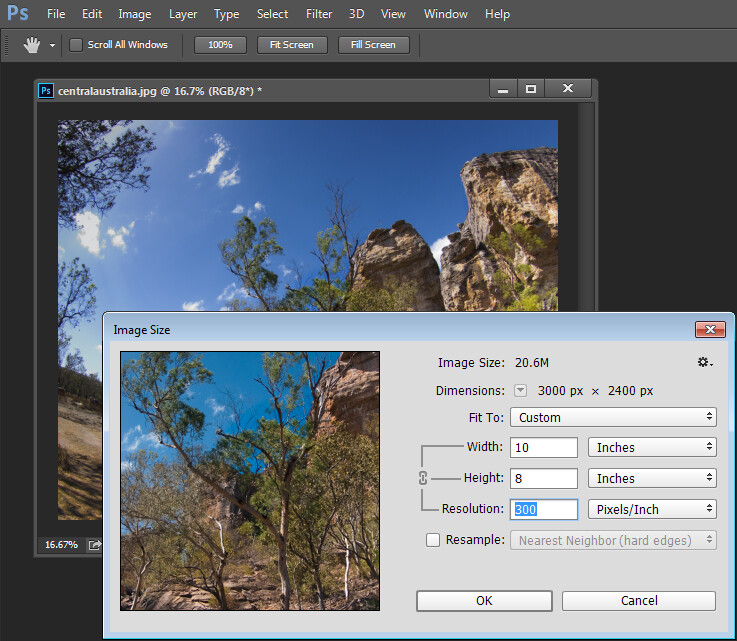
Here, an image cropped to a size of 3000 x 2400 pixels is being adjusted from 72 PPI to 300 PPI in preparation for printing at 300 PPI. There is no resampling required, as the image is already the correct dimensions and only the resolution requires adjusting.

Adjusting resolution in a photo without resampling it

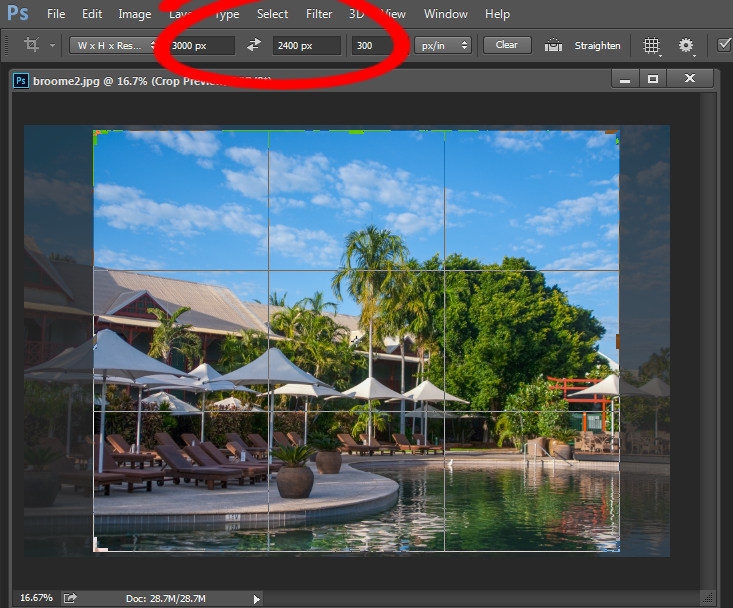
Photoshop, like other applications, will also crop an image to a fixed size and resolution if you type your desired values into the options bar when you have the crop tool selected (see below). If your image is smaller than the typed dimensions, then the image will be enlarged using the default resampling method. While it isn’t generally advisable to enlarge images, provided the image is already close to the desired size, enlarging it a little generally won’t cause a noticeable loss of quality.

When cropping in Photoshop, you can specify image size and resolution

Sizing for the screen

When it comes to displaying images on the screen, you need far fewer pixels than you do for printing.

This is because the density of pixels on the screen is far less than what is required for printing. For example, a typical monitor is 1920 x 1080 pixels in size; to fill the monitor, you only need an image that is 1920 x 1080 pixels in size. That’s about the same size image you need for a 4 x 6 print at 300 PPI – yet the 1920 x 1080 pixel image displays perfectly on a 23-inch monitor.

The post Image Size and Resolution Explained for Print and Onscreen appeared first on Digital Photography School. It was authored by Helen Bradley.


Digital Photography School

 
Comments Off on Image Size and Resolution Explained for Print and Onscreen

Posted in Photography


Fujifilm releases version 2.0 update for its X Webcam utility, brings on-screen settings control

18 Sep

Fujifilm has announced a version 2.0 release of its X Webcam utility, which makes it possible to use your compatible Fujifilm X and GFX camera as a webcam with popular livestreaming and video conferencing programs.

The version 2.0 update is available for both macOS and Windows users. The small update adds a new settings control window making it possible to change settings on-the-fly. In addition to basic exposure compensation and white balance changes, the settings control window can also be used to change film simulations and more while the camera is connected to your computer.

As with the previous version, Fujifilm X Webcam works with the following Fujifilm cameras: GFX100, GFX 50S, GFX 50R, X-H1, X-Pro2, X-Pro3, X-T2, X-T3, X-T4.

You can download the utility for macOS (10.12 and later) and Windows 10 computers on Fujifilm’s website.

Articles: Digital Photography Review (dpreview.com)

 
Comments Off on Fujifilm releases version 2.0 update for its X Webcam utility, brings on-screen settings control

Posted in Uncategorized


Image Size and Resolution Explained for Print and Onscreen

17 Sep

One of the most confusing things for a new photographer is understanding image size, resolution, and printing. I’ll try and explain what these things mean, and how to make the best choices depending on what you want to do with your photos.

Megapixels and photo size

Find information about a photo using File > File Info

As a photographer you will already have confronted the term megapixel when you first purchased your camera. While technically a megapixel is equal to 1,048,576 pixels, in reality, camera manufacturers round this number to 1,000,000 when stating how large an image the camera will capture.

So, my camera, for example, is stated to capture 14.6 megapixel images which is around 14,600,000 pixels per image (14.6 x 1,000,000). This information tells you nothing about the actual pixel dimensions of the image – it only tells you the total number of pixels that comprise the image.

My camera, like most dSLRs, captures images with an aspect ratio of 1.5. So the ratio comparing the number of pixels along the long edge of the image, to the short edge is 3:2. Each full size raw image is 4672 x 3104 pixels in dimension. So, by multiplying the number of pixels along the width by those of the height (4672 x 3104 = 14,501,888) we get the actual number of pixels in the image. You and I might call this 14.5 MP but the camera manufacturer rounds this up and calls it a 14.6 MP camera.

You can check the width and height of an image using your photo editing software. In Photoshop, with the image open, choose File > File Info > Camera Data. The image above shows this information dialogue box.

A pixel itself is a single picture element, and for our purposes it’s the smallest element that your photo can be divided into. A pixel can be only one color, and a photograph is made up of a grid of thousands of pixels, each of varying colors that together make up your image. You can see these pixels if you open a photo inside a photo editing program and zoom in until you see single blocks of color (like below). Each of these is a pixel.

An image of pixels in a photo

Why size is important when printing

When you’re printing an image you may encounter the term ppi or pixels per inch. Most printing services, and indeed your own printer, will require a certain density of pixels in the image (ppi) to be able to render an print that looks good, with smooth color transitions so you can’t see each individual pixel. Typical printing ppi values range from 150 to 300 ppi, although some high-end magazines may require images which are 1200 ppi.

So, for example, if you want to print an image 4 x 6 inches at 300 ppi, then you need a file that has at least 4 x 300 (1200) pixels along its short side and 6 x 300 (1800) pixels on the long side. So, it needs to be at least 1200 x 1800 pixels in size.

To print an 8 x 10 inches at 300 ppi use the same math – multiply the printed image width and height in inches each by 300 pixels. The result is 2,400 x 3,000 pixels, which is the size image you need to print an 8 x 10 at 300 ppi.

When cropping and sizing an image for printing, you’ll need to know what ppi the image should be – your printer manual or the printing service should be able to tell you this. This is a screenshot from the MpixPro.com website showing their Optimal and Minimum image sizes for standard print sizes. Their printer outputs at 250 ppi (but can handle 100 ppi images) – other services may differ – so always check before preparing your images:

Print size required for MpixPro printing

Use the crop or resize feature in your software to size the image to the desired width and height, and the ppi resolution. Here an image cropped to a size of 3000 x 2400 pixels is being adjusted from 72 ppi to 300 ppi in preparation for printing at 300 ppi. There is no resampling required as the image is already the correct dimension and only the resolution requires adjusting.

Adjusting resolution in a photo without resampling it

Photoshop, like other applications, will also crop an image to a fixed size and resolution if you type these value into the tool options bar when you have the Crop tool selected (see below). If your image is smaller than the typed dimensions then the image will be enlarged using the default resampling method as it is cropped. While it isn’t generally advisable to enlarge images – provided the image is already close in size to the desired size, enlarging it a little bit generally won’t cause a noticeable loss of quality.

Crop an image in Photoshop setting size and resolution

Sizing for screen

When it comes to displaying images on the screen you need far less pixels than you do for printing. This is because the density of pixels on the screen is far less than what is required for printing. So, for example a typical monitor is 1920 by 1080 pixels in size so, to fill the monitor you only need an image that is 1920 by 1080 pixels in size. That’s about the same size image you need for a 4 x 6 print at 300 ppi, yet this size image displays perfectly on a 23 inch diagonal monitor.

googletag.cmd.push(function() {
tablet_slots.push( googletag.defineSlot( “/1005424/_dPSv4_tab-all-article-bottom_(300×250)”, [300, 250], “pb-ad-78623” ).addService( googletag.pubads() ) ); } );

googletag.cmd.push(function() {
mobile_slots.push( googletag.defineSlot( “/1005424/_dPSv4_mob-all-article-bottom_(300×250)”, [300, 250], “pb-ad-78158” ).addService( googletag.pubads() ) ); } );

The post Image Size and Resolution Explained for Print and Onscreen by Helen Bradley appeared first on Digital Photography School.


Digital Photography School

 
Comments Off on Image Size and Resolution Explained for Print and Onscreen

Posted in Photography


Canon creates on-screen user-guides for EOS-1D X

01 Aug

canon_eos1dx.png

Canon USA has published a series of user guides for its flagship EOS-1D X full-frame DSLR, in the form of HD videos that are designed to be played-back on the camera’s rear LCD. There are 18 topics covered, including a series of videos looking at how to get the best out of the AF system. Canon video tutorials are also available for the EOS-1D Mark IV, 5D Mark III, 5D Mark II, 7D and 60D. (From UnitedByPhotography, via CanonWatch)

News: Digital Photography Review (dpreview.com)

 
Comments Off on Canon creates on-screen user-guides for EOS-1D X

Posted in Uncategorized