RSS
 

Posts Tagged ‘Only’

The Nikon D850 could be the only DSLR you’ll ever need

26 Sep

Introduction

Out-of-camera JPEG.
Nikon 70-200mm F2.8E @ 70mm | ISO 125 | 1/2500 sec | F4

Perched on a rock jutting out over Class IV+ rapids on the Deschutes River, I become fully aware that were I to slip and fall, the frothy white waves would toss me around like a cork, I’d probably hit my head on a submerged volcanic rock, fall unconscious and die.

One of the best things about photography (or one of the worst, I suppose, depending on your perspective) is access. Even if you’re not covering the industry, knowing your way around a camera and having a decent portfolio will often afford you opportunities to get up-close and personal with people you’ve never met before, who are doing things you’ve never seen before, in a place you’ve never been before.

The D850 might just be the most well-rounded camera Nikon’s ever made.

In this particular instance, the access came courtesy of Nikon USA. They wanted us to use the D850 so much that they flew me down to Bend, Oregon with a collection of other photographers and journalists, and stuck us all in a variety of disparate scenarios to get a feel for the camera.

From sports to portraits, the D850 seems almost universally capable. Out-of-camera JPEG, cropped slightly to taste.
Nikon 24-120mm F4 @ 50mm | ISO 2200 | F4 | 1/125 sec

And, not being one to back down from a challenge (or maybe I’m just terrible at scheduling), I was booked to photograph a friend’s wedding immediately upon returning to Seattle. I was eager to use the camera outside of the realm of a press trip, especially since its specs seem to indicate that the D850 might just be the most well-rounded camera Nikon’s ever made.

Actually, it might be the most well-rounded stills camera that anyone has ever made.

This thing is way too fast to be shooting 46 megapixels

This kayaker didn’t seem particularly worried about the Class IV+ rapids, which I was later told verged on Class V. Out-of-camera JPEG.
Nikon 70-200mm F2.8E @ 70mm | ISO 64 | 1/800 sec | F2.8

Perhaps the highest praise I can offer for the D850 is that, in more ways than one, it reminds me of Nikon’s flagship D5 with one of the grips lopped off.

The camera feels incredibly solid. The AF joystick is fantastic. Shutter lag is nonexistent. Autofocus is instant. As with the D5, I repeatedly got the sense that the camera was waiting for me, not the other way around. It offers a ‘transparent’ experience by just getting out of the way and letting me focus on what’s happening in front of me so I don’t miss a photo.

In more ways than one, the D850 reminds me of the flagship D5.

And that’s exactly what I needed as the first kayaker came around the bend. I initiated autofocus and let the camera’s 3D Tracking do its thing as I constantly zoomed and adjusted my composition, with the kayaker moving unpredictably through the scene in front of me and the camera motoring away at seven frames per second.

Want to know what brand the kayak is? Just zoom in to 100%. Out-of-camera JPEG.
Nikon 70-200mm F2.8E @ 70mm | ISO 125 | 1/2500 sec | F4

The fact that the D850 behaves this way, in that it is capable of churning out accurately focused 46MP files of fast-moving subjects, makes it unique. It’s true that Sony’s a99 Mark II shoots 42MP files at a speedier 12fps, but that camera wasn’t our best autofocus performer, and the user interface and SD-only recording media make it a slower camera than the D850 in most other respects.

So in the D850, you basically have a sports camera that you could turn around and make wall-sized gallery prints with in a heartbeat. If that doesn’t meet your definition of ‘well-rounded,’ I don’t know what will.

This man seems comfortable with his life choices. Out-of-camera JPEG.
Nikon 70-200mm F2.8E @ 70mm | ISO 125 | 1/2500 sec | F4

Good at every ISO

As I was heading to the airport outside of Bend, I was looking forward to my evening. I had a short flight back to Seattle, and enough time to get from Seatac Airport to a friend’s wedding ceremony on the shores of Puget Sound. Then I checked in, and saw my flight was delayed by 45 minutes.

Heavy sigh. Heavy stress.

By the time I hopped out of my cab in West Seattle minutes before the ceremony was set to start, the sun had already dropped low in the sky. I hastily introduced myself to the family members I hadn’t yet met, apologized profusely for my tardiness and gave the happy couple a couple of hugs. Time to start taking pictures.

Image processed to taste in Adobe Camera Raw, exposed for the highlights with shadows lifted. With a Nikon D5, Canon EOS-1D X Mark II or Sony a9, this processing would result in a much noisier image.
Nikon 24-120mm F4 @ 24mm | ISO 64 | 1/160 sec | F8

In many ways, peak action and wedding photography place similar demands on both photographer and camera. You’re constantly on the lookout for fleeting moments, and the camera has to be able to respond when you do.

But dedicated sports cameras often come with compromises, such as lower resolution and lower dynamic range. It’s not uncommon to see wedding shooters with one ‘speed’ body and one ‘resolution’ body. With the D850, I’m not sure that’s going to be necessary anymore.

Out-of-camera JPEG.
Nikon 24-120mm F4 @ 46mm | ISO 900 | 1/200 sec | F4

Even without a boost from the battery grip, the burst rate is more than sufficient. As when shooting white water kayaking, I never once found myself waiting for the camera during the ceremony. I knew that images at lower ISO values would have lots of editing latitude, but I was also pleasantly surprised at the quality of higher ISO shots when the sun set behind the clouds.

You can dramatically change an image’s composition while still maintaining a good amount of resolution.

The biggest downside for using the D850 for weddings, so far as I can see it, is just that the average client might not need 46MP for every single image. It burdens the photographer in terms of storage space, and honestly burdens the clients if they’re not going to be printing anything bigger than an 11×14. (Even high-quality JPEG files out of the camera weigh in at 20-30MB).

The camera’s smaller Raw file options might help this somewhat, but we’re still testing to see if there will be any dynamic range or other image quality penalty involved. But on the flip side, there’s no avoiding the freedom you’ll feel when cropping tightly on such a high-res image. You can dramatically change an image’s composition while still maintaining a good amount of amount of resolution, which is pretty powerful.

In the wild. Out-of-camera JPEG.
Nikon 24-120mm F4 @ 110mm | ISO 1400 | 1/500 sec | F4

Should I buy it?

No camera is perfect.

I’m not a big video shooter for freelance work, but I love a tilting screen to get some unique angles for stills, and while Nikon’s live view autofocus is accurate, it certainly isn’t fast. Forget about shooting moving subjects if you’re not in a position to have your eye to the finder.

Commitment.
Nikon 35mm F1.8G | ISO 400 | 1/160 sec | F4

Beyond that, Snapbridge (Nikon’s term for a suite of features including Wi-Fi and Bluetooth connectivity for downloading images) has improved, but still isn’t exactly refined. The initial connection process was quick and easy, but I couldn’t reconnect again until after I had both my phone and the camera ‘forget’ each other, and start all over again.

For the last year or so, I’ve been wrestling with the issue of whether or not to upgrade. For what I shoot, which is mostly weddings and events, the D850 certainly has a lot to offer. The files are awfully big, but downsizing them will just make for very sharp lower megapixel options.

Nikon seems to have thrown just about everything they’ve got into the D850, and it sits at a very reasonable price point for all that it is capable of. At first glance, it may not be the most exciting camera for the average consumer; it certainly isn’t flashy, nor is it petite.

Out-of-camera JPEG.
Nikon 35mm F1.8G | ISO 3200 | 1/320 sec | F1.8

But for seasoned photographers shooting a variety of subjects, the D850 is a formidable option.

For landscape shooters, you have the current low ISO benchmark at ISO 64, meaning the D850 should be able to match some medium format digital cameras in terms of dynamic range. For wedding and event shooters, you have all the speed you need, but with tons more resolution than may be used to – this could be a blessing or a curse, depending on your style. For those that love manual focus lenses, you get Nikon’s biggest-ever viewfinder on a DSLR. And for wildlife enthusiasts, you get the benefits of the latest sensor tech with plenty of resolution for cropping, as well as excellent autofocus tracking and coverage, even with low light levels.

In all, the D850 offers excellent autofocus performance, incredible resolution, expansive dynamic range and a capable burst speed. Unless you find yourself shooting run-and-gun video on the regular, the D850 is worth a look.

Sample gallery

$ (document).ready(function() { SampleGalleryV2({“containerId”:”embeddedSampleGallery_5682971467″,”galleryId”:”5682971467″,”isEmbeddedWidget”:true,”standalone”:false,”selectedImageIndex”:0,”startInCommentsView”:false,”isMobile”:false}) });
Articles: Digital Photography Review (dpreview.com)

 
Comments Off on The Nikon D850 could be the only DSLR you’ll ever need

Posted in Uncategorized


Don’t Fear Photo Post-Processing – Shooting is Only the First Part of the Image Creation Process

14 Sep

You have just bought your new bright shiny camera and you are sure that it is just the thing that will help you create better images. You’re shooting JPG with the camera’s automatic program modes, but you’re not getting the results you wanted. You keep upgrading your cameras thinking that will do the trick, only to find that the quality of your imagery isn’t getting any better. What’s going on?

Lightroom Banner - Don’t Fear Photo Editing - Shooting is Only the First Part of the Image Creation Process

You may be missing an important part of digital photography, post-processing, with a state of the art processing program like Adobe Lightroom or Photoshop.

Before and after

Iceland Light Before - Don’t Fear Photo Editing - Shooting is Only the First Part of the Image Creation Process

This image of a lighthouse in Iceland was taken on a bright yet overcast day. In a matter of moments with the help of Lightroom, it became a favorite.

Iceland Light After - Don’t Fear Photo Editing - Shooting is Only the First Part of the Image Creation Process

The role of post-processing in photography is not new

There are several integral parts to digital photography. The technical and creative aspect of using your camera, and the technical and creative application of post-processing your images. Each part is equally important and when all the pieces are put together, that’s when the magic starts to happen.

Unfortunately, many people are still thinking about the days of film when you took it to a lab and the post-processing was done for you. You never had to think twice about how the image was processed. Did you ever notice that different labs gave you different results? That’s because of their level of post-processing.

Now it’s time for you to understand the importance of post-processing if you are going to create better imagery. It will take some time and some dedication to learn, but it will improve your photography by ten-fold.

The first step – shooting with post-processing in mind

First of all, start shooting in RAW format and stop letting the camera make the decisions for you. When you shoot JPG format, it will automatically process your images in camera, even though you may even not be aware of it.

Have you ever taken a JPG and a RAW image and compared the two photographs? The JPG may appear bright and saturated and the RAW file looks flat. That’s because the JPG has been processed by the camera and the RAW file is an unprocessed digital negative.


That RAW file is ready for you to make your own creative adjustments and apply your photographic vision in Lightroom or Photoshop. Only then can you start to recreate that scene you saw when you first took the image.

What kind of post-processing decisions will the camera make for your JPGs? Depending on your camera, it can automatically increase saturation, sharpness, and contrast, but it will also compress your image. There are settings in your camera where you can make blanket adjustments for every JPG (Picture Styles), however, the camera is still making the decisions for you. That gives you zero creative control.

Raw format gives you control

RAW files contain more information and will allow you to have a wider range of tones (called dynamic range) to work with when you bring your images into Lightroom or Photoshop. When shooting in the JPEG format, image information is compressed and lost forever. In a RAW file, no information is compressed and you’re able to produce higher quality images while correcting problem areas that would be unrecoverable if shot in the JPEG format.

The Histogram

Once you start shooting in RAW, it’s very important to be conscious of the histogram. You can bring up the histogram on your Live View shooting screen or after you have taken the shot in your image review screen. Check your camera’s manual for the location of the histogram.

Note: If you shoot with a mirrorless camera you may be able to see the histogram on the screen before you shoot. Check your settings this is very handy.

Why is the histogram important for your photographic success?

If used correctly while shooting, the histogram will give you the information you need to know to bring up the shadows or bring down the highlights and pop out exposure and detail in an image.

The histogram shows you the brightness of a scene and it can be measured as you are shooting, or after you have captured the image. When look at the histogram and see the bulk of the graph pushing towards the right, this means you have an image that may be overexposed (or a really light toned subject).

Overexposed - Don’t Fear Photo Post-Processing - Shooting is Only the First Part of the Image Creation Process

If the data is mostly on the left of the graph, it’s an image that might be underexposed.

Underexposed - Don’t Fear Photo Post-Processing - Shooting is Only the First Part of the Image Creation Process

If the graph spikes on either the left or right “wall” of the histogram, that means that “clipping” has occurred. Clipping happens when you have areas in your photo with no information as a result of over or underexposure. When an area has no information, it is either pure white or pure black which is often referred to “blown out”.

Generally, it is undesirable to have large areas of your image that have highlights or shadows clipping. See the image below. The red areas show highlight clipping, and the blue areas show shadow clipping.

Clipping - Don’t Fear Photo Post-Processing - Shooting is Only the First Part of the Image Creation Process

Because of the limited dynamic range of a camera’s sensor, the area registering as clipped usually leaves the image with no information in the shadows or highlights. A spike touching the left edge of the histogram means that there is shadow clipping. A spike touching the right edge of the histogram means that there are highlights clipping.

What is possible with post-processing?

Many photographers have frustrating results with their images because they don’t embrace digital editing and post-processing. They are doing everything right when they shoot and are good at composition. They know how to expose correctly for the scene, but don’t know where to go with the image once they get home.

For example, maybe they are in a high contrast area and have taken an image with the histogram in mind. Then they open the image on-screen and throw it out because it looks over or underexposed. They don’t know what the post-processing possibilities are even though they may have a viable image. This is where they are missing a large part of the potential in their digital photography post-processing.

Here’s a great example. This image was taken in the Eastern Sierra in California.

Alabama Hills Before - Don’t Fear Photo Post-Processing - Shooting is Only the First Part of the Image Creation Process

It is obvious that the shadows are way underexposed and it creates an interesting silhouette. But, if you look at the histogram, you can see there is space on the left side of the graph which represents the shadows. This means there is more information there, and a good possibility of bringing up the shadows to create a whole different image.

Here is the result after brightening shadows in Lightroom. This adjustment took just seconds and creates a whole new scene.

Alabama Hills After - Don’t Fear Photo Post-Processing - Shooting is Only the First Part of the Image Creation Process

Start with Lightroom

Almost every image needs post-processing. Some people think that’s “cheating”. It’s not, it’s all part of the digital artistic process.

With post-processing, you can create the image you saw when you photographed the scene. Your eyes have the capability of seeing a wider range of light and color than your camera does, so the images need help in post-processing to duplicate the full range of light and shadows. The problem with a lot of beginners, is they tend to oversaturate or over-sharpen an image. So this talent comes with time and practice, practice, practice.


Once you have mastered the basics, there is a lot more you will be able to do with your digital post-processing that will add drama and interest to your photos. The above image of Bridal Veil Falls in Yosemite looks rather flat in the RAW version (left). Once you add saturation, sharpening, and a vignette to the whole picture it starts to pop. Then you can enhance the brightest areas by “painting with light”, and it now becomes a much more interesting image.

Start your post-processing journey with a full featured program like Adobe Lightroom. It is the standard in the industry for professionals, but it is also user-friendly for beginners and helps with both post-processing and image organization. Just be sure that your computer has enough memory and RAM to run these full featured programs. Check the requirements at adobe.com.

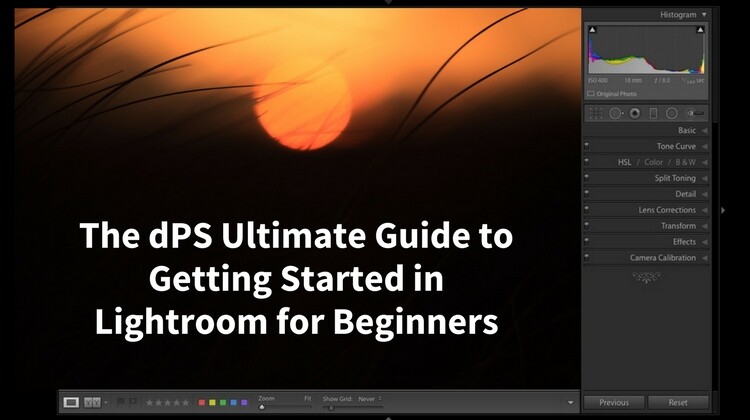
Check out our guide to LR:  The dPS Ultimate Guide to Getting Started in Lightroom for Beginners

Nothing is more satisfying than when you have a catalog of 30,000 images and you’re able to find your favorites in literally seconds by entering a few keywords and star ratings. Take some time to set it up, add a class or two, and you’ll be up and running!

Conclusion

Photo editing or post-processing is an integral part of the digital photography puzzle. Don’t think that you can skip this part and come away with satisfying images. It’s just as important to learn photo editing as it is to learn the basic functions of your camera. Only then, will you be able to bring that intentional photographic vision into post-processing and create great images

How are you going to start your post-processing journey? Is shooting in RAW and learning Lightroom in your future? Please share your thoughts with me on this subject.

The post Don’t Fear Photo Post-Processing – Shooting is Only the First Part of the Image Creation Process by Holly Higbee-Jansen appeared first on Digital Photography School.


Digital Photography School

 
Comments Off on Don’t Fear Photo Post-Processing – Shooting is Only the First Part of the Image Creation Process

Posted in Photography


Tutorial: How to shoot a martini splash photo using only speedlights

03 Sep

Photographer Dustin Dolby of workphlo is back with another of his straightforward, easy-to-follow lighting tutorials. This time, he’s showing us how to shoot (and post-process) a professional-looking splash photography shot—a very popular ad style—using just the affordable speedlights in his home studio.

As usual, his setup is extremely affordable. To start, he places the empty glass-and-lime combo onto a sheet of plexiglass, with two diffusers behind it and a cheap Yongnuo speedlight behind that. Then he uses a second speedlight off to the side to light the garnish, and that same speedlight is what he’ll use to light the splashes once he adds water and begins throwing in his fake ice cube.

From start to finish, here are all of the exposures he captured and combined in post to create his final image:

$ (document).ready(function() { SampleGalleryV2({“containerId”:”embeddedSampleGallery_8047647474″,”galleryId”:”8047647474″,”isEmbeddedWidget”:true,”standalone”:false,”selectedImageIndex”:0,”startInCommentsView”:false,”isMobile”:false}) });

Along the way Dolby offers a bunch of little tips and tricks that help really round out the final image, and produce something beautiful. Here’s the final shot, after a bit of post-production magic:

To see the full tutorial, click play above. And if you love product photography his YouTube channel is definitely worth a look.


All photographs by Dustin Dolby/workphlo and used with permission.

Articles: Digital Photography Review (dpreview.com)

 
Comments Off on Tutorial: How to shoot a martini splash photo using only speedlights

Posted in Uncategorized


This camera is designed to keep only the best photos

10 May

A new device called Trophy Camera uses artificial intelligence to compare its own photographs with the world’s most iconic images. During the comparison, Trophy Camera’s AI looks for specific characteristics common in photographs that have won World Press Photo yearly since 1955. Photos that show at least a 90-percent positive correlation with these notable characteristics are then uploaded to the camera’s own automated website. It’s a bit similar in spirit to Camera Restricta, a concept camera that uses GPS to prevent its user from taking clichéd photos.

Trophy Camera was created by media artist Dries Depoorter and PhD student/photographer Max Pinckers. Speaking to Co.design, Depoorter and Pinckers explain that their camera is a sort of commentary on what they see as the redundant photography produced by the ‘more automatized’ cameras that are becoming increasingly popular.

Elaborating on that, Pinckers said:

Press photography appears to be becoming a self-referential medium dominated by tropes, archetypes, and pop-culture references. What implications does this have on how we learn about the world through the images we are being shown? …By making this camera, we try to implicitly comment on the current status of photojournalism–which seems to be becoming more questionable in today’s visual landscape–along with the incredibly fast development of computer vision and the relevance of artificial intelligence in our time.

The camera itself is made from a Raspberry Pi Zero W, the computer’s Full HD camera module, a 128 x 32 monochrome OLED display, and a 5000mAh powerbank. Trophy Camera is currently part of an exhibition where photographs are taken; most of them are blurry and less than ‘notable,’ as shown on the camera’s automated website.

Via: Co.design

Articles: Digital Photography Review (dpreview.com)

 
Comments Off on This camera is designed to keep only the best photos

Posted in Uncategorized


‘The only camera that ever got me a date’ – Remembering the Canon EOS-1D Mark II

04 May

I dropped it because I was drunk. It was a brand new Canon EOS-1D Mark II, and I was drunk because I hadn’t eaten any dinner. It fell from hip-height onto the sand-covered floor of a shipping container, which had been converted into a tiki bar at an outdoor music festival. It was 2005 – tiki bars were a thing back then. 

The camera survived the fall, but the attached 24-70mm F2.8 did not. The lens took most of the impact, and jammed badly and permanently at around 50mm. A sobering (literally) lesson was learned, and in the subsequent weeks I shot quite a few jobs at 50mm before I could afford to send it in for repair. 

Another lesson from what I came to remember as ‘The Tiki Bar Incident of 20051‘ was that no matter how carelessly it was treated, the Canon EOS-1D Mark II was a very hard camera to kill. Based on the chassis of the original EOS-1D, the Mark II seemed to have been hewn from a solid lump of magnesium alloy. Like a Henry Moore sculpture, there wasn’t a straight line or hard corner anywhere. Also like a Henry Moore sculpture, it was large, expensive and heavy as hell.

Compared to the EOS 10D, the 1D Mark II was actually capable of proper flash metering – quite a novelty for me, back in 2005. That said, with the benefit of hindsight there’s no excuse at all for this slow sync zoom effect. 

For me, upgrading from an EOS 10D to the 1D Mark II was like entering an entirely different world. The 10D wasn’t cheaply built by any means, but the 1D series has always been in a league of its own. I got talking to a sports photographer a few years ago who still used an original EOS-1D, and over years of hard use, he’d worn the paint off virtually every part of the camera until it looked like a lump of roofing lead. Despite appearances it still worked perfectly, regularly getting smacked by soccer balls in its retirement role as a static goalpost camera. 

I owned my EOS-1D Mark II for about four years. I don’t remember any close encounters with soccer balls but it certainly absorbed its fair share of abuse.

It also absorbed a lot of beer. Shooting live music in major venues isn’t glamorous. During my (short) career I was pelted by bottles, kicked in the head, stolen from, and on one memorable occasion, almost swallowed by a collapsing floor2. And almost every night, someone would throw beer3 at the stage, which would inevitably fall short and drench the photographers instead. Back then, one of the most useful items I carried in my camera bag was a towel. Come to think of it, that’s still true.

Canon EOS-1D Mark II, 2004-8

$ (document).ready(function() { SampleGalleryV2({“containerId”:”embeddedSampleGallery_8480443759″,”galleryId”:”8480443759″,”isEmbeddedWidget”:true,”standalone”:false,”selectedImageIndex”:0,”startInCommentsView”:false,”isMobile”:false}) });

At the time of its launch in 2004, the EOS-1D Mark II was unmatched. Nikon’s game-changing D3 was still three years off, and Olympus and Pentax had quietly retreated from the professional SLR market, leaving Canon at the top of the tree. The EOS-1D Mark II had the best sensor and the best autofocus system of any professional DSLR and (arguably) benefited from the best lens lineup, too. Its modest APS-H crop factor of 1.3X provided a welcome focal length boost for telephoto work, without hobbling wideangle lenses too much (the 17-40mm F4L, for example, became a still very usable 22-50mm equivalent).

Shot from a prone position, on the stage side of the very skinny security barrier at Newcastle’s Carling Academy (stage 2). Compared to the 10D, the 1.3X crop of the EOS-1D Mark II wasn’t too severe, meaning that wide lenses were still reasonably wide.

It was from a similar position on the same stage that I was accidentally kicked in the head by a crowd-surfing metal fan a few months later. He was very nice about it, and most apologetic.

Compared to my 10D, the 1D Mark II was a racehorse. Suddenly I could shoot at ISO 1600 and upwards without worrying too much about noise, and take more than a handful of Raw files in a sequence (at 8 fps, no less) without the camera locking up. One battery lasted for thousands of exposures. I could use off-center autofocus points without fear. The EOS-1D Mark II even got me a date.4 It was the first camera I ever really loved, is the point.

So when I found a used 1D Mark II in my local camera store last year for a couple of hundred dollars (Glazers Camera in Seattle – be sure to visit if you’re ever in town) I couldn’t resist.

Can we all just agree that this is a good-looking camera? The EOS-1D Mark II is nothing but compound curves. In keeping with a lot of late-2000s reboots, the Mark III ditched the friendly curves for sharper, more aggressively-sculpted edges. Shame.  

Inevitably, after more than a decade my ardor has cooled a little. I’ve used a lot of cameras in the interim. I’m older, more jaded perhaps. More… experienced. And with experience comes perspective. The EOS-1D Mark II is still beautiful, but it’s not the forever camera I thought it was when I was just starting out.

The smile of a man who can barely afford to pay rent, but who’s having a good time anyway. This is a selfie taken on the balcony of the Newcastle Carling Academy in 2005, before ‘selfie’ was even a word. The EOS-1D Mark II is on the right.

By today’s standards, its most obvious deficiency is the small rear LCD screen, which isn’t sharp enough to judge critical focus with any degree of confidence. And then there’s the user interface. I’d forgotten how obsessed Canon used to be with preventing accidental button input in its professional cameras.

Even something as simple as scrolling through images or navigating the menu requires a cramp-inducing combination of ‘press, hold, scroll, press again’ actions that take a while to learn. I used to be able to operate the Mark II entirely by muscle memory, but shooting with it again recently I was struck by how complicated it seems compared to more modern cameras.

A youth theatre production of ‘Les Miserables’ in Durham, in 2005. The EOS-1D Mark II was my main camera for theatre and music photography for several years. 

Fussy user interface aside, when the EOS-1D Mark II is placed alongside the current EOS-1D X Mark II it’s amazing how little some things have changed. Canon got a lot right with the control layout of the EOS-1 back in 1989, and the continuity of design over almost 30 years of development is impressive. If you’ve shot with just a single one of the EOS-1 series, the chances are you’ll be able to pick up and use any of the rest without too much of a learning curve.

In 2005 the EOS-1D Mark II was replaced, sort of, by the torturously-named Canon EOS-1D Mark II N. Essentially the same camera with a larger LCD screen, the ‘N’ stuck around until early 2007, when Canon unveiled a more substantial update in the form of the EOS-1D Mark III.

For low light photographers like me, the Mark III was a better camera in all respects. It brought serious improvements to image quality and low light autofocus performance, it was faster, and it introduced a more modern user interface. It also marked the switch from Canon’s older, heavy NiMH battery packs to the lithium-ion batteries we still use today. Unfortunately, its AF system was bafflingly complicated compared to the Mark II, and turned out to be plagued with unpredictable accuracy issues when tracking moving subjects in daylight.

Aside from the small LCD, the EOS-1D Mark II’s rear control layout is extremely similar to today’s EOS-1D X Mark II. The essentials of the 1D II’s design were actually laid down in the original EOS-1, way back in 1989.

For whatever reason, the Internet responded to these problems with pure fury5, and Canon, caught on the back foot, struggled with damage limitation. A series of firmware fixes didn’t convincingly ‘fix’ the issues, and adding to the company’s woes was the fact that unlike the Mark II, the Mark III had some serious competition. A few months after the Mark III was introduced, Nikon upped its game considerably with the full-frame D3 – a colossally capable next-generation camera that eventually persuaded me (and a lot of the photographers I knew) to switch systems.

Because the EOS-1D Mark III had developed such a toxic reputation (unfairly, I would argue, but please let’s not get into all that again…) the Mark II/N enjoyed quite a long ‘life after death’, holding its value on the used market for a couple of years after it was officially discontinued. Ironically, that worked out well for me in 2008, when I sold mine to pay for a Nikon D3 – but that’s a whole other article…

Original Canon EOS-1D Mark II review samples (2004)

$ (document).ready(function() { SampleGalleryV2({“containerId”:”embeddedSampleGallery_1219446781″,”galleryId”:”1219446781″,”isEmbeddedWidget”:true,”standalone”:false,”selectedImageIndex”:0,”startInCommentsView”:false,”isMobile”:false}) });


1 Overshadowed in my memory only by ‘The Royal Festival Hall Cloakroom Disaster of 2009’, which I still can’t talk about.

2 I’m pretty confident that most of it wasn’t personal. Except perhaps for the floor.

3 At outdoor festivals, on the other hand, one of the first lessons you learn is that it isn’t always beer…

4 On the same day as the Tiki Bar Incident, actually. How’s that for karma? (It never happened again).

5 I got caught up the backlash myself, having published a largely positive review of the Mark III in the spring of 2007 for my previous employer, based largely on analysis of low-light shooting (like I said, it was spring in England). Since joining DPReview in 2009 I’ve been regularly subjected to violent threats by anonymous Americans over something I wrote on the Internet, but back in 2007 it was still a novelty.

Articles: Digital Photography Review (dpreview.com)

 
Comments Off on ‘The only camera that ever got me a date’ – Remembering the Canon EOS-1D Mark II

Posted in Uncategorized


All dPS eBooks – $9 Today Only

28 Dec

On the twelfth day of Christmas dPS gave to me …

It’s the last day of our 12 days of Christmas sale and for today only, you can get any of our photography ebooks for just $ 9.

Rather than pick a few to share, we thought we’d put EVERY single book on dPS for sale for just $ 9.

9 ebooks

There are 23 titles to choose from

Topics include photographing portraits, landscapes, travel, kids and much more.

There’s also eBooks on special effects, black and white, flash photography and even natural light photography.

Check them all out here.

Even our $ 50 Going Pro eBook is just $ 9.

It’s a $ 9 eBook spectacular! There’s also no limits, grab as many as you like. But only in the next 24 hours.

Check them all out before time runs out.

googletag.cmd.push(function() {
tablet_slots.push( googletag.defineSlot( “/1005424/_dPSv4_tab-all-article-bottom_(300×250)”, [300, 250], “pb-ad-78623” ).addService( googletag.pubads() ) ); } );

googletag.cmd.push(function() {
mobile_slots.push( googletag.defineSlot( “/1005424/_dPSv4_mob-all-article-bottom_(300×250)”, [300, 250], “pb-ad-78158” ).addService( googletag.pubads() ) ); } );

The post All dPS eBooks – $ 9 Today Only by Darren Rowse appeared first on Digital Photography School.


Digital Photography School

 
Comments Off on All dPS eBooks – $9 Today Only

Posted in Photography


How I Processed This Photo Using Only Lightroom

24 Nov

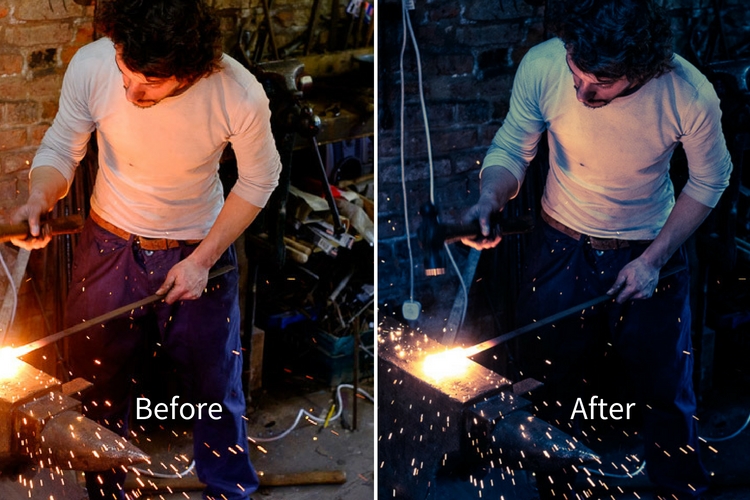
An advantage of using the Raw format is that it gives you a tremendous amount of freedom when it comes to processing. This, combined with Lightroom’s powerful processing engine, opens up lots of possibilities for the creative photographer. I’d like to show you how I processed a Raw file using only Lightroom.

Photoshop users will also be able to follow along with most of it, as Adobe Camera Raw shares many of Lightroom’s sliders and functions. This is the original Raw file, as it came out of the camera.

Lightroom processing

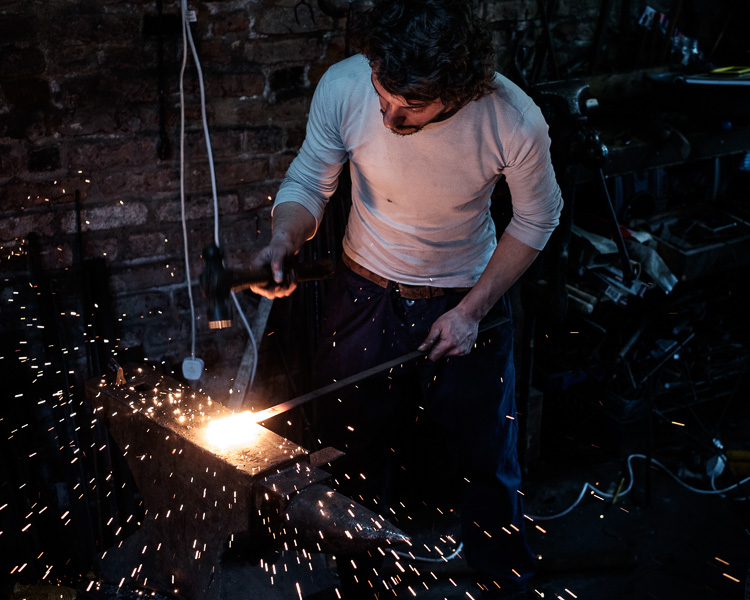
And here’s the finished result after post-processing.

Lightroom processing

The story behind the image

As you can see there’s quite a difference between the before and after images. But before we look at how I achieved this in Lightroom I’d like to share the back story of the photo. This is important because it guided the way that I decided to process it.

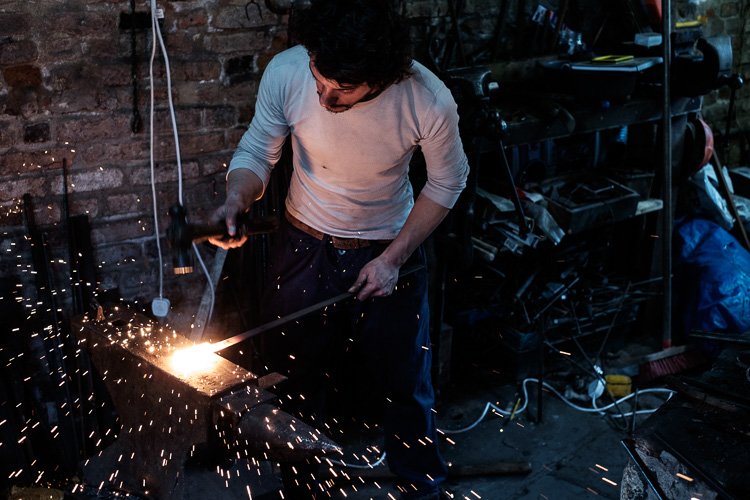
I took the photo in a blacksmith’s forge in the English town of Spalding earlier this year. The forge is remarkable because they use working practices that date back over a hundred years. It’s open to the public and they have demonstrations where you can take photos. The forge is small and you can get quite close to the blacksmith, which allows you to take intimate portraits like this one.

The light was coming from windows in front of the blacksmith and behind him, as well as from the hot piece of metal he is hammering. There was also overhead fluorescent lighting. The end result is that the light is fairly flat and boring, which is something I wanted to change in Lightroom.

A blacksmith’s forge should be lit by a combination of cool natural light and the fiery orange glow from the fires, not fluorescent light. I wanted mysterious shadows in the photo, not every detail visible. Points like these are important because they help you work with a destination in mind, rather than aimlessly pushing sliders around to see what happens.

lightroom-before-after

First steps – color corrections

The first steps involve getting the colors right, as this affects the look of the photo and everything you do from this point forward. The most important setting is in the Camera Calibration panel. A lot of people gloss over this panel as if it’s not so important. This isn’t helped by its placement at the bottom of the right-hand side in Lightroom’s Develop module.

When I took the photo I had the color profile set to Velvia, which gives high contrast and strong, saturated colors on my Fujifilm X-T1. It doesn’t matter what your color profile settings are on your camera if you’re shooting Raw as you can change them in Lightroom. I wanted softer, more subtle colors, so I changed the setting to Classic Chrome.

Note: This setting is only available on some Fujifilm cameras. The settings you see in the Camera Calibration panel depend on your camera model.

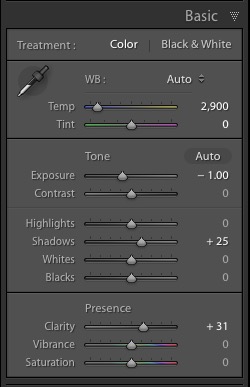
Next, I went to the Basic panel and set the White Balance to Auto. This tells Lightroom to decide how to set the color temperature to give the image neutral colors. How successful Lightroom is at this depends on the content of your photo. If you have mixed lighting sources, as this photo does, even Lightroom’s powerful algorithms aren’t going to give you anything other than an educated guess. It’s not possible to get rid of all color casts with mixed lighting.

Regardless, Auto White Balance gave me a good starting point. This is what the photo looks like so far. You can see it’s already quite different from the starting image which was quite orange.

Lightroom processing

Auto White Balance applied.

Tonal adjustments

The next step was to start making the transition from an image that is too bright to one that is dark and moody.

I did this by setting the Exposure slider to -1.0. This made the shadows too dark, so I brightened them by setting the Shadows slider to +25. I also set Clarity to +31 to bring out the gritty textures in the scene. See my settings below:

Lightroom processing

As you can see now that the image is darker the blacksmith’s face is lit by the glow from the hot metal he is working with. This was lost in the original.

Lightroom processing

Tonal adjustments and Clarity applied.

Cropping to remove distractions

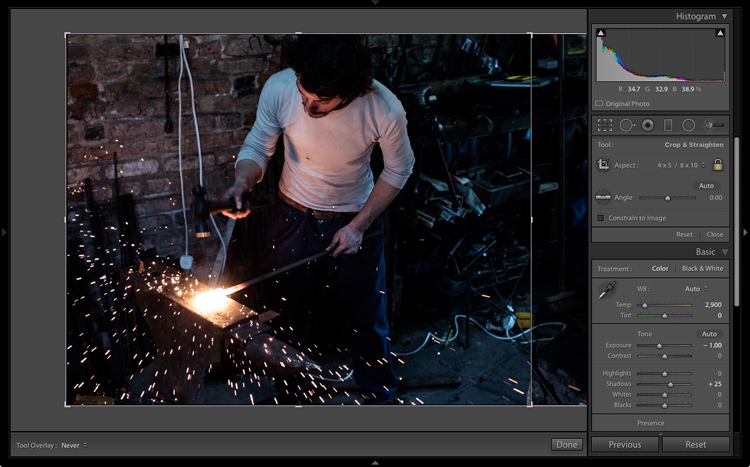
Now I can see that the photo has a major problem. There is too much empty space on the right-hand side, and the blue plastic is a major distraction. In hindsight, the composition would have been better if I had placed the blacksmith in the center of the frame. However, we can compensate for that by cropping the image.

I activated the Crop Overlay (keyboard shortcut R), set the Aspect to 4×5 / 8×10, and cropped the image. This cuts out the distractions on the right-hand side and brings the attention back to the blacksmith.

Lightroom processing

Lightroom processing

This is the result after the image has been cropped.

Refining the image with local adjustments

So far the adjustments made have all been global. That is that Lightroom applies them equally to the entire image. Now it’s time to refine the tonal values with some local adjustments.

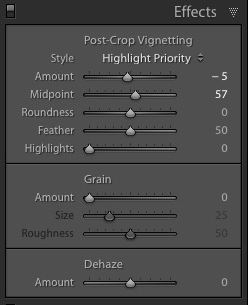
I started by adding a slight vignette using the Post-Crop Vignetting tool in the Effects panel. This darkened the corners slightly.

Lightroom processing

Next, I decided that I wanted to make the background even darker. This is going back to the earlier decision to make the image dark and moody as if the blacksmith is working in a much darker environment.

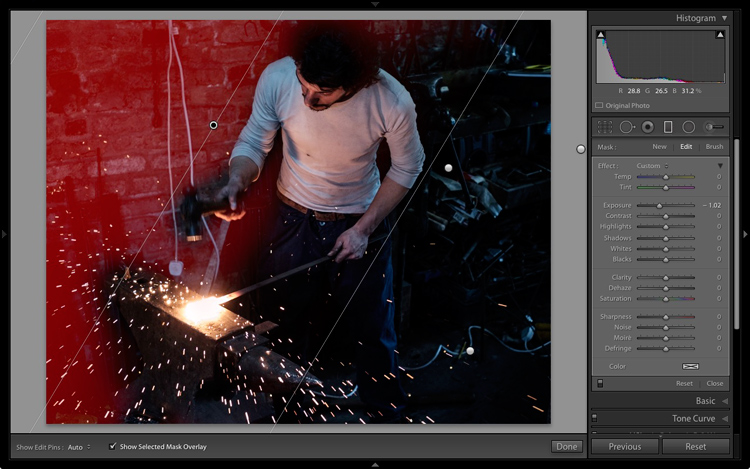
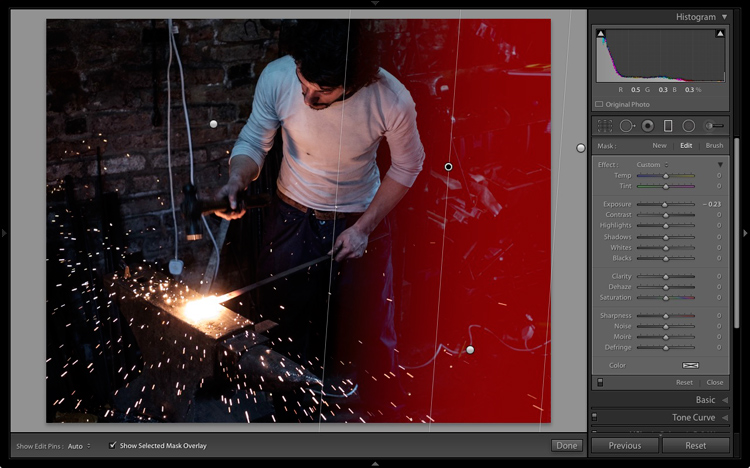
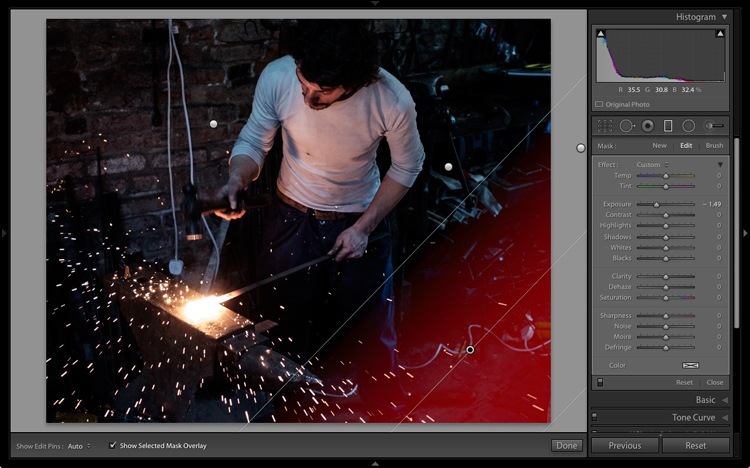
I added three Graduated filters to darken the edges. The screenshots below show the placement of the filters and the settings used.

Lightroom processing

Graduated Filter #1 applied on the upper left of the image.

Lightroom processing

Graduated Filter #2 applied on the right side of the image.

Lightroom processing

Graduated Filter #3 applied on the lower right corner of the image.

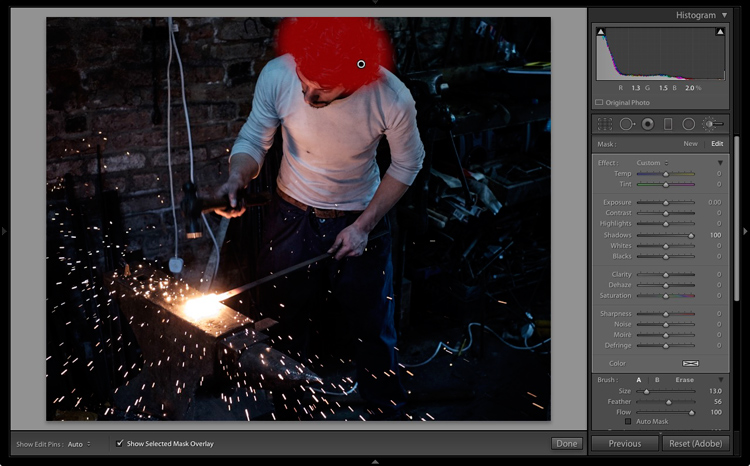
Then I used an Adjustment Brush and moved the Shadows slider right to make the blacksmith’s hair lighter and bring out the detail.

Lightroom processing

Adjustment Brush applied to his hair to bring out detail.

This is what the image looks like now with these adjustments.

Lightroom processing

After local adjustments have been applied.

Split toning for color grading

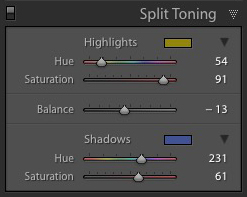
Lightroom processingFinally, I decided that the mood could be further enhanced with a split tone applied: blue to the shadows and an orange tone in the highlights.

The idea was to emphasize the difference in color temperature between the orange light from the hot metal and sparks, and the background, which in my imagination is lit by daylight (but in reality was also lit by fluorescent light). I did that in the Split Toning panel with these settings.

Here is the final result.

Lightroom processing

Final image after split toning applied.

Final thoughts

As you can see, even though the final image looks remarkably different from the starting Raw file, the steps involved in the processing were quite simple. It didn’t take long to get from the starting point to the end photo. This is mostly because I had a firm idea of what I wanted as the end result before I started processing the file.

If you have any questions or thoughts to share about the processing I did on this image then please let me know in the comments.


If you’d like to learn more about processing your photos in Lightroom then please check out my ebook Mastering Lightroom: Book Two – The Develop Module.

googletag.cmd.push(function() {
tablet_slots.push( googletag.defineSlot( “/1005424/_dPSv4_tab-all-article-bottom_(300×250)”, [300, 250], “pb-ad-78623” ).addService( googletag.pubads() ) ); } );

googletag.cmd.push(function() {
mobile_slots.push( googletag.defineSlot( “/1005424/_dPSv4_mob-all-article-bottom_(300×250)”, [300, 250], “pb-ad-78158” ).addService( googletag.pubads() ) ); } );

The post How I Processed This Photo Using Only Lightroom by Andrew S. Gibson appeared first on Digital Photography School.


Digital Photography School

 
Comments Off on How I Processed This Photo Using Only Lightroom

Posted in Photography


iPhone 7 Plus dual-cam only offers stabilization in wide-anlge lens, report says

12 Sep

According to a report by Ming-Chi Kuo of analyst firm KGI that was obtained by MacRumors, the iPhone 7 Plus dual-camera is equipped with optical image stabilization in the 28mm equiv. wide-angle lens, but not in its longer 56mm equiv. lens. In the report, KGI claims that optical image stabilization will likely make it into the tele lens with the next upgrade of the device in 2017 via a ‘voice coil motor’ upgrade:

“Note that for the dual-camera of iPhone 7 Plus, wide-angle CCM is equipped with optical image stabilization (OIS) VCM, while telephoto CCM only comes with general VCM. We believe the focus of the dual-camera upgrade will be equipping telephoto CCM with OIS CCM, so as to significantly enhance optical and digital zoom quality.”

In the same report KGI predicts that for the foreseeable future the dual-camera feature will remain exclusive to the larger iPhone Plus model which is expected to represent 30-40% of all iPhone sales. 

Apple limiting certain camera features to the larger model is not without precedent. In the iPhone 6 and 6s generations only the Plus devices were equipped with optical image stabilization. With the 7th generation this has now trickled down to the standard model and we would expect the same thing to happen with the dual-camera at some point in the future. 

During the launch presentation Apple did not mention a lack of OIS in the tele lens. In practical terms this would mean that, when shooting with the tele module,  the camera has to use higher ISO values in lower light to avoid camera shake. That said, we’ll have to wait for a review model to find what this means for image quality.

Articles: Digital Photography Review (dpreview.com)

 
Comments Off on iPhone 7 Plus dual-cam only offers stabilization in wide-anlge lens, report says

Posted in Uncategorized


Thieves needed only ten seconds to swipe photographer Brett Costello’s gear in Rio

05 Aug
News Corp. photographer Brett Costello

Another instance of robbery during the Rio Olympics has been reported, this time involving News Corp photographer Brett Costello and his bag of photography gear. The incident took place at a coffee shop in Ipanema, according to Costello’s statement to The Courier Mail, where a woman distracted him while her accomplice grabbed Costello’s gear bag. The thieves are said to have fled in a vehicle.

Speaking about the theft, Costello said:

I was ordering the coffee and was with my gear and then all of a sudden a woman asked me a question, so I turned briefly, probably for 10-seconds. I felt something was not quite right and my bag with all my gear was gone. She was speaking to me for about 10 seconds, not long at all. I was in shock. No one saw a thing, I couldn’t believe it, I was later told there was a getaway car outside. They work in numbers and they’re good at what they do unfortunately. The police weren’t overly surprised, there was a camera in the cafe but I don’t think that’s going to help.

Several robberies and thefts at the Rio Olympics have been reported. On August 1, for example, Australian athletes had some of their items stolen during a building evacuation. Most recently, reports claim a mugger attempted to rob a Russian diplomat at gun point.

Via: The Courier Mail

Articles: Digital Photography Review (dpreview.com)

 
Comments Off on Thieves needed only ten seconds to swipe photographer Brett Costello’s gear in Rio

Posted in Uncategorized


All 7 Photography Deals Back – 24 Hours Only

14 Jul

If you missed out on any of the amazing offers over the last 7 Days of our Summer Sale, today’s your final chance to grab a bargain.

fb-all_deals_are_back_3_1024

As in previous years we’ve received a few sad messages from readers who missed out on deals along the way, asking if there was any way to get them.

As a result, today we’re opening all 7 deals back up again for one last chance.

So if there’s a deal you regret missing or if you missed one of our emails – you’re in luck.

Just to recap, here’s what’s available for the next 24 hours:

  1. The Complete Portraits Pack (71% Off)
  2. Lightroom Rapid Editing System for Travel Photography (72% Off)
  3. Landscape Photography Ebooks & Video (Save $ 400)
  4. The Essential Guide to Black And White Photography (Just $ 6)
  5. Photo Nuts Courses Bundle (70% Off)
  6. The Complete Photography Tutorial eBook (61% Off)
  7. The Ultimate Post Production Photography Bundle ($ 5000 worth for $ 79)
  8. See all 7 deals over at our Summer Sale page!

googletag.cmd.push(function() {
tablet_slots.push( googletag.defineSlot( “/1005424/_dPSv4_tab-all-article-bottom_(300×250)”, [300, 250], “pb-ad-78623” ).addService( googletag.pubads() ) ); } );

googletag.cmd.push(function() {
mobile_slots.push( googletag.defineSlot( “/1005424/_dPSv4_mob-all-article-bottom_(300×250)”, [300, 250], “pb-ad-78158” ).addService( googletag.pubads() ) ); } );

The post All 7 Photography Deals Back – 24 Hours Only by Darren Rowse appeared first on Digital Photography School.


Digital Photography School

 
Comments Off on All 7 Photography Deals Back – 24 Hours Only

Posted in Photography