RSS
 

Posts Tagged ‘Oncamera’

Tips for Using On-Camera Flash for Beginners

26 May

Flash is a challenging subject and can be confusing if you’ve never used it. These two videos will give you an overview of some flash basics you need to know, and how to take the next step when using flash – bouncing it for better lighting.

On-Camera Flash Basics

In this video, Chris from The Camera Store gives you a crash course in some on-camera flash basics. He covers what you need to know to get your flash photos looking better and more natural so you don’t have subjects with deer in the headlights looks or black cavernous backgrounds with no light.

?

Flash for new users

?

Next, this video from Mark Goodin of RealWorld will walk you through understanding some of the settings on your flash and how to use it to make better light on your subject. He even gives a couple tips for diffusing your on-camera flash (the built-in one that pops up) so it isn’t so harsh.

Want more?

If you want more flash photography tips, try these dPS articles:

  • A Quick Guide to Using Bounce Flash for More Natural-Looking Photos
  • How to use Off-Camera Flash to Create Dramatic Images with Cross Lighting
  • What is a Flash Bracket and Why Do You Need One?
  • How to Understand the Difference Between TTL Versus Manual Flash Modes
  • Flash Shopping Guide – 5 Things to Consider When Buying a Speedlight
  • Tips for Using Speedlights to Create the Right Lighting for Outdoor Portraits

The post Tips for Using On-Camera Flash for Beginners appeared first on Digital Photography School.


Digital Photography School

 
Comments Off on Tips for Using On-Camera Flash for Beginners

Posted in Photography


How to Use an On-Camera Speedlight as Fill Flash for Portraits

03 Dec

Using a flash or speedlight on-camera can be daunting at first. This was certainly how I felt when I first purchased my Nikon speedlight. My biggest worry was calculating all the light ratios involved to get a proper exposure as you cannot take into account the actual flash output when metering in-camera. I was also nervous about using a light meter – all that trial and error and faffing, the thought of it all used to make me quake in my boots and swear I’d forever be a natural light photographer. But that was not to be, thankfully.

My main reservation about using flash is the harshness of the light. I hate the “flashed” look on people’s faces, the shadows under the jaws, the bright circular catchlights right in the middle of the iris. As well, the flatness of the face with the direct flash obliterating all possibility of sculpting shadows on the face.

But I live in London where it rains quite a bit, it’s hardly sunny at all, and half the year is cold. All these factors affect natural light and I felt I just had to put aside my reservations and take the leap. And I’m so glad I did.

How to Use an On-Camera Speedlight as Fill-Flash for Portraits

Let me share with you how I use flash to help me achieve the look I am after and without having to do the mental calculations of light ratios!

#1 Put a diffuser on the flash

It may only be a little plastic thing that goes on top the flash head but I find it makes a difference.  The light is less harsh – I know many will disagree about whether it softens the light or not as that is mainly due to the size of light and distance to subject  – but I notice a softness from a diffused flash head compared to a bare one.

Left: without a diffuser. Right: with a diffuser.

I only use a flash bare and pointed towards the camera when I am using it as a kicker light and want starburst effects coming from it.

#2 Control the flash manually

Set your flash to manual and choose the power. I’m usually at 1/32 or 1/16 and leave it there. Adjust the flash power only when absolutely necessary. Instead, make the frequent necessary adjustments to your camera settings.

Now I know there are many big fans of ETTL / TTL mode out there. I have tried it too. However, I have gone back to Manual as I find the TTL does not give me the look I want. Essentially, I only want my flash to be a fill light, not the main light and never too strong so that you can see a huge difference between the light coming from the flash and the ambient light. The ETTL / TTL mode is too smart for my needs and increases the output to a pretty high level if it senses that the ambient light is too weak, and vice versa. I felt I’d get an inconsistent output of light for the look I am after although that output may be “correct” in terms of the calculations.

For portraits, I find that the greater the contrast between the dark background and the illumination of the subject with a flash gun, the more I dislike the image. For dancing shots (like at a wedding), however, where I want to illuminate the subject well and freeze the action, I DO point my flash directly at the subject, stop down my aperture to between f/5.6 and f/8 and lower my shutter speed between 1/20th and 1/60th in order to capture ambient light and light trails or background blurring to give the effect of movement.

This image was created using a bare bulb flash (no diffuser) located behind and pointing directly at the couple (off-camera flash). I also had a second flash on-camera with a diffuser, and the flash aimed upward.

This image was created with a diffused flash pointed directly at the couple (camera in front of the couple, flash on-camera) while they were dancing. The motion blur was created by using a slow shutter speed and “dragging the shutter” after the flash has fired.

What I’m after is always a natural look, which, depending on where the main light is coming from, may not be achieved well without some kind of fill or reflected light to illuminate areas that are too dark for my intentions. This is the reason why I always bounce or angle my flash gun for most scenarios other than dancing as explained above.

#3 Bounce it

On some newer models, there is also a little white pull-out bounce card that is extremely useful if your ceilings are too high for the light to bounce off or you just want to point reflected light in a particular direction. When I shoot weddings where the rooms have very high ceilings or dark beams and ceilings. So I pull out the bounce card and use it to deflect the light coming from the flash. The handy swivel action helps me direct the reflected light wherever I want it to go.

My speedlight with the white bounce card extended.

As an aside, I use this setup for off-camera flash too. When I’m putting two speedlights opposite each other in a room to provide directional light during speeches, I point the flash heads upwards and pull out the diffuser so that all the reflected light is pointed inwards towards the center of the room.

#4 Angle it

The head of most speedlights can swivel right and left up to 90 degrees each way and forward and upward to 90 degrees in incremental angles. It is an awesome functionality that you should take advantage of especially for fill flash.

In the photos below, bright sunlight was coming from camera right at 45 degrees on a bright day. All I wanted was a bit of fill flash on their shadowed faces, just enough to lift the shadows a tad. What I really wanted to avoid was for the image to look like there was another light source other than that from the sun. To achieve this, I angled my speedlight upwards towards the back by one increment.

How to Use an On-Camera Speedlight as Fill Flash for Portraits

Flash as a fill light

As you can see, these photos below have very strong sunlight coming directly at the subjects and towards the camera, a very strong backlit light. It is extremely difficult to overpower this type of light without using a strong flash.  What I did was angle myself slightly to one side and pointed my flash directly at the subjects’ faces to try and counteract the sunlight.

This is when I adjust my flash power and increase it accordingly. The result is not as clean and sharp as if I had a big softbox firing at 70% ratio to the sun’s power but it still shows the faces clearly enough with some diffused hazy light in the background, which was also my intention for these shots.

How to Use an On-Camera Speedlight as Fill Flash for Portraits

Compare the two images below. The one on the left was taken in a big open space with a dense foliage background which blocked the light. There was enough light here to illuminate their faces that I could have done away with the flash altogether, but I pointed the flash backward to add just a tiny bit of light over my head. I don’t think it made a huge difference but it made me feel better and consistent!

The image on the right was taken in a shaded open area surrounded by tall trees which diffused the light coming from the background. Without the trees, it would have had the unfiltered effect as above, but despite the trees, this is still very much a backlit position as the background was very bright still. More fill light was needed there so I pointed the speedlight slightly upwards, with one increment down towards the subjects but not directly at their faces.

How to Use an On-Camera Speedlight as Fill Flash for Portraits

You can see the same flash angle as above on these close-up portraits below.

How to Use an On-Camera Speedlight as Fill Flash for Portraits

Make it moody

In the same spot as above, I wanted a look that was a little moodier than those close-ups so I pointed the speedlight directly upwards this time. So although their faces are still amply lit up, the image to feels like they are being enveloped by the diffused light behind them.

How to Use an On-Camera Speedlight as Fill Flash for Portraits

Tricky situations

The couple wanted a shot showing the lake and the trees in the far distance. The distance was too great to get the couple and the background sharp enough without using a really small aperture and a lot of artificial light (flash). Note that we were also in the shaded part of the lake which made it more difficult. I decided therefore that I would take a cozy shot that focused mainly on the background. The couple looking towards the trees, although they are not the lit focal point, they are still clearly visible and sharp. I pointed the speedlight slightly forwards to give them just a hint of light and shot with a small aperture.

Contrast the top image below to the photo directly underneath it where the depth of field has changed massively – the background now is blurry and the couple is in focus. This had the same angle of flash, slightly forwards, but of course, my camera settings changed to a wider aperture and lower ISO to balance the exposure. Now with the couple still in the same shaded spot, the angled flash was clearly essential here. Had I pointed the flash directly to their faces, it would have been too obvious and would kill the natural light ambiance that I was aiming for.

How to Use an On-Camera Speedlight as Fill Flash for Portraits

For this ring shot below, we sat on a bench with the sunlight coming from camera left. I put the ring on my phone to get a dark background and a nice reflection. With ring shots, I always stop down to at least f/7 with a macro lens. Therefore I need to make sure there is plenty of light for the shot as macro lenses tend to suck light.

I also always use a speedlight pointed directly opposite the main light. So in this case where the light is at camera left at 8 o’clock (if you’re looking at a clock face with the diamond at 6 o’clock), I swiveled my flash head to the opposite at around 4 o’clock to give off a bit of reflected light on the right side of the ring.

How to Use an On-Camera Speedlight as Fill Flash for Portraits

Likewise, on the photo below, you can clearly see where the sunlight is coming from so I pointed my speedlight slightly upwards to camera left, opposite the sunlight. This angle helped me achieve a gradual decrease of light from right to left as opposed to a dramatic one where you can see a clear cut-off from light to dark.

How to Use an On-Camera Speedlight as Fill Flash for Portraits

Your turn to try doing fill flash

If you haven’t tried using flash like this before, I encourage you to do so. Experiment and see how it could work for you. You don’t need to learn the lighting ratios and calculations off by heart to be able to get images you are after, although that could be handy.

Sometimes all you need is confidence, common sense, and a willingness to try. I hope you found this little tutorial useful. If you have more tips, share them in the comments below.

The post How to Use an On-Camera Speedlight as Fill Flash for Portraits by Lily Sawyer appeared first on Digital Photography School.


Digital Photography School

 
Comments Off on How to Use an On-Camera Speedlight as Fill Flash for Portraits

Posted in Photography


The Profoto A1 is the ‘world’s smallest studio flash’ and Profoto’s first on-camera flash

20 Sep

$ (document).ready(function() { SampleGalleryV2({“containerId”:”embeddedSampleGallery_4235413921″,”galleryId”:”4235413921″,”isEmbeddedWidget”:true,”standalone”:false,”selectedImageIndex”:0,”startInCommentsView”:false,”isMobile”:false}) });

As expected after last week’s photo and specs leak, lighting manufacturer Profoto has launched an on/off camera flash unit called the Profoto A1. But if you were expecting a simple speedlight, Profoto is definitely branding this as more powerful than that. In fact, they’re calling it “the world’s smallest studio flash.”

The new A1 is styled much like most on-camera flash units, but is equipped with the powerful features of a Profoto studio head. The 76Ws unit uses a lithium ion battery that is claimed to be good for up to 350 full power bursts and which charges in under 80 minutes. Profoto also says that the A1 recycles “four times faster than other on-camera solutions,” as it can emit a full power pop every 1.2 seconds.

A stand-out feature of the A1 is its circular lens, which is said to produce light that is “natural and beautiful with a pleasing soft-smooth fall-off.” The rim of that circular lens housing is also magnetic, and accepts a range of clip-on modifiers that can be changed quickly and easily. The head offers a manually operated zoom function and the rear display is large and easy to read.

The A1 heads are equipped with Profoto’s Air Remote TTL system so they can work in groups alongside other A1 heads or any other Air Remote studio heads from the Profoto studio head range. Finally, the A1 offers variable power over 9 stops in both standard and HSS modes, and includes an LED modeling light for previewing the effect of the flash or using on its own as a light source.

The A1 is currently compatible with Nikon and Canon systems, and will be with Sony models in the future… but it doesn’t come cheap. As previously reported, the Profoto A1 will cost you $ 995 USD… quite the pretty penny when you compare it to some of the full-featured speedlights other options out there from brands like Godox.

For more information on the Profoto A1, visit the Profoto website or watch the introductory video below.

Press Release

The world’s smallest studio light

The Profoto A1 might be the smallest flash we’ve ever made, but it’s still built to the same impossibly high standards we’ve set ourselves over the last fifty years.

Our focus with the A1 was to create a flash that delivers a truly high quality of light, which is why it features a round head which delivers light that’s both natural and beautiful with a pleasing soft-smooth fall-off, that blends seamlessly with the ambient light.

Thanks to a smart magnetic mount built into the head, light shaping tools and modifiers can be clicked on and off quickly and easily. Within seconds you’re being creative with light, shaping it. It also has a zoom function that allows you to make fine adjustments to the spread of light by simply twisting the zoom ring on the head, and for accuracy it has a modeling light built-in to the head – so you can see what you’re going to get before you press the shutter.

We made it our mission to make A1 the first on-camera flash that’s easy to use from the box. The user interface is simple and intuitive with a large high-contrast display at its center. The less time you spend learning and fiddling, the more time you’ll spend shooting. And that’s ultimately what counts. Despite its size, or lack of it, the A1 punches above its weight in a good number of key areas.

Battery life is key when a photographer is right in the thick of the action, because the last thing they need to have to stop mid flow to change the batteries. The A1 has its own Li-ion high capacity battery built-in which lasts up to four times longer than AA batteries with no performance fade. So, you can shoot for longer with confidence.

And this is a flash that can keep up with you because it recycles four times faster than other on-camera solutions – that’s every 1.2 seconds at full power. Put simply, you’ll never miss a shot.

And while it’s true to say the Profoto A1 is our very first on-camera solution it’s also just as effective off-camera as a standalone unit, and integrated into a larger system of lights. That level of versatility is possible because Air Remote is built-in, which means the A1 offers seamless connectivity with freestanding lights like another A1 or bigger Profoto lights like the B1X.

And with AirTTL you’ll get a perfect exposure super-fast. Better still, you can lock the exposure with a single ‘click’ while still being free to fine tune that exposure in manual, giving you even greater control.

So, this is so much more than our smallest flash yet. This is shooting on the move, shooting with confidence and shooting with light shaping excellence. This is shooting off-camera and for the first time with Profoto, on-camera. This is the Profoto A1 – the world’s smallest studio light.

Articles: Digital Photography Review (dpreview.com)

 
Comments Off on The Profoto A1 is the ‘world’s smallest studio flash’ and Profoto’s first on-camera flash

Posted in Uncategorized


How to Use Your On-Camera Speedlight to do Bounce Flash Effectively

26 Jul

An on-camera flash (or speedlight) is the tool many photographers own, but few know how to use. Every day I see this amazing piece of equipment go to waste, slamming harsh light into a subject, when it could be caressing it with soft, directional illumination. The flash is a sculptor’s chisel, not a sledgehammer. You just need to know some basic technique.
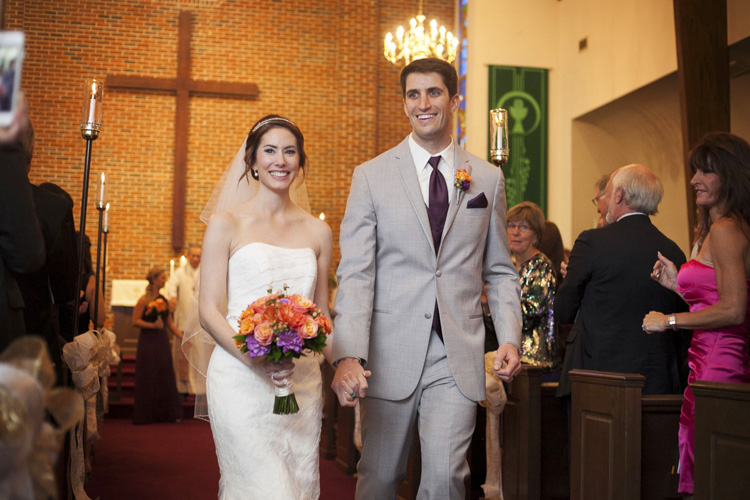
Photo6

In the 400-plus weddings I’ve photographed over the years, much of what I shoot indoors is lit with a speedlight. I have a trunk full of studio lights that I’ll set up and use sometimes at events, but more often than not, I end up preferring the photos from my little on-camera flash (not to be confused with the built-in one). You can create beautiful light bouncing your flash off of walls, ceilings, mirrors, professional wrestlers or herds of sheep.

Let me illustrate with a few examples, using my favorite model, my wife Karen. Every photo below is taken with the same lens (50mm), shutter speed (1/180), and aperture (f/4). We also don’t move at all. We are about 10 feet in front of a gray paper backdrop, white walls to the left and right are about seven feet away. The ceiling is also white. The only thing that changes in these photos is that I am spinning my flash head into different positions.

WHAT NOT TO DO

Photo1

In our first example, I’ve photographed Karen with direct flash. (She is laughing because she thinks I’m incompetent for having my flash in that position).

This is harsh, flat light. There is a nasty shadow on the background. This is the opposite of bounce flash, and typically a last resort flash position. Let’s move on.

A SLIGHT IMPROVEMENT

Photo2

Here I’ve improved things a bit by bouncing my flash off the ceiling. This has softened the light, but it is still coming from overhead, creating unattractive shadows under her eyes, and a lack of catchlights. We can do better!

LOOKING GOOD

Photo3

Here I’ve pointed my flash to the side, so it bounces off the wall to my left, giving me some softness and better directionality and volume of light. I think this is a keeper!

WHAT HAPPENED HERE?

Photo4

Just for fun, I turned my camera upside down here and pointed the flash at the floor, so the light is coming up from below. We call this Franken-light (monster lighting). Not something you are going to do a lot, but if you ever get hired to photograph a vampire, this is a good one to have in your toolkit.

All of these photos illustrate the two main factors I think about when shooting bounce flash: light direction and light quality (softness).

LIGHT DIRECTION

This just refers to the direction the light is coming from, something that is very easy to control with a bounce flash. If you point your flash up at the ceiling, it will hit your subject coming from above. If you bounce your light off a wall to the right, the light will come back from the right, etc.

Photo5

Check out this simple portrait of a wedding guest (above). She was looking to her right in the photo, so I bounced the light off a wall on that side to get some beautiful light into her face. If the next person I want to photograph is facing the other way, all I have to do it spin my flash 180 degrees and bounce it off the opposite wall. This sort of versatility is wonderful when shooting live events.

Photo6

In this photo of a just married couple walking down the aisle, I bounced my flash off a wall to the left again, to get some wonderful light on them. If you look at the people in the background, you can get an idea of the ambient illumination in the room.

The nicest light often comes more from the side than from above. If you fire your flash 90 degrees to your left, the light will come back from the left at 90 degrees. Incidentally, this is a similar angle to the great light you can get at dusk and dawn.

LIGHT QUALITY (SOFTNESS)

The softness of your light is mainly affected by the size of your light source. With bounce flash that is the section of wall or ceiling illuminated by your flash. I think this is the hardest concept for people to get with bounce flash. Just think of your light source as the surface that is illuminated by your flash (rather than the flash itself).

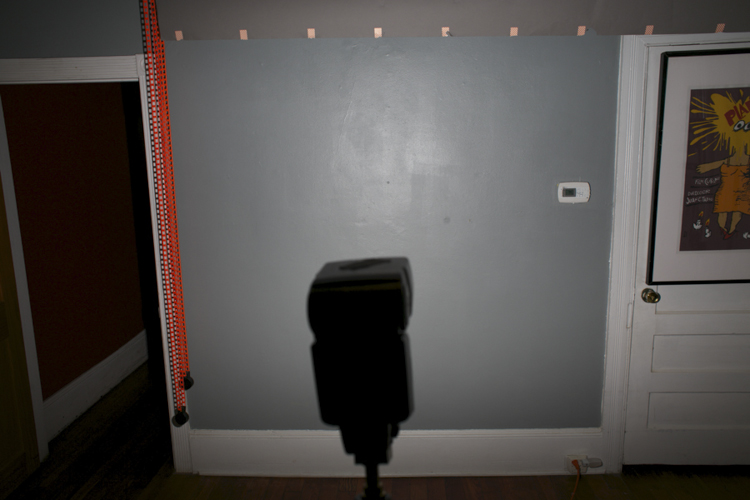
The bigger the light source, the softer the light. In other words, the larger the area you cover with your flash, the softer the light coming back. To cover a larger area with bounce flash, simply move farther from your bounce surface, to allow the light from the flash to spread out more. A lot of flashes also allow you to zoom the flash head in and out, creating a narrower or wider beam (a wider beam allows the flash to spread out faster, and vice versa).
Bounce sample 1

This can be a little hard to visualize, so I’ve taken a couple of photos to help illustrate how it works. In the first photo (above), I have my flash head zoomed all the way out, to create the widest beam possible. I then fired it at a wall in my studio about 10 feet away. As you can see, the flash lights up most of the wall. This would makes for some nice soft light bouncing back towards us.

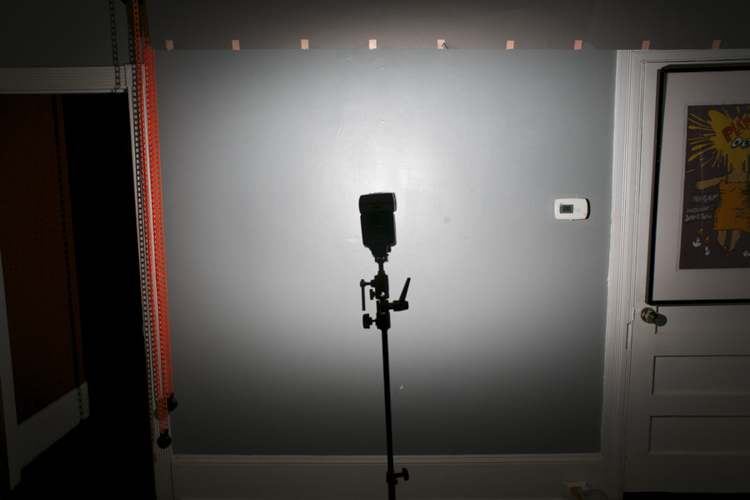
In the second photo (below), I have moved my flash closer to the wall with the same amount of zoom. As you can see, it is lighting up less wall now, meaning the light source is getting a bit smaller (more harsh/hard – less soft).
Bounce sample 2

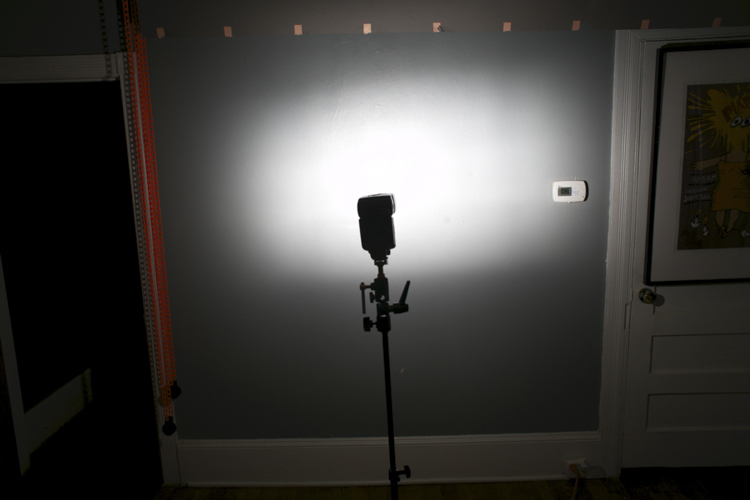
In the third photo, I’ve kept the flash in the same position, but zoomed in the flash head all the way. So the light source is now smaller still (the area on the wall which is reflecting light is the light source).
Bounce sample 3

What you may not realize is that you can send your light all the way across a massive hotel ballroom, for example, and have it come back nice and soft. In the photo below of adoring parents listening to a wedding speech, the light from my flash is traveling 20 or 30 feet to the wall and back. The farther it goes, the more it spreads out, and the softer the resulting light. Beautiful!

Photo7

POWER ISSUES AND TRICKY LOCATIONS

Now there is a limit to your flash power, and therefore, to how far away you can be from your bounce surface. Fortunately with digital cameras it’s easy to do some quick tests to see what you can get away with.

For example, let’s say you find yourself in a huge convention space photographing the keynote speaker at the annual prune sellers convention. The lighting in the room is from horrible overhead spotlights, and if you don’t improve upon it you’ll never get another job from this plum client. So you try bouncing your flash off a wall to the speaker’s left, but your flash just isn’t powerful enough. Your image is underexposed and your camera batteries are straining to recharge the flash.

In this situation, you can try a couple of different things to fix your problem:

  1. Ramp up your ISO as high as you can.
  2. Open your aperture up as much as possible.
  3. Zoom your flash head in as far as it will go, to narrow the light beam you are firing at the wall.

If nothing works, you may have to resort to shooting direct flash, but that should be a last resort.

Off course you won’t always be in white-walled rooms, but you can usually find something to bounce off if you look around. White ceilings and dark wood walls? Bounce off that ceiling (but try to point your flash slightly to one side or the other to give some better directionality to your light). You can also bounce off of darker surfaces. If the surface isn’t black, that means it is still reflecting some light and you can bounce a flash off it.

I’ve bounced off of everything from brick to wood paneling, though admittedly these surfaces do suck up a lot of your flash output and drain your batteries faster, so they aren’t ideal (they will also add a color cast to your image).

When I walk into a space where I’m going to use bounce flash, I immediately look around and think about what my bounce surfaces (light sources) could be. I’ll identify the surfaces that look good (generally light colored/reflective things), and position myself so I can use them to my advantage.

Let’s look at some more examples:

Photo8

This wedding couple is having their first dance at the Peabody Library in Baltimore, a very large space that doesn’t even have complete walls to bounce off, just columns, because of the way the library stacks are arranged. But I cranked my ISO up to 4000 and was able to bounce my flash and get some nice light for the photo.

Photo9

I’ve also included a photo above showing the entire space so you can get a better idea what I was dealing with.

Photo11

This sleepy little girl was photographed at a wedding reception at a country club in Virginia. I bounced my flash off a wall about 30 feet to my left, and got a little help from the purple lighting in the background.

Photo12

This wedding portrait was made at night at Camden Yards baseball stadium in Baltimore. This was outside and there was nothing to bounce a flash off, so I had an assistant hold a white reflector behind me to camera left, and I bounced my flash into that.

As I write this article, I’m sitting in a dark restaurant with a black ceiling, dark walls, dark carpet and dark furniture. It’s a real light-sucking pit, but there are a bunch of framed photos on the wall, and also a mirror. I’m pretty sure I could bounce a flash off of those and get some decent light if I needed to.

You can get really good at bounce flash fast. Once you are aware of the possibilities, it’s just a matter of experimenting, and refining your technique. Look around your environment and ask yourself what you can use as a bounce surface. Look at your subject and think, “Where do I want the light to come from?”

Then experiment, point your flash to the right, to the left, behind you. Before you know it, you’ll be a bounce flash master!

Please share your bounce flash tips and images in the comments below.

googletag.cmd.push(function() {
tablet_slots.push( googletag.defineSlot( “/1005424/_dPSv4_tab-all-article-bottom_(300×250)”, [300, 250], “pb-ad-78623” ).addService( googletag.pubads() ) ); } );

googletag.cmd.push(function() {
mobile_slots.push( googletag.defineSlot( “/1005424/_dPSv4_mob-all-article-bottom_(300×250)”, [300, 250], “pb-ad-78158” ).addService( googletag.pubads() ) ); } );

The post How to Use Your On-Camera Speedlight to do Bounce Flash Effectively by Dennis Drenner appeared first on Digital Photography School.


Digital Photography School

 
Comments Off on How to Use Your On-Camera Speedlight to do Bounce Flash Effectively

Posted in Photography


Manfrotto introduces next generation of on-camera LED panels

19 Jan
Left: CROMA2, Right: MICROPRO2

Italian accessory manufacturer Manfrotto has introduced three improved LED panels that are designed to be used by professional and serious enthusiasts in the hot shoes of their cameras. The new panels, which are powered by Litepanels, are the CROMA2, MICROPRO2 and the SPECTRA2. Each of the new models features surface-mounted LEDs, with new lenses that improve the intensity of illumination in the light path thus delivering better efficiency and less fall-off. The company also says the new technology benefits the accuracy of color rendition. 

The CROMA2 and MICROPRO2 panels are very similar, except that the CROMA2 offers variable color temperature so that it can work in both tungsten and daylight situations – as well as those in between. Using a mixture of daylight and tungsten LEDs, the dominance of colors can be controlled via a continuous dial between 3100K to 5600K. The CROMA2 has a maximum output of 900lux, while the MICROPRO2 can manage 940lux. 

The SPECTRA2

The SPECTRA2 is a smaller panel with a maximum output of 650lux, and is daylight only. A dimmer switch allows its power to be reduced to 50%. 

There is a range of diffusers and colored filters available for each of the panels, and they all run from 6 AA type cells, an AC adapter or an L-Type Li-ion battery. They all have a ball and socket tripod head included, and the larger panels come with AC adapters and a bracket for an L-Type battery. For the SPECTRA2 these are optional extras.

The SPECTRA2 costs $ 219.99/£154.95, the MICROPRO2 $ 349.99/£259.95 and the CROMA2 is $ 418.99/£329.95. 

For more information visit the Manfrotto website.


Press release: 

Manfrotto, world leader in the photography, imaging equipment and accessories industry, announces the new generation compact LED lights for professional and advanced hobbyist videographers and photographers. 

CROMA2, MICROPRO2 and SPECTRA2 offer the latest LED technology available (SMT – Surface Mount Technology) in a portable size, which guarantees images with perfect color rendition and improved optical efficiency.

These on-camera LED panels, powered by Litepanels, are part of the new ready to use Manfrotto LED lights. 

CROMA2 AND MICROPRO2: COMPACT NEW LED TECHNOLOGY

A new range with the same design, the SMT LED panels embed innovative lenses, which have been specifically created for high efficiency and CRI (Colour Rendering Index).

The intensity of the LED devices can be controlled by the user – CROMA2 up to 900lux and MICROPRO2 up to 940lux. The colour temperature in CROMA2 can be regulated from 3100K to 5600K, which makes this device the perfect versatile LED panel to match the existing ambient lighting. MICROPRO2 is Daylight 5600K and permits the colour correction thanks to the diffuser and gel filter included in the pack.

CROMA2 and MICROPRO2 operate on six AA standard batteries, from mains through the included AC adaptor or on L-Type Li-ion batteries through the included battery adaptor.

Compact and powerful, thanks to the included ball head they can be used for both on camera as well as off camera use.

SPECTRA2: MINI BUT POWERFUL

The most compact LED Panel in the professional range – high efficiency in the palm of your hand. SPECTRA2 features the state-of-the-art LED SMT technology, which guarantees images with perfect colour rendition and flicker-free functionality.

SPECTRA2 is perfect for on camera use with the included new ball-head, as well as for off camera use.

The LED device is dimmable, capable of emitting 650lux, and provides a further increase in the light output thanks to the boost mode (+50%). The colour temperature of the LED Panel is Daylight 5600K but it can be changed thanks to diffusers and filter gels.

SPECTRA2 can operate on six AA standard batteries and offers, as optional, AC or L-Type Li-ion batteries adaptors.

These new powerful and compact Manfrotto LED lights guarantee best performance with a high quality light. CROMA2, MICROPRO2 and SPECTRA2 represent the top range of on-camera units.

Articles: Digital Photography Review (dpreview.com)

 
Comments Off on Manfrotto introduces next generation of on-camera LED panels

Posted in Uncategorized


3 Video Tutorials – How to Use On-Camera Flash

18 Jan

This week I have found some great videos to help you to understand how to use on-camera flash to your advantage. Flash can be confusing to understand and using on-camera flash incorrectly can make unflattering light, or worse yet ruin your photos completely. Have a watch of these tutorials on flash and see if you can pick up some helpful tips:

Video #1 Ed Vorosky – On-camera fill flash basics

Ed Vorosky covers some of the basics you will need to get a grasp on using flash on-camera. He goes over some of the settings to look for on your flash, different lighting situations, and which camera shooting mode to use. There’s a helpful demonstration of using Flash Exposure Compensation and how it affects your photo as well.

Video #2 Tony Northrup – Bounce Flash Basics

In this second video tutorial Tony Northrup goes into a little more detail using on-camera flash indoors and bouncing it for various different looks. He shows the results using just ambient light, flash straight on, and bounced off both the ceiling and side walls. You can see how just a small adjustment with your flash can completely change the look of your image or portrait.

Video #3 Mark Wallace – On-camera flash basics

In this last video Mark Wallace covers some of the basic flash settings for both Canon and Nikon flashes, then he goes outside to demonstrate how to control the exposure on the background (ambient) using both systems. Then he goes back indoors and shows several options for using the flash on-camera in that environment including bounce flash techniques.

Do you have any anxiety around using flash? Or are you a pro? Share any questions and comments you have below.

googletag.cmd.push(function() {
tablet_slots.push( googletag.defineSlot( “/1005424/_dPSv4_tab-all-article-bottom_(300×250)”, [300, 250], “pb-ad-78623” ).addService( googletag.pubads() ) ); } );

googletag.cmd.push(function() {
mobile_slots.push( googletag.defineSlot( “/1005424/_dPSv4_mob-all-article-bottom_(300×250)”, [300, 250], “pb-ad-78158” ).addService( googletag.pubads() ) ); } );

The post 3 Video Tutorials – How to Use On-Camera Flash by Darlene Hildebrandt appeared first on Digital Photography School.


Digital Photography School

 
Comments Off on 3 Video Tutorials – How to Use On-Camera Flash

Posted in Photography


Mastering On-Camera Flash

14 Sep

You get caught off-guard with a photo assignment and you might not have time to set up additional lights or have the luxury of using a reflector. Maybe it’s an awards event in a large room and you don’t want the background to go completely dark. You see a celebrity, rock star, astronaut or maybe it’s the president of your company that you need to photograph (see image below), or maybe you just need to travel light, with a minimum of gear.

Fig 1

George Lucas: 1/180 at f/13, ISO 200

Shoe-mount flashes are very portable and you CAN use them to get a great image. The key to getting that image is controlling the balance of camera, flash, and ambient light.

TTL TYPES

The automatic advantage to shoe-mount flash units is that they use TTL metering, which stands for Through The Lens. This type of flash metering is much more accurate than the thyristor technology that precedes it, and it’s also easier to use correctly.

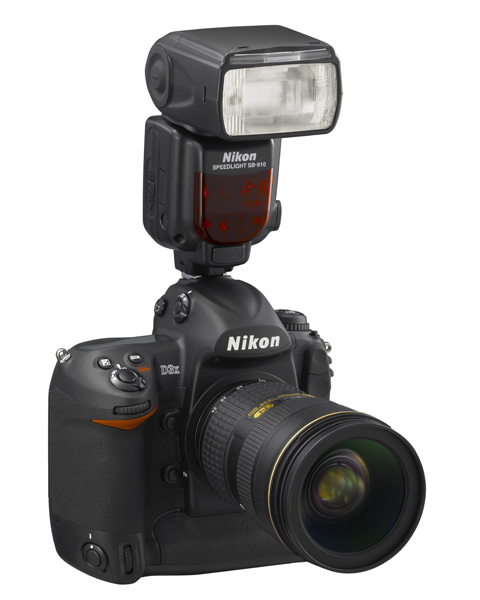
Sb910 d3x frt34r

Photo courtesy of Nikon

Camera manufacturers have their own versions of TTL flash and the alphabet soup of lettering can be a bit intimidating. Different types include i-TTL, P-TTL, E-TTL, etc. So what is the difference or similarity in each of these? Canon calls their flash technology E-TTL (introduced in 1995) or the newer E-TTL2 (since 2004). Firing a low power pre-flash immediately before the shutter opens, this type of Through The Lens metering is very accurate because the flash unit actually fires very quickly. This brief pre-flash determines the correct power output of the flash unit. The camera body and flash communicate together on the exposure by means of additional contact pins in the hotshoe and in the foot assembly of the flash unit.

Pentax’s P-TTL arrived in 2001 and it meters a low power flash with the lens wide open before opening the shutter. Nikon’s i-TTL has been available since 2003 and also uses a pre-flash to calculate the amount of light needed by the flash. Their TTL-BL is a separate mode for fill flash, with the idea of it giving you better balanced light, but for it to work accurately the subject needs to be darker than the background. So all of these systems are similar and no matter what brand of camera system you have, one of them will work great for you.

All of this solves the problem of getting the correct amount of light on the subject, which is weighted with the area of focus that you and your camera have selected. What about the surrounding elements in your artistic composition? You are seeing a potentially great image in the viewfinder, and whether you’re indoors or out, you want the flash to match the scene just enough to make it look right.

MATCHING THE LIGHT

Let’s take the example of photographing indoors. The best way to do this that I’ve found is to meter the ambient light in the room first. The camera can be in any exposure mode to take this reading. If for example, your exposure is 1/30 at f/5.6, ISO 800 – you would then switch the camera to Manual mode and make those your camera settings. Note that some cameras have a slow sync setting, or you could also use shutter priority to get this same balance.

Fig 2

Paula and Cayden: 1/60 at f11, ISO 200

You can leave the flash set on TTL mode and let it adjust its power output automatically. When you take the image you should have a remarkably balanced exposure. This can be further fine-tuned by adjusting the flash exposure compensation to add a little more, or a little less, fill light to the image. Flash exposure compensation can be added on the flash unit itself, or by adjusting the settings in the camera.

If you find that you need a little more depth of field to get your subjects in focus you can bump up the ISO to 1600 and lower the aperture setting to f/8. If you can use less depth of field, do the opposite by lowering the ISO to 400 and opening your aperture to f/4. There are always tradeoffs to be made, and you might not be able to handhold that particular lens at 1/30 second to get a steady image. Try using a monopod or tripod to help with that issue. For a faster shutter speed you might want to try 1/60 at f/5.6 with 1600 ISO. If you need to get your depth of field back to f/8 then you might need to be daring and go to 3200 ISO. Digital noise levels are improving all the time so don’t be afraid to try a higher ISO.

If you are photographing outdoors the opposite is true. Go to the lowest ISO to match your ambient light with your flash. There’s no way a flash can compete with the sun, so if you can select a lower ISO you will have a better chance of balancing ambient and flash at f/8 or f/11, rather than f/16 or f/22.

DIFFUSERS

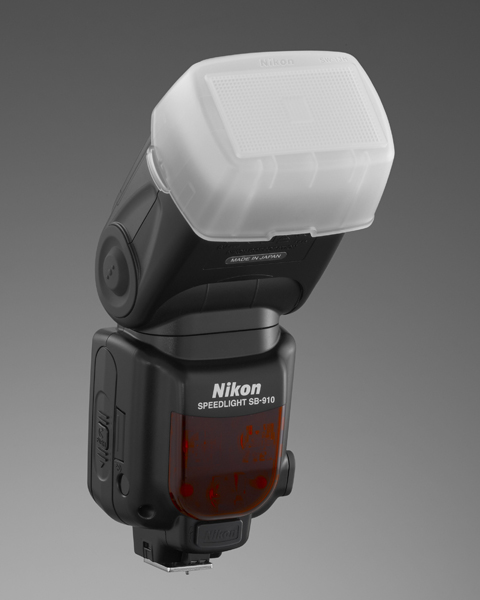
Sb910 sw13hSome flash units come with diffusers and I’ve had good luck with those. These are usually plastic, and they snap on tightly in front of the flash. There are also many innovative aftermarket diffusers available. Some units are a card type that bounce the light and redirect it to a larger pattern. Some diffusers are of the softbox type with a diffusion panel that the light passes through.

Some diffusers take the plastic design to a much higher level (such as the Gary Fong brand). All of these diffusers are variations on taking a directional light, such as an on-camera flash unit, and modifying the light to lower the amount of shadow
that you would normally get from a harsh light source. My recommendation is that you try some of these for yourself and see what works best for you. Your flash, the environment you’re photographing in, and the type of photos that you take are
all factors that could determine which is the best one for you. If you have a favorite please let us know in the comments following this article.

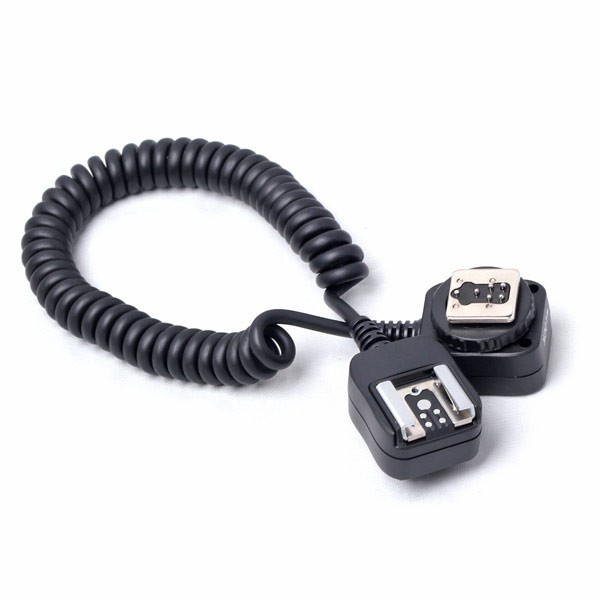
Bounce flash is when you angle the flash head so that the light reflects off of the ceiling or a nearby wall to disperse the light. Due to light falloff less light will get to the subject, so having a low ceiling is helpful for this to work. Light falls off and can be accounted for using the Inverse Square Law – an object that is twice the distance from the flash head will receive one quarter the illumination – or two stops less light.Ttl cord

TTL CORDS

Off-camera TTL cords are another great option. I consider this to still be on-camera flash but the TTL cord allows you to be flexible with the direction of the light. Holding the camera in one hand, you can move the flash unit around with the other hand and try different variations of light on your subject. These cords are small, easy to carry with you, and they are relatively inexpensive. They’re a good item to keep in your camera bag.

FILTERS

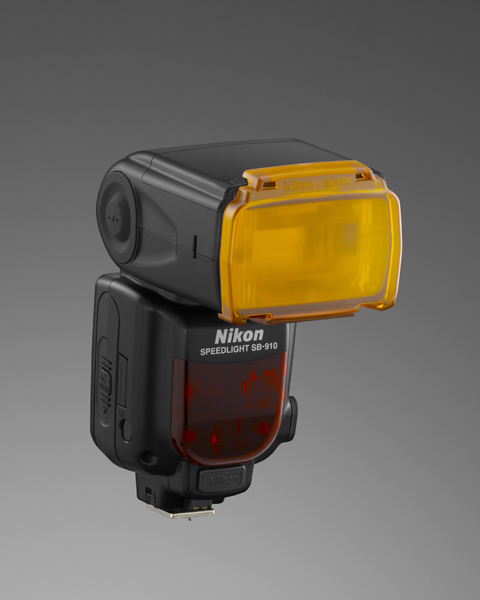
Sb910 sz2tnFilters sometimes come with a shoe mounted flash, and they are also available from aftermarket sources. The most common filters are tungsten and fluorescent. These are a great, and often overlooked, option to match the color of light from your flash unit to the ambient light temperature of a room. Color temperature from a shoe mounted flash is similar to a daylight balance of approximately 5500 degrees Kelvin. Fluorescent lights are in the 4000K range and tungsten light is around 3200K, so using these filters will make quite a difference in the color of your final image. Give those filters a try the next time you’re in that situation.

SUMMARY

Fill flash is a matter of finding the right amount of light to make the image appear to have been taken with natural light by using just enough flash to add catch-lights to the eyes, eliminate shadows, and give a more pleasing look overall to an image. You will be able to capture this balance using just your on-camera flash. It might sound difficult, but it doesn’t have to be.

Fig 3

Lisa Marie Presley: 1/250 at f/4.5, ISO 200

The post Mastering On-Camera Flash by Jim Wise appeared first on Digital Photography School.


Digital Photography School

 
Comments Off on Mastering On-Camera Flash

Posted in Photography


Do You Get the Most Out of Your On-camera Flash?

08 Jan

Life is happening all around you. Every day is full of amazing, once in a lifetime moments that you can’t wait to capture and share. Unfortunately for us as photographers, the moments we most want to capture often happen in less than ideal lighting conditions. This is why flash photography is a great tool to have in your arsenal. Flash Continue Reading

The post Do You Get the Most Out of Your On-camera Flash? appeared first on Photodoto.


Photodoto

 
Comments Off on Do You Get the Most Out of Your On-camera Flash?

Posted in Photography