The post 5 Tips for Musician Portraits (So You Can Hit All the Right Notes) appeared first on Digital Photography School. It was authored by Melinda Smith.

If you’re looking to capture beautiful, flattering musician portraits – the kind that every musician will appreciate – you’ve come to the right place.
As an experienced portrait photographer, I’ve done quite a few musician photoshoots. And over time, I’ve picked up some tips that will make a huge difference to your photography.
Specifically, I’m going to explain:
- How to ensure you create natural, realistic portraits of musicians
- Some unorthodox image ideas that musicians will really appreciate
- Quick research you should do before the session to make sure you’re prepared
- Much, much more!
Let’s get started.

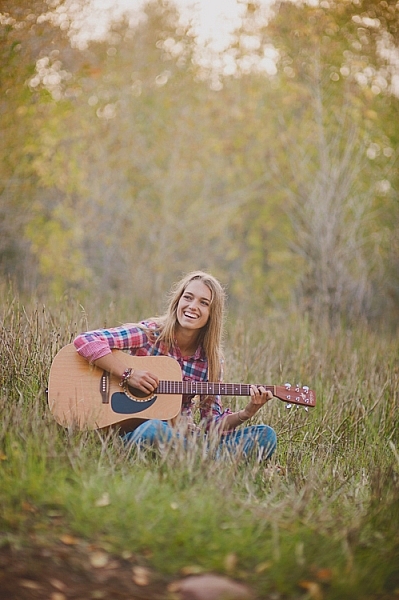
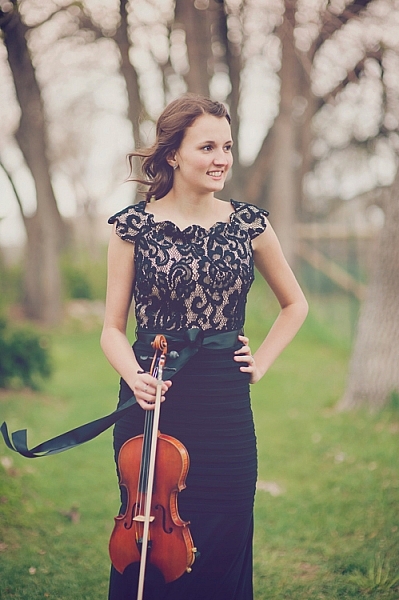
1. Trust the musician (and ask lots of questions)
As a musician myself, I love photographs with gorgeous instruments in them – but I am especially bothered by photos that don’t capture those instruments naturally. Sometimes I’ll come across a photo that makes me cry out, “Why? Nobody would ever hold their instrument like that!”
Because here’s the thing: You can still be creative with your photos without making them awkward. There are plenty of easy ways to capture stunning musician portraits, and you don’t need to rely on ridiculous posing gimmicks (like a flute on top of the head, cellos held under the chin, etc.).
And it all starts with trusting the musician, especially if you’re not familiar with the instrument you’re photographing.
So start your session by asking your subject how they hold their instrument. You might ask how they hold their instrument while playing, and how they hold it when they’re relaxing between songs. If it’s a big instrument, like a piano, ask them how they stand next to it before they perform, or how they sit by it when they’re thinking about what to practice or while waiting to play. If it’s a small instrument, like a violin, ask them to demonstrate how they carry it from one place to another.
These might seem like silly questions, but you can really get a sense of what positions and holds are natural. Then you can build from there.

As an example, a violinist may tell you she holds her violin under her right arm when resting. So you could ask her to sit on a chair in a formal pose, position the violin under her arm, and get a beautiful portrait of a girl and her violin.
The key is to remember that the musician knows how to naturally pose with their instrument, and that you are much less familiar. Of course, if you do happen to know the instrument well, feel free to use your knowledge to get beautiful natural poses, too.
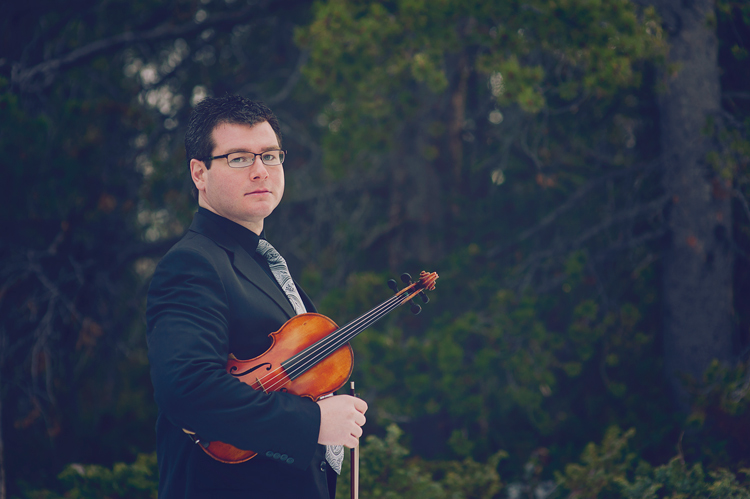
2. Do your homework
While I definitely recommend asking the musician how they hold their instrument (it can vary slightly from musician to musician, after all), you can take steps ahead of time to become knowledgeable (that way, you can start thinking of posing ideas before the session even starts).
For instance, you could watch some videos on YouTube of a musician playing the instrument you’ll be photographing. Pay careful attention to how the musician sits/stands, as well as how they position their head and hands relative to the instrument.
You might also find a professional musician who plays the same instrument, then look at their website to see what kind of photos they feature.
You may have a client who is very shy and needs more guidance posing, so it’s helpful to have a few ideas in mind ahead of time.
Also, as part of your research process, look at photos of the instrument (and do a bit of reading on instrument care, as well). Consider challenges that it might bring, such as unwanted reflections in brass, the immobility of harps or pianos, sensitivity to temperature or weather, and so on. Then make a plan to counteract these issues; that way, neither you nor the musician feel uncomfortable or uncertain during the session.

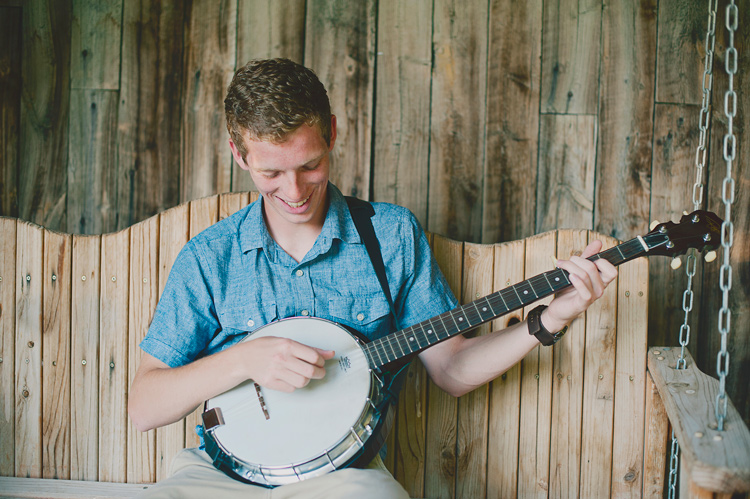
3. Ask the musician to play for you
Posed musician photography is nice…
…but if you can get your subject to give you a little performance during the photo session, you’ll get some stunning action shots. It usually helps loosen your subject up a little bit too, and will bring out natural smiles.
Some musicians are self-conscious, especially when playing without preparation. So remind them that it doesn’t matter if they make mistakes; your camera won’t catch any audio. Emphasize that you’ll only capture the perfect physical movements of their playing. And remind your subject that you aren’t there to judge their skill. You just want to capture the relationship they have with their instrument.
As they begin to play, move around the scene, catching the beautiful moment from every possible angle. Get down low, try to find a higher vantage point, get in close, move back far – all of it can make for outstanding images!

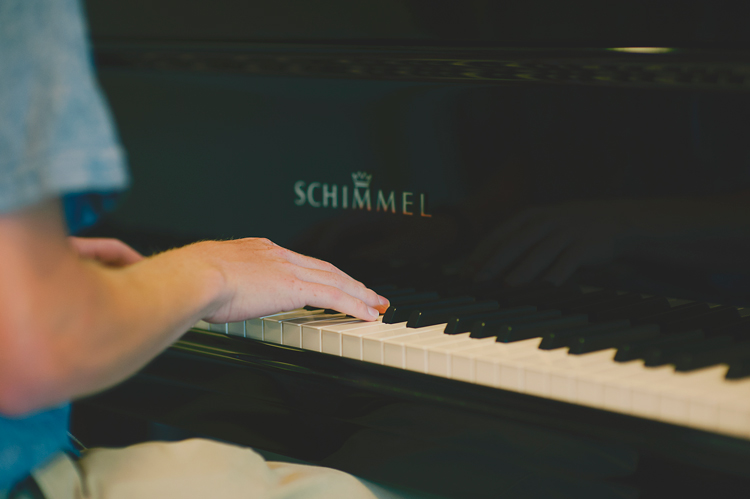
4. Get close-ups of the action
For most musicians, hands are a big deal. After all, the hands generally play the instrument, so they’ll offer a window into the musician’s engagement with the music.
So focus on the hands. Capture some close-ups, where you zoom in close on the hands as they play. Shoot the hands from every angle: above, from the side, from down low, from behind. Try focusing on the hands as you shoot down the neck of a guitar, highlight the fingers on a flute, or shoot hands that are frozen in midair during a drum solo. Getting in close on these details can create beautiful action photos that really tell the story.
In fact, hand photos often end up being some of my very favorites (and the musicians love them, too).
Pro tip: If your subject’s hands are moving too quickly for you to focus, ask them to freeze while you get the shot, then instruct them to continue playing.

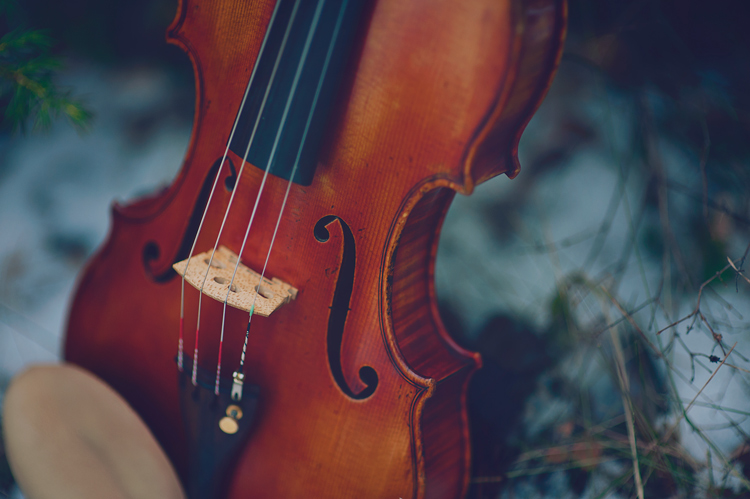
5. Make the instrument the star
With musician portraits, you’re expected to photograph the person – but I highly recommend you also capture a few photos of the instrument on its own.
Why? Well, musicians love their instruments, and they will love photos that show their beauty. (These photos often make for great website and social media cover photos, as well.)

Of course, if you need to adjust or move an instrument while shooting, be sure to ask permission. You can even ask the owner to do all of the touching and moving, while you walk around the instrument to get the photos that you’re after. Instruments can be extremely expensive, and even more importantly, they can have sentimental value that can never be compensated.
Keep this in mind throughout the session, whether your subject is in the photo with the instrument or not. And never ask the musician to do something that could harm or damage the instrument; it’s a very easy way to lose the musician’s trust, make them feel uncomfortable, and cause the session to go up in flames.
So when you’re ready to take some instrument photos, simply tell the musician what you have in mind, and they will most likely be happy to help you get some amazing instrument photos. If they’re not – or if they seem uncomfortable – don’t push it. A good photo isn’t worth upsetting your subject.

Musician portrait tips: conclusion

Every time I’ve been asked to do musician photography for album covers, headshots for websites, art to print and frame, or just to capture someone’s favorite hobby, my goal is to create a photo that the musician will love. One that will stay true to what they would naturally do with their instruments.
And by following the tips I’ve shared, you can do the same!
Now over to you:
Which of these tips do you resonate with the most? Do you have any musician portrait tips of your own? Share your thoughts (and photos!) in the comments below.

Table of contents
Portrait Photography
-
GENERAL
-
15 Common Portrait Mistakes to Avoid
-
10 Ways to Direct a Portrait Shoot like a Pro
-
How to Photograph People: 7 Tips for Photographers Who Never Photograph People
-
10 Crucial Things You Need to Think About for Portrait Photography
-
5 Portrait Photography Rules You Should Probably Ignore
-
Five Budget Portrait Photography Hacks to Save You Money
-
8 Lessons Learned from My First Attempt at Portrait Photography
-
How Self-Portraiture Makes You a Better Photographer
-
The Photo Critique: Portrait Edition
-
10 Shots, 10 Portraits, 1 Focal Length: Take this Photography Challenge
-
How I Got The Shot: Portrait Style
-
-
PREPARATION
-
Tips for Preparing for a Portrait Session
-
8 Tips to Help Make People Comfortable for Their Portrait Session
-
Clothing for Portraits – How to Tell your Subjects What to Wear
-
How to Plan a Successful Sunset Portrait Session
-
5 Secrets for Finding Great Indoor Photoshoot Locations
-
10 Christmas Portrait Locations (with Bonus Lighting and Composition Tips)
-
How to Build a Bench Prop for Great Portrait Photos
-
A Beginners Guide to Taking Portraits of Elderly Clients: Part 1 – Preparation and Rapport
-
How to Scout for Portrait Shooting Locations
-
The Importance of Location for Outdoor Portraits
-
How to Choose Urban Landscapes for Portrait Photography
-
-
SETTINGS
-
The Best Camera Settings for Portrait Photography
-
How to Achieve Blurred Backgrounds in Portrait Photography
-
How to Bypass the Portrait Mode on Your Digital Camera and Get Great Portraits
-
Understanding the Focus and Recompose Technique
-
Overcoming Depth of Field Problems in Portraits
-
9 Ways to Ensure You Get Sharp Images When Photographing People
-
Stunning Portraits: Manipulating White Balance
-
Shooting for HDR Portraiture
-
How [Not] to Take a Self Timer Portrait
-
How Focal Length Changes the Shape of the Face in Portraiture
-
-
LIGHTING
-
5 Tips How to Set Up a Home Studio for Dramatic Portraits
-
Simple Portrait Setups You Can Create on a Tight Budget
-
How to Eliminate Reflections in Glasses in Portraits
-
Portrait Photography: How to Photograph People in the Harsh Midday Sun
-
4 Ways to Shoot Portraits in the Middle of the Day
-
6 Portrait Lighting Patterns Every Photographer Should Know
-
3 Lighting Setups for Photographing Headshots
-
6 Ways of Using Reflector to Take Better Portraits
-
How to Create and Shoot Night Portraits
-
How to Make Beautiful Portraits Using Flash and High-Speed Sync
-
How to Make a Low Key Portrait (Step by Step)
-
Fill Flash Photography: How to Get Beautiful Portraits (Even in Bad Light)
-
A Lighting Ratios Guide: How to Make (or Break) Your Portraits
-
How to Mix Ambient Light and Fill-Flash for Outdoor Portraits
-
How to Photograph Fantastic Portraits with One Flash
-
DIY How to Build and Use a Reflector to Take Better Portraits
-
Understanding Light for Better Portrait Photography
-
Tips for Doing Natural Light Headshots and Portraits
-
3 Reasons to do Headshots with Natural Light
-
A Beginners Guide to Taking Portraits of Elderly Clients: Part 2 – Lighting and Posing
-
How to Create Stunning Wide-Angle Portraits (Using an Off-Camera Flash)
-
Tips for Making the Most of Morning Light for Portraits
-
5 Ways to Use a Beauty Dish Light for Portraits
-
Beginners Tips for Sunrise Portraits : Part I
-
Getting to Grips with Fill Light in Portrait Photography
-
How to Use Flash for Night Portraits
-
What Size Beauty Dish is Right For Your Portrait Photography?
-
How to Create Catch Lights in Your Natural Light Portraits
-
Tips for Using Golden Hour Light for Portraits
-
Side-by-side comparison between reflectors and diffusers for portraits
-
6 Tips for Taking Better Natural Light Classic Portraits
-
How to Use a Small Softbox With Your Flash to Transform Your Portraits
-
Simple Tips for Positioning Your Portrait Subject to Leverage Natural Light
-
The Importance of Shadows in Portrait Photography
-
So You Have No Model? Here are Ways to Practice Your Portrait Lighting With Toys
-
How to use Colored Gels to Create Unique and Creative Portraits
-
3 Steps to Professional Looking Headshots Using One Flash
-
How to Use Two LED Lights to Achieve Moody Portraits
-
Made in the Shade – Why Taking Portraits in the Shade Can be Ideal
-
What Is Good Light? (And How to Use It for Beautiful Portraits)
-
How to do Accent Lighting for Portraits
-
Tips For Great Indoor Portraits Using Natural Light
-
5 Reasons for Doing Natural Light Portraits
-
Review of the Westcott Eyelighter for Headshots and Portraits
-
How to Use Angle of Light in People Photography for Added Punch
-
High Speed Sync Versus a Neutral Density Filter to Overcome Bright Sunlight in Portraits
-
5 Creative Portrait Lighting Tricks Using Only Phone Light
-
How to Use Off-camera Flash to Fix Lighting Problems for Outdoor Portraits
-
How to Create Awesome Portrait Lighting with a Paper Bag an Elastic Band and a Chocolate Donut
-
Tips for Using Speedlights to Create the Right Lighting for Outdoor Portraits
-
How to use a Gobo to add Depth to Your Portraits with Subtractive Lighting
-
How to Use Hard Lighting to Create a Dramatic Portrait
-
Portrait Comparison – Flash Versus Natural Light
-
Stealing Light – Using Street Lights for Portraits
-
Five Places for Perfect Natural Portrait Lighting
-
How to See the Light for Portraits: A Quick Tip for Beginners
-
Shooting with Available Light – Lifestyle Portraiture
-
5 Ways to Light Your Christmas Tree Portraits This Festive Season
-
A Simple Lighting Technique for Couples Portraits
-
Awash In Light: High Key Portraiture
-
A Portrait Lighting Project for a Rainy Day
-
Simple Portrait Lighting Setup: Gorgeous Result
-
How to Achieve Great Portraits with Window Light
-
A Simple Exercise on Working with Natural Light in Portraits
-
Small Flash Portraits on Location with Adorama TV
-
Portraits on an Overcast Day? Use a Reflector
-
Tips for Using Flash for Beach Portraits
-
How to Find and Use Natural Reflectors for Portraits
-
How to Create Dramatic Portraits with Shadow Photography
-
Tips for Portrait Photography in Overcast Weather
-
How to Photograph People Outdoors Without Using a Reflector
-
How To Use an Outdoor Studio for Natural Portraits
-
-
POSING
-
Female Poses: 21 Posing Ideas to Get You Started Photographing Women
-
Glamour Posing Guide: 21 Sample Poses to Get You Started
-
Posing Guide: 21 Sample Poses to Get You Started with Photographing Men
-
Good Crop Bad Crop – How to Crop Portraits
-
How to Pose and Angle the Body for Better Portraits
-
Posing Guide: 21 Sample Poses to Get You Started with Photographing Groups of People
-
Posing Guide: 21 Sample Poses to Get You Started with Photographing Couples
-
Your Guide to the Best Poses for Engagement Photos
-
How to do Gentle Posing: A Collection of Prompts to Get You Started
-
Tips for Posing Large Families and Groups
-
How to Pose People for Headshots
-
Tips for Posing People in Outdoor Portraits
-
20 Tips for Getting People to Smile in Photos
-
How to Avoid Fake Smiles in Your People Photography
-
Tips for Posing Muscular Female Body Types
-
Your Posing Guide for Maternity Sessions
-
Handiwork: How to Pose Hands
-
Your Guide to Posing Bands in Photography
-
Posing Tip for Portraits – Which Way Should Your Subject Lean?
-
Posing Tips – Waistlines, Thighs and Bustlines
-
3 Posing Tips for Young Siblings
-
What Everybody Ought to Know About Posing for Portraits
-
Poser: Achieve Perfect Portrait Expression
-
Capturing Better Portraits Between Poses
-
A Posing Technique from A Girl With a Pearl Earring
-
Tips for Posing Men
-
-
COMPOSITION
-
6 Types of Portrait Backgrounds for Creative Images
-
6 Tips for Perfect Composition in Portrait Photography
-
How to Find Great Backgrounds for Outdoor Portraits
-
How to Make Colors Pop in Your Portraits – Without Using Photoshop
-
How to Use Foreground Framing to Improve Your Portrait Photography
-
How to Use Negative Space in People Photography
-
3 Simple Ways to Use Framing and Layering in Portraits
-
Is Portrait Formatting always best for Portraits?
-
Portrait Tip: Don't Fill the Frame
-
How to Use Portrait Angles More Creatively: A Visual Guide
-
How to Use Facial View and Camera Angle to take Flattering Portraits
-
-
GEAR
-
Comparing a 50mm Versus 85mm Lens for Photographing People
-
Comparing a 24mm Versus 50mm Lens for Photographing People
-
3 Tips for Taking Portraits with a Kit Lens
-
Best Fujifilm X-Series Kit for Urban Portraits
-
3 Ways to Get Killer Portraits Using a Tripod
-
Photographing Portraits with Classic Lenses (includes Example Images)
-
Portrait Photographers: Do You Really Need a 70-200mm Lens?
-
Essential Portrait Photography Gear You Need When Starting Out
-
Portable Portrait Studio in a Bag: Now You Can Take Portraits While on the Road
-
How to Choose the Perfect Portrait Lens
-
Which 50mm Lens is Best for Portraits?
-
-
ADVANCED GUIDES
-
13 Tips for Improving Outdoor Portraits
-
Create Beautiful Indoor Portraits Without Flash (NSFW)
-
10 Tips for Photographing Great Headshots
-
3 Simple Ways to Create Stunning Eyes in Your Portrait Photography
-
11 Tips for Photographing High School Senior Portraits
-
Tips for Doing Fall Portraits
-
6 Tips for Photographing Large People
-
7 Tips for Black and White Portrait Photography
-
How to Create Environmental Portraits (Tips and Examples)
-
Capturing Unenthusiastic Teens: Forget the Perfect Pose and Get Photos You Truly Love
-
Tips for Taking the Torture out of Extended Family Portrait Sessions
-
Self Portrait Photography Tips
-
What the Mona Lisa Can Teach You About Taking Great Portraits
-
5 Tips for Musician Portraits (So You Can Hit All the Right Notes)
- 1. Trust the musician (and ask lots of questions)
- 2. Do your homework
- 3. Ask the musician to play for you
- 4. Get close-ups of the action
- 5. Make the instrument the star
- Musician portrait tips: conclusion
- 1. Trust the musician (and ask lots of questions)
- 2. Do your homework
- 3. Ask the musician to play for you
- 4. Get close-ups of the action
- 5. Make the instrument the star
- Musician portrait tips: conclusion
-
5 Tips to Help You Take More Natural Looking Portraits
-
15 Tips for More Powerful Portraits
-
How to Create Dramatic Portraits in Your Garage
-
9 Tips that Make Couples Happy During a Portrait Session
-
5 Tips for Taking Better Portraits in Nature
-
Snow Portrait: Behind the Scenes
-
Tips for Creating Dance Portraits
-
How to Take Better Beach Portraits at Any Time of Day
-
The Introverts Guide to Photographing People
-
6 Ways to Take a Candid Portrait of Somebody You Know
-
3 Body Language Hacks to Improve Your Portrait Photography
-
5 More Tips for Making Better Black and White Portraits
-
Tips for Planning and Capturing a Creative Portrait
-
5 Tips for Creating Romantic Portraits of Couples
-
10 Tips to Create Emotive Portraits
-
7 Tips for Photographing a Bridal Portrait Session
-
3 Lessons I Learned by Doing a Self-Portrait Project
-
The Ultimate Guide to Photographing People for the Shy Photographer
-
Tips for Getting Yourself to Relax as a Photographer and Have More Successful Portrait Sessions
-
Tips for Taking More Natural Engagement Portraits
-
6 Tips for Better Portraits on Location
-
7 Ways to Take Advantage of Autumn in Your Portrait Photography
-
7 Tips and Etiquette for Taking Portraits in Public
-
How to Make a Unique Portrait in the City at Night
-
3 Tips for Creating Outstanding Portraits, Inspired by the work of Dutch Artist Van Gogh
-
5 Keys to Taking Beautiful Maternity Portraits
-
Photographing People: To do Styled Portraits or Not?
-
7 Steps to Capturing Truth in Your Portraiture
-
Engagement Portrait Shoots: 7 Professional Tips to take your Engagement Shoots to the Next Level
-
Personalities and Portraits – and Getting Them to Mix
-
3 Reasons to Have Your Own Portrait Taken
-
5 Tips for Photographing Portfolio-Worthy Costume Portraits
-
3 Critical People Skills Portrait Photographers Need
-
The Essence of Masculinity – Portraits of Men
-
5 Corporate-Style Portrait Techniques
-
5 Tips for Doing Portrait Photography in Busy Locations
-
Tips for Great Beach Sunset Portraits
-
-
CREATIVE TECHNIQUES
-
How to Create Portraits with a Black Background
-
How Using Props in Portraits Can Make Your Photos More Interesting
-
How to Take Unique Crystal Ball Portraits
-
How to Create a Hollywood Film Noir Portrait
-
How to Create this “Fight Club” Inspired Portrait using One Light
-
Dragging the Shutter for Creative Portraits
-
5 Secrets for Creating Perfect Silhouette Portrait Photography
-
How to do Tilt-Shift Portraits
-
Copper, Prisms, and Orbs, Oh My! – 3 Creative Techniques for People Photography
-
Portrait Tip: Add Interest and Movement into Your Shots with Wind
-
Glitter Portrait: How I Took It
-
How to Create a Unique Bokeh Portrait for Under $ 10
-
5 Ways to Use a Piece of Glass for Unique Portraits
-
Room with a View: How to Create this Window with Blinds Portrait Anywhere
-
7 Steps to Perfect White Portrait Backgrounds in the Studio
-
How to Make Unique Portraits Using Light Painting
-
-
POST-PROCESSING
-
11 Steps for Basic Portrait Editing in Lightroom – A Beginner’s Guide
-
Five Common Portrait Retouching Mistakes to Avoid
-
How to Create a Dramatic Cinematic Style Portrait Using Photoshop Color Grading
-
How to Edit Corporate Headshots in Lightroom
-
How to Create a Dark and Moody Rembrandt-Style Portrait In Lightroom
-
How to Retouch a Portrait with the Adjustment Brush in Lightroom
-
Photoshop: Red Eye Fix for Difficult Cases in People and Pets
-
3 Steps to Photoshop Retouching for Natural Looking Portraits
-
How to do Frequency Separation Portrait Retouching in Photoshop
-
Basic Portrait Post-Processing Workflow Tips to Help You Save Time and Stay Organized
-
How to Add a Grunge Effect to Your Portraits Using Lightroom
-
How to Create Twinkle Lights for Christmas Tree Portraits in Photoshop
-
How to Enhance Portraits Using Gray Layers to Dodge and Burn in Photoshop
-
How to Blur the Background of a Portrait Using the Magnetic Lasso Tool in Photoshop
-
How to Use Photoshop Blending Modes for Fine Art Portraiture
-
Stylized Techniques for Editing Portraits Using Lightroom
-
How to Make a Bubble Portrait using Photoshop CS3
-
Creating a Black and White High Contrast Portrait Edit in Lightroom
-
How to Create a “Soft Portrait” Preset in Lightroom 4
-
Basic Photoshop Tutorial – How to Add Creative Overlays to Your Portraits
-
3 Essential Photoshop Tools for New Portrait Photographers
-
How to Make Creative Lightroom Develop Presets for Portraits
-
5 Reasons to Use Lightroom for Portrait Retouching
-
Advanced Portrait Retouch on a Male Subject in Lightroom 4 – Part 1 of 3
-
3 Ways to Make Selective Color Portraits Using Lightroom and Silver Efex Pro 2
-
Correcting For Under Exposure and Boosting Dynamic Range with an Environmental Portrait in Lightroom 4
-
How to do Portrait Retouching With Luminar
-
Tips for Portrait Processing with ON1 Photo RAW 2018.5
-
5 Tips to Cut Your Portrait Editing Time in Half
-
-
BUSINESS
-
Portrait Consultations: Two Questions That Make A Big Difference
-
How to Shoot a Self Portrait to Support your Brand Identity
-
-
INSPIRATION
-
5 Examples of Beautiful Simple Portraits
-
DISCUSS: When you Photograph People in Black and White, you Photograph their Souls
-
21 Inspirational Natural Light Portraits
-
24 Photos of Perfectly Posed Portraits
-
19 More Creative Mirror Self Portraits
-
18 Stunning Self Portraits
-
Interview with Fine Art Portrait Photographer Bill Gekas
-
11 Influential Portrait Photographers you Need to Know
-
Black and White Portraits a Set of Images to Admire
-
Nadav Kander on Portrait Photography [VIDEO]
-
21 Spooky Portraits
-
Inspiring Portraits of Women – a Collection of Images
-
12.5 Years of Daily Self Portraits [VIDEO]
-
Interview with Self Portrait and 365 Photographer – Anna Gay
-
Triptych Portrait Series
-
8 Striking Portraits from Photograph Einar Erici [Shot in 1930]
-
An Interview With Underwater Portrait Photographer Sacha Blue
-
Masters of Photography – Yousuf Karsh Portrait Photographer
-
21 Fun Images of People Laughing
-
-
RESOURCES
-
Portrait Photography: Secrets of Posing & Lighting [Book Review]
-
The Luminous Portrait: Book Review
-
The Portrait Photography Course by Mark Jenkinson – Book Review
-
The Perfect Portrait Guide – How to Photograph People – Book Review
-
Improve Your Portraits with these Courses from Ed Verosky
-
People Photography and Portraits: Best Resources Toolbox
-
var dpsTopics = {
id: 110362,
titles: [{“id”:”trust-the-musician-and-ask-lots-of-questions”,”permalink”:”https:\/\/digital-photography-school.com\/portraits-musicians-tips\/”,”title”:”1. Trust the musician (and ask lots of questions)”},{“id”:”do-your-homework”,”permalink”:”https:\/\/digital-photography-school.com\/portraits-musicians-tips\/”,”title”:”2. Do your homework”},{“id”:”ask-the-musician-to-play-for-you”,”permalink”:”https:\/\/digital-photography-school.com\/portraits-musicians-tips\/”,”title”:”3. Ask the musician to play for you”},{“id”:”get-close-ups-of-the-action”,”permalink”:”https:\/\/digital-photography-school.com\/portraits-musicians-tips\/”,”title”:”4. Get close-ups of the action”},{“id”:”make-the-instrument-the-star”,”permalink”:”https:\/\/digital-photography-school.com\/portraits-musicians-tips\/”,”title”:”5. Make the instrument the star”},{“id”:”musician-portrait-tips-conclusion”,”permalink”:”https:\/\/digital-photography-school.com\/portraits-musicians-tips\/”,”title”:”Musician portrait tips: conclusion”},{“id”:”trust-the-musician-and-ask-lots-of-questions”,”permalink”:”https:\/\/digital-photography-school.com\/portraits-musicians-tips\/”,”title”:”1. Trust the musician (and ask lots of questions)”},{“id”:”do-your-homework”,”permalink”:”https:\/\/digital-photography-school.com\/portraits-musicians-tips\/”,”title”:”2. Do your homework”},{“id”:”ask-the-musician-to-play-for-you”,”permalink”:”https:\/\/digital-photography-school.com\/portraits-musicians-tips\/”,”title”:”3. Ask the musician to play for you”},{“id”:”get-close-ups-of-the-action”,”permalink”:”https:\/\/digital-photography-school.com\/portraits-musicians-tips\/”,”title”:”4. Get close-ups of the action”},{“id”:”make-the-instrument-the-star”,”permalink”:”https:\/\/digital-photography-school.com\/portraits-musicians-tips\/”,”title”:”5. Make the instrument the star”},{“id”:”musician-portrait-tips-conclusion”,”permalink”:”https:\/\/digital-photography-school.com\/portraits-musicians-tips\/”,”title”:”Musician portrait tips: conclusion”}] };
The post 5 Tips for Musician Portraits (So You Can Hit All the Right Notes) appeared first on Digital Photography School. It was authored by Melinda Smith.


You must be logged in to post a comment.